Helvi EXPLORER 120 User manual

MANUALE D’ISTRUZIONE
GB IT
DIGITAL BATTERY CHARGER
CARICA BATTERIE DIGITALE
DIGITALES BATTERIELADEGERÄT
CHARGEUR DE BATTERIES DIGITAL
CARGADOR DE BATERÍA DIGITAL
ЦИФРОВОЕ ЗАРЯДНОЕ УСТРОЙСТВО
DIGITALE BATTERIJLADER
EXPLORER 120
BEDIENUNGSANLEITUNG
MANUEL D’INSTRUCTIONS
OPERATING MANUAL
DE FR ES RU NL
ИНСТРУКЦИЯ ПО ЭКСПЛУАТАЦИИ
HANDLEIDING
MANUAL DE USO

2
SAFETY INSTRUCTIONS 4
GENERAL DESCRIPTION 5
START UP 5
CHARGE MODE 6
POWER SUPPLY MODES:
SHOWROOM / DIAG+ 7
TESTER MODE 9
PROTECTIONS 10
CONFIGURATION MENU 10
USB CONNECTIVITY 10
CONNECTIVITY MODULES 13
LIST OF ERROR CODES 13
INDEX
GB IT
DFR
ISTRUZIONI DI SICUREZZA 16
DESCRIZIONE GENERALE 17
START UP 17
MODALITÀ DI CARICA 18
MODALITÀ DI ALIMENTAZIONE:
SHOWROOM / DIAG+ 20
MODALITÀ TESTER 21
PROTEZIONI 22
MENU DI CONFIGURAZIONE 22
CONNETTIVITÀ USB 23
MODULI DI CONNETTIVITÀ 25
ELENCO DEI CODICI DI ERRORE 25
SICHERHEITSANWEISUNGEN 28
BESCHREIBUNG 29
INBETRIEBNAHME 29
LADEMODUS 30
VERSORGUNGSMODI:
SHOWROOM / DIAG+ 32
TEST-MODUS 33
SCHUTZ 34
EINSTELLUNGSMENÜ 34
USB-ANSCHLUSS 35
ANSCHLUSS WEITERER GERÄTE 37
LISTE DER FEHLERCODES 37
RÈGLES DE SÉCURITÉ ET AVERTISSEMENTS 40
DESCRIPTION GÉNÉRALE 41
MISE EN ROUTE 41
MODE CHARGE 42
MODES ALIMENTATION :
SHOWROOM / DIAG+ 44
MODE TESTEUR 45
PROTECTIONS 46
MENU CONFIGURATION 46
CONNECTIVITÉ USB 47
CONNECTIVITÉ MODULES 49
LISTE DES CODES ERREURS 49

3
INSTRUCCIONES DE SEGURIDAD 52
DESCRIPCIÓN GENERAL 53
INICIO 53
MODO CARGA 54
MODOS DE ALIMENTACIÓN :
SHOWROOM / DIAG+ 56
MODO DE PRUEBA 57
PROTECCIONES 58
MENÚ DE CONFIGURACIÓN 58
CONECTIVIDAD USB 59
CONECTIVIDAD MÓDULOS 61
LISTAS DE CÓDIGOS ERROR 61
ES RU
NL
BELANGRIJKE VEILIGHEIDSINSTRUCTIES 76
ALGEMENE OMSCHRIJVING 77
OPSTARTEN 77
LADEN 78
VOEDINGSMODULES :
SHOWROOM / DIAG+ 80
MODULE TESTER 81
BEVEILIGING 82
CONFIGURATIE MENU 82
AANSLUITMOGELIJKHEDEN USB 83
AANSLUITMOGELIJKHEDEN MODULES 85
LIJST ERROR CODES 85
TECHNICAL FEATURES / SPECIFICHE TECNICHE / TECHNISCHE EIGENSCHAFTEN /SPÉCIFIC-
ATIONS TECHNIQUES / ESPECIFICACIONES TÉCNICAS/ ТЕХНИЧЕСКИЕ СПЕЦИФИКАЦИИ /
TECHNISCHE SPECIFICATIES
88
FRONT / FRONTALE / FRONTSEITE / FACE AVANT / DELANTERA / ПЕРЕДНЯЯ ПАНЕЛЬ /
VOORKANT
89
REAR PANEL / RETRO / RÜCKSEITE / FACE ARRIÈRE / PARTE TRASERA / ЗАДНЯЯ ПАНЕЛЬ /
ACHTERKANT
89
ПРАВИЛА БЕЗОПАСНОСТИ 64
ОПИСАНИЕ 65
ВКЛЮЧЕНИЕ 65
РЕЖИМ ЗАРЯДКИ 66
РЕЖИМ ПИТАНИЯ: S
HOWROOM / DIAG+ 67
ТЕСТОВЫЙ РЕЖИМ 69
ЗАЩИТЫ 70
МЕНЮ КОНФИГУРАЦИИ 70
СОЕДИНЕНИЕ USB 71
ПРОГРАММНЫЕ МОДУЛИ 73
СПИСОК КОДОВ ОШИБОК 74

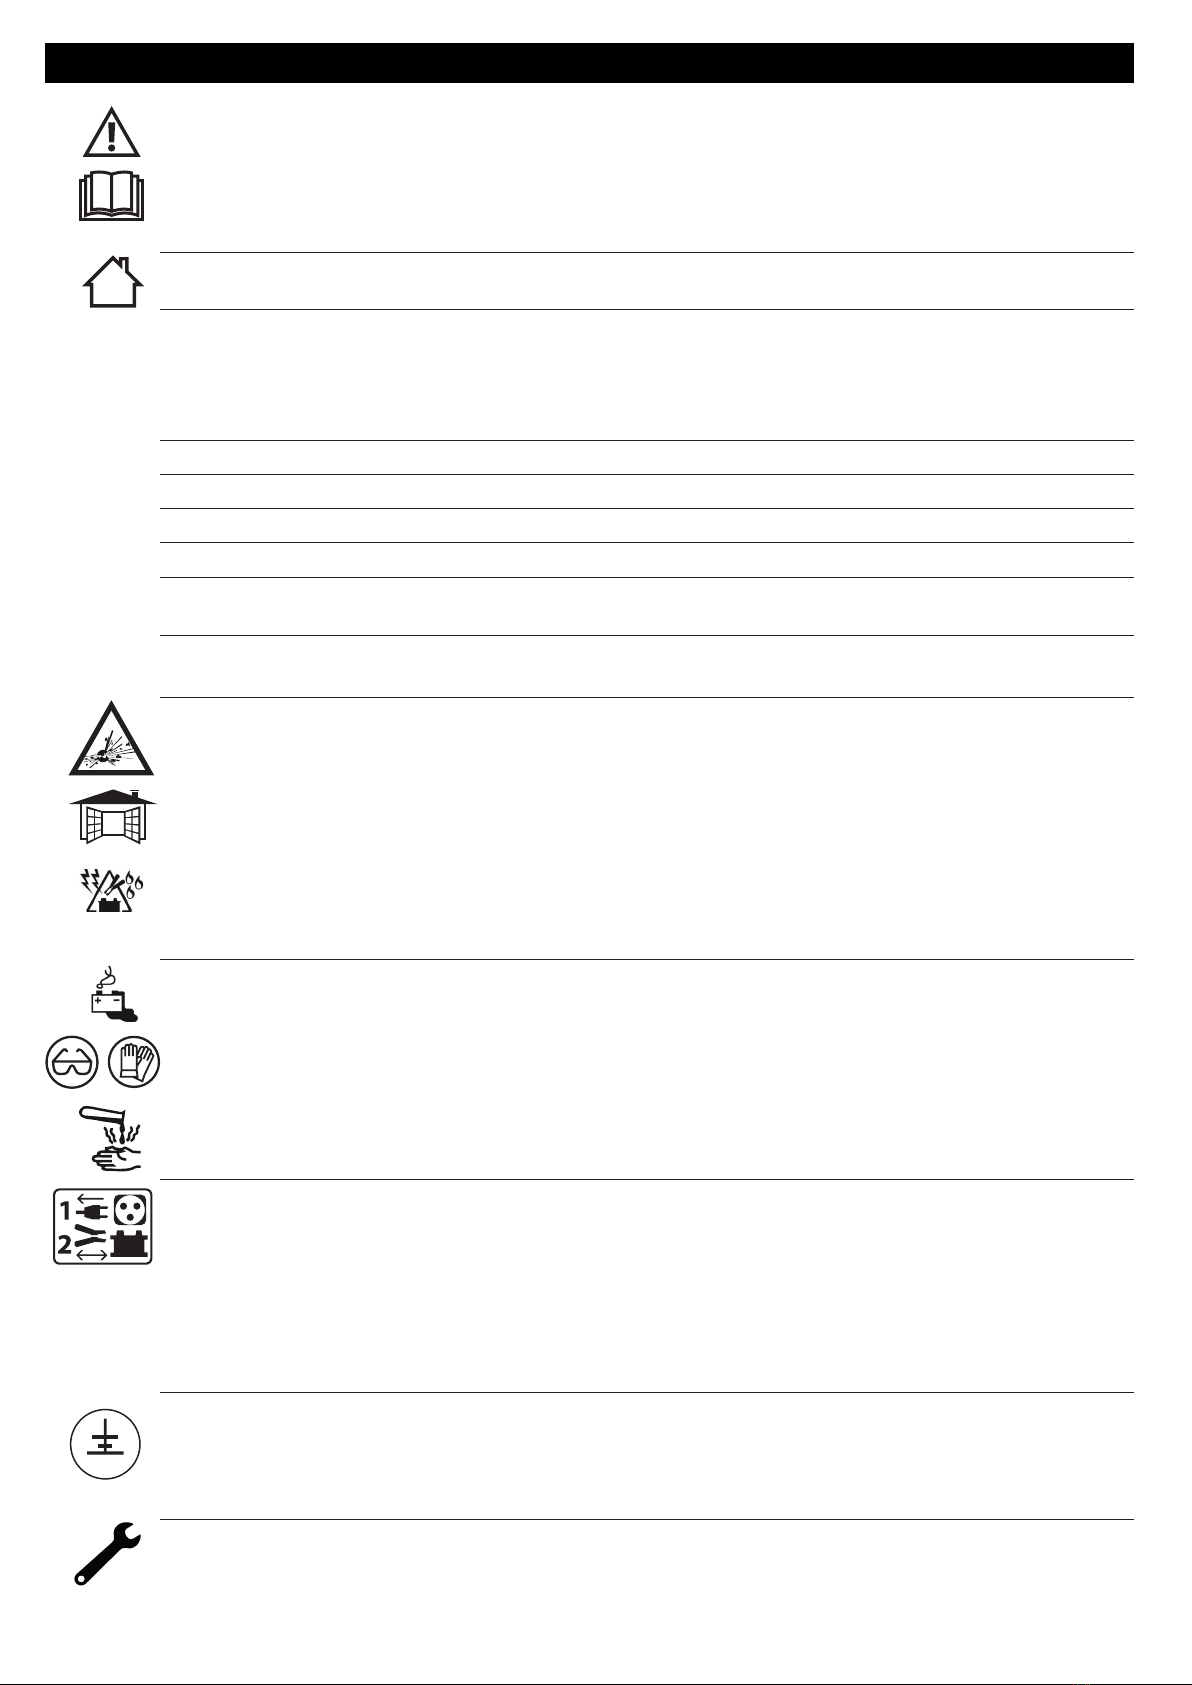
4
SAFETY INSTRUCTIONS
This manual contains safety and operating instructions.
Please read it carefully before using the device for the first time and keep it for future reference.
This machine should only be used for charging operations specified within the limits indicated
on the machine and in the instruction manual. The operator must observe the safety precau-
tions. In case of improper or unsafe use, the manufacturer cannot be held liable.
The device is destined to be used indoors. Must not be exposed to the rain.
This unit can be used by children aged 8 or over and by people with reduced physical, sensory
or mental capabilities or lack of experience or knowledge, if they are properly monitored or
if instructions for using the equipment have safely been read and potential risks understood.
Children must not play with the product. Cleaning and maintenance should not be performed
by an unsupervised child.
Do not use to charge domestic batteries or non rechargeable batteries.
Do not use the charger if the mains cable or plug is damaged.
Never use on a frozen or damaged battery.
Do not cover the device.
Do not place the unit near a heat source or expose to prolonged high temperatures (above
50 ° C).
The operating mode of the automatic charger and the restrictions applicable to its use are
explained later in this manual.
Fire and explosion risks!
• A battery can emit explosive gases when on charge.
• During the charge, the battery must be placed in a well ventilated area.
• Avoid flames and sparks.
• Protect the electrical contact surfaces of the battery against short circuits.
Risk of acid dispersion!
• Wear protective goggles and gloves.
• In case of contact with the eyes or the skin, rinse immediately with water and see a medical
doctor as soon as possible.
Connection / disconnection :
• Disconnect the power supply before plugging or unplugging the connections to/from the
battery.
• Always ensure the Red clamp is connected to the «+» battery terminal first. If it is necessary
to connect the black clamp to the vehicle chassis, make sure it is a safe distance from the
battery and the fuel line. The charger must be connected to the mains.
• After charging, disconnect the charger from the mains, then disconnect the negative clamp
from the car body and then disconnect the positive clamp from the battery, in this order.
Connection :
• The charger must be connected to an earthed power supply.
• The connection to the power supply must be carried out in compliance with national
standards.
Maintenance :
• If the power supply cable is damaged, the replacement cable must be obtained from the
manufacturer or its service team.
• Maintenance should only be carried out by a qualified person.

5
• Warning ! Always disconnect from the mains before performing maintenance on the device.
• The device does not require any specific maintenance.
• If the internal fuse is melted, it must be replaced by the manufacturer (dedicated sales
service) or by an equally qualified person to prevent any accidents.
• Do not use solvents or any agressive cleaning products.
Regulations :
• The Machine is compliant with European directives.
• The declaration of conformity is available on our website.
• EAEC Conformity marking (Eurasian Economic Community).
Waste management:
• This product should be disposed of at an appropriate recycling facility. Do not throw away
in a household bin.
GENERAL DESCRIPTION
Your Explorer 120 is a professional multifunctional charger with Inverter technology. Designed to support
the batteries of demonstration vehicles or during the diagnostic work, it also guarantees an ideal quality
of charge for the maintenance of the most advanced models. This charger can be fitted with cables up
to 8 m long. Changing the charging cables requires recalibration. It is considered a fixed device not a
mobile product.
Your Explorer 120 is supplied with a software that includes 4 different modes to choose from:
• Charging mode: dedicated to the charging of lead-acid (sealed, liquid, AGM...) or lithium (LiFePO4)
starter batteries.
• Power mode | Diag+ : Supplies the energy required during diagnostic work on the vehicle.
• Power mode | Showroom : Maintains the charge of the battery and supplies the energy required
when using the consumers of a demonstration vehicle.
• Tester Mode: Used to check the state of the battery and test the vehicle starting system and alternator.
Your Explorer 120 is SMART!
The original features of your Explorer 120 can be extended by adding specific charging modes and profiles
using the USB port and custom settings.
Your Explorer 120 also offers the possibility to recover data from several hundred charging operations on
your USB stick for analysis on a spreadsheet.
Additional modules (such as printer, Ethernet port, etc.) can also be connected to the charger via its
dedicated module socket.
Auto-Detect» function:
The Explorer 120 is equipped with the «Auto-Detect» function which automa-
tically starts a charge when a battery is connected to the charger.
AUTO-DETECT 12V
U=12.3V
Auto-Restart» function:
The «Auto-Restart» function offers the possibility of automatically restarting the charger in the event of
a power failure.
«Lock» function:
It is possible to lock the buttons on your Explorer 120 when it is used in a place open to the public or
unattended. To activate/deactivate the lock, press and hold and for 3 seconds.
START UP
1. Connect the charger to the mains.
2. Set the switch, located at the back of the charger, to «ON».
3. Select the desired mode (Charge -> Showroom -> Diag+ -> Tester).
To access the «configuration» menu press the key for 3s.

6
CHARGE MODE
• Setting the mode:
1Press the SELECT button for 3 seconds to activate
the modification of the mode settings. Pb-CHARGE
liquid
12V
50Ah
1
2
3
4
1- Type of charge
2- Charge profile
3- Rated battery voltage
4- Rated battery capacity
2Use the arrows to change the value of the parameter.
3Press the SELECT button to accept the value and
move to the next parameter.
Charge
type: Profil Charging
voltage
Pb-CHARGE
normal 2.40 V/cell Lead batteries of the types Gel, MF, EFB, SLA...
AGM 2.45 V/cell Most AGM lead-acid batteries including START and STOP.
However, some AGM batteries require a lower voltage charge
(Normal profile). Check the battery manual if in doubt.
water 2.45 V/cell Open liquid-type lead-acid batteries with cap.
Easy 2.40 V/cell
Profile dedicated to lead batteries that automatically adapts
the charging current according to the size of the battery.
However, for maximum charge optimization, it is recommended,
when possible, to use normal, AGM or liquid charge curves.
Li-CHARGE LFP/
LiFePO4 3.60 V/cell Lithium batteries type LFP (Lithium Ferro Phosphate)
• Start of the charge:
1
To start the charge, press the START/STOP
button. Pb-CHARGE
U=13.1V
24%
I=9.7A
1
2
3
Pb-CHARGE
Q=6.7Ah
24%
01h23
45
1- Battery voltage
2- Progress of the charging cycle
3- Current delivered by the charger
4- Ampere hours supplied
5- Duration
If the AUTO-DETECT function is active, charging
will start automatically after 5 seconds if a
battery is present.
AUTO-DETECT12V
U=12.3V
2During charge, your Explorer 120 indicates the percentage
of progress of the charging cycle and alternately the voltage,
current, amps hour supplied and the duration.
3Press the START/STOP button to stop the charge.
Precautions :
When charging a vehicle, it is recommended to reduce the vehicle power consumption to a minimum (switch
off the lights, switch off the ignition, close the doors, etc.) in order not to disturb the charging process.
Precaution: Check the electrolyte level of any open battery. Fill it up if necessary, before starting the charge.
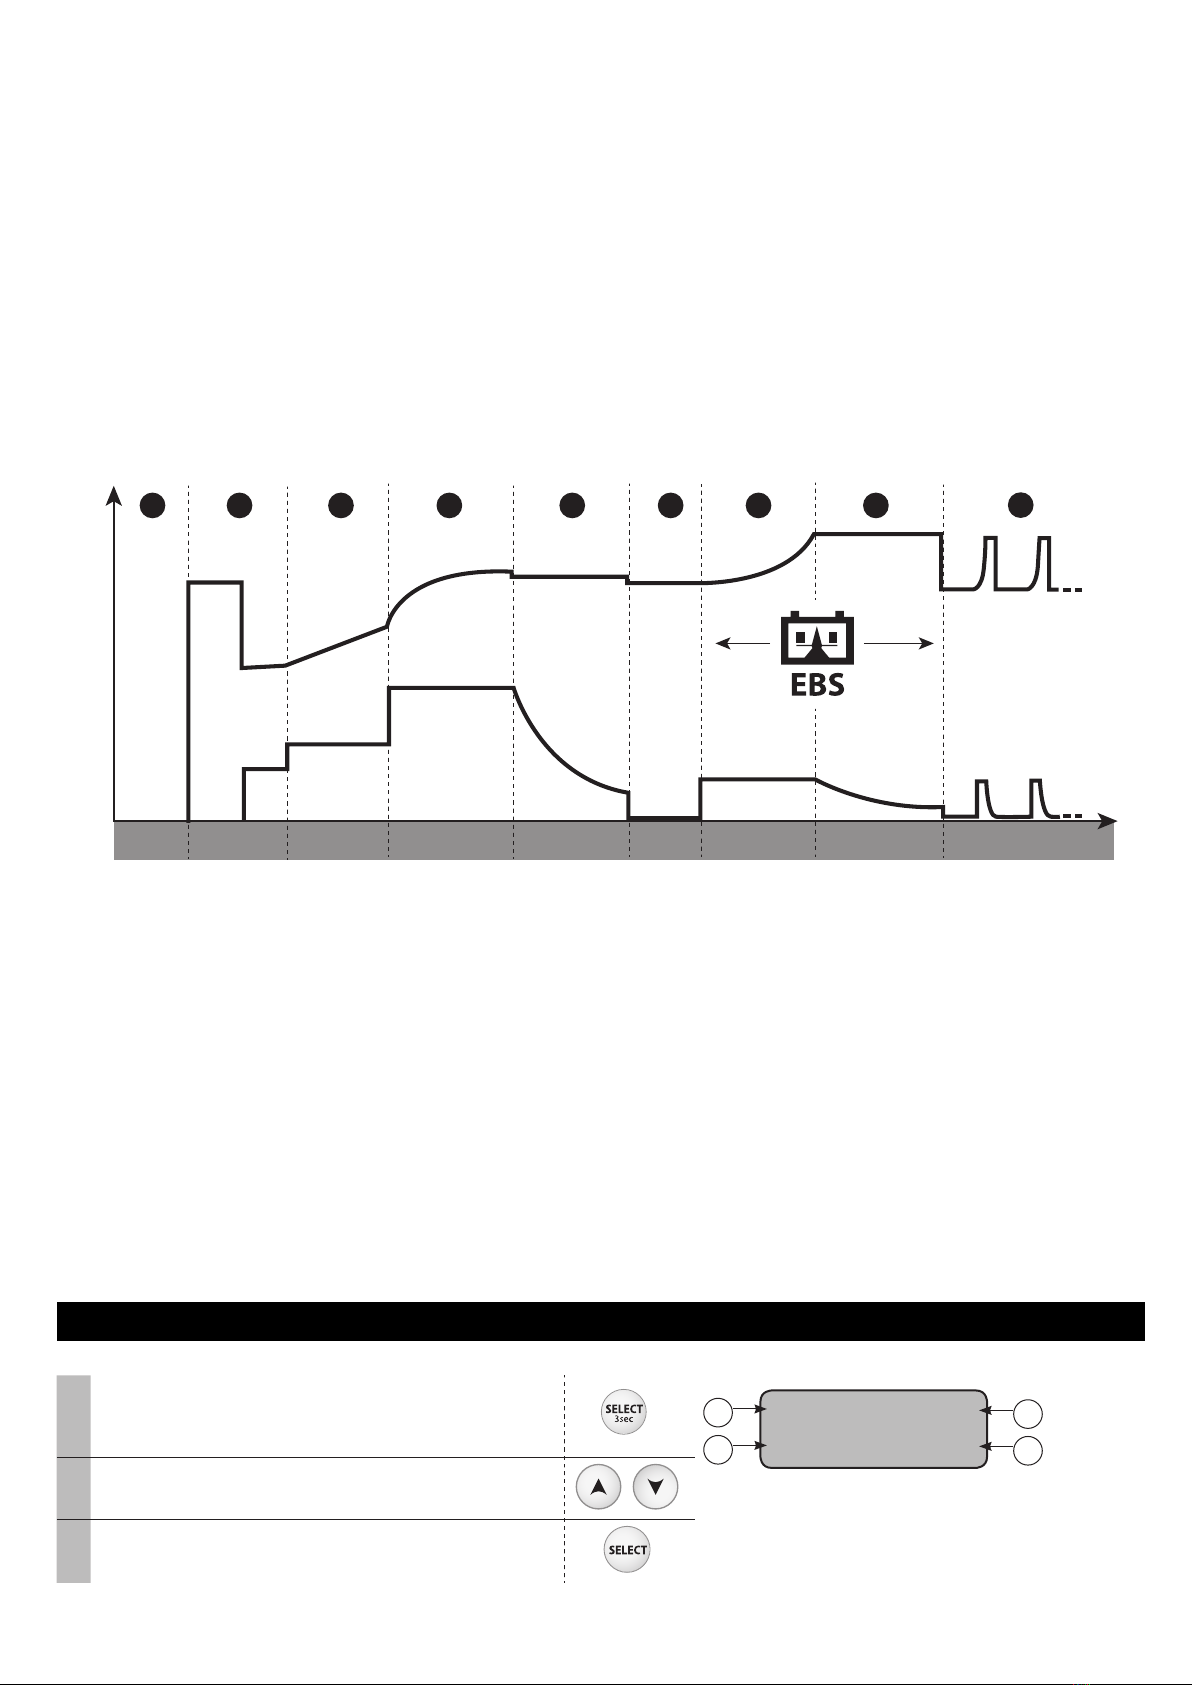
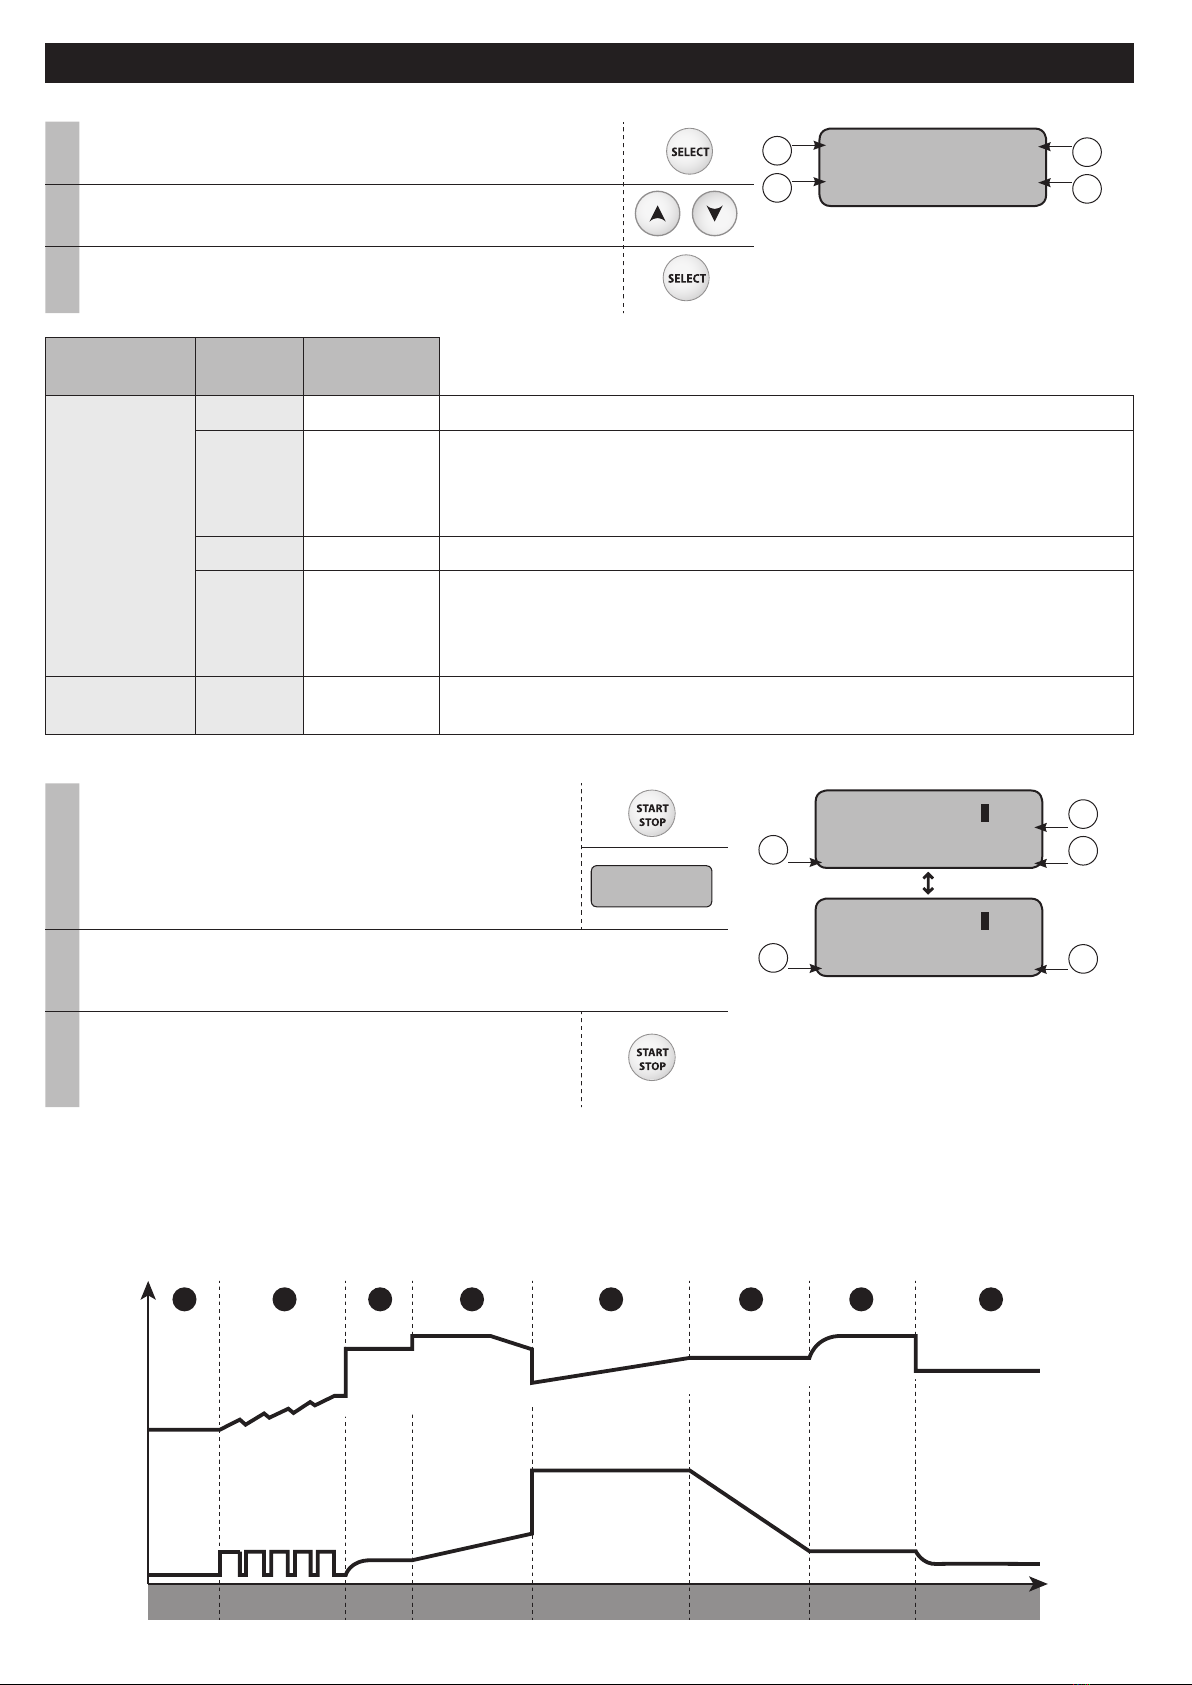
• Lead-acid charging curve:
U
I
1 2 3 4 5 6 7
Analysis Recovery Test Desulfation Charge Absorption Maintenance/-
Floating charge
0%
8
Refresh
(only for liquid prole)
10% 20% 80% 95% 100%
7
Step 1 : Analysis
Analyses the state of the battery (charge level,
polarity inversion, wrong battery…)
Step 6: Absorption
Constant voltage charge to reach 100% charge
level.
Step 2 : Recovery
Recovering damaged elements after deep and
prolonged discharge.
Step 7: Refresh (only for liquid profile)
The charger supplies an additional current to create
gas that will allow the electrolyte to be mixed and
thus reconditioning the battery cells. During this
phase, the battery may produce some water.
Step 3 : Test
Sulfated battery test
Step 4 : Desulfation
Battery desulfation algorithm. Step 8 : Maintenance/Floating charge
Maintains battery charge level at its maximum.
Step 5 : Charge
Fast charge at maximum current to reach 80%
charge level.
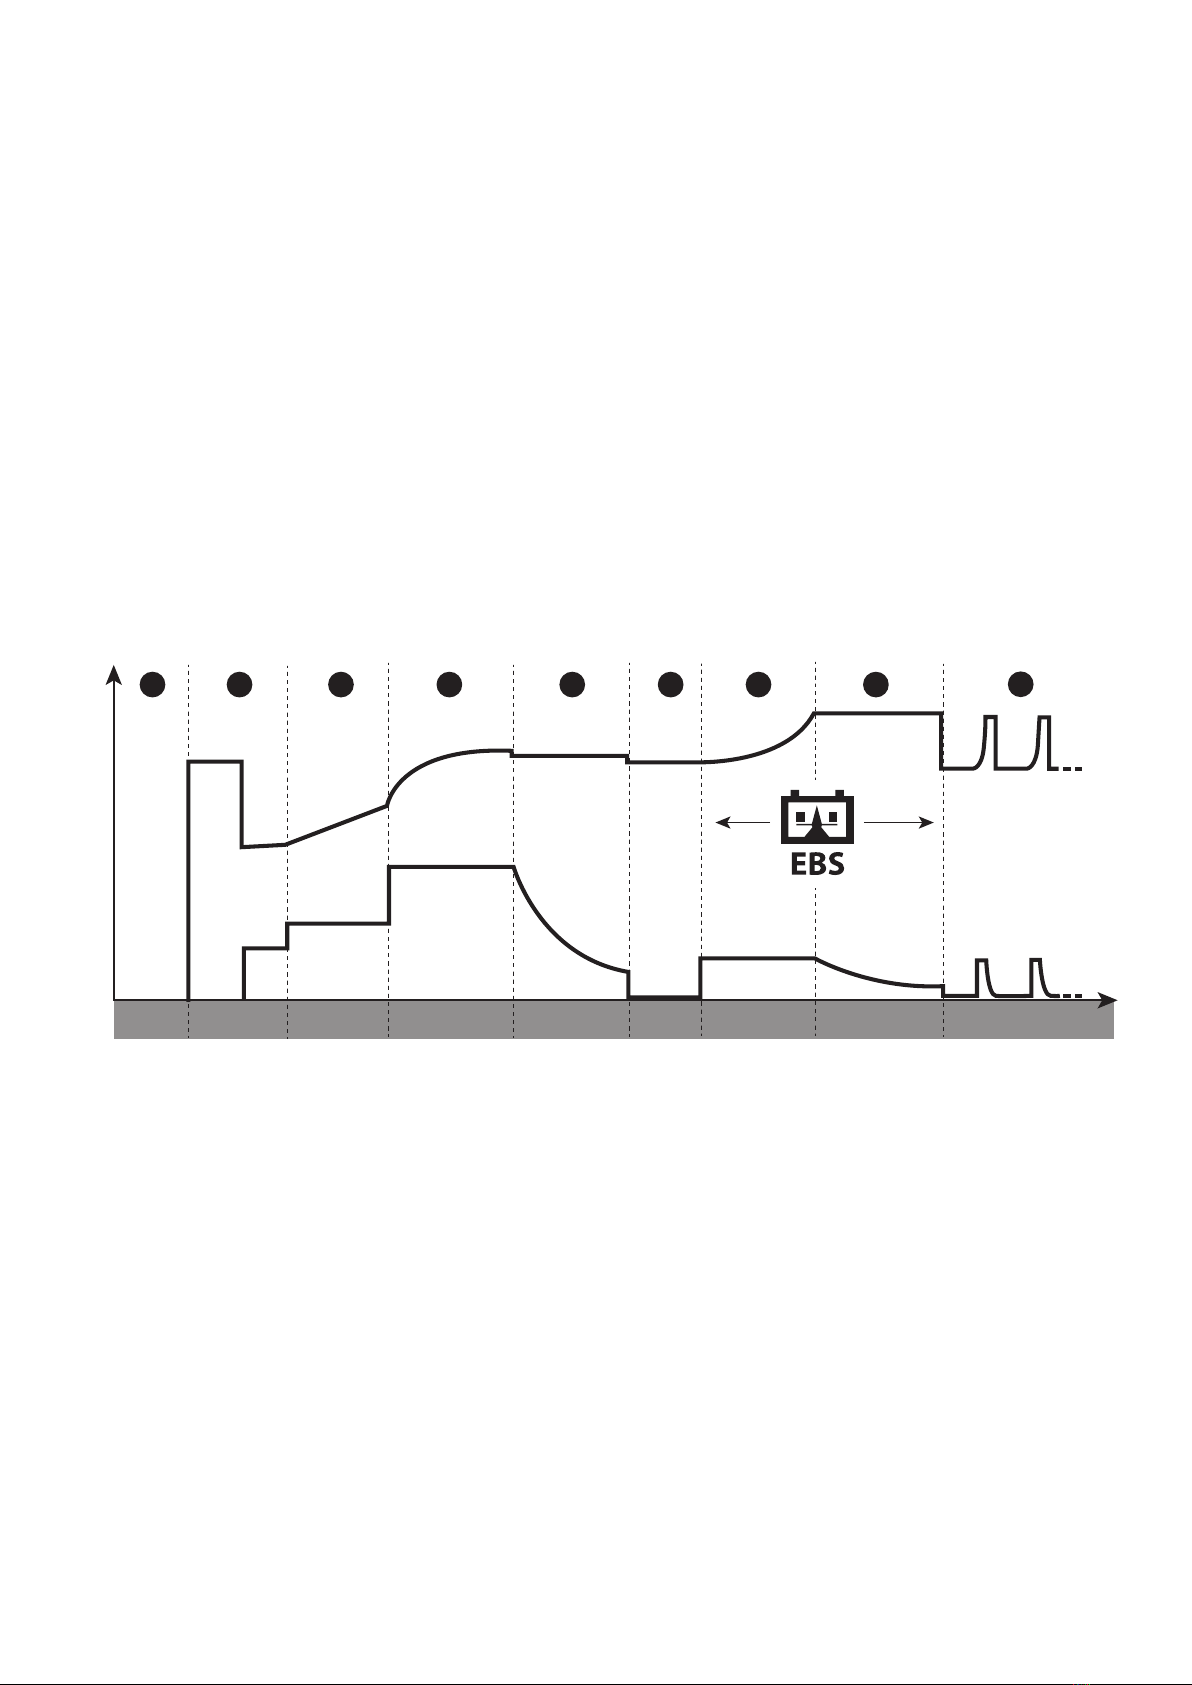
LFP Lithium charging curve:
U
I
1 2 3 4 5 6 7
Analysis UVP Wake up Recovery Charge Test Supplement Equalization /
Balancing
0%
8
Absorption Maintenance/
Floating charge
9
Equalizing Battery System
2% 85% 95% 99% 100%
Step 1 : Analysis
Analyses the state of the battery (charge level,
polarity inversion, wrong battery…)
Step 6 : Test
Charge conservation test.
Step 2: UVP Wake up
Reactivates batteries in UVP protection (Under
Voltage Protection)
Step 7 : Supplement
Reduce current charge to reach 100% charge level.
Step 3: Recovery
Recovery algorithm following a deep discharge. Step 8: Equalization / Balancing
Balancing the battery cells
Step 4 : Charge
Maximum current fast charge to reach an 90%
charge level.
Step 9: Maintenance/Floating charge
Maintain the battery charge level at its maximum.
Step 5: Absorption
Constant voltage charge to reach a 95% charge
level.
POWER SUPPLY MODES: SHOWROOM / DIAG+
• Setting the mode:
1Press the SELECT button for 3 seconds
to activate the modification of the mode
settings.
SHOWROOM
U:13.5V
12V
I:50A
1
2
3
4
1- Mode name
2- Voltage to be regulated
3- Rated voltage
4- Maximum current
2Use the arrows to change the value of the
parameter.
3Press the SELECT button to accept the value
and move to the next parameter.
Power limitation: If the symbol «*» appears next to the current setting (eg «I: 50A *»), this indicates that the

8
charger cannot deliver this current at the voltage set on the display. At this voltage level, the charger will
be running at maximum power. However, this current could be delivered at lower voltage depending on
the power output of the charger.
• Start of the charge:
1
To start the mode, press the START/STOP button.
SHOWROOM
U:13.7V
12V
I:9.7A
12
1- Battery voltage
2- Current delivered by the charger
If the AUTO-DETECT function is active, charging
will start automatically after 5 seconds if a
battery is present.
AUTO-DETECT 12V
U=12.3V
2During the mode, your Explorer 120 indicates the battery
voltage and the current delivered by the charger.
3Press the START/STOP button to stop the mode.
Precautions :
When starting the mode, a current displayed above 10 A means that your battery is discharged. The device
will start charging automatically Check that there is no electrical consumer on the vehicle. Wait until the
current supplied drops below 10 A before starting any action on the vehicle (use of the vehicle’s electrical
accessories, diagnostic operation, etc.).
Features of the power modes:
Mode "No Battery"
function "Integrated charging"
function Abnormal undervolta-
ge protection Adjustment of the
voltage
Showroom 12.7 V - 14.4 V
DIAG+ 12.7 V - 14.8 V
• «No battery» function (not recommended):
This function allows you to use the SHOWROOM power mode when there is no
battery. To do this, press the START/STOP button for 3 seconds. The «No battery
mode» indication is displayed for 3 seconds before forcing the power supply.
It is strongly recommended not to use the «no battery» function if a battery is present.
This function disables the «Integrated charging» function, as well as some of the protections such
as abnormal undervoltage protection or disconnection detection.
In this configuration, reverse polarity can damage the vehicle electronics.
• «Integrated charging» function:
The SHOWROOM mode (outside of the «no battery» function) incorporates an automatic charging algorithm
adapted to all types of batteries (lead and lithium), in order to guarantee an optimal charge level for de-
monstration vehicles. This function is perfectly compatible with the presence of consumers on the battery.
U
I
1 2 3 4 56
Analysis Charging Complement Equalization /
Balancing Power supply modeAbsorption
SHOWROOM 12V
no battery mode
9
Step 1: Analysis
Analysis of the battery condition (charge level,
inversion, polarity, wrong battery connected, etc).
Step 4: Complement
Gradual increase of the voltage up to U2
(ex: 14.4 V to ). Maximum duration 2 hours.
Step 2: Charging
Fast charging at maximum current until U1 is
reached
(ex: 13.8 V to )
Step 5: Equalization / Balancing
Maintaining the voltage U2 (ex: 14.4V at ).
Maximum duration 2 hours.
Step 3: Absorption
Charge under constant voltage U1 (ex: 13.8 V in
). Maximum duration 1 hour.
Step 6: Power supply mode
Application of the selected voltage.
• Abnormal undervoltage protection:
This protection prevents the risk linked to possible short circuits or battery being too damaged. The charger
will automatically stop if the voltage is abnormally low for more than 10 minutes.
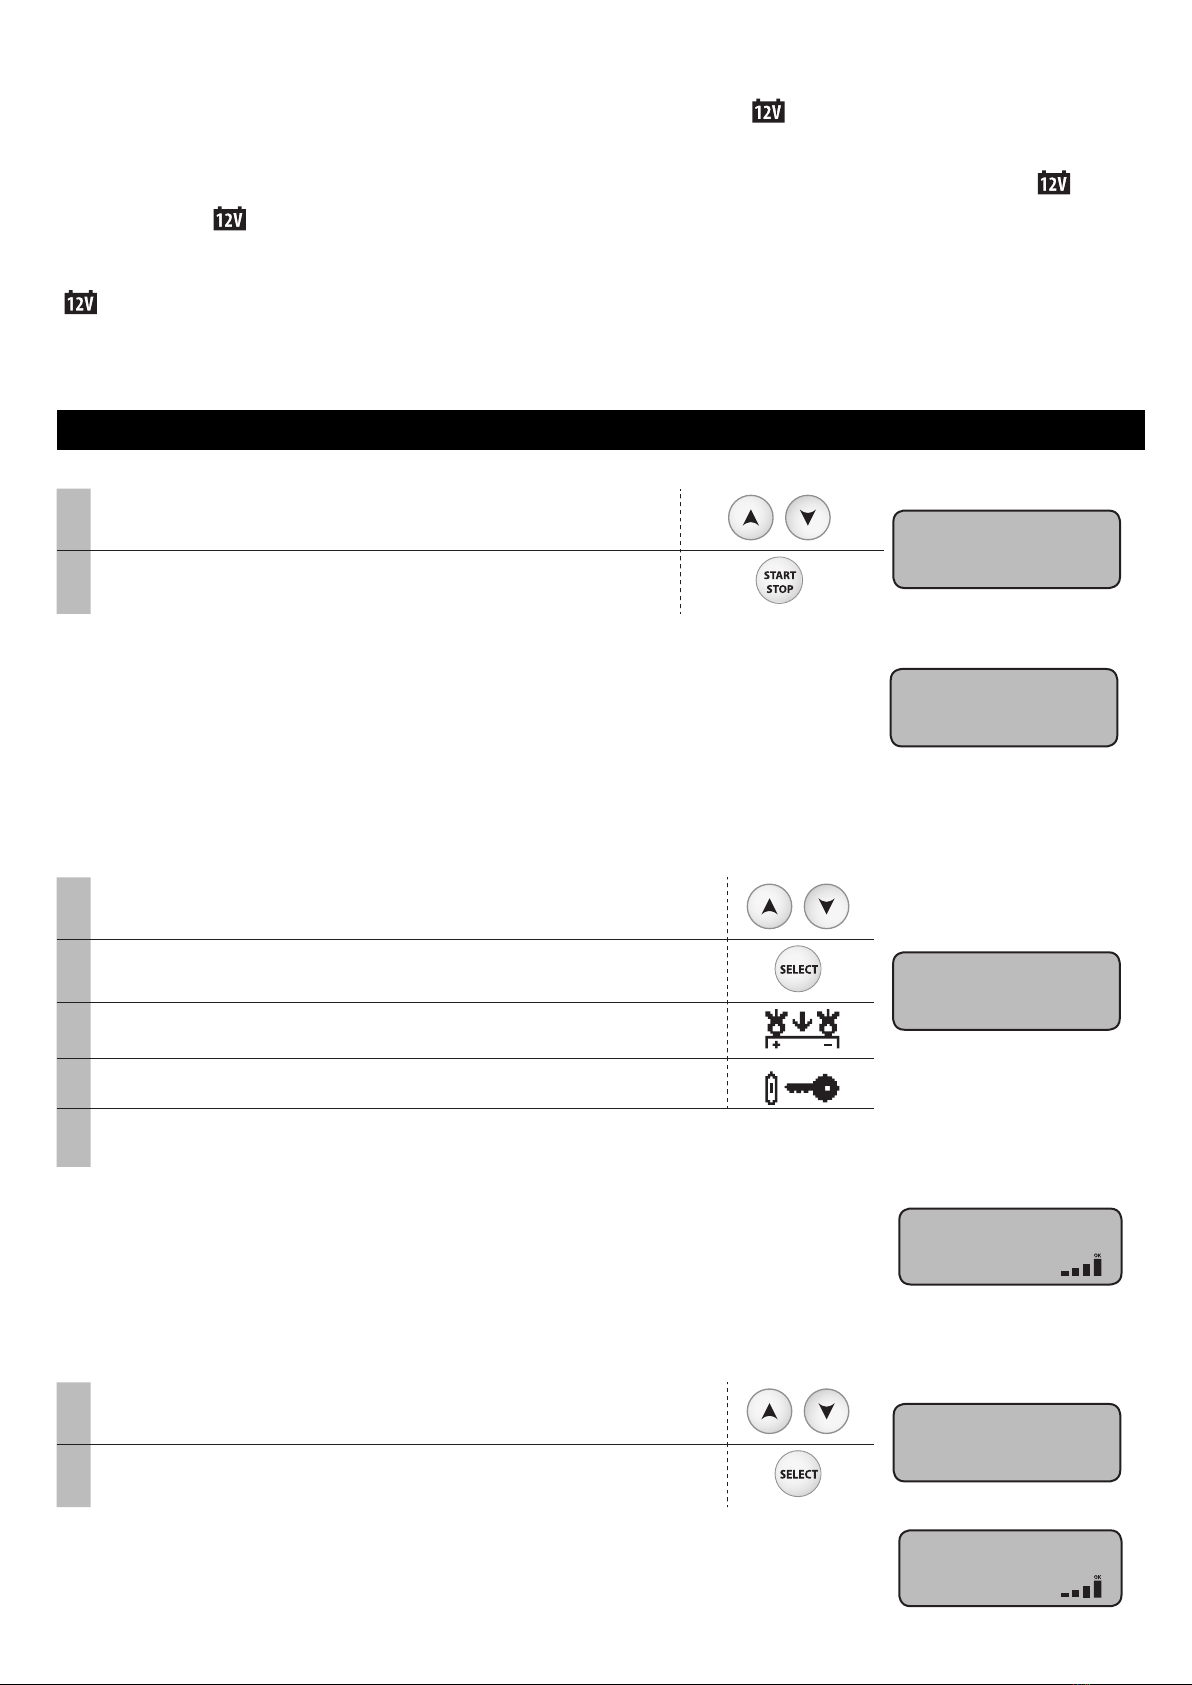
TESTER MODE
General navigation :
1Use the arrows to select the test to be performed TESTER MODE
Voltage test
2Press the START/STOP button to start the test
• Voltage test:
This mode allows you to view the voltage at the terminals of the charging
clamps and thus use your Explorer 120 as a voltmeter, in order to measure
the battery voltage.
Voltage test
U=12.1V
• Start-up test:
The purpose of this mode is to evaluate the state of a vehicle starting system (starter + battery) when the
engine is turned on. This test must be done with the battery connected to the vehicle.
1Use the arrows to select the nominal voltage of the vehicle
battery
Engine start test
12V
2 Press the SELECT button to confirm
3 Connect the clamps to the vehicle battery
4 Start the engine by turning the ignition key
5The charger automatically detects the engine start attempt and runs a cal-
culation algorithm to determine the state of the start system.
Test result: The charger indicates the minimum value of the battery voltage
perceived during the engine start phase, as well as the status of the start system
in the form of a gauge.
• Alternator test :
This mode is used to determine the condition of the alternator in the vehicle. This test is performed on a
vehicle with the engine running.
1Use the arrows to select the nominal voltage of the vehicle
battery Alternator test
12V
2Press the SELECT button to confirm
Test result: The charger indicates the voltage provided by the vehicle alternator,
as well the alternator status in the form of a gauge.
Engine start test
Umin=8.6V
Alternator test
U=14.1V

10
PROTECTIONS
This device is protected against short circuits and polarity reversals. It has an anti-spark system that prevents
sparks when connecting the charger to the battery. The device will not deliver current if there is no battery
detected (no voltage in the clamps). This charger is protected against handling errors by an internal fuse.
CONFIGURATION MENU
Navigation :
1Press the MODE button for 3 seconds to access the Configuration Menu
2 Use the arrows to scroll through the different parameters
3 Press the SELECT button to select the parameter or enter the submenu.
4 When a parameter is flashing, use the arrows to change its value
5Confirm the parameter value by pressing SELECT again
Languages :
Selecting the display language.
Sound:
Turning the unit’s sound on (ON) or off (OFF).
Auto-Restart:
Enable (ON) or disable (OFF) the AUTO-RESTART function. This function automatically restarts the charger
in the event of a power failure.
Auto-Detect :
Enable (ON) or disable (OFF) the AUTO-DETECT function. This function automatically starts a charge
when a battery is connected to the charger.
Date :
Setting the date and time.
Cable calibration :
Procedure for calibrating the charging cables of the device, so that the charger optimally compensates for
the voltage drop due to the cables. It is strongly recommended to perform this procedure at least once a
year and each time the charging cables are replaced.
Calibration procedure :
1Press SELECT to enter the CABLE CALIBRATION submenu
2 Short-circuit the clamps
3 Press START/STOP to start the calibration
4: The calibration was successful.
Err19: Cable_NOK : A problem occurred during cable calibration.
Check that the cables are in good condition and correctly short-circuited and repeat the operation.
USB connectivity :
Sub-menu to access USB features.
Your Explorer 120 is equipped with USB connectivity that extends its functionality by creating custom confi-
gurations on your computer that can then be downloaded to the device via a simple USB stick. The custom
configuration allows you to add, delete or modify charging modes and profiles, so that your charger can
be adapted to your needs.
USB connectivity also gives you the ability to retrieve the history and data of more than 100 recharge on
a USB stick and run them on a spreadsheet.
USB CONNECTIVITY

11
Navigation :
1Use the arrows to scroll through the different submenus or files available
2 Press the SELECT button to enter the submenu or select a file.
3Use the MODE button to return to the previous submenu
Import a new configuration:
This function allows you to download a new configuration («.gfc» file) into the charger via the USB key.
1First, make sure that the"".gfc"" file corresponding to the new configuration is present on the USB key.
This file must not be located in a folder or subfolder of the USB stick.
2 Connect the USB stick to the charger.
3 Enter the "Import CONFIG" submenu
Import CONFIG
4 Select the file to download Select file
config.gfc
5 Confirm the download of the file Continue?
YES
6The charger will then download the new configuration. Loading
Export a configuration on a USB key:
This function allows you to save the current charger configuration («.gfc» file) to the USB stick.
1Connect the USB stick to the charger.
2 Enter the "Export CONFIG" submenu Export CONFIG
3 Confirm that the configuration has been saved. Continue?
YES
4The charger will then save its current configuration on the USB stick.
( file ""Config_file.gfc"").
Loading
Restore the previous configuration:
This function allows you to restore the second to last charger configuration in case of a problem or error
with the last downloaded configuration.
1Enter the "Restore CONFIG" submenu Restore CONFIG
2 Confirm the restoration of the configuration. Continue?
YES
3The charger will then restore the penultimate configuration of the charger. Loading

12
Export charging data on USB stick:
This function allows you to retrieve the charge history and data on a USB key, in order to be able to use
them on a spreadsheet or other.
1Enter the "Export DATA" submenu
Export DATA
2 Confirm the recording of the charging data. Continue?
Yes
3The charger will then copy the charging data to the USB stick as files, « .CSV » Loading
Custom configuration
List of modes and profiles available for customization:
CHARGE MODE
Charge type: Charge
profiles Charging
voltage
Pb-CHARGE
normal 2.40 V/cell Charging profile for lead batteries of the types Gel, MF, EFB, SLA...
AGM 2.45 V/cell
Charging profile for most AGM lead-acid batteries including START and
STOP.
However, some AGM batteries require a lower voltage charge (Normal
profile). Check the battery manual if in doubt.
water 2.45 V/cell Charging profile for open liquid-type lead-acid batteries with plug.
Easy 2.40 V/cell
Charging profile dedicated to lead batteries that automatically adapts
the charging current according to the size of the battery.However, for
maximum charge optimization, it is recommended, when possible, to
use normal, AGM or liquid charge curves.
boost 2.42 V/cell
Maximum current charge for lead-acid battery. This type of charge is
ultra-fast.
Warning : this type of charge must remain occasional in order to preserve
battery life.
recovery+ 2.40-2.50
V/cell
Charging profile for the recovery of severely damaged lead batteries.
It is essential to recover the battery outside the vehicle to avoid
damaging the vehicle electronics and in a well ventilated area.
Caution: Recovery voltage up to 4.0 V/cell.
Li-CHARGE
LFP/
LiFePO4 3.60 V/cell Charging profile for Lithium batteries type LFP (Lithium Ferro Phosphate)
Li-ion std 4.20 V/cell Charging profile for standard lithium-ion batteries based on Manganese
or Cobalt (NMC, LCO, LMO, MCO...)
LFP cell+ 3.60 V/cell Charging profile dedicated to LFP (Lithium Ferro Phosphate) type li-
thium-ion cells with selection of the number of cells in series to be charged.
Li-ion
cell+ 4.20 V/cell Charging profile dedicated to standard lithium-ion cells based on
Manganese or Cobalt (NMC, LCO, LMO, MCO...) with selection of the
number of cells in series to be charged.
TRACTION water 2.42 V/cell Charging profile dedicated to open lead traction batteries for forklift
trucks.
gel 2.35 V/cell Charging profile dedicated to gel-type traction batteries for forklift trucks.
POWER MODES
Showroom Maintains the battery's state of charge and supplies power when using the electrical
consumers of a demonstration vehicle.
DIAG+ Supplies energy requirements during the vehicle diagnostic work.
CHANGE BAT. Allows to keep the vehicle power supply during battery replacement, in order to preserve
the memory of the vehicle's ECUs.
POWER SUPPLY Allows the charger to be used as an adjustable stabilized power supply with high power.
The voltage to be regulated and the current limitation are fully adjustable.

13
Li-SUPPLY/LFP Mode intended to supply lithium-ion cells of the LFP type (Lithium Ferro Phosphate)
with selection of the number of cells in series, adjustment of the voltage and current
to be applied.
Li-SUPPLY/Li-ion Mode intended to supply standard lithium-ion batteries based on Manganese or Cobalt
(NMC, LCO, LMO, MCO...) with selection of the number of cells in series, adjustment
of the voltage and current to be applied.
MISCELLANEOUS
TESTER MODE Allows to check the state of the battery, to evaluate the starting of the vehicle as well
as the operation of the alternator
Predefined configurations adapted to each application. Contact the manufacturer or dealer (see the
nameplate).
Configuration file
(120) Applications
CHARGE MODE POWER MODES MISCELLANEOUS
Pb-CHARGE Li-CHARGE TRACTION
SHOWROOM
DIAG+
CHANGE BAT.
POWER SUPPLY
Li-SUPPLY/LFP
Li-SUPPLY/Li-ion
TESTER MODE
normal
AGM
water
Easy
Boost
Recovery+
LFP/LiFePO4
Li-ion std
LFP cell+
Li-ion cell+
water
gel
1_120_original.gfc Initial configuration of the charger
2_car_extended.gfc Extensive features for garages
3_showroom_only.gfc Simplified version for dealerships and
demonstration vehicles
4_pro_lithium.gfc Professional of lithium battery
5_traction.gfc Forklift truck, electric pallet truck, stacker...
6_full_version.gfc Full version
CONNECTIVITY MODULES
Your Explorer 120 is equipped with a DB9 type socket allowing you to connect various additional modules
offered such as a printer, Ethernet or other module in order to further extend the possibilities of your charger.
LIST OF ERROR CODES
Error code Meaning Solutions
1Err01: Int_1-
Err02: Int_2
Err23 : Int_3
Electronic problem
Defective charger Contact the reseller
2Err03: Fuse_NOK Output fuse out of order Have the fuse replaced by a qualified person
3 Err04: T>Tmax Abnormal overheating Contact the reseller
4 Err05: (+)(-) The polarity has been
reversed on the clamps Connect the red clamp to the (+) and the black
clamp to the (-) of the battery.
5 Err06: U>__V Overvoltage detected at the
clamp terminals Disconnect the clamps
6 Err07: No_bat Battery not connected Check that the battery is correctly connected to the
charger
7 Err08: U<__V Abnormally low battery
voltage
Check that the selected mode is compatible with the
battery voltage (e. g. : 6 V battery in 24 V mode)
Charge the battery via CHARGE mode
Battery to be replaced
8 Err09: U>__V Abnormally high battery
voltage Check that the selected mode is compatible with the
battery voltage (e. g. : 24 V battery in 12 V mode)
9 Err10: U>2.0V Short-circuit detected during
the charge process Check the assembly
10 Err11: Time_Out Triggering the time limit Presence of a consumer on the battery disrupting
the charge
Abnormally long charge Battery to be replaced

14
11 Err12: Q>___Ah Tripping the overcharge
protection
Presence of a consumer on the battery disrupting
the charge
Battery to be replaced
12 Err13: U<__V Abnormally low battery
voltage when checking the
charge Battery to be replaced
13 Err14: Bat_UVP Abnormally low battery
voltage during UVP Wake
up
Presence of a short circuit, check the assembly
Battery to be replaced
14 Err15: U<__V Battery too low
Check that the selected mode is compatible with the
battery voltage (e. g. : 24 V battery in 12 V mode)
Battery to be replaced
15 Err16: Bat_NOK Battery out of order Battery to be replaced
16 Err17: Recov_
NOK Battery recovery failure Battery to be replaced
17 Err18: U>0V Presence of a voltage at
the clamp terminals when
calibrating the cables Check the assembly
18 Err19: Cable_
NOK Cable calibration failure Charging cables to be replaced
Incorrect connection, check the assembly
19 Err20: U<__V Triggering of the abnormal
undervoltage protection Presence of a short circuit, check the assembly
20 Err21: U<__V or
Err22: U<__V Abnormally low battery
voltage during charging
Battery to be replaced
Presence of a consumer on the battery
21 ? Key not detected Check that the USB key is correctly connected to
the charger.
22 ? No configuration file (.gfc)
is present on the key Check that your files are present at the root of the
USB key. Do not put them in a folder or sub-folder.
23 Corrupted file The file you wish to download is corrupted. Delete
and reinstall the file on the key.

15
16
ISTRUZIONI DI SICUREZZA
Questo manuale contiene istruzioni sulla sicurezza e sul funzionamento.
Leggere attentamente prima di utilizzare il dispositivo per la prima volta e conservarlo per
riferimento futuro.
Questa macchina deve essere utilizzata solo per le operazioni di ricarica specificate nei limiti
indicati sulla macchina e nel manuale di istruzioni. L’operatore deve osservare le precauzioni di
sicurezza. In caso di uso improprio o non sicuro, il produttore non può essere ritenuto responsabile.
Il dispositivo è destinato solo all’uso all’interno. Non deve essere esposto alla pioggia.
Questa unità può essere utilizzata da bambini di età pari o superiore a 8 anni e da persone con
ridotte capacità fisiche, sensoriali o mentali o mancanza di esperienza o conoscenza, se sono
adeguatamente monitorate o se le istruzioni per l’uso dell’attrezzatura sono state lette in modo
sicuro e sono stati compresi i potenziali rischi. I bambini non devono giocare con il prodotto. La
manutenzione e la pulizia deve essere eseguita sotto la supervisione di una persona qualificata.
Non utilizzare per caricare batterie domestiche o batterie non ricaricabili.
Non utilizzare il caricabatterie se il cavo di alimentazione o la spina sono danneggiati.
Non utilizzare mai su una batteria congelata o danneggiata.
Non coprire il dispositivo.
Non posizionare l’unità vicino a fonti di calore o esporre a temperature elevate (sopra i 50
° C) per un tempo prolungato.
La modalità operativa del carica batterie automatico e le restrizioni applicabili al suo utilizzo
sono spiegate più avanti in questo manuale.
Rischi di incendio ed esplosione!
• Una batteria può emettere gas esplosivi quando è in carica.
• Durante la carica, la batteria deve essere posizionata in un’area ben ventilata.
• Evitare fiamme e scintille.
• Proteggere le superfici di contatto elettrico della batteria dai cortocircuiti.
Rischio di dispersione di acido!
• Indossare occhiali e guanti protettivi.
• In caso di contatto con gli occhi o la pelle, sciacquare immediatamente con acqua e con-
sultare un medico il prima possibile.
Connessione / disconnessione:
• Scollegare l’alimentazione prima di collegare o scollegare i collegamenti alla / dalla batteria.
• Assicurarsi sempre che il morsetto rosso sia collegato per primo al terminale della batteria
«+». Se è necessario collegare il morsetto nero al telaio del veicolo, assicurarsi che sia a una
distanza di sicurezza dalla batteria e dal tubo del carburante. Il caricabatterie deve essere
collegato alla rete elettrica.
• Dopo la ricarica, scollegare il caricabatterie dalla rete elettrica, quindi scollegare il morsetto
negativo dalla carrozzeria e infine scollegare il morsetto positivo dalla batteria, in questo ordine.
Connessione :
• Il caricabatterie deve essere collegato a un alimentatore con messa a terra.
•Il collegamento all’alimentazione deve essere eseguito in conformità alle norme nazionali.
Manutenzione :
• Se il cavo di alimentazione è danneggiato, il cavo di ricambio deve essere fornito dal pro-
duttore o da un suo centro di assistenza.
17
• La manutenzione deve essere eseguita solo da una persona qualificata.
• Avvertimento! Scollegare sempre dalla rete prima di eseguire la manutenzione del dispositivo.
• Il dispositivo non richiede alcuna manutenzione specifica.
• Se il fusibile interno viene fuso, deve essere sostituito dal produttore (servizio di vendita
dedicato) o da una persona ugualmente qualificata per evitare incidenti.
• Non utilizzare solventi o detergenti aggressivi.
Regolamenti :
• La macchina è conforme alle direttive europee.
• La dichiarazione di conformità è disponibile sul nostro sito Web.
• Marchio di conformità CEEA (Comunità economica eurasiatica).
Gestione dei rifiuti:
• Questo prodotto deve essere smaltito presso un’opportuna struttura di riciclaggio. Non
gettare nei rifiuti domestici.
DESCRIZIONE GENERALE
Explorer 120 è un caricabatterie multifunzione professionale a tecnologia Inverter. Progettato per suppor-
tare le batterie dei veicoli dimostrativi o durante i lavori diagnostici, garantisce anche una qualità di carica
ideale per la manutenzione dei modelli più avanzati. Questo caricabatterie è dotato di cavi lunghi fino
a 8 m. La sostituzione dei cavi di ricarica richiede una nuova calibrazione. È considerato un dispositivo
fisso, non un prodotto mobile.
Explorer 120 è dotato di un software che offre 4 diverse modalità tra cui scegliere:
• Modalità di ricarica: dedicata alla ricarica di batterie di avviamento al piombo acido (sigillate,
liquide, AGM ...) o al litio (LiFePO4).
• Modalità di alimentazione|Diag+: fornisce l’energia necessaria durante i lavori diagnostici sul veicolo.
• Modalità di alimentazione|Showroom: mantiene la carica della batteria e fornisce l’energia ne-
cessaria quando si utilizzano i dispositivi elettrici di un veicolo dimostrativo.
• Modalità tester: utilizzata per controllare lo stato della batteria e testare il sistema di avviamento
del veicolo e il funzionamento dell’alternatore.
Il vostro Explorer 120 è SMART!
Le funzionalità originali di Explorer 120 possono essere estese aggiungendo modalità e profili di ricarica
specifici utilizzando la porta USB e le impostazioni personalizzate.
Explorer 120 offre anche la possibilità di recuperare i dati da diverse centinaia di operazioni di ricarica
sulla chiavetta USB per l’analisi su un foglio di calcolo. Moduli aggiuntivi (come stampante, porta Ethernet,
ecc.) possono anche essere collegati al caricabatterie tramite la sua presa dedicata.
Funzione «Auto-Detect»:
Explorer 120 è dotato della funzione «Auto-Detect» che avvia automaticamente
una carica quando una batteria è collegata al caricabatterie.
AUTO-DETECT 12V
U=12.3V
Funzione «Auto-Restart» :
La funzione «Auto-Restart» offre la possibilità di riavviare automaticamente il caricabatterie in caso di
mancanza di corrente.
Funzione «Lock» :
È possibile bloccare i pulsanti di Explorer 120 quando viene utilizzato in un luogo aperto al pubblico o
incustodito. Per attivare / disattivare il blocco, tenere premuto per 3 secondi.
START UP
1. Collegare il caricabatterie alla rete elettrica.
2. Impostare l’interruttore, situato sul retro del caricatore, su «ON».
3. Selezionare la modalità desiderata (Carica -> Showroom -> Diag + -> Tester).
Per accedere al menu configurazione premere il tasto per 3 secondi.
18
MODALITÀ DI CARICA
• Impostazione della modalità:
1Premere il pulsante SELECT per 3 secondi per attivare
la modifica delle impostazioni della modalità. Pb-CHARGE
liquid
12V
50Ah
1
2
3
4
1- Tipo di carica
2- Profilo di carica
3- Tensione nominale della batteria
4- Capacità nominale della batteria
2Utilizzare le frecce per modificare il valore del
parametro.
3Premere il pulsante SELECT per confermare il valore
e passare al parametro successivo.
Tipo di
carica Profilo Tensione di
carica
Pb-CHARGE
normale 2.40 V/cell Batterie al piombo Gel, MF, EFB, SLA...
AGM 2.45 V/cell
La maggior parte delle batterie al piombo-acido AGM, tra cui
START e STOP. Tuttavia, alcune batterie AGM richiedono una carica
di tensione inferiore (profilo normale). Controllare il manuale della
batteria in caso di dubbi.
liquido 2.45 V/cell Batterie aperte tradizionali con acido liquido e tappi di rabboccamento
Easy 2.40 V/cell
Profilo dedicato alle batterie al piombo che adatta automatica-
mente la corrente di carica in base alle dimensioni della batteria.
Tuttavia, per la massima ottimizzazione della carica, si consiglia,
quando possibile, di utilizzare curve normali, AGM o di carica liquida.
Li-CHARGE LFP/
LiFePO4 3.60 V/cell Batterie al litio tipo LFP (Lithium Ferro Phosphate)
• Inizio della carica:
1
Per avviare la carica, premere il pulsante START
/ STOP. Pb-CHARGE
U=13.1V
24%
I=9.7A
1
2
3
Pb-CHARGE
Q=6.7Ah
24%
01h23
45
1- Tensione della batteria
2- Progresso del ciclo di ricarica
3- Corrente erogata dal caricabatterie
4- Ampere-ora forniti
5- Durata
Con la funzione AUTO-DETECT attiva, la carica
inizierà automaticamente dopo 5 secondi se è
presente una batteria.
AUTO-DETECT12V
U=12.3V
2Durante la carica, Explorer 120 indica la percentuale di avan-
zamento del ciclo di carica e alternativamente la tensione, la
corrente, gli ampere-ora forniti e la durata.
3Premere il pulsante START / STOP per interrom-
pere la carica.
Precauzioni :
Quando si carica un veicolo, si consiglia di ridurre al minimo il consumo di energia del veicolo (spegnere
le luci, spegnere l’accensione, chiudere le porte, ecc.) Per non disturbare il processo di ricarica. Precau-
zione: controllare il livello dell’elettrolita di qualsiasi batteria aperta. Portare a livello se necessario, prima
di iniziare la carica.
• Curva di carica acido-piombo:
U
I
1 2 3 4 5 6 7
Analisi Recupero Test Desolfatazione Carica Assorbimento Manutenzione/-
Carica ottante
0%
8
Refresh
(solo per prolo liquido)
10% 20% 80% 95% 100%
19
Passaggio 1 : Analisi
Analizza lo stato della batteria (livello di carica, inversione di polarità, batteria errata ...)
Passaggio 2 : Recupero
Ripristino di elementi danneggiati dopo scariche profonde e prolungate.
Passaggio 3 : Test
Test della batteria solfatata
Passaggio 4 : Desolfatazione
Algoritmo di desolfatazione della batteria.
Passaggio 5 : Carica
Carica rapida alla massima corrente per raggiungere l’80% del livello di carica.
Passaggio 6: Assorbimento
Carica di tensione costante per raggiungere il livello di carica del 100%.
Passaggio 7: Refresh (solo per il profilo liquido)
Il caricabatterie fornisce una corrente aggiuntiva per creare gas che consentirà la miscelazione dell’elet-
trolita e quindi il ricondizionamento delle celle della batteria. Durante questa fase, la batteria potrebbe
produrre un po ‘d’acqua.
Passaggio 8 : Manutenzione / carica flottante
Mantiene il livello di carica della batteria al massimo.
Curva di carica litio LFP:
U
I
1 2 3 4 5 6 7
Analisi UVP Wake up Ripristino Carica Test Supplemento Equalizzazione /
bilanciamento
0%
8
Assorbimento Manutenzione / Carica
Flottante
9
Sistema di equalizzazione
della batteria
2% 85% 95% 99% 100%
Passaggio 1 : Analisi
Analizza lo stato della batteria (livello di carica, inversione di polarità, batteria errata ...)
Passaggio 2: UVP Wake up
Riattiva le batterie con protezione UVP (Under Voltage Protection)
Passaggio 3: Recupero
Algoritmo di recupero a seguito di una scarica profonda.
Passaggio 4 : Carica
Carica rapida massima corrente per raggiungere un livello di carica del 90%.
Passaggio 5: Assorbimento
Carica di tensione costante per raggiungere un livello di carica del 95%.
Passaggio 6 : Test
Test di conservazione della carica.
Passaggio 7 : Supplemento
Riduce la carica corrente per raggiungere il livello di carica del 100%.
Passaggio 8: Equalizzazione / bilanciamento
Bilanciamento delle celle della batteria
Passaggio 9: Manutenzione / carica flottante
Mantiene il livello di carica della batteria al massimo.

20
MODALITÀ DI ALIMENTAZIONE: SHOWROOM / DIAG+
• Impostazione della modalità:
1Premere il pulsante SELECT per 3 secondi per
attivare la modifica delle impostazioni della
modalità.
SHOWROOM
U:13.5V
12V
I:50A
1
2
3
4
1- Modalità
2- Tensione da impostare
3- Tensione nominale
4- Corrente massima
2Utilizzare le frecce per modificare il valore
del parametro.
3Premere il pulsante SELECT per confermare
il valore e passare al parametro successivo.
Limitazione di potenza: se accanto all’impostazione corrente appare il simbolo «*» (ad es. «I: 50A *»), ciò
indica che il caricabatterie non può fornire questa corrente alla tensione impostata sul display. A questo
livello di tensione, il caricabatterie funzionerà alla massima potenza. Tuttavia, questa corrente potrebbe
essere erogata a una tensione inferiore a seconda della potenza del caricabatterie.
• Inizio della carica:
1
Per avviare la modalità, premere il pulsante
START / STOP.
SHOWROOM
U:13.7V
12V
I:9.7A
12
1- Tensione della batteria
2- Corrente erogata dal
caricabatterie
Per avviare la modalità, se la funzione AU-
TO-DETECT è attiva, la carica inizierà auto-
maticamente dopo 5 secondi se è presente
una batteria.
AUTO-DETECT 12V
U=12.3V
2Durante la modalità, Explorer 120 indica la tensione della
batteria e la corrente erogata dal caricabatterie.
3Premere il pulsante START / STOP per interrom-
pere la modalità.
Precauzioni :
Quando si avvia la modalità, una corrente visualizzata sopra 10 A indica che la batteria è scarica. Il
dispositivo inizierà a caricarsi automaticamente. Verificare che non vi siano dispositivi elettrici sul veicolo.
Attendere che la corrente fornita scenda al di sotto di 10 A prima di iniziare qualsiasi azione sul veicolo
(uso degli accessori elettrici del veicolo, operazioni diagnostiche, ecc.).
Caratteristiche delle modalità di alimentazione:
Modalità Funzione "Senza
batteria" Funzione "Carica
integrata" Protezione da sotto-
tensione anomala Regolazione della
tensione
Showroom 12.7 V - 14.4 V
DIAG+ 12.7 V - 14.8 V
• Funzione «Senza batteria» (non raccomandata):
Questa funzione consente di utilizzare la modalità di alimentazione SHOWROOM
in assenza di batteria. Per fare ciò, premere il pulsante START / STOP per 3
secondi. L’indicazione «Modalità senza batteria» viene visualizzata per 3 secondi
prima di forzare l’alimentazione.
Si consiglia vivamente di non utilizzare la funzione «senza batteria» se è presente una batteria.
Questa funzione disabilita la funzione di «ricarica integrata», nonché alcune delle protezioni come
la protezione da sottotensione anomala o il rilevamento di disconnessione.
In questa configurazione, l’inversione di polarità può danneggiare l’elettronica del veicolo.
• Funzione «carica integrrata»:
La modalità SHOWROOM (al di fuori della funzione «nessuna batteria») incorpora un algoritmo di ricarica
automatica adattato a tutti i tipi di batterie (piombo e litio), al fine di garantire un livello di carica ottimale
per i veicoli dimostrativi. Questa funzione è perfettamente compatibile con la presenza di dispositivi che
assorbono dalla batteria.
SHOWROOM 12V
Senza batteria
Table of contents
Languages:
Other Helvi Batteries Charger manuals


