Helvi DISCOVERY 60 User manual

MANUALE DI ISTRUZIONI
INSTRUCTIONS MANUAL
DISCOVERY 60

Adatto per batterie a 6/12V al Piombo normali o stagne, Batterie al GEL do
potenza compresa tra 5 e 120 Ah
AVVENTENZE SICUREZZA
Gas
Quando si inizia a caricare la batteria si potrebbe notare il ribollire del liquido a causa
del rilascio di gas. Dato che il gas è inammabile non si devono avere amme libere
nelle vicinanze della batteria e l’area deve essere ben ventilata.
A causa del rischio dovuto ai gas esplosivi, connettere e sconnettere i cavi del carica
batterie solo se il relativo cavo di alimentazione è sconnesso.
Tipi di batterie
Questo carica batterie è adatto solo per batterie al Piombo normali o stagne, Batterie
al GEL e non deve essere usato per ricaricare batterie NICAD o altri tipi di batterie
Avvertenze
Quando non in uso, il carica batterie deve essere posizionato in una zona secca per
evitare che l’umidità possa danneggiare le parti interne.
Riparazione
- Il carica batterie non deve essere aperto. Ogni tentativo di modica o riparazione
da parte dell’utente porta alla decadenza della garanzia.
- Il cavo di alimentazione di questo apparecchio non può essere sostituito. Se si
danneggia l’intero carica batterie deve essere sostituito.
Pericolo
- evitare di entrare in contatto con l’elettrolita della batteria con pelle o vestiti. E’ un
acido e può causare ustioni. In caso di contatto dovete lavare immediatamente con
acqua la zona in cui è avvenuto il contatto.
- in caso di contatto con gli occhi, lavarli abbonda mentente con acqua e contattate
un medico immediatamente.
- mai caricare una batterie congelata. Se il liquido della batteria (elettrolita) si conge-
la, portate la batteria in una zona calda per permettere alla batteria di scongelarsi pri-
ma di iniziare la carica. Non mettere mai la batteria sopra il carica batterie e viceversa
- non far toccare le pinze del carica batterie quando lo stesso è in carica.
- non usare mai il carica batterie se ha subito una gran botta, è caduto o se è dan-
neggiato. Portatelo da un esperto qualicato per un’ispezione e riparazione.
- Posizionate il cavo di alimentazione in modo che non possa essere calpestato,
strappato o danneggiato.
- Non scollegare mai il cavo di alimentazione tirandolo per il cavo. Tirare il cavo di
alimentazione può danneggiare il carica batterie.
Precauzioni da usare quando si lavora con le batterie
- se l’acido della batterie entra in contatto con la pelle o i vestiti, lavare immediata-
mente con sapone ed acqua. Se l’acido entra in contatto con gli occhi, lavateli imme-
diatamente con acqua corrente per 20 minuti e contattate un medico immediatamente.
- Non fumare o permettere amme o scintille in prossimità della batteria o del motore.
- Non far cadere utensili di metallo sulla batteria. La scintilla risultante o il corti
circuito sulla batteria o su altre parti elettriche può comportare un’esplosione.
- Rimuovere oggetti di metallo ad uso personale, quali anelli, braccialetti, collane e
orologi quando si lavora con batteria al piombo.
- Una batteria al piombo può produrre una corrente di corto circuito sufciente a
saldare un anello o similari al metallo, causando ustioni gravi.
CARATTERISTICHE
Carica batterie automatico con 4 stadi di carica
Il DISCOVERY 60 è controllato da microprocessore e ha 4 stadi di carica, adatti alla
carica di batterie per automobili, moto, motoslitte, trattori, barche,….
Il microprocessore verica le condizioni della batteria e genere la corrente e tensio-
ne di carica corrette per la batteria (caratteristiche di carica). Questo darà la carica
migliore e la vita più lunga alla batteria
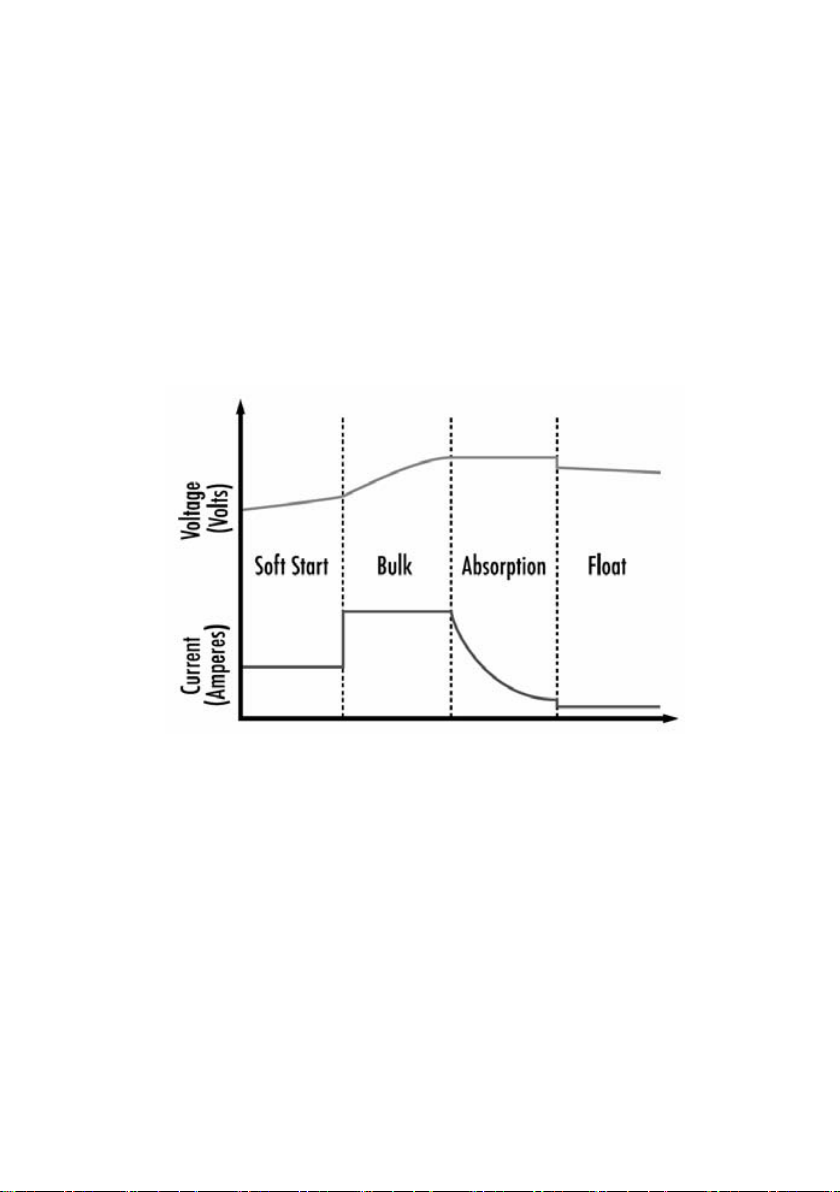
Caratteristiche di carica:
Test batteria e precarica (Stadio 1):
verica la tensione della batteria per vericare che le connessioni sia buone e che la
batteria sia in condizione stabile prima di iniziare il processo di carica
Bulk (Stadio 2):
stadio di carica principale, in cui la batteria riceve la maggior parte della carica. Alla
ne di questo stadio di carica la batteria raggiunge il 75-80% della sua capacità di
carica. I carica batterie eroga la corrente massima nchè la tensione della batteria
non raggiunge il livello di carica completa per una normale batteria
Assorbimento (Stadio 3):
completa la carica no a raggiungere virtualmente il 100% a tensione costante. La
corrente di carica si riduce molto nel momento in cui la corrente raggiunge un valore
di carica minimo
Floating (Stadio 4):
carica a tensione costante ridotta, serve per il mantenimento della batteria
FIG.1

Aspetto e Display LCD
1) Se durante la carica il DISCOVERY 60 viene spento, alla sua riaccensione il pro-
cesso di carica ricomincerà dal punto in cui si era interrotto.
Attenzione: se le pinze vengono scollegate, la memoria dello stato di carica
verrà persa e la modalità di carica non verrà riselezionata in automatico
2) Modalità di carica:
identica automaticamente le batterie 6V / 12V; per batterie 6V è disponibile solo
la modalità SLOW 1A; per batterie da 12V, sono disponibili tre modalità di ricarica:
• 6V 1A / modalità di ricarica SLOW (default)
• 12V 1A modalità di ricarica / SLOW
• 12V 4A / modalità di ricarica veloce
• 12V 4A modalità di ricarica / LOW TEMP (temperatura ambiente <10° C)
Le tensioni minime per l’identicazione automatica di batterie a 6V e 12V sono 3V e
7.4V, rispettivamente.
3) Protezioni:
• Protezione di cortocircuito:.
• Protezione inversione di polarità: il display LCD visualizza il segnale di inversione
di polarità
• Protezione surriscaldamento
4) ) Funzioni Display LCD
Il prodotto integra un display LCD, come mostrato in Fig. 1. Viene visualizzato lo
stato della batteria, la modalità di ricarica, lo stato della carica, la tensione in tempo
reale, e gli eventuali messaggi di errore. Si integra di indicatori LED. Gli stati LCD
specici sono mostrati qui di seguito:
a: Polarità invertita
b: Batteria errata
c: Batteria 12V
d: Batteria 6V
e: Stato batteria
f: Modalità slow
g: Modalità fast
h: Modalità LowTemp
i: Multimetro
FIG.2

Note:
i) 6V: quando la tensione della batteria è compresa tra 3.5V-5V, il caricabatterie
funziona a 6V / modalità lenta. Il display LCD visualizza la tensione della batteria in
tempo reale alla frequenza di 1 Hz e l’icona della batteria scorre. Premere il tasto per
mettere in pausa / riprendere il processo di ricarica. L’icona della batteria smette di
scorrere quando è in PAUSA.
Dopo aver caricato la batteria per 2 minuti, se la tensione della batteria è ancora
<4.5V, il display LCD lampeggia con frequenza 1 Hz per visualizzare alternativamen-
te “Lo” e la “Tensione in tempo reale”. LED rosso luce continua a “ON”
ii) 12V: quando la tensione della batteria è compresa tra 7.4V e 10V. Il caricabatterie
funziona a 12V / modalità lenta. Premere il tasto e cambiare la modalità di “Fast”,
“Low Temp” o “Pausa” il processo di carica, rispettivamente. L’icona della batteria
smette di scorrere quando è in PAUSA.
Dopo aver caricato la batteria per 2 minuti, se la tensione della batteria è ancora
<9V, il display LCD lampeggia con frequenza 1 Hz per visualizzare alternativamente
“Lo” e la “Tensione in tempo reale”. LED rosso luce continua a “ON”
In questi 2 casi, si prega di premere il pulsante per rilevare / controllare lo stato della
batteria e riavviare il processo di carica. Non è necessario scollegare i cavi dalla
batteria e il cavo di alimentazione.
Mantenere la carica delle batteria per 4 ore (modalità 6V) / 9 ore (modalità 12V). Se
la tensione della batteria è ancora al di sotto del livello corretto, il display LCD vi-
sualizza Er3. Il LED rosso si accende. In questo caso, è necessario scollegare i cavi
dalla batteria, oppure scollegare il cavo di alimentazione del carica batterie.
Si faccia riferimento a Fig. 3 e Fig. 4.
FIG.3

PRECAUZIONI E ISTRUZIONI OPERATIVE
1) Precauzioni:
a. La tensione di alimentazione del prodotto è di 220 ~ 240 V ; assicurarsi che la
tensione di rete si conforme alle speciche del prodotto prima di utilizzarlo;
b. Il caricabatterie è adatto a batteria 6V / 12V al piombo con capacità 5Ah ~ 120Ah;
c. Collegare il polo positivo della batteria (+) con la pinza rossa, e ssare il polo
negativo (-) con la pinza nera. Se le pinze vengono connesse con polarità inversa
viene visualizzato un messaggio di errore ;
d. Prima di caricare la batteria, al ne di protegge l’apparecchiatura collegata alla
batteria da danni, scollegare la batteria dalll’apparecchiatura prima di caricare la
batteria;
2) Istruzioni per l’uso:
A. Collegamento e inversione di polarità: selezionare la batteria da caricare, ve-
ricare la tensione di ingresso al carica batterie e poi inserire la spina. Accedere
all’interfaccia di inizializzazione come segue in Fig. 6; Collegare la pinza rossa al
terminale positivo (+) della batteria, e collegare il morsetto nero al polo negativo
(-); se la polarità è inversa, il (Fault) LED rosso lampeggia a 1 Hz e il display LCD
visualizza lo stato in Fig. 7
FIG.4
FIG.5
B. precarica, corrente costante (Bulk, tensione costante (Assorbimento): ssare i
terminali di uscita alla batteria per identicare se è 6V o 12V;
per la batteria 6V, inizia la carica in modalità 6V / Slow;
per la batteria 12V, inizia la carica in modalità 12V / Slow; è possibile premere il ta-
sto MODE per passare tra le tre modalità di carica (Slow / Fast / bassa temperatura
(Low Temp)). La retroilluminazione è attivata per 10 secondi; l’effetto della visualiz-
zazione è mostrato in Fig. 8;
FIG.6 FIG.7
C. Carica di tampone (Floating): in modalità Floating l’indicatore della batteria mo-
stra la batteria piena. Il display LCD visualizza alternativamente la tensione in tempo
reale e la scritta FUL. In questa fase la retroilluminazione sarà “ON” solo quando
si preme il pulsante; nessuna selezione di modalità è possibile durante la carica di
mantenimento, come mostrato in Fig. 9 di seguito: FIG.9
FIG.8
D. Memoria dello stato di carica: se durante il processo di carica si scollega il cavo di
alimentazione o nel caso di interruzione dell’alimentazione, il carica batterie salverà
lo stato di carica originale no a quando la tensione della batteria sarà superiore a 5
V; lo schermo LCD non sarà attivo, ma il LED “POWER” (verde) sarà “ON”. Il tempo
di memoria massima è di 12 ore; quando l’alimentazione è ripristinata, la carica con-
tinuerà dallo stato originale;

E. Carica completa: staccare la spina dalla presa di alimentazione, e quindi rimuo-
vere i cavi dalla batteria.
MANUTENZIONE E CURA DEL CARICA BATTTERIE
E ‘essenziale mantenere la batteria carica regolarmente durante tutto l’anno, so-
prattutto durante i mesi invernali. In inverno l’efcacia della vostra batteria dell’auto
è ridotta dal freddo. Il carburante è più denso, i motori sono difcili da avviare. Ter-
gicristalli e le luci sono tutte causa del calo di carica della batteria. È in queste con-
dizioni che le batterie devono essere al massimo della loro resa. Se la batteria non
è regolarmente mantenuta e completamente carica, può causare problemi e essere
soggetta a possibili rotture.
Sono elencati alcuni suggerimenti utili su come mantenere la batteria in buona salu-
te in relazione con il carica batterie.
Celle difettose
Le batterie sono solitamente realizzate con sei celle. Una di queste celle può dete-
riorarsi o danneggiarsi. Se, dopo diverse ore di carica la batteria è ancora scarica, si
dovrebbe vericare la batteria.
SOLO per batterie non sigillate: Prendere letture con il densimetro da ogni cella della
batteria. Se una lettura è inferiore rispetto alle altre, questo potrebbe indicare una
cella difettosa. Se necessario, chiedete ad uno specialista di vericare la batteria.
Una cella difettosa è sufciente per rovinare la batteria.
E’ inutile continuare ad usarla e sarebbe meglio prenderne una nuova.
Manutenzione della batteria
A volte la batteria potrebbe apparire scarica, ma questo potrebbe essere sempli-
cemente dovuto a connessioni sporche o incoerenti sui terminali della batteria. È
importante controllare i cavi regolarmente. A tale scopo, rimuovendo i cavi dalla
batteria, pulire l’interno di ogni connettore e i terminali sulla batteria, pulire le mor-
settiere e i connettori con vaselina, rimontarli nelle posizioni corrette e stringere le
connessioni saldamente.
E’ necessario mantenere l’elettrolita sopra il livello delle piastre.
Si noti, tuttavia, che non si deve averne una quantità eccessiva, in quanto l’elettrolita
è fortemente acido. Per il rabbocco non usare l’acqua del rubinetto. Utilizzare solo
acqua distillata o deionizzata. È importante mantenere il livello di acidità. Se neces-
sario farlo controllare da uno specialista.
Controllare la condizione della batteria (SOLO per batterie non sigillate)
Utilizzando un densimetro, che può essere acquistato nella maggior parte dei negozi
di accessori auto, è possibile controllare il peso specico dell’elettrolita in ogni cella.
Il densimetro è utilizzato per aspirare una quantità di uido dalla cella. Il galleggiante
all’interno del densimetro registrerà la condizione di quella cella. Rimettere il liquido
nella cella dopo il test, facendo attenzione a non schizzare il liquido.

Suitable for 6/12V Normal Lead Acid, Sealed or Gel Batteries between 5-120Ah
IMPORTANT SAFETY INSTRUCTIONS
Gases
When the battery is being charged you may notice bubbling in the uid caused by
the release of gas. As the gas is ammable no naked lights should be used around
the battery, and the area should be kept well ventilated.
Because of this risk of explosive gas only connect and disconnect the battery leads
when the mains supply is disconnected.
Type of batteries
This charger is only suitable for normal lead acid, sealed, or gel batteries and should
not be used to recharge NICAD or any other type of battery.
Points of note
• When not in use, store the charger in a dry area to avoid moisture damaging the
internal parts.
Repair
• The Battery Charger should not be opened. Any attempt at modication or repair
by the user will entail the loss of your guarantee.
• The mains supply cord of this appliance can not be replaced; if the cord is dama-
ged, the appliance should be discarded.
Danger!
• Avoid getting electrolyte on your skin or clothes. It is acidic and can cause burns.
If this occurs you should rinse the affected area with water immediately.
• If it gets into your eyes - wash thoroughly and seek medical attention immediately.
• Never charge a frozen battery. If battery uid (electrolyte) becomes frozen, bring
battery into a warm area to allow battery to thaw before you begin charging. Never
let a battery on top of charger or vice versa.
• Do not touch the battery clamps together when the charger is on.
• Never operate charger if it has received a hard blow, been dropped, or otherwise
damaged. Take it to a qualied professional for inspection and repair.
• Be sure to position the charger power cord to prevent it from being stepped on,
tripped over, or damaged.
• Never pull out the plug by the cord when unplugging the charger. Pulling on the
cord may cause damage to the cord or the plug.
Precautions When Working with Batteries
• If battery acid contacts skin or clothing, wash immediately with soap and water. If
acid enters eye, immediately ood eye with running cold water for at least 20 minu-
tes and get medical attention immediately.
• Never smoke or allow a spark or ame in vicinity of battery or Engine.
• Do not drop a metal tool on the battery. The resulting spark or short-circuit on the
battery of other electrical part may cause an explosion.
• Remove personal metal items such as rings, bracelets, necklaces, and watches
when working with a lead-acid battery.
• A lead-acid battery can produces a short-circuit current high enough to weld a
ring or the like to metal, causing severe burns.
FEATURES
Automatic and Intelligent 4-Stage Charging Curve
The DISCOVERY 60 is controlled by a microprocessor with 4-stage charging cha-
racteristic for charging batteries automobiles, motorcycles, snow mobiles, tractors,
personal watercraft, boats etc.
A microprocessor senses the condition of the battery to provide the right current and
voltage to the battery (charging characteristic). This will give the best effect on char-
ging and give the longest life to battery.
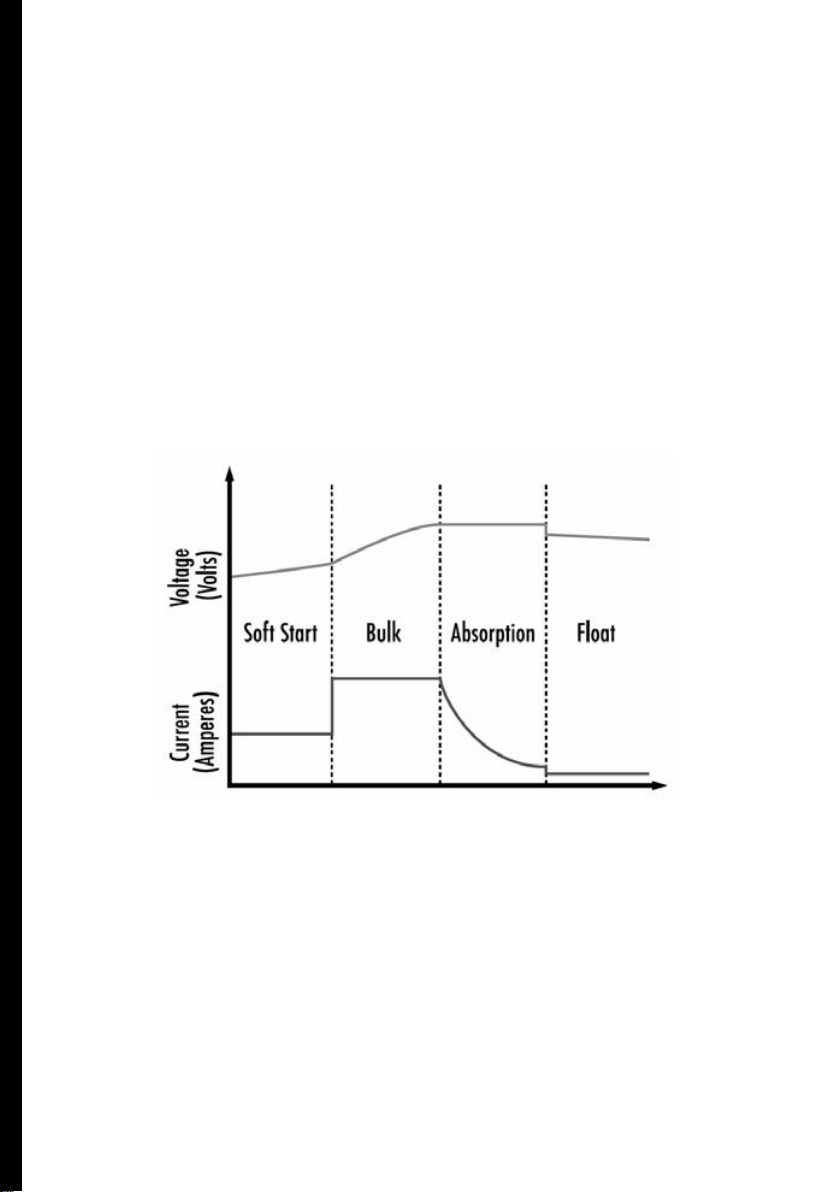
Charging characteristic:
Battery Test and Precharge (Stage 1):
Check the battery voltage to make sure battery connections are good and the battery
is in a stable condition before beginning the charge process
Bulk (Stage 2):
Major charging stage where the battery receives the majority of its charge.
During this stage the battery brought to 75 - 80% of its charge. The charger delivers
maximum current until the terminal voltage has risen to the full charge level for Nor-
mal battery.
Absorption (Stage 3):
Completes the charge up to virtually 100% at a constant voltage. The
current tapers off after the current reached the minimum level.
Floa t(Stage 4):
Low constant voltage, minimal charge current, battery is fully charged
FIG.1

APPEARANCE AND LCD DIAGRAM
1) Power-down memory function:
in the charging process (constant current and follow-up stage), the product can re-
member the current charging mode after power outage, and restores the original
state when the grid resumes; the maximum time is 12h with battery connection.
In power-down memory state, the Power LED is on, the LCD doesn’t display,
and the backlight is off;
2) Charging mode:
identify 6V/12V batteries automatically; for 6V batteries, only 6V/1A SLOW mode is
available; for 12V batteries, three charging modes are available, as follows:
• 6V 1A /SLOW charging mode (default)
• 12V 1A /SLOW charging mode
• 12V 4A /FAST charging mode
• 12V 4A /LOW TEMP charging mode (Environment temperature <10°C)
The minimum voltages for automatic identication of 6V&12V batteries are 3V and
7.4V respectively.
3) Protection:
• Short circuit protection: keep or return to the initialization interface.
• Reverse polarity protection: the LCD displays reverse polarity signal
• Overheating protection
4) LCD display function
The product integrates LCD, as shown in Fig. 1. It displays the analog battery status,
charging mode, charging state, real-time voltage, and error message, and integrates
LED indicators. The specic LCD states are shown in Fig. 4 below:
a: reverse polarity icon
b: wrong battery icon
c: 12V battery icon
d: 6V battery icon
e: analog battery icon
f: slow mode icon
g: fast mode icon
h: LowTemp mode icon
i: Digit/character icon
FIG.2

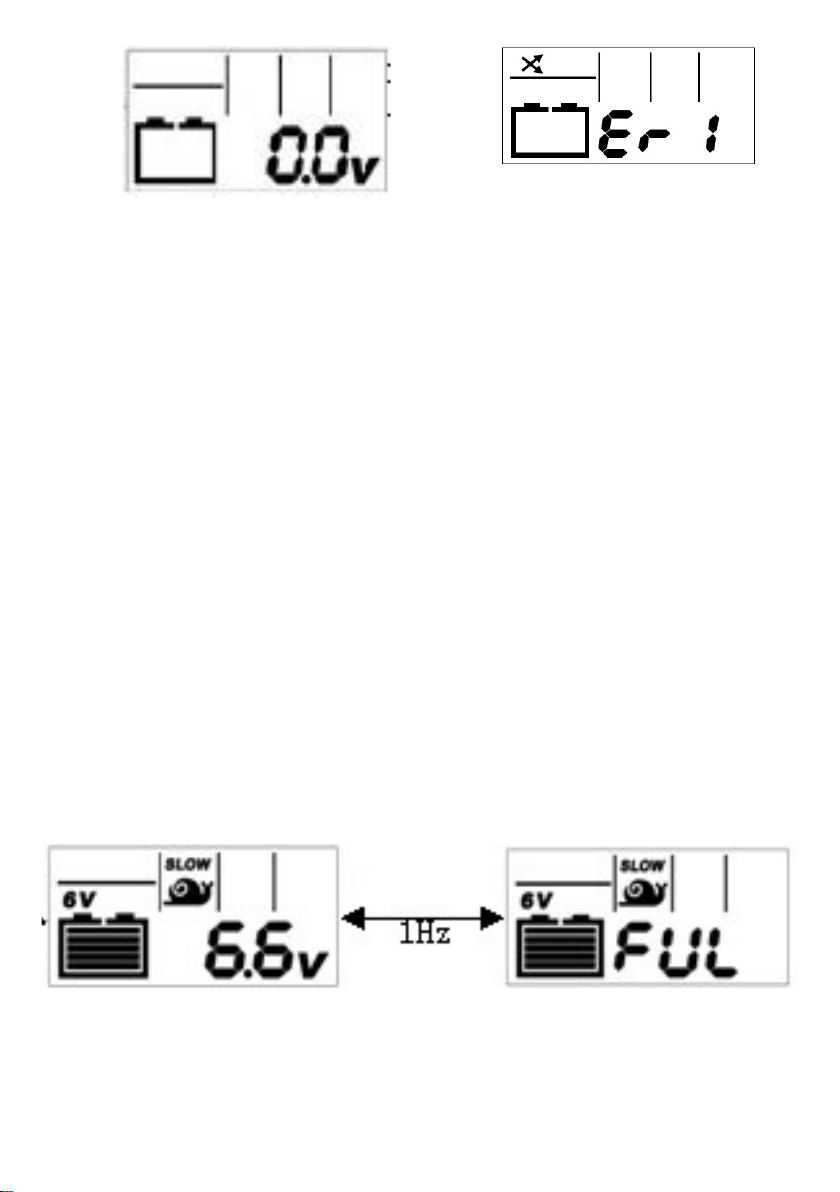
Remark:
i) 6V: When the battery voltage is between 3.5V–5V, the charger will work at 6V/Slow
mode. LCD ashes the real time battery voltage at 1Hz frequency and the battery
icon scrolls. Press the button to pause/resume the charging process. The battery
icon stops scrolling when it is “pause”.
After charging the battery by 2 minutes, if battery voltage is still <4.5V, LCD ash
at 1Hz frequency to display “Lo” and “real time voltage” alternatively. Red LED light
keeps “ON”
ii) 12V: When the battery voltage is between 7.4V and 10V. The charger will work
at 12V/Slow mode. Press the button and change the mode to “Fast”, “Low Temp” or
“Pause” the charging process respectively. The battery icon stops scrolling when it
is “pause”.
After charger the battery by 2 minutes, if battery voltage is still <9V, LCD ash at 1Hz
frequency to display “Lo” and “real time voltage” alternatively. Red LED light keeps
“ON”
In these 2 cases, please press the button to detect/check the battery status and start
the charging process again. Don’t need to disconnect the AC power and battery
cable clamp.
Keep charging the battery 4 hours (6V mode)/9 hours (12V mode). If the battery
voltage is still below the correct level, LCD displays Er3. Red LED light keeps “ON”.
In this case, you must to disconnect the battery cable clamp, or need to disconnect
the power.
Please refer to Fig. 3 and Fig. 4., 6V/ 12V LCD charging block diagram.
FIG.3

PRECAUTIONS AND OPERATING INSTRUCTIONS
1) Precautions:
a. The supply voltage of the product is 220~240VAC; please make sure that the
mains voltage meets the specications of the product before using;
b. The charger is suitable for 6V/12V regular and Lead-acid batteries with 5Ah ~
120Ah capacity;
c. Clamp the battery positive pole (+) with the red clip of the output line, and clamp
the negative pole (-) with the black clip; it will report error if the polarity is reverse;
d. Before charging the battery, in order to prevent the equipment connected to the
battery from damage or unnecessary inuence, disconnect the battery and the
equipment before charging the battery;
2) Operating instructions:
A. Connection and reverse polarity: select the battery to be charged, verify the input
voltage and then insert the power plug, enter into the initialization interface as fol-
lows Fig. 6; clamp the red clip of the output side to the positive (+) of the battery, and
clamp the black clip to the negative (-); if the polarity is reverse, the red (Fault) LED
ashes at 1Hz, and LCD displays as shown in Fig. 7
FIG.4
FIG.5

B. Pre-charge, constant current & constant voltage charging: clamp the output termi-
nal to the battery to identify 6V or 12V battery; for 6V battery, it will start charging in
6V/slow mode immediately; for 12V battery, it enters 12V/slow mode by default; you
can press the MODE button to switch among the three modes sequentially(Slow/
Fast/Low Temp), each time you press the button, the backlight is turned on for 10
seconds; the display effect is shown in Fig. 8;
FIG.6 FIG.7
C. Float charge: enter the oat charging state, the battery icon shows full, and the
real-time voltage and FUL characters display alternately at 1Hz frequency. In this
stage only the backlight will be “ON” when you press the button; no mode selection
is possible during the oat charge, as shown in Fig. 9 below: FIG.9
FIG.8
D. Power-down memory: in the charging process, unplug the power plug or in case
of power outage, the product will save the original charging mode as long as the
battery voltage exceeds 5V; the LCD screen doesn’t have display but the “power”
LED (Green) will be “ON, the maximum memory time is 12 hours; when the power
resumes, it will continue to charge in the original state;

E. Charging completes: unplug the power plug, and then remove the clips from the
battery.
MAINTENANCE AND CARE
It is essential to keep your battery regularly charged throughout the year, especially
during the winter months. In the winter the effectiveness of your car battery is redu-
ced by the cold. Oil is thick. Engines are difcult to start and the heater, windscreen
wipers and lights are all draining power. It is at this time that batteries have to be at
peak power. If your battery is not regularly maintained and kept fully charged, it can
cause problems and a possible breakdown.
Listed are some helpful hints on how to keep your battery healthy in conjunction with
your Battery Charger.
Faulty Cells
Batteries are usually made with six cells. One of these cells can deteriorate or get
damaged. If, after several hours charging your battery is still at, you should test the
battery.
ONLY for NOT sealed batteries:
Take hydrometer readings from each cell in the battery. If one reading is lower than
the others, this could indicate a faulty cell. If necessary, get an Auto-Electrician to
check your battery. One faulty cell is enough to ruin your battery.
It is pointless to continue using it and you would be better getting a new one.
Care
Sometimes the battery may appear at, but this could simply be dirty or loose con-
nections on your battery terminals. It is important to maintain the leads on a regular
basis. Do this by removing the leads from the battery, clean the inside of each con-
nector and terminal posts on the battery, smear the terminal posts and connectors
with Vaseline, ret in there correct positions and tighten rmly.
It is essential to keep the electrolyte level above the plates.
Note, however, that you should not overll it, as the electrolyte is strongly acidic.
When topping up do not use tap water. Always use distilled or de-ionized water. It
is important to keep the acid level up. If necessary have it checked by your garage.
Checking the condition of your battery (ONLY for NOT sealed batteries)
Using a hydrometer, which can be purchased, from most motor accessory stores,
you can check the specic gravity of the electrolyte in each cell. The hydrometer is
use to suck up a quantity of uid from the cell. The weighted oat inside the hydro-
meter will register the condition of that cell. Put the uid back into the cell after te-
sting, taking care not to splash the uid about.

This manual suits for next models
1
Table of contents
Languages:
Other Helvi Batteries Charger manuals


