Helvi DIGICAR 600 Instruction Manual

OPERATING INSTRUCTIONS MANUAL
MANUALE DI ISTRUZIONI
BETRIEBSANLEITUNG
MANUEL D’INSTRUCTION
РУКОВОДСТВО ПО ЭКСПЛУАТАЦИИ
DIGITAL BATTERY CHARGER
AND STARTER
CARICA BATTERIE E
AVVIATORE DIGITALE
DIGITALES BATTERIELADEGERÄT
MIT STARTHILFE
CHARGEUR DE
BATTERIES/DÉMARREUR DIGITAL
ЦИФРОВОЕ ЗАРЯДНОЕ
УСТРОЙСТВО И СТАРТЕР

2
SMALTIMENTO DI APPARECCHI DA ROTTAMARE DA PARTE DI PRIVATI NELL’UNIONE EUROPEA
Questo simbolo che appare sul prodotto o sulla confezione indica che il prodotto non deve essere smaltito assieme agli altri rifiuti domesti-
ci. Gli utenti devono provvedere allo smaltimento delle apparecchiature da rottamare portandole al luogo di raccolta indicato per il riciclag-
gio delle apparecchiature elettriche ed elettroniche. La raccolta ed il riciclaggio separati delle apparecchiature da rottamare in fase di smal-
timento favoriscono la conservazione delle risorse naturali e garantiscono che tali apparecchiature vengano rottamate nel rispetto dell’am-
biente e della tutela della salute. Per ulteriori informazioni sui punti di raccolta delle apparecchiature da rottamare, contattare il proprio comu-
ne di residenza, il servizio di smaltimento dei rifiuti locale o il negozio presso il quale è stato acquistato il prodotto.
DISPOSAL OF WASTE EQUIPMENT BY USERS IN PRIVATE HOUSEHOLDS IN THE EUROPEAN UNION
This symbol on the product or on its packaging indicates that this product must not be disposed of with your other household waste. Instead,
it is yr responsibility to dispose of yr waste equipment by handing it over to a designated collection point for the recycling of waste electri-
cal and electronic equipment. The separate collection and recycling of yr waste equipment at the time of disposal will help to conserve natu-
ral resources and ensure that it is recycled in a manner that protects human health and the environment. For more information about where
you can drop off yr waste equipment for recycling, please contact yr local city office, yr household waste disposal service or the shop where
you purchased the product.
EVACUATION DES ÉQUIPEMENTS USAGÉS PAR LES UTILISATEURS DANS LES FOYERS PRIVÉS AU
SEIN DE L’UNION EUROPÉENNE
La présence de ce symbole sur le produit ou sur son emballage indique que vous ne pouvez pas vous débarrasser de ce produit de la même
façon que vos déchets courants. Au contraire, vous êtes responsable de l’évacuation de vos équipements usagés et à cet effet, vous êtes tenu
de les remettre à un point de collecte agréé pour le recyclage des équipements électriques et électroniques usagés. Le tri, l’évacuation et le
recyclage séparés de vos équipements usagés permettent de préserver les ressources naturelles et de s’assurer que ces équipements sont recy-
clés dans le respect de la santé humaine et de l’environnement. Pour plus d’informations sur les lieux de collecte des équipements usagés,
veuillez contacter votre mairie, votre service de traitement des déchets ménagers ou le magasin où vous avez acheté le produit.
ENTSORGUNG VON ELEKTROGERÄTEN DURCH BENUTZER IN PRIVATEN HAUSHALTEN IN DER EU
Dieses Symbol auf dem Produkt oder dessen Verpackung gibt an, dass das Produkt nicht zusammen mit dem Restmüll entsorgt werden darf.
Es obliegt daher Ihrer Verantwortung, das Gerät an einer entsprechenden Stelle für die Entsorgung oder Wiederverwertung von
Elektrogeräten aller Art abzugeben (z.B. ein Wertstoffhof). Die separate Sammlung und das Recyceln Ihrer alten Elektrogeräte zum
Zeitpunkt ihrer Entsorgung trägt zum Schutz der Umwelt bei und gewährleistet, dass sie auf eine Art und Weise recycelt werden, die keine
Gefährdung für die Gesundheit des Menschen und der Umwelt darstellt. Weitere Informationen darüber, wo Sie alte Elektrogeräte zum
Recyceln abgeben können, erhalten Sie bei den örtlichen Behörden, Wertstoffhöfen oder dort, wo Sie das Gerät erworben haben.
ELIMINACIÓN DE RESIDUOS DE APARATOS ELÉCTRICOS Y ELECTRÓNICOS POR PARTE DE
USUARIOS DOMÉSTICOS EN LA UNIÓN EUROPEA
Este símbolo en el producto o en el embalaje indica que no se puede desechar el producto junto con los residuos domésticos. Por el contra-
rio, si debe eliminar este tipo de residuo, es responsabilidad de usuario entregarlo en un punto de recolección designado de reciclado de apa-
ratos electrónicos y eléctricos. El reciclaje y la recolección por separado de estos residuos en el momento de la eliminación ayudarán a pre-
servar recursos naturales y a garantizar que el reciclaje proteja la salud y el medio ambiente. Si desea información adicional sobre los luga-
res donde puede dejar estos residuos para su reciclado, póngase en contacto con las autoridades locales de su ciudad, con el servicio de
gestión de residuos domésticos o con la tienda donde adquirió el producto.
DESCARTE DE EQUIPAMENTOS POR USUÁRIOS EM RESIDÊNCIAS DA UNIÃO EUROPEIA
Este símbolo no produto ou na embalagem indica que o produto não pode ser descartado junto com o lixo doméstico. No entanto, é sua respon-
sabilidade levar os equipamentos a serem descartados a um ponto de colecta designado para a reciclagem de equipamentos eletro-eletrônicos.
A colecta separada e a reciclagem dos equipamentos no momento do descarte ajudam na conservação dos recursos naturais e garantem que os
equipamentos serão reciclados de forma a proteger a saúde das pessoas e o meio ambiente. Para obter mais informações sobre onde descartar
equipamentos para reciclagem, entre em contacto com o escritório local de sua cidade, o serviço de limpeza pública de seu bairro ou a loja em
que adquiriu o produto.
УТИЛИЗАЦИЯ ВЫВЕДЕННЫХ ИЗ ЭКСПЛУАТАЦИИ ПРИБОРОВ ЧАСТНЫМИ ЛИЦАМИ В ЕВРОПЕЙСКОМ
СОЮЗЕ
Этот символ на изделии или его упаковке означает, что изделие не следует перерабатывать вместе с бытовыми отходами. Пользователи
должны перерабатывать его в отходы путем передачи его в специальные пункты сбора, занимающиеся утилизацией электрического и
электронного оборудования. Раздельный сбор и переработка оборудования в отходы и передача на металлолом во время утилизации
помогут сохранить природные ресурсы и обеспечить переработку в соответствии с экологическими нормами и нормами по охране
здоровья. Для получения дополнительной информации о пунктах сбора, обратитесь в местные органы власти, в местную службу по
утилизации отходов или к дистрибьютору, где был приобретен прибор.
3
CAUTION!
BEFORE INSTALLING, OPERATING OR CARRYING OUT MAINTENANCE ON THE
BATTERY CHARGER, READ THE CONTENTS OF THIS MANUAL CAREFULLY, PAYING
PARTICULAR ATTENTION TO THE SAFETY RULES.
In the event of these instructions not being clear, please contact your supplier.
CONGRATULATIONS ON YOUR NEW PURCHASE!
YOU ARE NOW IN THE POSSESSION OF ONE OF THE SAFEST AND MOST TECHNOLOGI-
CALLY ADVANCED BATTERY CHARGERS ON THE MARKET.
FOLLOW OUR SUGGESTIONS AND YOU WILL BE GUARANTEED SAFE AND PROBLEM-
FREE OPERATION.
- During charging, explosive gases are generated: do not allow sparks or
amestobeproducedinthevicinity.
- Thebatterychargercontainspartsthatmaycauseelectricarcsor
sparks;therefore,ifitisusedinagarageorsimilarenvironment,make
surethepremisesarewell-ventilated.
- Usethebatterychargeronlyandexclusivelyindoorsandmakesurethe
environmentiswell-ventilated.
- Donotexposethebatterychargertorainorsnow.
- Neverchargenon-rechargeablebatteries.
- Neverchargedifferenttypesofbatteriesatthesametime(e.g.lead
– gel).
- Followtheinstructionsofthebatterymanufacturer.
SAFETY RULES AND WARNINGS
INSTALLATION
ASSEMBLING
HANDLE AND WHEELS
- Carefullyremovethebatterychargerfromitspacking;
- Attach the handle using the supplied screws;
- Inserttheaxleandattachthewheelsusingthesuppliedrings(onlyformodelswithtrolley).
FOOT(onlyDigicar900)
- Attach the foot using the supplied screws;
CONNECTING THE CHARGE CABLES
- Toconnectthepositivecabletothedinseplugs,inserttheplugonthecableintothesocketon
thefrontofthebatterychargerandthenturntheplugclockwiseinordertolockit.
LOCATION
Adoptthefollowingguidelinesforpositioningyourbatterychargercorrectly:
- Usethebatterychargeronlyandexclusivelyindoors;
- Thepremisesmustbewell-ventilated;
- Thepremisesmustbedryanddust-free;
- Theairventsshouldbefreeofobstructions;
- Thebatterychargershouldbeplacedonastablesurface.
4
GENERAL INFORMATION ON THE BATTERY CHARGER
Thebatterychargerisanelectricaldevicethatisusedtochargeorrechargebatteriesthatarenor-
mallyusedonmotorvehicles,motorbikes,boatsetc.
Thebatteryisanaccumulatorthatisabletostore,intheformofchemicalenergy,electricalenergy
thatissuppliedwhileitisbeingchargedbyadirectcurrentpowersource.
Thestoredenergyisgivenupasadischargeintheformofdirectcurrentelectricalenergy.This
processofstoringandgivingupenergyisrepeatedforthewholelifeofthebattery.
Beforestartingthechargingprocess,makesurethatthecapacityofthebattery(Ah)tobecharged
isnogreaterthanthatofthebatterychargeryouareabouttouse.
Forbatterychargerswithadjustablechargecurrent,werecommendfollowingtheinstructionsofthe
batterymanufacturer,settingchargingtimeat10hourswithacurrentequalto1/10(10%)ofthebat-
terycapacityinAh.ThistypeofchargingisdenedasSLOW.
Rapidchargingisdenedaschargingdoneathighercurrentlevels,wherethechargingtimeisusually
controlledbyatimer(ifthemodelhasone)inordertopreventoverheatinginthebattery.
To lengthen the life of the battery, it is better to charge slowly in order to prevent overheating.
Thetimetakentochargeabatterymayvary,dependingon:
-environmentalconditions(Cold/Hot)
-batterycondition(Flat/VeryFlat)
-ageofbattery(Old/New)
Never connect or disconnect the battery clamps while the battery charger is working. First
switch off the device.
CONNECTION TO THE SUPPLY
--Beforemakinganyelectricalconnection,makesurethattheavailablepowersupplyvoltagecorre-
spondswiththatindicatedonthedataplateofyourbatterycharger.
-Ifthepowersupplycableofyourbatterychargeriswithoutaplug,followtheinstructionsbelowfor
wiring the plug.
-Wirethepowersupplycabletoastandard(2P+T)plugofsuitablecapacity.
Towireuptheplug,followtheinstructionsbelow:
-connectthebrownwiretotheplugterminalmarkedL1
-connectthebluewiretotheplugterminalmarkedN
-connecttheyellow/greenwiretotheplugterminalmarkedPEormarkedwith
thesymbol()
Inallcases,theconnectionoftheyellow/greenearthwiretothePE()terminalmustbemadeso
thatwhentheplugispulledoutthisisthelastterminaltobedisconnected.
Thesockettowhichthebatterychargerwillbeconnectedmustbettedwithfusesorwithanauto-
maticcircuit-breaker.
If you need to use an extension for the power supply cable, this should have an appropriate
section that is at least equal to that of the power supply cable.

5
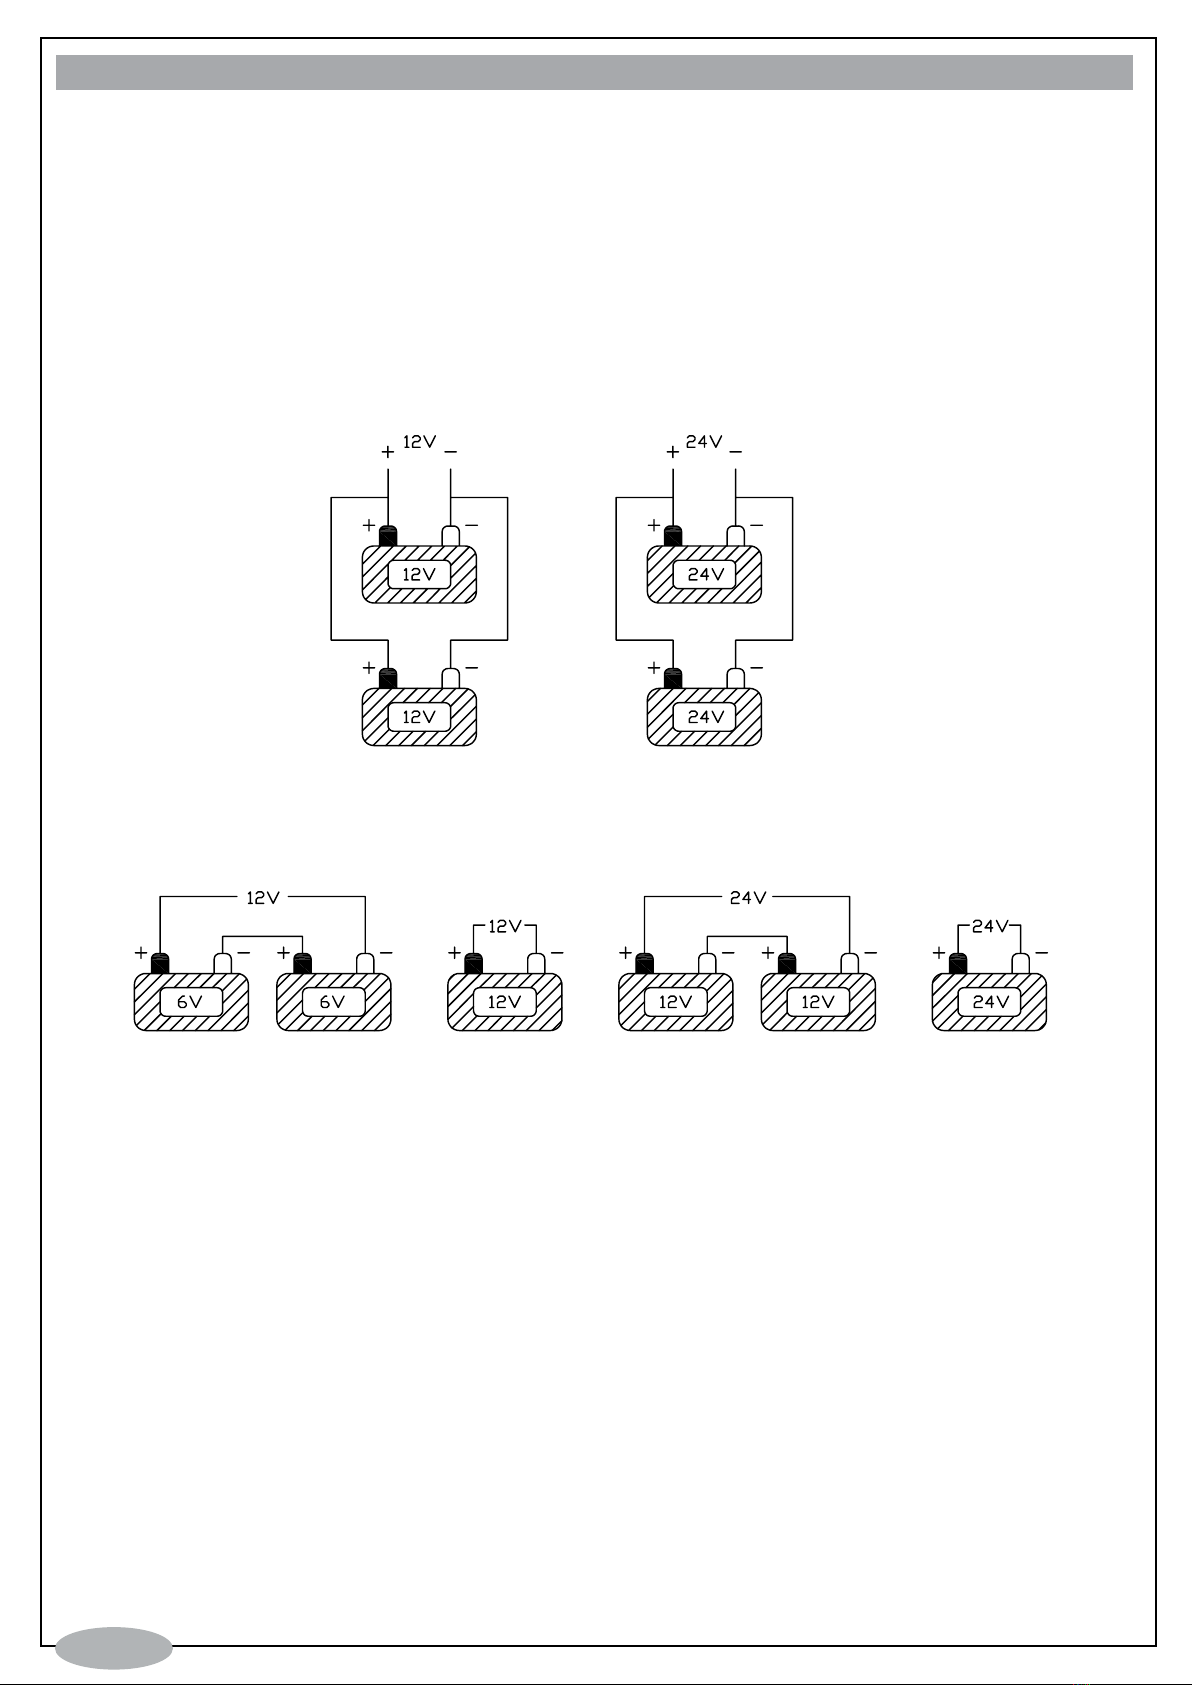
CHARGING MORE THAN ONE BATTERY AT THE SAME TIME
Warning: do not charge batteries with different capacities or different types of batteries at the
same time.
Ifitisnecessarytochargemorethanonebatteryatthesametime,theycanbeconnectedinseries
or in parallel.
Connectioninseriesispreferredbecausethismakesitpossibletomonitorthecurrentcirculatingin
eachbattery,andthiswillbeequaltothatshownontheammeter.
Please,followthebelowdiagram:
6
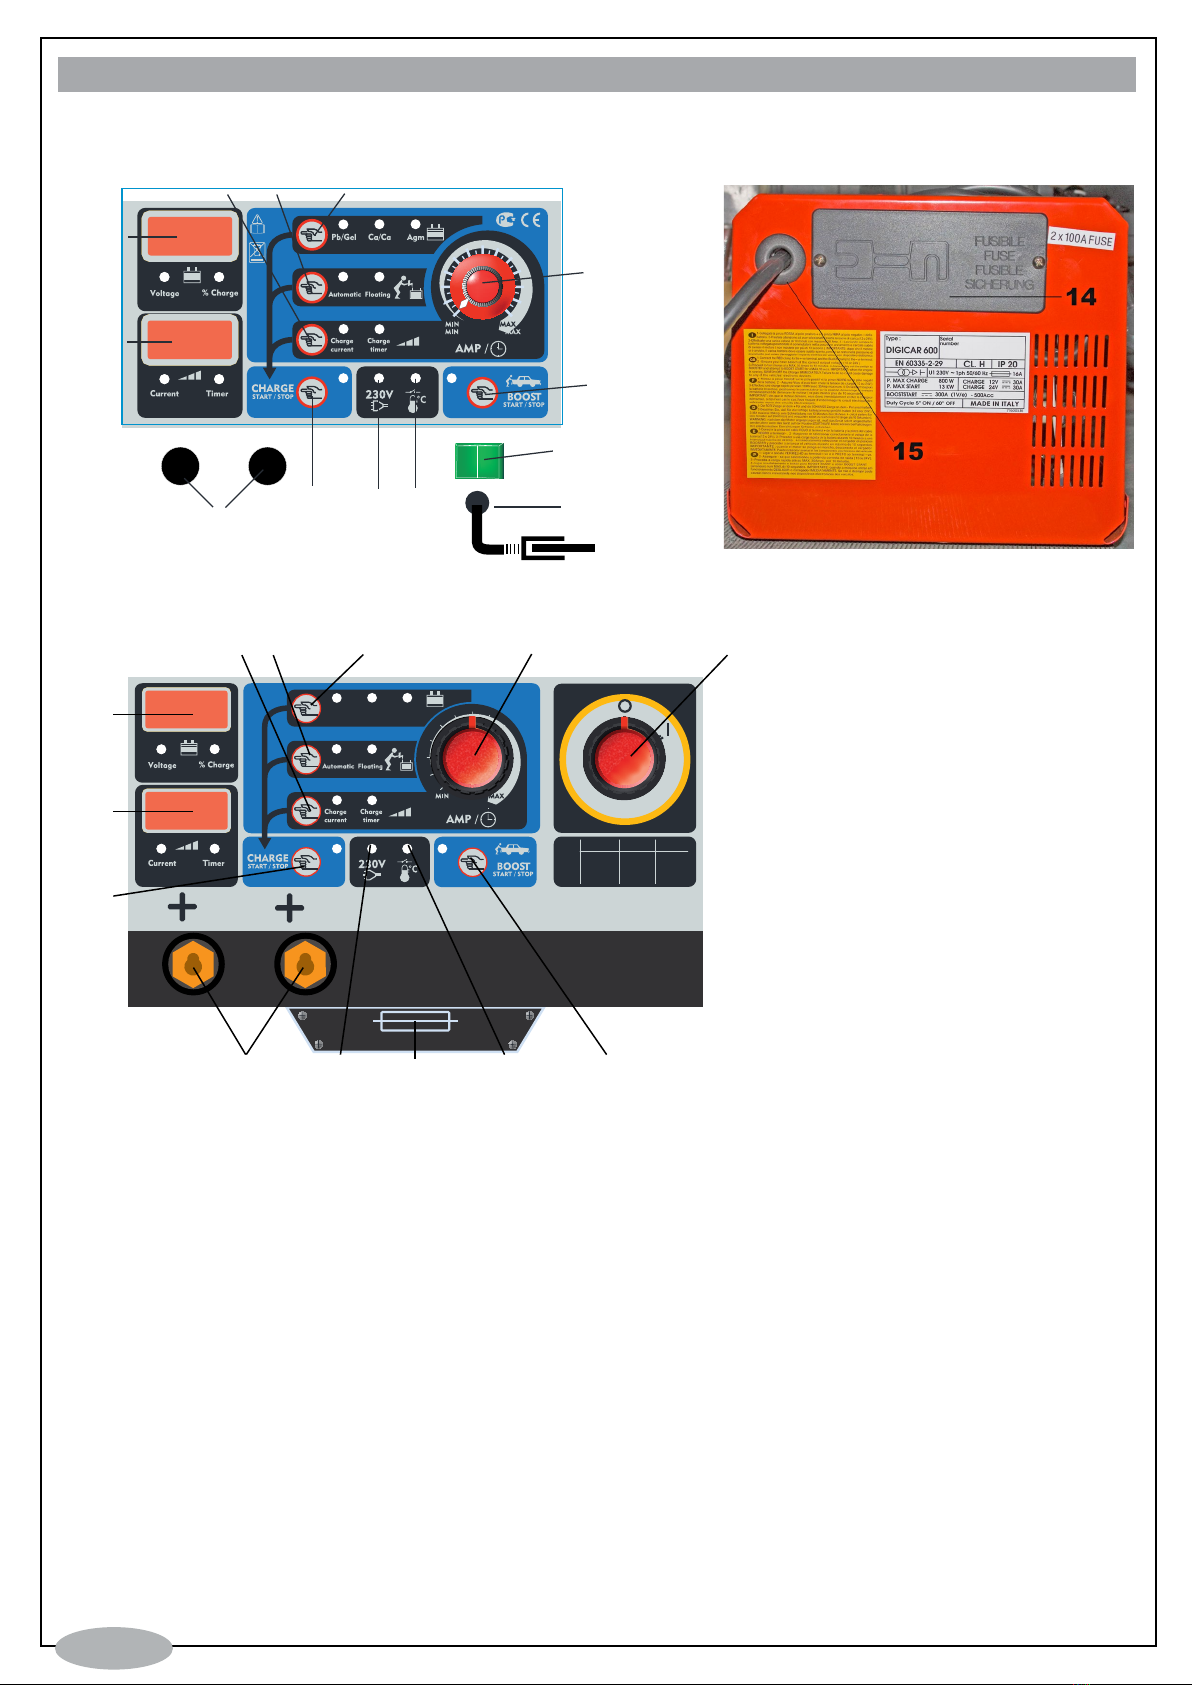
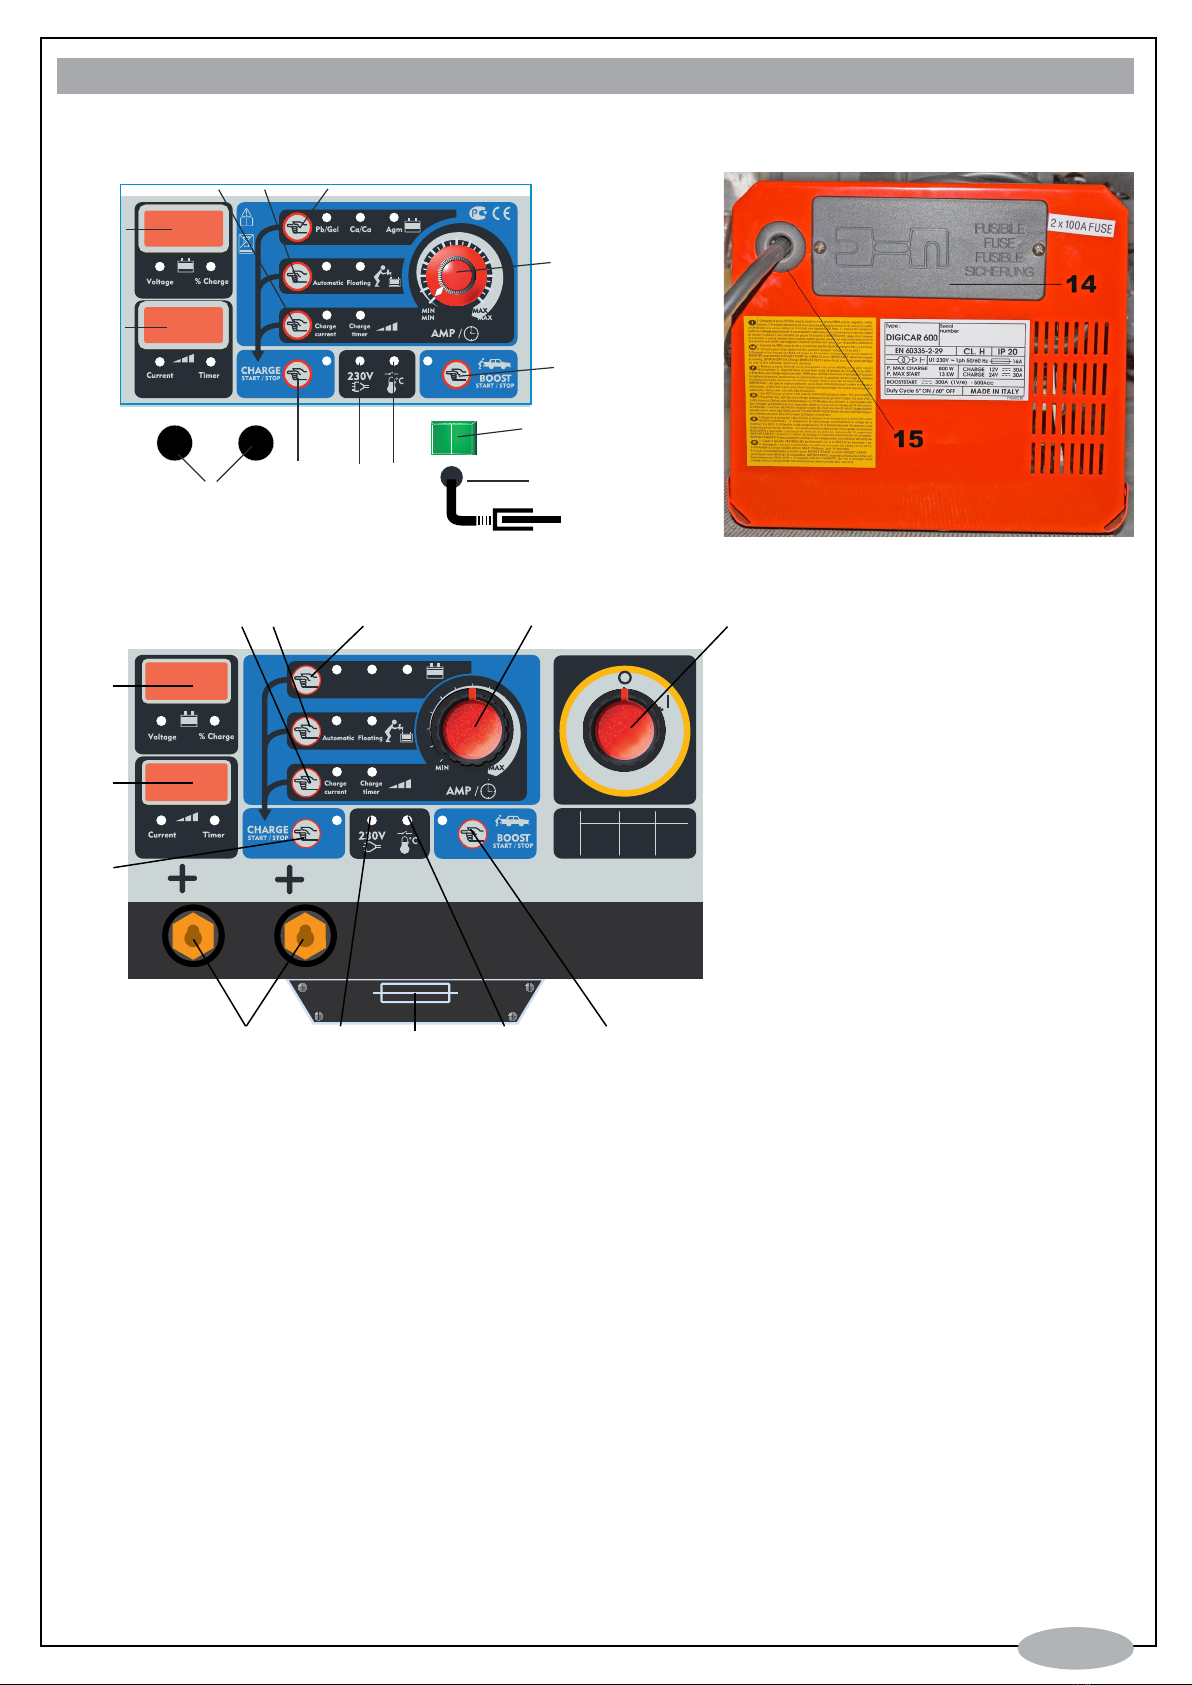
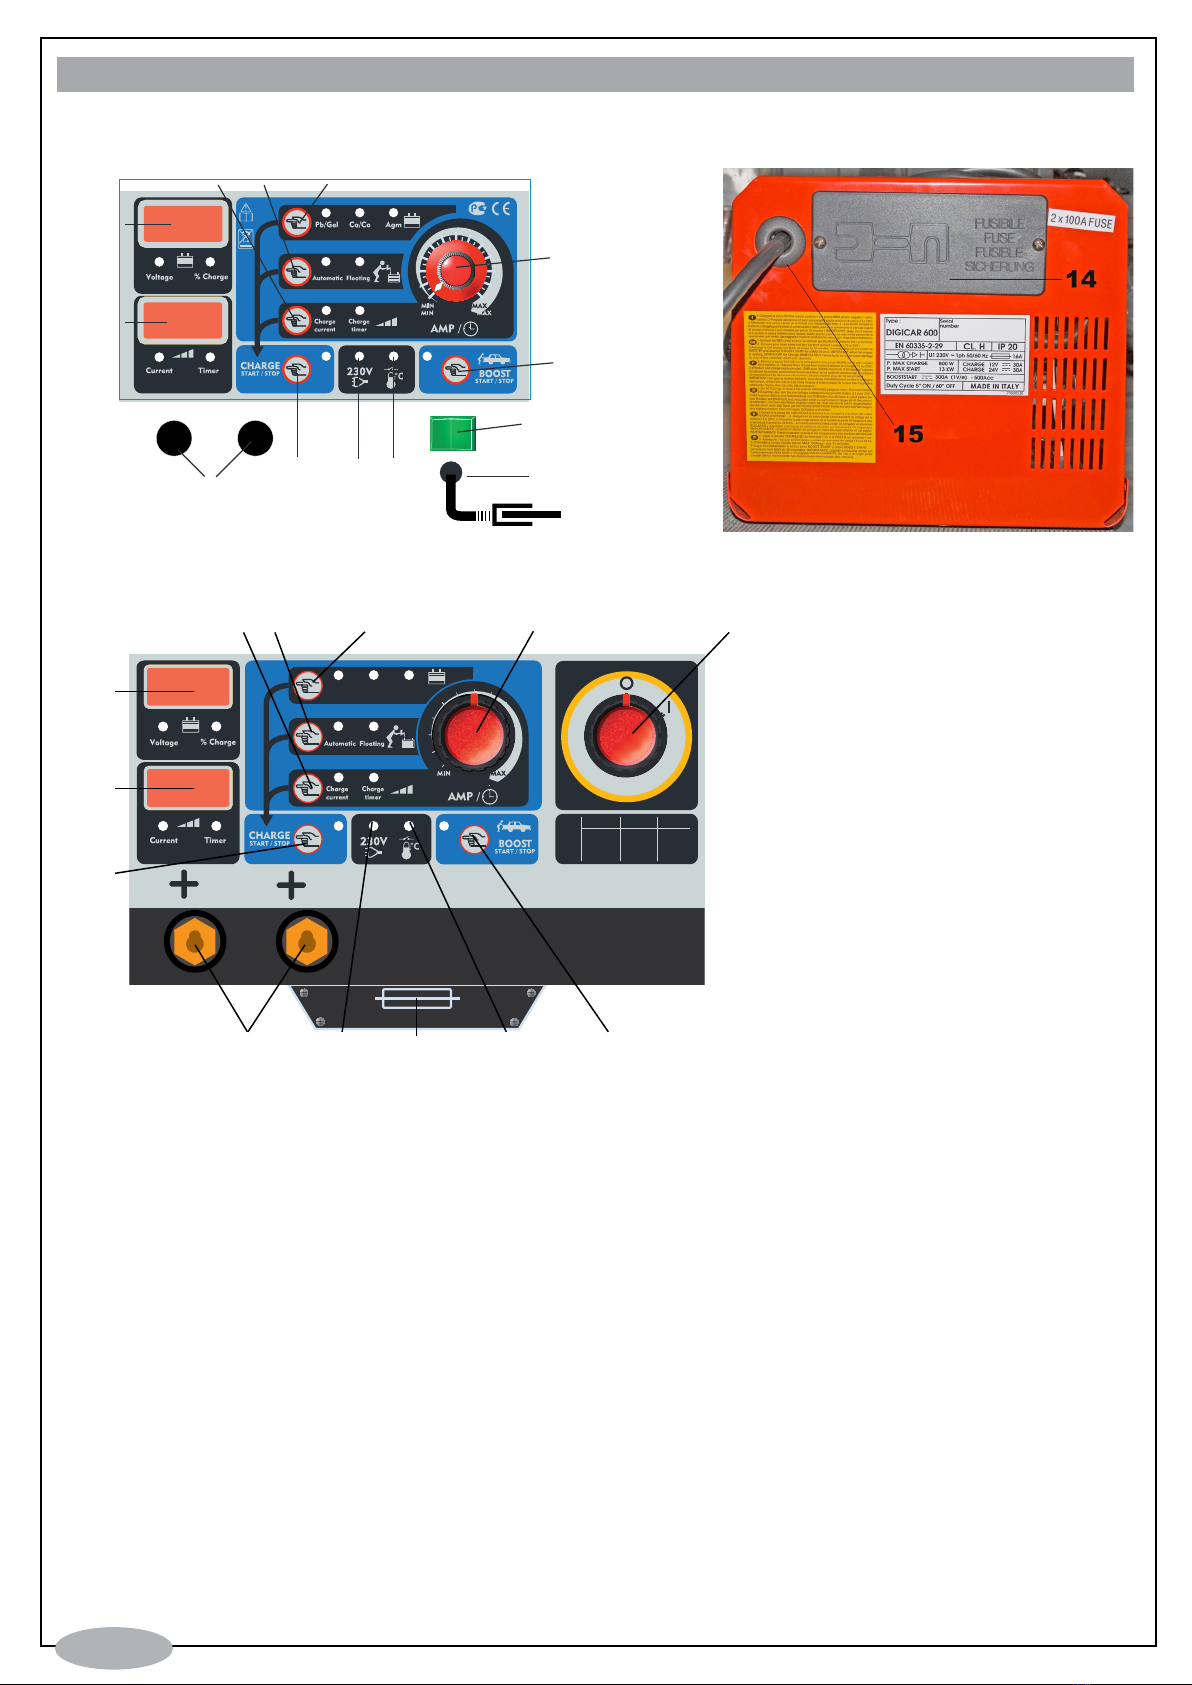
1) Main Switch
2) Green led: it lights ON when the battery charger is powered
3) Yellow light: it lights ON when the overtemperature protection activates
4) Battery type selector:
Pb/Gel, Ca/Ca or AGM
5) Type of charge process selector: Automatic or Floating
6) Charge current / Charge time selector
7) Charge current / charge time adjustment knob
8) Charge start / Charge stop button
9) Boost start / boost stop button
10) Voltage – Charge % display: it views either the battery voltage or the charge percentage.
11) Current – Timer display: it views the charge current and the remaining charge time
12) 12V / 24V positive socket
13) Negative cable (Digicar 900: inside the cables compartment)
14) Protection fuse (Digicar 600:on the rear)
15) Supply cable
FUNCTIONS
ONOFF
12 V +24 V +1
9
7
313
28
12
456
10
11
DIGICAR 600
DIGICAR 900
12V 24V
Pb/Gel Ca/Ca Agm
Pb/Gel Ca/Ca Agm
14,9V14,7V14,4V12V
29,8V29,4V28,8V24V
888
888
FUSE
1
2 3
4
9
56
8
12
11
10
7
14

7
INSTALLATION RECCOMENDATIONS
-Beforeyouprocedecheckthatthebatterycapacity(Ah)isnothigherthanthatofyourbattery
charger.
-Thechargemustbeperformedinawellventilatedarea
-Checkthebatterywhichhastobecharged,makingsurethatthecaseisingoodconditions,with
noleaksandthattheclampsarenotoxidized.
-Removethecapsfromthebatterytoallowthegaseswhichareproducedduringchargingtoeasi-
lycomeout.Ifnecessaryadddistilledwater,untiltheinternalelementsofthebatteryarecovered
(correctvalue=5-10mmabovetheelements)
CAUTION: the electrolyte is a highly corrosive acid!
OPERATIONS AS BATTERY CHARGER
WARNING: The charging process activates only if the battery charger is connected to a
battery and only if the voltage parameters comply with the following minimum voltage
values:
For 12V batteries: more than 7,5V
For 24V batteries: more than 18V
-Connectthebatterychargertothemains.Checkthatthesocketisequippedwithprotection
fusesorcircuitbreakers.
-SwitchONthebatterycharger:greenled(2)willlighton.
Beforestartingthechargeyouhavetosetupthechargingparameters:
1) battery type:throughthebutton4,youcanselectwhichkindofbatteryyouwanttocharge.
ThisbatterychargercanbeusedwithnormalLeadbatteries(sealedorunsealed),GEL,AGMbat-
teriesorCalciumbatteries.Whenselectingthebatterytypebesureofwhichkindofbatteryyouare
charging.Intheeventhatyouarenotsureofthebatterytype,selectCalciumbattery.
2) type of charging process:Selectthroughthebutton5betweenthese2chargemodes:
- AUTOMATIC=thismodewillperformafullcharge(atthesetcurrent)untilthesettimehasrun.
Oncethesettimehaspassed,thechargestopsandthedisplayviewsthewording“END”.Thewor-
ding“END”willdisappearasyoupushabuttonorturntheadjustmentknob:thedisplaywillthen
showthesetchargecurrent.Ifthechargingtimehasnotbeenset,thechargewillcontinuefor9,9
hours(themaximumdefaultvalue).Tostopthechargebeforethesettime,justpushthebutton8
(chargestart/stop).
- FLOATING=thismodewillperformafullcharge(atthesetcurrent)untilthesettimehasrun:then,
thechargecurrentwilldecreasetoalowerxedcurrent.Abuzzerwillsignalthepassagefromfull
chargetooatingcharge.
3) Charge current:toselectthechargecurrentpressbutton6untiltheled“chargecurrent”lights
on:thenthroughtheadjustmentknobsetthedesiredchargecurrent.Thecurrentvaluewillbeshown
inthedisplay11.Usuallyyoushouldsetupavaluethatis10%ofthebatterycapacity.Forexample,
ifyouhavea140Ahbatteryyoushouldsetup14A.Thisbatterychargerallowsyoutosetupanyva-
lueofcurrentfrom1Amptillthemaximumratedamperageofthebatterycharger(30ADigicar600,
50ADigicar900).
4) Charge time:toselectthechargetimepressbutton6untiltheled“chargetimer”lightson.
Thenthroughtheadjustmentknobsetthedesiredtime,whichwillbeshowninthedisplay11(maxi-
mumsettingis9,9hours).
5) Connect the red cabletothe12V/24Vpositivesocket(12)andtothepositiveterminalofthe
battery.Besureyouconnectthecabletotherightpositivesocket.
6) Connect the black cabletotheminusterminalofthebattery.
Ifyouhavemadethecorrectconnections,thedisplay10willviewthebatteryvoltageandthecharge

8
statusofthebattery(expressedin%.99%meansthatthebatteryisfull).
Incaseyouhavenotmadetherightconnectionsthedisplay10willviewthewording“Alb”:please,
doublecheckthebatteryvoltageandconnecttheredcabletotherightpositivesocket.
Thedisplaywillviewthewording“StB”(=standby)anytimethebatterychargerisnotconnectedto
anybattery.
Ifafterconnectingthebattery,thedisplayviews“StB”andchargingisnotactivated(bypressingthe
“CHARGESTART/STOP”),itmeansthatthebatteryisfullydischarged,short-circuitedorinterrup-
ted.Tochargeafullydischargedbatteryitcanbeactivatedthe“ForcedCharge”,followtheinstruc-
tions to the next paragraph.
7) checkifalltheparametersthatyousetupinthebatterychargerareaccordingtowhatyou
plannedandpushthebutton8toSTARTthecharge
8) duringthechargeyoucannotchangeanyofthesettings.Tochangesomesetting,youhaveto
pushbutton8toSTOPthecharge.Afteryouhavechangedtheparameters,youcanstartagainthe
chargingprocessbypushingbutton8.
During the charge:
-thedisplay10willviewtheactualvoltagevalueofthebattery.
-thedisplay11willviewalternatelytherealchargecurrentandtheremainingchargetime.
WARNING:followingthechargeguidelinesbelowthesecurityfunctionsaredisabled,i.e.checkfor
short-circuitedbatteryandcorrectconnection.Payattentiontothepolarityoftheconnectionsandto
thecorrespondencewiththebatteryvoltage.
1) Connectthebatterychargertothemains.Checkthatthesocketisequippedwithprotection
fusesorcircuitbreakers.
2) SwitchONthebatterycharger.
3) Checkforthecorrectvoltagevalueonthebattery.
4) Connecttheblackcabletotheminusterminalofthebatteryandtheredcabletothe12V/24V
positivesocket(12)andtothepositiveterminalofthebattery.
5) Selectthetypeofbattery,thetypeofchargeandthechargecurrentasdescribedinthepre-
vious paragraph.
6) Ensurethatthecablesarewellxedtothebatteryterminalsandholdthebutton8tillthetop
displayviews24.andthebottomdisplay12.
7) Selectthechargevoltagebypressingthebatterytypeselectorbutton(4)for24Vandcharge
currentselectorbutton(6)for12V.
8) Chargewillstart1secondafterthechargevoltageselection.
ATTENTION:chargecanbestoppedatanytimebypressingagainthe“CHARGESTART/STOP”
button(8).
ATTENTION:toactivateagainthesecurityfunctions,turnthechargeroffandonagain.
FORCED CHARGE

9
OPERATIONS AS BOOST STARTER
Thisbatterychargerisequippedwithaboostingsystemthatwillletyoustartyoucarwithoutdama-
gingtheelectroniconboardofyourvehicle.
WARNING: Boost starts MUST be performed when the battery is still mounted on the vehicle.
It is suggested to perform a fast charge at the maximum current for 10/15 minutes before you
try to boost your car.
WARNING: The charging or boosting process activates only if the battery charger is
connected to a battery and only if the voltage parameters comply with the following
minimum voltage values:
For 12V batteries: more than 7,5V
For 24V batteries: more than 18V
Thecorrectproceduretoboostyourcaris:
1)Connecttheblackcabletotheminusterminalofthebattery.
Connecttheredcabletothe12V/24Vpositivesocket(12)andtothepositiveterminalofthebattery.
2)Connectthebatterychargertothemains.Checkthatthesocketisequippedwithprotec-
tionfusesorcircuitbreakers.SwitchONthebatterycharger:greenled(2)willlighton.
3)Beforestartingtheboostingprocedureisadvisabletoperformafastchargewiththemaximum
currentfor10minutes
4)pushbutton9(booststart/stop)tostarttheboostingprocess.Afteryoustartedthisprocess,the
batterychargerwillnotgiveenergytothecaruntilthecarwon’taskforit
5)gointothecar,trytoturnonthecar.Atthispointthebatterychargerwillstarttogiveenergytothe
car,butwithoutovertakingthevoltagesecurityvalue.
Iftheboostisnotperformed,waitafewminutesandtryagain.Ifnecessary,performafast
chargeatthemaximumcurrentfor10/15minutes.
Intheeventthatthebatteryisdamaged(shortcircuitorbrokenelements)theboostingwillnot
beperformedbythebatterycharger,soyoucarwillnotbedamagedbyanimproperboosting.
Iftheovertemperatureprotectionactivates,theyellowled3willlightonandthebatterychar-
gerwillnotworkuntilithassufcientlycooled.
6)Oncethecarisstarted,thebatterychargerwillautomaticallystopgivingcurrent.Pressthebutton
9BoostStop.
7)Disconnectthecablesfromthebatteryandreplacethebatterycaps
8)SwitchOFFthebatterycharger,disconnectitfromthemainsupplyandstoreitinadryplace.

10
ATTENZIONE!
PRIMA DI INSTALLARE, UTILIZZARE O MANUTENZIONARE QUESTO CARICA BATERIE,
LEGGETE ATTENTAMENTE QUESTO MANUALE CON PARTICOLARE ATTENZIONE AL
NORME DI SICUREZZA.
Nel caso le istruzioni non fossero chiare contattate il vostro rivenditore.
CONGRATULAZIONI PER IL VOSTRO ACQUISTO!
ILVOSTROCARICABATTERIEE’UNODEIPRODOTTIPIU’SICURIE
TECNOLOGICAMENTE AVANZATI NEL MERCATO.
SEGUITE LE NOSTRE INDICAZIONI E POTRETE GODERE DEL VOSTRO
CARICA BATTERIE IN MODO SICURO E SENZA PROBLEMI.
- Nellafasedicaricasigeneranodeigasesplosivi,evitatelaformazionedi
scintilleeammenellevicinanze.
- Ilcaricabatteriecontienepartichepossonoprovocarearchielettricio
scintille;pertantoseusatoinunaautorimessaoinunambientesimileporreil
caricabatterieinunlocaleareato.
- Usateilcaricabatterieesclusivamenteall’internoeassicurateviche
l’ambientesiaventilato.
- Nonesponeteilcaricabatterieallapioggiaoallaneve.
- Noncaricaremaibatterienonricaricabili.
- Noncaricatemaiinsiemebatterieditipodiverso(es.piombo–gel).
- Rispettateleindicazionidelcostruttoredellabatteria.
NORME DI SICUREZZA
INSTALLAZIONE
ASSEMBLAGGIO
MANICO E RUOTE
- Rimuoveteconattenzioneilcaricabatteriedalsuoimballo;
- Fissateilmanicoconlevitiindotazione;
- Inseritel’asseessateleruoteconglianelliindotazione(soloperimodellicarrellati).
PIEDE(soloDigicar900)
- Fisateilpiedeconlevitiindotazione.
COLLEGAMENTO DEI CAVI CARICA
- Percollegareilcavopositivoagliattacchiabaionettabisognainserirelospinottodelcavo
all’internodelattaccopostonelfrontaledelcaricabatteriaepoiruotaredi180°lospinottoinmododa
bloccarlo.
COLLOCAZIONE
Seguireleseguentilineeguidaperlacollocazionecorrettadelvostrocaricabatterie:
- Usareilcaricabatterieesclusivamenteall’interno;
- L’ambientedeveesserebenareato;
- Inluoghiprotettidapolvereeumidità;
- Iforidiareazionenondevonoessereostruiti;
- Ilcaricabatteriedeveessereposizionatosuunasuperciestabile,
11
INFORMAZIONI GENERALI SUL CARICA BATTERIE
Ilcaricabatterieèun’apparecchiaturaelettricausatoperlacaricaelaricaricadellebatteriecomu-
nementeusatenelcampoautomobilistico,motociclistico,navaleecc.
Labatteriaèunaccumulatoreingradodiimmagazzinareenergiaelettricafornitadurantelasuacarica
daungeneratoredicorrentecontinua,sottoformadienergiachimica.
Taleenergiavienerestituitanellascaricasottoformadienergiaelettricaacorrentecontinua.Questo
processodiimmagazzinamentoeresadienergiasiripetepertuttalavitadellabatteria.
Primadiprocedereallacarica,vericatechelacapacitàdellabatteria(Ah)chesiintendecaricare
nonsiasuperioreaquelladelcaricabatteriechestateusando.
Neicaricabatterieconcorrentedicaricaregolabileèconsigliabileseguireleindicazionideicostruttori
dibatteriechestabilisconounaduratadellacaricadi10oreconunacorrenteparia1/10(0,1)della
capacitàinAhdellabatteria.
TaletipodicaricasidenisceLENTA.
SideniscecaricaRapidaquellacaricachevieneeffettuataconcorrentipiùelevateedove,per
evitareeccessivisurriscaldamentidellabatteriailtempodicaricaègeneralmentecontrollatodaun
temporizzatore(neimodellicheloprevedono).
E’ preferibile per una durata superiore della vita della batteria , scegliere cariche lente che
evitano il surriscaldamento.
Iltempodicaricadiunabatteriapuòvariareinfunzionedi:
-condizioniambientali(Freddo/Caldo)
-statodellabatteria(Scarica/Moltoscarica)
-etàdellabatteria(Vecchia/Nuova)
Non collegare né scollegare mai le pinze della batteria con il carica batterie funzionante. Spe-
gnere prima l’apparecchio.
COLLEGAMENTO ALLA RETE DEL CARICA BATTERIE MONOFASE
-Primadieffettuarequalsiasicollegamentoelettrico,vericatechelatensionedialimentazioneela
frequenzadisponibilesiacorrispondenteconquelleindicateneidatiditargadalvostrocaricabatte-
rie.
-Nelcasoincuiilcavodialimentazionedelvostrocaricabatteriesiasprovvistodispinaseguitele
istruzioniquidiseguitoriportatepercollegarelaspina.
-Collegateilcavodialimentazioneadunaspinanormalizzata(2P+T)diportataadeguata.
Seguiteleseguentiistruzionipercollegareilcavodialimentazioneallaspina:
-illomarronevacollegatoalmorsettocontrassegnatodallaletteraL1dellaspina
-illobluvacollegatoalmorsettocontrassegnatodallaletteraNdellaspina
-illogiallo/verdevacollegatoalmorsettocontrassegnatodallaletteraPEodal
simbolo()dellaspina
Intuttiicasiilcollegamentodelloditerragiallo/verdealmorsettoPE()deveesserefattoinmodo
talecheincasodistrappodellaspinasial’ultimoastaccarsi.
Lapresaacuiverràcollegatoilcaricabatteriadeveessereprovvistadifusibilidiprotezioneodiinter-
ruttoreautomatico.
Nelcasoincuisidebbausareunaprolungaperilcavodialimentazione,questadeveavereunase-
zioneadeguataecomunquenoninferioreaquelladelcavodialimentazione.
12
CARICA CONTEMPORANEA DI PIU’ BATTERIE
Attenzione: non caricare batterie di capacità e tipologia diversa fra loro.
Dovendocaricarepiùbatteriecontemporaneamentesipuòricorrereadeicollegamentiin“serie”o
in“parallelo”.
Traiduesistemièconsigliabileilcollegamentoin“serie”inquantoinquestomodosipuòcontrollare
lacorrentecircolanteinciascunabatteriachesaràugualeaquellaindicatadall’amperometro.
Seguiteloschemaquìsotto:
13
1) Interruttore principale
2) Led verde acceso indica che il carica batterie è acceso
3) Led giallo acceso in sovratemperatura
4) Tasto per la selezione del tipo di batteria da caricare
Piombo/Gel - Ca/Ca - Agm
5) Tasto di selezione carica Automatic o Floating
6) Tasto di selezione della corrente di carica e del tempo di durata della carica
7) Manopola impostazione corrente di carica e tempo di carica
8) Tasto avvio e arresto processo di carica Charge Start/Stop
9) Tasto avvio e arresto funzione di avviamento Boost Start/Stop
10) Display Voltage - % Charge - Visualizza la tensione della batteria e la percentuale
di carica della stessa.
11) Display Current - Timer - Visualizza la corrente di carica e il tempo di carica residuo.
12) Presa positiva a 12V e a 24V
13) Cavo negativo
14) Fusibile di protezione ( si trova nel retro del carica batterie)
15) Cavo di alimentazione
DISPOSITIVI DEL CARICA BATTERIE
ONOFF
12 V +24 V +1
9
7
313
28
12
456
10
11
DIGICAR 600
DIGICAR 900
12V 24V
Pb/Gel Ca/Ca Agm
Pb/Gel Ca/Ca Agm
14,9V14,7V14,4V12V
29,8V29,4V28,8V24V
888
888
FUSE
1
2 3
4
9
56
8
12
11
10
7
14

14
RACCOMANDAZIONI PER L’INSTALLAZIONE
- Primadiprocedereallacarica,vericatechelacapacitàdellabatteria(Ah)chesiintendeca-
ricarenonsiasuperioreaquelladelcaricabatteriechestateusando.
- controllatelabatteriadaricaricarevericandochelacarcassasiainbuonecondizioni,senzaperdite.
- Puliteimorsettipositivoenegativodapossibiliincrostazionidiossidoinmododaassicurare
unbuoncontattodellepinze.
- Eseguitelacaricainambientiareatiperevitarel’accumulodigas.
- Rimuoveteitappidallabatteria(sepresenti)perpermetterelafuoriuscitadeigaschesipro-
ducono durante la carica.
- Controllatecheillivellodell’elettrolitaricopraglielementidellabatteria,senecessarioaggiun-
geteacquadistillatanoacoprireglielementiinternidellabatteria(valorecorretto5-10mmsopra
glielementi).
In questa fase fate particolare attenzione perché l’elettrolita è un acido altamente corrosivo.
FUNZIONAMENTO COME CARICA BATTERIE
ATTENZIONE: il processo di carica si attiva solo se il carica batterie è connesso ad una
batteria e se i parametri di tensione rientrano entro un valore minimo di tensione.
Batterie a 12V maggiore di 7,5V
Batterie a 24V maggiore di 18V
- Collegareilcavodialimentazioneadunapresa.
Lapresaacuiverràcollegatoilcaricabatteriadeveessereprovvistadifusibilidiprotezioneo
diinterruttoreautomatico.
- Posizionarel’interruttoreprincipaleinposizioneON/I
- Illeddicoloreverdepostonelfrontaledelcaricabatteriesaràacceso.
- Premereiltastoperselezionareiltipodibatteriachesiintendecaricare,illedsiac-
cenderàincorrispondenzadellabatteriaselezionata,Piombo/Gel - Ca/Ca - Agm
- PremereiltastoperimpostareiltipodicaricadesiderataAutomaticoFloating,illedsi
accenderàincorrispondenzadeltipodiselezioneeffettuata.
CaricaAutomatic=caricaautomaticacontimer;alloscaderedeltempodicaricaimpostatoil
processodicaricasiinterrompe,neldisplaychevisualizzalacorrentedicaricaverràvisualiz-
zatolaseguentescritta“End”.
Lascritta“Endvienesostituitadalvaloredellacorrenteimpostatanonappenasipremeun
pulsanteosiruotailpotenziometrodiregolazione.
CaricaFloating=caricaautomaticaedimantenimento;alloscaderedeltempodicaricaim-
postatoilprocessodicaricanonsiinterrompemadiventacaricadimantenimento.Unsegna-
lesonorodelladuratadi5secondiindicalanedellacaricaautomaticaedilpassaggioalla
caricadimantenimento.
Nellafasedicaricaautomaticalacorrentecorrispondeaquellaimpostata,nellafasediman-
tenimentolacorrentesiriducea1,5A.
Nellafasedimantenimentoilcaricabatteriecontrolleràcostantementelatensioneaicapi
dellabatteria,erogandoointerrompendoautomaticamente,quandoènecessariolacorrente
dicaricaversolabatteria.
- Aquestopuntobisognaimpostarelacorrentedicarica.Perimpostarelacorrentedi
caricabisognapremereilpulsante(6),illedChargecurrentedilledcurrentpostosottoil
display(10)dovrannoessereaccesi.Ildisplayvisualizzeralacorrentedicaricaimpostata.Il
valoredellacorrentedicaricavieneimpostataruotandolamanopolapostanelfrontaledel

15
caricabatterie.Lacorrentemaxsaràdi30AperilDigicar600edi50AperilDigicar900.
Neicaricabatterieconcorrentedicaricaregolabileèconsigliabileseguireleindicazionidei
costruttoridibatteriechestabilisconounaduratadellacaricadi10oreconunacorrentepari
a1/10(0,1)dellacapacitàinAhdellabatteria.Es.Batteriada40Ah,Correntedicaricaconsi-
gliata40/10=4APerunmininodi10ore
- Perimpostareiltempodicaricabisognapremereilpulsante(6),iLledChargetimered
illedTimerpostosottoildisplay(10)dovrannoessereaccesi.Ildisplayvisualizzeràiltempo
dicaricaimpostato.Ilvaloredeltempodicaricavienevariatoruotandolamanopolaposta
nelfrontaledelcaricabatterie.Ilvaloremassimovisualizzatodaldisplaysarà9.9acuicorri-
spondono9.9oredicarica.
- Selezionareilvalorecorrettodellatensionedicarica12V–24Vinserendoilcavo
positivonellapresacorrispondentenelpannellofrontaledelcaricabatteria.
- Collegatelapinzadicaricadicolorerossoalmorsettopositivo(+)dellabatteria.
- Collegatelapinzadicaricadicoloreneroaltelaiodelveicolo,lontanodallabatteria
edalcondottodelcarburante.Nelcasolabatterianonsiainstallatanelveicolocollegatela
pinzadicaricadicoloreneroalmorsettonegativo(-)dellabatteria.
- Selabatteriaèconnessaallapresacorretta(batteria12Vconnessaallapresada
12Vobatteriaa24Vconnessaallapresada24V)ildisplayvisualizzalatensionedellabatte-
riaelostatodicaricadellastessa,Lostatodicaricadellabatteriavieneespressoinpercen-
tuale(%)dove99%corrispondeallabatteriacarica.
Nelcasoincuilabatteriasiastataconnessaadunapresasbagliata(batteriaa12Vconnes-
saallapresaa24Veviceversa)ildisplayvisualizzeràlaseguentescritta“Alb”checorrispon-
deadAllarmebatteriaedilcaricabatterieemetteràunallarmesonoro.
Neldisplaypotràcomparireanchelaseguentescritta“StB”checorrispondeaStandby,si
leggeogniqualvoltalabatterianonècollegataalcaricabatterie.Sedopoavercollegatola
batteria,ildisplayriportalascritta“STB”elafasedicaricanonsiattiva(anchepremendoil
tasto“CHARGESTART/STOP”),signicachelabatteriaètotalmentescarica,incortocircuito
ointerrotta.Perpotercaricareunabatteriatotalmentescaricaèpossibileattivarelafunzione
“ForzaturaCarica”seguendoleindicazionialparagrafosuccessivo.
- Aquestopuntodopoaverimpostatotuttiiparametridesideratipossiamoavviareilpro-
cessodicaricapremendoilpulsanteChargeStart.
Iparametriimpostatinonpossonoesseremodicatiinfasedicarica,permodicarlibisogna
arrestareilprocessodicaricapremendoilpulsanteChargeStop,unavoltaeseguitelevaria-
zionidesiderateèsufcientepremereiltastoChargeStartperriavviareilprocessodicarica
coninuoviparametriimpostati.
ATTENZIONE!:seguendoleseguentiindicazionidicaricalefunzionidisicurezzavengono
disabilitate,vericabatteriaincortocircuitoecorrettocollegamento.Prestatemoltaattenzione
allapolaritàdeicollegamentieallacorrispondenzaconlatensionedellabatteria.
- Collegateilcavodialimentazioneadunapresa.
Lapresaacuiverràcollegatoilcaricabatteriadeveessereprovvistadifusibilidiprotezioneo
diinterruttoreautomatico.
- Posizionatel’interruttoreprincipaleinposizioneON/I
- Vericateilvaloredellatensioneriportatosullabatteria.
- Collegarelapinzadicoloreneroalmorsettonegativodellabatteriaelapinzadicolore
rossoalmorsettopositivodellabatteria.
ISTRUZIONI PER LA CARICA FORZATA

16
ISTRUZIONI GENERALI PER L’USO DEL CARICA BATTERIE /AVVIATORE
- Selezionateiltipodibatteria,iltipodicaricaelacorrentedicaricacomeindicatoal
paragrafo precedente.
- Assicuratevicheicavisianobenssatiaipolidellabatteriaepremeteiltasto“CHAR-
GESTART/STOP”tenendolopremutonoachecomparelascritta24.suldisplaysuperiore
e12Vsuldisplayinferiore.
- Selezionatelatensionedicaricapremendoiltastodiselezionebatteria(4)peri24Ve
iltastodiselezionedellacorrentedicarica(6)peri12V.
- Lafasedicaricainizieràdopo1secondodallaselezionedellabatteria.
ATTENZIONE:Lafasedicaricapuòessereinterrottainqualsiasimomentoripremendoil
tasto“CHARGESTART/STOP”.
ATTENZIONE:perripristinarelefunzionidisicurezzaspegnereeriaccendereilcaricabatte-
riamediantel’interruttoreprincipale.
L’avviamentodiunveicolopermezzodiunavviatoresirendenecessarionelcasoincuila
batterianonabbiasufcienteenergiaperfargirareilmotorediavviamento.
Gli avviamenti devono essere fatti sempre con batteria collegata.
Effettuate una carica veloce di almeno 10-15 minuti con una corrente adeguata alla bat-
teria installata nel vostro veicolo prima di procedere all’avviamento con un avviatore.
Questo limiterà la corrente di avviamento.
ATTENZIONE: il processo di carica o avviamento si attiva solo se il carica batterie è
connesso ad una batteria e se i parametri di tensione rientrano entro un valore minimo
di tensione.
Batterie a 12V maggiore di 7,5V
Batterie a 24V maggiore di 18V
- Collegarelapinzadicoloreneroalmorsettonegativodellabatteriaelapinzadicolore
rossoalmorsettopositivodellabatteriaeallapresapositivaa12Vo24V.
- Collegareilcavodialimentazioneadunapresa.
Lapresaacuiverràcollegatoilcaricabatterie/avviatoredeveessereprovvistadifusibilidi
protezioneodiinterruttoreautomatico.
- Posizionarel’interruttoreprincipaleinposizioneON/I.Illeddicoloreverdepostonel
frontaledelcaricabatteriesaràacceso.
- PremereilpulsanteBoostStart/Stop,l’accensionedelledindicheràl’attivazionedella
funzioneavviamento.
- Salitenelveicoloegiratelachiave,solonelmomentoincuigiratelachiaveilvostro
avviatoreforniràenergianecessariaperl’avviamento.
- Sel’avviamentononavviene,noninsistete,maattendetequalcheminutoprimadi
riprovare.Eventualmenteripetetelacaricaveloce,questolimiteràlacorrentediavviamento.
- Dopovaritentatividiavviamentopuòintervenireiltermostatointernodiprotezionedell’ap-
parecchio,ilsuointerventoèsegnalatodall’accensionedelledgiallo.Quandocitroviamoin
questacondizione,ilcaricabatterienonfunziona,laspiasispegneràsoloquandolamacchinasi
saràsufcientementeraffreddataeautomaticamenteilcaricabatterieriprenderàafunzionare.
- Dopocheilmotoreèavviato,scendeteespegneteilcaricabatterie/avviatorepremen-
do il tasto Boost Stop.
- Scollegateprimalapinzadicoloreneroepoilapinzadicolorerosso.
- Scollegateilcaricabatterie/avviatoredallareteelettricaeponeteloinunluogoasciutto.
17
WARNUNG!
VOR DER INSTALLATION, INBETRIEBNAHME ODER WARTUNG DES
BATTERIELADEGERÄTS SOLLTEN SIE DIE ANWEISUNGEN DIESER
GEBRAUCHSANWEISUNG SORGFÄLTIG LESEN UND BESONDERS DIE
SICHERHEITSRICHTLINIEN BEACHTEN.
Sollten Ihnen Teile dieser Gebrauchsanweisung unklar sein, wenden Sie sich bitte
an Ihren Händler.
HERZLICHEN GLÜCKWUNSCH ZU IHREM ERWERB! SIE SIND NUN IM BESITZ EINES
DER SICHERSTEN UND TECHNOLOGISCH FORTGESCHRITTENSTEN BATTERIELADE-
GERÄTE AUF DEM MARKT.
FOLGEN SIE DEN ANWEISUNGEN, UM GARANTIERT EINEN SICHEREN UND
PROBLEMLOSEN BETRIEB ZU ERHALTEN.
- WährenddesAuadenswerdenexplosiveGaseerzeugt:HaltenSieFun-
kenoderFlammenaußerhalbderReichweite.
- DasBatterieladegerätenthältTeile,dieelektrischeLichtbögenoderFun-
kenerzeugenkönnen;sorgenSiedaherbeimGebrauchineinerGarageoder
einerähnlichenUmgebungdafür,dassdieRäumegutgelüftetwerden.
- VerwendenSiedasBatterieladegerätausschließlichinInnenräumenund
sorgenSiedafür,dassdieRäumegutgelüftetwerden.
- SetzenSiedasBatterieladegerätniemalsRegenoderSchneeaus.
- LadenSieniemalsnichtwiederauadbareBatterienauf.
- LadenSieniemalsverschiedeneArtenvonBatterienzurgleichenZeit
auf(z.B.Blei-Gel).
- Befolgen Sie stets die Anweisungen des Herstellers.
SICHERHEITSANWEISUNGEN UND WARNUNGEN
INSTALLATION
MONTAGE
GRIFF UND RÄDER
- EntnehmenSiedasBatterieladegerätvorsichtigausseinerVerpackung.
- MontierenSiedenGriffmitdenbeigefügtenSchrauben.
- SetzenSiedieAchseeinundmontierenSiedieRädermitdenbeigefügtenRingen(nurfürdie
ModellemitTrolley).
FUSS(nurzuDigicar900)
- MontierenSiedenFußmitdenbeigefügtenSchrauben.
AnschließendesPlusLadekabels
- UmdasPlus-LadekabelmitdemGerätzuverbinden,steckenSiedenSteckerdesLadekabels
indievonIhnengewünschteLadebuchse(12bzw.24V)anderVorderseitedesLadegerätesund
drehenSiedenSteckerimUhrzeigersinnbisereinrastet.
EINSATZORT
BeachtenSiedenfolgendenAnweisungenzurrichtigenAufstellungIhresBatterieladegeräts:
- VerwendenSiedasLadegerätausschließlichinInnenräumen.
- DieRäumemüssengutgelüftetsein.
- DieRäumemüssentrockenundstaubfreisein.
- DieBelüftungsolltenichtbehindertsein.
- DasBatterieladegerätmussaufeinenstabilenUntergrundgestelltwerden.

18
- BevorSiedasGerätandasStromnetzanschließen,solltenSieüberprüfen,dassdiezur
VerfügungstehendeVoltzahlmitderVoltzahlaufdemAngabenschilddesLadegerätsübereinstimmt.
- SolltedasNetzkabelIhresBatterieladegerätsüberkeinenSteckerverfügen,folgenSieden
AnweisungenweiteruntenzurVerbindungmiteinemStecker.
- VerbindenSiedasNetzkabelmiteinemStandardstecker(2P+T)mitausreichenderKapazität.
UmdenSteckermitdemKabelzuverbinden,folgenSiedenfolgendenAnweisungen:
- VerbindenSiedasbrauneKabelmitdemalsL1markiertenKabelschuh
- VerbindenSiedasblaueKabelmitdemalsNmarkiertenKabelschuh
- VerbindenSiedasgelb-grüneKabelmitdemalsPEoderdemSymbol()markiertenKabel-
schuh.DieVerbindungdesgelb-grünenErdungskabelsmitdemPE()Kabelschuhmussaufjeden
Fallhergestelltwerden,sodassbeimHerausziehendesSteckersdieseVerbindungalsletztege-
trenntwird.DieSteckdose,mitderdasBatterieladegerätverbundenwird,mussübereineSicherung
odereinenSicherungsautomatverfügen.
SolltenSieeinVerlängerungskabelbenötigen,sosolltediesesübereinenangemessenenStecker
verfügen,derdemdesNetzkabelsgleicht.
ALLGEMEINE INFORMATIONEN ZUM BATTERIELADEGERÄT
DasBatterieladegerätisteinelektrischesGerät,welcheszumAuadenvonBatterieneingesetztwird,
dienormalerweiseinFahrzeugen,Motorrädern,Bootenetc.verwendetwerden.
DieBatterieisteinAkkumulator,welcherinderLageist,elektrischeEnergieinFormvonchemischer
Energiezuspeichern,welchebeimAuadenvoneinerdirektenStromquellezugeführtwird.Diegespei-
cherteEnergiewirdinFormvondirektemelektrischemStromentladen.DieserProzessdesSpeicherns
undEntladensvonEnergiewirdwährenddesgesamtenLebenszyklusderBatteriefortgesetzt.
VordemLadeprozesssolltenSiesicherstellen,dassdieKapazitätderBatterie(Ah),dieaufgeladen
werdensoll,nichtgrößeralsdieKapazitätdesverwendetenBatterieladegerätist.
BeiBatterieladegerätenmitanpassbarerLadestromstärkeempfehlenwir,denAnweisungendesBatte-
rieherstellerszufolgen,dieLadezeitauf10StundenfestzusetzenmiteinerStromstärkevon1/10(10%)
derBatteriekapazitätinAh.DieseLadeartistalsSLOWdeniert.
SchnellesLadengeschiehtmithöherenStromstärken,beidenendieLadezeitennormalerweiseüber
einenTimerkontrolliertwerden(soweitdasModelldarüberverfügt),umeinÜberhitzenderBatterie
auszuschließen.
UmdasLebenIhrerBatteriezuverlängern,empehltessich,dieBatterielangsamaufzuladen,umein
Überhitzenzuvermeiden.
DieLadezeitenfüreineBatteriesindunterschiedlichundkönnenvonfolgendemabhängen:
-Umgebungstemperaturen(kalt/warm)
-Batterieart(ach/sehrach)
-AlterderBatterie(alt/neu)
Schließen Sie niemals eine Batterie an oder entfernen Sie sie, während das Batterieladegerät in
Betrieb ist. Schalten Sie zuerst das Ladegerät aus.
NETZVERBINDUNG

19
DAS AUFLADEN VON MEHREREN BATTERIEN GLEICHZEITIG
Warnung: Laden Sie keine Batterien mit unterschiedlichen Kapazitäten oder unterschiedliche
Arten von Batterien zur selben Zeit auf.
SolltemehralseineBatteriegeladenwerdenmüssen,sokönnendieseparalleloderinSeriegesteckt
werden.DasVerbindeninSerienschaltungistzuempfehlen,dadabeidieießendeStromstärkeinjeder
BatterieüberwachtwerdenkannundderaufdemStrommesserangezeigtenStromstärkeentspricht.
BittebeachtenSiedasfolgendeDiagramm:
20
1) Hauptschalter
2) Grüne LED: Leuchtet auf, wenn das Ladegerät mit Energie versorgt wird
3) Gelbes Licht: Schaltet sich an, wenn sich der Überhitzungsschutz aktiviert
4) Wahl der Batterieart:
Blei/GEL, Kalzium/Kalzium, AGM
5) Wahl des Ladeprozesses: Automatisch oder schwebend (oating)
6) Wahl Ladestrom/ Ladezeit
7) Drehknopf zur Anpassung von Ladestrom/ Ladezeit
8) Taste Ladebeginn/ Ladestopp
9) Taste Boost Start/ Boost Stopp
10) Spannung - Ladezustand % Display: Zeigt entweder die Batteriespannung oder den
Ladezustand an
11) Strom - Timer Display: zeigt den Ladestrom und die verbleibende Ladezeit an
12) 12V / 24V positiver Stecker
13) negatives Kabel
14) Sicherung (Digicar 600: auf der Hinterseite des Batterieladegeräts)
15) Netzkabel
FUNKTIONEN
ONOFF
12 V +24 V +1
9
7
313
28
12
456
10
11
DIGICAR 600
DIGICAR 900
12V 24V
Pb/Gel Ca/Ca Agm
Pb/Gel Ca/Ca Agm
14,9V14,7V14,4V12V
29,8V29,4V28,8V24V
888
888
FUSE
1
2 3
4
9
56
8
12
11
10
7
14
This manual suits for next models
1
Table of contents
Languages:
Other Helvi Batteries Charger manuals


Popular Batteries Charger manuals by other brands


Parkside
Parkside PDSLG 12 A1 Original instructions

Sony
Sony BC-TRX operating instructions

VOLTCRAFT
VOLTCRAFT V-CHARGE 600 DUO operating instructions

Motorola solutions
Motorola solutions NNTN6899 user guide

Multiplex
Multiplex MULTIcharger LN-3008 EQU instructions

Schumacher
Schumacher SpeedCharge 2500A owner's manual