Helvi DIGICAR 540E User manual

MANUALE D’ISTRUZIONEMANUALE D’ISTRUZIONE
ITIT
DIGITAL BATTERY CHARGER AND STARTER
CARICA BATTERIE E AVVIATORE DIGITALECARICA BATTERIE E AVVIATORE DIGITALE
DIGITALES BATTERIELADEGERÄT
MIT STARTHILFE
INSTRUCTIONS MANUALINSTRUCTIONS MANUAL
BEDIENUNGSANLEITUNGBEDIENUNGSANLEITUNGDD
ENEN
DIGICAR 540EDIGICAR 540E
DIGICAR 1100EDIGICAR 1100E

II
SAFETY RULES AND WARNINGS EN-1
GENERAL INFORMATION ON THE
BATTERY CHARGER EN-1
INSTALLATION EN-2
ASSEMBLING - HANDLE AND WHEELSEN-2
LOCATION EN-2
CONNECTION TO THE SUPPLY EN-2
PRELIMINARY RECOMMENDATIONS EN-2
UNIT CONTROLS AND CONNECTIONS EN-3
OPERATIONS AS BATTERY CHARGER EN-3
FORCED CHARGE EN-4
CHARGING MORE THAN ONE
BATTERY AT THE SAME TIME EN-5
OPERATIONS AS BOOST STARTER EN-5
OPERATIONS AS VOLTAGE SUPPLY EN-6
TROUBLESHOOTING EN-6
MAINTENANCE AND CARE EN-6
INDEX
GBGB ITIT
AVVERTENZE SICUREZZA IT-1
INFORMAZIONI GENERALI SUL
CARICA BATTERIE IT-1
INSTALLAZIONE IT-2
ASSEMBLAGGIO - MANICO E RUOTE IT-2
COLLOCAZIONE IT-2
COLLEGAMENTO ALLA RETE IT-2
RACCOMANDAZIONI IT-2
CONTROLLI E CONNESSIONI IT-3
FUNZIONAMENTO COME CARICA BATTERIE IT-3
CARICA FORZATA IT-4
CARICA CONTEMPORANEA DI PIU’
BATTERIE IT-5
ISTRUZIONI PER L’USO COME AVVIATORE IT-5
ISTRUZIONI PER L’USO COME ALIMENTATORE IT-6
RICERCA GUASTI IT-6
MANUTENZIONE E CURA DEL CARICA
BATTERIE IT-6

III
DD
SICHERHEITSANWEISUNGEN UND
WARNUNGEN D-1
ALLGEMEINE INFORMATIONEN ZUM
BATTERIELADEGERÄT D-1
INSTALLATION D-2
MONTAGE - GRIFF UND RÄDER D-2
EINSATZORT D-2
NETZANSCHLUSS D-2
INSTALLATIONSEMPFEHLUNGEN D-2
GERÄTFUNKTIONEN UND ANSCHLUSS D-3
INBETRIEBNAHME DES
BATTERIELADEGERÄTES D-3
ZWANGSLADUNG D-4
GLEICHZEITIGES AUFLADEN VON
MEHREREN BATTERIEN D-5
BETRIEB ALS BOOST STARTER D-5
SPANNUNGSTABILISIERUNGSFUNKTION D-6
FEHLERDIAGNOSE` D-6
WARTUNG UND PFLEGE D-6

IV

EN-1
CAUTION!
BEFORE INSTALLING, OPERATING OR CARRYING OUT MAINTENANCE ON THE
BATTERY CHARGER, READ THE CONTENTS OF THIS MANUAL CAREFULLY, PAYING
PARTICULAR ATTENTION TO THE SAFETY RULES.
In the event of these instructions not being clear, please contact your supplier.
CONGRATULATIONS ON YOUR NEW PURCHASE!
YOU ARE NOW IN THE POSSESSION OF ONE OF THE SAFEST AND MOST
TECHNOLOGICALLY ADVANCED BATTERY CHARGERS ON THE MARKET.
FOLLOW OUR SUGGESTIONS AND YOU WILL BE GUARANTEED SAFE AND PROBLEM-
FREE OPERATION.
Gases
When the battery is being charged you may notice
bubbling in the fluid caused by the release of gas.
As the gas is flammable no naked lights should be
used around the battery, and the area should be
kept well ventilated.
Because of this risk of explosive gas only connect
and disconnect the battery leads when the mains
supply is disconnected.
Points of note
• When not in use, store the charger in a dry
area to avoid moisture damaging the inter-
nal parts.
Repair
• The Battery Charger should not be opened.
Any attempt at modification or repair by the
user may entail the loss of your guarantee.
• The mains supply cord of this appliance can
be replaced only by qualified personnel.
Danger!
• Avoid getting electrolyte on your skin or clo-
thes. It is acidic and can cause burns. If this
occurs you should rinse the affected area
with water immediately.
• If it gets into your eyes - wash thoroughly and
seek medical attention immediately.
• Never charge a frozen battery. If battery flu-
id (electrolyte) becomes frozen, bring battery
into a warm area to allow battery to thaw be-
fore you begin charging. Never let a battery
on top of charger or vice versa.
• Do not touch the battery clamps together
when the charger is on.
• Never operate charger if it has received a
hard blow, been dropped, or otherwise da-
maged. Take it to a qualified professional for
inspection and repair.
• Be sure to position the charger power cord
to prevent it from being stepped on, tripped
over, or damaged.
• Never pull out the plug by the cord when
unplugging the charger. Pulling on the cord
may cause damage to the cord or the plug.
Precautions When Working with Batteries
• If battery acid contacts skin or clothing, wash
immediately with soap and water. If acid en-
ters eye, immediately flood eye with running
cold water for at least 20 minutes and get
medical attention immediately.
• Never smoke or allow a spark or flame in
vicinity of battery or Engine.
• Do not drop a metal tool on the battery. The
resulting spark or short-circuit on the battery
or other electrical part may cause an explo-
sion.
• Remove personal metal items such as rings,
bracelets, necklaces, and watches when wor-
king with a lead-acid battery.
• A lead-acid battery can produce a short-cir-
cuit current high enough to weld a ring or the
like to metal, causing severe burns.
SAFETY RULES AND WARNINGS
The battery charger is an electrical device that is used
to charge or recharge batteries that are normally
used on motor vehicles, motorbikes, boats etc.
The battery is an accumulator that is able to store,
in the form of chemical energy, electrical energy
that is supplied while it is being charged by a direct
current power source.
The stored energy is given up as a discharge in the
form of direct current electrical energy. This process
of storing and giving up energy is repeated for the
whole life of the battery.
GENERAL INFORMATION ON THE BATTERY CHARGER
Before starting the charging process, make sure
that the capacity of the battery (Ah) to be charged
is no greater than that of the battery charger you
are about to use.
Your battery charger provides you a simple way to
set the charge current, by simply setting the right
charge level based on the capacity of your battery.
This is a charging defined as SLOW.
In the case you need to make a rapid charging
at higher current levels we suggest to control the
charging time with the timer in order to prevent

EN-2
ASSEMBLING - HANDLE AND WHEELS
• Carefully remove the battery charger from its
packing;
• Attach the handle using the supplied screws;
• Insert the axle and attach the wheels using
the supplied rings.
LOCATION
Adopt the following guidelines for positioning your
battery charger correctly:
• Use the battery charger only and exclusively
indoors;
• The premises must be well-ventilated;
• The premises must be dry and dust-free;
• The air vents should be free of obstructions;
• The battery charger should be placed on a
stable surface.
CONNECTION TO THE SUPPLY
• Before making any electrical connection,
make sure that the available power supply
voltage corresponds with that indicated on
the data plate of your battery charger, see
last page of this manual.
• If the power supply cable of your battery
charger is without a plug, follow the instruc-
tions below for wiring the plug.
1. Wire the power supply cable to a standard (
2P + T ) plug of suitable capacity.
2. To wire up the plug, follow the instructions
below:
• connect the brown wire to the plug ter-
minal marked L1
• connect the blue wire to the plug ter-
minal marked N
• connect the yellow/green wire to the
plug terminal marked PE or marked
with the symbol ( )
In all cases, the connection of the yellow/green earth
wire to the PE ( ) terminal must be made so that
when the plug is pulled out this is the last terminal
to be disconnected.
The socket to which the battery charger will be
connected must be fitted with fuses or with an
automatic circuit-breaker.
If you need to use an extension for the power
supply cable, this should have an appropriate
section that is at least equal to that of the po-
wer supply cable.
PRELIMINARY RECOMMENDATIONS
Type of batteries
• This charger is only suitable for the following
batteries:
Lead Battery (Liquid)
Calcium (Liquid)
AGM (Liquid AGM)
Gel (GEL sealed)
It should not be used to recharge NICAD,
LIPO or any other type of battery.
• Before you proceed check that the battery
capacity (Ah) is not higher than that of your
battery charger.
• The charge must be performed in a well ven-
tilated area
• Check the battery which has to be charged,
making sure that the case is in good condi-
tion, with no leaks and that the terminals are
not oxidized.
• Remove the caps from the battery to allow
the gases which are produced during char-
ging to easily come out. If necessary add
distilled water, until the internal elements of
the battery are covered (correct value= 5-10
mm above the elements)
CAUTION: the electrolyte is a highly corrosive
acid!
INSTALLATION
overheating in the battery. Max charging time 80’.
At the max current level, the timer is automatically
set with a charge time of 20’ to prevent damages
to exhausted or small batteries.
To lengthen the life of the battery, it is better
to charge slowly (low current level) in order to
prevent overheating.
The time taken to charge a battery may vary,
depending on:
• environmental conditions (Cold/Hot)
• battery condition (Flat/Very Flat)
• age of battery (Old/New)
Never connect or disconnect the battery clam-
ps while the battery charger is working. First
switch off the device.

EN-3
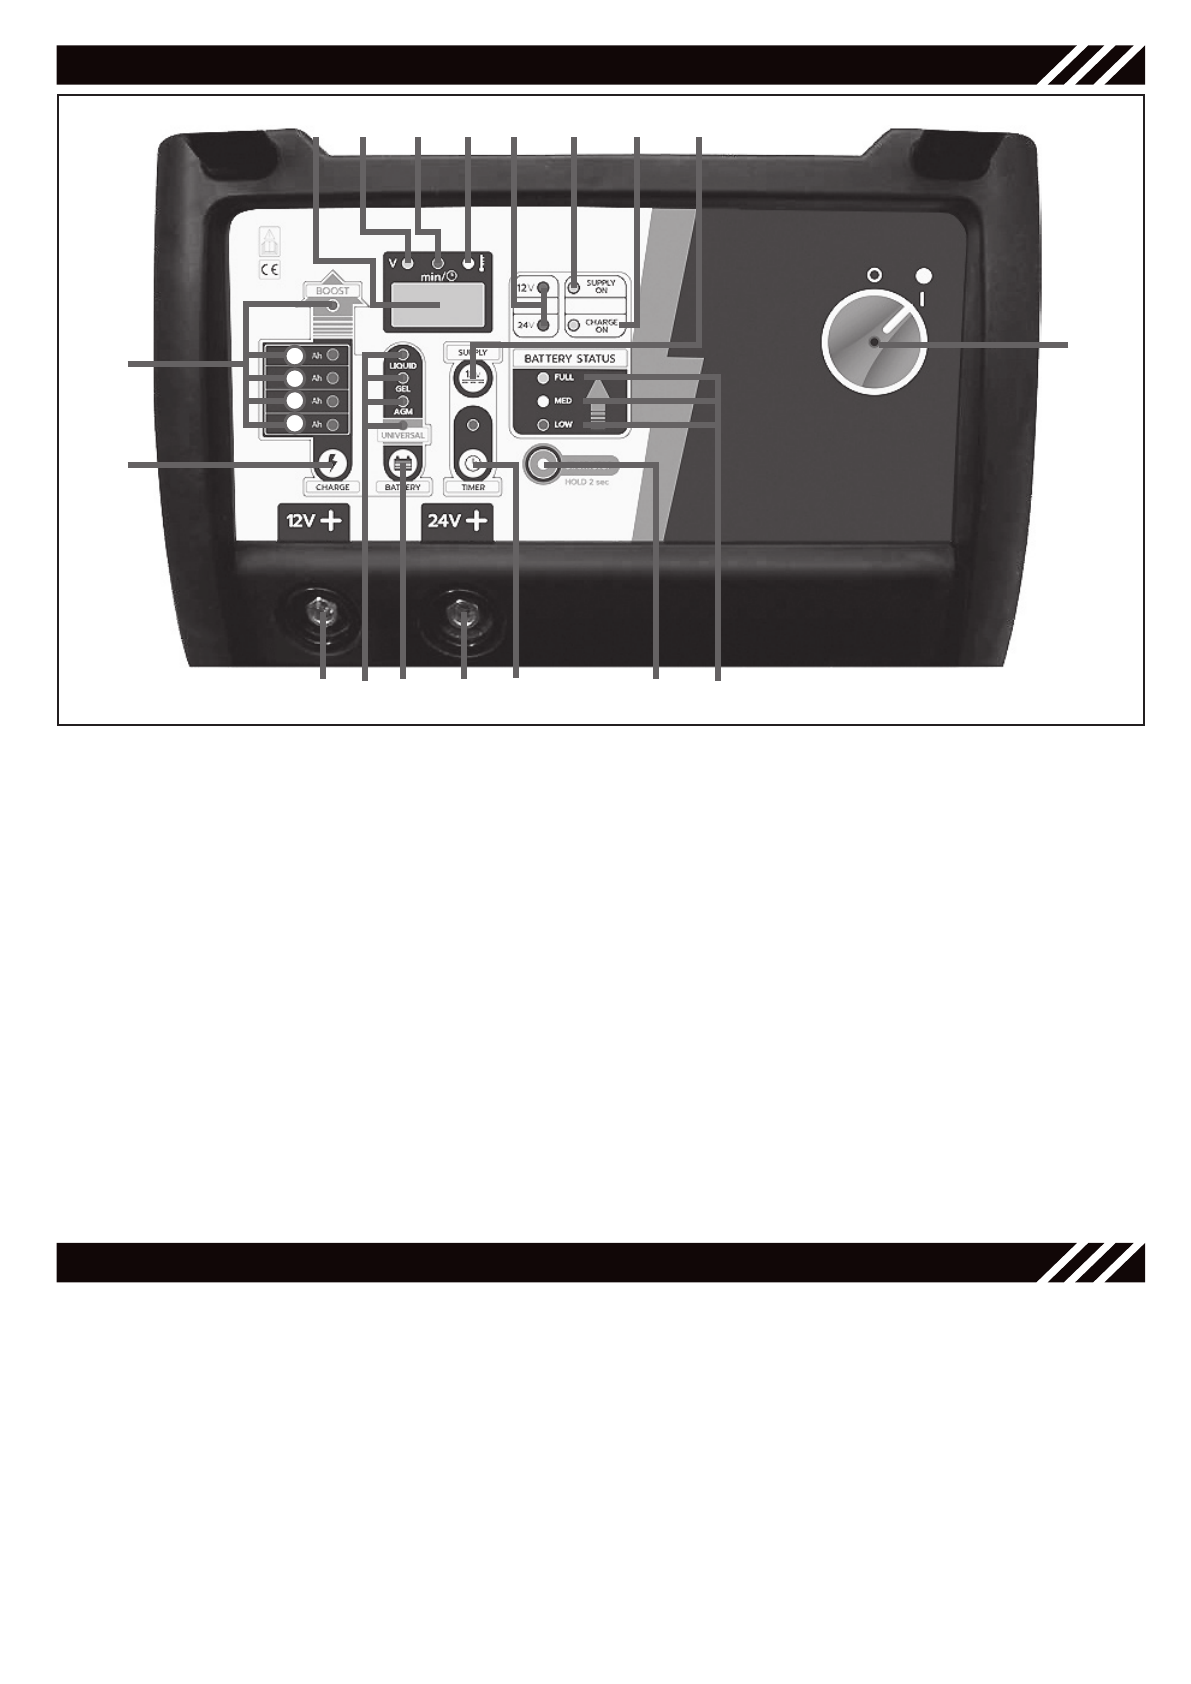
FUNCTIONS
1. 12V / 24V positive socket
2. ON/OFF Mains Switch
3. Charge / Boost Start Selector switch
4. Charging level LED / Boost LED
5. Display
• Charge: visualization of the voltage on the
battery;
• Charge with timer: visualization of the voltage
on the battery and of the residual charge time;
• Setting: visualization of the voltage on the
battery and set charge time;
• Alarms / status visualization
6. Charge voltage LEDs for showing the de-
tected charge voltage.
7. Battery Status LEDs for showing the charge
status of the battery;
8. Selection Key of the battery type:
• Universal,
• AGM,
• GEL,
• LIQUID
9. Battery type LEDs for showing the selected
battery.
10. Timer key to set the charging time
11. Start/Stop key to start and stop any selected
process;
12. LED Charge ON for showing that the char-
ger is charging
13. Supply key to activate the Voltage supply fun-
ction
14. Supply Function LED
15. Voltage LED for showing the display is viewing
the battery voltage
16. Time LED for showing the display is viewing
the set or residual charge time
17. Overtemperature LED
UNIT CONTROLS AND CONNECTIONS
Figure 1 - Control Panel
FUNCTIONS
WARNING: The charging process activates
only if the battery charger is connected to a
battery and only if the voltage parameters
comply with the following minimum voltage
values:
For 12V batteries: more than 7,5V
For 24V batteries: more than 15V
• Connect the red cable to the 12V / 24V po-
sitive socket 1. Be sure you connect the ca-
ble to the right positive socket. Turn the plug
clockwise in order to lock it. Connect the
clamp to the positive terminal (+) of the bat-
tery.
• Connect the black cable to the minus termi-
nal (-) of the battery.
FUNCTIONS OPERATIONS AS BATTERY CHARGER
• Connect the battery charger to the mains.
• Check that the socket is equipped with pro-
tection fuses or circuit breakers.
• Switch ON the battery charger through the
mains switch 2.
• The display 5 will view the battery voltage.
• The LED 6 corresponding to the detected
charge voltage will light on. If you have
made the wrong connection, the display 5
will view the wording “BAT” and both LEDs 6
will blink.
• The LED 7 corresponding to the status of the
battery will light on.
• Before starting the charge you have to set up
the charging parameters:
2
3
56
8
9 7
11
15
10
4
1
12
1
14 13
16 17
D
B
C
A
EN-4
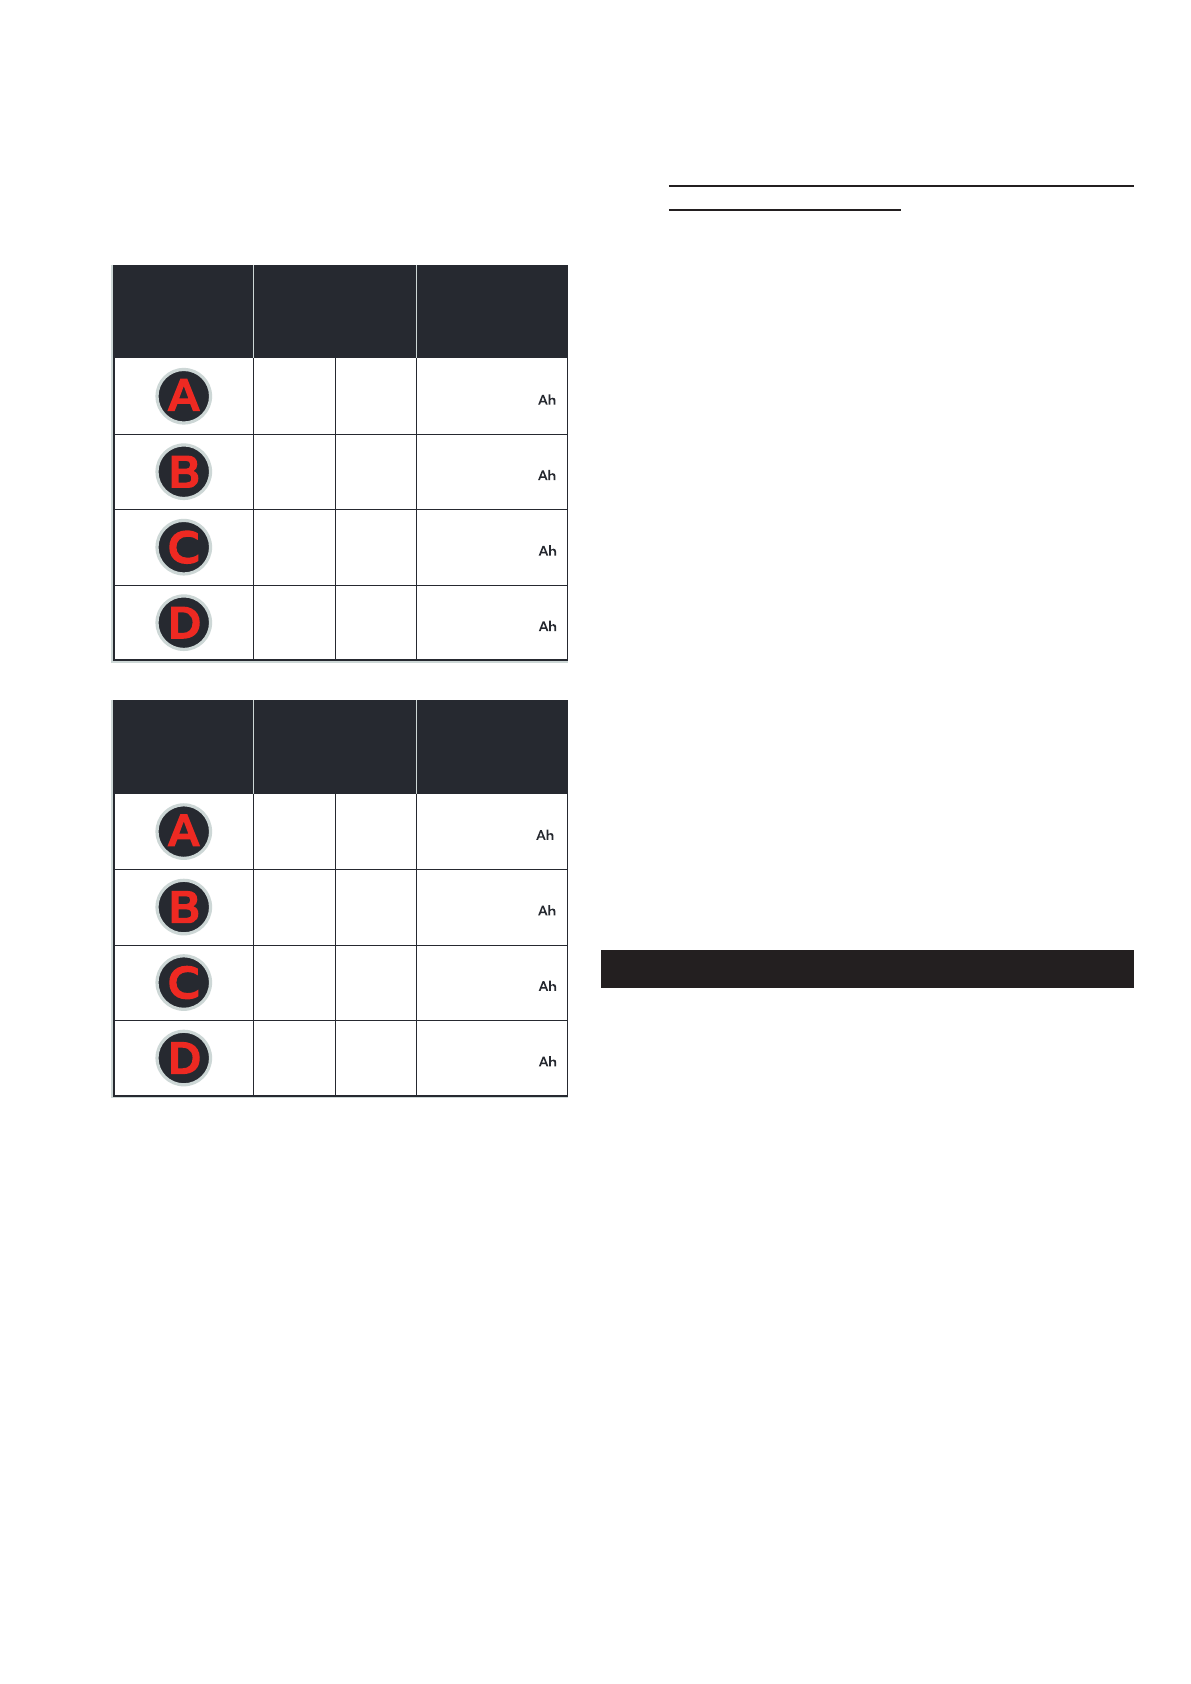
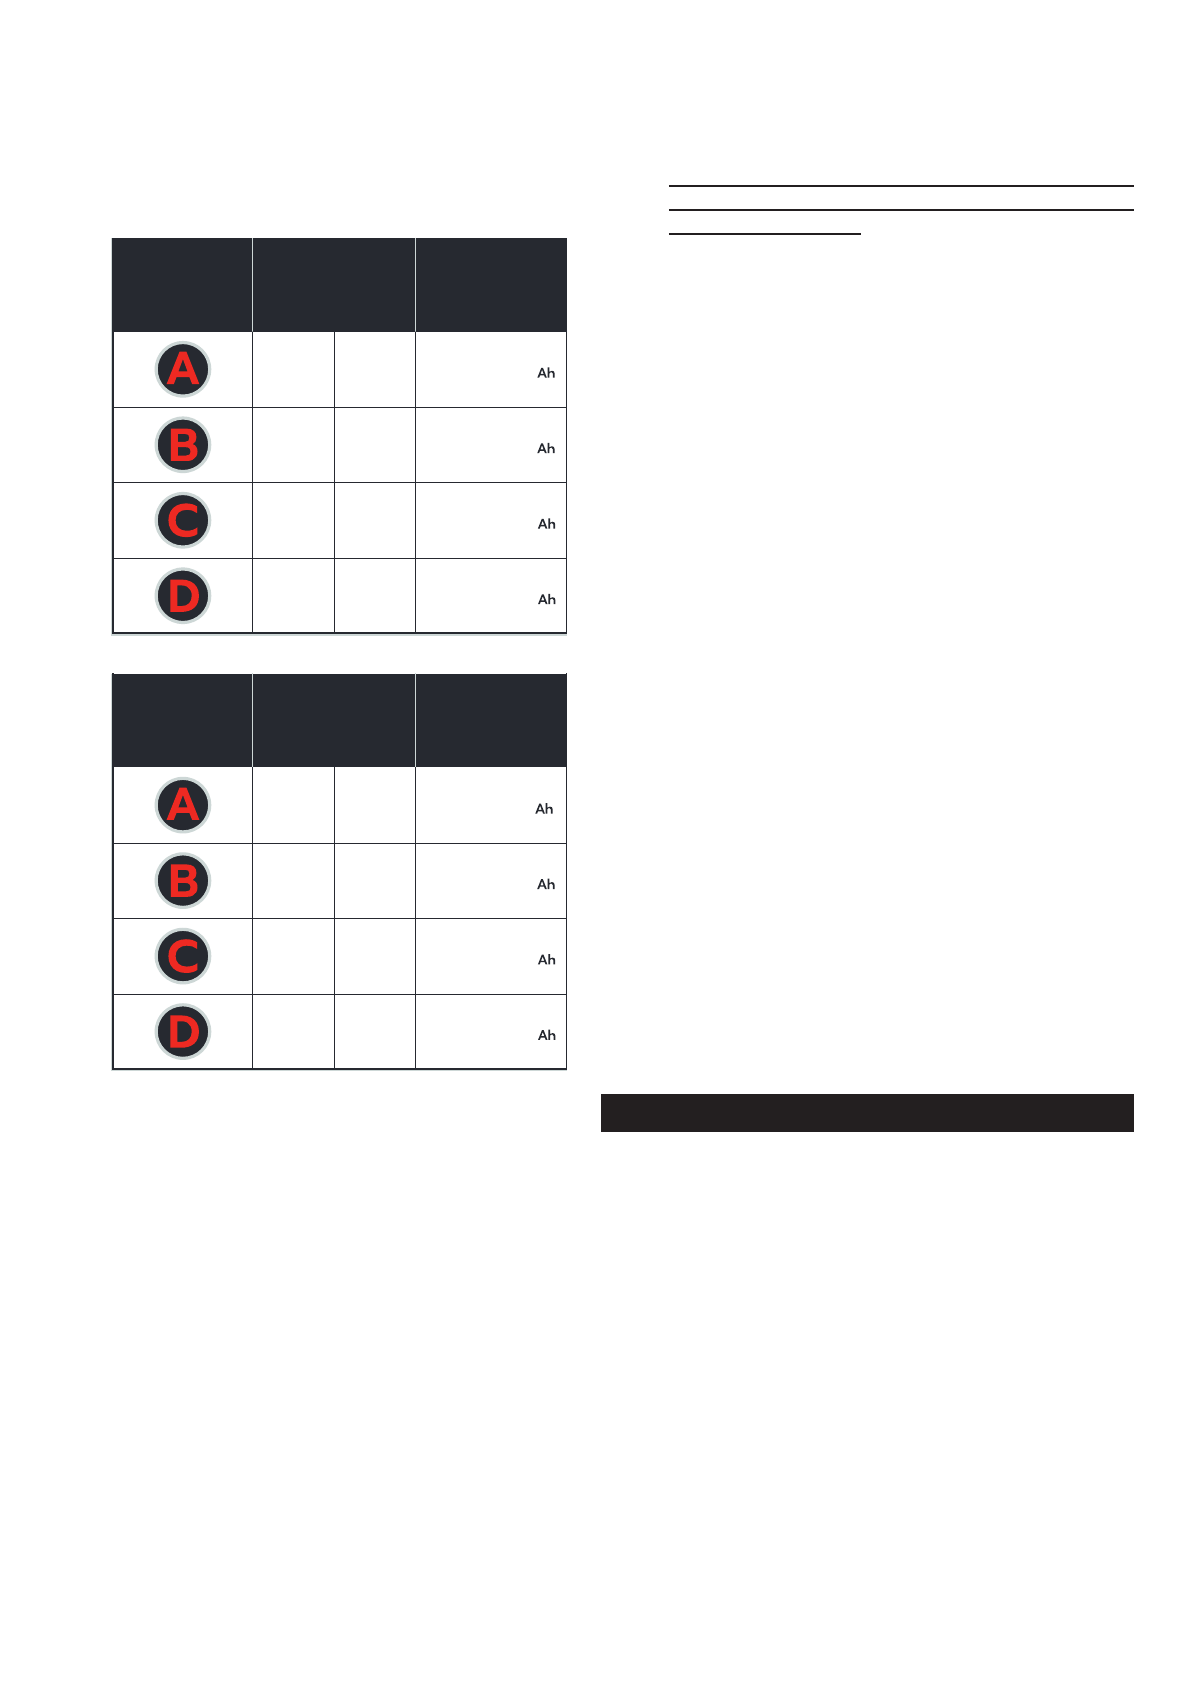
– Charging level (3-4)
through the key 3 select the charge step ac-
cording to the capacity of the battery you are
going to charge (read the value on the batte-
ry). For a rapid charge you may select a step
one level higher, but it is recommended to
set also the timer. Use the here below tables
available also on the unit as guideline:
DIGICAR 540E
DIGICAR 1100E
PANTONE GEOGUIDE/COATED
MATERIAL
Polycarbonate
GLUE
3M
24/09/2020
Cut line
PANTONE 7547C
PANTONE 877C
Etich. Charging range
DIGICAR 540E
CHARGING
STEPS
CHARGING
CURRENT
5
15
25
40
BAT TE RY
CAPACITY
( max 10 hours)
HOW TO CHARGE
PANTONE 1795C
WHITE
20-75
40-225
100-375
150-540
12V 24V
5
10
15
25
PANTONE GEOGUIDE/COATED
MATERIAL
Polycarbonate
GLUE
3M
24/09/2020
Cut line
PANTONE 7547C
PANTONE 877C
Etich. Charging range
DIGICAR 1100E
CHARGING
STEPS
CHARGING
CURRENT
5
20
40
70
BAT TE RY
CAPACITY
( max 10 hours)
HOW TO CHARGE
PANTONE 1795C
WHITE
20-75
50-375
300-750
500-1100
12V 24V
5
15
30
40
– Battery type (8-9)
through the key 8 select which kind of battery
you want to charge. This battery charger can
be used with normal Lead batteries (sealed
or unsealed), AGM or GEL batteries. When
selecting the battery type be sure of which
kind of battery you are charging. In the event
that you are not sure of the battery type, se-
lect Universal battery (refer to Preliminary
Recommendations section, Type of batteries).
The LED 9 corresponding to the selected bat-
tery type will light on.
– Timer (10)
if necessary you may set through the key 10
the charge time. Press the key 10, the LED
16 will light on. Press the key again to set the
time: one press = 20’ (maximum setting is
600min)
To reset the timer hold the timer key 10 until
the LED 16 gets off.
NOTE: it is recommended not to exceed an
80 minutes charge time when performing a
rapid charge.
• check if all the parameters that you have set
up in the battery charger are according to
what you have planned.
• HOLD THE KEY 11 FOR 2 SECONDS TO
START THE CHARGE. The LED 12 will light
ON.
• The charger will start to charge the battery
at the correct charge current according to
the set battery capacity. Battery status can be
checked throught the LEDs 7.
• By standard charge:
the display will view the battery voltage and
the LED 15 will stay ON; this mode will per-
form a full charge (at the set current) until
the battery will be fully charged. The char-
ge current will then decrease to a lower fixed
current. The display will visualize the wor-
ding “FLT”. By floating mode the charger will
continuously check the voltage at the battery
terminals and will automatically adjust the
charge current.
To STOP the charge by manual mode hold
the key 11 for 2 seconds. “Charge on” LED
12 will get off.
• by charge with timer:
the display will alternate the battery voltage
and the residual charge time and the LEDs
15 and 16 will alternatively light on; this
mode will perform a full charge (including
Floating) until the set time has run.
To stop the charge before the set time, just
hold the key 11 for 2 seconds.
• during the charge, no setting can be chan-
ged. To change some setting, you have first
to STOP the charge.
FORCED CHARGE
WARNING: following the charge guide-
lines below the security functions are di-
sabled, check for short-circuited battery
and correct connection. Pay attention to
the polarity of the connections and to the
correspondence with the battery voltage.
• To force the charging process, hold the bat-
tery type selection key 8 for 6 seconds. The
new minimum voltage values will be:
For 12V batteries: more than 4V
For 24V batteries: more than 11,5V
ATTENTION: charge can be stopped at any
time by pressing again the “CHARGE START/
STOP” button (11).
ATTENTION: to activate again the security
functions, turn the charger off and on again.
EN-5
Figure 2 - Connection Diagram
This battery charger is equipped with a boosting
system that will let you start your car without
damaging the electronic on board of your vehicle.
WARNING: Boost starts MUST be performed
when the battery is still fittet to the vehicle.
WARNING: The charging or boosting process
activates only if the battery charger is con-
nected to a battery and only if the voltage pa-
rameters comply with the following minimum
voltage values:
For 12V batteries: more than 7,5V
For 24V batteries: more than 15V
• Connect the black clamp to the vehicle’s
chassis, far from the battery and from the
exhaust pipe.
• Connect the red cable to the 12V / 24V po-
sitive socket 1 and the clamp to the positive
terminal of the battery.
• Connect the battery charger to the mains.
Check that the socket is equipped with pro-
tection fuses or circuit breakers.
• Switch ON the battery charger through the
mains switch 2.
Before starting the boosting procedure is advi-
sable to perform a fast charge for 10/15 mi-
nutes.
• Select the Boost Start Function through the
selector key 3. The corresponding Boost LED
4 will light on;
• Hold the Start/Stop key 11 for 2’’, the display
FUNCTIONS OPERATIONS AS BOOST STARTER
5 will visualize the wording “RDY” and the
Boost LED 4 will blink.
• After you have selected this process, the bat-
tery charger won’t give energy to the car until
the car won’t ask for it. Go into the car, try to
turn on the car. The battery charger will give
energy to the car for 4 seconds without over-
taking the voltage security value. The display
will view the battery voltage.
• If the boost is not performed, you may try
again after 15 seconds, wait until the wor-
ding “RDY” is visualized again on the display
5. If necessary, perform a fast charge for
10/15 minutes.
In the event that the battery is damaged
(short circuit or broken elements) the
boosting will not be performed by the
battery charger, so your car will not be
damaged by an improper boosting.
• Once the car is started, the battery charger
will automatically stop giving current.
• Hold Start/Stop key to stop the process.
• Turn the charger off through the mains switch
2.
• Disconnect the cables from the battery and
replace the battery caps.
• Disconnect the charger from the mains sup-
ply and store it in a dry place.
For forced boost, follow the instructions in the
“Forced charge” paragraph.
Warning: do not charge batteries with diffe-
rent capacities or different types of batteries
at the same time.
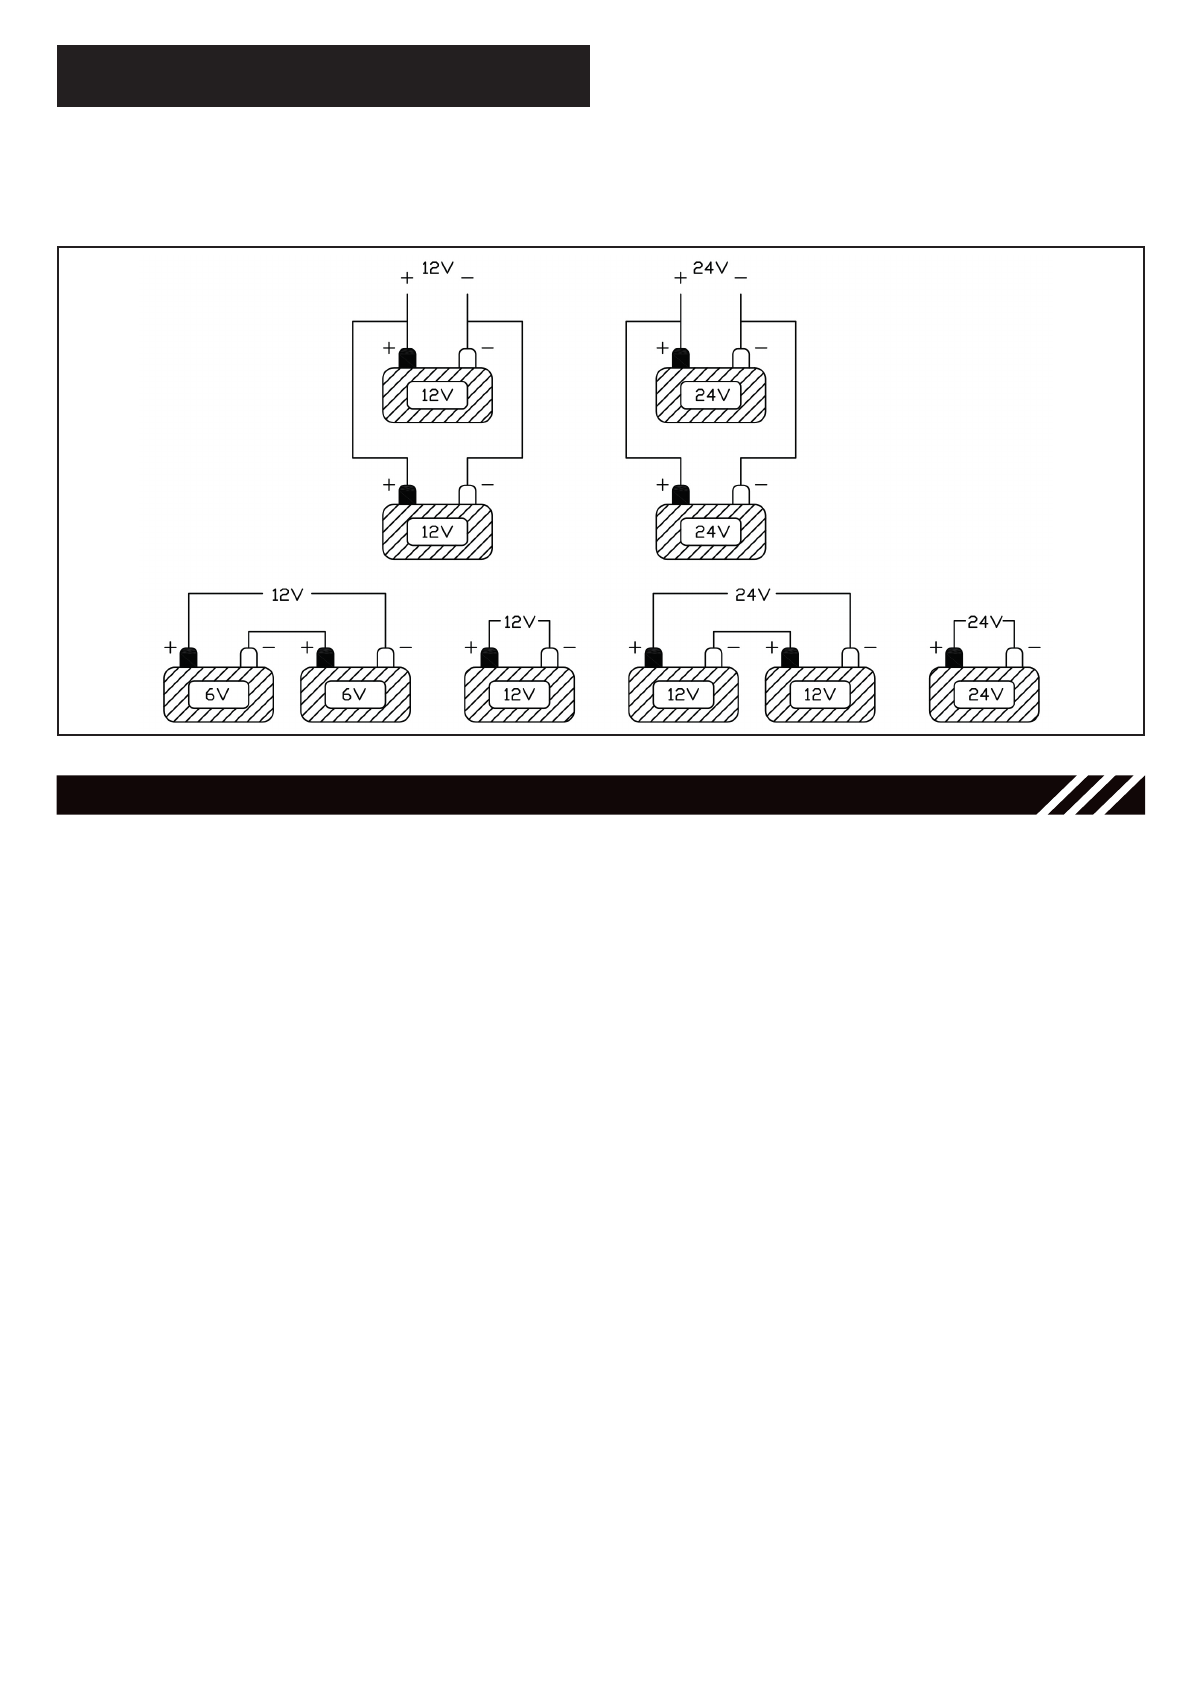
If it is necessary to charge more than one battery
at the same time, they can be connected in series
CHARGING MORE THAN ONE BATTERY AT
THE SAME TIME
or in parallel.
Connection in series is preferred because this makes
it possible to monitor the current circulating in each
battery, and this will be equal to that shown on the
ammeter.
Please, follow the below diagram:

EN-6
TROUBLESHOOTING
Charger doesn’t charge
• Display visualises the wor-
ding “BAT” and LEDs 6
blink
• Display visualizes the wor-
ding “TER”. LED 17 is on
• Wrong Charge Voltage
Connection
• Battery voltage level lo-
wer than 7,5V@12V -
15V@24V.
• Charger overheated
• Check for correct charging
cables connection.
• Allow to the charger to
cool down.
Boost can not be performed
• Display doesn’t visualize
the wording “RDY”
• Display visualizes the wor-
ding “RDY”
• Wait for the OFF time of
15 seconds, display visua-
lizes the battery voltage
• Battery is damaged
• Try to boost start your vehi-
cle once display visualizes
the wording “RDY”
Charge in finished, display vi-
sualizes “FLT”, Battery status LED
is “Med”
• Start a new charge at low
current
MAINTENANCE AND CARE
It is essential to keep your battery regularly charged
throughout the year, especially during the winter
months. In the winter the effectiveness of your car
battery is reduced by the cold. Oil is thick. Engines
are difficult to start and the heater, windscreen wipers
and lights are all draining power. It is at this time that
batteries have to be at peak power. If your battery
is not regularly maintained and kept fully charged,
it can cause problems and a possible breakdown.
Listed are some helpful hints on how to keep your
battery healthy in conjunction with your Battery Charger.
Faulty Cells
Batteries are usually made with six cells. One of
these cells can deteriorate or get damaged. If, after
several hours charging your battery is still flat, you
should test the battery.
ONLY for NOT sealed batteries:
Take hydrometer readings from each cell in the
battery. If one reading is lower than the others, this
could indicate a faulty cell. If necessary, get an Auto-
Electrician to check your battery. One faulty cell is
enough to ruin your battery.
It is pointless to continue using it and you would be
better getting a new one.
Care
Sometimes the battery may appear flat, but this could
simply be dirty or loose connections on your battery
terminals. It is important to maintain the leads on a
regular basis. Do this by removing the leads from
the battery, clean the inside of each connector and
terminal posts on the battery, smear the terminal
posts and connectors with Vaseline, refit in there
correct positions and tighten firmly. It is essential to
keep the electrolyte level above the plates.
Note, however, that you should not overfill it, as the
electrolyte is strongly acidic. When topping up do
not use tap water. Always use distilled or de-ionized
water. It is important to keep the acid level up. If
necessary have it checked by your garage.
Checking the condition of your battery (ONLY
for NOT sealed batteries)
Using a hydrometer, which can be purchased, from
most motor accessory stores, you can check the
specific gravity of the electrolyte in each cell. The
hydrometer is use to suck up a quantity of fluid from
the cell. The weighted float inside the hydrometer
will register the condition of that cell. Put the fluid
back into the cell after testing, taking care not to
splash the fluid about.
• Connect the red cable clamp to the positive
terminal of the battery.
• Connect the black cable clamp to the negati-
ve terminal of the battery.
• Switch ON the battery charger through the
mains switch on the left side panel.
• Press the Supply key 13. The display will view
the wording “SUP” and the battery voltage.
• Hold the Start/Stop key 11. The “Supply On”
LED 14 blinks at first then stays on.
• A constant voltage of 13,7V at the max ou-
tput current keeps on providing power to the
computer system of modern vehicles when
replacing the battery (Please don’t reverse
battery connection to avoid the damage on
OPERATIONS AS VOLTAGE SUPPLY
the charger).
• Hold the Start/Stop to disable the function
and press the Supply key 13 to get out.
Main applications are:
• Noise-free stabilized power supply of the on
board electronics, to be used during diagno-
stic operations in order to protect the battery.
• Power supply to keep safe the batteries of
vehicles in showrooms.
• Power supply to maintain the on-board elec-
tronics when removing the battery and pre-
vent loss of various set-up.

IT-1
ATTENZIONE!
PRIMA DI INSTALLARE, UTILIZZARE O MANUTENZIONARE QUESTO CARICA BATERIE,
LEGGETE ATTENTAMENTE QUESTO MANUALE CON PARTICOLARE ATTENZIONE ALLE
NORME DI SICUREZZA.
Nel caso le istruzioni non fossero chiare contattate il vostro rivenditore.
CONGRATULAZIONI PER IL VOSTRO ACQUISTO!
IL VOSTRO CARICA BATTERIE E’ UNO DEI PRODOTTI PIU’ SICURI E
TECNOLOGICAMENTE AVANZATI NEL MERCATO.
SEGUITE LE NOSTRE INDICAZIONI E POTRETE GODERE DEL VOSTRO
CARICA BATTERIE IN MODO SICURO E SENZA PROBLEMI.
Gas
Quando si inizia a caricare la batteria si potrebbe
notare il ribollire del liquido a causa del rilascio di
gas. Dato che il gas è infiammabile non si devono
avere fiamme libere nelle vicinanze della batteria e
l’area deve essere ben ventilata.
A causa del rischio dovuto ai gas esplosivi, connet-
tere e sconnettere i cavi del carica batterie solo se il
relativo cavo di alimentazione è sconnesso.
Avvertenze
Quando non in uso, il carica batterie deve essere po-
sizionato in una zona secca per evitare che l’umidità
possa danneggiare le parti interne.
Riparazione
• Il carica batterie non deve essere aperto.
Ogni tentativo di modifica o riparazione da
parte dell’utente potrebbe portare alla deca-
denza della garanzia.
• Il cavo di alimentazione di questo apparec-
chio può essere sostituito solo da personale
qualificato.
Pericolo
• evitare di entrare in contatto con l’elettrolita
della batteria con pelle o vestiti. E’ un aci-
do e può causare ustioni. In caso di contatto
dovete lavare immediatamente con acqua la
zona in cui è avvenuto il contatto.
• in caso di contatto con gli occhi, lavarli ab-
bondantemente con acqua e contattate un
medico immediatamente.
• mai caricare una batteriA congelata. Se il
liquido della batteria (elettrolita) si congela,
portate la batteria in una zona calda per per-
mettere alla batteria di scongelarsi prima di
iniziare la carica. Non mettere mai la batte-
ria sopra il carica batterie e viceversa
• non far toccare le pinze del carica batterie
quando lo stesso è in carica.
• non usare mai il carica batterie se ha subi-
to una gran botta, è caduto o se è danneg-
giato. Portatelo da un esperto qualificato per
un’ispezione e riparazione.
• Posizionate il cavo di alimentazione in modo
che non possa essere calpestato, strappato o
danneggiato.
• Non scollegare mai il cavo di alimentazione
tirandolo per il cavo. Tirare il cavo di alimen-
tazione può danneggiare il carica batterie.
Precauzioni da usare quando si lavora con
le batterie
• se l’acido della batterie entra in contatto con
la pelle o i vestiti, lavare immediatamente
con sapone ed acqua. Se l’acido entra in
contatto con gli occhi, lavateli immediata-
mente con acqua corrente per 20 minuti e
contattate un medico immediatamente.
• Non fumare o permettere fiamme o scintille
in prossimità della batteria o del motore.
• Non far cadere utensili di metallo sulla bat-
teria. La scintilla risultante o il corto circuito
sulla batteria o su altre parti elettriche può
comportare un’esplosione.
• Rimuovere oggetti di metallo ad uso perso-
nale, quali anelli, braccialetti, collane e oro-
logi quando si lavora con batteria al piom-
bo.
• Una batteria al piombo può produrre una
corrente di corto circuito sufficiente a salda-
re un anello o similari al metallo, causando
ustioni gravi.
AVVERTENZE SICUREZZA
Il carica batterie è un’apparecchiatura elettrica
usato per la carica e la ricarica delle batterie co-
munemente usate nel campo automobilistico, mo-
tociclistico, navale ecc.
La batteria è un accumulatore in grado di imma-
gazzinare energia elettrica fornita durante la sua
carica da un generatore di corrente continua, sotto
forma di energia chimica.
INFORMAZIONI GENERALI SUL CARICA BATTERIE
Tale energia viene restituita nella scarica sotto forma
di energia elettrica a corrente continua. Questo
processo di immagazzinamento e resa di energia
si ripete per tutta la vita della batteria.
Il caricabatterie offre un modo semplice per impostare
la corrente di carica, semplicemente impostando il
livello di carica adeguato in base alla capacità della
batteria. Questa carica si definisce LENTA.

IT-2
ASSEMBLAGGIO - MANICO E RUOTE
• Rimuovete con attenzione il carica batterie
dal suo imballo;
• Fissate il manico con le viti in dotazione;
• Inserite l’asse e fissate le ruote con gli anelli
in dotazione.
COLLOCAZIONE
Seguire le seguenti linee guida per la collocazione
corretta del vostro carica batterie:
• Usare il carica batterie esclusivamente all’in-
terno;
• L’ambiente deve essere ben areato;
• In luoghi protetti da polvere e umidità;
• I fori di areazione non devono essere ostruiti;
• Il carica batterie deve essere posizionato su
una superficie stabile.
COLLEGAMENTO ALLA RETE
• Prima di effettuare qualsiasi collegamento
elettrico, verificate che la tensione di alimen-
tazione e la frequenza disponibile sia corri-
spondente con quelle indicate nei dati di tar-
ga dal vostro carica batterie.
• Nel caso in cui il cavo di alimentazione del
vostro carica batterie sia sprovvisto di spina
seguite le istruzioni qui di seguito riportate
per collegare la spina.
• Collegate il cavo di alimentazione ad una
spina normalizzata ( 2P + T ) di portata ade-
guata.
Seguite le seguenti istruzioni per collegare il cavo
di alimentazione alla spina:
• il filo marrone va collegato al morsetto con-
trassegnato dalla lettera L1 della spina
• il filo blu va collegato al morsetto contrasse-
gnato dalla lettera N della spina
• l filo giallo/verde va collegato al morsetto
contrassegnato dalla lettera PE o dal
simbolo ( ) della spina
In tutti i casi il collegamento del filo di terra giallo/
verde al morsetto PE ( ) deve essere fatto in modo
tale che in caso di strappo della spina sia l’ultimo
a staccarsi.
La presa a cui verrà collegato il caricabatteria deve
essere provvista di fusibili di protezione o di inter-
ruttore automatico.
Nel caso in cui si debba usare una prolunga
per il cavo di alimentazione, questa deve ave-
re una sezione adeguata e comunque non in-
feriore a quella del cavo di alimentazione.
RACCOMANDAZIONI
Tipi di batterie
• Questo carica batterie è adatto solo per le
seguenti batterie:
Piombo (Liquid)
Calcio (Liquid)
AGM (Liquid AGM)
Gel (GEL sealed)
e non deve essere usato per ricaricare batte-
rie NICAD, LIPO o altri tipi di batterie
• Prima di procedere alla carica, verificate che
la capacità della batteria (Ah) che si intende
caricare non sia superiore a quella del carica
batterie che state usando.
• Controllate la batteria da ricaricare verifi-
cando che la carcassa sia in buone condizio-
ni, senza perdite.
• Pulite i morsetti positivo e negativo da possi-
bili incrostazioni di ossido in modo da assi-
curare un buon contatto delle pinze.
• Eseguite la carica in ambienti areati per evi-
tare l’accumulo di gas.
• Rimuovete i tappi dalla batteria (se presenti)
per permettere la fuoriuscita dei gas che si
producono durante la carica.
• Controllate che il livello dell’ elettrolita rico-
pra gli elementi della batteria, se necessario
aggiungete acqua distillata fino a coprire gli
elementi interni della batteria ( valore corret-
to 5-10mm sopra gli elementi).
In questa fase fate particolare attenzione
perché l’elettrolita è un acido altamente
corrosivo.
INSTALLAZIONE
Nel caso sia necessario effettuare una carica rapida
a livelli di corrente più elevati si consiglia di con-
trollare il tempo di carica con il timer in modo da
evitare il surriscaldamento della batteria. Tempo di
ricarica massimo 80 minuti.
Al massimo livello di corrente, il timer viene impostato
automaticamente con un tempo di ricarica di 20 ‘per
evitare danni a batterie scariche o piccole.
E’ preferibile per una durata superiore
della vita della batteria, scegliere cari-
che lente (a correnti basse) che evitano il
surriscaldamento.
Il tempo di carica di una batteria può variare in
funzione di:
• condizioni ambientali (Freddo/Caldo)
• stato della batteria (Scarica/Molto scarica)
• età della batteria (Vecchia/Nuova)
Non collegare né scollegare mai le pinze
della batteria con il carica batterie fun-
zionante. Spegnere prima l’apparecchio.
IT-3
FUNCTIONS
1. Presa positiva 12V / 24V
2. Interruttore principale
3. Selettore processo di Carica / Avviamento
4. LED livello di carica / avviamento
5. Display
• Carica: visualizzazione del valore della ten-
sione della batteria;
• Carica con timer: visualizzazione del valore
della tensione della batteria e del tempo di
carica residuo;
• Impostazione: visualizzazione della tensione
della batteria e del tempo di carica impostato.
• Visualizzazione stato / allarmi.
6. LED tensione di carica per indicare la tensio-
ne di carica rilevata
7. LED stato batteria per indicare lo stato di ca-
rica della batteria
8. Tasto di selezione del tipo di batteria da caricare:
• Universale
• AGM
• GEL
• Liquid
9. LED tipo di batteria per indicare il tipo di bat-
teria impostato.
10. Tasto Timer per impostare il tempo di carica.
11. Tasto Start/Stop per avviare / fermare qualsi-
asi processo selezionato
12. LED Charge ON per indicare che il carica
batterie sta caricando.
13. Tasto Supply per attivare la funzione di ali-
mentatore
14. LED funzione alimentatore (Supply)
15. LED tensione per indicare che il display sta
visualizzando la tensione della batteria.
16. LED tempo per indicare che il display sta vi-
sualizzando il tempo di carica impostato o
residuo.
17. LED sovratemperatura
CONTROLLI E CONNESSIONI
Figura 1 - Pannello di controllo
FUNZIONAMENTO COME CARICA BATTERIE
ATTENZIONE: il processo di carica si attiva
solo se il carica batterie è connesso ad una
batteria e se i parametri di tensione rientrano
entro un valore minimo di tensione.
Batterie a 12V maggiore di 7,5V
Batterie a 24V maggiore di 15V
• Collegare il cavo rosso alla presa positiva
12V o 24V (1) inserendo e avvitando in sen-
so orario lo spinotto. Assicurarsi di collegare
il cavo alla presa corretta. Collegare la pinza
di carica al morsetto positivo (+) della batte-
ria.
• Collegare la pinza di carica di colore nero al
morsetto negativo (-) della batteria.
• Collegare il cavo di alimentazione ad una
presa. La presa a cui verrà collegato il cari-
ca batteria deve essere provvista di fusibili di
protezione o di interruttore automatico.
• Posizionare l’interruttore principale (2) in po-
sizione ON / I.
• Il display 5 visualizza la tensione della bat-
teria.
• Il LED 6 corrispondente alla tensione rilevata
della batteria si accende. In caso di connes-
sione non corretta, il display 5 visualizza la
scritta “BAT” e entrambi i LED 6 lampeggiano.
2
3
56
8
9 7
11
15
10
4
1
12
1
14 13
16 17
D
B
C
A

IT-4
• Si accende il LED di indicazione dello stato di
carica della batteria 7.
• Prima di iniziare la carica impostare i para-
metri di carica:
– Livello di carica (3-4)
selezionare mediante il tasto 3 lo step di carica
in base alla capacità della batteria che state
andando a caricare (verificare il valore sulla
batteria). Usare le seguenti tabelle che trovate
anche sulla macchina come riferimento:
DIGICAR 540E
PANTONE GEOGUIDE/COATED
MATERIAL
Polycarbonate
GLUE
3M
24/09/2020
Cut line
PANTONE 7547C
PANTONE 877C
Etich. Charging range
DIGICAR 540E
CHARGING
STEPS
CHARGING
CURRENT
5
15
25
40
BAT TE RY
CAPACITY
( max 10 hours)
HOW TO CHARGE
PANTONE 1795C
WHITE
20-75
40-225
100-375
150-540
12V 24V
5
10
15
25
Per una carica rapida (con maggiore corrente)
è possibile selezionare uno step di carica più
alto ma si raccomanda di impostare il timer.
– Tipo di batteria (8 - 9)
selezionare mediante il tasto 8 quale tipo di
batteria si vuole caricare. Questo caricabatte-
rie può essere utilizzato con normali batterie al
piombo (sigillate o non sigillate), batterie AGM
o GEL. Quando si seleziona il tipo di batteria,
accertarsi del tipo di batteria che si sta cari-
cando. Se non si è sicuri del tipo di batteria,
selezionare Batteria universale (consultare la
sezione Raccomandazioni per l’installazione,
tipo di batterie). Il LED 9 corrispondente al tipo
di batteria selezionato si accenderà.
– Timer (10)
se necessario è possibile impostare tramite il
tasto 10 il tempo di carica. Premere il tasto
10, il LED 16 si accende. Premere di nuovo
il tasto per impostare l’ora: una pressione =
PANTONE GEOGUIDE/COATED
MATERIAL
Polycarbonate
GLUE
3M
24/09/2020
Cut line
PANTONE 7547C
PANTONE 877C
Etich. Charging range
DIGICAR 1100E
CHARGING
STEPS
CHARGING
CURRENT
5
20
40
70
BAT TE RY
CAPACITY
( max 10 hours)
HOW TO CHARGE
PANTONE 1795C
WHITE
20-75
50-375
300-750
500-1100
12V 24V
5
15
30
40
DIGICAR 1100E
20 ‘(l’impostazione massima è 600min)
Per resettare il timer, tenere premuto il tasto
Timer 10 fino a quando il LED 16 si spegne.
NOTA: si consiglia di impostare un tempo di
carica massimo di 80 minuti quando si ese-
gue una carica rapida.
• controllare che tutti i parametri impostati
corrispondano alle necessità di carica.
TENERE PREMUTO IL TASTO 11 PER 2 SE-
CONDI PER INIZIARE LA CARICA.Il LED
12 si accende.
• Il caricabatterie inizierà a caricare la batteria
alla corrente di carica corretta in base alla ca-
pacità della batteria impostata. Lo stato della
batteria può essere verificato tramite i LED 7.
• In modalità standard:
il display visualizza la tensione della batteria
e il LED 15 è acceso; questa modalità con-
sente una carica completa (alla corrente im-
postata), la carica si interrompe quando la
batteria è completamente carica. La corrente
di carica scenderà poi ad un valore fisso più
basso. Il display visualizzerà la scritta “FLT”.
Durante la fase di mantenimento il carica
batteria continuerà a controllare la batteria
ai terminali e regolerà automaticamente la
corrente di carica.
Per interrompere la carica tenere premuto il
tasto 11 per 2 secondi. Il LED 12 “Charge
On” si spegne.
• In modalità con timer:
il display visualizza in modo alternato la ten-
sione della batteria e il tempo di carica resi-
duo, i LED 15 e 16 si alternano accesi; questa
modalità consente una carica (alla corrente
impostata) temporizzata, allo scadere del
tempo di carica impostato il processo di cari-
ca (Mantenimento incluso) si interrompe.
Per interrompere la carica tenere premuto il
tasto 11 per 2 secondi.
• durante la carica non è possibile cambiare i
parametri impostati. Per cambiare le impo-
stazioni fermare prima la carica.
CARICA FORZATA
ATTENZIONE!: seguendo le seguenti in-
dicazioni di carica le funzioni di sicurez-
za, verifica batteria in cortocircuito e cor-
retto collegamento, vengono disabilitate.
Prestate molta attenzione alla polarità
dei collegamenti e alla corrispondenza
con la tensione della batteria.
• Per forzare il processo di carica tenere premu-
to il tasto di selezione batteria 8 per 6 secon-
di. I nuovi valori minimi di tensione saranno:
Batterie a 12V maggiore di 4V
Batterie a 24V maggiore di 11,5V.
ATTENZIONE: La fase di carica può essere
interrotta in qualsiasi momento ripremendo il
tasto “CHARGE START/STOP” 11.
ATTENZIONE: per ripristinare le funzioni di
sicurezza spegnere e riaccendere il carica bat-
teria mediante l’interruttore principale.

IT-5
Figura 2 - Schema di collegamento
Questo carica batteria è dotato di una sistema di
avviamento che permette di avviare il vostro veicolo
senza danneggiare l’elettronica di bordo.
ATTENZIONE: Gli avviamenti devono essere
fatti sempre con batteria collegata.
ATTENZIONE: il processo di carica o avviamen-
to si attiva solo se il carica batterie è connesso
ad una batteria e se i parametri di tensione ri-
entrano entro un valore minimo di tensione.
Batterie a 12V maggiore di 7,5V
Batterie a 24V maggiore di 15V
• Collegare la pinza di colore nero al morset-
to negativo della batteria, la pinza di colore
rosso al morsetto positivo della batteria e lo
spinotto del cavo rosso alla presa positiva a
12V o 24V.
• Collegare il cavo di alimentazione ad una pre-
sa. La presa a cui verrà collegato il carica bat-
terie/avviatore deve essere provvista di fusibili
di protezione o di interruttore automatico.
• Posizionare l’interruttore principale 2 in posi-
zione ON / I.
Effettuare una carica veloce di almeno 10-15
minuti prima di procedere all’avviamento.
• Selezionare la funzione di Avviamento (Bo-
ost) con il selettore 3. Il LED corrispondente
si accende.
• Tenere premuto il tasto Start/Stop 11 per 2’’,
il display 5 visualizzerà la scritta “RDY” e il
LED Boost lampeggerà.
• Dopo aver selezionato questo processo il ca-
ISTRUZIONI PER L’USO COME AVVIATORE
rica batteria non fornirà energia al veicolo
fino a che questo non lo richiederà.
• Salire nel veicolo e cercare di avviarlo. Il ca-
rica batteria fornirà energia al veicolo per 4
secondi senza superare il valore di tensione
di sicurezza. Il display visualizzerà la tensio-
ne della batteria.
• Se non si riesce ad avviare il veicolo è possi-
bile ritentare dopo 15 secondi, aspettare che
sul display 5 compaia nuovamente la scritta
RDY. Se necessario effettuare una carica ve-
loce di 10/15 minuti alla massima corrente.
Nel caso la batteria sia danneggiata
(corto circuito o elementi aperti) non sarà
possibile l’avviamento, il veicolo non sarà
quindi danneggiato da un avviamento
improprio.
• Una volta che il veicolo è avviato, il carica
batteria automaticamente smetterà di fornire
corrente. Spegnere il carica batteria median-
te l’interruttore principale 2.
• Scollegate prima la pinza di colore nero e poi
la pinza di colore rosso e rimettere i tappi.
• Scollegare il carica batterie/avviatore dalla
rete elettrica e conservarlo in un luogo asciut-
to.
Per l’avviamento forzato seguire le indi-
cazioni al paragrafo “Carica forzata”.
CARICA CONTEMPORANEA DI PIU’ BATTERIE
Attenzione: non caricare batterie di capacità e
tipologia diversa fra loro.
Dovendo caricare più batterie contemporaneamente
si può ricorrere a dei collegamenti in “serie” o in
“parallelo”.
Tra i due sistemi è consigliabile il collegamento in
“serie” in quanto in questo modo si può controllare
la corrente circolante in ciascuna batteria che sarà
uguale a quella indicata dall’amperometro.
Seguite lo schema quì sotto:

IT-6
RICERCA GUASTI
Il carico batteria non carica
• Il display visualizza la scrit-
ta “BAT” e i LED 6 lampeg-
giano.
• Display visualizza la scritta
“TER” LED 17
• selezione tensione di cari-
ca non corretta
• Livello della tensione della
batteria sotto 7,5V@12V -
15V@24V.
• Carica batteria surriscal-
dato
• Selezionare mediante il ta-
sto 6 la tensione di carica
corretta.
• Lasciare che il carica bat-
terie si raffeddi.
Avviamento non possibile
• il display non visualizza la
scritta “RDY”
• il display visualizza la scrit-
ta “RDY”
• Aspettare per il tempo di
pausa di 15 secondi, il di-
splay visualizza ila tensio-
ne della batteria.
• La batteria è danneggiata.
• Tentare l’avviamento
quando il display visualiz-
za la scritta “RDY”
• La carica è terminata, il di-
splay visualizza “FLT”, il LED
stato batteria indica MED
• Iniziare una nuova carica
a corrente bassa
MANUTENZIONE E CURA DEL CARICA BATTERIE
E ‘essenziale mantenere la batteria carica regolar-
mente durante tutto l’anno, soprattutto durante i mesi
invernali. In inverno l’efficacia della vostra batteria
dell’auto è ridotta dal freddo. Il carburante è più denso,
i motori sono difficili da avviare. Tergicristalli e le luci
sono tutte causa del calo di carica della batteria. È
in queste condizioni che le batterie devono essere al
massimo della loro resa. Se la batteria non è rego-
larmente mantenuta e completamente carica, può
causare problemi e essere soggetta a possibili rotture.
Sono elencati alcuni suggerimenti utili su come
mantenere la batteria in buona salute in relazione
con il carica batterie.
Celle difettose
Le batterie sono solitamente realizzate con sei celle.
Una di queste celle può deteriorarsi o danneggiarsi.
Se, dopo diverse ore di carica la batteria è ancora
scarica, si dovrebbe verificare la batteria.
SOLO per batterie non sigillate: Prendere letture con
il densimetro da ogni cella della batteria. Se una
lettura è inferiore rispetto alle altre, questo potrebbe
indicare una cella difettosa. Se necessario, chiedete
ad uno specialista di verificare la batteria. Una cella
difettosa è sufficiente per rovinare la batteria.
E’ inutile continuare ad usarla e sarebbe meglio
prenderne una nuova.
Manutenzione della batteria
A volte la batteria potrebbe apparire scarica, ma
questo potrebbe essere semplicemente dovuto a
connessioni sporche o incoerenti sui terminali della
batteria. È importante controllare i cavi regolarmen-
te. A tale scopo, rimuovendo i cavi dalla batteria,
pulire l’interno di ogni connettore e i terminali
sulla batteria, pulire le morsettiere e i connettori
con vaselina, rimontarli nelle posizioni corrette e
stringere le connessioni saldamente.
E’ necessario mantenere l’elettrolita sopra il livello
delle piastre.
Si noti, tuttavia, che non si deve averne una quantità
eccessiva, in quanto l’elettrolita è fortemente acido.
Per il rabbocco non usare l’acqua del rubinetto.
Utilizzare solo acqua distillata o deionizzata. È im-
portante mantenere il livello di acidità. Se necessario
farlo controllare da uno specialista.
Controllare la condizione della batteria (SOLO per
batterie non sigillate)
Utilizzando un densimetro, che può essere acquista-
to nella maggior parte dei negozi di accessori auto,
è possibile controllare il peso specifico dell’elettrolita
in ogni cella. Il densimetro è utilizzato per aspirare
una quantità di fluido dalla cella. Il galleggiante
all’interno del densimetro registrerà la condizione
di quella cella. Rimettere il liquido nella cella dopo
il test, facendo attenzione a non schizzare il liquido.
• Collegare la pinza di carica del cavo rosso al
morsetto positivo (+) della batteria.
• Collegare la pinza di carica del cavo nero al
morsetto negativo (-) della batteria.
• Posizionare l’interruttore principale posto sul lato
sinistro del carica batterie in posizione ON / I.
• Premere il tasto 13 Supply. Il display visua-
lizza in modo alternato la scritta “SUP” e la
tensione della batteria.
• Tenere premuto il tasto 11 Start/Stop. Il LED
14 Supply On inizialmente lampeggia poi ri-
mane acceso.
• Una tensione costante di 13,7V alla corrente
massima di uscita manterrà alimentati i cir-
cuiti elettronici del veicolo durante il cambio
ISTRUZIONI PER L’USO COME ALIMENTATORE
della batteria (attenzione a non invertire le
polarità delle connessioni per non danneg-
giare il carica batterie).
• Tenere premuto il tasto 11 Start/Stop per di-
sattivare la funzione e premere il tasto 13
Supply per uscire.
Le applicazioni principali sono:
• Alimentazione stabilizzata priva di disturbi dell’e-
lettronica di bordo da usare durante le opera-
zioni di diagnostica per proteggere la batteria.
• Alimentazione per conservare in sicurezza le
batterie dei veicoli esposti negli showroom.
• Alimentazione per mantenere l’elettronica di
bordo quando si rimuove la batteria e preve-
nire la perdita di varie impostazioni.

D-1
Das Batterieladegerät ist ein elektrisches Gerät,
welches zum Aufladen von Batterien eingesetzt wird,
die normalerweise in Fahrzeugen, Motorrädern,
Booten etc. verwendet werden.
Die Batterie ist ein Akkumulator, welcher in der
Lage ist, elektrische Energie in Form von chemischer
ALLGEMEINE INFORMATIONEN ZUM BATTERIELADEGERÄT
Energie zu speichern, welche beim Aufladen von
einer direkten Stromquelle zugeführt wird.
Die gespeicherte Energie wird in Form von direkten
elektrischem Strom entladen. Dieser Prozess des
Speicherns und Entladens von Energie wird während
des gesamten Lebenszyklus der Batterie fortgesetzt.
WARNUNG!
VOR DER INSTALLATION, INBETRIEBNAHME ODER WARTUNG DES BATTERIELADE-
GERÄTS SOLLTEN SIE DIE ANWEISUNGEN DIESER GEBRAUCHSANWEISUNG
SORGFÄLTIG LESEN UND BESONDERS DIE SICHERHEITSRICHTLINIEN BEACHTEN.
Sollten Ihnen Teile dieser Gebrauchsanweisung unklar sein, wenden Sie sich bitte
an Ihren Händler.
HERZLICHEN GLÜCKWUNSCH ZU IHREM ERWERB! SIE SIND NUN IM BESITZ EINES DER
SICHERSTEN UND TECHNOLOGISCH FORTGESCHRITTENSTEN BATTERIELADE- GERÄTE
AUF DEM MARKT. FOLGEN SIE DEN ANWEISUNGEN, UM GARANTIERT EINEN SICHEREN
UND PROBLEMLOSEN BETRIEB ZU ERHALTEN.
SICHERHEITSANWEISUNGEN UND WARNUNGEN
GASE
• Während des Ladens der Batterie können
Sie bemerken, dass Gas entweicht. Dieses
Gas ist entflammbar, daher darf kein offenes
Feuer in der Nähe der Batterie sein, und der
Standort muss gut gelüftet sein.
• Da Explosionsgefahr besteht, darf man die
Batteriekabel nur befestigen und abnehmen,
wenn die Gesamtstromzufuhr abgestellt ist.
Wichtig
• Wenn das Batterie-Ladegerät nicht benutzt
wird, muss dieses an einem trockenen Ort
aufbewahrt werden, um zu vermeiden, dass
sie Schimmel auf den inneren Teilen bildet.
Reparatur
• Das Batterie-Ladegerät darf nicht geöffnet
werden. Jeder Versuch, das Ladegerät zu
verändern oder zu reparieren, kann einen
Garantieverlust begründen.
• Das Hauptkabel darf nur durch qualifiziertes
Personal ausgewechselt werden.
Gefahr!
• Elektrolyt darf nicht mit Ihrer Haut oder Klei-
dung in Kontakt geraten. Diese Säure kann
Verbrennungen verursachen. Bei versehentli-
chem Kontakt müssen diese Stellen sofort mit
Wasser gereinigt werden.
• Sollte Elektrolyt in Ihre Augen gelangen: un-
ter fließenden Wasser auswaschen und ärzt-
liche Hilfe beantragen.
• Nie eine gefrorene Batterie aufladen. Sollte
die Batteriesäure (Elektrolyt) gefroren sein,
bringen Sie die Batterie an einen warmen
Ort bevor Sie mit dem Ladevorgang begin-
nen. Stellen Sie nie eine Batterie auf das La-
degerät oder umgekehrt.
• Berühren Sie nicht die Batterieklemmen wenn
der Hauptschalter auf ON ist.
• Nie ein Batterie-Ladegerät benutzen, wenn
dieser einen harten Stoß erlitten hat, gefallen
ist oder anderweitig beschädigt wurde. Las-
sen Sie das Gerät von qualifiziertem Personal
warten oder reparieren.
• Platzieren Sie das Kabel des Ladegerätes so,
dass niemand auf das Kabel tritt oder über
das Kabel fällt, oder dass das Kabel anders
beschädigt wird.
• Ziehen Sie nie an dem Kabel um den Stecker
zu ziehen, da das Kabel oder der Stecker be-
schädigt werden können.
VORSICHTSMASSNAHMEN BEIM ARBEITEN
MIT BATTERIEN
• Wenn die Batteriesäure mit Haut oder Klei-
dung in Kontakt geraten ist, sofort mit Was-
ser und Seife auswaschen.
• Wenn die Batteriesäure in die Augen gerät,
diese unter fließendem Wasser mindestens
20 Minuten lang auswaschen und ärztliche
Hilfe beantragen.
• Niemals rauchen; Funken oder Flammen in
der Nähe von Batterien oder Ladegeräten
müssen vermieden werden.
• Nie mit Metallwerkzeugen die Batterie berüh-
ren. Die Funken, die dadurch entzündet wer-
den, können einen Kurzschluss an der Batterie
verursachen oder andere elektrische Teile der
Batterie können eine Explosion hervorrufen.
• Nehmen Sie alle metallische Objekte ab,
wenn Sie mit einer Blei-Batterie arbeiten (Rin-
ge, Armbänder, Halsketten, Uhren ...).
• EineBlei-SäureBatteriekanneinenKurzschluss
verursachen, mit einer Spannung die einen
Ring oder andere Metallteile verschweißen
und schwere Verbrennungen herbeiführen.

D-2
MONTAGE - GRIFF UND RÄDER
• Entnehmen Sie das Batterieladegerät vor-
sichtig aus seiner Verpackung.
• Montieren Sie den Griff mit den beigefügten
Schrauben.
• Setzen Sie die Achse ein und montieren Sie
die Räder mit den beigefügten Ringen.
EINSATZORT
Beachten Sie den folgenden Anweisungen zur
richtigen Aufstellung Ihres Batterieladegeräts:
• Verwenden Sie das Ladegerät
ausschließlich in Innenräumen.
• Die Räume müssen gut gelüftet sein.
• Die Räume müssen trocken und
staubfrei sein.
• Die Belüftung sollte nicht behindert sein.
• Das Batterieladegerät muss auf einen stabi-
len Untergrund gestellt werden.
NETZANSCHLUSS
• Bevor Sie das Gerät an das Stromnetz an-
schließen, sollten Sie überprüfen, dass die
zur Verfügung stehende Voltzahl mit der
Voltzahl auf dem Angabenschild des Lade-
geräts übereinstimmt.
• Sollte das Netzkabel Ihres Batterieladegeräts
über keinen Stecker verfügen, folgen Sie den
Anweisungen weiter unten zur Verbindung
mit einem Stecker.
• Verbinden Sie das Netzkabel mit einem Stan-
dardstecker (2P+T) mit ausreichender Kapa-
zität.
Um den Stecker mit dem Kabel zu verbinden, folgen
Sie den folgenden Anweisungen:
• Verbinden Sie das braune Kabel mit dem als
L1 markierten Kabelschuh
• Verbinden Sie das blaue Kabel mit dem als N
markierten Kabelschuh
• Verbinden Sie das gelb-grüne Kabel mit dem
als PE oder dem Symbol ( ) markierten Ka-
belschuh.
Die Verbindung des gelb-grünen Erdungskabels
mit dem PE ( ) Kabelschuh muss auf jeden Fall
hergestellt werden, so dass beim Herausziehen
des Steckers diese Verbindung als letzte getrennt
wird. Die Steckdose, mit der das Batterieladegerät
verbunden wird, muss über eine Sicherung oder
einen Sicherungsautomat verfügen.
Sollten Sie ein Verlängerungskabel benötigen,
so sollte dieses über einen angemessenen
Stecker verfügen, der dem des Netzkabels
gleicht.
INSTALLATIONSEMPFEHLUNGEN
Batterieart
• Dieses Ladegerät darf nur für die folgende
Batterien verwendet werden.
Blei-Säure-Batterien (Liquid),
Flüssiges Kalzium (Liquid),
Flüssige AGM (Liquid AGM),
Verschlossene Gel-Batterien (Gel sealed)
Andere Batterietypen, LIPO oder NICAD Bat-
terien dürfen hiermit nicht geladen werden.
• Vor dem Ladeprozess sollten Sie sicherstel-
len, dass die Kapazität der Batterie (Ah), die
aufgeladen werden soll, nicht größer als die
Kapazität des verwendeten Batterieladegerät
ist.
• Das Aufladen sollte an einem gut gelüfteten
Ort geschehen.
• Überprüfen Sie die Batterie, die aufgeladen
werden soll, und stellen Sie sicher, dass das
Gehäuse in gutem Zustand ist, es keine un-
dichten Stellen gibt und die Klemmen/Pole
nicht oxidiert sind.
• Entfernen Sie die Abdeckungen der Batterie,
damit die Gase, die sich während des Au-
fladens bilden, leicht herausströmen können.
Falls notwendig fügen Sie destilliertes Wasser
hinzu, bis die Innenteile der Batterie bedeckt
sind (korrekter Wert = 5-10 mm über den
Elementen).
WARNUNG: Das Elektrolyt ist eine stark
ätzende Säure!
INSTALLATION
Das Batterie-Ladegerät bietet eine einfache Mögli-
chkeit, den Ladestrom einzustellen, indem einfach
die entsprechende Ladestufe entsprechend der
Akkukapazität eingestellt wird. Diese Ladeart ist als
SLOW definiert.
Falls eine Schnellladung mit höheren Stromstärken
erforderlich ist, ist es ratsam, die Ladezeit über einen
Timer zu kontrollieren, um ein Überhitzen der Batterie
auszuschließen. Maximale Ladezeit 80 Minuten.
Bei maximaler Stromstärke wird der Timer automa-
tisch mit einer Ladezeit von 20 Minuten eingestellt,
um Schäden an schwachen oder kleinen Batterien
zu vermeiden.
Um das Leben Ihrer Batterie zu verlängern,
empfiehlt es sich, die Batterie langsam mit
(niedrigen Stromstärken) aufzuladen, um ein
Überhitzen zu vermeiden.
Die Ladezeiten für eine Batterie sind unterschiedlich
und können von folgendem abhängen:
- Umgebungstemperaturen (kalt/ warm)
- Batterieart (flach/ sehr flach)
- Alter der Batterie (alt/ neu)
Schließen Sie niemals eine Batterie an oder
entfernen Sie sie, während das Batterielade-
gerät in Betrieb ist. Schalten Sie zuerst das La-
degerät aus.

D-3
FUNCTIONS
1. 12V / 24V positiver Stecker
2. Hauptschalter
3. Ladung / Boost Wahlumschalter
4. Ladestufe- / Boost-LED
5. Display
• Ladung: Anzeige der Spannung an der Batterie;
• Ladung mit Timer: Anzeige der Spannung an
der Batterie und der verbleibenden Ladezeit;
• Einstellung: Anzeige des eingestellten Lade-
strom und Ladezeit.
• Alarm- und Statusanzeige
6. Ladespannungs-LEDs - Ladespannungssta-
tus der Batterie
7. Batteriestatus-LEDs - Ladungsstatus der Batterie
8. Wahltaste der Batterieart:
• Universal
• AGM
• GEL
• Liquid
9. Batterieart LEDs zur Anzeige der gewählten
Batterieart
10. Timer zur Einstellung der Ladezeit
11. Start/Stop-Taste zum Starten / Stoppen eines
ausgewählten Prozesses
12. Charge ON LED zur Anzeige, dass die La-
dung läuft
13. Supply-Tasteum dieStromversorgungfunktion
zu aktivieren
14. Stromversorgungfunktion-LED
15. Spannung-LED zur Anzeige, dass auf dem
Display die Batteriespannung angezeigt wird.
16. Zeit-LED zur Anzeige, dass auf dem Display
die eingestellte oder die verbleibende Lade-
zeit angezeigt wird.
17. Übertemperatur-LED
GERÄTFUNKTIONEN UND ANSCHLUSS
Abbildung 1 - Kontrollpanel
WARNUNG; Der Aufladeprozess beginnt
nur dann, wenn das Batterieladegerät an
eine Batterie angeschlossen ist und die Span-
nungsparameter mit den folgenden Mindest-
spannungswerten übereinstimmen;
Für 12V Batterien: mehr als 7,5V
Für 24V Batterien: mehr als 15V
• Verbinden Sie das rote Kabel mit dem 12V /
24V positiven Stecker (1). Drehen Sie den
Stecker im Uhrzeigersinn um diesen zu befe-
stigen. Überprüfen Sie, ob Sie das Kabel mit
dem richtigen positiven Stecker verbunden
haben. Verbinden Sie die rote Klemme mit
der positiven Elektrode der Batterie.
FUNCTIONS
INBETRIEBNAHME DES BATTERIELADEGERÄTES
• Verbinden Sie das schwarze Kabel mit
der negativen Elektrode der Batterie.
• Verbinden Sie das Batterieladegerät mit dem
Stromnetz. Überprüfen Sie, dass die Steckdo-
se mit Sicherungen oder Sicherungsautoma-
ten versehen ist.
• Schalten Sie das Batterieladegerät am
Hauptschalter (2) ein (ON/I).
• Auf dem Display (5) wird die Batteriespan-
nung angezeigt.
• Die der erkannten Batteriespannung entspre-
chende LED 6 leuchtet auf. Bei falscher Ver-
bindung zeigt das Display 5 die Meldung
„BAT“ an und beide LEDs 6 blinken.
• Die Batterieladestatus LED 7 leuchtet auf.
• Stellen Sie vor Ladung die Ladeparameter ein:
2
3
56
8
9 7
11
15
10
4
1
12
1
14 13
16 17
D
B
C
A
D-4
– Ladestufe (3-4)
Verwenden Sie die Taste 3, um den Ladestufe
basierend auf der Kapazität der zu ladenden
Batterie auszuwählen (überprüfen Sie den
Wert auf der Batterie). Verwenden Sie die
folgenden Tabellen, die Sie auch auf dem
Gerät finden, als Referenz:
DIGICAR 540E
HINWEIS: Es wird empfohlen, beim Schnel-
lladen eine Ladezeit von bis zu 80 Minuten
einzustellen.
• Überprüfen Sie, dass alle neu gesetzten Pa-
rameter der zu landenden Batterie passen.
• DRÜCKEN SIE DEN SCHALTER 11 FÜR 2
SEKUNDEN, UM DEN LADEVORGANG
ZU BESTÄTIGEN. Die entsprechende LED
12 leuchtet auf.
• Das Ladegerät beginnt mit dem Laden der
Batterie mit dem richtigen Ladestrom basie-
rend auf der eingestellten Batteriekapazität.
Der Batteriestatus kann über die LEDs 7
überprüft werden.
• Im manuellen Ladungsmodus:
Auf dem Display wird die Batteriespannung
angezeigt and die LED 15 leuchtet auf.
Dieser Modus ermöglicht eine vollständige
Aufladung (bei dem eingestellten Strom). Der
Ladevorgang wird beendet, wenn die Batte-
rie vollständig aufgeladen ist. Der Ladestrom
fällt dann auf einen niedrigeren festen Wert
ab. Das Display zeigt “FLT”. Während der
Float-phase überprüft das Batterieladegerät
weiterhin die Batterie an den Klemmen und
passt den Ladestrom automatisch an. Um
den Ladevorgang zu beenden, halten Sie die
Taste 11 für 2 Sekunden gedrückt. Die LED
12 “Charge On” erlischt.
• Im Automatik-Modus mit Timer:
das Display zeigt abwechselnd die Batterie-
spannung und die verbleibende Ladezeit an,
die LEDs 15 und 16 leuchten abwechselnd;
Dieser Modus ermöglicht eine zeitgesteuerte
Ladung (mit dem eingestellten Strom), wenn
die eingestellte Ladezeit abgelaufen ist und
der Ladevorgang (einschließlich Float) stoppt.
Um den Ladevorgang zu beenden, halten Sie
die Taste 11 für 2 Sekunden gedrückt.
• Während des Ladevorgangs können keine
Parameter geändert werden. Um die Para-
meter zu ändern, muss der Ladevorgang erst
gestoppt werden.
ZWANGSLADUNG
ACHTUNG!: Nach den folgenden La-
dehinweise sind die Sicherheitsfunktio-
nen, überprüfen des Kurzschlusses der
Batterie und korrekter Verbindung, de-
aktiviert. Achten Sie genau auf die Pola-
rität der Anschlüsse und die Übereinstim-
mung mit der Batteriespannung.
• Um den Aufladeprozess zu erzwingen, hal-
ten Sie die Batterietyp-Wahltaste 8 für 6
Sekunden gedrückt. Die neuen Mindestspan-
nungswerte sind:
Für 12V Batterien: mehr als 4V
Für 24V Batterien: mehr als 11,5V
ACHTUNG: Die Ladeprozess kann jederzeit
durch erneutes Drücken der Taste „CHARGE
START / STOP“ 11 unterbrochen werden.
Sobald Sie das Ladegerät ausschalten, kehren
die Werte zur Standardeinstellung zurück.
PANTONE GEOGUIDE/COATED
MATERIAL
Polycarbonate
GLUE
3M
24/09/2020
Cut line
PANTONE 7547C
PANTONE 877C
Etich. Charging range
DIGICAR 540E
CHARGING
STEPS
CHARGING
CURRENT
5
15
25
40
BAT TE RY
CAPACITY
( max 10 hours)
HOW TO CHARGE
PANTONE 1795C
WHITE
20-75
40-225
100-375
150-540
12V 24V
5
10
15
25
PANTONE GEOGUIDE/COATED
MATERIAL
Polycarbonate
GLUE
3M
24/09/2020
Cut line
PANTONE 7547C
PANTONE 877C
Etich. Charging range
DIGICAR 1100E
CHARGING
STEPS
CHARGING
CURRENT
5
20
40
70
BAT TE RY
CAPACITY
( max 10 hours)
HOW TO CHARGE
PANTONE 1795C
WHITE
20-75
50-375
300-750
500-1100
12V 24V
5
15
30
40
DIGICAR 1100E
Für eine schnelle Ladung (mit höherem
Strom) ist es möglich, eine höhere Ladestufe
zu wählen; es wird jedoch empfohlen, den
Timer einzustellen.
– Batterieart (8-9)
Wählen Sie mit dem Schalter 8 die Batterieart,
die Sie laden möchten. Das Batterieladegerät
kann für Blei-Säure Batterien (geschlossen und
unverschlossen), Gel, AGM und Kalzium-Batte-
rien benutzt werden. Überprüfen Sie, dass die
Einstellung der zu ladenden Batterie entspricht.
Sollten Sie einen Zweifel haben, was für eine
Batterie geladen werden soll, regeln Sie den
Schalter auf Universal-Batterie. Die LED 9 er-
leuchtet und gibt die ausgewählte Batterieart an.
– Timer (10)
Bei Bedarf kann die Ladezeit mit der Taste 10
eingestellt werden. Drücken Sie die Taste 10,
LED 16 leuchtet auf. Drücken Sie die Taste er-
neut, um die Zeit einzustellen: einmal drücken
= 20 ‘(die maximale Einstellung ist 600 Min.)
Um den Timer zurückzusetzen, halten Sie die
Timer-Taste 10 gedrückt, bis die LED 16 erlischt.
This manual suits for next models
1
Table of contents
Languages:
Other Helvi Batteries Charger manuals


Popular Batteries Charger manuals by other brands


Enercell
Enercell Wall Charger with Lightning Connector user guide

Würth
Würth BLG 12/24 V - 35 A Translation of the original operating instructions

Tronic
Tronic T4X Operation and safety notes

FJC
FJC 52010 instruction manual

Williams Sound
Williams Sound CHG 238 Specification sheet

StreamLight
StreamLight FAST CHARGER operating instructions


