HELVIA HWA-40 PLAY User manual

HWA-40 PLAY
2x10W Wall-Mount Amplier with Player and BT
Manuale d’uso
en-ita User Manual
Please read this manual carefully and keep it for future reference
Leggete questo manuale e conservatelo per future consultazioni

2
Dear value Customer,
First, thank you for purchasing a HELVIA® product. Our mission is to
oer solutions based on the most up-to-date technologies for all systems
integration needs in the private, commercial and corporate sectors.
We hope you are satised with this product and, if you wish to participate,
we would be very pleased to receive your feedback on the operation of
this product and possible improvements for the future. You can go to
“CONTACT” section of www.frenexport.com and send an e-mail with your
opinion; this would help us make equipment that are closer to the real
needs of our customers.
Finally, please read this user manual carefully before using the product;
incorrect use could cause damages to you and the product. Take care!
The HELVIA team
Gentile Cliente,
Prima di tutto, grazie per aver acquistato un prodotto HELVIA®. La nostra
missione e di orire soluzioni basate sulle tecnologie più aggiornate a
tutte le esigenze di integrazione di sistemi nei settori privati, commerciali
e corporate.
Speriamo che siate soddisfatti da questo prodotto e, qualora vogliate
partecipare, saremmo molto lieti di poter ricevere il vostro feedback sul
funzionamento del prodotto e su possibili miglioramenti da apportare in
futuro. Potete andare sulla sezione CONTATTACI del sito www.frenexport.
com e inviare una e-mail con la vostra opinione; questo ci aiuterebbe a
realizzare apparecchiature sempre più vicine alle reali esigenze dei Clienti.
Vi preghiamo, inne, di leggere attentamente questo manuale di istru-
zioni prima di utilizzare il prodotto; un uso incorretto potrebbe causare
danni a voi e al prodotto stesso: pensateci!
Il team HELVIA

3
TABLE OF CONTENTS
1. PRECAUTIONS ..........................................................4
1.1. Important Safety Instructions ....................................................4
2. UNPACKING ..................................... 4
3. FEATURES...................................................................5
4. BASIC FUNCTIONS ..................................................5
5. PLAY FUNCTION.......................................................6
5.1. FM 6
5.2. USB device.......................................................................................6
5.3. SD-Card............................................................................................7
5.4. AUX In...............................................................................................7
5.5. AUX Out ...........................................................................................8
5.6. BT Connection ................................................................................8
6. REMOTE CONTROL..................................................9
7. SYSTEM SETTINGS.................................................10
8. INSTALLATION INSTRUCTIONS..........................12
8.1. In-Wall Installation ......................................................................13
8.2. On-Wall Installation....................................................................16
9. SPECIFICATIONS..................................................... 17
10. WARRANTY AND SERVICE ..................................18
11. WARNING ................................................................ 18

4
1. PRECAUTIONS
1.1. Important Safety Instructions
yRead these instructions
yKeep these instructions
yHeed all warning
yFollow all instructions
Water and Moisture
The apparatus should be protected from moisture and rain and can
not be used near water; for example near a bathtub, a kitchen sink, a
swimming pool, etc.
2. UNPACKING
Thank you for purchasing your HWA-20 PLAY Amplier. All units have
been rigorously tested before leaving the factory, In order to facilitate
your installation, commissioning and use of this product, please read this
manual before installation. Carefully unpack the carton and check the
contents to ensure that all parts are present and in good conditions:
y1 x HWA-20 PLAY amplier
y1x Remote control
yThis User manual

5
3. FEATURES
HWA-20 PLAY is a mini in-wall amplier capable of delivering 2x10W @
8ohm. The elegant and functional design oers a simple interface thanks
to the large LCD display. The Class-D amplication stage with high e-
ciency, low thermal dissipation and maximum reliability. The multimedia
player with USB port, SD-Card, FM Radio, BT, AUX input and remote con-
trol, accepts audio les in MP3, WAV, FLAC and other formats, making this
amplier easy to use in any user in hotels, home environments and more.
yConvenient and Ecient Home Music Control Center
yStylish Design, User-Friendly Interface with LCD Display and remote
control
yBuilt-in 2x10W stereo Class D amplier
yShort-circuit, Overheating, and Overloaded Protection
yMulti Player Function with FM Tuner, USB, SD-Card, BT, AUX
ySupport MP3, WAV, FLAC and other audio formats
yAdjustable sensitivity for AUX Input
yFM radio with auto or manual channel receiving, and up to 20 us-
er-stored channels
yAUX Output for Multiple Unit Linking
yWide Voltage Input from 100 to 240VAC, 50/60Hz
4. BASIC FUNCTIONS
Description of Music Controller
Display
Play/Pause
Volume down
Previous
Infrared receiver
Mode
Volume up
Next
6
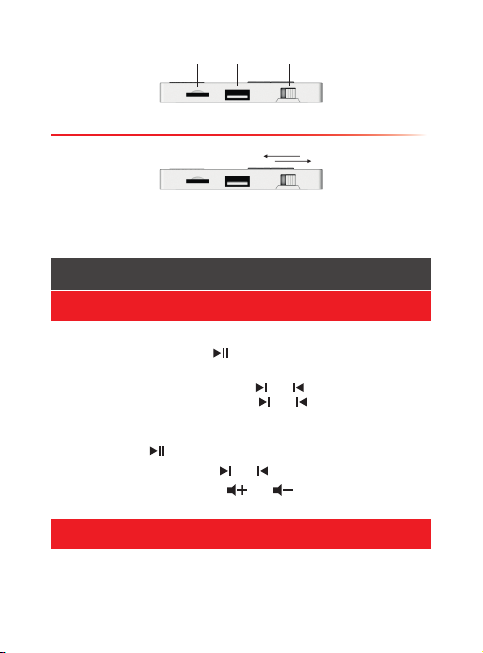
SD slot USB port On-Off
On /O ,Standby
Off On
• On: Turn the on-o key right, it will be powered on.
• O: Turn the on-o key left, it will be powered o.
• Standby: Press and hold the “M” key to enter standby; press “M”
key to restore the start state.
5. PLAY FUNCTION
5.1. FM
Press “M” key to choose FM mode.
Automatic Search: long press “ ” to start the automatic channel receiv-
ing, and the system will automatically save the eective radio stations.
Manual ne tuning mode: long press “ ” or “ ” to enter the manual
ne tuning mode; and then short press “ ” or “ ” to manually adjust
the current channel. If no key operation within 5 seconds, it will save the
current channel and exit the mode.
Mute: short press “ ” for mute FM play.
Channel switching: short press “ ” or “ ” to switch the saved channel.
Volume adjustment: short press “ ” or “ ” to increase or reduce
current volume level.
5.2. USB device
Insert a USB drive (FAT32 format, max 32GByte) in the USB slot on front
panel; the unit will automatically switch operative mode and read the
content. If the drive is already in the unit and you want to skip from other

7
modes to USB, Press “M” button to choose USB mode.
If there is no USB device in the port, the screen will display “NO” and
icker; If there is a USB drive, it will read the card, and the screen will
display “USB”. After a few seconds, it will automatically play music and
show time code progression.
Play control: short press “ ” or “ ” to switch to previous or next songs,
and long press to fast forward or fast reverse; and short press “ ” to
play or pause.
Volume adjustment: short press “ ” or “ ” to increase or reduce the
current volume.
5.3. SD-Card
Insert a Micro-SD drive (FAT32 format, max 32GByte) in the SD slot on
front panel; the unit will automatically switch operative mode and read
the content. If the card is already in the unit and you want to skip from
other modes to SD, Press “M” button to choose SD mode.
If there is no SD card in the port, the screen will display “NO” and icker;
If there is a card, it will read it and the screen will display “SD”. After a few
seconds, it will automatically play music and show time code progression.
Play control: short press short press “ ” or “ ” to switch to previous or
next songs, and long press to fast forward or fast reverse; and short press
“ ” to play or pause.
Volume adjustment: short press “ ” or “ ” to increase or reduce the
current volume.
5.4. AUX In
After having connected a stereo line-level audio source to dedicated
connector (“8. INSTALLATION INSTRUCTIONS” at page 12), press “M”
key to choose AUX mode.
Play control: short press “ ” to play or mute. When it is muted, the LCD
screen will icker.
Volume adjustment: short press “ ” or “ ” to increase or reduce the
current volume.

8
Sensitivity adjustment: long press “ ” or “ ” to enter the sensitivity
adjustment. It can be switched between S1 and S2 (S1: input 500mV, S2:
input 1000mV).
5.5. AUX Out
This device can be used as a audio source output to other amplier
devices. When the AUX OUT interface is connected to other devices and
one pf the audio sources (FM\USB\SD\AUX IN\BT) is selected for play-
back, the audio signal will be routed to these devices through this AUX
OUT, and play synchronously.
5.6. BT Connection
NOTE: Before using this operative mode for the first time,
you need to pair your HWA-20 PLAY to your BT device. To
do that:
• Press on your HWA-20 PLAY unit “M” key and choose BT mode. If
there is no paired device, the BT logo will icker.
• On your BT device, open the BT setting page and search for
HELVIA device. Default password is “0000”. If pairing procedure
successful, the BT logo will be always on. Now you can play your
playlist.
Connection: Pairing procedure has to be run only the rst time you
connect a certain Bluetooth device to the HWA-20 PLAY. After it, you just
need to press “M” button on the amp (or remote control), choose BT
mode, and the unit will automatically connect to your BT device.
Volume adjustment: short press ” or “ ” to increase or reduce
current volume.

9
6. REMOTE CONTROL
7
9
2
1
3
4
5
6
8
10
12
11
1. Mode Selection: press to choose the dierent
modes
2. Standby switch: It puts in standby on and
o the unit
3.
EQ Curves: by pressing this button you can
choose among 4 EQ curves (Normal, POP,
Rock, Jazz)
4.
Last Song: In USB, SD and BT mode, press
this button to switch to previous song in the
playlist. In FM mode, press this key to switch
to previous stored station in the list.
5.
Play/Pause: In USB, SD and BT mode, this but-
ton pauses & plays current song. In FM mode,
it searches radio stations automatically.
6.
0-9 buttons: In USB/SD modes they are used
to select song according to they position in
the directory or play list; in FM mode, you can
input an FM frequency*.
7. Mute key: press to mute the player)
8. Not used.
9. Volume +: it turns up player volume from
0 to 32.
10.
Next Song: In USB, SD and BT mode, press this
button to switch to next song in the directory.
In FM mode, press this key to switch to next
stored station in the list.
11. Cycle: It switches between ONE (current song
repeated) and ALL (normal reproduction).
12. Volume -: It turns down player volume from
32 to 0.
*) NOTE: Input range is 0870 to1080. For example, 103.3MHz will
be input 1033. If the input frequency is out of range, the unit
will not change.

10
7. SYSTEM SETTINGS
The HWA-20 PLAY is supplied with a conguration PC software, which
allows the installer to setup BT connections name and password, and limit
volume amount.
HWA-20 PLAY Configuration
1
2
3
1. First please prepare a USB Type-A male to Type-A male cable (same
plug, not male/female - check www.soundsationmusic.com; you can
search for U120-15 and U120-30 cables).
USB Type-A Male-to-Male plug
2. Download the Conguration software from www.helviasystems.com
(search for HWA-20 PLAY web page) or contact your HELVIA systems
reseller.
3. Launch the software on you PC (Windows® only). The “Status” section
will show, in addition to the VID and PID values, current connection
status. When the unit is not connected, the status is “Removed”.
4. Connect the HWA-20 PLAY to the PC. Once connected the status will

11
change into “Attached”. The amplier display will show “PC”, and all
audio sources will be temporarily muted.
5. In Bluetooth section, you can assign a customized name and
password to the BT device. Press “Congure” button to conrm the
modications.
6. In Maximum Volume Limit, you can limit maximum volume to 25%,
50%, 75%, 100%. Press “Congure” button to conrm the modi-
cations.
7. Disconnect the USB cable and switch o the HWA-20 PLAY before
trying to connect the BT again.
NOTE: Once all changes have been confirmed, you need to
disconnect the USB cable and switch off the HWA-20 PLAY
before trying to connect the BT again.
WARNING: If the Bluetooth device has already been paired
to the amplifier before changing name and/or password,
you need to unpair the old amplifier device in you Blue-
tooth setting menu, and pair the new amplifier name.

12
8. INSTALLATION INSTRUCTIONS
Product Dimension
38mm
10mm
+
-
M
86mm
86mm
62mm
62mm
60mm
Rear Panel Descriptions
1 5 62 3 4
Function Symbol Name
Power input
(~100-240V)
N Null line
LLive wire
FM ANT FM antenna
GND Signal ground
13
AUX IN(1) R Audio input right
L Audio input left
AUX OUT(2) R Audio output right
L Audio output left
Power amplier
output 8ohm
OUTL+ Left speaker positive terminal
OUTL- Left speaker negative terminal
OUTR+ Right speaker negative terminal
OUTR- Right speaker positive terminal
(1) Audio input (2×0.3mm² double-shielded audio cable)
(2) Audio output (2×0.3mm² double-shielded audio cable)
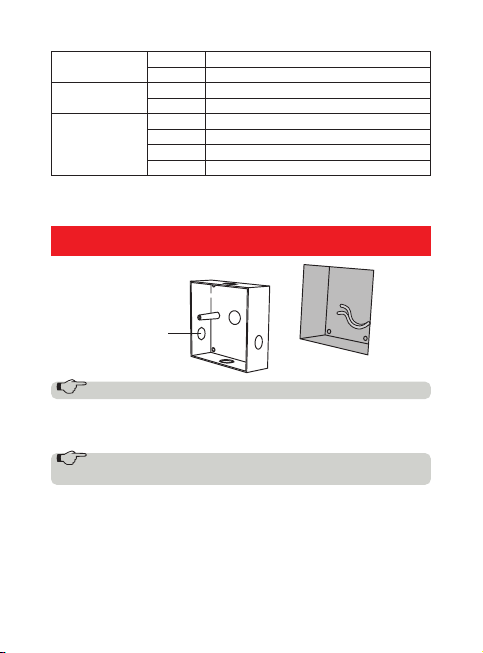
8.1. In-Wall Installation
Reserved
hole position
Wall groove
NOTE: A box with depth of not less than 40mm is required.
1. Open a groove suitable for the box dimension on the wall needing
installation, put the box in the wall groove, and x the box securely.
NOTE: Please arrange line connection according to the
actual hole position of the purchased box.
2. Find the right side of the front panel and the base binding site of
gap.

14
3. Carefully pry the clips with a slotted screwdriver.
Screwdriver
4. As show in the following gure, you will see the two clips in the
direction of “A” or “B”, outer open edge outward, so snap out of and
be careful to separate the amplier front panel and the base.
5. Connect the line end with the port on the base of the amplier, and
x the base shell on the two mounting columns with two screws.
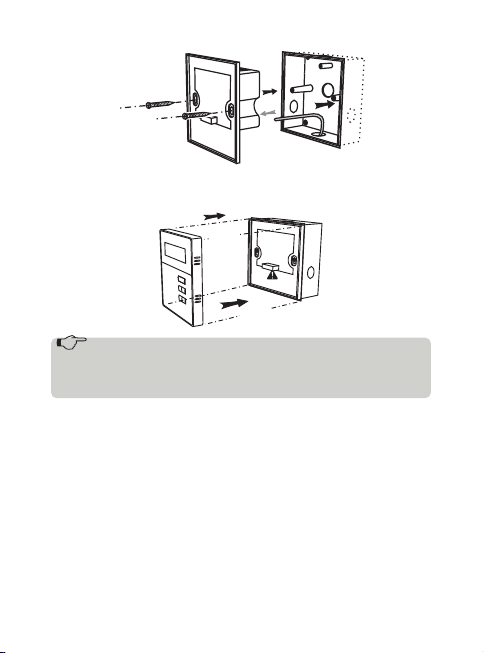
15
6. Buckle the amplier front panel on the base on the wall, and check if
the front panel buckles the base completely.
Parallel
Parallel
CAUTION: When assemble front panel and amplifier base,
pay attention that pins on rear side of front panel holes are
not bent or damaged, otherwise it will cause damage to the
amplifier seriously.
16
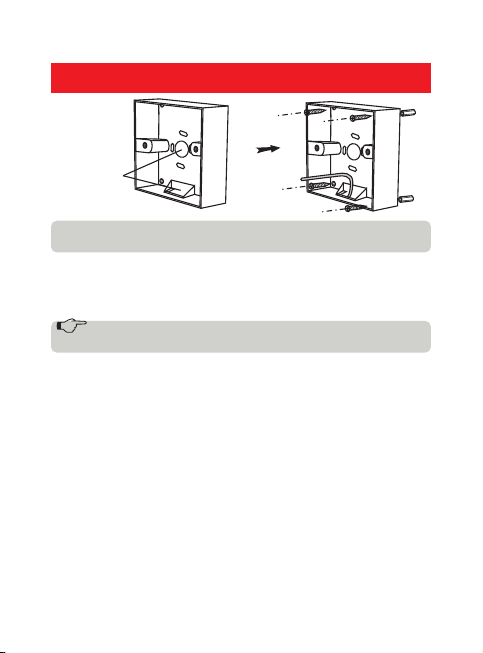
8.2. On-Wall Installation
*Reserved
hole position
NOTE: A box for on-wall mounting and depth of not less than
40mm is required.
According to the four corners of the bottom surface of the box screws
holes, drill holes in the wall. Before mounting the box, pass all wires
through the dedicated holes of the box. Then, by using four self-tapping
screws, x the box on the wall.
NOTE: Please arrange line connection according to the
actual hole position of the purchased box.
Please refer to in-wall installation step 2 to step 6 to complete installation.
17
9. SPECIFICATIONS
Power input 100-240Vac
Output power 2×10W @ 8ohm
Total harmonic distortion ≤0.03% (1KHz, 1W, 8ohm)
Signal-to-noise ratio >81dB
Frequency response 20Hz~20kHz
Sensitivity of auxiliary input 1.0V/500mV (adjustable)
Audio format MP3, WAV, FLAC, etc.
Bluetooth BT2.1+EDR
Storage type USB, Micro SD-Card
Drive Format FAT32 (max 32GByte)
Unit Size (WxDxH) 86×86×38 mm
Packing Size (WxDxH) 143x119x84 mm
Unit Weight 135g
Packing Weight 245g
Our products are subject to change. Modications to technical features
remain subject to change without notice

18
10. WARRANTY AND SERVICE
All HELVIA® products are covered by warranty according to European
regulations (2 years in the case of purchase by private person - B2C;
1 year in the case of purchase by company - B2B). The warranty is
valid from the date of purchase by the end user (private individual or
company), indicated in the purchase document (receipt in the case of
private person; invoice in the case of company). The following cases /
components are not covered by the above warranty:
yAll accessories supplied with the product;
yImproper use;
yFailure due to wear and tear;
yAny unauthorized modication of the product by the user or third par-
ties.
HELVIA must meet the warranty obligations due to any non-compliant
materials or manufacturing defects, by remedying free of charge at
HELVIA’s discretion by either repairing or replacing specic parts or the
entire equipment.
11. WARNING
READ CAREFULLY - only for EU and EEA (Norway, Iceland and
Liechtenstein). This symbol indicates that the product must not
be disposed of with household waste, according to the WEEE
directive (2202/96/EC and subsequent amendments) and
national legislation.
The product must be delivered to a designated waste collec-
tion center (e.g. on an authorized one-for-one basis when you buy a new
similar product, or to an authorized collection site for recycling waste
electrical and electronic equipment). For more information about where
you can drop o your waste equipment for recycling, please contact
your local city oce, waste authority, approved WEEE scheme or your
household waste disposal service.

SOMMARIO
1. ISTRUZIONI DI SICUREZZA................................. 20
2. CONTENUTO DELL’IMBALLO................20
3. CARATTERISTICHE GENERALI ............................. 21
4. FUNZIONI DI BASE ............................................... 22
5. FUNZIONI DI RIPRODUZIONE ........................... 23
5.1. FM 23
5.2. Dispositivo USB........................................................................... 23
5.3. SD-Card......................................................................................... 24
5.4. Ingresso AUX In .......................................................................... 24
5.5. Uscita AUX Out ........................................................................... 25
5.6. Connessione BT........................................................................... 25
6. TELECOMANDO..................................................... 26
7. IMPOSTAZIONI DI SISTEMA............................... 27
8. ISTRUZIONI DI INSTALLAZIONE ....................... 29
8.1. Installazione a Muro.................................................................. 30
8.2. Installazione sul Muro............................................................... 32
9. SPECIFICHE ............................................................. 34
10. GARANZIA E ASSISTENZA .................................. 35
11. AVVERTENZA ......................................................... 35

20
1. ISTRUZIONI DI SICUREZZA
yLeggete queste istruzioni
yConservate queste istruzioni
yRispettate tutte le avvertenze
ySeguite tutte le istruzioni
Acqua / Umidità
L’apparecchio deve essere protetto dall’umidità e dalla pioggia, non può
essere usato in prossimità di acqua; ad esempio nei pressi di una vasca da
bagno, di un lavandino, di una piscina, etc.
2. CONTENUTO DELL’IMBALLO
Grazie per aver acquistato l’amplicatore HWA-20 PLAY. Tutte le unità
sono state rigorosamente testate prima di lasciare la fabbrica. Per
facilitare l’installazione, la messa in servizio e l’uso di questo prodotto,
leggere questo manuale prima dell’installazione. Disimballare con cura
la confezione e controllare il contenuto per assicurarsi che tutte le parti
siano presenti e in buone condizioni:
y1 x Amplicatore HWA-20 PLAY
y1x Telecomando
yQuesto manuale di istruzioni
Table of contents
Languages:
Other HELVIA Amplifier manuals

HELVIA
HELVIA HCA-40 PLAY User manual

HELVIA
HELVIA HPMA Series User manual

HELVIA
HELVIA HCA-60 PLAY User manual

HELVIA
HELVIA HRMA PLAY Series User manual

HELVIA
HELVIA ZEUS X Series User manual

HELVIA
HELVIA HRMA-1206C User manual

HELVIA
HELVIA HMMA PLAY Series User manual

HELVIA
HELVIA HSMA PLAY Series User manual

HELVIA
HELVIA HTMA TOUCH Series User manual

HELVIA
HELVIA ZEUS CA Series User manual


