HELVIA HMMA PLAY Series User manual

HMMA PLAY Series
Mini Digital Mixer Amplier with USB/FM/BT
Manuale d’uso
en-ita
Please read this manual carefully and keep it for future reference
Leggete questo manuale e conservatelo per future consultazioni
User Manual

Gentile Cliente,
Prima di tutto, grazie per aver acquistato un prodotto HELVIA®. La nostra missio-
ne e di orire soluzioni basate sulle tecnologie più aggiornate a tutte le esigenze
di integrazione di sistemi nei settori privati, commerciali e corporate.
Speriamo che siate soddisfatti da questo prodotto e, qualora vogliate partecipare,
saremmo molto lieti di poter ricevere il vostro feedback sul funzionamento del
prodotto e su possibili miglioramenti da apportare in futuro. Potete andare sulla
sezione CONTATTACI del sito www.frenexport.com e inviare una e-mail con la vo-
stra opinione; questo ci aiuterebbe a realizzare apparecchiature sempre più vicine
alle reali esigenze dei Clienti.
Vi preghiamo, inne, di leggere attentamente questo manuale di istruzioni prima
di utilizzare il prodotto; un uso incorretto potrebbe causare danni a voi e al pro-
dotto stesso: pensateci!
Il team HELVIA
Dear value Customer,
First, thank you for purchasing a HELVIA® product. Our mission is to oer
solutions based on the most up-to-date technologies for all systems integration
needs in the private, commercial and corporate sectors.
We hope you are satised with this product and, if you wish to participate, we
would be very pleased to receive your feedback on the operation of this product
and possible improvements for the future. You can go to “CONTACT” section of
www.frenexport.com and send an e-mail with your opinion; this would help us
make equipment that are closer to the real needs of our customers.
Finally, please read this user manual carefully before using the product; incorrect
use could cause damages to you and the product. Take care!
The HELVIA team

TABLE OF CONTENTS
1. PRECAUTIONS .................................................................................. 3
1.1. Important Safety Symbols.................................................................................................3
1.2. Important Safety Instructions ......................................................................................... 4
2. GETTING STARTED........................................................................... 5
2.1. Unpacking..............................................................................................................................5
2.2. First Start-Up .........................................................................................................................6
3. PRODUCT OVERVIEW ..................................................................... 6
3.1. Features: .................................................................................................................................7
4. INSTRUCTION....................................................................................7
4.1. Front Panel.............................................................................................................................7
4.2. Rear panel ..............................................................................................................................9
4.3. Side Panel............................................................................................................................. 11
4.4. Remote Control:................................................................................................................. 11
5. SPECIFICATIONS..............................................................................13
6. WARRANTY AND SERVICE ...........................................................14
7. WARNING.........................................................................................14
1. PRECAUTIONS
1.1. Important Safety Symbols
The above warning is located on the rear of the unit

HMMA PLAY Series Mini Digital Mixer Amplifier with USB/FM/BT
4
The lightening ash with arrowhead symbol within an equi-
lateral triangle is intended to alert the user to the presence of
uninsulated “dangerous voltage” within the product’s enclosure
that may be of sucient magnitude to constitute a risk of elec-
tric shock to persons.
The exclamation point within an equilateral triangle is intended
to alert the user to the presence of important operating and
maintenance (servicing) instructions in the literature accompa-
nying the product.
1.2. Important Safety Instructions
yRead these instructions
yKeep these instructions
yHeed all warning
yFollow all instructions
Water and Moisture
The apparatus should be protected from moisture and rain and can not be used
near water; for example near a bathtub, a kitchen sink, a swimming pool, etc.
Heat
The apparatus should be located away from heat sources such as radiators, stoves
or other appliances that produce heat.
Ventilation
Do not block areas of ventilation opening. Failure to do could result in re. Always
install according to the manufacturer’s instructions.
Object and Liquid Entry
Objects do not fall into and liquids are not spilled into the inside of the apparatus
for safety.
Power Cord and Plug
In case of external power cord, protect it from being walked on or pinched partic-
ularly at plugs, convenience receptacles, and the point where they exit from the
apparatus. Do not defeat the safety purpose of the polarized or grounding-type
plug. A polarized plug has two poles; a grounding-type plug has two poles and a
third grounding terminal. The third prong is provided for your safety. If the pro-

HMMA PLAY Series
Mini Digital Mixer Amplifier with USB/FM/BT
5
vided plug does not t into your outlet, refer to an electrician for replacement.
Power Supply
In case of products with external power adapter, the unit should be connected to
power adapters only of the type as marked on the apparatus or described in the
manual. Failure to do could result in damage to the product and possibly the user.
Unplug this apparatus during lightning storms or when unused for long periods.
Fuse
In case of products with external fuse holder, in order to prevent the risk of re
and damaging the unit, please use only of the recommended fuse type as de-
scribed in the manual. Before replacing the fuse, make sure the unit turned o
and disconnected from the AC outlet.
Noise and Interferences
Do not use the device in the nearby of a TV, radio, stereo equipment, mobile
phone, or other electric devices. Otherwise, the device, TV, or radio may generate
noise.
Electrical Connection
Improper electrical wiring may invalidate the product warranty.
Cleaning
Clean only with a dry cloth. Do not use any solvents such as benzene or alcohol.
Servicing
Do not implement any servicing other than those means described in the manual.
Refer all servicing to qualied service personnel only. Only use accessories/attach-
ments or parts recommended by the manufacturer.
2. GETTING STARTED
2 .1 . Unpacking
Thank you for purchasing your HMMA PLAY Mini Mixer Amplier. All units have
been rigorously tested before leaving the factory, This product is widely used in
schools, shops, bars, pubs, parks, parking lots, villas, and other places: it is the
ideal choice for public broadcasting. In order to facilitate your installation, com-
missioning and use of this product, please read this manual before installation.

HMMA PLAY Series Mini Digital Mixer Amplifier with USB/FM/BT
6
Carefully unpack the carton and check the contents to ensure that all parts are
present and in good conditions:
y1 x HMMA PLAY mini mixer amplier
y3x Phoenix Connectors (2x 2pin; 1x 4pin)
y1x FM Tuner Antenna Cable
y1 x Power Cord (only HMMA-30/120 PLAY)
y1x Remote Control
yThis User manual
If anything damaged during transport, notify the shipper immediately and keep
packing material for inspection. Again, please save its carton and all packing
materials. If the unit must be returned to the manufacturer, it is important that
the unit is returned in the original manufacturer’s packing. Please do not take any
action without rst contacting us.
Our products are subject to a continuous process of further development. There-
fore modications to the technical features remain subject to change without
further notice.
2.2. First Start-Up
When starting up the stereo amplier for the rst time, please proceed as follows:
1. Turn down the master volume.
2. Turn down the volume of each source.
3. Connect the amplier to a microphone and/or other AUX source.
4. Turn on ON/OFF switch. The power indicator will light.
5. Adjust the master volume to the optimal level.
6. Adjust the Master Volume at half level, and gradually increase the input level
related to connected source (MIC1, MIC2/AUX2, AUX1) until you reach the de-
sired volume. If you need to change the wiring or installation, make sure to to
decrease master volume to minimum and disconnect power cord rst.
3. PRODUCT OVERVIEW
HMMA PLAY series is designed for all those PA applications where space is quite
zero. In half 19” Rack Unit there is a Class-D amplier with powers ranging from
35W to 120W (70-100V or 4-16ohm outputs), a USB/BT/FM Radio with Remote
Control, and a mixer for the control of the individual audio sources and the mas-
ter. It is also possible to connect these ampliers to your alarm system and power
a 24V in the event of a re prevention system. Really the perfect solution for small
business premises.

HMMA PLAY Series
Mini Digital Mixer Amplifier with USB/FM/BT
7
3.1 . Features:
yCompact design, Half 19” Rack Unit Size
y100V-70V & 4-16 ohm Speaker Output
yRated powers ranging from 35W to 120W
yBuilt-in USB Player, FM Radio & BT Streaming with remote controller
y2 MIC inputs (MIC1 with 6.3mm Jack; MIC2 with 2 XLR and Phantom)
y1 EMC input, 2 Line Inputs, 1 Line Output.
yHigh-Performance Class-D amplier with Switching Power Supply
yIndividual Volume control for Mic 1-2, Line 1-2, MP3/FM/BT
yBass/Treble and Master Volume Control
yDC24V Auxiliary Power Input
4. INSTRUCTION
4.1. Front Panel
MODE
MIC1
MIC1
Priority MIC2/AUX2 AUX1 TREBLE
BASS MASTER
ON
OFF
POWER
PROT
8
6
4
2
USB
USB/BT/TUNER DISPLAY
0 10 0 10 0 10 0 10
+10-10
0
+10-10
0
HMMA-120 PLAY
120W Mini Mixer Amplifier
1
8 9 10 11 12 13 14 15
2 3456
7
1. Display Screen
It shows all information about operative modes, tuner stations, BT, and USB play-
ing status.
2. USB Interface
Insert here your USB-Drive (FAT32 format –32GB Max) with your favorite MP3 play
lists.
3. Play / Pause (Station Storing in FM Mode)
In USB and BT mode, this button pauses & plays current song. In FM mode, it
searches radio stations automatically. Maximum preset number is 99, but nal

HMMA PLAY Series Mini Digital Mixer Amplifier with USB/FM/BT
8
result depends on stations active in your place.
4. Last Song (Last Station Recall in FM Mode)
In USB and BT mode, press this button to switch to last song in the directory. In
FM mode, press this key to switch to previous stored station in the list.
In FM/BT/USB mode, long press this button to turn down player volume. It ranges
from 32 to 0.
5. Next Song (Next Station Recall in FM Mode)
n USB and BT mode, press this button to switch to next song in the directory. In
FM mode, press this key to switch to next stored station in the list.
In FM/BT/USB mode, long press this button to turn up player volume. It ranges
from 0 to 32.
6. Mode Selection
Press this button to select AUX, BT, and Tuner mode.
7. MIC1 Input
This 1/4” (6,3mm) input connector has priority on all other sources (MIC1, MIC2/
AUX2, AUX1, BT, USB, Tuner).
8. MIC1 Volume
This knob adjusts MIC1 volume.
9. MIC2/AUX2 Volume
It adjusts MIC2/AUX2 volume.
10. AUX1 Volume
It adjusts AUX1 volume.
11. Bass Level
Turn counter clockwise to decrease Bass tone level; turn clockwise to increase it.
12. Treble Level
Turn counter clockwise to decrease High tone level; turn clockwise to increase it.
13. Master Volume
This knob adjusts the level of all signals (except EMC).

HMMA PLAY Series
Mini Digital Mixer Amplifier with USB/FM/BT
9
14. Power Switch
Press “ON” to turn the unit on; press “OFF” to turn power o.
15. LED Bar
This bar combines three information:
yPOWER - Is lit when the unit on;
yPROT - When this LED is on, indicates that the amplier is in overload state;.
Please reduce Master volume or adjust single audio source levels in order to
keep this LED o.
yLEDs from 2 to 8 - These bar shows the audio output level.
4.2. Rear panel
AMPLIFIER OUT
24V/4A
- +
DC IN
AUX OUT AUX1 IN MIC2 IN
MIC2 PHANTOM
AUX2
+48V
VOL
-+
AUX2 IN
COM 100V70V
4-16Ω
EMC IN
VOL
-+
350mV
100V
FM ANT
-
+
~220V/50-60Hz/4A
MADE IN CHINA
1
8 9 10 11 12 13 14
2
3 4 5 6 7
1. Power input
Connect the IEC/Schuko power cord here (only for HMMA-30 PLAY and HMMA-
120 PLAY). Please be sure your mains is AC~110-240V 50/60Hz before connecting
this amplier.
2. Tuner Antenna
Connect here the radio antenna.
3. DC-24V Power Input
In case of EVAC or alarm systems, it could be requested to connect this amplier
to auxiliary DC 24V power. Pay attention to respect correct polarity.
4. Audio Power Output
Connect this 4-pin Phoenix connector to your speaker system. Use dierent
constant voltage levels, and low-impedance output according to your speaker
system. Follow this table for your reference (from left to right):

HMMA PLAY Series Mini Digital Mixer Amplifier with USB/FM/BT
10
PIN1 COM
PIN2 4ohm-16ohm
PIN3 70V
PIN4 100V
5. AUX Output
Use this stereo line RCA pair to connect your HMMA PLAY amplier to other au-
dio systems, mixers or recording equipment.
6. AUX1 Input
Use this stereo line RCA pair to connect other sources to your HMMA PLAY ampli-
er (e.g. CD-players, mixers, DVD-players, etc.)
7. AUX2 Input
Like AUX1, use this stereo line RCA pair to connect other sources (e.g. CD-players,
mixers, DVD-players, etc.)
8. AUX2/MIC2/Phantom Switch
This selector has 3 positions: AUX2, MIC2, PHANTOM. In AUX2 position, this
channel routes to MIC2/AUX2 knob the stereo signal from AUX2 input; when in
MIC2 position, it routes the signal from XLR connector MIC2 to the MIC2/AUX2
knob; when in PHANTOM position, it keeps MIC2 to MIC2/AUX2 knob and acti-
vates +48V phantom power. This is required in case of condenser microphones
with balanced cable (3-pin XLR connector).
9. Indicator of 48V phantom power
When on, this LED indicates that Phantom Power is active on MIC2 connector.
NOTE: Never use Phantom Power in case of dynamic microphones or
other audio sources that do not require phantom power.
10. MIC2 Balanced Input
This 3-pin XLR connector is used to connect dynamic or condenser microphones.
In case of condenser capsules, please remember to select PHANTOM mode on
switch n. 8.
11. AUX2/MIC2 Gain
This trimmer adjusts input gain. Before connecting an audio source to MIC2 XLR
outlet, please turn it anti-clockwise to minimum lever; then connect the source,
put MIC2/AUX2 to half level, and adjusts this gain trimmer at half - 3/4 level. Do

HMMA PLAY Series
Mini Digital Mixer Amplifier with USB/FM/BT
11
not turn at maximum level if not required; increase MIC2/AUX2 knob level rst.
12. 100V Emergency Input
This 2-pin Phoenix connector accepts 100V constant-voltage line signal. It is used
to connect an emergency 100V line to your HMMA PLAY amplier. You can then
adjust its level by acting on trimmer n. 13.
13. Volume control of emergency input
This trimmer adjusts EMC inputs connected to 2-Pin Phoenix n. 12 and 1/4”
(6.3mm) Jack input n. 14. Before connecting audio sources to these inputs, please
turn it anti-clockwise to minimum lever; then connect the source, and gradually
increase level to the desired volume.
14. Audio Emergency Input
This 1/4” (6.3mm) connector accepts 350mV line signal. It is used to connect an
emergency system to your HMMA PLAY amplier. You can then adjust its level by
acting on trimmer n. 13.
4.3. Side Panel
Heat Dissipation Vent
During installation, please pay attention to not cover the heat dissipation vent, in
order to prevent overheating.
4.4. Remote Control:
HMMA-35 PLAY & HMMA-120 PLAY
1. Mode Selection: press it to choose AUX, BT or Tuner modes
2. Power switch: It switches on and o the player (only BT/USB/FM)
3. EQ Curves: by pressing this button you can choose among 7 EQ curves (Nor-
mal, POP, Rock, Jazz, Classic, Cut, Drc)
4. Last Song: In USB and BT mode, press this button to switch to previous song
in the directory. In FM mode, press this key to switch to previous stored sta-
tion in the list.
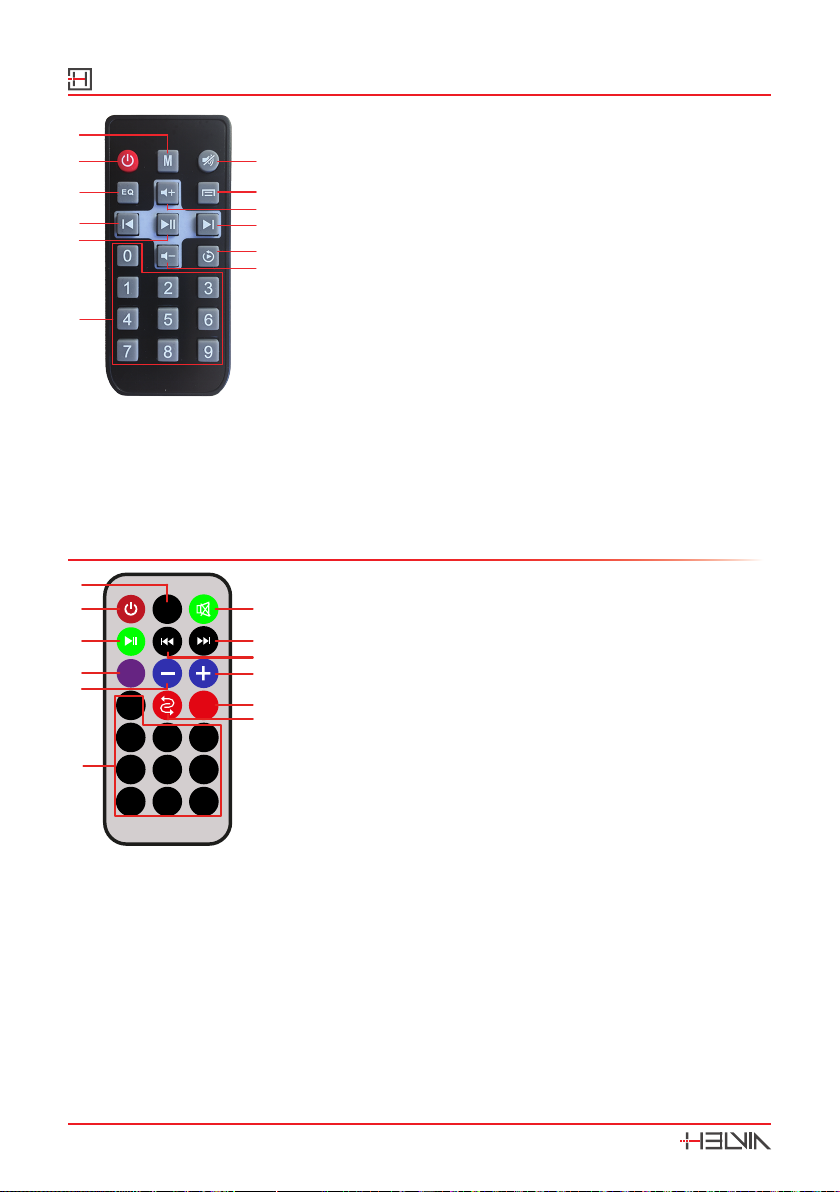
HMMA PLAY Series Mini Digital Mixer Amplifier with USB/FM/BT
12
5. Play/Pause: In USB and BT mode, this button paus-
es & plays current song. In FM mode, it searches
radio stations automatically.
6. 0-9 buttons: In USB/BT modes they are used to se-
lect song according to they position in the directo-
ry or play list; in FM mode, it recalls preset stations.
7. Mute key: It mutes the player (only BT/USB/FM)
8. STOP: In USB mode, it stops song playing
9. Volume +: In FM/BT/USB mode, it turns up player
volume from 0 to 32.
10. Next Song: In USB and BT mode, press this button
to switch to next song in the directory. In FM mode,
press this key to switch to next stored station in the
list.
11. Cycle: It switches between ONE (current song repeated) and ALL (normal
reproduction).
12. Volume -: In FM/BT/USB mode, it turns down player volume from 32 to 0.
HMMA-60 PLAY
1. Mode Selection: press it to choose AUX, BT or
Tuner modes
2. Power switch: It switches on and o the player
(only BT/USB/FM)
3. Play/Pause: In USB and BT mode, this button paus-
es & plays current song. In FM mode, it searches
radio stations automatically.
4. EQ Curves: by pressing this button you can choose
among 7 EQ curves (Normal, POP, Rock, Jazz, Clas-
sic, Cut, Drc)
5. 0-9 buttons: In USB/BT modes they are used to
select song according to they position in the direc-
tory or play list; in FM mode, it recalls preset stations.
6. Mute key: It mutes the player (only BT/USB/FM)
7. Last Song: In USB and BT mode, press this button to switch to previous song
in the directory. In FM mode, press this key to switch to previous stored sta-
tion in the list.
8. Next Song: In USB and BT mode, press this button to switch to next song in
the directory. In FM mode, press this key to switch to next stored station in
the list.
9. Volume -: In FM/BT/USB mode, it turns down player volume from 32 to 0.
10. Volume +: In FM/BT/USB mode, it turns up player volume from 0 to 32.
7
9
2
1
3
4
5
6
8
10
12
11
1
Mode
EQ
2 3
4 5
7
6
0
8 9
SCAN
6
7
2
1
3
4
9
5
8
10
12
11

HMMA PLAY Series
Mini Digital Mixer Amplifier with USB/FM/BT
13
11. Cycle: It switches between ONE (current song repeated) and ALL (normal
reproduction).
12. Not Used.
5. SPECIFICATIONS
Model HMMA-35 PLAY HMMA-60 PLAY HMMA-120 PLAY
Rated power 35W 60W 120w
Speaker Outputs 100V or 70V & 4Ohms-8 Ohms-16 Ohms
Connectors
Mic1 Input with unbalanced 6.3mm Jack
MIC2 with balanced XLR and Phantom Power
Line1-2 Inputs and Line Output with RCA
Knob Controls Microphone 1-2, Line1-2, MP3/FM, bass/treble and master
Sensitivity MIC 1&2 5mV; AUX 1&2 350mV; EMC 350mV
MIC frequency response 180Hz-10kHz (±3dB)
AUX frequency response 70Hz-16kHz (±3dB)
Noise <5mV (4 ohm load output terminal)
THD <1% 1KHz
Protection Short-Circuit, Clip, Overload and High-Temp Protection
Bass-Treble Adjustment 10dB (±2)
USB Connection: Type-B, Female
USB Drive Format: FAT32 format –32GB Max
Player File Formats: MP3 e streaming audio wireless BT
BT Receiving Distance 10m
BT Standard BT2.1+EDR
Power Requirement AC~110-220V
Rated Output Power 35W/4ohm, AC220V 60W/4ohm, AC220V 120W/4ohm, AC220V
Priority EMC > MIC1 > Others
Unit Size (W×D×H) 247x198x66 mm
Packing size (W×D×H) 343x302x121 mm
Net Weight 2.5kg 2.75kg 3.0kg
Gross Weight 3.2Kg 3.45Kg 3.7kg
Our products are subject to change. Modications to technical features remain subject to change without notice

HMMA PLAY Series Mini Digital Mixer Amplifier with USB/FM/BT
14
6. WARRANTY AND SERVICE
All HELVIA® products are covered by warranty according to European regulations (2 years
in the case of purchase by private person - B2C; 1 year in the case of purchase by company
- B2B). The warranty is valid from the date of purchase by the end user (private individual
or company), indicated in the purchase document (receipt in the case of private person;
invoice in the case of company). The following cases / components are not covered by the
above warranty:
yAll accessories supplied with the product;
yImproper use;
yFailure due to wear and tear;
yAny unauthorized modication of the product by the user or third parties.
HELVIA must meet the warranty obligations due to any non-compliant materials or manu-
facturing defects, by remedying free of charge at HELVIA’s discretion by either repairing or
replacing specic parts or the entire equipment. Any defective parts removed by a product
in the event of a warranty claim become property of HELVIA.
During the warranty period, defective products can be returned to HELVIA retailer or
installer with proof of original purchase (receipt or invoice). To avoid damage during trans-
port, please use the original packaging, if available. For more information, visit the website:
www.frenexport.com.
7. WARNING
READ CAREFULLY - only for EU and EEA (Norway, Iceland and Liechtenstein).
This symbol indicates that the product must not be disposed of with household waste,
according to the WEEE directive (2202/96/EC and subsequent amendments) and national
legislation.
The product must be delivered to a designated waste collection center (e.g. on an autho-
rized one-for-one basis when you buy a new similar product, or to an authorized collection
site for recycling waste electrical and electronic equipment).
Improper handling of this type of waste can have a negative impact on the environment
and human health due to potentially dangerous substances that are generally associated
with electrical and electronic equipment. At the same time, your cooperation in the proper
disposal of this product will contribute to the eective use of natural resources.
For more information about where you can drop o your waste equipment for recycling,
please contact your local city oce, waste authority, approved WEEE scheme or your
household waste disposal service.

SOMMARIO
8. PRECAUZIONI ..................................................................................15
8.1. Importanti Simboli di Sicurezza....................................................................................15
8.2. Importanti Istruzioni di Sicurezza.................................................................................16
9. PER INIZIARE....................................................................................17
9.1. Contenuto dell’imballo ....................................................................................................17
9.2. Prima accensione...............................................................................................................18
10. DESCRIZIONE GENERALE..............................................................19
10.1. Caratteristiche................................................................................................................19
11. ISTRUZIONI ......................................................................................19
11.1. Pannello Frontale...............................................................................................................19
11.2. Pannello Posteriore ......................................................................................................21
11.3. Pannello Laterale .........................................................................................................24
11.4. Telecomando ................................................................................................................ 24
12. SPECIFICHE...................................................................................... 26
13. GARANZIA E ASSISTENZA ........................................................... 27
14. AVVISO ............................................................................................. 27
8. PRECAUZIONI
8.1 . Importanti Simboli di Sicurezza
L’etichetta “CAUTION” è presene sul retro dell’unità.

Serie HMMA PLAY Mini Amplificatori-Mixer Digitali con USB/FM/BT
16
Il simbolo composto da un lampo all’interno di un triango-
lo equilatero avvisa l’utente della presenza di una “tensione
pericolosa” non isolata all’interno del telaio del prodotto che
può essere di entità suciente a costituire un rischio di scossa
elettrica per le persone.
Il punto esclamativo all’interno di un triangolo equilatero avver-
te l’utente della presenza di importanti istruzioni operative e di
manutenzione (assistenza) nella documentazione che accom-
pagna il prodotto.
8.2. Importanti Istruzioni di Sicurezza
yLeggete queste istruzioni
yConservate queste istruzioni
yRispettate tutte le avvertenze
ySeguite tutte le istruzioni
Acqua / Umidità
L’apparecchio deve essere protetto dall’umidità e dalla pioggia, non può essere
usato in prossimità di acqua; ad esempio nei pressi di una vasca da bagno, di un
lavandino, di una piscina, etc.
Calore
L’apparecchio deve essere posto lontano da fonti di calore come radiatori, stufe o
altri apparecchi che producono calore.
Ventilazione
Non ostruite le prese d’aria per la ventilazione: ciò potrebbe provocare incendi.
Installate sempre l’unità secondo le istruzioni del produttore.
Introduzione di Oggetti e Liquidi
Non introdurre oggetti o versare liquidi all’interno dell’apparato per ragioni di
sicurezza.
Cavo di Alimentazione e Spina
In caso di apparecchi con cavo di alimentazione, evitate che esso venga calpesta-
to o schiacciato, in particolare in prossimità delle spine, delle prese e del punto
in cui fuoriesce dall’apparecchio. Non vanicate la nalità di sicurezza della spina
con messa a terra. Una spina normale o “polarizzata” ha due soli terminali; una

Serie HMMA PLAY
Mini Amplificatori-Mixer Digitali con USB/FM/BT
17
spina con messa a terra ha un terzo polo di terra. Questo ulteriore terminale serve
per la vostra sicurezza. Se la spina fornita non si inserisce nella presa, consultate
un elettricista per l’eventuale sostituzione.
Alimentazione
In caso di apparecchi con alimentatore o adattatore di rete esterno, tenete pre-
sente che l’apparecchio deve essere sempre collegato alla sorgente di alimenta-
zione elettrica del tipo indicato sull’apparecchio o descritto nel manuale. In caso
contrario si potrebbero provocare danni al prodotto ed eventualmente all’utente.
Staccate la spina in caso di temporali o quando non viene utilizzato per lunghi
periodi di tempo.
Fusibile
In caso di apparecchi con porta-fusibile esterno, per evitare il rischio di incendi
e di danni all’unità, utilizzate solo il tipo di fusibile descritto nel manuale. Prima
di sostituirlo, assicuratevi che l’apparecchio sia spento e scollegato dalla presa di
corrente.
Collegamento alla Rete Elettrica
Il collegamento elettrico improprio può invalidare la garanzia del prodotto.
Rumore e Interferenze
Non utilizzare il dispositivo in prossimità di TV, radio, apparecchiature stereo,
telefoni cellulari o altri dispositivi elettrici. In caso contrario, il dispositivo, la TV o
la radio potrebbero generare rumore ed interferenze.
Pulizia
Pulite solo con un panno asciutto. Non utilizzate solventi come benzolo o alcol.
Manutenzione
Non eettuate qualsiasi altro intervento al di fuori di quelli descritti nel manuale.
Per eventuale assistenza rivolgetevi solo a personale qualicato. Utilizzate solo
accessori / componenti suggeriti dal produttore.
9. PER INIZIARE
9.1. Contenuto dell’imballo
Grazie per aver acquistato l’amplicatore-mixer della serie HMMA PLAY. Tutte

Serie HMMA PLAY Mini Amplificatori-Mixer Digitali con USB/FM/BT
18
le unità sono state rigorosamente testate prima di lasciare la fabbrica. Questo
prodotto è ampiamente utilizzato in scuole, negozi, bar, pub, ville e altri luoghi: è
la scelta ideale per le trasmissioni pubbliche. Per facilitare l’installazione, la messa
in servizio e l’uso di questo prodotto, leggere questo manuale prima dell’installa-
zione.
Disimballare con cura la confezione e controllare il contenuto per assicurarsi che
tutte le parti siano presenti e in buone condizioni:
y1 x Mini amplicatore-mixer HMMA PLAY
y3x Connettori Phoenix (2x 2-pin; 1x 4-pin)
y1x Cavo Antenna per Radio FM
y1 x Cavo di alimentazione (solo HMMA-30/120 PLAY)
y1x Telecomando
yQuesto Manuale d’Uso
In caso di danni durante il trasporto, informare immediatamente lo spedizioniere
e conservare il materiale di imballaggio per l’ispezione. Ancora una volta, si prega
di conservare la confezione e tutti i materiali di imballaggio. Se l’unità deve essere
restituita al produttore, è importante che questa venga restituita nella confezione
originale del produttore. Si prega di non intraprendere alcuna azione senza prima
averci contattato.
I nostri prodotti sono soggetti a un processo continuo di sviluppo. Pertanto, le
modiche alle caratteristiche tecniche rimangono soggette a modiche senza
preavviso.
9.2. Prima accensione
Quando si avvia l’amplicatore stereo per la prima volta, procedere come segue:
1. Ridurre il volume generale al minimo.
2. Ridurre al minimo il volume di ogni sorgente audio.
3. Collegare l’amplicatore ad un microfono e/o altra sorgente AUX.
4. Accendere l’amplicatore tramite l’interruttore ON/OFF.
L’indicatore di alimentazione si accenderà.
5. Regolare il volume generale ad un livello ottimale
6. Regolare il volume generale a metà livello e aumentare gradualmente il livello
di ingresso correlato alla sorgente collegata (MIC1, MIC2 / AUX2, AUX1) no
a raggiungere il volume desiderato. Se è necessario modicare il cablaggio o
l’installazione, assicurarsi di ridurre il volume generale al minimo e scollegare
prima il cavo di alimentazione.

Serie HMMA PLAY
Mini Amplificatori-Mixer Digitali con USB/FM/BT
19
10. DESCRIZIONE GENERALE
La serie HMMA PLAY è pensata per tutte quelle applicazioni PA dove lo spazio è
praticamente assente. In mezza unità rack da 19” trovano posto un amplicatore
in classe-D con potenze da 35W a 120W e uscita 70-100V o bassa impedenza
4-16ohm, un lettore multimediale USB, BT, Radio FM con telecomando, e un
mixer per il controllo delle singole sorgenti audio e del master. E’ inoltre possibile
collegare questi amplicatori al proprio impianto di allarme e alimentarlo a 24V
in caso di impianti antincendio. Davvero la soluzione perfetta per i piccoli locali
commerciali.
1 0.1. Caratteristiche
yDesign compatto, Mezza Unità Rack da 19”
yUscita con linea a 100V-70V e a bassa impedenza 4-16 ohm
yPotenze RMS da 35W a120W
yLettore USB integrato, radio FM e streaming BT con telecomando
y2 ingressi MIC (MIC1 con jack da 6,3 mm; MIC2 con 2 XLR e Phantom)
y1 ingresso EMC, 2 ingressi di Linea, 1 Uscita di Linea.
yAmplicatore in classe D ad alte prestazioni con alimentazione switching
yControllo del volume individuale per Mic 1-2, Line 1-2, MP3/FM/BT
yControlli Bass/Treble e Volume Master
yIngresso per alimentazione ausiliaria a 24Vcc
11. ISTRUZIONI
11.1. Pannello Frontale
MODE
MIC1
MIC1
Priority MIC2/AUX2 AUX1 TREBLE
BASS MASTER
ON
OFF
POWER
PROT
8
6
4
2
USB
USB/BT/TUNER DISPLAY
0 10 0 10 0 10 0 10
+10-10
0
+10-10
0
HMMA-120 PLAY
120W Mini Mixer Amplifier
1
8 9 10 11 12 13 14 15
2 3456
7
1. Display
Mostra tutte le informazioni su modalità operative, stazioni di sintonizzazione, BT

Serie HMMA PLAY Mini Amplificatori-Mixer Digitali con USB/FM/BT
20
e stato di riproduzione USB
2. Interfaccia USB
Inserire qui la propria unità USB (formato FAT32 –32 G-Byte massimo) con i brani
MP3 preferiti.
3. Play / Pausa (Memorizzazione delle stazioni in modalità FM)
In modalità USB e BT, questo pulsante mette in pausa e/o riavvia la riproduzione
del brano corrente. In modalità FM, cerca automaticamente le stazioni radio. Il
numero massimo predenito è 99, ma il risultato nale dipende dalle stazioni
attive.
4. Brano Precedente (Richiamo della stazione precedente in modalità FM)
In modalità USB e BT, premere questo pulsante per passare all’ultimo brano nella
directory. In modalità FM, premere questo tasto per passare alla stazione memo-
rizzata precedente nell’elenco. In modalità FM / BT / USB, premere a lungo questo
pulsante per abbassare il volume del lettore. Si va da 32 a 0.
5. Brano successivo (Richiamo della stazione successiva in modalità FM)
In modalità USB e BT, premere questo pulsante per passare al brano successivo
nella directory. In modalità FM, premere questo tasto per passare alla successiva
stazione memorizzata nell’elenco. In modalità FM / BT / USB, premere a lungo
questo pulsante per aumentare il volume del lettore. Va da 0 a 32.
6. Selezione delle Modalità
Premere questo pulsante per selezionare la modalità AUX, BT e Radio.
7. Ingresso MIC1
Questo connettore di ingresso da 1/4 ”(6,3mm) ha la priorità su tutte le altre fonti
(MIC1, MIC2 / AUX2, AUX1, BT, USB, Sintonizzatore).
8. Volume MIC1
Questa manopola regola il volume di MIC1.
9. Volume MIC2/AUX2
Regola il volume di MIC2 / AUX2.
10. AUX1 Volume
Regola il volume di AUX1.
This manual suits for next models
3
Table of contents
Languages:
Other HELVIA Amplifier manuals

HELVIA
HELVIA HSMA PLAY Series User manual

HELVIA
HELVIA HCA-60 PLAY User manual

HELVIA
HELVIA HRMA PLAY Series User manual

HELVIA
HELVIA HTMA TOUCH Series User manual

HELVIA
HELVIA HPMA Series User manual

HELVIA
HELVIA HRMA-1206C User manual

HELVIA
HELVIA HCA-40 PLAY User manual

HELVIA
HELVIA ZEUS X Series User manual

HELVIA
HELVIA HWA-40 PLAY User manual

HELVIA
HELVIA ZEUS CA Series User manual


