HemoSense INRatio2 User manual

Self Test User Guide
INRatio2 ProthrombinTime (PT) Monitoring System
Selbsttest-Benutzerhandbuch
INRatio 2 Prothrombinzeit (PT) Überwachungssystem
Guide de l’utilisateur pour l’autotest
Système de mesure du taux de prothrombine (TP) INRatio 2
Guida Utente per l’autoverica
Sistema di Monitoraggio delTempo di Protrombina (PT) INRatio 2
Guía de Usuario para el Autoanálisis
Sistema de Monitorización INRatio 2 delTiempo de Protrombina (TP)
Zelftest-gebruikershandleiding
INRatio2-systeem voor meting van de protrombinetijd (PT)
Brugervejledning til selvtestning
INRatio 2-systemet til monitorering af protrombintid (PT)
Itsetestauksen käyttöohje
INRatio 2 protrombiiniajan (PT) seurantajärjestelmä
Brukerveiledning ved egentesting
INRatio 2 protrombintid (PT)-overvåkningssystem
Användarhandbok för självanalys
Övervakningssystemet INRatio 2 ProthrombinTime (PT)
Guia de Auto-teste para o Utilizador
Sistema de monitorização do tempo de protrombina (TP) INRatio 2
EN
D
FR
IT
ES
NL
DK
FI
NO
SV
PT

Self Test User Guide
Welcome
Congratulations on your purchase of the INRatio2™PT Monitoring System from HemoSense.
This guide will provide you with useful information on how to perform PT testing with the
INRatio2.
Table of Contents page
Introduction
1. Introduction 4
2. Getting your System ready forTesting 4
3. Contacting HemoSense 5
The INRatio2 PT Monitor
4. System Description 6
5. Precautions and Limitations 7
6.Turning the Monitor ON and OFF 8
7. Changing the Monitor Settings 10
Performing a Test
8. Performing aTest 15
9. Collecting a Fingerstick Sample 20
10. Reviewing Past Results in the Monitor Memory 21
11. Quality Control 23
Maintenance and Troubleshooting
12. Care and Cleaning of your Monitor 24
13. Installing/Replacing Monitor Batteries 24
14.Troubleshooting Error Messages 25
Helpful Reference Information
15. Hazards, LCD Display Icons, and Symbols 28
16. Performance Characteristics and Specications 31
17.Warranty 31
18. Glossary ofTerms 32
19. Index 34
EN
3

EN
41. Introduction
Before You Begin
Before using this system to test your ProthrombinTime (PT), read this entire User Guide and
the inserts that came with the INRatioTest Strips and the Lancet device.
Take special note of CAUTIONS throughout this User Guide.You must complete proper
training on the INRatio2 PT Monitoring system and practice the test with a health care
provider before you begin using the system.
Intended Use
The INRatio2 PT Monitoring system is used for the quantitative measurement of Prothrombin
Time (PT) in fresh, capillary whole blood.The INRatio2 PT Monitoring system is intended
for use outside the body (in vitro diagnostic use) by people taking warfarin and other oral
anticoagulant (blood thinning) therapy who need to monitor the clotting time of their blood.
The INRatio2 PT Monitoring System is not intended to be used for screening purposes.
The INRatio2 PT Monitoring system should only be used with a prescription from your physician.
Test Principle
A drop of blood is applied to the test strip, where it is drawn into the test area.The blood
mixes with reagents that start the clotting reaction. As the blood clots, there is a change in
the impedance in the sample.The monitor detects the change and then calculates the PT for
the sample and reports the result on the screen.
The reagents used in performing PT tests can vary substantially between testing methods.
This may cause dierences in test results depending on the method used. For this reason,
the International Normalized Ratio (INR) unit was developed.The INR is a mathematical
correction of the PT result that adjusts for sensitivity dierences in reagents.The INRatio2 PT
Monitoring system provides both a PT and INR result with every test.
2. Getting your System ready for Testing
Your INRatio2 PT Monitoring system comes with:
• INRatio2PTMonitor
• SelfTestUserGuide
• QuickReferenceGuide
• ReusableLancetDevice
• DisposableSterileBloodLancets
• Gauzeandalcoholpads(USAonly)
• 4xAAAlkalineBatteries
(not installed)
• CarryingCase
• TrainingVideo

EN
5
NOTE: The INRatio2 PT monitor uses standard AA alkaline batteries.
You will also need:
• INRatioTestStrips
• Punctureresistant(Sharps)container
Optional accessories not provided with this system kit:
• PowerSupply(availablefromHemoSense).Powerfromastandardwalloutlet
can be used to power the monitor instead of using battery power. DO NOT use
any other Power Supply with the INRatio2 PT Monitoring system or you may
damage the system.
The Power Supply, additional INRatioTest Strips, the Lancet Device and Sterile Blood Lancets
may be ordered through an authorized INRatio2 distributor.
3. Contacting HemoSense
Contact HemoSense Customer Service if you have questions about your system kit contents.
Customer Service
1-877-436-6444 (toll free) or 1-408-719-1393
Customer Service available 7am – 5pm (PST), Monday – Friday
To re-order supplies, contact the distributor who provided you with the INRatio2 system kit.
Product
INRatioTest Strips
(Box of 12)
INRatio2 PT Monitor Power Supply
USA
INRatio2 PT Monitor Power Supply
withWorldwide Plugset
Autolet Impression Device
Unilet GP 21g Lancets
(Box of 12)
Unilet GP 21g Lancets
(Box of 100)
Part Number
0100071
0100011
0100260
0200497
0200122
0200138
Description
12 single-use test strips for use
with the INRatio2 PT Monitor
USA Power supply for use
with the INRatio2 PT Monitor
Worldwide Power supply for use
with the INRatio2 PT Monitor
Reusable Lancet Pen
Disposable sterile blood lancets for
use with the Autolet Impression
Disposable sterile blood lancets for
use with the Autolet Impression

EN
6
4. System Description
The INRatio2 PT Monitor
TopView
Contact HemoSenseTechnical Support if you have questions about using your system
correctly or if you are having problems with the monitor or strips.
Technical Support
1-877-436-6444 (toll free) or 1-408-719-1393
Technical support available 24 hours/day, 7 days/week
CAUTION: Contact your health care provider if you have questions about
your test results and any actions you should take.
LCD Display
(Setup) Button: puts the monitor in Setup mode
(OK) Button:
turns the monitor ON and OFF, and accepts/
stores display entries
(Memory) Button:
puts the monitor in Memory
mode
(UP) and (DOWN) Buttons:
changes information on the display
and scrolls between results in the
monitor memory
Test Strip Guide: insert test strip here to turn monitor
ON forTesting
Sample Light: apply blood sample here after the test
strip is inserted

EN
7
The INRatio2 PT Monitor
TopEndandBottomViews
Battery Door
Battery Door Release
Data Port
Power Supply Jack
The Test Strip
Electrodes
Test Area
Sample Well
Certain conditions limit the eectiveness of the INRatio2 PT Monitoring system to work
properly and provide accurate results.Take note of these limitations and precautions.
Care of your INRatio2 PT monitor
• DO NOT allow any liquid to spill on the monitor. If this should occur, unplug the
monitor (if it is plugged in) and call HemoSenseTechnical Support immediately.
• Themonitorisadelicateinstrument,andshouldbehandledwithcare.
Dropping or other mishandling may cause it to malfunction.
• Themonitorshouldbetransportedinitssuppliedcarryingcaseoranothersecure
container.
• DO NOT store the monitor below -4ºF/-20ºC or above 158ºF/70ºC.
Testing environment
• Room temperature for testing should be between 50ºF and 95ºF (between 10ºC and 35ºC).
• Themonitorandteststripmustalsobeatroomtemperaturebeforeuse.
• Relativehumidityshouldbebetween15%and95%,withoutcondensation.
• Atmosphericpressureshouldbebetween700hPaand1060hPa.
5. Precautions and Limitations

EN
8
Your current health status
Current health status may aect test results and cause inaccurate results or results that are not
what you expect. It’s important to take certain health factors into consideration when
interpreting test results and deciding on a course of action with your health care provider.
Failure to do so may lead to an incorrect interpretation of the PT monitor result. See Performing
a Test (Section 8) of this User Guide for more information about unexpected results.
Performing a test
Running a test with an incorrect strip code may cause inaccurate results. Conrm the
strip code each time a test strip is inserted.
Test with the monitor on a level surface that is free of vibrations.Testing on an uneven
surface or shaking may cause inaccurate results. DO NOT hold the monitor in your
hand while running a test.
Blood sample must be applied to the test strip immediately after collection or the blood
will begin clotting.This may cause inaccurate results.
Test strips are for single use only. DO NOT reuse them or re-apply blood to them.This
may cause inaccurate results or a testing error.
DO NOT move or touch the monitor while it is running a test.
Collecting a ngerstick blood sample
Use only fresh capillary blood for testing.
Squeezing the ngerstick site excessively (milking) may release interstitial uid into the
blood sample.This may cause inaccurate results.
The ngerstick site must be completely dry. If any alcohol remains on the nger, it may
cause hemolysis.This may cause inaccurate results.
6. Turning the Monitor ON and OFF
Follow these steps to turn the monitor ON or OFF.
NOTE:The INRatio2 PT Monitor comes with batteries but you must install them before the
monitor will turn ON. See Installing/Replacing Monitor Batteries (Section 13) for installing
batteries.
Turning the monitor ON
You have 2 options for turning the monitor ON:
1. Press and hold the button until the monitor turns on.
2. Insert a fresh test strip if you are ready to perform a test.

EN
9
NOTE:The LowTemperature symbol ( ) or HighTemperature symbol ( ) will appear
on the display if the ambient temperature is outside the operating range of the monitor. If
you get a“LO”or“HI”message, move the monitor to a location that is within the operating
range and begin again.You will not be able to perform a test until the ambient temperature is
within the monitor’s operating range.
With the monitor ON you can:
• performatest,or
• enterSetupmodewhereyoucanchangethemonitorsettings,or
• enterMemorymodewhereyoucanreviewpastresults.
See the appropriate sections of this User Guide for complete information for all of these options.
In both cases the monitor
will automatically perform a
self test where all segments
will appear on the display.
The monitor will prepare for
testing for a few seconds.
The monitor will then
prompt you to insert a test
strip, or to conrm the strip
code if you inserted a test
strip to turn on the monitor.
NOTE: If your monitor is connected to a computer or other
external device, 2 dashes“- -”will appear on the display.This
means the monitor is turned OFF but is communicating with
the external device.
Turning the monitor OFF
You can turn the monitor OFF whenever it is idle (not in the process of performing a test) by
pressing and holding the button for about two seconds.

EN
10
7. Changing the Monitor Settings
Follow these steps to change the date, time, units (how you want your test results displayed),
and whether you want to set a target range for your results.
1. Press and hold the button to turn the monitor ON
(Example timeout when being
prompted to apply blood)
The monitor will
automatically perform a self
test where all segments will
appear on the display.
The monitor will begin
preparing for a test for a few
seconds.
The monitor will then
prompt you to insert a test
strip.
NOTE:You may access Setup mode whenever your monitor is turned on, or after performing
a test.
2. Enter Setup mode
Press the Setup button to enter Setup mode.
The Setup symbol ( ) will appear on the display along with the year that’s currently set in
the monitor.
NOTE:When you turn on the monitor for the rst time, the date will be set to 01/01/2004
and the time will be set to 12:00.
If you are using the external power supply, the monitor will stay on indenitely.
NOTE:Turning the monitor OFF manually when it is not
being used will help conserve battery power. If you are using
battery power, and the monitor is left idle for about 10
minutes, the monitor will count down for about 10 seconds
and then turn OFF. Press any button to keep the monitor
turned ON and return to the previous monitor display.

EN
11
(Example MM/DD/YY format)
3. Select the desired format for displaying the date
Choose between MM/DD/YY or DD/MM/YY formats.The rst 2
sets of digits (DD/MM or MM/DD) will be ashing on the display.
Use the and buttons to switch between date formats. Press
the button when you have the correct date format on the
display.
4. Set the year
The last 2 digits of the year will begin to ash on the display. Use
the and buttons to change the year. Press the button
when you have the correct year on the display.
5. Change the month
The month will be ashing on the display. Use the and
buttons to change the month. Press the button when you
have the correct month on the display.
6. Change the day
The day will be ashing on the display. Use the and buttons
to change the day.
Press the button when you have the correct day on the
display.
7. Select the desired format for displaying the time
of day
Choose between 12-hour (AM/PM) or 24-hour formats.The 2
digits next to“hr”will be ashing on the display. Use the and
buttons to switch between 12-hour and 24-hour time formats.
Press the button when you have the correct time format on
the display.
(Example 12-hour format)

EN
12
INR Mode
Test results are displayed in
International Normalized Ratio
(INR) units only.The INR is a
mathematical correction of the
ProthrombinTime (PT) result
that adjusts for dierences in
the reagents that are used in
calculating your test results.
INR + PT Mode
Test results are displayed in
International Normalized Ratio
(INR) units and Prothrombin
Time (PT) seconds.
(Example result)
INR + PT Mode
8. Change the hour
The hour will be ashing on
the display. Use the and
buttons to change the hour.
Press the button when
you have the correct hour on
the display.
9. Change the minutes
The minutes will be ashing
on the display. Use the
and buttons to change the
minutes.
Press the button when
you have the correct minutes
on the display.
10. Select the test result display mode
Use the and buttons to choose 1 of 4 dierent display modes.
This display mode controls how much information will appear
along with your INR test result on the monitor display. DO NOT
select either of the 2 display modes that show QC results (INR +
QC mode or INR + PT + QC mode).These 2 modes are for health
care providers only.
INR Mode (Example result)
NOTE:Your test result in INR units will appear no matter which of the 4 display modes you select.
EN
13
Press the button when you have the correct display mode on the display.
11. Select the target range mode
An INR target range may be set in your monitor to alert you when your test results fall outside
the range.
CAUTION: Always contact your health care provider before setting an
INR target range that’s appropriate for you. If your results fall outside the
target range, or if your results fall within the target range but are not
consistent with your current health status (e.g., you have symptoms such as
bleeding or bruising), follow your health care provider’s instructions for the
correct action to take.
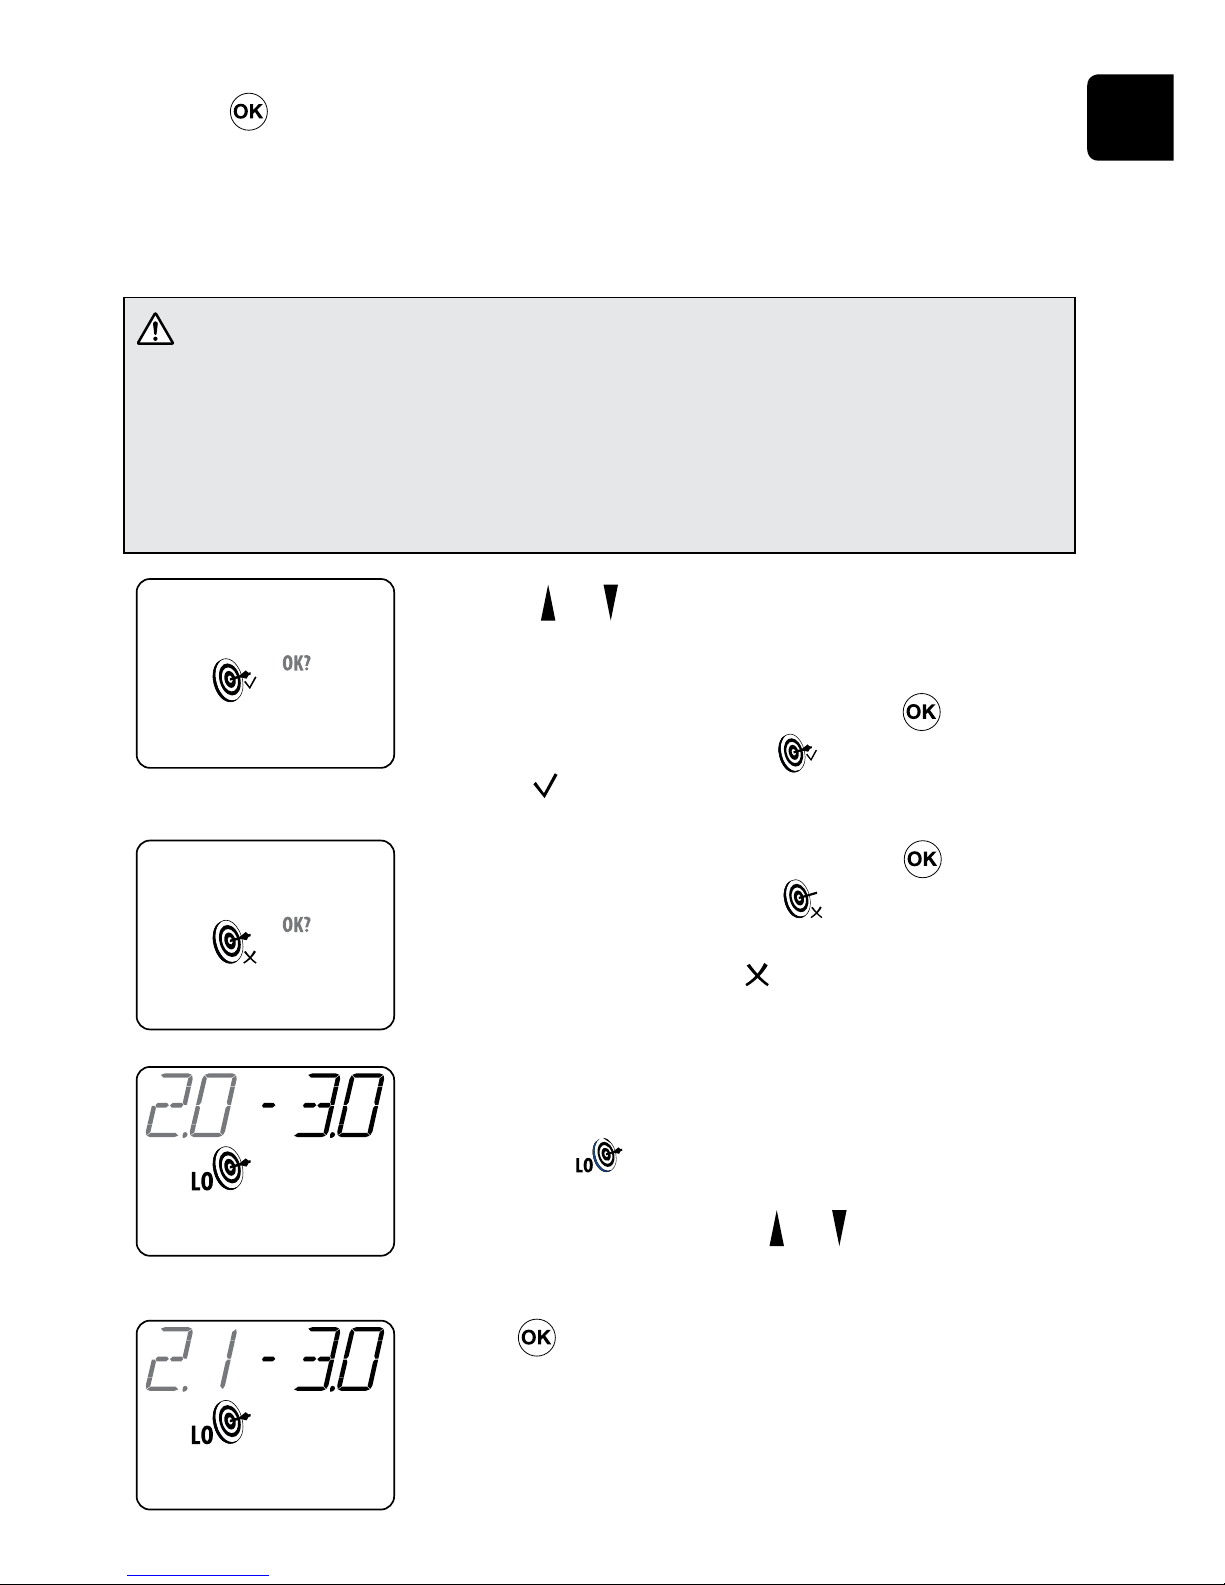
Use the the and buttons to switch between theTarget ON and
OFF modes.
If you want the target range mode ON, press the button
when theTarget Range ON symbol ( ) is on the display. Go to
step 12. ( =Targetrange mode ON)
If you want the target range mode OFF, press the button
when theTarget Range OFF symbol ( ) is on the display.You
will return to the monitor display that prompts you to insert a test
strip. Skip steps 12 and 13. ( = Target Range mode OFF)
12. Set the lower limit of the target range
The lower limit of the target range will be ashing, and the Low
Target symbol ( )will appear on the display.The“LO”message
will also appear on your test result display whenever your result
falls below the lower limit. Use the and buttons to change the
lower limit.
Press the button when you have the correct lower limit on
the display.
EN
14
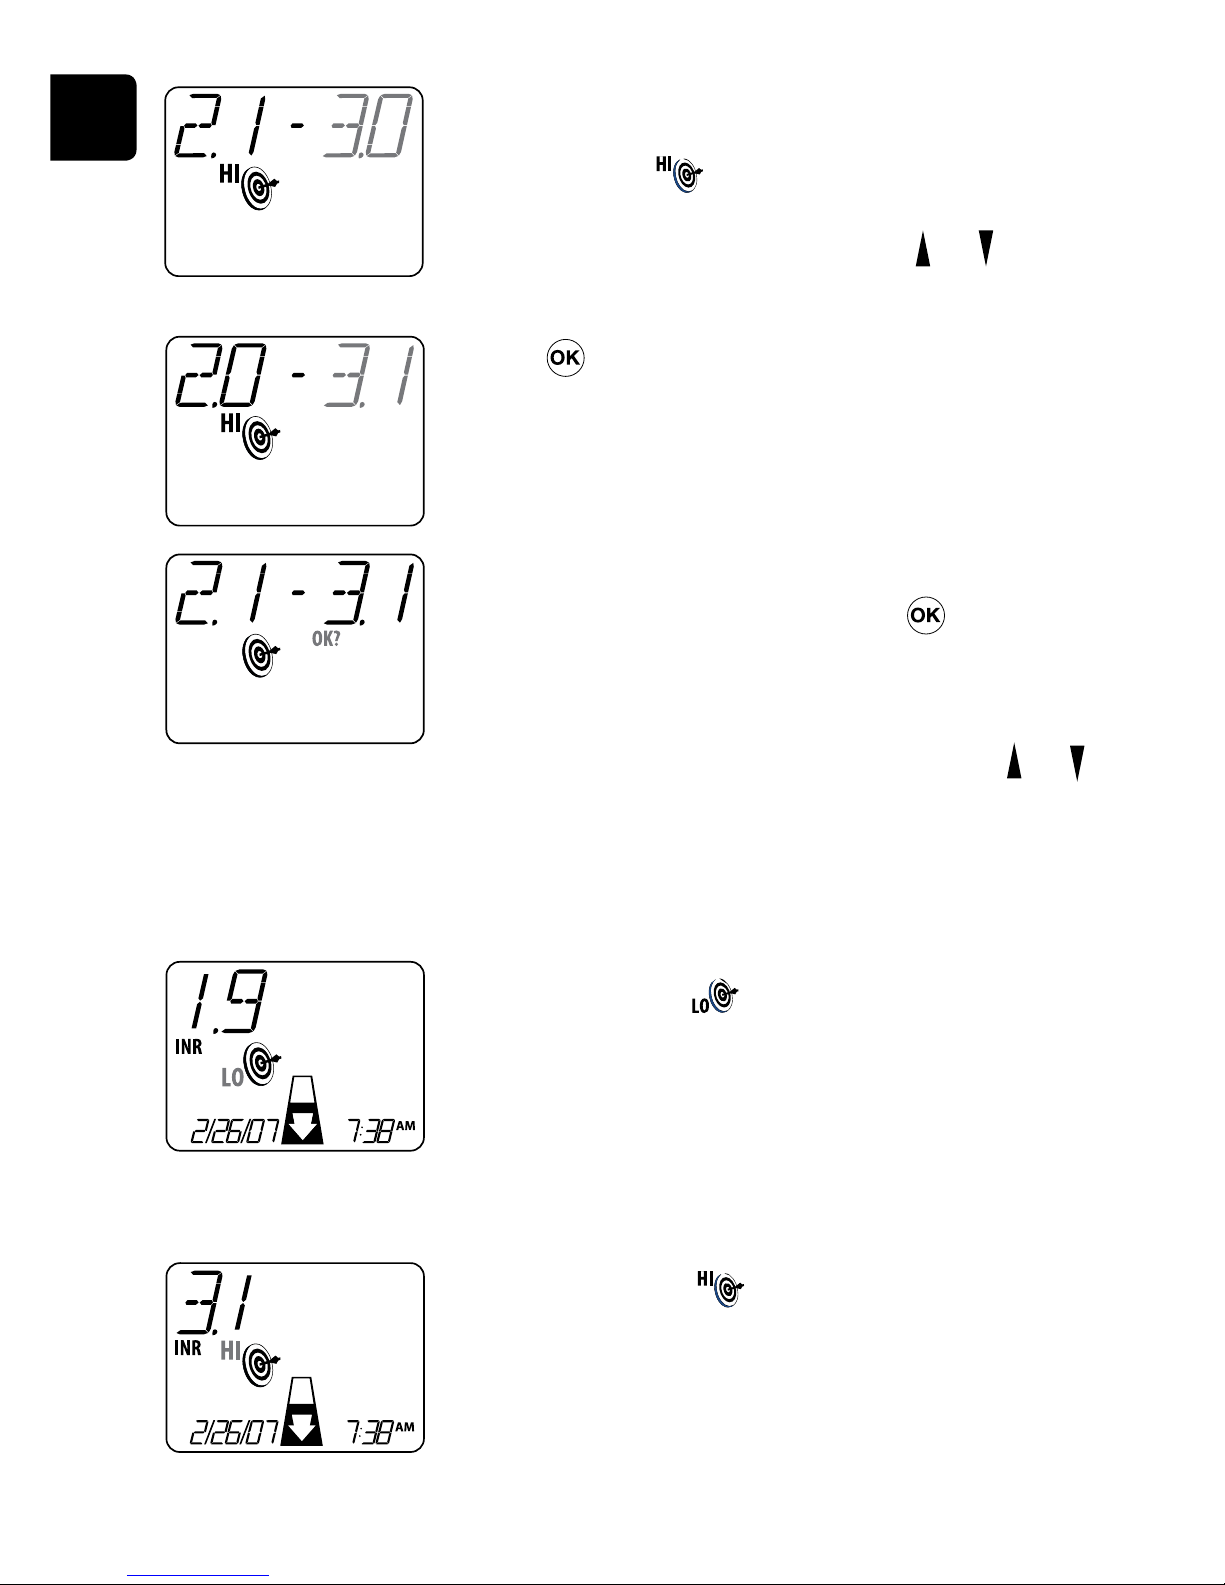
(Example test result above
target range — INR mode)
(Example test result below
target range — INR mode)
Example monitor displays when test results fall outside the target range
The LowTarget symbol ( ) will appear with your test result
on the display whenever your result falls below the lower limit
of your target range.
The HighTarget symbol ( ) will appear with your test result
on the display whenever your result is above the upper limit of
your target range.
13. Set the higher limit of the target range
The higher limit of the target range will be ashing, and the
HighTarget symbol ( ) will appear on the display.The“HI”
message will also appear on your test result display whenever
your result falls above the higher limit. Use the and
buttons to change the higher limit.
Press the button when you have the correct higher limit on
the display.
After setting the higher limit,“OK?”will begin ashing on the
display. If the target range is correct, press the button to
store the target range in the monitor.You will return to the
monitor display that prompts you to insert a test strip.
Or, if you would like to re-enter a target range, press the and
buttons to go back to the lower limit and repeat steps 12 and 13
until the correct target range is on the monitor display.

EN
15
NOTES:
• Ifyouneedtogobackandcorrectanyselectionsbeforeyouexit,youwillneedtorepeat
all Setup steps. Press the Setup button to return to the monitor display where you
are prompted to insert a test strip. Press the Setup button again to re-enter Setup
mode where you will begin by setting the date.
• AfteryoucompleteallSetupsteps,youwillreturntothemonitordisplaywhereyourst
entered Setup mode.
• Yourdate,time,displaymode,andtargetrangesettingsarestoredinthemonitorusing
battery power. If you are using a Power Supply and have removed the batteries (or the
batteries have completely run down), you will lose your settings within about two hours if
you unplug the Power Supply.To save your settings, install or replace the batteries as
needed even when using a Power Supply.
8. Performing a Test
Follow these steps to perform a test.
CAUTION: Always place the monitor on a at surface that is free of
vibration while you perform a test. DO NOT hold the monitor in your hand.
Failure to do so may cause inaccurate results.
1. Press and hold the button or insert a fresh test strip to turn the
monitor ON
The monitor will
automatically perform a self
test where all segments on
the display will appear.
The monitor will prepare for
a test for a few seconds.
If you turned the monitor on
by pressing the button,
the monitor will prompt you
to insert a test strip (go to
step 2).
If you turned the monitor on
by inserting a fresh test strip,
the monitor will prompt you
to conrm the strip’s code
(go to step 3).

EN
16 2. Insert a test strip into the test strip guide on the
monitor
Remove a fresh test strip from its foil pouch. Insert it into the
test strip guide so that the clear end with the vertical contact
bars goes in rst. On the blue end of the strip you should be able
to read the word“INRatio®”appearing from left to right. Make
sure the sample well in the strip lines up with the green light on
the test strip guide.
3. Match the code on the monitor display with the
strip code on the test strip pouch or strip container
If the codes match, simply press the button while“OK?“is
ashing on the display and proceed to Step 4.
If the codes do not match, use the and buttons to change
the rst digit of the code which will then be ashing.
Press the button to accept the rst digit and move to the
next digit. Change each digit using the and buttons, then
press the button to accept each digit and move to the next
digit.
To scroll more quickly through letters and numbers while
making changes, hold the and buttons down.
After setting the fth digit,“OK?”will begin ashing on the
display. If the code is correct, press the button to store the
code in the monitor.
Or, if you need to correct the code, press the and buttons to
go back to the rst digit and repeat step 3 until the correct code
is on the monitor display.

EN
17
CAUTION: Always match the code on the monitor display with the strip
code on the test strip pouch/container. Failure to do so may cause
inaccurate results.
NOTE: If you entered an invalid strip code, the CAUTION
symbol ( ) will ash underneath the code. Re-enter the
correct code beginning with the rst digit, which is now
ashing.
4. Wait for the monitor to warm up
The monitor will count down for a few seconds and display
theTemperature symbol ( )as it warms up for the test.
The monitor display will prompt you to apply a blood sample
when it’s ready to perform a test.
5. Get a ngerstick sample
See Instructions for Collecting a Fingerstick Sample (Section 9) for getting the correct blood
sample to perform a test.
6. Apply the blood sample to the sample well on the
test strip
Make sure you apply the sample directly over the green light.
DO NOT move the monitor or your nger as you apply the
sample.
If you applied a blood sample before the monitor was ready, the
CAUTION symbol ( ) will ash on the display. Remove the
test strip. DO NOT add more blood to the test strip. Go back to
step 2 and re-test with a fresh test strip.

EN
18 7. Wait for the monitor to beep and then count down
for a few seconds as it performs the test
If the monitor does not beep and count down, it means not
enough blood was applied. DO NOT add more blood to the test
strip. Remove the test strip.Then go back to step 2 and re-test
with a fresh test strip.
Your test result will appear on the monitor display along with the
date and time.
Test results are automatically stored in the monitor memory along
with the date and time of the test. See Reviewing Past Results in
the Monitor Memory (Section 10) for reviewing past results.
(Example INR mode result)
CAUTION: Unexpected results:
An unexpected result may include any result that falls outside the
therapeutic target range, or a result that falls inside the target range, but
is not consistent with your current health status (e.g., you have symptoms
such as bleeding or bruising).
What causes unexpected results:
1. A hematocrit (percentage of your blood that is red blood cells) that is higher or lower than
the validated operating range of the INRatio2 system can cause an inaccurate result. Refer
totheteststrippackageinsertformoreinformation.Vericationofyourhematocritwith
your health care provider will help ensure the reliability of results obtained with the PT
monitor.
2. Lupus or antiphospholipid antibody syndrome (APS) may falsely prolong the INR value.
Testing with an APS-insensitive laboratory method is recommended.
3. Certain prescription drugs (e.g., heparin - Refer to the test strip package insert for more
information) and over-the-counter medications (e.g., antibiotics) can aect the action of
oral anticoagulants and the INR value.

EN
19
4. Liver diseases, congestive heart failure, thyroid dysfunction, and other diseases or
conditions can aect the action of oral anticoagulants and the INR value.
5. Changes in diet, lifestyle, or taking nutritional supplements such as ginkgo biloba can
aect the action of oral anticoagulants and the INR value.
Be sure your health care provider is aware of any of these conditions before you begin testing,
and any time there is change in health status or medications after you have begun testing.
What to do when you get an unexpected result:
Always follow your health care provider’s instructions for re-testing on the PT monitor,
re-testing using an alternative method, adjusting your dose of anticoagulant medication, or
any other corrective actions.
8. Turn the monitor OFF when you are nished testing
To turn the monitor o, press and hold the button for about two seconds. Remove the
used test strip when prompted, and discard it in a Sharps or other puncture proof container.
If using batteries, the monitor will turn o automatically if you leave it unattended for a few
minutes. If using the power supply, the monitor will stay on indenitely. It is recommended
that you turn the monitor OFF manually to conserve power.
Before turning the monitor OFF, you also have the option to:
1.Perform another test
Remove and discard the used test strip, then begin again at step 2 with a fresh test strip,
using a dierent nger for the ngerstick sample.
2.Review past results in the monitor memory
Press the Memory button to enter Memory mode (see Reviewing Past Results in the
Monitor Memory in Section 10 for reviewing past results).
3.Change the monitor settings
Press the Setup button to enter Setup mode (see Changing the Monitor Settings in
Section 7 for changing your monitor settings).

EN
20 9. Collecting a Fingerstick Sample
Follow these steps to obtain a drop of blood from your nger.
CAUTION: It is important that you use the correct technique and a 21
gauge lancet to obtain the right type and amount of blood sample. Failure
to do so may cause inaccurate results. If you use another type of lancing
device or lancet, make sure to follow the instructions that came with that
device to get the correct blood sample.
1. Prepare sampling supplies
•Lancet device
•Sterilebloodlancet
•Alcoholpad
•Gauze
•Sharpsorotherpunctureresistant
container
2. Increase blood ow in your ngers by:
•Warming your hand (wash in warm water or use a heating pad/hand warmer)
•Gentlymassagingyournger
•Holdingyourhandbelowyourheart
3. Identify a site on your ngertip to puncture
Choose:
•amiddlengeroneitherhand
•anareanearthetopofthengertoeitherside
of center
•anareaawayfromanycallusesorscars
4. Clean the puncture site
Cleantheselectedareawith70%isopropylalcohol,oran
alcohol solution. Dry thoroughly with gauze.
5. Puncture your ngertip
Follow the instructions that came with the Lancet device to
puncture the ngertip.

EN
21
6. Apply pressure to your ngertip
Apply gentle, continuous pressure until a large, hanging drop of
blood (at least 15 µL) forms.
7. Clean and dry the puncture area after
applying the sample
Hold gauze over the puncture site until the bleeding stops.
Apply the hanging drop of blood to the sample well on the test strip
See Performing a Test (Section 8) for complete instructions.
8. Dispose of all used materials into a sharps or other puncture proof
container
NOTE: Used test strips, gauze, alcohol pads, lancing device and lancets may be considered
biohazardous waste in your area. Be sure to follow your local regulations for proper disposal.
10. Reviewing Past Results in the Monitor Memory
Follow these steps to review past results that are stored in the monitor memory.
Whenever you successfully perform a test, the result is automatically stored in the monitor
memory along with the date and time of the test.You can review your previous results and
share them with your health care provider.The monitor memory will store up to 120 results in
the order in which the tests were taken, beginning with your most recent result.The latest 60
results are available for on-screen review.
The monitor memory also stores PT computation errors, errors that occur when not enough
blood has been applied to the test strip, and QC errors.
You may access the monitor memory after performing a test, or whenever your monitor is
turned on. Simply press the Memory button . Once in Memory mode, the Memory symbol
() will appear on the display as you review past results.
Table of contents
Popular Recording Equipment manuals by other brands


Yamaha
Yamaha MT44D operating manual

Applied Research and Technology
Applied Research and Technology Project Series user manual

EFI
EFI Titan 100WF Instruction bulletin

Turbosound
Turbosound LMS-A6 user manual

National Instruments
National Instruments NI 9866 Getting started

Parasound
Parasound Zselect owner's guide