Henn&Hart FL0022 User manual

Save these instructions
CARE INSTRUCTIONS:
• Unpluglampbeforecleaning.
• Wipecleanwithasoft,dryclothorstaticduster.
• Alwaysavoidtheuseofharshchemicalsorabrasivecleanersastheymay
causedamagetothexture’snish
Page1of7Made in China FL0022FL0123FL0124rev032819EFS
IMPORTANT SAFETY INSTRUCTIONS:
• Theseinstructionsareprovidedforyoursafety.
Please read carefully and completelybeforebeginning
theassemblyandinstallationofthislightingxture.
• Thislightingxtureisintendedforindooruseonly.
• Alwaysplacelightingxtureonasolid,levelsurface.
• Toavoidtheriskofre,donotexceedthemaximumwattageof100W TYPE A lamp ,
or 23W Self-Ballasted lamp , or 9W SB LED lamp or lamp adapter.
(Bulbsnotincluded)
• Thislightingxturehasapolarizedplug(oneprongiswiderthantheother)asasafety
featuretoreducetheriskofelectricshock.Thisplugwilltinapolarizedoutletonlyone
way.Iftheplugdoesnottfullyintotheoutlet,reversetheplug.Ifitstilldoesnott,contact
aqualiedelectrician.Neverusewithanextensioncordunlessplugcanbefullyinserted.
Do not alter the plug.Donotattempttobypassthissafetyfeature.
WARNINGS:
• Toreducetheriskofre,electricalshock,orpersonalinjury:alwaysturnoandunplugthis
lightingxtureandallowittocoolbeforeattemptingtoreplacethelightbulb.
• Donottouchlightbulbwhilextureisturnedon.
• Keepammablematerialsawayfromthislightingxture.
• Neverlookdirectlyatalitbulb.
• Toavoidtheriskofelectricshockordamage,onlyusethesupplied,pre-installednylonset
screwtosecurethepositionoftheelectricalcordasdescribedintheseinstructions.
Never use a metal or pointed screw.
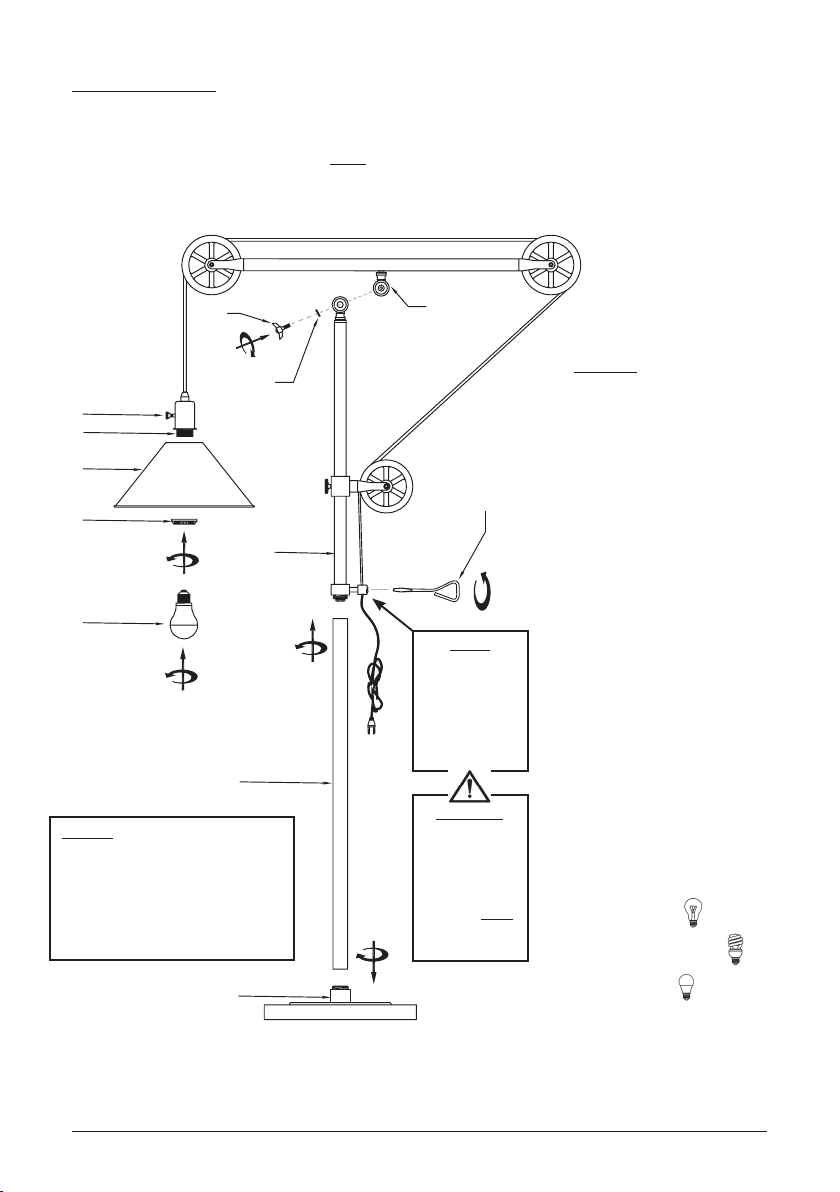
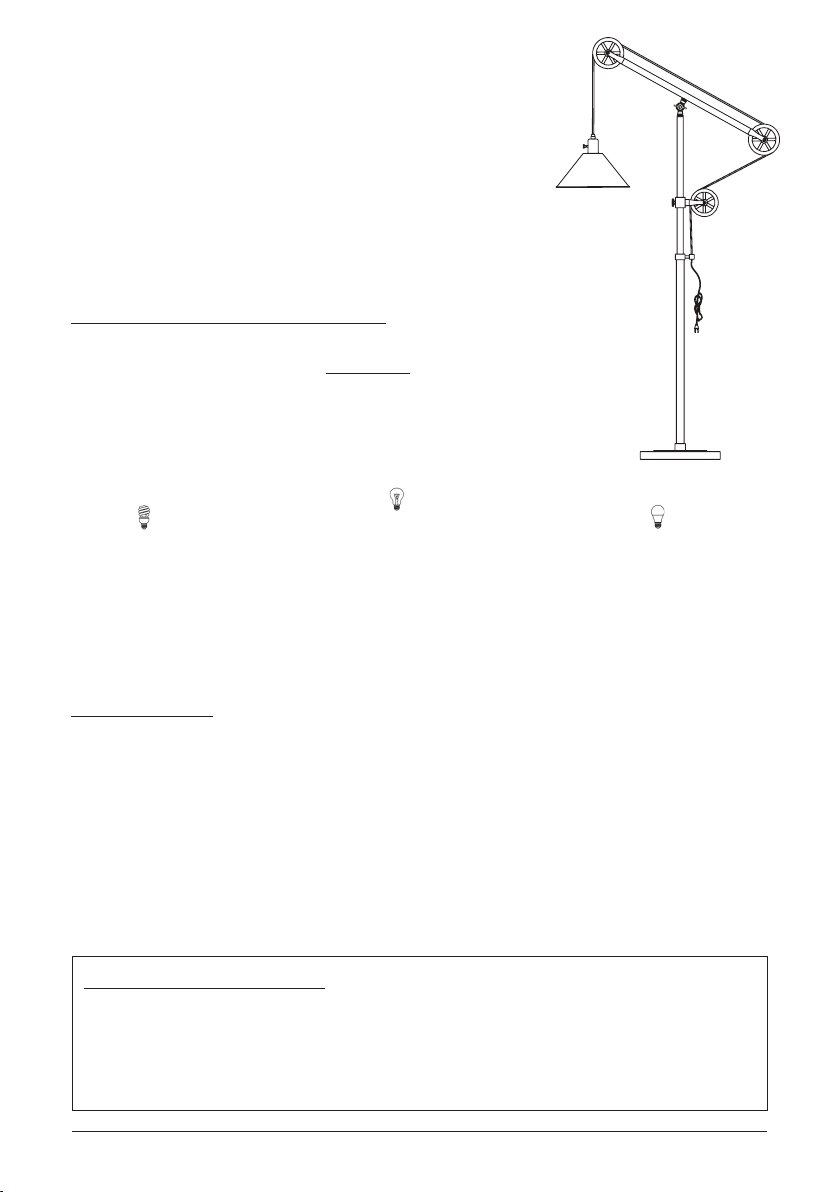
PULLEY SYSTEM FLOOR LAMP

ADJUSTABLE OPTIONS:
OPTIONS AJUSTABLES :
OPCIONES AJUSTABLES:
Page2of7
I
H
G
D
J
C
A
B
K
F
E
L
STEP 1:
BeginwiththeBase(A)byplacingit
uprightonaat,evenoorsurface.
AttachtheBottomPost(B),taking
extracarenottostripthethreads.
Tightenrmlybyhand.
NOTE:
Usescrewdriver
withthe
preinstalledset
screwtoadjust
andsecurethe
cordforlamp
shadeposition.
WARNING:
Onlyusethe
suppliednylon
screwtosecure
cord.Toavoid
riskofshockor
damage,never
useametalor
pointedscrew.
PRE-ASSEMBLY:
Carefullyremoveallpartsandhardwarefromcarton,alongwithanyprotectiveplasticpackaging.
Do not discard any contents until after assembly is complete to avoid accidentally
discarding small parts or hardware.
Page3of7Made in China
DO NOT EXCEED THE
SPECIFIED WATTAGE
Forusewiththefollowing
typesoflightbulbs:
(notincluded)
•100WTypeA
•23WSelf-Ballasted
•9WSBLED
PARTS:
(A)Base
(B)BottomSupportPost
(C)CenterSupportPost
(D)TopSupportPost
(E)Washer
(F)ThumbScrew
(G)On/OSwitch
(H)Cord/Socket
(I)Shade
(J)ShadeRing
(K)LightBulb(notincluded)
(L)Screwdriver
Conservez ces instructions
INSTRUCTIONS D’ENTRETIEN :
• Déconnectezleluminaireavantdelenettoyer.
• Essuyez-leproprementàl’aided’unchiondouxetsecoud’unessuie-meublestatique.
• Éviteztoujoursd’utiliserdesproduitschimiquesfortsouagentsnettoyantsabrasifs,
carilspourrontendommagerlanitionduluminaire.
Page4de7Fabriqué en Chine
CONSIGNES DE SÉCURITÉ ESSENTIELLES :
• Cesconsignessontfourniesauxnsdevotresécurité.
Veuillez les lire attentivement et au completavantdecommencer
l’assemblageetlamiseenplacedeceluminaire.
• Celuminaireestdestinéàutilisationàl’intérieurseulement.
• Poseztoujoursceluminairesurunesurfacesolideetdeniveau.
• Pouréliminertoutrisqued’incendie,évitezdedépasserlapuissancemaximale
prescrited’uneampouleTYPE A de 100 W , ou d’une ampoule à lumière mixte de
23 W , ou d’une ampoule à DÉL et à capteur de luminosité ambiante de 9 W ,
ou d’une douille voleuse. (Ampoulesnoncomprises)
• Celuminaireprésenteunechepolarisée(avecunebrochepluslargequel’autre)àtitrededispositif
desécuritévisantàamoindrirlerisquedechocélectrique.Cetteches’insèredansuneprisepolarisée
d’uneseulemanière.Silachenes’insèrepasaucompletdanslaprise,inversezlache.Siellenes’y
insèretoujourspasadéquatement,communiquezavecun(e)électricien(ne)qualié(e).N’utilisezjamais
decordonprolongateuravecceluminaireàmoinsquesachepuisses’insérercorrectement.
Évitez d’altérer la che.Évitezdecontournercettecaractéristiquedesécurité.
AVERTISSEMENTS :
• Pouramoindrirlerisqued’incendie,dechocélectriqueoudeblessurecorporelle,veuilleztoujours
mettrehorstensionetdéconnecterceluminaireetlelaisserserefroidiravantdetenterderemplacer
l’ampoule.
• Évitezdetoucherl’ampoulependantqueleluminaireestsoustension.
• Gardeztoutematièreinammableéloignéedeceluminaire.
• Éviteztoujoursderegarderdirectementuneampouleallumée.
• Utilisezuniquementlavisennylonfourniepourbloquerlecordon.Pourécartertoutrisquedechoc
électriqueoudedommage,ne jamais utiliser une vis métallique ou pointue.
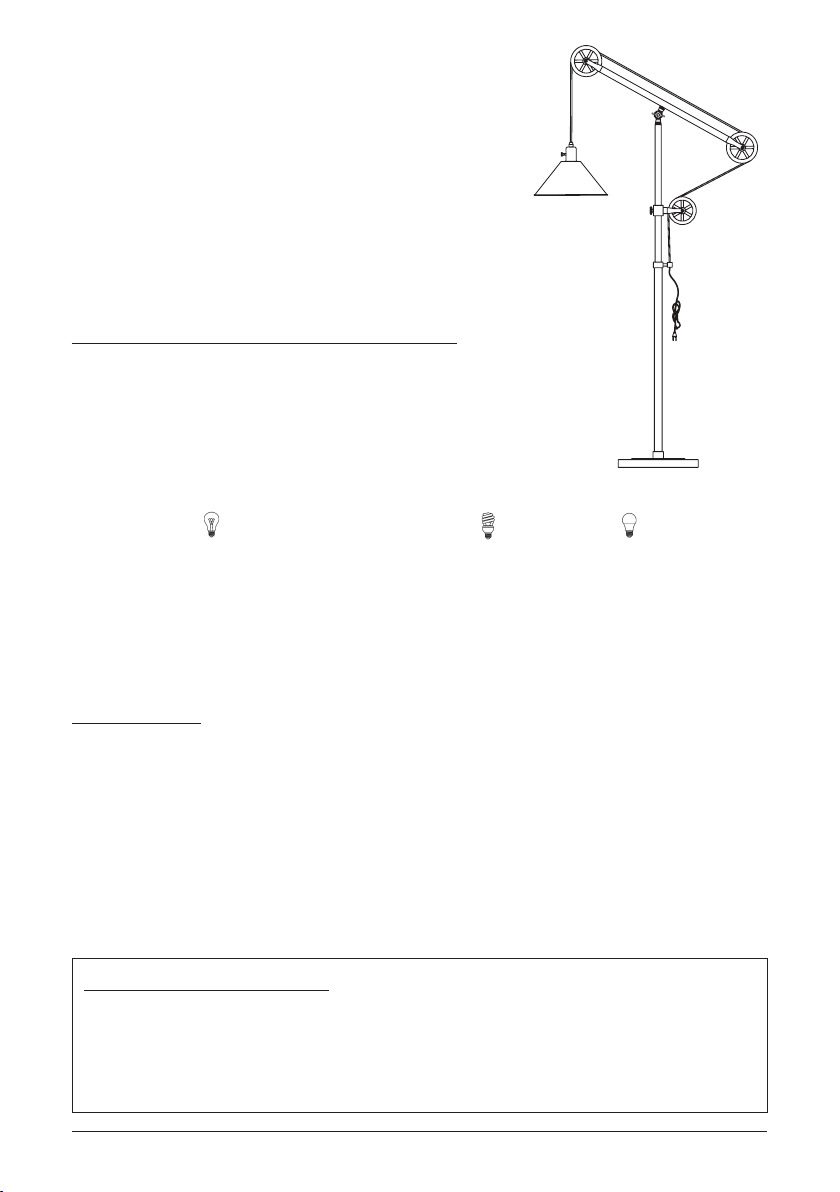
LAMPADAIRE DE SYSTÈME DE POULIE
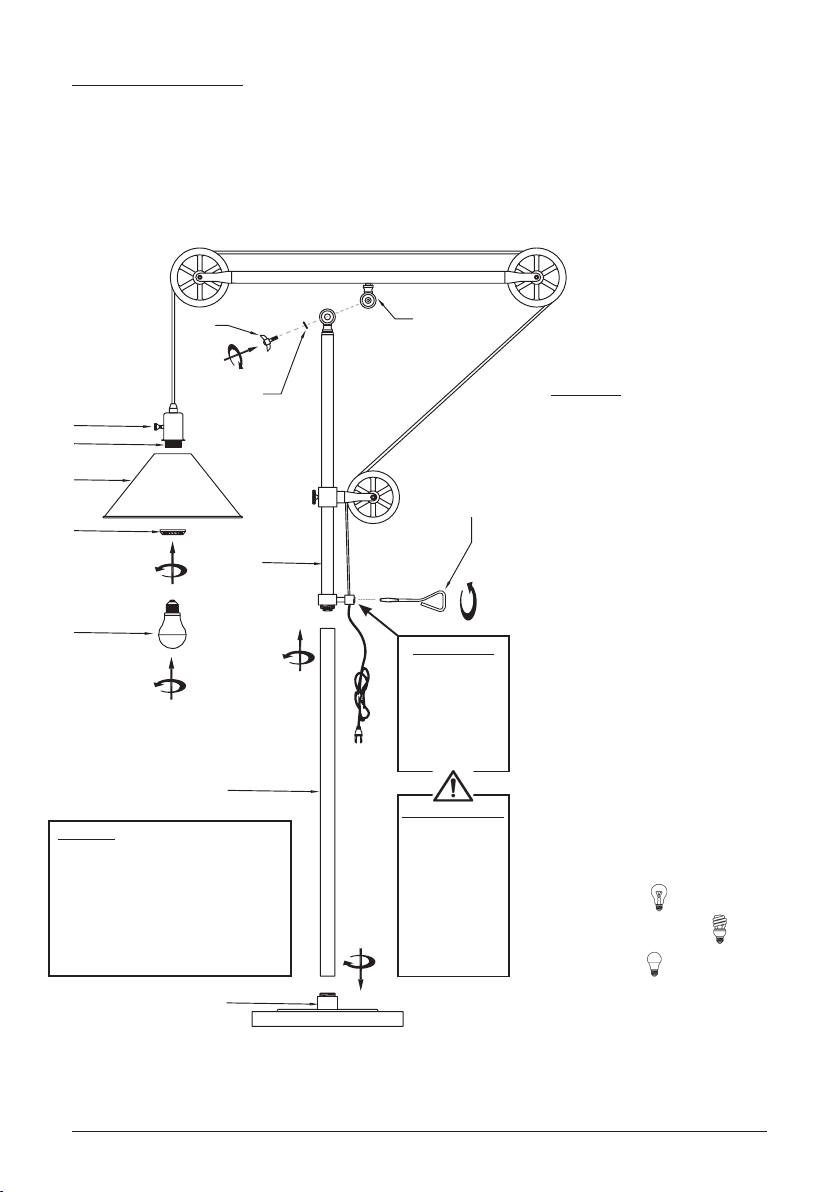
PRÉASSEMBLAGE :
Retirezsoigneusementdelaboîtetouteslespièces,toutelaquincaillerie,ettoutemballagede
plastiqueprotecteur.
Ne mettez aucun élément de contenu au rebut avant de terminer l’assemblage au complet,
an d’éviter de jeter accidentellement de petites pièces ou un élément de quincaillerie.
Page5de7Fabriqué en Chine
ÉVITEZ DE DÉPASSER LA
PUISSANCE MAXIMALE SPÉCIFIÉE
Pourutilisationaveclestypes
d’ampoulesuivants(noncompris):
•100WtypeA
•Lumièremixtede23W
•DÉLde9W
PIÈCES :
(A)Base
(B)Barredesupportinférieure
(C)Barredesupportcentrale
(D)Barredesupportsupérieure
(E)Rondelle
(F)Visàoreilles
(G)BoutonON/OFF
(H)Cordonélectrique/prise
(I)Abat-jour
(J)Baguedeabat-jour
(K)Ampoule(nonincluse)
(L)Tournevis
I
H
G
D
J
C
A
B
K
F
E
L
ÉTAPE 1 :
Commencezparposerleculotde
lampe(A)deboutsurunesurfacede
plancherplaneetdeniveau.
Vissezleporte-lampeinférieur(B)en
place,enprenantgrandsoind’éviter
d’arracherleslets.
Serrezfermementàlamain.
REMARQUE :
Utiliseruntournevis
surlavisdecalage
préinstalléepour
ajusteretbloquerle
cordondansla
positionsouhaitée
pourl’abat-jour.
AVERTISSEMENT :
Utilisez
uniquementlavis
ennylonfournie
pourbloquerle
cordon.Pour
écartertoutrisque
dechocélectrique
oudedommage,
nejamaisutiliser
unevismétallique
oupointue.
Guarde estas instrucciones
INSTRUCCIONES DE CUIDADO:
• Desenchufelalámparaantesdelimpiarla.
• Limpieconunpañosuaveysecooconunpañoparaestática.
• Evitesiempreelusodelimpiadoresquímicosásperosoabrasivos,yaquepuedendañar
elacabadodelaccesorio.
Hecho en China Página6de7
INSTRUCCIONES IMPORTANTES DE SEGURIDAD:
• Estasinstruccionesseproporcionanparasuseguridad.
Léalascuidadosamenteyporcompletoantesde
comenzaraensamblareinstalarestalámpara.
• Estalámparaestádestinadaaserutilizadasoloeninteriores.
• Coloquesiemprelalámparasobreunabasermeynivelada.
• Paraevitarelriesgodeincendios,noexcedaelvatajemáximo de una bombilla de
100W TIPO A
, de 23W con balasto incorporado , LED SB de 9W , o un adaptador
para bombilla.(Noseincluyenlasbombillas)
• Estalámparatieneunenchufepolarizado(unapatillasesmásanchaquelaotra)como
característicadeseguridadparareducirelriesgodeunelectrochoque.Esteenchufesolo
entraráenuntomacorrientepolarizadodeunasolamanera.Sinoentracompletamenteen
eltomacorriente,inviertaelenchufe.Siaúnasínoentra,comuníqueseconunelectricista
calicado.Noutilicenuncauncableprolongador,amenosqueelenchufesepuedainsertar
porcompleto.Nomodiqueelenchufe.Nointenteeludirestacaracterísticadeseguridad.
ADVERTENCIAS:
• Parareducirelriesgodeincendio,electrochoqueolesionespersonales:siempreapaguey
desenchufeestalámparaydéjelaenfriarantesdeintentarreemplazarlabombilla.
• Notoquelabombillamientraslalámparaestáencendida.
• Mantengalosmaterialesinamableslejosdelalámpara.
• Nuncamiredirectamenteaunabombillaencendida.
• Utiliceúnicamenteeltornillodenylonparaasegurarelcable.Paraevitarelriesgode
descargaeléctricaodaños,nunca utilice un tornillo de metal o con punta.
LÁMPARA DE PIE DEL SISTEMA DE LA POLEA

Página7de7Hecho en China
ANTES DEL ENSAMBLADO:
Retireconcuidadotodaslaspiezasyherramientasdelacaja,juntocontodoelenvoltorio
plásticoprotector.
No deseche nada hasta después de haber terminado de ensamblar para evitar botar por
accidente piezas pequeñas o herramientas.
NO EXCEDA EL VATAJE
ESPECIFICADO
Parautilizarconlossiguientestipos
debombillas:(noincluidas)
•100WTipoA
•23Wconbalastoincorporado
•9WLEDSB
PARTES:
(A)Base
(B)Barradesoporteinferior
(C)Barradesoportecentral
(D)Barradesoportesuperior
(E)Arandela
(F)Tornillodepulgar
(G)Interruptorencendido/
apagado
(H)Cableeléctrico/
Enchufedelaluz
(I)Pantalladelámpara
(J)Anillodepantalla
(K)Bombilladeluz
(noincluida)
(L)Destornillador
I
H
G
D
J
C
A
B
K
F
E
L
PASO 1:
Comiencecolocandolabase(A)en
posiciónverticalsobreunasupercieplana
yuniformedelpiso.
Fijeelposteinferior(B),poniendoespecial
cuidadoennodesgarrarloshilos.
Ajusteamanoconrmeza.
NOTA:
Useeldestornillador
coneltornillodel
conjuntopreinsta
-
ladoparaajustary
asegurarelcable
paralaposiciónde
lapantallade
lalámpara.
ADVERTENCIA:
Utiliceúnicamente
eltornillodenylon
paraasegurarel
cable.Paraevitarel
riesgodedescarga
eléctricaodaños,
nuncautiliceun
tornillodemetalo
conpunta.
This manual suits for next models
2
Table of contents
Languages:
Other Henn&Hart Outdoor Light manuals


