Henry Schein 900-8181 User manual
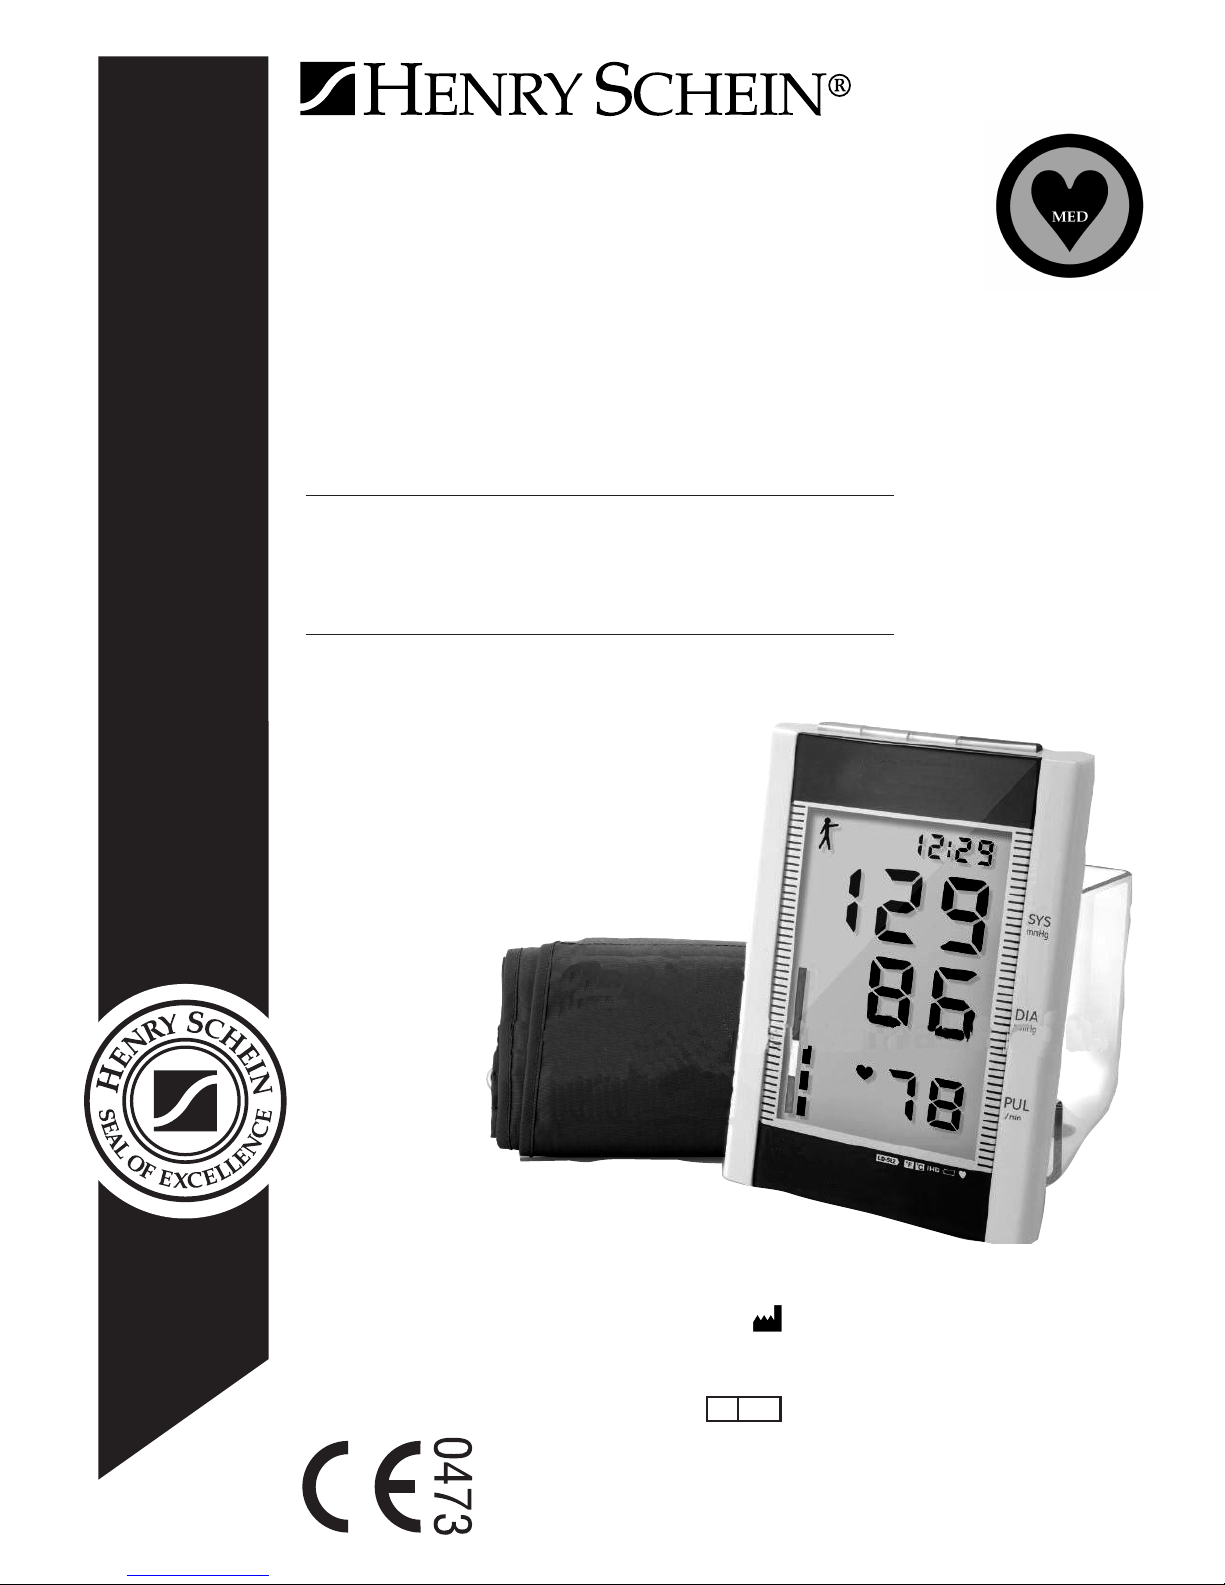
900-8181
®
Digital BlooD
Pressure unit
Digital de la unidad
de sangre de presión
Unité numérique
de tension artérielle
HS-Digitales Blutdruckmessgerät
Distributed by: (US only)
!$*#$$!
EC REP
+++"!&(,)"!#&(& '%
Rev. 2011/10
InstructIons for use
InstruccIones De uso
Manuel D’utIlIsatIon
GebrauchsanweIsunG

2
GENERAL
This instruction manual is intended to assist the user for safe and ef-
ficient operation of the automatic digital blood pressure monitor (he-
reinafter: device) model LD7. The device must be used in accordance
with the procedures described in the manual. It is important to read
and understand the entire manual, especially the section "Tips on ta-
king blood pressure measurement". This device is intended for the
non-invasive measurement of systolic and diastolic arterial blood
pressure and pulse rate in adults (age 15 and above). Consult the phy-
sician if measurement is taken in children or persons with arrhythmia
as errors may occur.
PRINCIPLE OF OPERATION
This device adopts the oscillometric technology with uzzy Algorithm
measuring the arterial blood pressure and pulse rate. The cuff is wrap-
ped around the arm and automatically inflated by the air pump. The de-
vice sensor catches weak fluctuation of the cuff pressure in the cuff
produced by extension and contraction of the artery of the arm in re-
sponse to each heartbeat. The amplitude of the pressure waves is mea-
sured, converted in millimeters from the mercury column, and is
displayed in digital value. Annotation: This device cannot provide rea-
sonable accuracy if used or stored in the temperature or humidity bey-
ond the range stated in the section "SPECI ICATIONS" of this manual.
NEW TECHNOLOGIES USED
UZZY algorithm takes into account the uniqueness of individual
heartbeats, which provides higher accuracy of measurement.
TIPS ON TAKING BLOOD PRESSURE MEASUREMENT
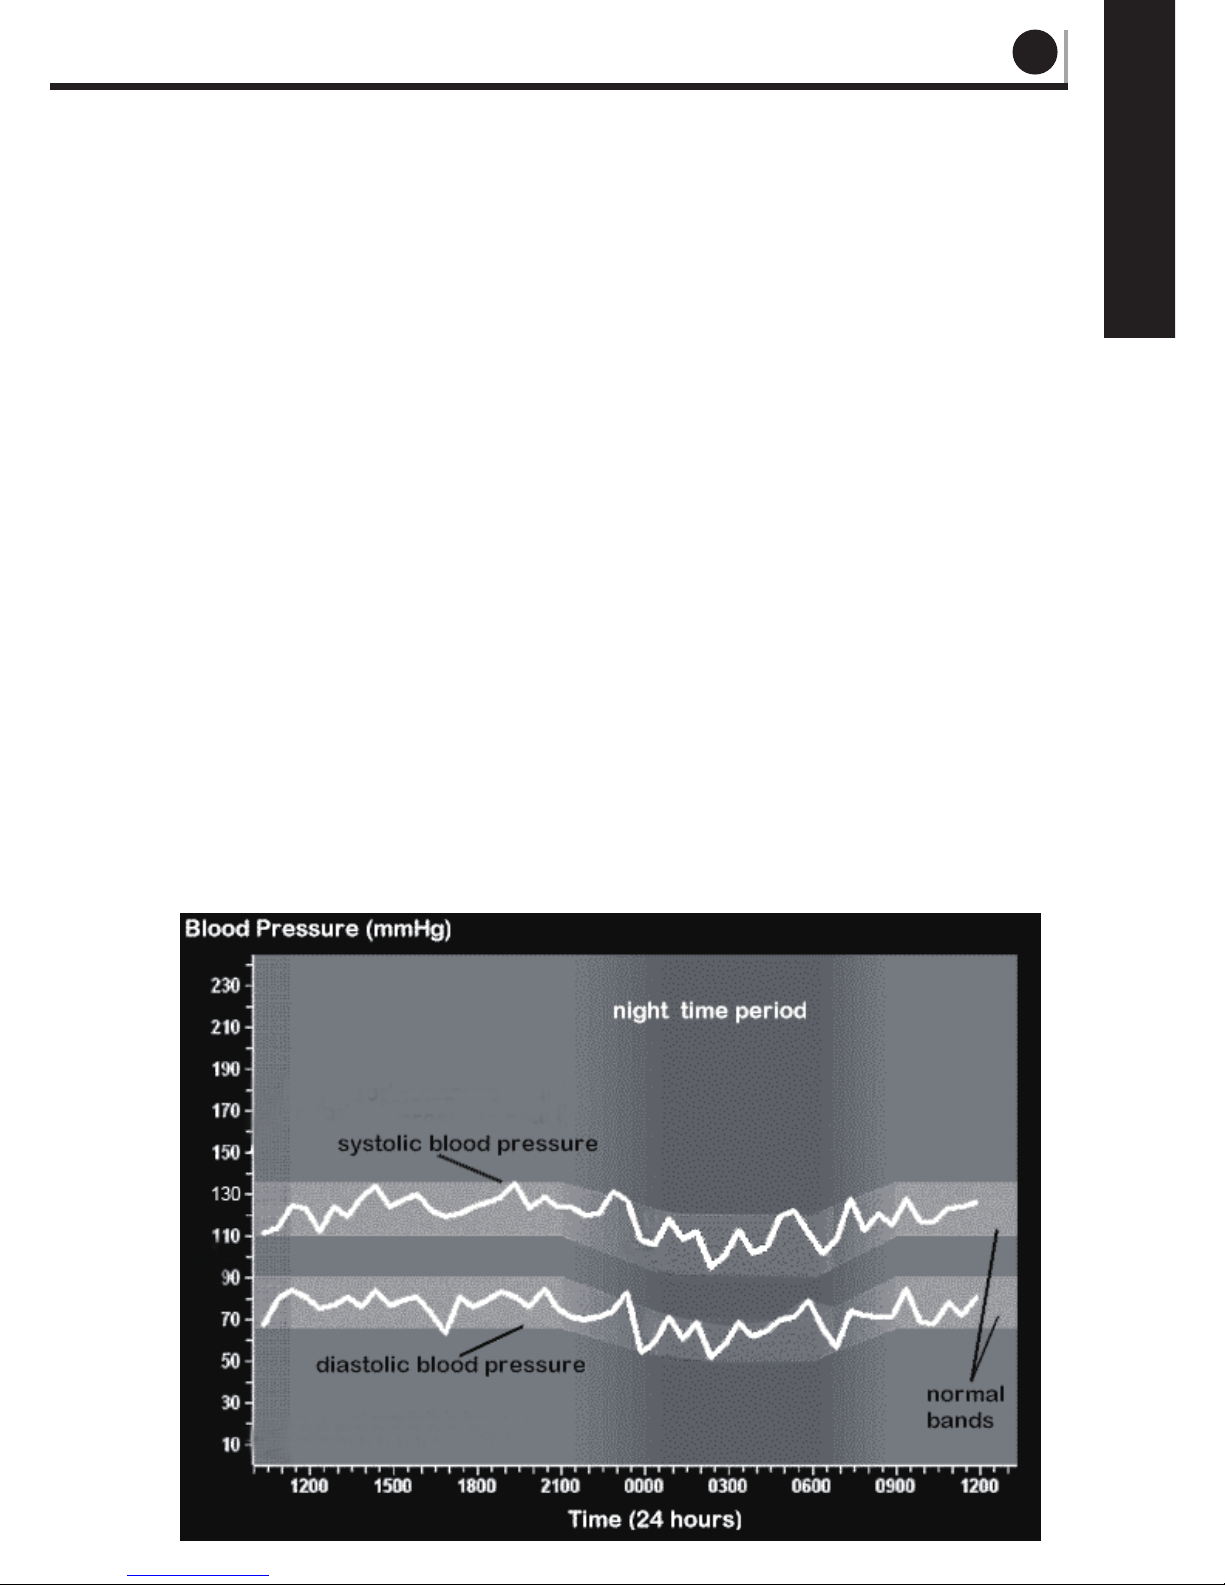
1. Arterial blood pressure is subjected to sharp fluctuations. The level
of the arterial blood pressure depends on many factors. Generally
arterial blood pressure is lower in summer and higher in winter.
3
ENGLISH
Arterial blood pressure changes with atmospheric pressure and is
affected considerably by many factors, e.g. physical loads, emo-
tional state, stress, meals, etc. Medicines, drinking, smoking has
a big effect on the individual level of blood pressure. When blood
pressure is measured in hospital, the value is always higher than
that at home. Tension can have a serious effect on certain groups
of patients and is known medically as 'White coat effect' Blood
pressure will raise in low temperature, so it is better to take blood
pressure measurement in room temperature (approximately 20°C).
If device is stored in low temperature, bring up to room tempera-
ture for at least 1 hour before use or measurement could be inac-
curate. Blood pressure does vary with age and individual, and it is
recommended to write down the readings in blood pressure record
daily and check with your doctor to find out what 'normal blood
pressure' is for you.
4
2. Take measurement under doctor's instruction for patients with car-
dio-vascular diseases. Under no circumstances should you alter
the dosages of any drugs prescribed by your doctor!
3. Accurate measurement of blood pressure may be difficult in se-
rious arteriosclerosis, weak pulse, or in patients with obvious
fluctuation of heart contraction rhythm. Please consult qualified
physician to interpret your blood pressure readings.
4. It is necessary to remain still and silent during measurement to get
accurate readings. Measurement should be conducted in quiet en-
vironment at room temperature. Don't eat or smoke before a mea-
surement. This device is supplied with the cuff which will fit arm
sizes 22-42cm. Children and adults whose cuff size falls outside
the range 22-42 cm should select another cuff size. Please contact
the dealer to get the other cuff sizes.
ATTENTION:
Do not use cuffs other than the original cuff contained in this kit!
5. Repeated measurements at 3 minute intervals are recommended
to calculate the average for a more accurate measurement. Athe-
rosclerosis patients should use longer intervals (10-15 minutes)
as elasticity of patients' vessels decrease significantly in these
diseases. 10-15 minutes interval is also applicable for patients suf-
fering from diabetes for a long time. Per ESH (European Society of
Optimal

5
ENGLISH
Hypertension) recommendations 'At least two measurements at
1 min intervals are should be taken carefully at each visit', we pro-
vide the average of the latest three readings.
BATTERY INSTALLATION
1. Open the battery cover and install four 'AA' type batteries into the bat-
tery compartment as indicated. Make sure that the polarity is correct.
2. Close the battery compartment cover.
Replace batteries if W appears in the display or if no power when
ON/O button is pressed.
Replace all batteries simultaneously, and don't use rechargeable bat-
teries. If the device is to be unused for a long time, please take out
the batteries. Do not leave worn batteries in the device. Life span of
enclosed batteries may be short and should only be used to check
that the device is operating correctly.
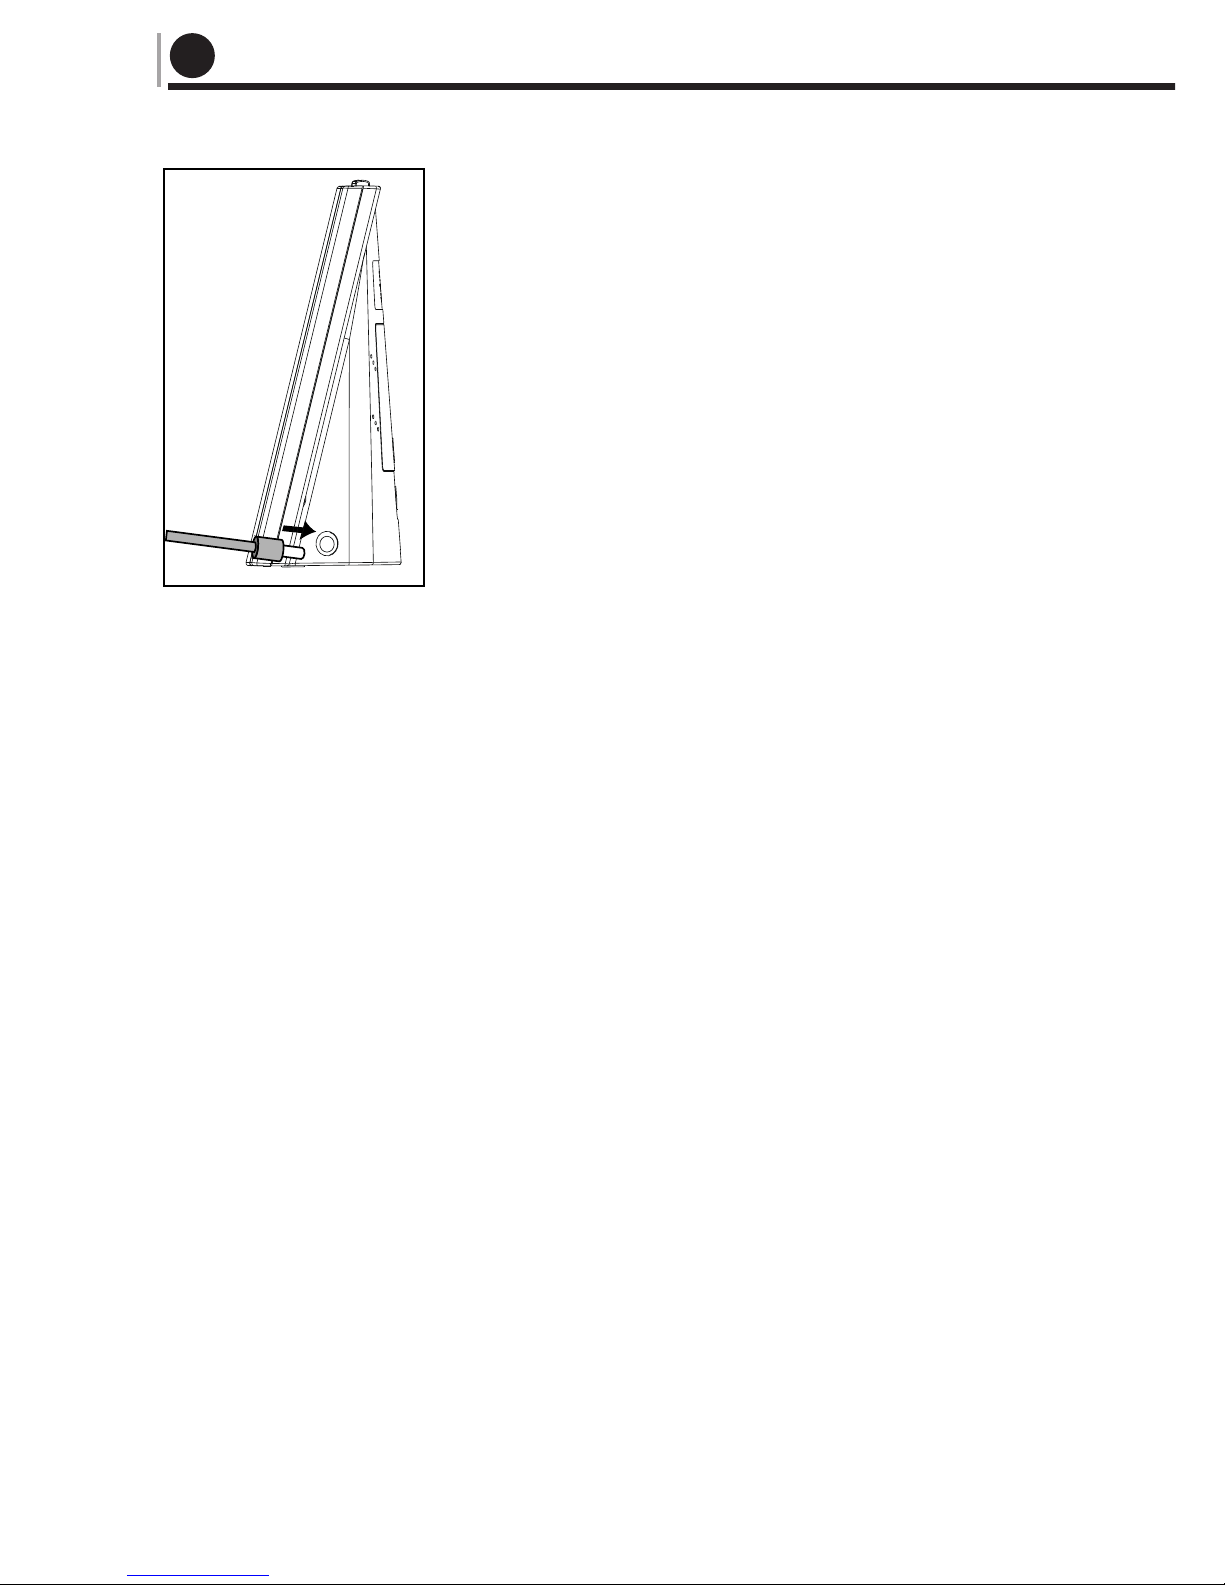
USE THE DE ICE WITH AC POWER Adaptor
In addition to the batteries, you can use AC power adaptor as the
power supply. AC power adapter is optional for the device for sale.
The connector of AC power adapter is located in right side of the
device. Use only AC power adapter with below specified technical
features Output voltage: 6V±5%
• Max. output current: At least 600 mA
• Output plug polarity: <-> inner
• External diameter 5.5±0.1 mm
• Internal diameter: 2.1 ± 0.1 mm
• Length: 10±0.3 mm
6
CORRECT POSTURE FOR MEASUREMENT
1. Sit at a table and let the table support your arm as you take the
measurement. Make sure that the cuff on the upper arm is at ap-
proximately the same level as the heart, and that the forearm is ex-
tended naturally on the table.
2. You may lie on your back and take measurement.
Look at the ceiling, keep calm, and don't move your neck or body du-
ring the measurement. Make sure that the cuff on the upper arm is at
approximately the same level as the heart.
FITTING THE CUFF
1. Insert the edge of the cuff approximately 5 centimeters into the D-
ring as shown in figure.
2. Put the cuff on the left upper arm with the tube pointing to the di-
rection of palm. If measurement on your left arm is difficult, you
can use right arm for measurement. In this case, it is necessary to
know that the readings may differ about 5-10 mmHg between left
arm and right arm.
3. Wrap cuff around your upper arm with the lower edge of the cuff
approximately 2-3 centimeters above the elbow. The mark "artery"
must be over the artery of the arm.

7
ENGLISH
4. Press the cuff to make sure that it is attached securely. The cuff
should not be too tight or too loose. It should be easy to insert two
fingers between the cuff and the upper arm.
5. The mark "INDEX" on the cuff must point to area "NORMAL"
(22-32 cm). This means the cuff size is correct. If mark "INDEX"
points to the area beyond area "NORMAL", please consult your
dealer for another cuff size.
6. If it is difficult to secure the cuff evenly to the user's upper arm, a
cone shape is also acceptable.
7. Clothes should not restrict the area of the upper arm, if sleeve is
tight then remove clothing to allow accurate measurement.
SETTING THE DATE AND TIME
The function provides accurate measuring time for each measure-
ment. Preset the date and time correctly before use as follows:
1. When the device is connected to power supply at first time, the dis-
play will show as ig. 1.
2. Press and hold button "PRESET"
3. Press button "M1" or "M2" to add or subtract the number, and press
button "START" for confirmation.
4. When the year setup is finished, the month number will flash au-
tomatically. Please follow the same instruction as above to set
month, date and time.
5. Press button "START" to finish setup.
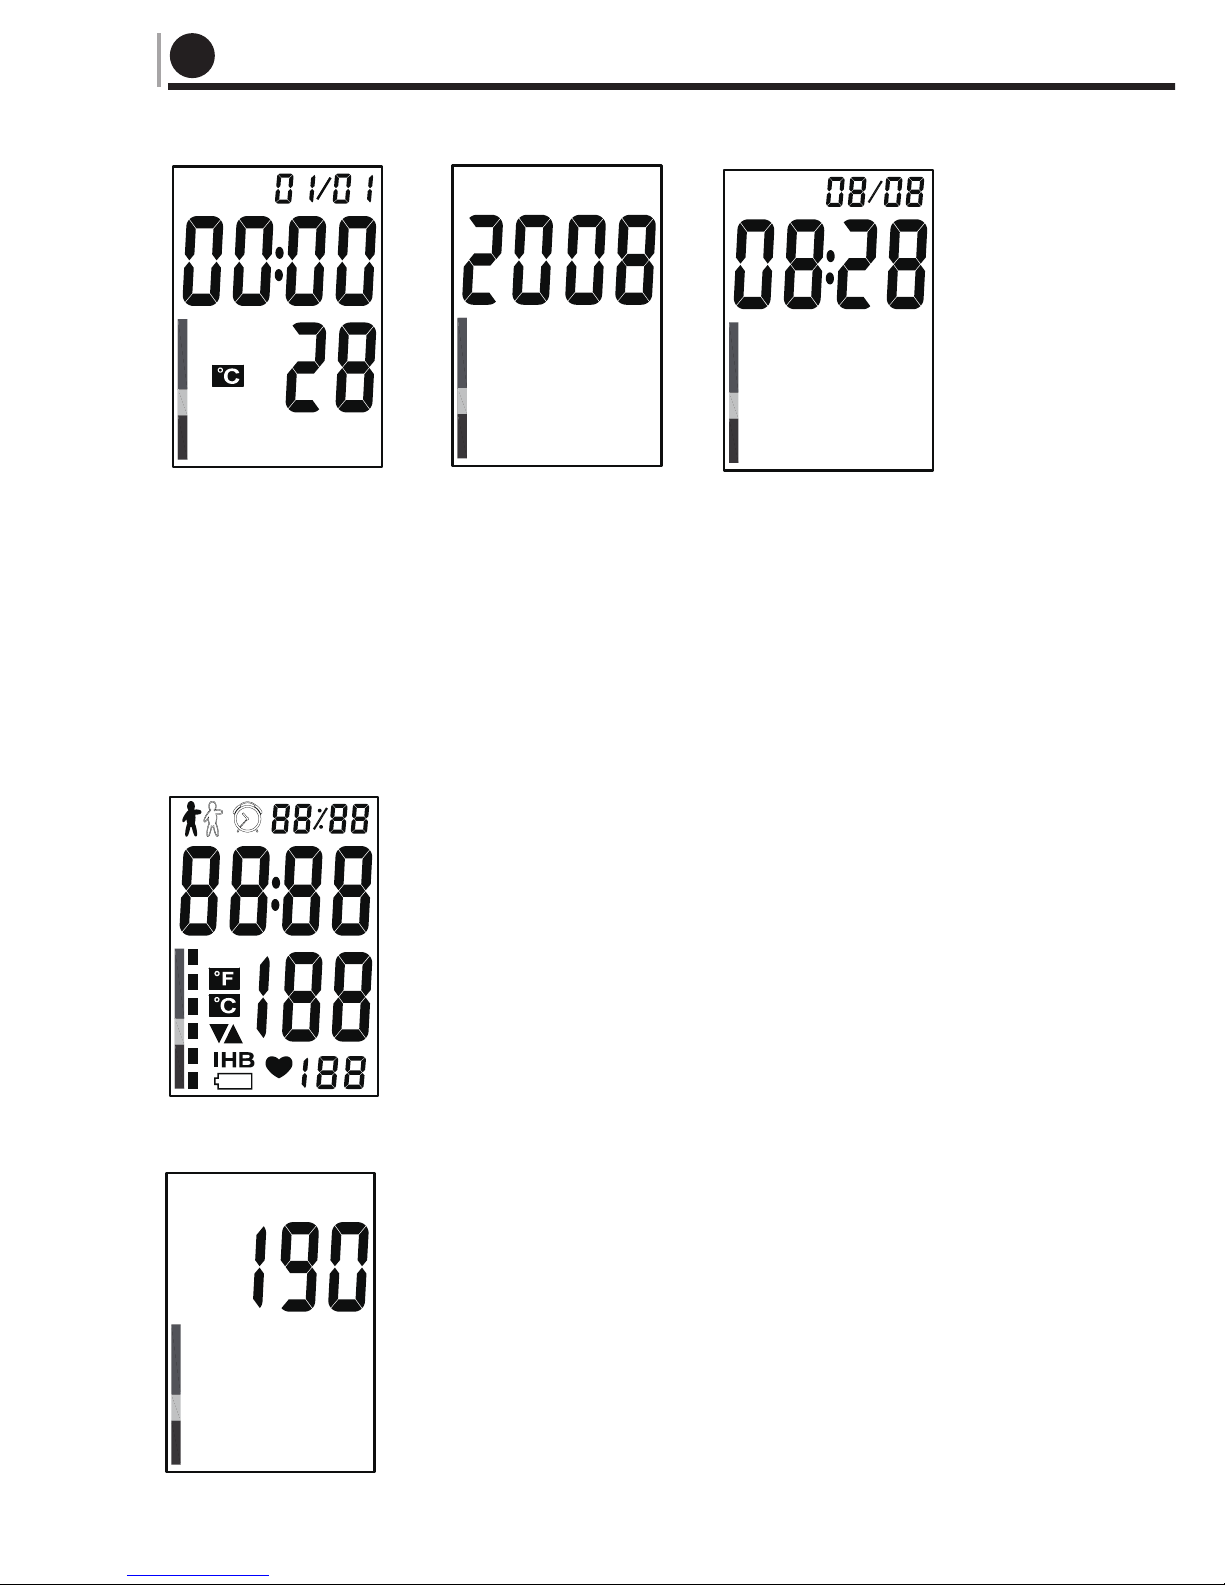
8
CARRY OUT A MEASUREMENT
1. Insert the tube plug into the air connector.
Before the measurement, take 3~5 times deep breaths and relax.
Don't talk or move your arm.
2. Press button "START " and all symbols will appear on display in
2 seconds as ig. 3.
3. Two beeps will sound and '0 mmHg' will appear
on the screen. Pump begins to inflate with dis-
play showing the reading of pressure. Generally
the pressure will reach 190 mmHg as ig. 4.
4. Pump stops inflating and pressure begins to de-
crease gradually, during which the user's blood
pressure and pulse will be calculated as ig. 5.

9
ENGLISH
5. There will be a long beep once measurement
is complete. The air in the cuff will quickly de-
flate and the blood pressure reading - pulse
reading will show. The measuring time will
also display in two screens and a reminder to
record the reading will show " " flashing.
6. Press button "M1" or button "M2" to record the
reading in corresponding memory. or example, if button "M2", is
pressed, the display will show as ig. 7. If the user does not press
button, the reading won't be recorded.
7. If power supply is not switched off and the device is not used, it
will return to standby mode after 3 minutes.
AUTOMATIC INFLATION
There are 4 given levels of inflation pressure for this device:
190mmHg, 230mmHg, 270mmHg and 300mmHg. When 190mmHg
is not enough or movement of arm occurs, the device will automatic-
ally inflate to reasonable pressure level to ensure a successful mea-
surement. It is not a fault.
RAPID DEFLATION DURING MEASUREMENT
If you feel unwell during measurement or want to stop for any reason.
Press the On/Off button. The device will quickly release the air in cuff
and the device will be returned to standby mode.
10
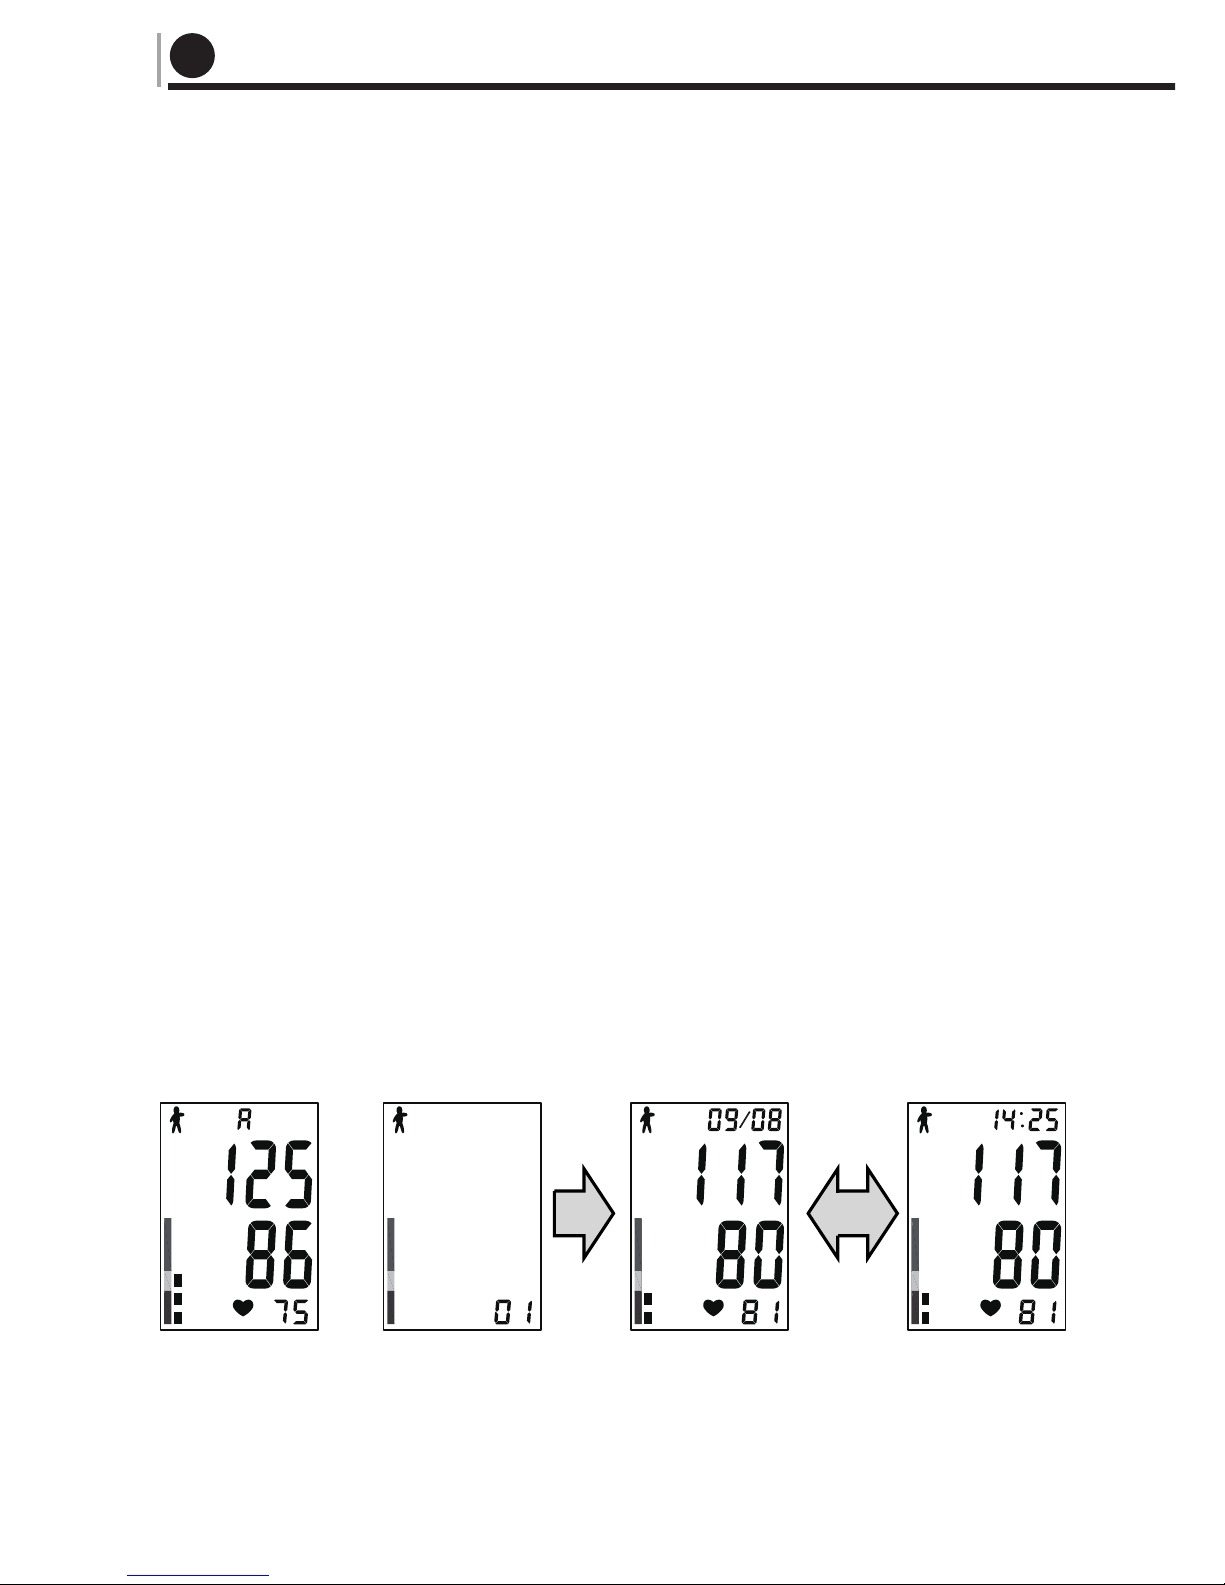
FUNCTION OF MEMORY
MEMORY RECALL
1. LD7 can store 60 sets of readings each in '"M1" and "M2", and will
automatically calculate the average value of the latest 3 readings for
"M1" and "M2" respectively. When the memory is full (60 sets of rea-
dings are stored), the oldest reading will be replaced by a newer one.
Memory remains even if power is removed.
2. Once measurement is finished or if in standby mode, the user can
press button "M1" or button "M2" to recall memory.
Press button "M1" or "M2", the display will show the average value
of the latest 3 readings as ig. 8.
Press again, the display will show '01', which means the latest rea-
ding, then turns to another screen to show readings and measuring
time as ig. 9.
Press again, the display with show '02', which means the second
to the latest reading...
11
ENGLISH
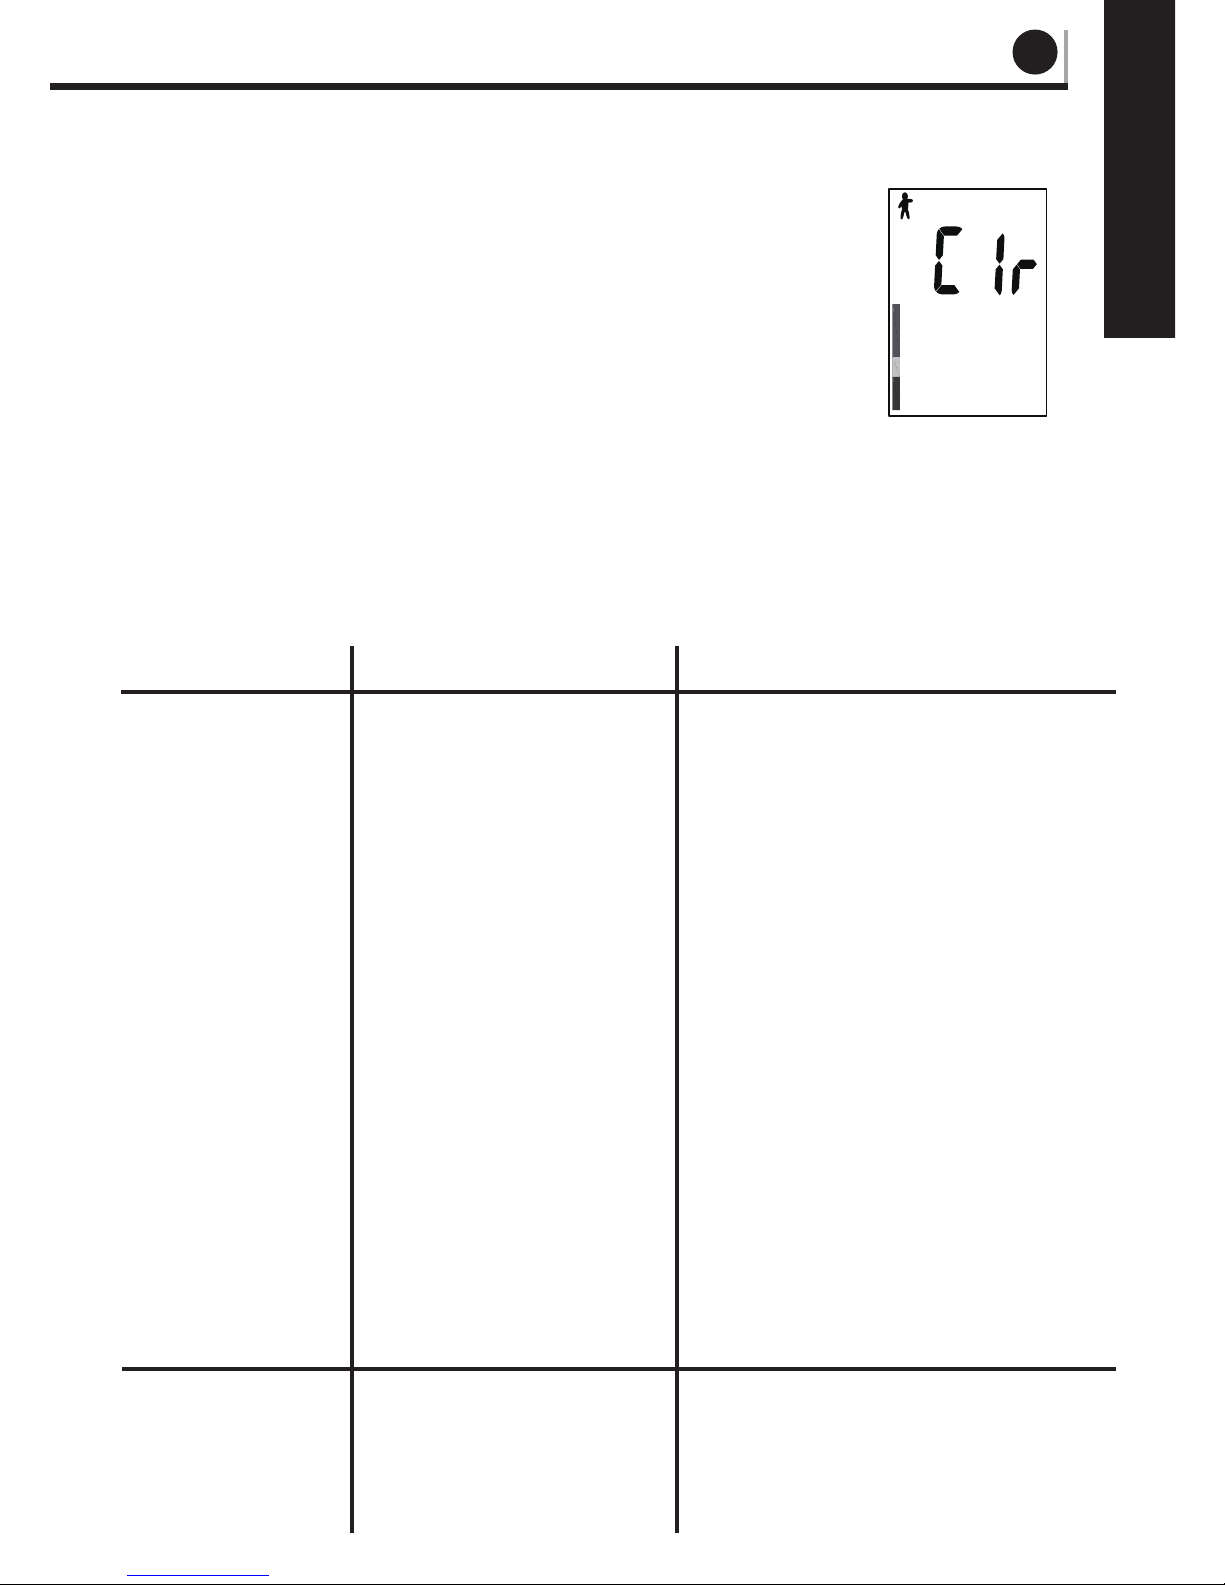
MEMORY CLEARANCE
After a measurement is finished or when the device
stands by, hold down button "M1" or "M2" for at
least 5 seconds, the display will show "CLR", which
means the stored reading for "M1" or "M2" is remo-
ved as ig. 10.
ERROR AND LOW BATTERY INFORMATION
INDICATION POSSIBLE REASON CORRECTION METHODS
• The cuff is put on in-
correctly or the tube
plug is inserted too
loosely
• Movement of
arm/hand or talking
during measurement.
• The cuff is not infla-
ted to necessary
pressure
• Arrhythmia
The batteries are weak
• Make sure that cuff is put
on correctly and the tube
plug is inserted tightly
and repeat the measure-
ment
• Repeat the measurement
the following completely
recommendations of ma-
nual
• Repeat the measurement
with pumping cuff on 30-
40 mmHg above expected
systolic pressure
• Consult your personal
physician
Replace all 4 batteries with
new ones
C Err
–

12
CARE, STORING, REPAIR AND RECYCLING
1. Protect this device from high moisture, direct sunlight, shock,
solvent, alcohol and gasoline.
2. Remove batteries if device is stored for a long time, and keep the
batteries away from the children.
3. Keep cuff away from sharp objects and do not extend or twist the
cuff.
4. Clean device with soft or dry cloths only.
5. The cuff must be handled with care and the cover can be cleaned
with a damp cloth. WARNING: Do not wash the inner bladder.
6. The device should be checked yearly by specialists to ensure correct
operation. Please consult your dealer for more information.
7. ollw the local directive (WEE regulations)for disposal of batteries
and device.
TROUBLESHOOTING
SYMPTOM CHECKPOINT REMEDY
No display when
the ON/O
button is pressed
Inflation stops and
re-inflate later
• The batteries have
run down
The polarity of battery
is wrong
• The contact of bat-
tery compartment is
polluted
• The automatic infla-
tion for ensuring cor-
rect measurement
• Did you talk or move
your arm (or hand)
during measurement?
• The batteries have
run down
The polarity of battery
is wrong
• The contact of bat-
tery compartment is
polluted
• See "AUTOMATIC
IN LATION"
• Keep still and silent
during the measure-
ment

13
ENGLISH
SYMPTOM CHECKPOINT REMEDY
The reading is ex-
tremely low or high.
Pulse rate is too low
or too high
The batteries are
run down soon
The device is auto-
matically turned off
• Is the cuff at the
same level as the
heart
• Is the cuff wrapped
correctly?
• Did you strain your
arm during measu-
rement?
• Did you talk or
move your arm (or
hand) during mea-
surement?
• Did you talk or
move your arm (or
hand) during mea-
surement? Did you
make measurement
right after exercise?
• aulty batteries are
used
It is the result of au-
tomatically turn off
system
Make sure that your
posture is right
■Wrap the cuff
correctly
• Relax during
measurement
• Keep still and silent
during the measure-
ment
• Keep still and silent
during the measure-
ment
Take measurement
again after resting for
more than 5 minutes
Suggest to use alka-
line batteries of
known manufacturers
• This is to save the
power consumption
of the device, and it is
not a fault.

14
WARRANTY OBLIGATIONS
1. The Monitor has a 36 months warranty from date of purchase ex-
cluding the cuff. The cuff has a 12 month warranty.
2. The warranty obligations are prescribed by warranty certificate for
buyer.
3. The addresses of organizations for guarantee maintenance are pre-
sent in the warranty certificate.
SPECIFICATIONS
Model
Size
Weight
Measuring method
Measuring range
Measuring accuracy
Inflation
Rapid deflation
Batteries
Adapter
LD7
150 (U x 130 {W)x 50(H) mm
Approximately 350 g without batteries
Oscillometry
40 to 260 mmHg (blood pressure) 40 to
160 beats/minute (pulse rate)
± 3 mmHg for systolic and diastolic pres-
sure ± 5% of the reading for the pulse rate
Automatic by the pump
Automatic electronic valve
4"AA"x1,5V
Optional component, 6V, 600 mA

15
ENGLISH
SPECIFICATIONS
BLOOD PRESSURE RECORD
DATE SYSTOLIC DIASTOLIC PULSE
(mmHg) (mmHg) (beats/minute)
Memory
Operation tempera-
ture and humidity
Storage temperature
and humidity
Cuff size
Complete kit
2 x 60 sets of memory
+10°C a + 40°C, 85% and below
-20°C a + 50°C, 85% and below
Applicable for arm size 22-32 cm
Main body, cuff, 4 AA batteries & adapter
(optional), instruction manual storage bag,
guarantee card

16
LD7 DIGITAL BLOOD PRESSURE MONITOR GUARANTEE
AND REPAIR SER ICE
Your digital blood pressure monitor is covered by the best service
and guarantee policy in the industry. The digital blood pressure mo-
nitor is guaranteed against manufacturing faults and defective mate-
rials for a period of 1 year. If any defective materials or manufacturing
faults are found during the term of the guarantee, Henry Schein will
make the necessary repairs free of charge on receiving the faulty de-
vice. The guarantee does not cover accidental damage or evident mi-
suse of the device. In the event of any claim, please contact our
distributor.
Date of purchase
Distributor
important notice! THIS IS A COMPLEX TECHNICAL DE ICE.
READ INSTRUCTION MANUAL CAREFULLY BEFORE USE
EN1060-1:1996/EN1060-3:1996
ANSI/AAMI SP10
IEC6060-1
IEC6060-1-2
The manufacturer reserves the right to make technical changes
without notice in the interest of progress.
Prior notices will not be given in case of any amendments within this
manual. The mentioned trademarks and names are owned
by the corresponding companies.

17
GENERAL
Este manual de instrucciones pretende ayudar al usuario para que
pueda utilizar con seguridad y eficacia el tensiómetro digital (de aquí
en adelante el dispositivo) MODELO B100. El dispositivo se debe uti-
lizar de acuerdo con los procedimientos que se describen en este ma-
nual. Es importante leer y entender todo el manual, especialmente el
apartado "Consejos para medir la tensión arterial". Este dispositivo
está pensado para la medición no invasiva de la tensión arterial sis-
tólica y diastólica, así como de la frecuencia cardiaca, en adultos (de
más de 15 años de edad). Consulte al médico si se toma la tensión a
niños o a personas con arritmia, ya que se pueden producir errores.
PRINCIPIO DE FUNCIONAMIENTO
Este dispositivo adopta la tecnología oscilométrica a través de algorit-
mos difusos que permiten la medición de la tensión arterial y la frecu-
encia cardiaca. El manguito se enrolla alrededor del brazo y se infla
automáticamente gracias a la bomba de aire. El sensor del dispositivo
capta las pequeñas oscilaciones de presión en el manguito producidas
por la extensión y la contracción de la arteria del brazo como respuesta
a cada latido. Se mide la amplitud de las ondas de presión, se convierte
en milímetros de mercurio y se muestra en un valor digital.
Nota: Este dispositivo no proporcionará una medición fiable si se usa
o se almacena bajo una temperatura o una humedad fuera del intervalo
establecido en la sección de "ESPECI ICACIONES" de este manual.
USO DE NUE AS TECNOLOGÍAS
El algoritmo difuso es el algoritmo de procesamiento que tiene en cu-
enta la especificidad de los latidos individuales, lo que proporciona
una mayor precisión de las mediciones
ESPAÑOL
18
CONSEJOS PARA MEDIR LA TENSIÓN ARTERIAL
1. Es necesario saber que la tensión arterial está sujeta a oscilaciones
bruscas. El nivel de la tensión arterial depende de muchos factores.
Por lo general, la tensión arterial es más baja en verano y más alta
en invierno. La tensión arterial cambia con la presión atmosférica,
y se ve considerablemente afectada por muchos factores, p. ej. por
las cargas físicas, por el nerviosismo, por el estrés, la alimentación,
etc. Los medicamentos, el consumo de alcohol o fumar afectan
enormemente al nivel de la tensión arterial individual. Cuando se
mide la tensión arterial en el hospital, el valor es siempre más alto
que en casa. El motivo es el estado de tensión, y este caso es espe-
cialmente grave en determinados grupos de pacientes, lo que se
conoce médicamente como "síndrome de bata blanca". La tensión
arterial aumenta a temperaturas bajas, de manera que es mejor
medir la tensión arterial a temperatura ambiente (aproximadamente
20°C). Si el dispositivo se ha almacenado a bajas temperaturas,
hay que dejarlo a temperatura ambiente durante al menos 1 hora,
si no, la medida no será precisa. La tensión sanguínea varía con la
edad y el individuo, y se recomienda anotar las lecturas diariamente
en un registro de tensión arterial, de manera que pueda consultar
con su médico cuál es la "tensión arterial normal" para usted.
.
19
ESPAÑOL
2. Tome la tensión siguiendo las instrucciones del médico en el caso
de los pacientes con enfermedades cardiovasculares.
¡Bajo ningún concepto debe modificar las dosis de ningún fármaco
que le haya recetado su médico!
3. Es posible que sea difícil medir la presión sanguínea con precisión
en los casos de arteriosclerosis grave, pulso débil, o en pacientes
con una oscilación evidente de la frecuencia cardíaca. Consulte a
su médico para que interprete las lecturas de su tensión arterial.
4. Hay que permanecer en silencio mientras se toma la tensión para
conseguir una lectura precisa. La medición se deberá llevar a cabo
en un ambiente tranquilo a temperatura ambiente. No coma ni fume
antes de una medición. Este dispositivo se suministra con un man-
guito que sirve para un tamaño de brazo de 22-32 cm. Se deberá
tener cuidado para garantizar que el tamaño del manguito es ade-
cuado para la persona cuya tensión arterial se está tomando. Los
niños y los adultos que necesiten un manguito que se esté fuera del
intervalo 22-32 cm tendrán que seleccionar otras tallas. Contacte
con el proveedor para conseguir los manguitos de otros tamaños.
ATENCIÓN: ¡No utilice otros manguitos distintos al
manguito original que se incluye en este kit!
Optimal

20
5. Se recomienda hacer mediciones repetidas con intervalos de 3 mi-
nutos, de manera que se pueda calcular la media para conseguir
una medición más precisa. Los pacientes con aterosclerosis nece-
sitan un intervalo mayor (10-15 minutos) ya que la elasticidad de
los vasos del paciente disminuye significativamente en estas en-
fermedades. El intervalo de 10-15 minutos se refiere también a los
pacientes que sufren diabetes desde hace mucho tiempo.
COLOCACIÓN DE LAS PILAS
1. Abra la tapa de las pilas e instale cuatro pilas tipo "AA" en su comp-
artimento, tal y como se indica. Asegúrese de que la polaridad es
la correcta.
2. Cierre la tapa del compartimento de las pilas.
• Sustituya las pilas cuando aparezca el indicativo de sustitución 'W
en la pantalla o no suceda nada después de presionar el botón ON/O .
• Las pilas de este kit son para comprobar si el dispositivo funciona,
de manera que es posible que su vida sea más corta que la que se
recomienda.
• Sustituya todas las pilas a la vez y no utilice pilas recargables.
• Si el dispositivo no se va a utilizar durante mucho tiempo, saque las
pilas. No deje las pilas gastadas en el dispositivo.
USE EL DISPOSITI O CON UN ADAPTADOR DE CORRIENTE
ALTERNA
Aparte de las pilas, se puede utilizar un adaptador de corriente alterna.
El adaptador de corriente alterna se suministra de manera opcional
al dispositivo.
El conector del adaptador de corriente alterna se encuentra a
la derecha del dispositivo.
Utilice solo un adaptador de corriente alterna con las características
técnicas que se especifican a continuación.
Table of contents
Languages:
Other Henry Schein Blood Pressure Monitor manuals


