Hepha Trekking 7 User manual

Hepha Trekking 7
Display Instructions
HEPHA GmbH
www.hepha.com [email protected]
Lise-Meitner-Str. 7a, 82216 Maisach
+49 (0) 8142 2844480

1 Safety instructions
1.1 Safety information
1.2 Privacy notice
2. Congratulations
3. Product description and
specifications
3.1 Intended use
3.2 Product features
3.3 Technical data
4. Assembly
5. Operation
5.1 Buttons
5.2 Pages
6. Functions
6.1 Turn the display on/off
6.2 Switch assist Mode
6.3 Connect with your smartphone
6.4 Charging and discharging
6.5 Anti-theft
6.6 Pop-up and troubleshooting
7. Connecting by APP
8. Maintenance and servicing
8.1 Maintenance and cleaning
8.2 After-sales service and advice
on using products
8.3 Transport
8.4 Disposal
01
02
02
03
03
04
04
06
07
16
16
18
19
19
19
20
22
22
22
22
Content
English version
German version
French version
01
21
47

Safety instructions Congratulations
01 02
1 Safety instructions
2. Congratulations
1.1 Safety information
Read all the safety information and instructions.
Updates
Failure to observe the safety information and follow instructions may result in electric shock,
fire and/or serious injury. 1.2 Privacy notice
If the display is sent to Hepha Service because it requires servicing, the data stored on the
display may be transmitted to Hepha and dealers.
Congratulations on purchasing this display. Hepha P-100 reliably displays all important riding
data.
Hepha P-100's range of functions is continually being expanded. Keep your Hepha APP up to
date. You can use this APP to download new functions and transfer them to your Hepha
P-100.
In addition to the functions shown here, changes to software relating to troubleshooting and
functional enhancements may be introduced at any time.
Save all safety warnings and instructions for future reference.
The term battery is used in these instructions to mean all original Hepha E-Bike rechargeable
battery packs.
• Read and observe the safety warnings and directions contained in all the E-Bike system
operating instructions and in the operating instructions of your E-Bike.
• Do not attempt to secure the display or operating unit while riding.
• Do not allow yourself to be distracted by the display.
If you do not focus exclusively on the traffic, you risk being involved in an accident. If you
want to make entries in your on-board display other than switching the assistance level, stop
and set the appropriate data.
• Do not use your smartphone while riding.
If you do not focus exclusively on the traffic, you risk being involved in an accident. Only
enter the relevant data having stopped first.
• Set the display brightness so that you can adequately see important information such as
speed and warning symbols.
Incorrectly adjusted display brightness may lead to dangerous situations.
• Do not open the display. Opening the display may damage it beyond repair and void any
warranty claims.
• Do not use the display as a handle. Lifting the E-Bike up by the display can cause irreparable
damage to the display.
• Do not place your bicycle upside down on its saddle and handlebars if the display or its
holder protrudes from the handlebars.
This may irreparably damage the display or the holder. Additionally, move the display before
placing the bicycle on a wall mount to ensure that the display does not fall off or get
damaged.

Product description and specifications Assembly
03 04
4. Assembly
(1)
(2)
(4)
(3)
(5)
(6)
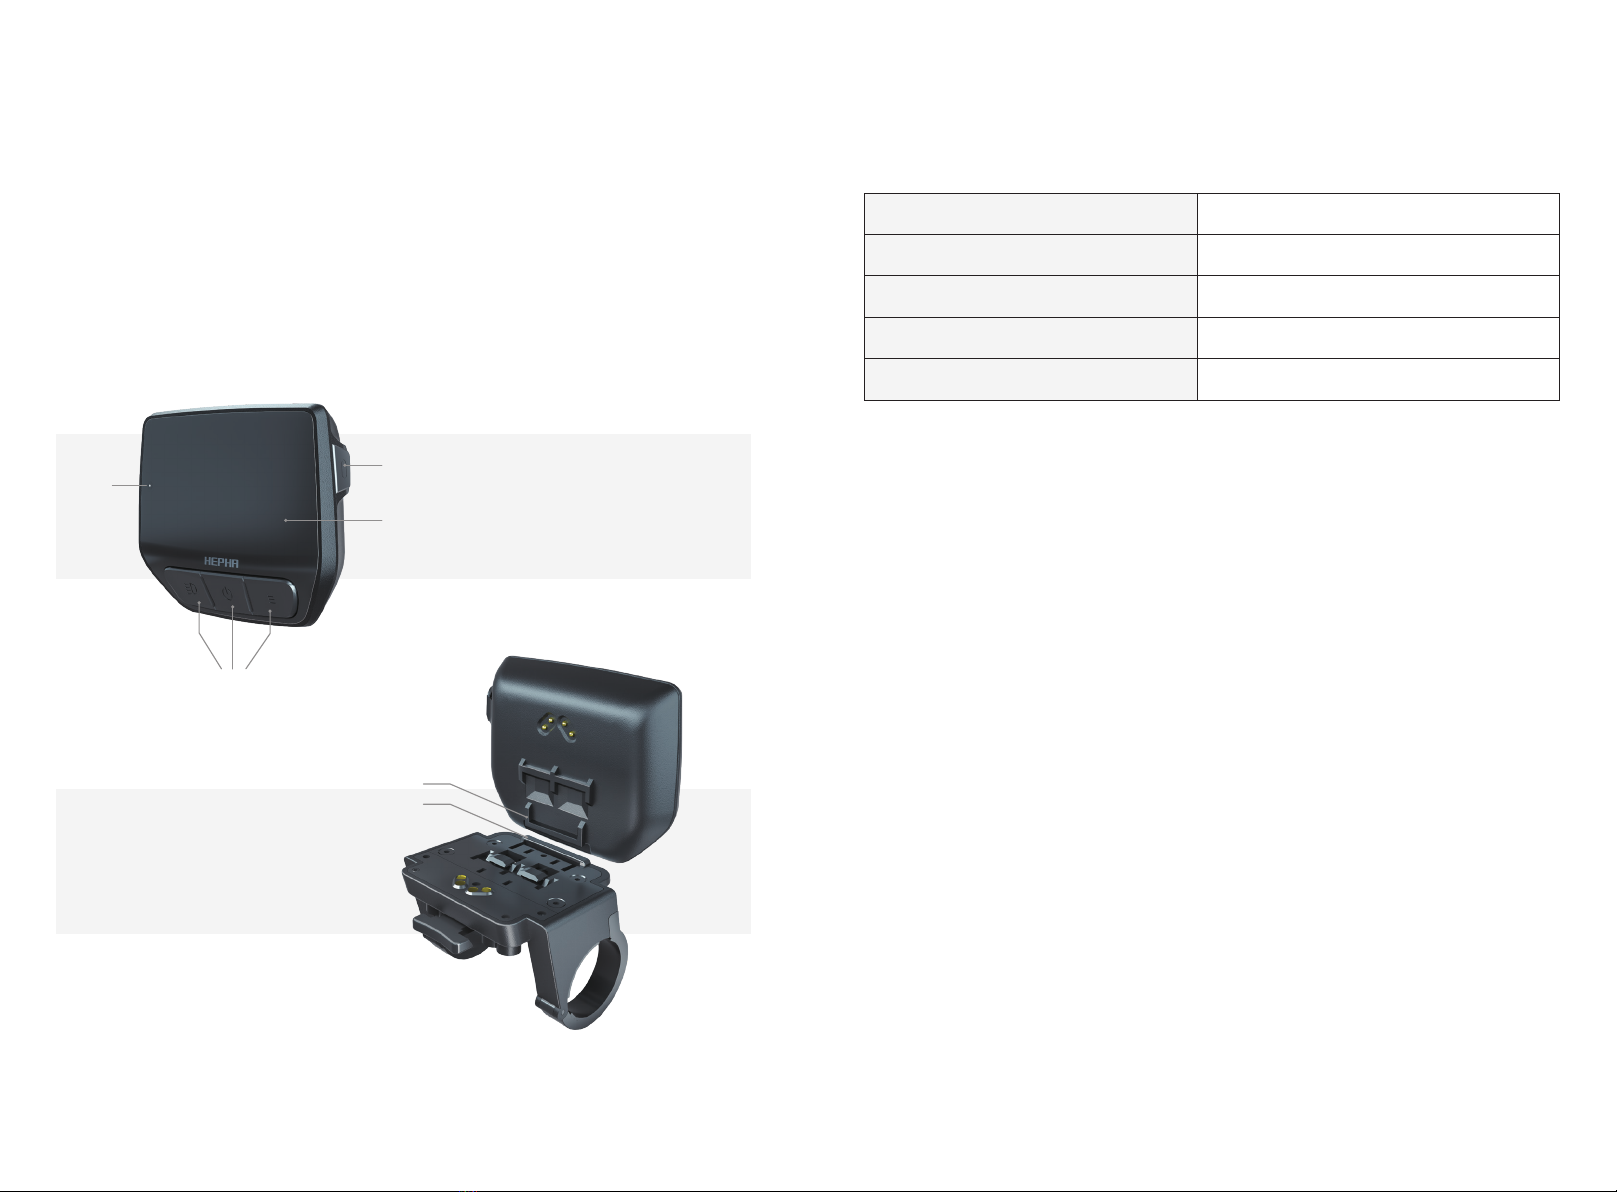
Product code
Operating temperature*
Storage temperature
Protection rating
Weight, approx.
SC-P100
-20 ~ 60°C
-20 ~ 60°C
IPX5
83g
Display Hepha P-100
(1) Type-C interface
(2) Screen
(3) Buttons
(4) Light sensor
(5) Display contacts
(6) Holder contacts
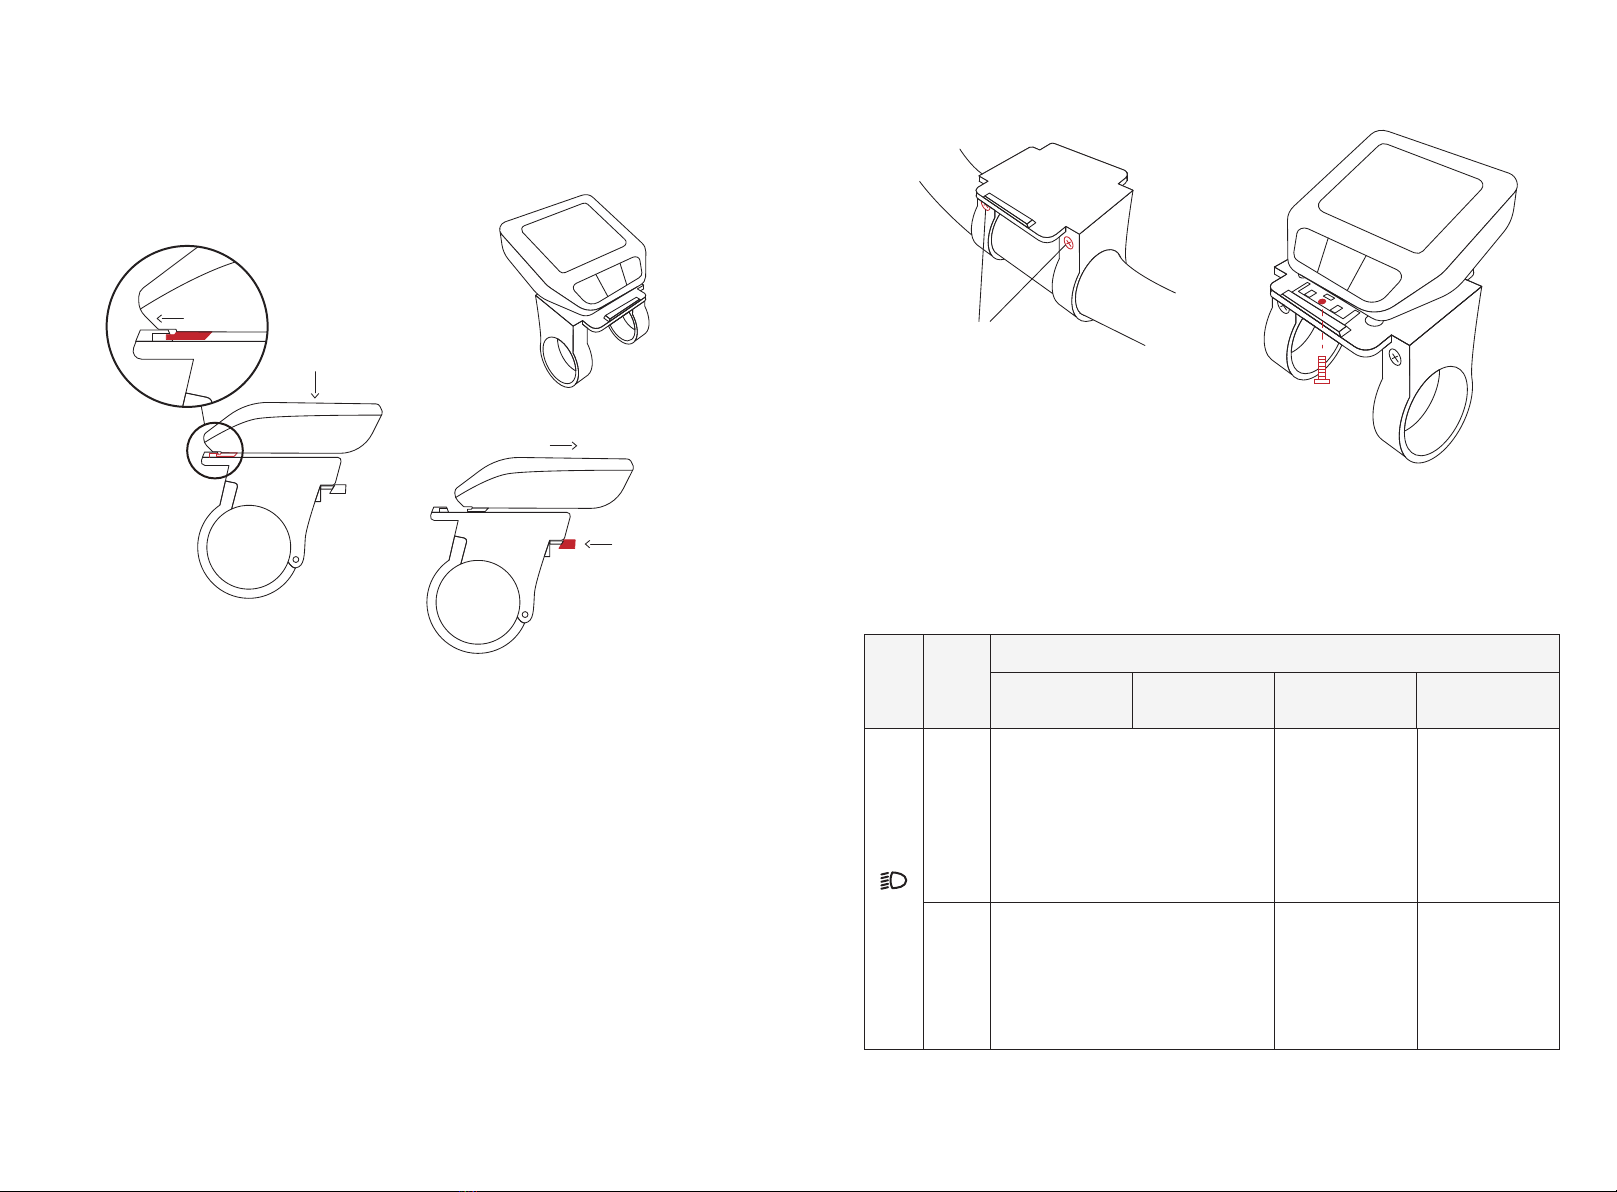
4.1. Install your display
Take the display from the toolbox. Position the lower end to the display holder
correctly, press the upper part onto the holder, and you'll hear a "click".
When parking the bike, remove the display by pressing the raised part of the
display holder. Take the display away.
Note: Your bike has activated the Bike Lock Function by default set. That means
your display is the key to your bike. Remove the display and the motor will be
automatically deactivated. To unlock it, install the same display on the bike, and the
motor support will be reactivated. The display shows the Locked status when
motor it is activated or deactivated support through the Lock function.
Install/remove the display
3. Product description and specifications
3.1 Intended use
3.3 Technical data
3.2 Product features
The Hepha P-100 display is designed to illustrate cycling data.
To access the full functionality of the Hepha P-100 display, you will need a compatible
smartphone installed with the Hepha APP (available from the Apple APP Store or the Google
Play Store).
* Temperatures outside this range may cause the display to malfunction.

Assembly Operation
05 06
5. Operation
① insert
② press after
insert the display
① press here
② remove
Install
Uninstall
Fasten the display if you don't want to carry the display with you.
Remove the display holder using Allen key #3. Press the display to your display
holder. Turn back the display holder, take an M3 screw from the toolbox, and
fasten it using Allen key #3. Then install the display holder and the display back
to your handlebar.
① unscrew these two
screws and remove
the holder from the
bike
③fix the screw and
install the holder back
to the bike
② install the display to
the holder before fix
the screw
4.2. Fasten your display
5.1 Buttons
M3 screw
Display Status
Off-bike & not
charging
switch lights
(automatic/manual)
(on *Level 1 page)
page up on
(on *Level 2 page)
Turn on the flashlight (on *Level 1 page)
turn the page up (on *Level 2 page)
Long
press
Turn on the flashlight (on *Level 1 page)
turn the page up (on *Level 2 page)
Short
press
switches the lights
(on/off) (on *Level 1
page)
turn the page up on
(on *Level 2 page)
switch lights
(automatic/manual)
(on *Level 1 page)
switches the lights
(on/off) (on *Level 1
page)
Off-bike & charging On-bike & not
charging On-bike & charging
Button Operation

Operation Operation
07 08
5.2.1 Level 1-Page 1
* Definition of Level 1 pages& Level 2 pages refers to 5.2 Pages
Attention: Level 1 - page 1 is displayed after your E-Bike is powered on
*Heart rate: this function cannot be supported
temporarily, pending upgrade and development
5.2 Pages
5.2.2 Level 1-Page 2 5.2.3 Level 1-Page 3
Display Status
Off-bike & not
charging
E-Bike power offDisplay power off
Long
press
Display power on
confirm selection
(on *Level 2 page)
screen off
confirm selection
(on *Level 2 page)
Short
press
E-Bike power on
confirm selection
(on *Level 2 page)
screen off
screen on
Off-bike & charging On-bike & not
charging On-bike & charging
Button Operation
enter the *Level 2 page (on *Level 1 page)
exit from the *Level 2 page (on *Level 2 page)
Long
press
turn the page down (on *Level 1 page)
turn the page down (on *Level 2 page)
Short
press
screen on
screen on
ECO mode Tour mode
Turbo mode Off
5.2.4 Level 1-Page 4 5.2.5 Level 1-Page 5
10
Operation Operation
09
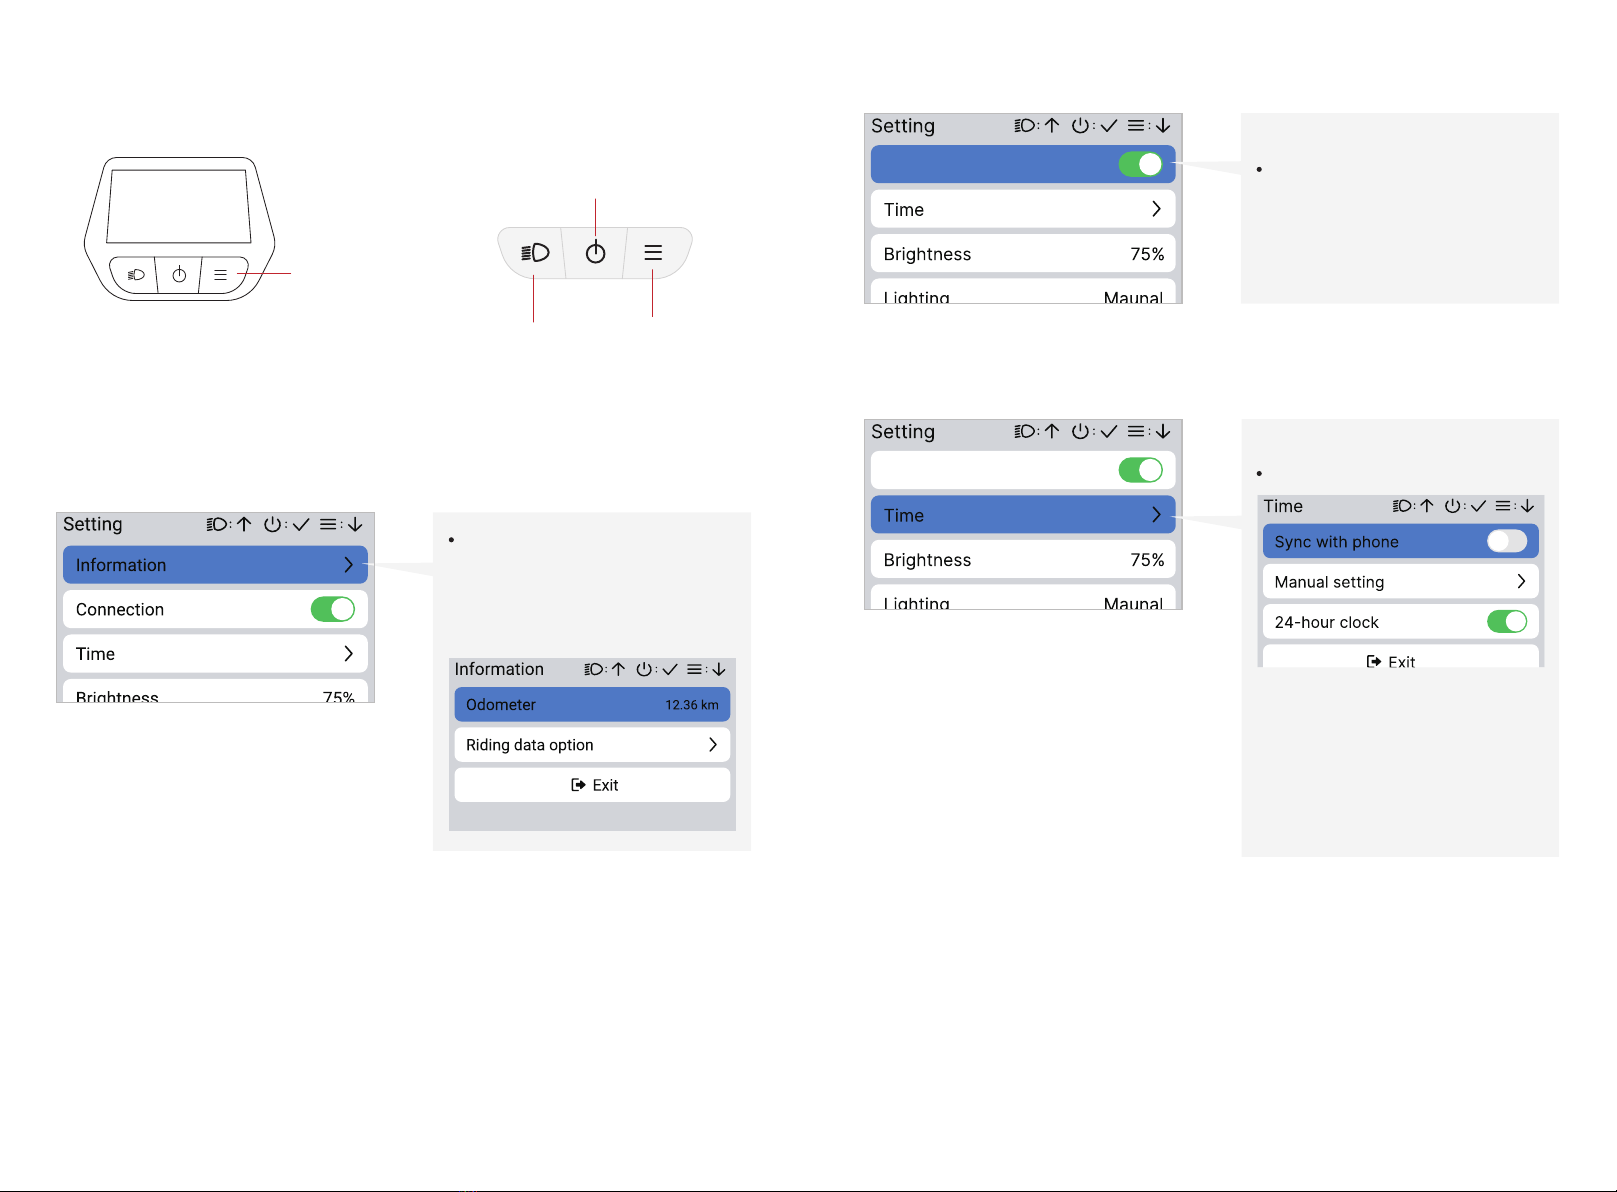
Long press the MENU button on any level 1
page can enter into the setting page rompt
page:
Enter setting page On setting page:
5.2.5.1 Level 2- settings
MENU button
Light button:
Page up
power botton:
confirm
Menu botton:
Page down
Connection
Connection
Press confirm to change:
Connection on/off
Connection
Press confirm to change:
• Sync with phone (ON/OFF)
• Manual Setting
• 24-hour clock (ON/OFF)
Time
Press confirm to view your total
ride distance or change the
calculation option.
Information

Connection
Press confirm to change:
AUTO, 25%, 50%, 75%, 100%
Brightness
After setting to Auto, the headlights
will automatically turn on in the dark
and turn off at dawn according to the
brightness of the environment.
Lighting:Auto/Manual
12
Operation Operation
11
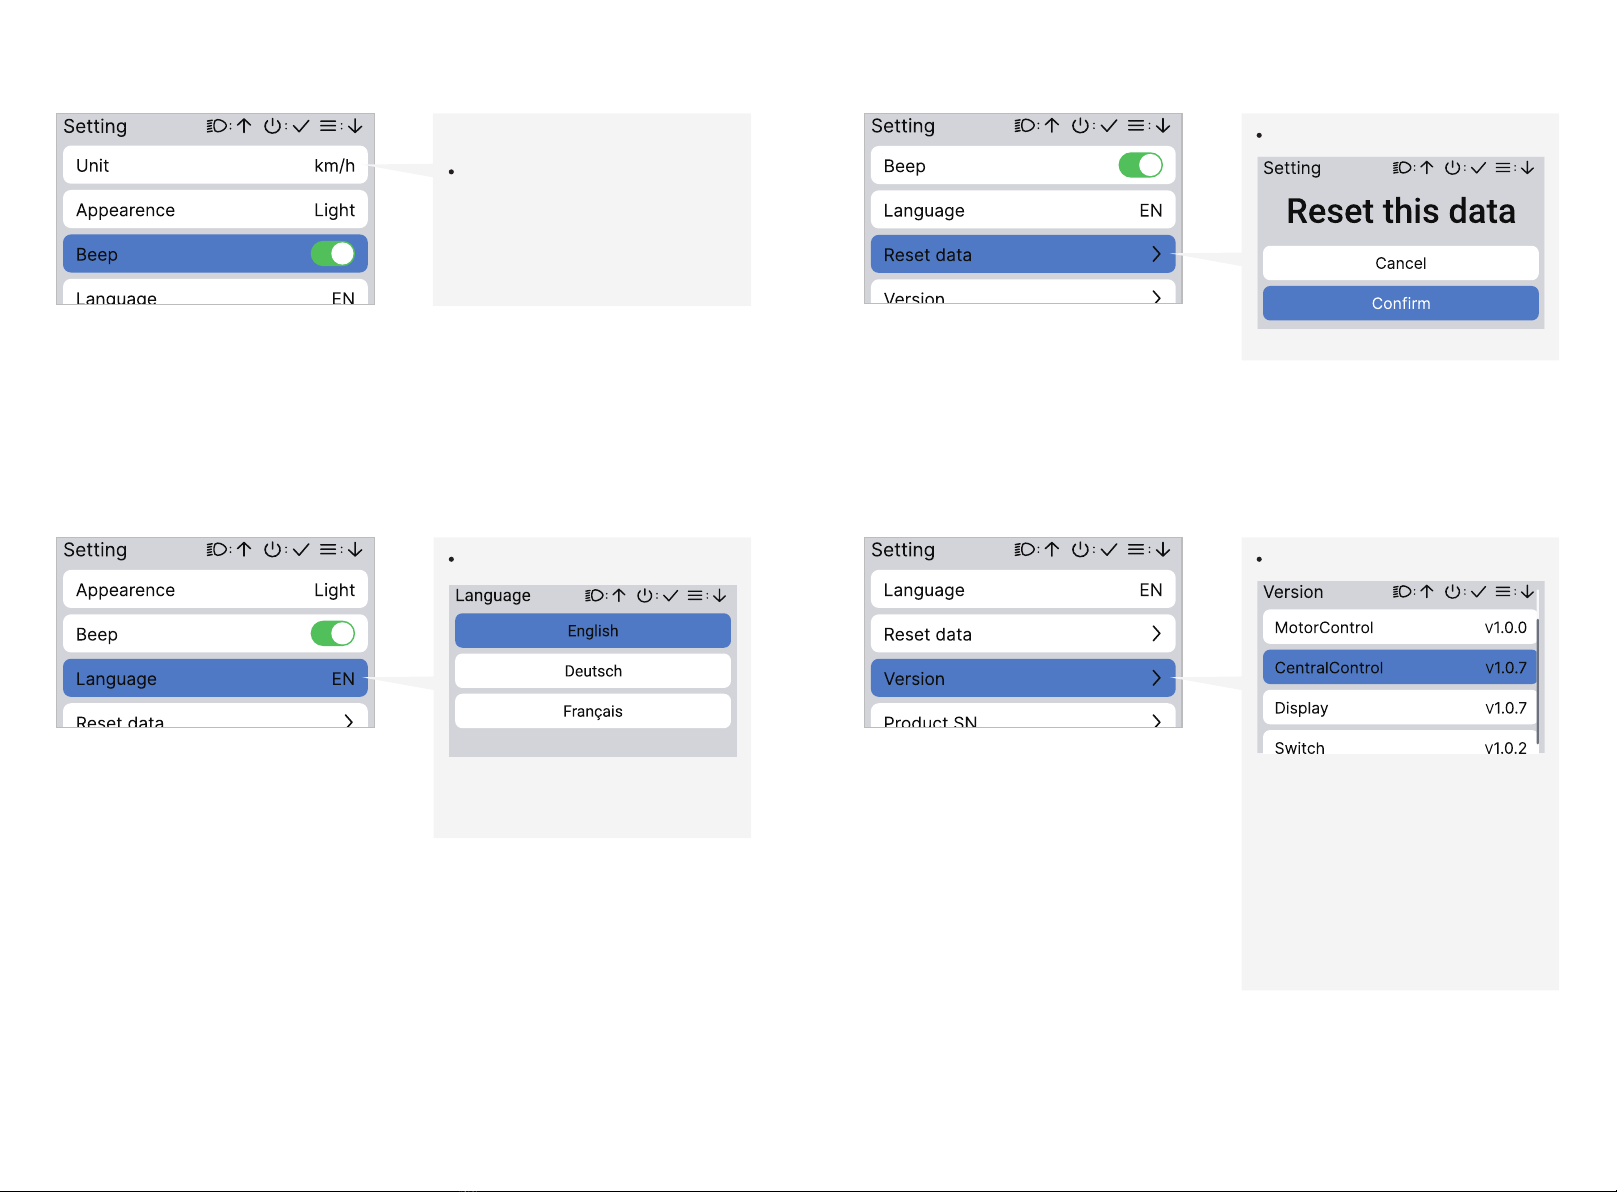
Press confirm to change:
Metric/Inches
Unit
Press confirm to change:
Automatic switch(on/off)
Appearance(Light/Dark)
Appearance
14
Operation Operation
13
Press confirm to change:
Beep on/off
Beep
Reset data
Press confirm to change:
Deutsch/English/Français
Language
①The display is on the E-Bike,
displaying the software version of the
motor control, central control, display,
switch, connection, and battery;
②The display is not on the E-Bike and
power on, only the versions of display
and connection are displayed.
Version:
16
Operation
* Through the Hepha APP, you can also adjust the power level of the three gears of Eco,
Tour, and Turbo, the starting response speed, the maximum torque of the gear, and the
sensitivity of road condition recognition; the Walk mode does not support adjustment.
Functions
15
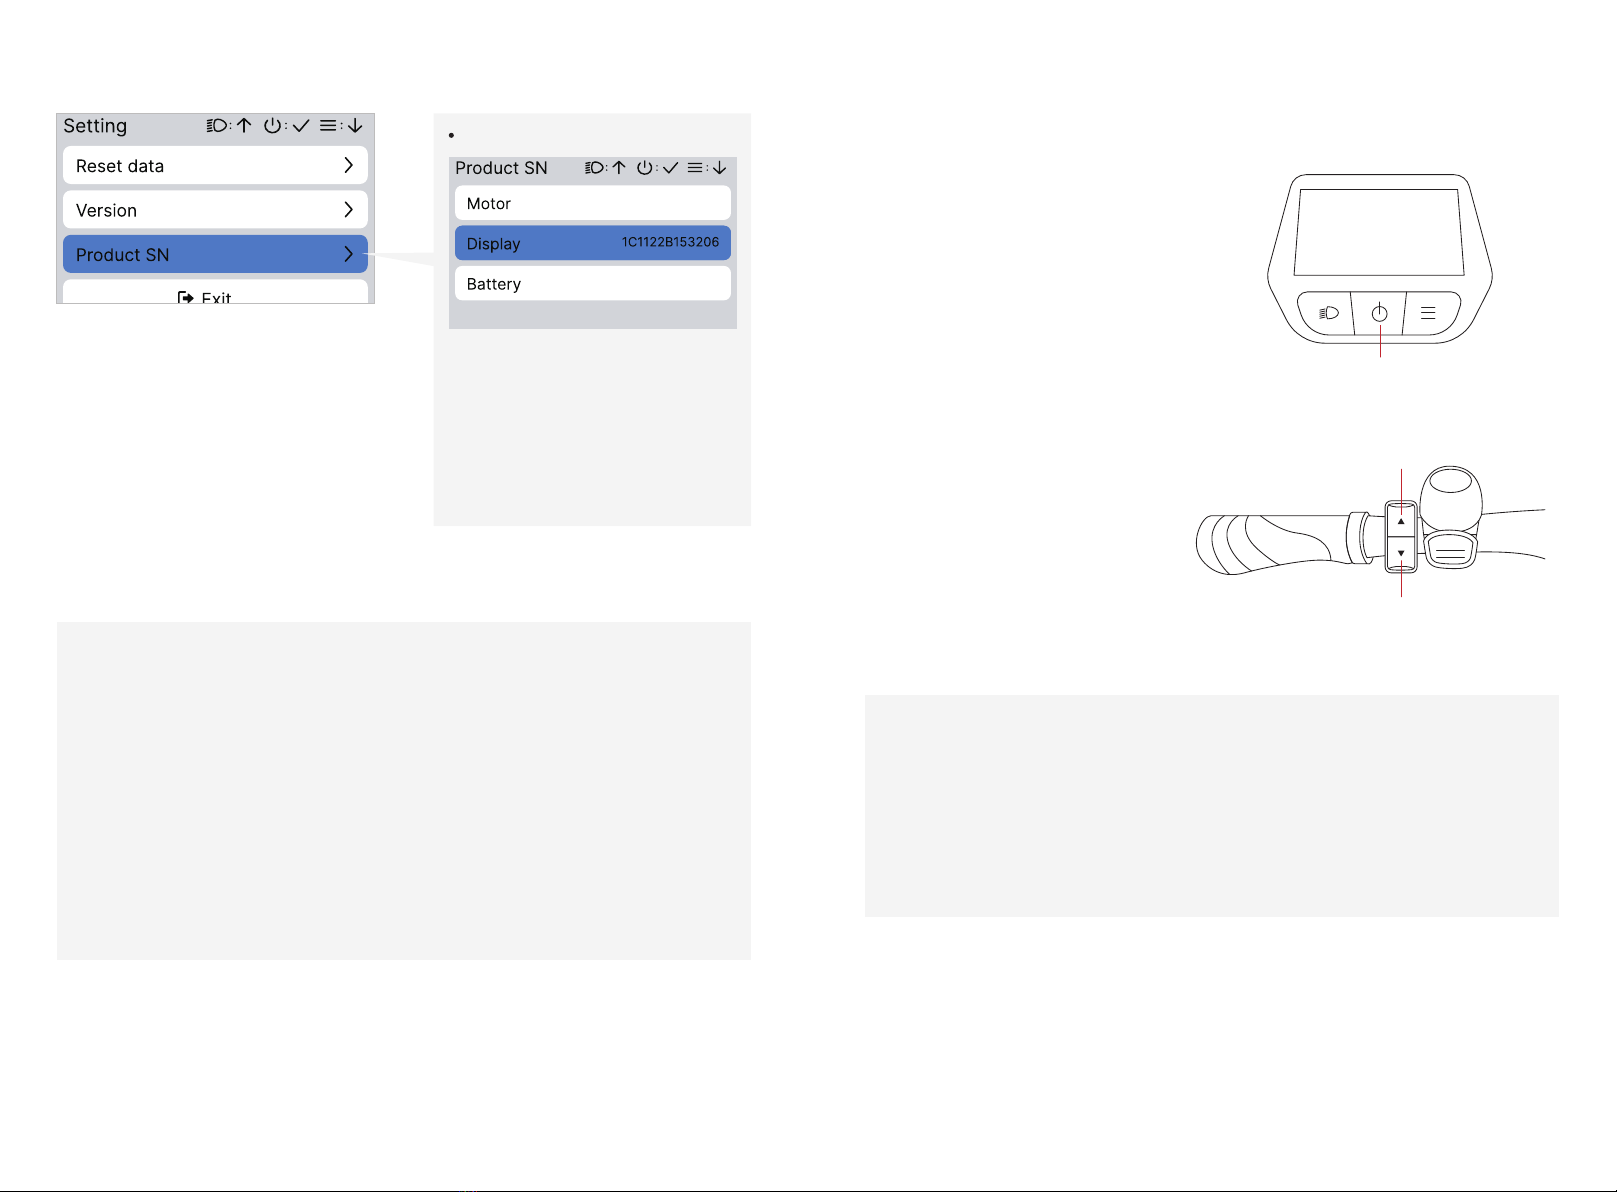
① The display is on the E-Bike,
showing the serial numbers of the
motor, display and battery;
② The display is not on the E-Bike and
power on, only the display number is
shown.
Product SN:
Notice:
1 In order to ensure your safety, please do not set it up while riding or pushing the
E-Bike.
2 Only when the E-Bike speed is equal to 0km/h can you enter the setting interface, a
normal prompt sound will be heard: one beep (if Beep has been turned on in the setting.)
3 When the E-Bike speed is over 0km/h, press or hold the setting button, and an
abnormal prompt sound will be heard (if Beep has been turned on in the setting.)
6. Functions
6.1 Turn the Display on/off
6.2 Switch Assist Mode
Power-on
short press the power button
Power off
long press the power button
Power button
Press the up and down button on the
left handlebar to select and switch
power assist mode
Switch order: Off – Eco– Tour – Turbo
down button
up button
18
Functions Functions
17
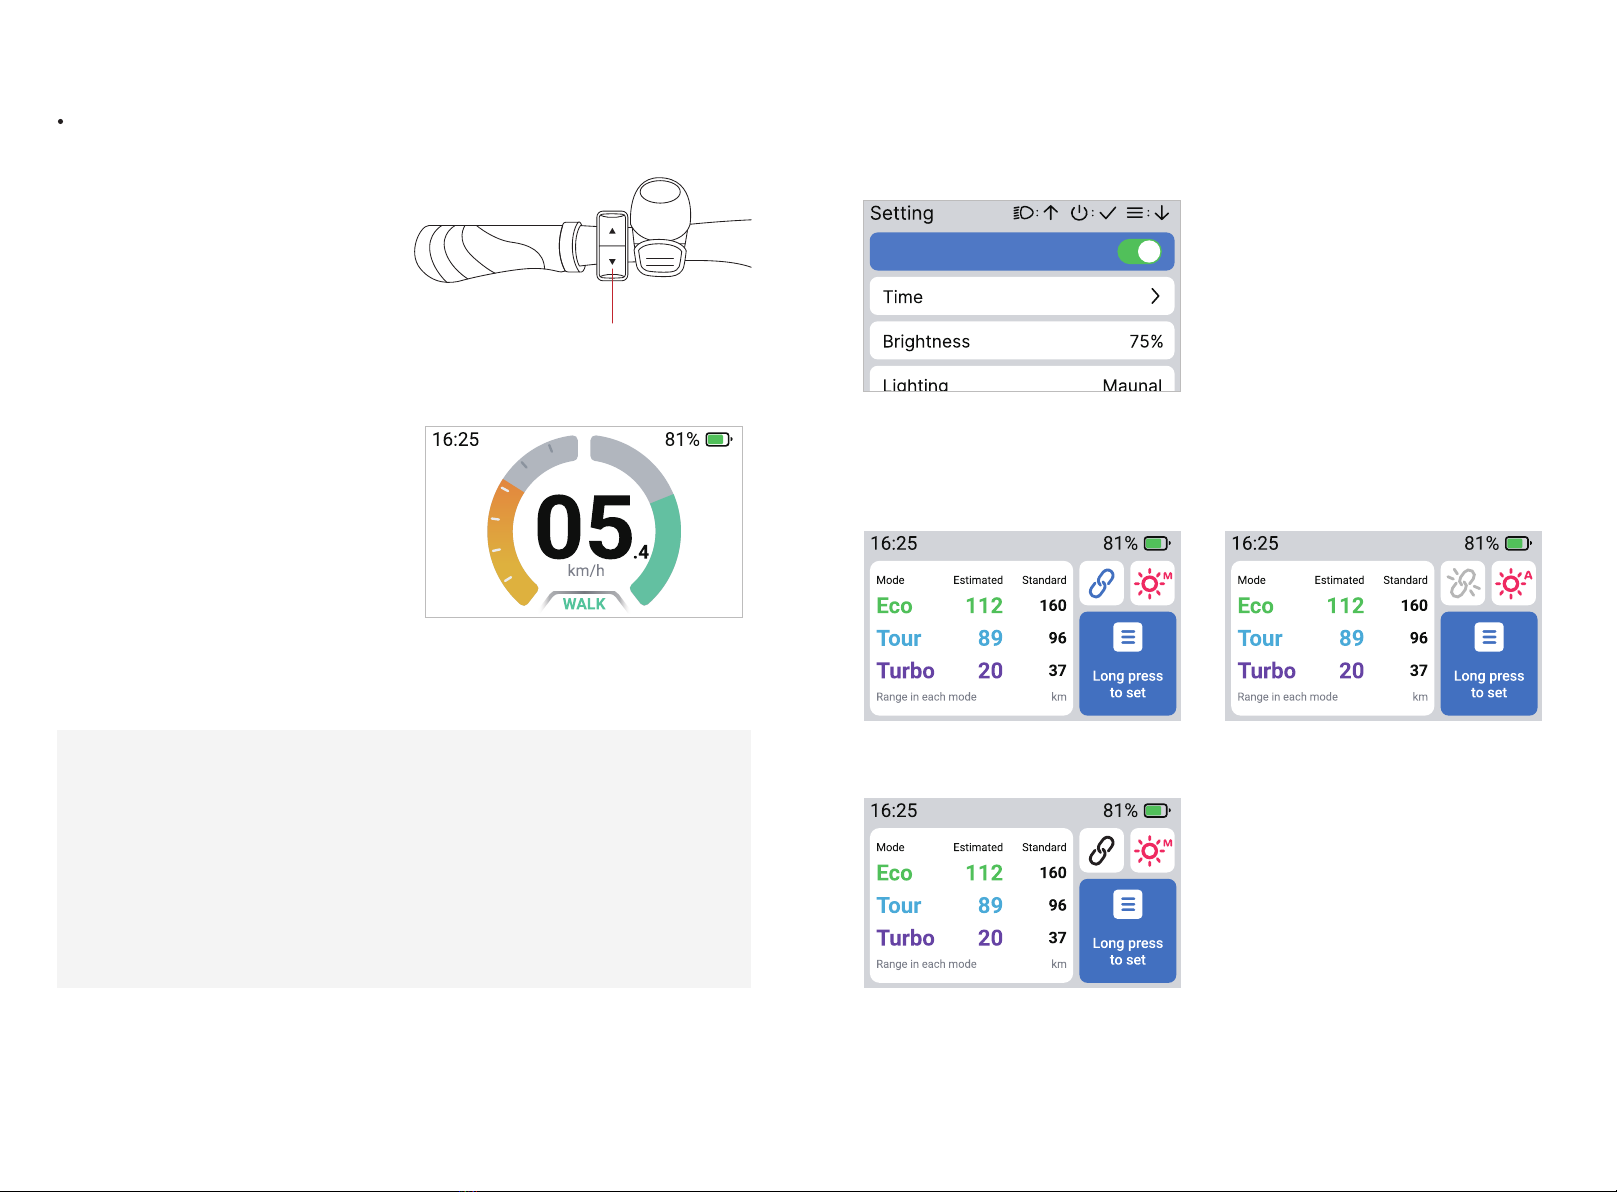
WALK mode
WALK mode is the assist mode for pushing
your E-Bike.
In any gear mode, press and hold the down
button for more than 1 second and then
release it, so you can enter the "WALK
standby mode".
In the "WALK standby mode", pressing the
down button to enter the "WALK mode", the
motor will output power to push your E-Bike
forward. (You need to keep pressing the
down button, once released, the power
assist will stop.)
In the "WALK mode", if the speed of the
E-Bike is greater than 6km/h or the down
button is released, the power assist will be
stopped and it will return to the "WALK
standby mode".
The display can be connected with Hepha APP
Level 1-page 5 shows the connection status:
Notice:
①If you press the up button, the power assist will stop, exit the "WALK mode" and
"WALK standby mode" and return to the original gear mode.
② If you step on the pedal, it will stop the power assist, exit the "WALK mode" and
"WALK standby mode" and return to the original gear mode. After pedaling and exiting,
you need to release the down button again. The gear mode can be then switched.
6.3 Connect with your smartphone
hold the down button
Connection
On
Not connected
Off

20
Connecting by App
19
The display is on the E-Bike & not charging: the E-Bike will charge the display;
The display is not on the E-Bike: You can use a standard 5V/1A charger and type-C cable to
charge the meter (the cable and charger will not provided by Hepha.)
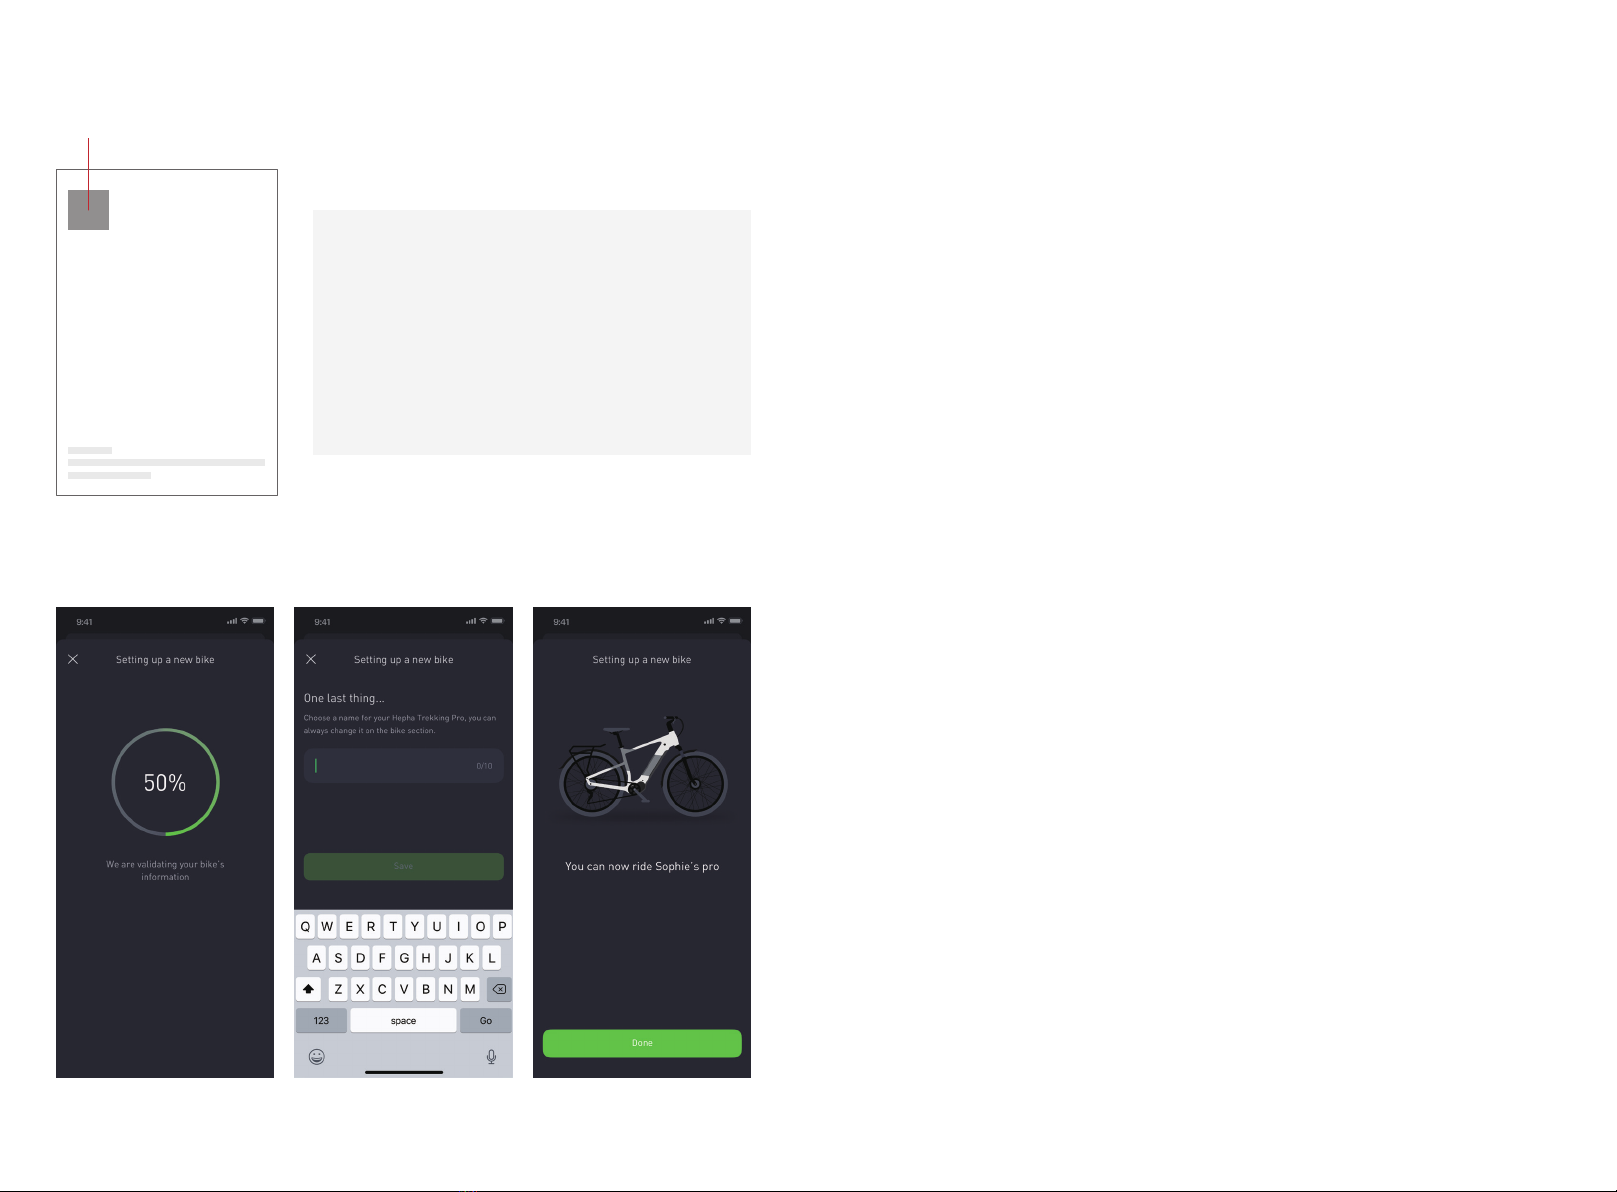
step 1:Download the Hepha APP from the Google Play Store or the Apple APP Store
step 2:Register an account and log in on Hepha APP
step 3:Setting up a new E-Bike
step 4:Follow the prompts to scan the QR code on the back of the E-bike manual
The display is on the E-Bike, and the E-Bike is powered on: The Type-C interface of the display
can charge external devices (mobile phones, etc.) Please note that the cable and charger will
not provided by Hepha.
The display is the key to your E-Bike. Without the display, your E-Bike will not be able to be
powered on;
If an unauthorized display is used, the electrical function of the E-bike is limited.
When your E-Bike fails, a pop-up window will appear on the display to prompt a fault QR
code.
Please scan the fault QR code to learn about the specific cause of the fault and how to deal
with it.
7. Connecting by APP
6.4 Charging and discharging
6.5 Anti-theft
6.6 Pop-up and troubleshooting
6.4.1 Charging
6.4.2 Discharging
Notice:
The external output power of the appliance is 5V/900mA, and it has an overheat
protection function. Please avoid using this function in an overheating environment.
Activating the Hepha APP
If you can't solve the problem, please contact us through the Hepha APP or the following
ways:
Tel: +49 (0) 8142 2844480
Connecting by App
22
Connecting by App
21
scan the QR code 8. Maintenance and servicing
Do not clean any of the components with pressurised water.
Keep the screen of your display clean. Dirt can cause faulty brightness detection.
Clean your display using a soft cloth dampened only with water. Do not use cleaning
products of any kind.
Have your E-Bike system checked by an expert at least once a year (including mechanical
parts, updates of system software.)
8.1 Maintenance and cleaning
If you have any questions about the E-Bike system and its components, please contact
www.hepha.com.
8.2 After-sales service and advice on using products
If you transport your E-Bike attached to the outside of your car, e.g.on a bike rack, remove
the display and the E-Bike battery to avoid damaging them.
8.3 Transport
The drive unit, display incl. operating unit, battery, speed sensor, accessories and packaging
should be disposed of in an environmentally correct manner.
Check that your personal data has been deleted from the device.
Do not dispose of your E-Bike and its components with household waste.
In accordance with Directive 2012/19/EU and Directive 2006/66/EC respectively, electronic
devices that are no longer usable and defective/drained batteries must be collected
separately and recycled in an environmentally friendly manner.
Please return Hepha E-Bike components that are no longer usable free of charge to an
authorised bicycle dealer or to a recycling facility.
Subject to change without notice.
8.4 Disposal
Notice:
Press and hold the power button of the E-Bike while
scanning the QR code.
After connecting with the mobile phone, the time
display will be consistent with the mobile phone.
Trekking 7 User manual
BACK COVER

1 Sicherheitshinweise
1.1 Informationen zur Sicherheit
1.2 Hinweis zum Datenschutz
2. Herzlichen Glückwunsch
3. Beschreibung und Spezifika-
tionen des Produkts
3.1 Verwendungszweck
3.2 Produktmerkmale
3.3 Technische Daten
4. Montage
5. Bedienung
5.1 Schaltflächen
5.2 Seiten
6. Funktionen
6.1 Display ein-/ausschalten
6.2 Schalter Assist-Modus
6.3 Verbinden Sie sich mit Ihrem
Smartphone
6.4 Aufladen und Entladen
6.5 Diebstahlsicherung
6.6 Pop-up und Fehlerbehebung
7. Verbinden per APP
8. Wartung und Instandhaltung
8.1 Wartung und Reinigung
8.2 Kundendienst und Beratung
bei der Verwendung der Produkte
8.3 Transport
8.4 Entsorgung
25
26
26
27
27
28
28
30
31
40
40
42
43
43
43
44
46
46
46
46
Inhalt
23 24
German Version

Sicherheitshinweise Herzlichen Glückwunsch
25 26
1 Sicherheitshinweise
2. Herzlichen Glückwunsch
1.1 Informationen zur Sicherheit
Lesen Sie alle Sicherheitshinweise und Anweisungen.
Aktualisierungen
Die Nichtbeachtung der Sicherheitshinweise und die Nichtbefolgung der Anweisungen kann
zu einem elektrischen Schlag, Brand und/oder schweren Verletzungen führen.
1.2 Hinweis zum Datenschutz
Wenn das Display zur Wartung an den Hepha-Service geschickt wird, können die auf dem
Display gespeicherten Daten an Hepha und die Händler übermittelt werden.
Herzlichen Glückwunsch zum Kauf dieses Displays. Die Hepha P-100 zeigt zuverlässig alle
wichtigen Fahrdaten an.
Der Funktionsumfang von Hepha P-100 wird ständig erweitert. Halten Sie Ihre Hepha APP auf
dem neuesten Stand. Sie können diese APP nutzen, um neue Funktionen herunterzuladen
und diese auf Ihre Hepha P-100 zu übertragen.
Zusätzlich zu den hier gezeigten Funktionen können jederzeit Änderungen an der Software
zur Fehlerbehebung und Funktionserweiterungen vorgenommen werden.
Bewahren Sie alle Sicherheitshinweise und Anweisungen zum späteren Nachschlagen
auf.
Der Begriff Akku wird in dieser Anleitung für alle originalen Hepha E-Bike-Akkus verwendet.
• Lesen und beachten Sie die Sicherheitshinweise und Anweisungen in allen Bedienungsanlei-
tungen des E-Bike-Systems und in der Bedienungsanleitung Ihres E-Bikes.
• Versuchen Sie nicht, das Display oder die Bedieneinheit während der Fahrt zu sichern.
• Lassen Sie sich nicht von der Anzeige ablenken.
Wenn Sie sich nicht ausschließlich auf den Verkehr konzentrieren, riskieren Sie, in einen
Unfall verwickelt zu werden. Wenn Sie in Ihrem Display andere Eingaben als das Umschalten
der Assistenzstufe vornehmen wollen, halten Sie an und stellen Sie die entsprechenden
Daten ein.
• Benutzen Sie Ihr Smartphone nicht während der Fahrt.
Wenn Sie sich nicht ausschließlich auf den Verkehr konzentrieren, riskieren Sie, in einen
Unfall verwickelt zu werden. Geben Sie die relevanten Daten nur ein, wenn Sie zuvor
angehalten haben.
• Stellen Sie die Helligkeit des Displays so ein, dass Sie wichtige Informationen wie Geschwin-
digkeit und Warnsymbole gut erkennen können.
Eine falsch eingestellte Bildschirmhelligkeit kann zu gefährlichen Situationen führen.
• Öffnen Sie das Display nicht. Das Anheben des E-Bikes am Display kann zu irreparablen
Schäden am Display führen.
• Verwenden Sie das Display nicht als Griff. Das Anheben des E-Bikes am Display kann zu
irreparablen Schäden am Display führen.
• Stellen Sie Ihr Fahrrad nicht verkehrt herum auf den Sattel und den Lenker, wenn das
Display oder seine Halterung aus dem Lenker herausragt.
Dies kann zu irreparablen Schäden am Display oder an der Halterung führen. Nehmen Sie
auch das Display ab, bevor Sie das Fahrrad an einer Wandhalterung befestigen, um sicher-
zustellen, dass das Display nicht herunterfällt oder beschädigt wird.
Beschreibung und Spezifikationen des Produkts Montage
27 28
4. Montage
(1)
(2)
(4)
(3)
(5)
(6)
Produkt-Code
Betriebstemperatur*
Lagertemperatur
Schutzart
Gewicht, ca.
SC-P100
-20 ~ 60 °C
-20 ~ 60 °C
IPX5
83 g
Anzeige Hepha P-100
(1) Typ-C-Schnittstelle
(2) Bildschirm
(3) Tasten
(4) Lichtsensor
(5) Kontakte anzeigen
(6) Kontakte des Inhabers
4.1. Display montieren und befestigen
Nehmen Sie das Display aus dem Werkzeugkasten. Setzen Sie das untere Seite richtig
auf den Display-Halter, drücken Sie den oberen Teil auf den Halter, bis Sie ein "Klick"
hören.
Wenn Sie das Fahrrad abstellen, entfernen Sie das Display, indem Sie auf den
erhöhten Teil des Displayhalters drücken. Nehmen Sie das Display ab.
Hinweis: Ihr Fahrrad hat standardmäßig die Fahrradschlossfunktion aktiviert. Das
heißt, Ihr Display ist der Schlüssel zu Ihrem Fahrrad. Entfernen Sie das Display und
der Motor wird automatisch deaktiviert. Um ihn wieder zu aktivieren, bringen Sie
dasselbe Display wieder am Fahrrad an, und die Motorunterstützung wird wieder
aktiviert. Das Display zeigt den Status "Gesperrt" an, wenn die Motorunterstützung
durch die Sperrfunktion aktiviert oder deaktiviert ist.
Displays montieren/entfernen
3. Beschreibung und Spezifikationen des Produkts
3.1 Verwendungszweck
3.3 Technische Daten
3.2 Produktmerkmale
Das Hepha P-100-Display ist für die Darstellung von Radfahrdaten konzipiert.
Um die volle Funktionalität des Hepha P-100-Displays nutzen zu können, benötigen Sie ein
kompatibles Smartphone, auf dem die Hepha APP installiert ist (erhältlich im Apple App Store
oder im Google Play Store).
* Temperaturen außerhalb dieses Bereichs können zu Fehlfunktionen der Anzeige führen.
Montage Bedienung
29 30
5. Bedienung
Befestigen Sie das Display, wenn Sie es nicht mit sich tragen wollen.
Entfernen Sie den Displayhalter mit dem #3 Inbusschlüssel. Drücken Sie das Display
auf den Displayhalter. Drehen Sie die Rückseite des Displayhalters nach oben,
nehmen Sie eine M3-Schraube aus dem Werkzeugkasten und befestigen Sie sie mit
dem #3 Inbusschlüssel. Bringen Sie dann den Displayhalter und das Display wieder
an Ihrem Lenker an.
4.2.
Das Display befestigen
5.1 Schaltflächen
schaltet die
Beleuchtung
(automatisch/manu-
ell) auf der Seite
*Ebene 1 ein /
blättert auf der Seite
*Ebene 2 auf
Einschalten der Taschenlampe auf der
Seite *Level 1 / Umblättern auf der Seite
*Level 2
Langes
Drücken
Einschalten der Taschenlampe auf der
Seite *Level 1 / Umblättern auf der Seite
*Level 2
Kurzes
Drücken
schaltet die
Beleuchtung
(ein/aus) auf der
Seite *Ebene 1 ein /
blättert auf der Seite
*Ebene 2 auf
schaltet die
Beleuchtung
(automatisch/manu-
ell) ein*Seite 1
schaltet die
Beleuchtung
(ein/aus) auf *Seite 1
Status anzeigen
Off-Bike & nicht
aufladen Off-Bike & aufladen On-Bike & nicht
aufladen On-Bike & aufladen
Schalt
fläche Operation
① Einsetzen ② Drücken Sie nach dem
Einsetzen des Displays
① Hier drücken
② Entfernen
Montieren
Entfernen
① Lösen Sie diese beiden
Schrauben und nehmen Sie
den Halter vom Fahrrad ab
③Befestigen Sie die
Schraube und bringen
Sie die Halterung wieder
am Fahrrad an
② Bringen Sie das Display
am Halter an, bevor Sie die
Schraube festziehen
M3 Schraube

Bedienung Bedienung
31 32
5.2.1 Ebene 1 - Seite 1
* Die Definition von Seiten der Ebene 1 und der Ebene 2 bezieht sich auf 5.2 Seiten
Achtung! Level - Seite 1 wird nach dem Einschalten Ihres E-Bikes angezeigt
*Herzfrequenz: Diese Funktion kann vorübergehend
nicht unterstützt werden, da eine Aktualisierung und
Entwicklung noch aussteht.
5.2 Seiten
5.2.2 Ebene 1 - Seite 2 5.2.3 Ebene 1 - Seite 3
E-Bike ausschaltenDisplay Ausschalten
Display Strom ein/
Bestätigen der
Auswahl auf der
Seite *Stufe 2
Bildschirm aus
Bestätigen der
Auswahl auf der
Seite *Ebene 2
E-Bike einschalten /
Auswahl auf Seite
*Level 2 bestätigen
Bildschirm aus
Bildschirm ein
Eintritt in die Seite *Ebene 2 auf der Seite *Ebene 1 / Austritt aus
der Seite *Ebene 2
Umblättern auf der Seite *Ebene 1 / Abwärtsblättern
auf der Seite *Ebene 2
Bildschirm aus
Bildschirm aus
ECO Modus Tour Modus
Turbo Modus Off
5.2.4 Ebene 1 - Seite 4 5.2.5 Ebene 1 - Seite 5
Status anzeigen
Off-Bike & nicht
aufladen Off-Bike & aufladen On-Bike & nicht
aufladen On-Bike & aufladen
Schalt
fläche Operation
Langes
Drücken
Kurzes
Drücken
Langes
Drücken
Kurzes
Drücken

34
Bedienung Bedienung
33
Durch langes Drücken der Taste MENU auf einer
beliebigen Seite der Ebene 1 können Sie die Seite
mit den Einstellungsaufforderungen aufrufen:
Einstellungsseite aufrufen Auf der Einstellungsseite: 5.2.5.1 Ebene 2 - Einstellungen
Menü-Taste
Licht-Taste:
Umblättern auf
der Seite
Einschalttaste:
bestätigen
Menü-Taste:
Abwärtsblättern
auf der Seite
Drücken Sie die Bestätigungstaste
zum Ändern von: ein/aus
Anschluss (ON/OFF)
Drücken Sie die Bestätigungstaste
zum Ändern von:
• Synic mit Telefon (ON/OFF)
• Manuelle Einstellung
• 24-Stunden-Uhr (EIN/AUS)
Zeit
Drücken Sie die Bestätigungstaste,
um Ihre Gesamtfahrstrecke
anzuzeigen oder die Berechnung-
soption zu ändern.
Informationen

36
Bedienung Bedienung
35
Drücken Sie die Bestätigungstaste
zum Ändern von: Metrisch/Inch
Einheit
Drücken Sie die Bestätigungstaste
zum Ändern von: AUTO, 25%, 50%,
75%, 100%
Helligkeit:
Nach der Einstellung auf Auto
schalten sich die Scheinwerfer bei
Dunkelheit automatisch ein und bei
Dämmerung aus, je nach Helligkeit
der Umgebung.
Beleuchtung: Auto/Manuell
Drücken Sie die Bestätigungstaste
zum Ändern von:.
Automatischer Schalter (ein/aus)
Erscheinungsbild (Hell/Dunkel)
Hintergrund
Other manuals for Trekking 7
1
Table of contents
Languages:
Popular Bicycle Accessories manuals by other brands


Specialized
Specialized Elite CylcoComputer user manual

Sigma
Sigma BC 16.16 manual

Playcore
Playcore Dero Setbacks installation instructions

VDO Cyclecomputing
VDO Cyclecomputing x3dw instruction manual

Cateye
Cateye RAPID X2 manual

buratti meccanica
buratti meccanica Clorofilla Trail Use and maintenance manual


