Heritage Audio OST-8 adat User manual

USER MANUAL
8-SLOT 500 SERIES RACK
WITH PREMIUM 24 BIT 192K ADC
August/2022)Rev.)1.0.)
adat
OST-
2
INTRODUCTION
CONTENTS
DESCRIPTION
GETTING STARTED
APPLICATIONS!
WIRING FOR DB25 CONNECTORS
SPECIFICATIONS!
TROUBLE SHOOTING
WARRANTY STATEMENT
REGISTRATION
RECALL SHEETS
2
2
3
4
6
13
14
15
16
16
17
TABLE OF CONTENTS
Thank you for choosing the OST-8 adat. Heritage Audio is dedicated to bringing you ´the sound of yesterday for
tomorrow´. We specialize in capturing that unique, enticing sound that everybody has fallen in love with. For years
engineers, producers and musicians have been yearning for that classic vibe. Usually the only option is to search for
old, used original equipment that is almost always in a questionable state of operation. This brings with it a whole lot of
other issues, making the experience less than desirable. Not to mention the very high prices asked for this equipment,
which makes them virtually unobtainable for the great majority. Now it´s possible to obtain that same sound with a
brand new piece that will give you all the problem-free, heavy-duty use you´ll need for years of music making history.
Peter Rodriguez
CEO!
Heritage Audio - Madrid, Spain
INTRODUCTION
© 2022 Heritage Audio S.L. is the sole owner of the copyright of all information and drawings contained in this manual which are not to be copied or
reproduced by any means or disclosed in part or whole to any third party without written permission.
Heritage Audio reserves the right to alter specifications without notice. The information in this manual has been carefully checked and is believed to
be accurate at the time of publication. However, no responsibility is taken by us for inaccuracies, errors or omissions nor any liability assumed for any
loss or damage resulting either directly or indirectly from use of the information contained within it.
OST 8 ADAT
AC POWER CORD EU & US
POWER SUPPLY HA-PSU02
RACK SCREWS
BROCHURES

DESCRIPTION
The OST-8 adat 500 series enclosure is designed for racking any and all 500-series modules and devices, including
‘double wide’ modules and even the most demanding class-A and vacuum tube designs, and connect them to your
existing audio interface. It features Heritage Audio’s On Slot Technology, providing maximum protection, filtering, and
isolation to each channel. While most 500-series enclosures on the market have a relatively simple power supply
design essentially feeding every channel in parallel, each channel of the OST-8 adat enclosure has its own power
supply, individually regulated and isolated from the rest. This ensures that every 500-series module installed will
perform at its peak potential, and that no ‘power hungry’ or even a faulty module will compromise the performance of
another. In addition to reducing interference, many 500-series devices actually exhibit lower self-noise and better
performance when racked in the OST-8 adat enclosure, specially mic preamps.
The best part is we have incorporated a premium analog to digital converter to send your signals on to your DAW as
easily as possible. This high quality, premium ADC is 24Bit and offers selectable internal sampling frequencies variable
from 44.1 kHz to 192 kHz in addition to being externally syncable by WordClock. This all takes place using just one
ADAT Lightpipe cable. One of the neatest features of the unit is the ability to individually, per channel, decide whether
the signal converted and sent to the DAW comes directly from the corresponding input (non-processed signal), after the
500 series module (processed signal) or from an external source. What this allows you to do is send your ´500 Series´
processed signal out to another signal processor and then return it to the unit so it can be converted digitally and sent
along to your DAW. This can really come in handy if you need a bit of external rack EQ or compression for more control
before the digital conversion. This actually means you have 3 selectable sources for each of the eight converters, a
seemingly small detail that can really make a big difference when you´re knee deep in the mix or session and don´t
have time to spare.
This also means that you can use the OST-8 adat as a stand-alone converter and gradually add 500 modules at your
convenience to setup your ideal rig. So for those times when all you need is a top-of-the-line analog to digital converter,
look no further, you already have it right here.
All the inputs and outputs are provided on gold plated XLRs with LINE inputs and outputs also being offered on DB25
connectors for convenience. These DB25 connectors follow the TASCAM protocol for wiring. The alternative 8 External
Inputs for the converter are also available on a DB25 connector. Then, of course, are the format specific connectors for
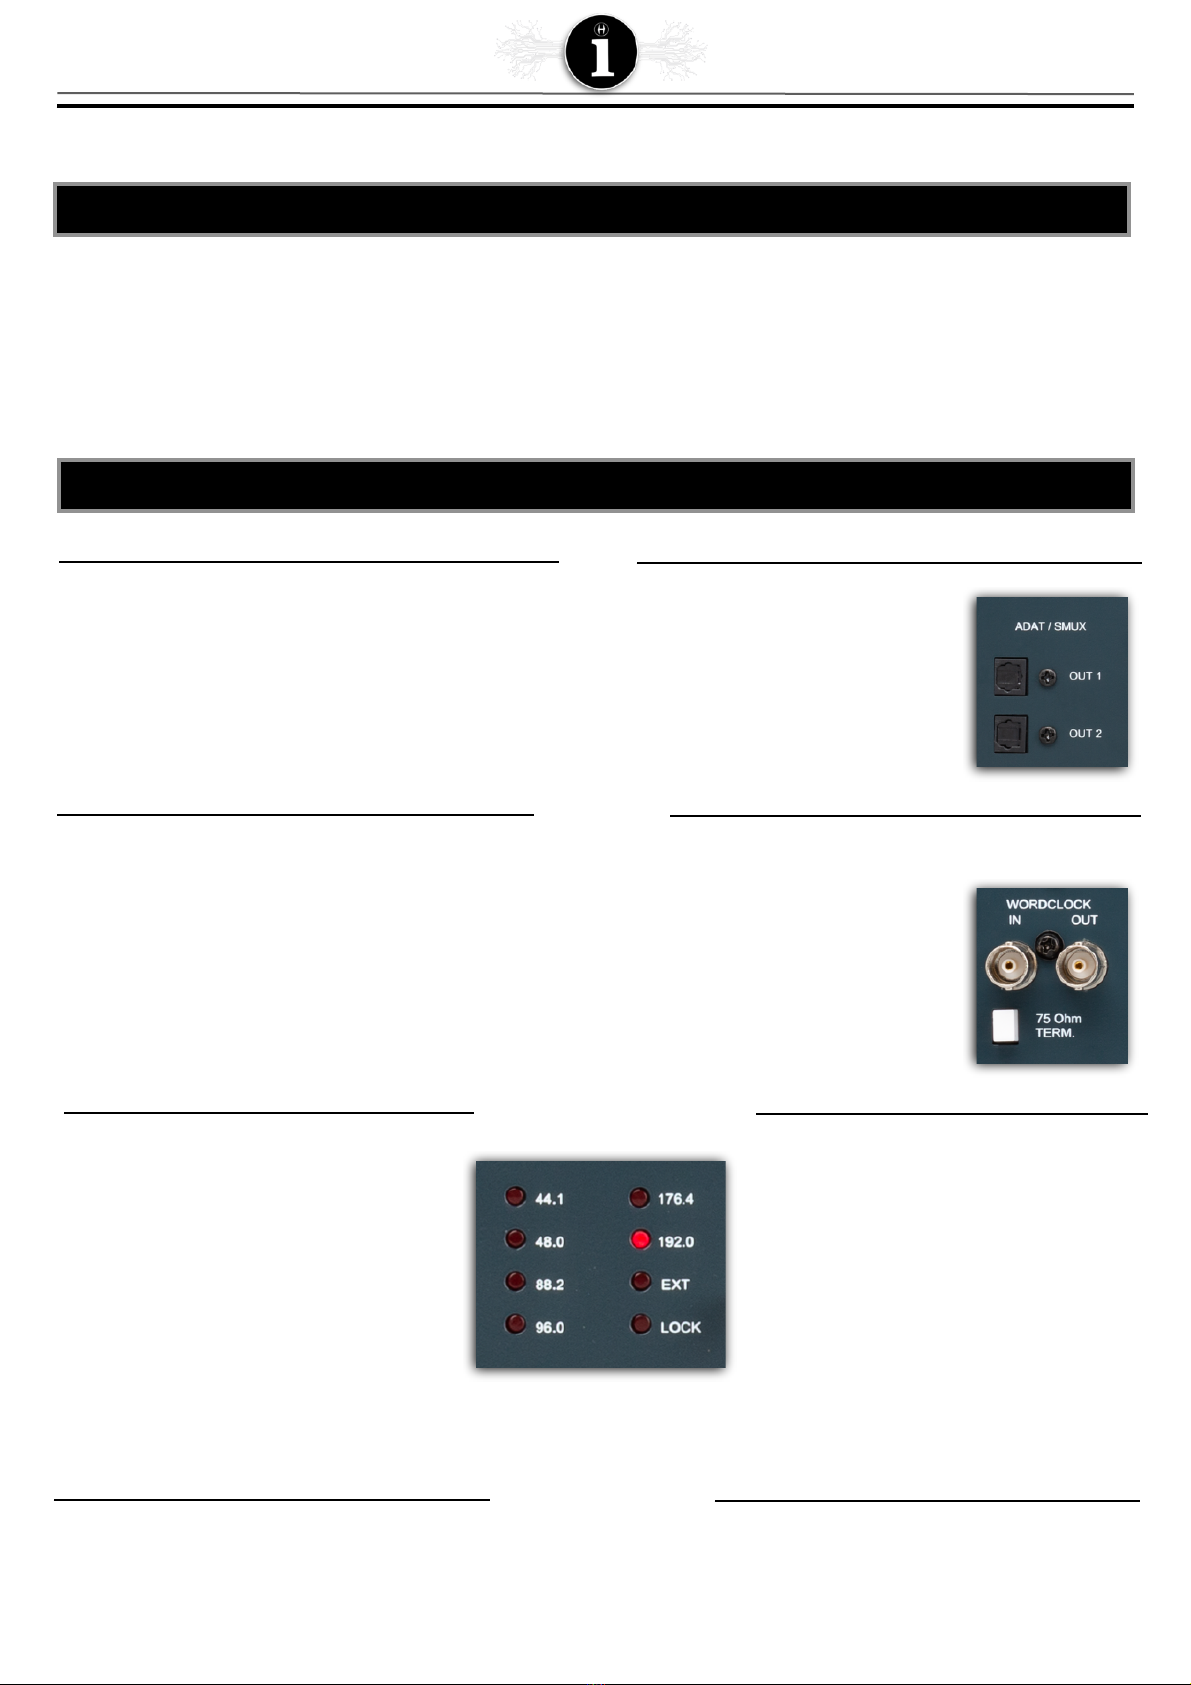
ADAT (two of them for SMUX possibilities) and BNC WordClock Input and Output.
Another new and exciting feature in the OST-8 adat is the Link option, allowing each channel to be internally routed
over to the next at the push of a button (via back panel), no patch cables required!
As with all Heritage Audio products; the 500 Series OST-8 adat enclosures are built utilizing the most cutting edge
methods in manufacturing and design, without ever compromising audio quality or cutting corners.
3
GETTING STARTED
4
FRONT
6
7
8
FREQUENCY SELECTOR
FOR ADC
To Choose the Desired
Sampling Frequency of the
ADC
POWER BUTTON ON/OFF
Turns the Unit On
VOLTAGE LEDs
Verify that the correct voltage is
arriving at each slot (±16 V) as
well as +48 V
1
2
3
4
5
ON SLOT TECHNOLOGY
Individual power per slot
SLOTS (8)
On Gold Plated Edge
Connectors
COMPRESSION LINKS
Jumpers used to determine the
Compression Linking between
adjacent slots
ADC INPUT SWITCHES 1-8
To choose the input path for the
analog to digital converter
FREQUENCY INDICATOR
Sampling Frequency of the
ADC
1
2
3
8
7
5
6
4
5
All XLRs are:
Pin 1: GND!
Pin 2: Hot!
Pin 3: Cold
1
2
3
3
2
1
GND!
Hot (+)!
Cold (-)
MALE XLR
FEMALE XLR
REAR
6
7
8
9
10
ADAT - S/MUX Optical Ports
Outputs on Digital ADAT
Format
EXTERNAL POWER INPUT
HA-PSU02
On Gold Plated XLR5
INPUTS
On Gold Plated XLRs
AUDIO LINKS
Link Output With Input of
Adjacent Slot
25 PIN D-SUB(DB25)
CONNECTOR INPUTS
Line Inputs
1
2
3
4
5
BNC IN & OUT CONNECTOR
Connect for Wordclock Syncing
OUTPUTS
On Gold Plated XLRs
25 PIN D-SUB(DB25)
CONNECTOR ANALOG TO
DIGITAL CONVERTER
Additional External Line Inputs
25 PIN D-SUB(DB25)
CONNECTOR OUTPUTS
Line Outputs
75 Ohm TERM BUTTON
Push to Activate Termination
1
5
6
2
8
9
10
4
3
7
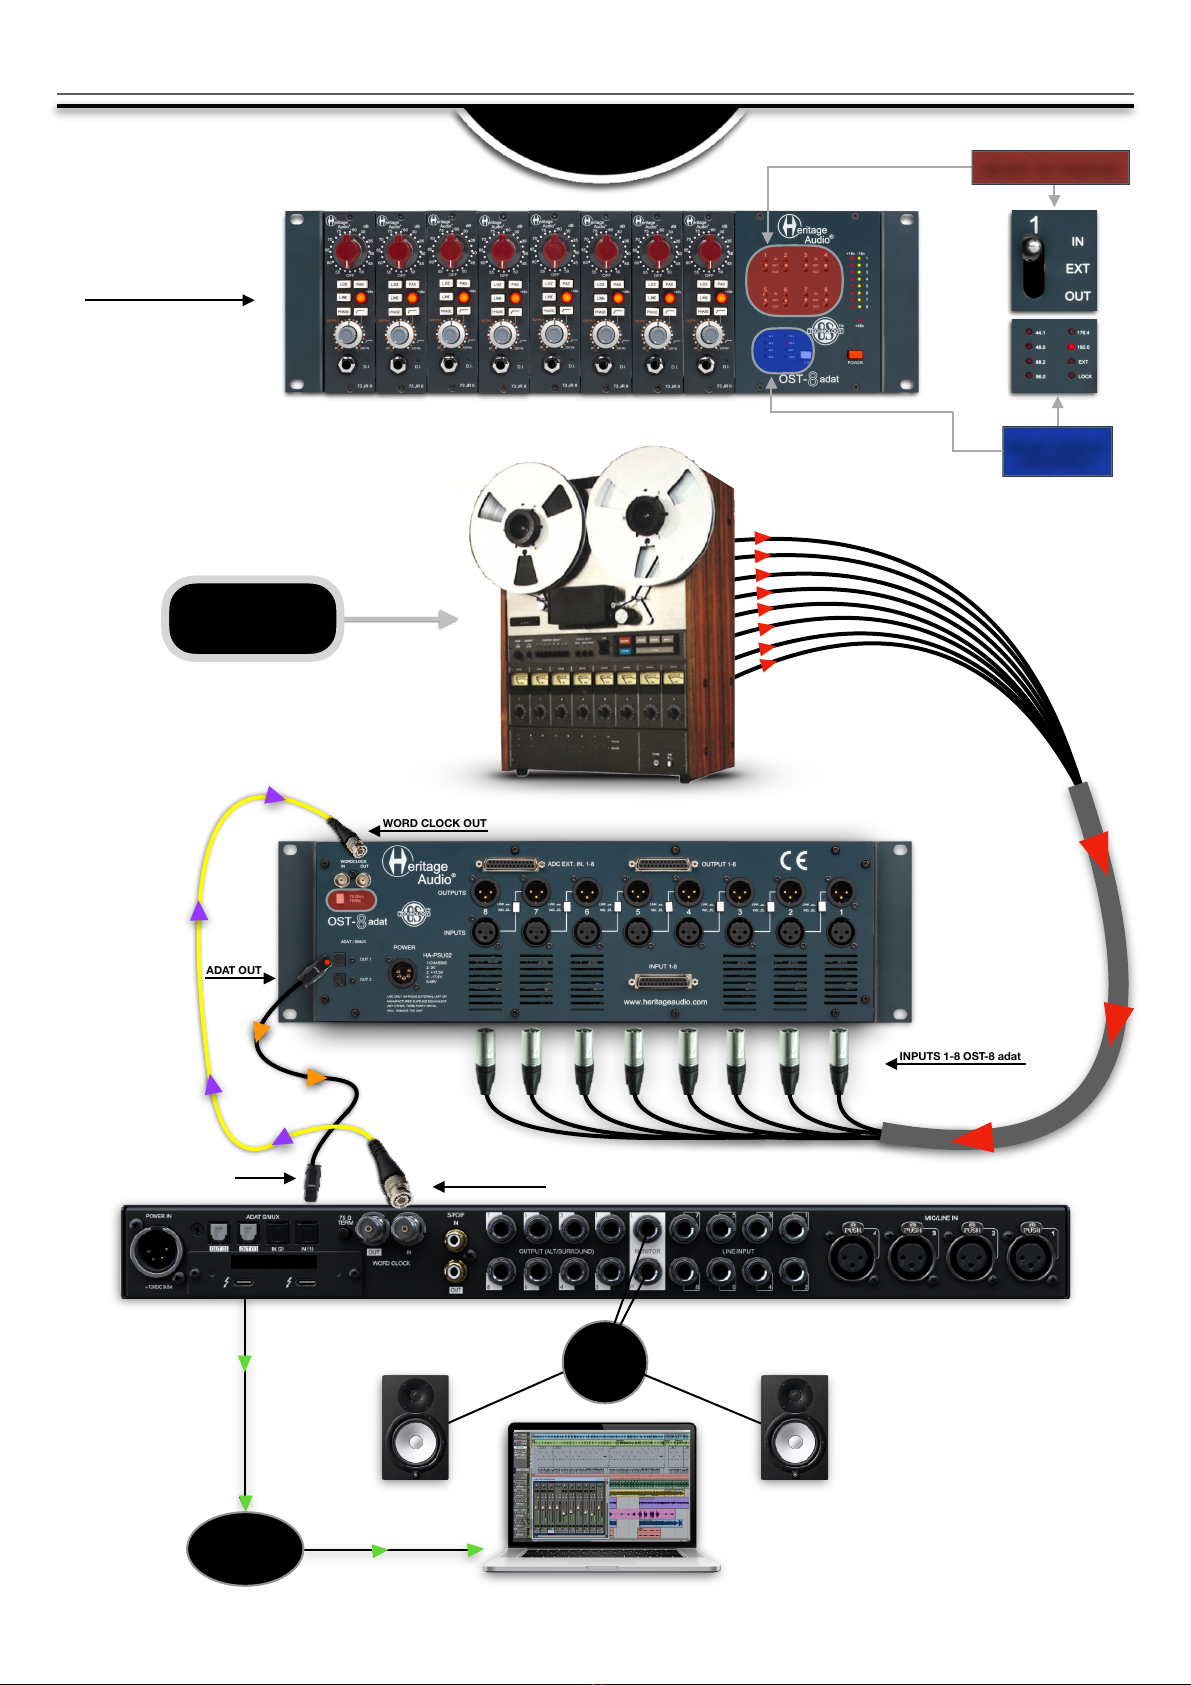
DIGITAL CONNECTION
ADAT/SMUX

6
DRUM RECORDING
SETUP 1
APPLICATIONS
KICK
SNARE
HI HAT
TOM 1
OH - L
SNARE
TOM 2
OH - R
1 - MIC INPUT
2 - MIC INPUT
3 - MIC INPUT
4 - MIC INPUT
5 - MIC INPUT
6 - MIC INPUT
7 - MIC INPUT
8 - MIC INPUT
1
2
3
5
4
8
7
MONITOR
SPEAKERS
THUNDERBOLT
COMPUTER
OUTPUTS 1-8 OST-8 adat
INPUTS 1-8 OST-8 adat
6
LINE
INPUTS
73 JR II!
Modules not included
7
DRUM RECORDING
SETUP 2
KICK
SNARE
HI HAT
TOM 1
OH - L
SNARE
TOM 2
OH - R
1 - MIC INPUT
2 - MIC INPUT
3 - MIC INPUT
4 - MIC INPUT
5 - MIC INPUT
6 - MIC INPUT
7 - MIC INPUT
8 - MIC INPUT
1
2
3
5
4
8
7
MONITOR
SPEAKERS
THUNDERBOLT
COMPUTER
INPUTS 1-8 OST-8 adat
6
WORD CLOCK OUT
WORD CLOCK IN
ADAT IN
ADAT OUT
ACTIVATE “TERM” BUTTON
SELECT “EXT” POSITION
SELECT “OUT” POSITION
73 JR II!
Modules not included
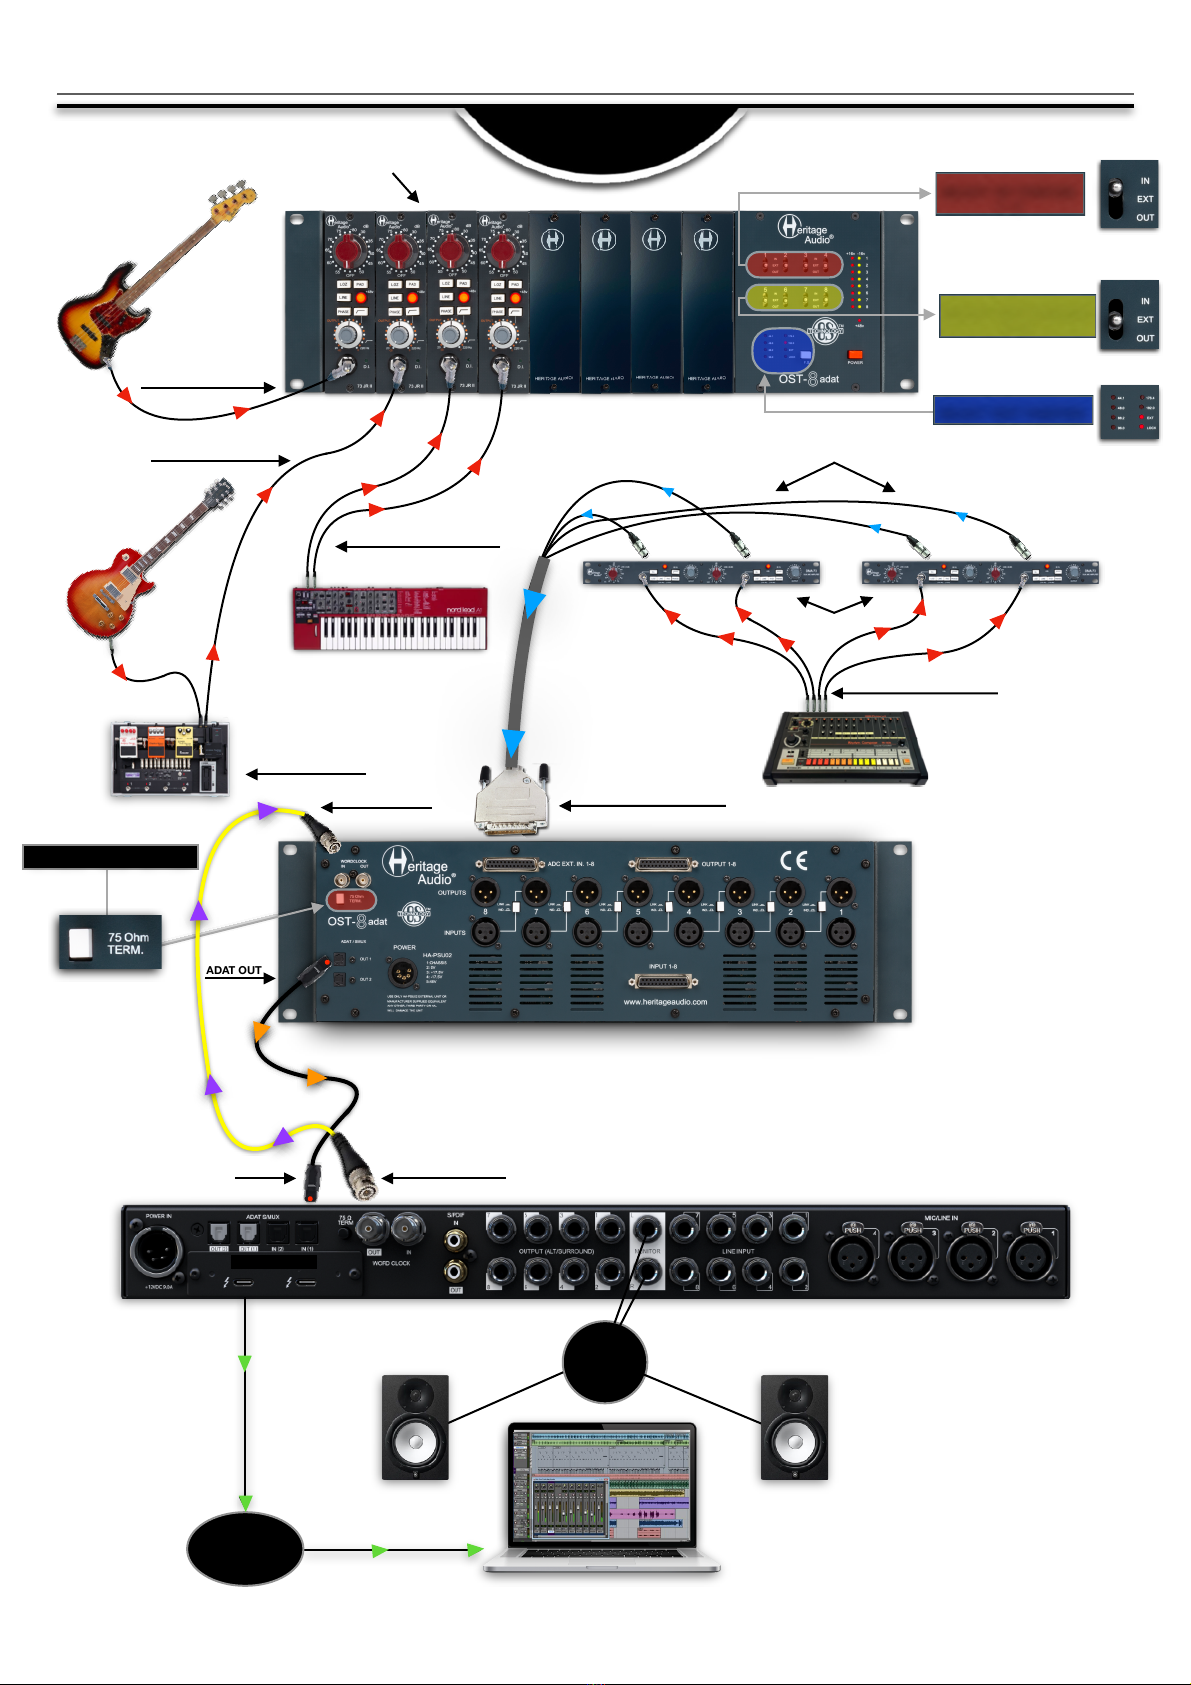
8
MIXED INPUT
RECORDING
MONITOR
SPEAKERS
THUNDERBOLT
COMPUTER
WORD CLOCK OUT
ADAT IN
ADAT OUT
ACTIVATE “TERM” BUTTON
GUITAR FX PEDAL
D.I. INPUT MODULE 1
D.I. INPUT MODULE 2
OUTPUTS L&R KEYBOARD
D.I. INPUT MODULE 3 & 4
PREAMP OUTPUTS
CONNECTED TO ADC EXT. 5-8
DRUM MACHINE
INDIVIDUAL OUTPUTS 1-4
D.I. INPUTS
DB25 CONNECTED TO
ADC EXTERNAL IN 1-8
WORD CLOCK IN
SELECT “EXT” POSITION
SELECT “IN” POSITION
1 - 4
SELECT “EXT” POSITION
5 - 8
73 JR II!
Modules not included

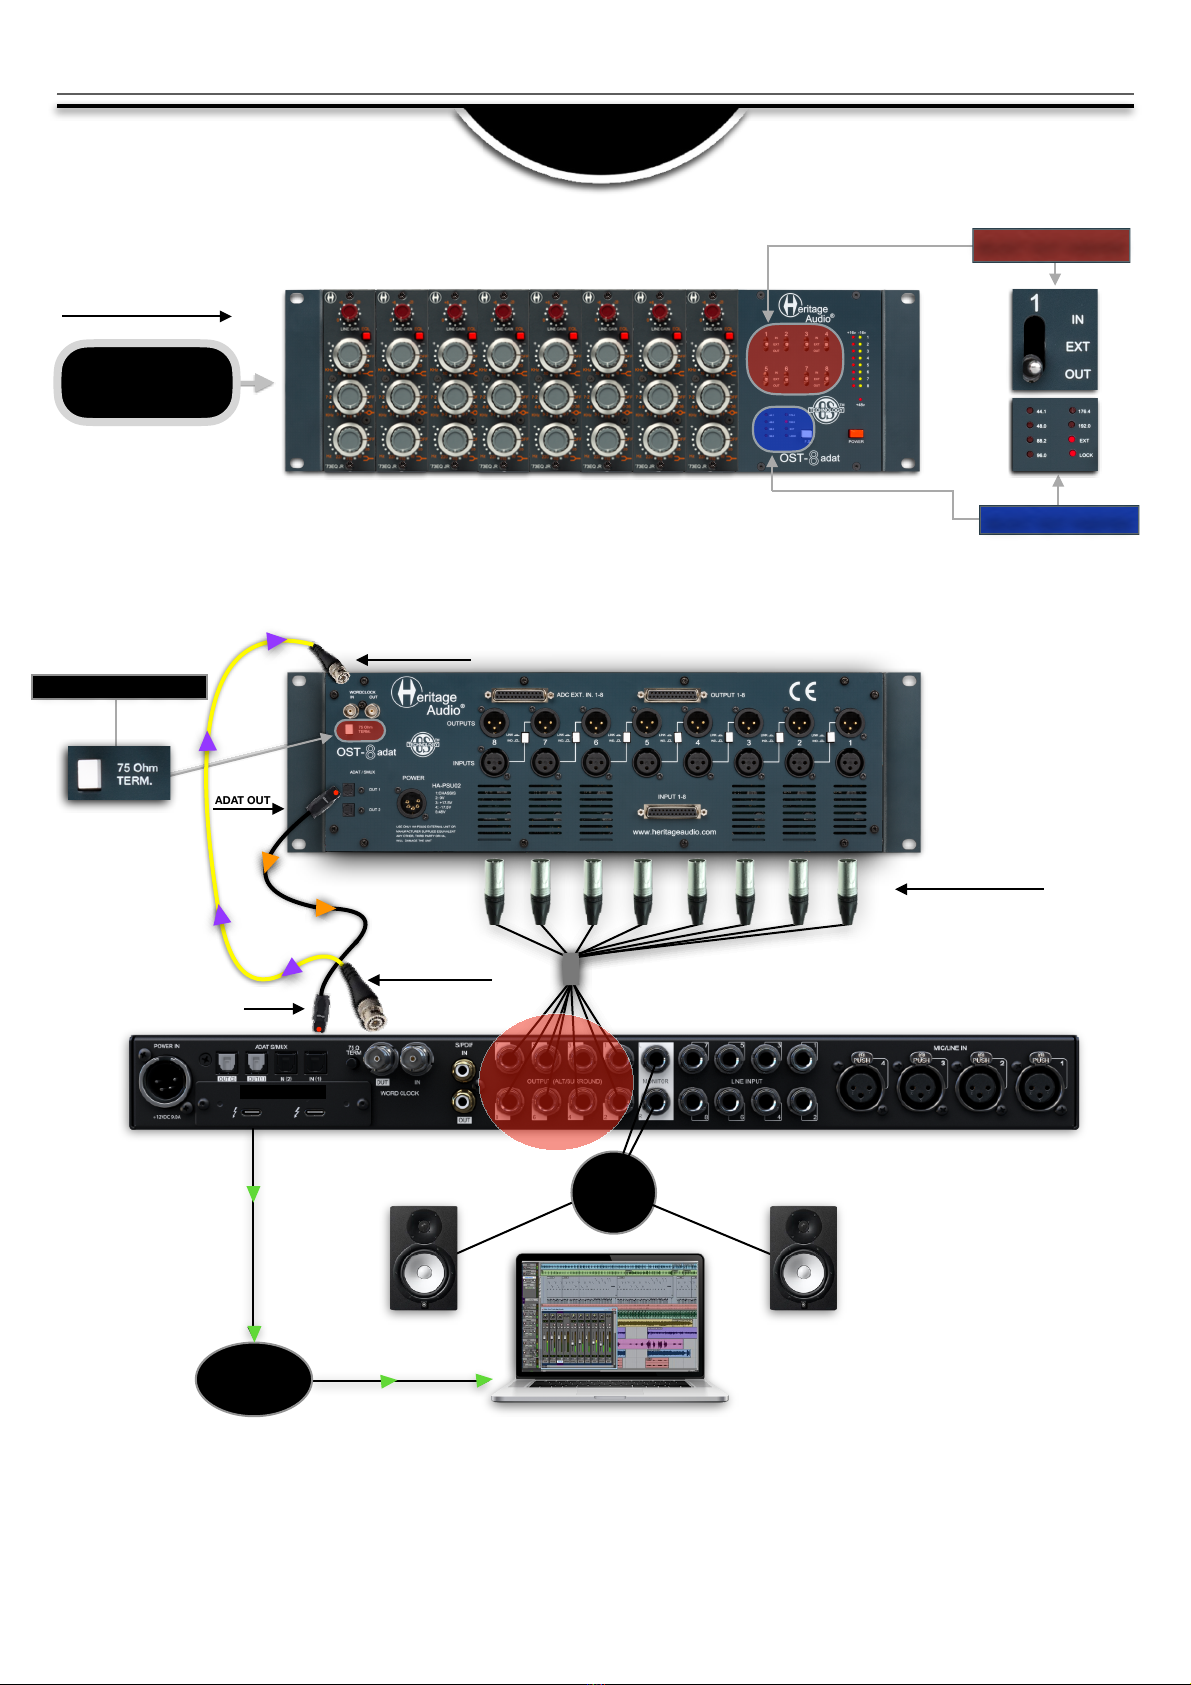
9
VOCAL LINKED EQ
PROCESSED/UNPROCESSED
MONITOR
SPEAKERS
THUNDERBOLT
COMPUTER
WORD CLOCK OUT
ADAT IN
ADAT OUT
ACTIVATE “TERM” BUTTON
WORD CLOCK IN
CONDENSER MICS
ACTIVATE LINK SWITCH
(SLOT 1, 3, 5 & 7)
73 JR II
SLOT 1
73 EQ JR
SLOT 2
73 JR II
SLOT 3
73 EQ JR
SLOT 4
73 JR II
SLOT 5
73 EQ JR
SLOT 6
73 JR II
SLOT 7
73 EQ JR
SLOT 8
ACTIVATE +48 V
MODULES 1, 3, 5 & 7
STAGE BOX TO
DB25 INPUT 1-8
SELECT “IN” POSITION
1, 3, 5 & 7
STAGE BOX
SELECT “OUT” POSITION
2, 4, 6 & 8
SELECT “EXT” POSITION
This configuration would be used to record
two tracks of the same signal, one straight
from the Preamp and the other processed
through a 500 series module.
In this case we´re using an EQ for processing.
73 JR II & 73 EQ JR!
Modules not included
10
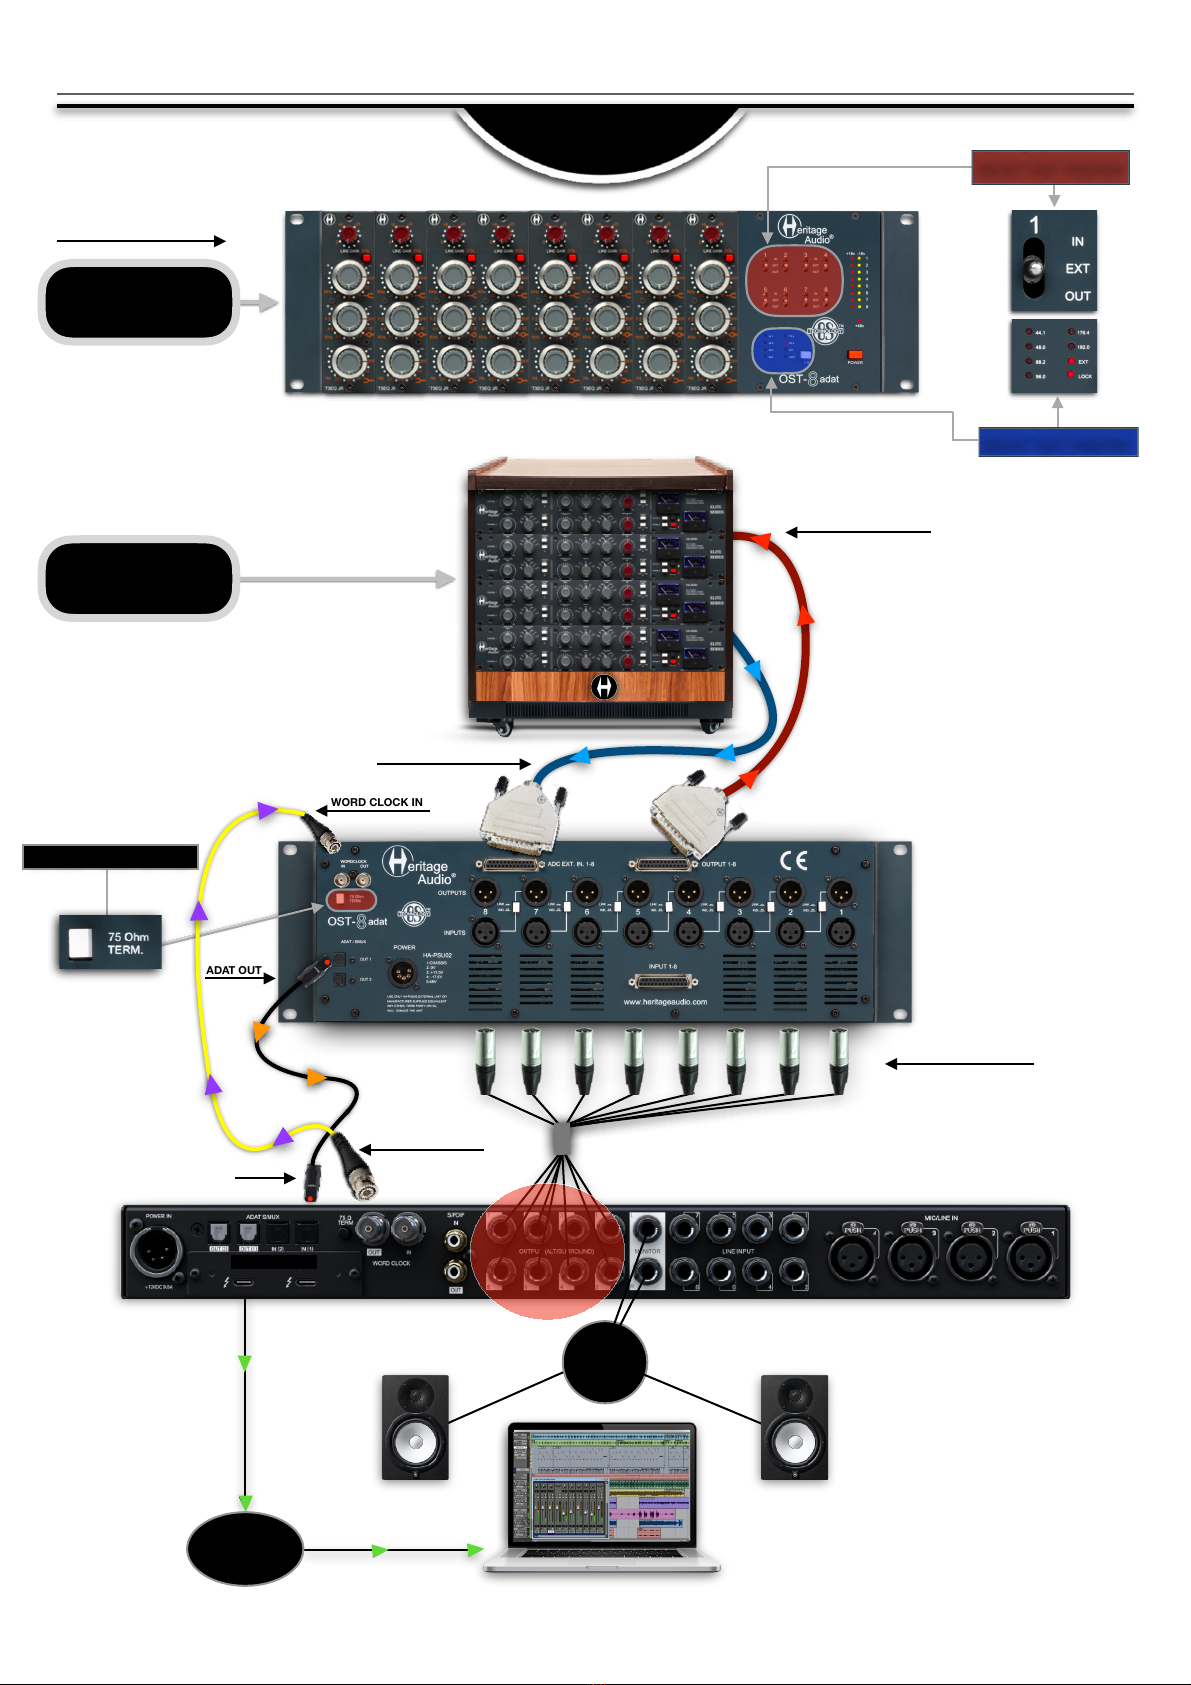
MIXING
INSERT SETUP 1
MONITOR
SPEAKERS
THUNDERBOLT
COMPUTER
WORD CLOCK OUT
WORD CLOCK IN
ADAT IN
ADAT OUT
ACTIVATE “TERM” BUTTON
SELECT “EXT” POSITION
SELECT “OUT” POSITION
LINE
OUTPUTS
8 CHANNELS
OF EQUALIZATION
INPUTS 1-8 OST-8 adat
73 EQ JR!
Modules not included
11
MIXING
INSERT SETUP 2
MONITOR
SPEAKERS
THUNDERBOLT
COMPUTER
INPUTS 1-8 OST-8 adat
WORD CLOCK OUT
WORD CLOCK IN
ADAT IN
ADAT OUT
ACTIVATE “TERM” BUTTON
SELECT “EXT” POSITION
SELECT “EXT” POSITION
LINE
OUTPUTS
COMPRESSOR INPUTS
COMPRESSOR OUTPUTS
8 CHANNELS
OF EQUALIZATION
8 CHANNELS
OF COMPRESSION
73 EQ JR!
Modules not included
STAND ALONE
CONVERTER
MONITOR
SPEAKERS
THUNDERBOLT
COMPUTER
SELECT SAMPLE
FREQUENCY
SELECT “IN” POSITION
12
INPUTS 1-8 OST-8 adat
WORD CLOCK IN
WORD CLOCK OUT
ADAT IN
ADAT OUT
8 TRACKS FOR
CONVERSION
73 JR II!
Modules not included

1
INPUT # 1
2
INPUT # 2
3
INPUT # 3
4
INPUT # 4
5
INPUT # 5
6
INPUT # 6
7
INPUT # 7
8
INPUT # 8
All DB25 multi pin connectors are TASCAM protocol. This same protocol is also used by AVID amongst many others,
and is a follows:
The list of the DB25 connectors used and their corresponding channels are as follows:
TASCAM DSUB
CHANNEL #
CHANNEL I/P
1-8
1
OUTPUT # 1
2
OUTPUT # 2
3
OUTPUT # 3
4
OUTPUT # 4
5
OUTPUT # 5
6
OUTPUT # 6
7
OUTPUT # 7
8
OUTPUT # 8
1
ADC RETURNS # 1
2
ADC RETURNS # 2
3
ADC RETURNS # 3
4
ADC RETURNS # 4
5
ADC RETURNS # 5
6
ADC RETURNS # 6
7
ADC RETURNS # 7
8
ADC RETURNS # 8
It is worth noting that, in order to avoid ground loops, the DB25 ground connections are lifted on the OST-8 adat
side, leaving the ground paths of your DB25 snakes only acting as shields and preventing any current returns.
TASCAM DSUB
CHANNEL #
CHANNEL O/P
1-8
TASCAM DSUB
CHANNEL #
ADC RETURNS
1-8
Pin-out for TASCAM DB25 8 Channel Balanced Connector
CHANNEL INPUTS 1-8:
CHANNEL OUTPUTS 1-8:
ADC EXTERNAL IN 1-8:
H = HOT
C = COLD
G = GROUND
WIRING FOR DB25 CONNECTORS
13
SPECIFICATIONS
• XLR Inputs & Outputs: Gold Plated Balanced +4 dB Connectors.
• DB25: 25 Pin Balanced +4 dB Eight Channel Connectors.
•On Slot Technology.
•Maximum audio rails current: 1,8 A per rail, or 400 mA per rail per slot, whatever is reached first.
•Maximum phantom power current: 140 mA.
•Operating voltage: Universal 100-240 V AC.
14
ANALOG I/O
DIGITAL CONNECTIONS
ADAT
•Connector Type: Optical TOSLINK JIS F05.
•Format: ADAT Digital Lightpipe with S/MUX.
•Supported Sample rates (kHz): 44.1, 48, 88.2, 96, 176.4, 192.
•Channel Assignments @ 44.1 kHz, 48 kHz: Port 1 = Channels 1 – 8, Port 2 = 1 – 8 (mirrored).
•Channel Assignments @ 88.2 kHz, 96 kHz: Port 1 = Channels 1 – 4, Port 2 = Channels 5 – 8.
•Channel Assignments @ 176.4 kHz, 192 kHz: Port 1 = Channels 1 – 2, Port 2 = Channels 3 – 4.
Word Clock
•Connector Type: BNC.
•Word Clock Input Termination: 75 Ohms, switchable.
Synchronization Sources
•INTERNAL, EXTERNAL (Word Clock)
•Dimensions (W x H x L): 200 mm x 134 mm (3U) x 482 mm.
•Weight: 4,715 Kg.
Dimensions/Weight
TROUBLE SHOOTING
PROBLEMS
SOLUTIONS
There doesn´t seem to be any power feeding the OST-8
adat.
Make sure the HA-PSU02 power supply has been
connected.
No audio seems to be getting to the modules.
Double check that you have correctly connected the
Inputs and Outputs.
My audio is still not passing through the installed 500
series module.
Make sure you have not accidentally pressed one of the
¨LINK´ buttons on the back.
There is no converted signal being sent to my DAW.
Check to make sure you have selected the correct input
for the Converter (In/Out/Ext/). This needs to be done for
each of the 8 channels.
I am having trouble syncing my OST-8 adat to my DAW.
Make sure you have connected the BNC for a WordClock
signal from your DAW(MASTER) to your OST-8 adat
(SLAVE).
I am still having trouble syncing my OST-8 adat to my
DAW.
Make sure you have selected the EXT option with the
Sampling Frequency (F.S.) button.
There is still no signal arriving at my DAW from the ADC.
Double check that the appropriate connector (LightPipe) is
indeed inserted properly.
There are clicks being generated.
Make sure you have selected the correct Sampling
Frequency with the (F.S.) button.
There are still clicks being generated.
Make sure you are using a BNC cable to connect the
WordClock signal.
There are unexpected noises and/or jitter being produced.
If your unit is the last in a group of digitally synced units
you should press the ´75 Ohm Term´ button.
I have everything connected correctly but I’m still not
receiving any signal in my DAW.
Make sure you have selected the correct INPUT routing in
your DAW.
15

LIMITED 2 YEAR WARRANTY
Heritage Audio OST-8 adat is warranted by Heritage Audio SL to be free from defects in materials and workmanship for
the period of 2 years to the original purchaser. In the event of such defects, the product will be repaired without charge
or, at our option, replaced with a new one if delivered to Heritage Audio prepaid, together with a copy of the sales slip or
other proof of purchase date. The warranty excludes problems due to normal wear, abuse, shipping damage or failure
to use the product in accordance with the specifications.
Heritage Audio shall not be liable for damages based upon inconvenience, loss of use of the product, loss of time,
interrupted operation or commercial loss or any other damages, whether incidental, consequential or otherwise.
This warranty is not transferable.
Heritage Audio and the Heritage Audio “H” logos are registered Trademarks owned and/or licensed by Heritage Audio.
REGISTRATION
16
WARRANTY STATEMENT
* 73 JR II Modules not included
Please visit our website:
https://heritageaudio.com/registration/
17
RECALL SHEETS
Session / Title: Track: Connected Equipment: !
Date: Instrument: Sampling Frequency: Internal: External: !
!
Notes:
Session / Title: Track: Connected Equipment: !
Date: Instrument: Sampling Frequency: Internal: External: !
!
Notes:

Table of contents
Popular Enclosure manuals by other brands


Alto
Alto PASSIVE owner's manual

MediaSonic
MediaSonic HF7-SU31C Quick installation guide

Crestron
Crestron C2N-DEMO-INTERFACE reference guide

Phoenix Mecano
Phoenix Mecano Bopla Bocard BCD 310 Assembly instructions

Montech
Montech Air 900 Series quick start guide

Gallien-Krueger
Gallien-Krueger Neo series owner's manual


