5 6 7
M Installation Guide Rev. 70242-0-19
x5
» Es liegt in der Verantwortung des Monteurs
sicherzustellen, dass die Montage des Geräts den gültigen
Vorschriften, Standards und aufsichtsrechtlichen
Anforderungen entspricht.
»Spender nicht über Wärmequellen oder in der Nähe von
Zündquellen/Flammen montieren.
»Nicht an Orten montieren, wo ein Defekt des
Montagesystems oder das Tropfen des Füllguts von den
Händen einem Geräteschaden oder einem Sicherheitsrisiko
ausgesetzt sind.
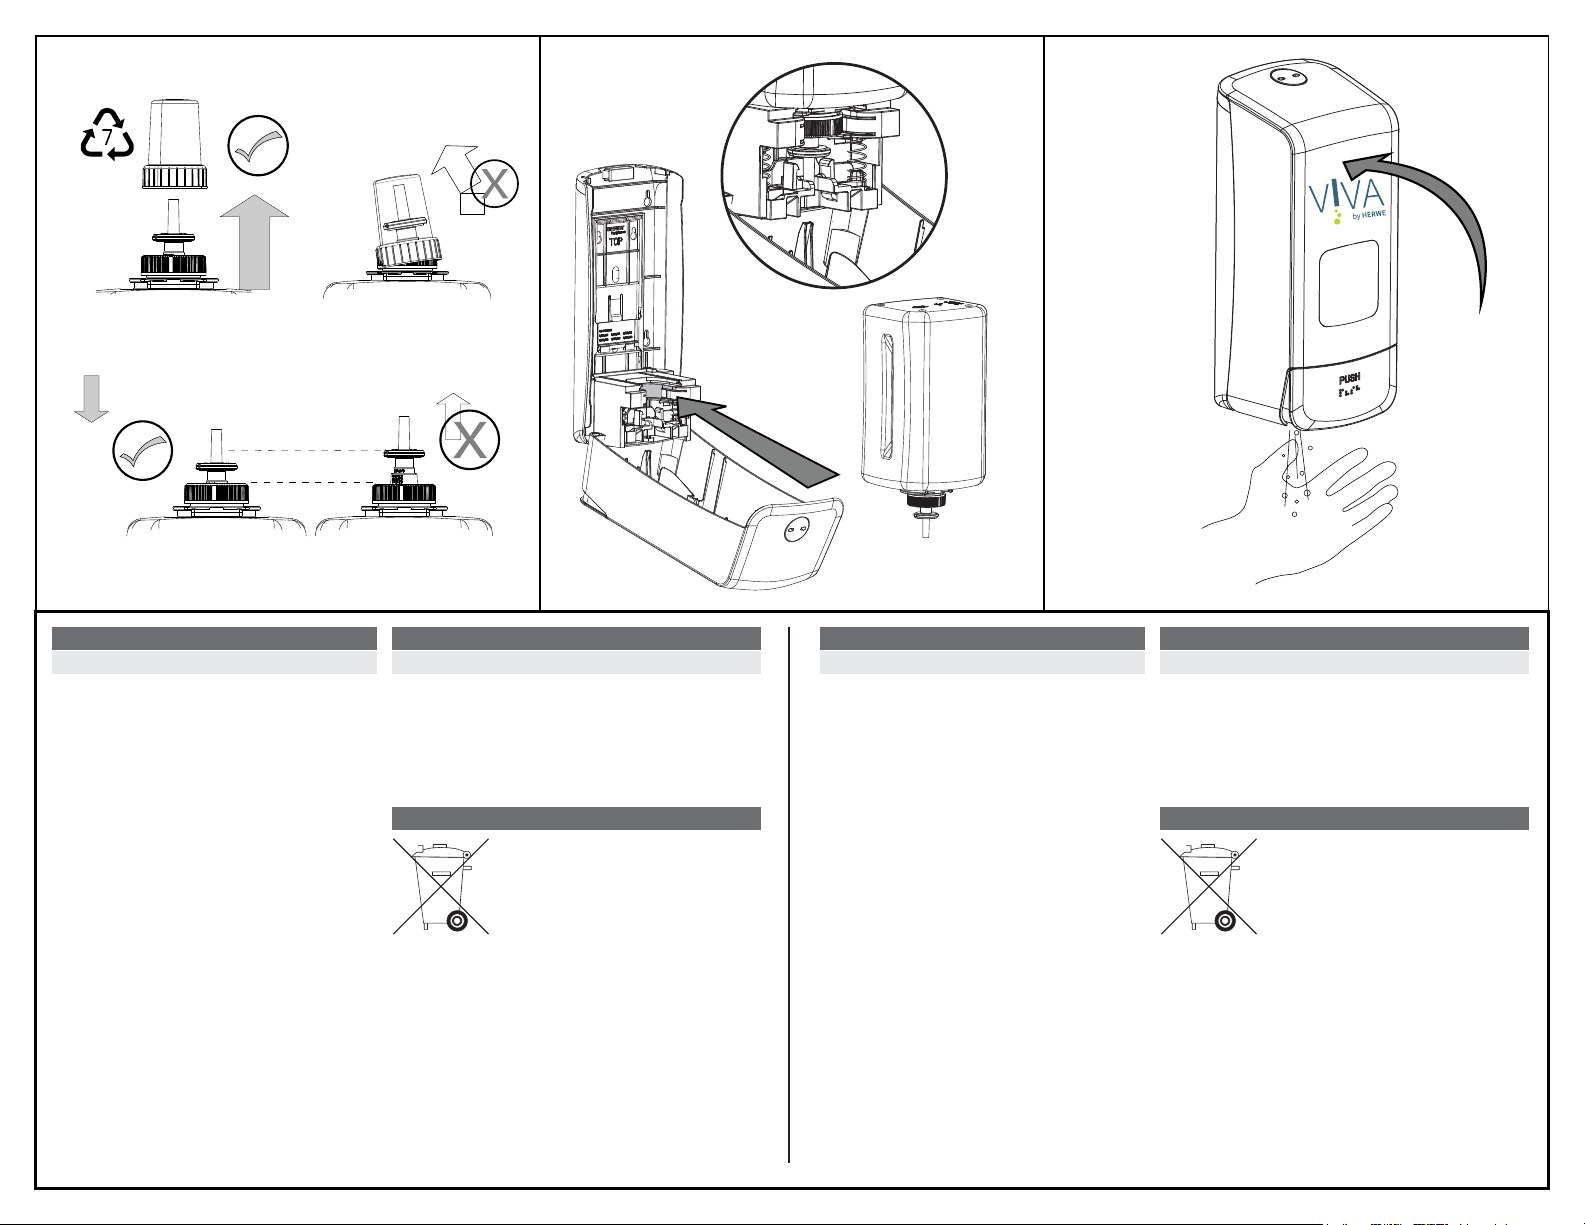
Gerät öffnen [Abb. 1]
■ Öffnen Sie das Gehäuse durch Drücken der
Verriegelungstaste oder nutzen Sie den Schlüssel.
Montage [Abb. 4 und 5]
■ Montieren Sie den Spender an die Wandschiene oder
direkt an die Wand.
Nutzen Sie hierfür beiliegendes Befestigungsmaterial.
Pumpe [Abb. 6]
■ Entfernen Sie den Deckel senkrecht zur Düse. Achten Sie
auf die Position der Düse wie in der Abbildung dargestellt.
Behälter mit Pumpe einsetzen [Abb. 7]
■ Setzen Sie die Pumpe in den Behälter. Achten Sie auf die
Position der Düse.
Spender bedienen [Abb. 8]
■ Schließen Sie den Spender.
■ Um sicherzustellen, dass die Pumpe bereit ist, bedienen
Sie den Spender mehrmals.
■ Spendergehäuse mit einem leicht angefeuchteten Tuch reinigen.
■ Reinigungsmittel müssen kompatibel zu Kunsstoffoberflächen sein.
■ Keine Produkte mit abrasiven Bestandteilen verwenden.
■ Anhaftende Produktreste müssen regelmäßig entfernt werden.
■ Desinfektion des Spendergehäuses mit geeignetem Flächendesin-
fektionsmittel möglich.
Werfen Sie das Gerät keinesfalls in den
normalen Hausmüll. Entsorgen Sie das Gerät
über einen zugelassenen Entsorgungsbetrieb
oder über Ihre kommunale Entsorgungseinrich-
tung. Beachten Sie die aktuell geltenden
Vorschriften. Setzen Sie sich im Zweifelsfall mit
Ihrer Entsorgungseinrichtung in Verbindung.
Führen Sie alle Verpackungsmaterialien einer
umweltgerechten Entsorgung zu.
Entsorgung
Montage und Inbetriebnahme
Achtung!
Wartung / Pflege
Achtung!
» It is the responsibility of the fitter to ensure that
the assembly of the device complies with the
applicable regulations, standards and official
requirements.
»Do not install the dispenser above heat sources
or near to sources of ignition/flames.
»Do not install in locations where a defect to
the assembly system or the dripping of the
filling material from hands could cause device
damage or a safety risk.
Open device [Fig. 1]
■ Open the housing by pressing the locking button
or use the key.
Assembly [Fig. 4 and 5]
■ Attach the dispenser to the wall plate or
directly to the wall. Use the enclosed
fixing materials for this purpose.
Pump [Fig. 6]
■ Remove the lid vertically from the nozzle. Make
sure the position of the nozzle is the same as
depicted in the figure.
Insert container with pump [Fig. 7]
■ Place the pump into the container. Pay attention
to the position of the nozzle.
Operate dispenser [Fig. 8]
■ Close the dispenser.
■ To ensure that the pump is ready, operate the
dispenser multiple times.
■ Clean the dispenser housing with a slightly
moistened cloth.
■ Cleaning agents must be compatible with plastic
surfaces.
■ Do not use any products with abrasive ingredients.
■ Sticky product residues must be removed regularly.
■ Disinfecting the dispenser housing with appropriate
surface disinfectant is possible.
Do not dispose of this device with household
waste. Dispose of the device via an approved
waste disposal company or via your local
authority waste disposal facility. Observe the
currently valid regulations. In case of doubt,
contact your waste disposal facility. Dispose of
all packaging in an environmentally compatible
manner.
Disposal
Assembly and start-up
Attention!
Maintenance / care
Attention!
PUSH


