Heuresis Pb200i Alpha User manual

1
30-October-2015
User’s Guide USA
Revision 8.1
Pb200i Alpha
NOT FOR RELEASE OR DISTRIBUTION
Before operating the Pb200i, read this entire user guide.

2
Pb 200i Features:
Trigger
LED indicator (Warning Lights)
System Label (includes serial
numbers)
Proximity Button
Foot Stabilizer

3
Power button
Power indicator LED
LCD
Pb200i Widget/App
Back Button
Center Button
Menu Button
Battery
Door
CE Mark
Battery Wedge
Mini USB Port
w/ Cable
Battery Pack

4
Installing the Batteries
The Pb200i requires 6 AA batteries. Only rechargeable Nickel-Metal Hydride cells or disposable
lithium cells should be used in the system. Insert the battery with the negative pole towards the
spring, two batteries per side, until all six chambers are filled (Fig.1, 2). Note that the positive
and negative positions are marked on the top of the battery assembly (Fig. 3).
Figure 1 Figure 2 Figure 3
Remove the battery door of the system. Place the battery holder in the system, positive
terminal facing the left side of the instrument (Fig.4). The end of the battery holder with the +-
Top; this end
goes in first.
Rechargeable Nickel
-
Metal Hydride cell
or disposable Lithium Ion
Battery holder

5
marked end should be inserted so it faces the top of the instrument. Apply upward force to seat
the battery holder properly, and when fully inserted, push to the rear to have the battery holder
sit on a ledge in the handle (Fig. 5). Replace the battery door (Fig.6). With the software currently
on the system, the unit will immediately boot, as indicated by the LCD illuminating and the LED
above the LCD turning red and then green when energized.
Note: placing the battery holder in with the incorrect orientation will not damage the system. It
simply will not start.
Figure 4 Figure 5 Figure 6
Taking a Measurement
1) When the system has completed its boot up sequence, the home screen will display an
Android application called Pb200i. To access the application:
a. Swipe the “lock”icon on the home screen to the right (Fig. 7).
b. Select the Pb200i application by touching the app on the LCD (Fig. 8).
c. Enter the password assigned by the Compliance or Safety officer using the
keyboard provided (Fig. 9).
d. Accept the acknowledgment that you understand that the system produces
radiation when the lights are on (Fig. 10).
e. Select “Test”(Fig.11).
Figure 7 Figure 8 Figure 9

6
Figure 10 Figure 11
2) The software is designed to open and close the shutter of the system, exposing the
radioactive source. To open the shutter, certain conditions must be met. These
conditions are:
a. The proximity button must be depressed.
b. The trigger must be pulled.
Once these conditions are met, the shutter will open. This will cause the LEDs on the left and
right side of the system to turn on, emitting a red light. If anyone of the conditions stated above
are not met during the measurement process, the shutter will close immediately and the LEDs
will shut off. Once the shutter is opened, there is a maximum time limit of five minutes that the
shutter will remain open for, if all the above conditions are met.
Figure 12
The instrument should be flush against the object you are measuring so that the proximity
button is fully engaged. Use the foot stabilizer to balance the instrument directly against the
LED window
will be red
when the
shutter is
open
Proximity button and trigger
need to be depressed to
open the shutter and initiate
a reading.
Foot
Stabilize
r

7
surface you are measuring (see figures 12,13). When the proximity button is depressed fully,
the green light will give the user a visual que indicating that the instrument is ready to take a
measurement.
Figure 13
When the measurement begins, you will notice the numbers on screen changing as it
calculates a result:
Figure 14
Result
Standard
deviation
(2 sigma)

8
Once the measurement has been completed, the final result will be posted, the shutter will close
and the LEDs will turn off. Typical measurements in paint mode will take anywhere from one to
three seconds. Results in examples below are based off an action level of 1.0 mg/cm2.
Figure 15
Figure 16
“Positive”
–
lead present.
Result above selected
threshold.
“Null”
–
instrument has
not made a decision. Null
readings are not valid.

9
Figure 17
Figure 18
Sleep function:The system will go to sleep after 30 minutes of inactivity. You may
press any button to wake the system back up again. **Be advised, a bug exists in the
version of code on the two RAD systems running the RAD safety application, where if
the system sleeps for too long, the LCD does not wake back up. The length of time to
create this scenario is unknown. If this happens, please remove the battery and restart
the system.
“Negative”
–
lead either
not present or below
selected threshold.
No text displayed
–
lead
content is right on the
action level of 1.0.
“Positive”or “Negative”
displayed above and
below action level 1.0.

10
Downloading Data:
a) On the main menu, select “Readings”.
Figure 19
b) Select “Export Readings”.
Figure 20

11
c) You may export all the readings, or you may choose a range to download. Choose your
selection then “Export”. You will receive a confirmation; select “OK”.
Figure 21 Figure 22
d) Remove the battery door of the Pb200i and insert the mini USB cable, making sure the
battery wedge is in place.
Figure 23
12
e) Connect the mini USB cable up to the PC. You will see this screen; you may also get a
message on the analyzer, “Allow USB Debugging?”- select “Yes”.
Figure 24
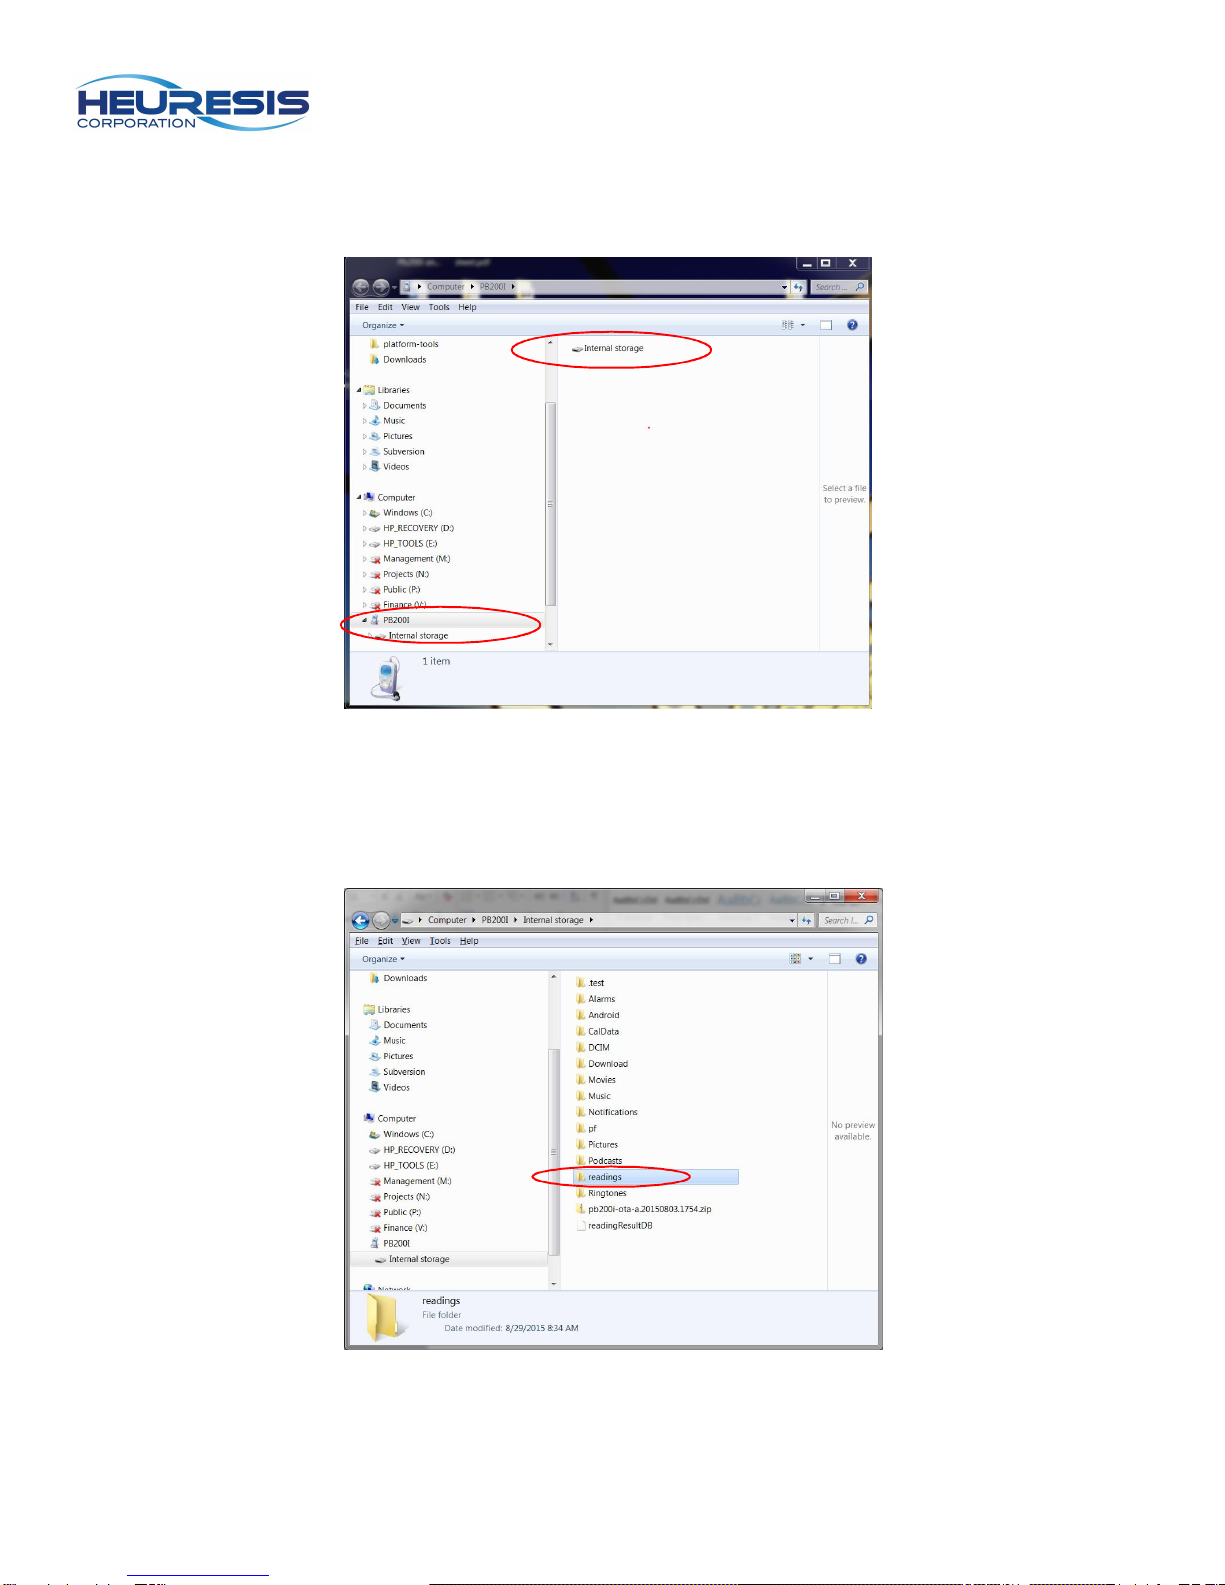
f) Double click on the internal storage icon, then double click the “Readings”folder.
Figure 25
13
g) There will be a .csv file; this file contains your readings. Drag the file to your desktop or any
other location you like. Double clicking on the file will open it.
Figure 26
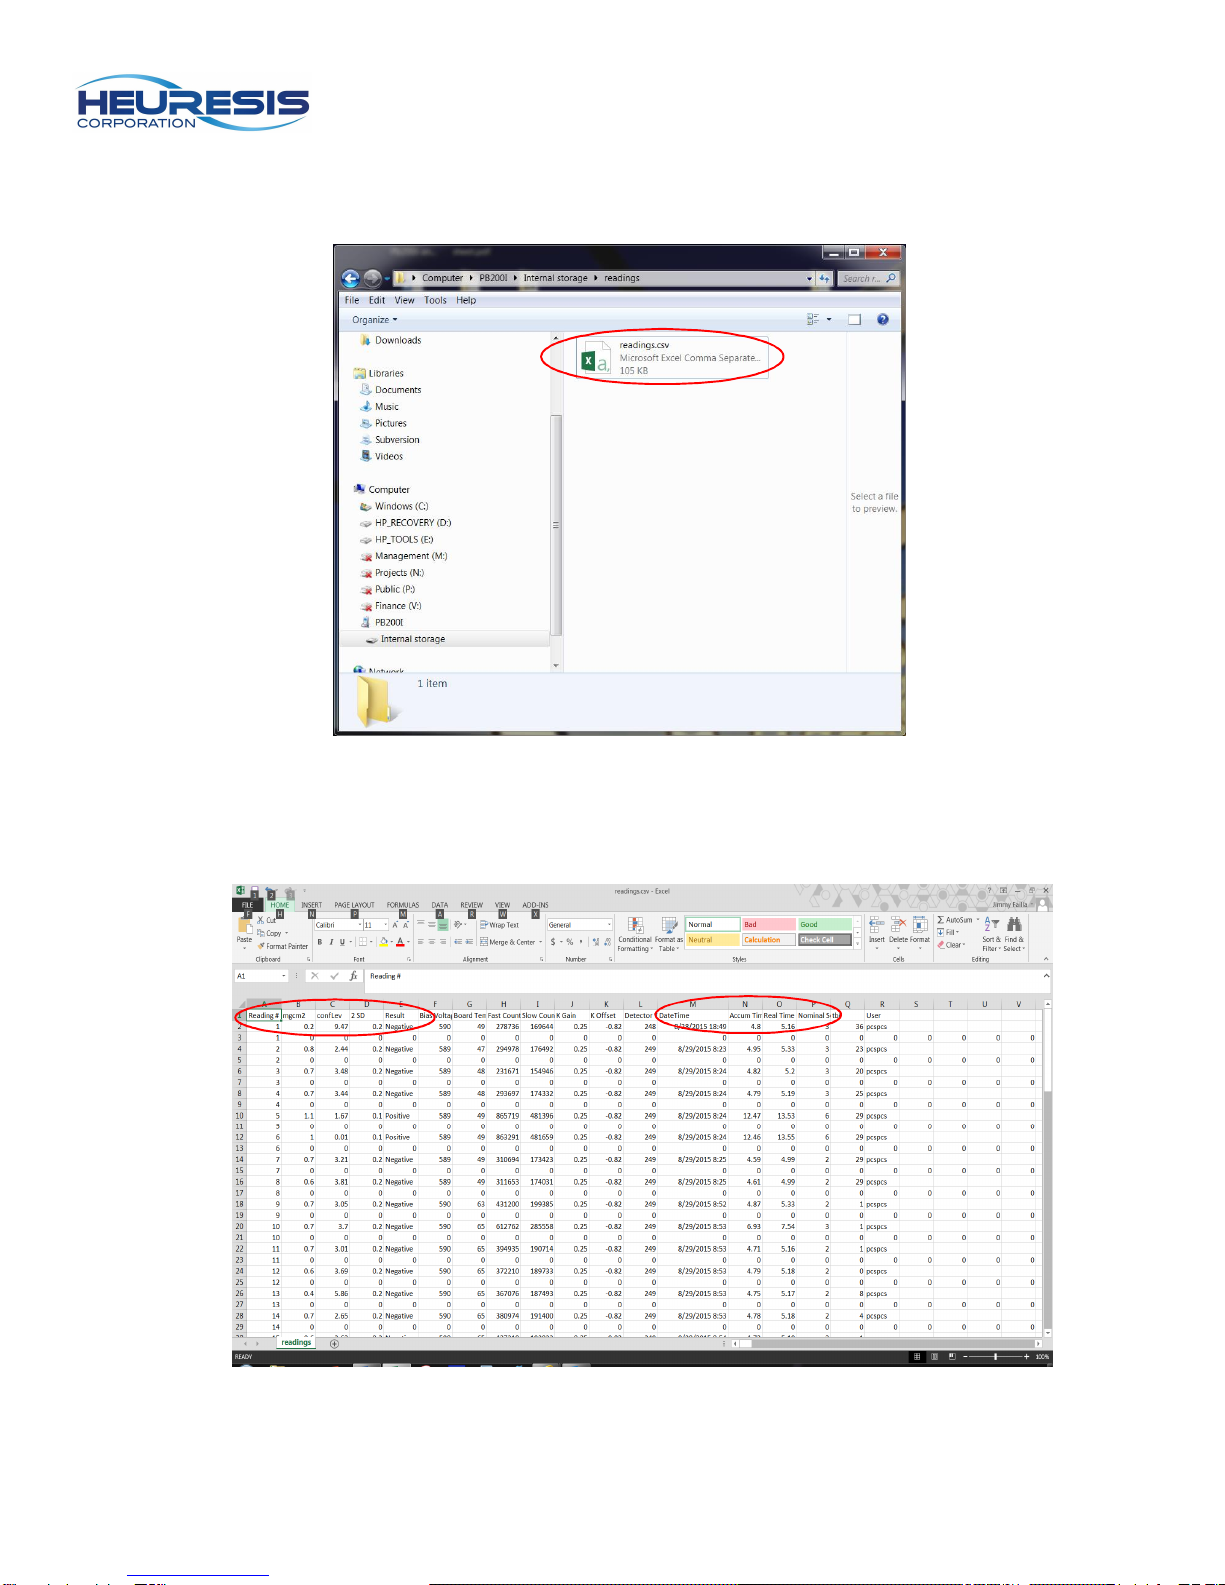
h) There is debug information in the file as well (you can graph spectra as well using
the second line of data associated with the reading); the main columns of interest
are circled here.
Figure 27

14
i) Check to make sure all the data is there that you required in the download. If it is not, unplug
the analyzer from the PC, and repeat steps C through G.
Wi-Fi Connectivity:
You may use Wi-Fi to download your system as well. To enable Wi-Fi usage:
a) Select the “settings”app:
Figure 28
b) Enable Wi-Fi by swiping right; the “Wi-Fi”icon will appear.
Figure 29

15
c) Find the desired network, select and connect.
Figure 30
d) Exit out using the left arrow shut the “Settings”app off by holding the center button down
until it appears and swiping left. Note: turning Wi-Fi on will decrease your battery life. It is
best to leave it off until it is being used.
Figure 31

16
e) Select and open the FTP Server app.
Figure 32
f) Enable the FTP server. Note: this will default to the “off”position due to security reasons
every time the instrument is power cycled.
Figure 33

17
g) Place the number circeld below in your web browser; example here would be
ftp://10.1.10.13:2121.
Figure 34
h) You will be prompted to enter a user name and password. They are the same for both –
“ftp”. Select “Log on”after enetering.
Figure 35

18
i) Your screen will look like this. You should bookmark this page in your browser at this time.
Note: the ID number you input in your browser should come up each time you enable the FTP
app. In the event that it does not, simply inout the number that does and repeat steps g and h.
Select the “readings”folder.
Figure 36
j) You will be taken to this screen; select “readings”. You will then be prompted to save the
readings in a location of your choice (.csv file format). You may choose to open the file at this
time if you wish or just have it save.
Figure 37

19
Bluetooth Connectivity:
The Pb200i is also equipped with Bluetooth. You may use this to pair to an external keyboard,
etc. Please be aware that there are numerous Bluetooth equipped items on the market. This
system may not be compatible with them all.
a) Select the “Settings”app
Figure 38
b) Enable Bluetooth by swiping right; click on “Bluetooth”
Figure 39

20
c) A list of available devices will populate; click on the Pb200i. This will make it visible for
other devices to see.
Figure 40 Figure 41
d) Pair with desired device.
E-mail:
The Pb200i allows you the flexibility to e-mail your readings, etc. directly from the analyzer. You
must set up the email app to do this that is provided with the system. Please follow the prompts
on screen to do this.
To email your readings, follow the export the desired readings you want as outlined in the
“Downloading Readings”section.
Open the email app and select the email address you wish to send them to and click on the
“attachment”icon.
Figure 42
Other manuals for Pb200i Alpha
1
Table of contents
Other Heuresis Measuring Instrument manuals

Popular Measuring Instrument manuals by other brands


AvionTEq
AvionTEq Staveley NORTEC 2000D Operation manual

JUMO
JUMO B 90.7023.1 operating instructions

Extech Instruments
Extech Instruments RH305 user guide

SMC Networks
SMC Networks PFG20 Operation manual

Swan Analytical Instruments
Swan Analytical Instruments A-85.119.010 manual

Flomec
Flomec EGM Series Operation manual