Heutec GP-CN-0002 User manual

1
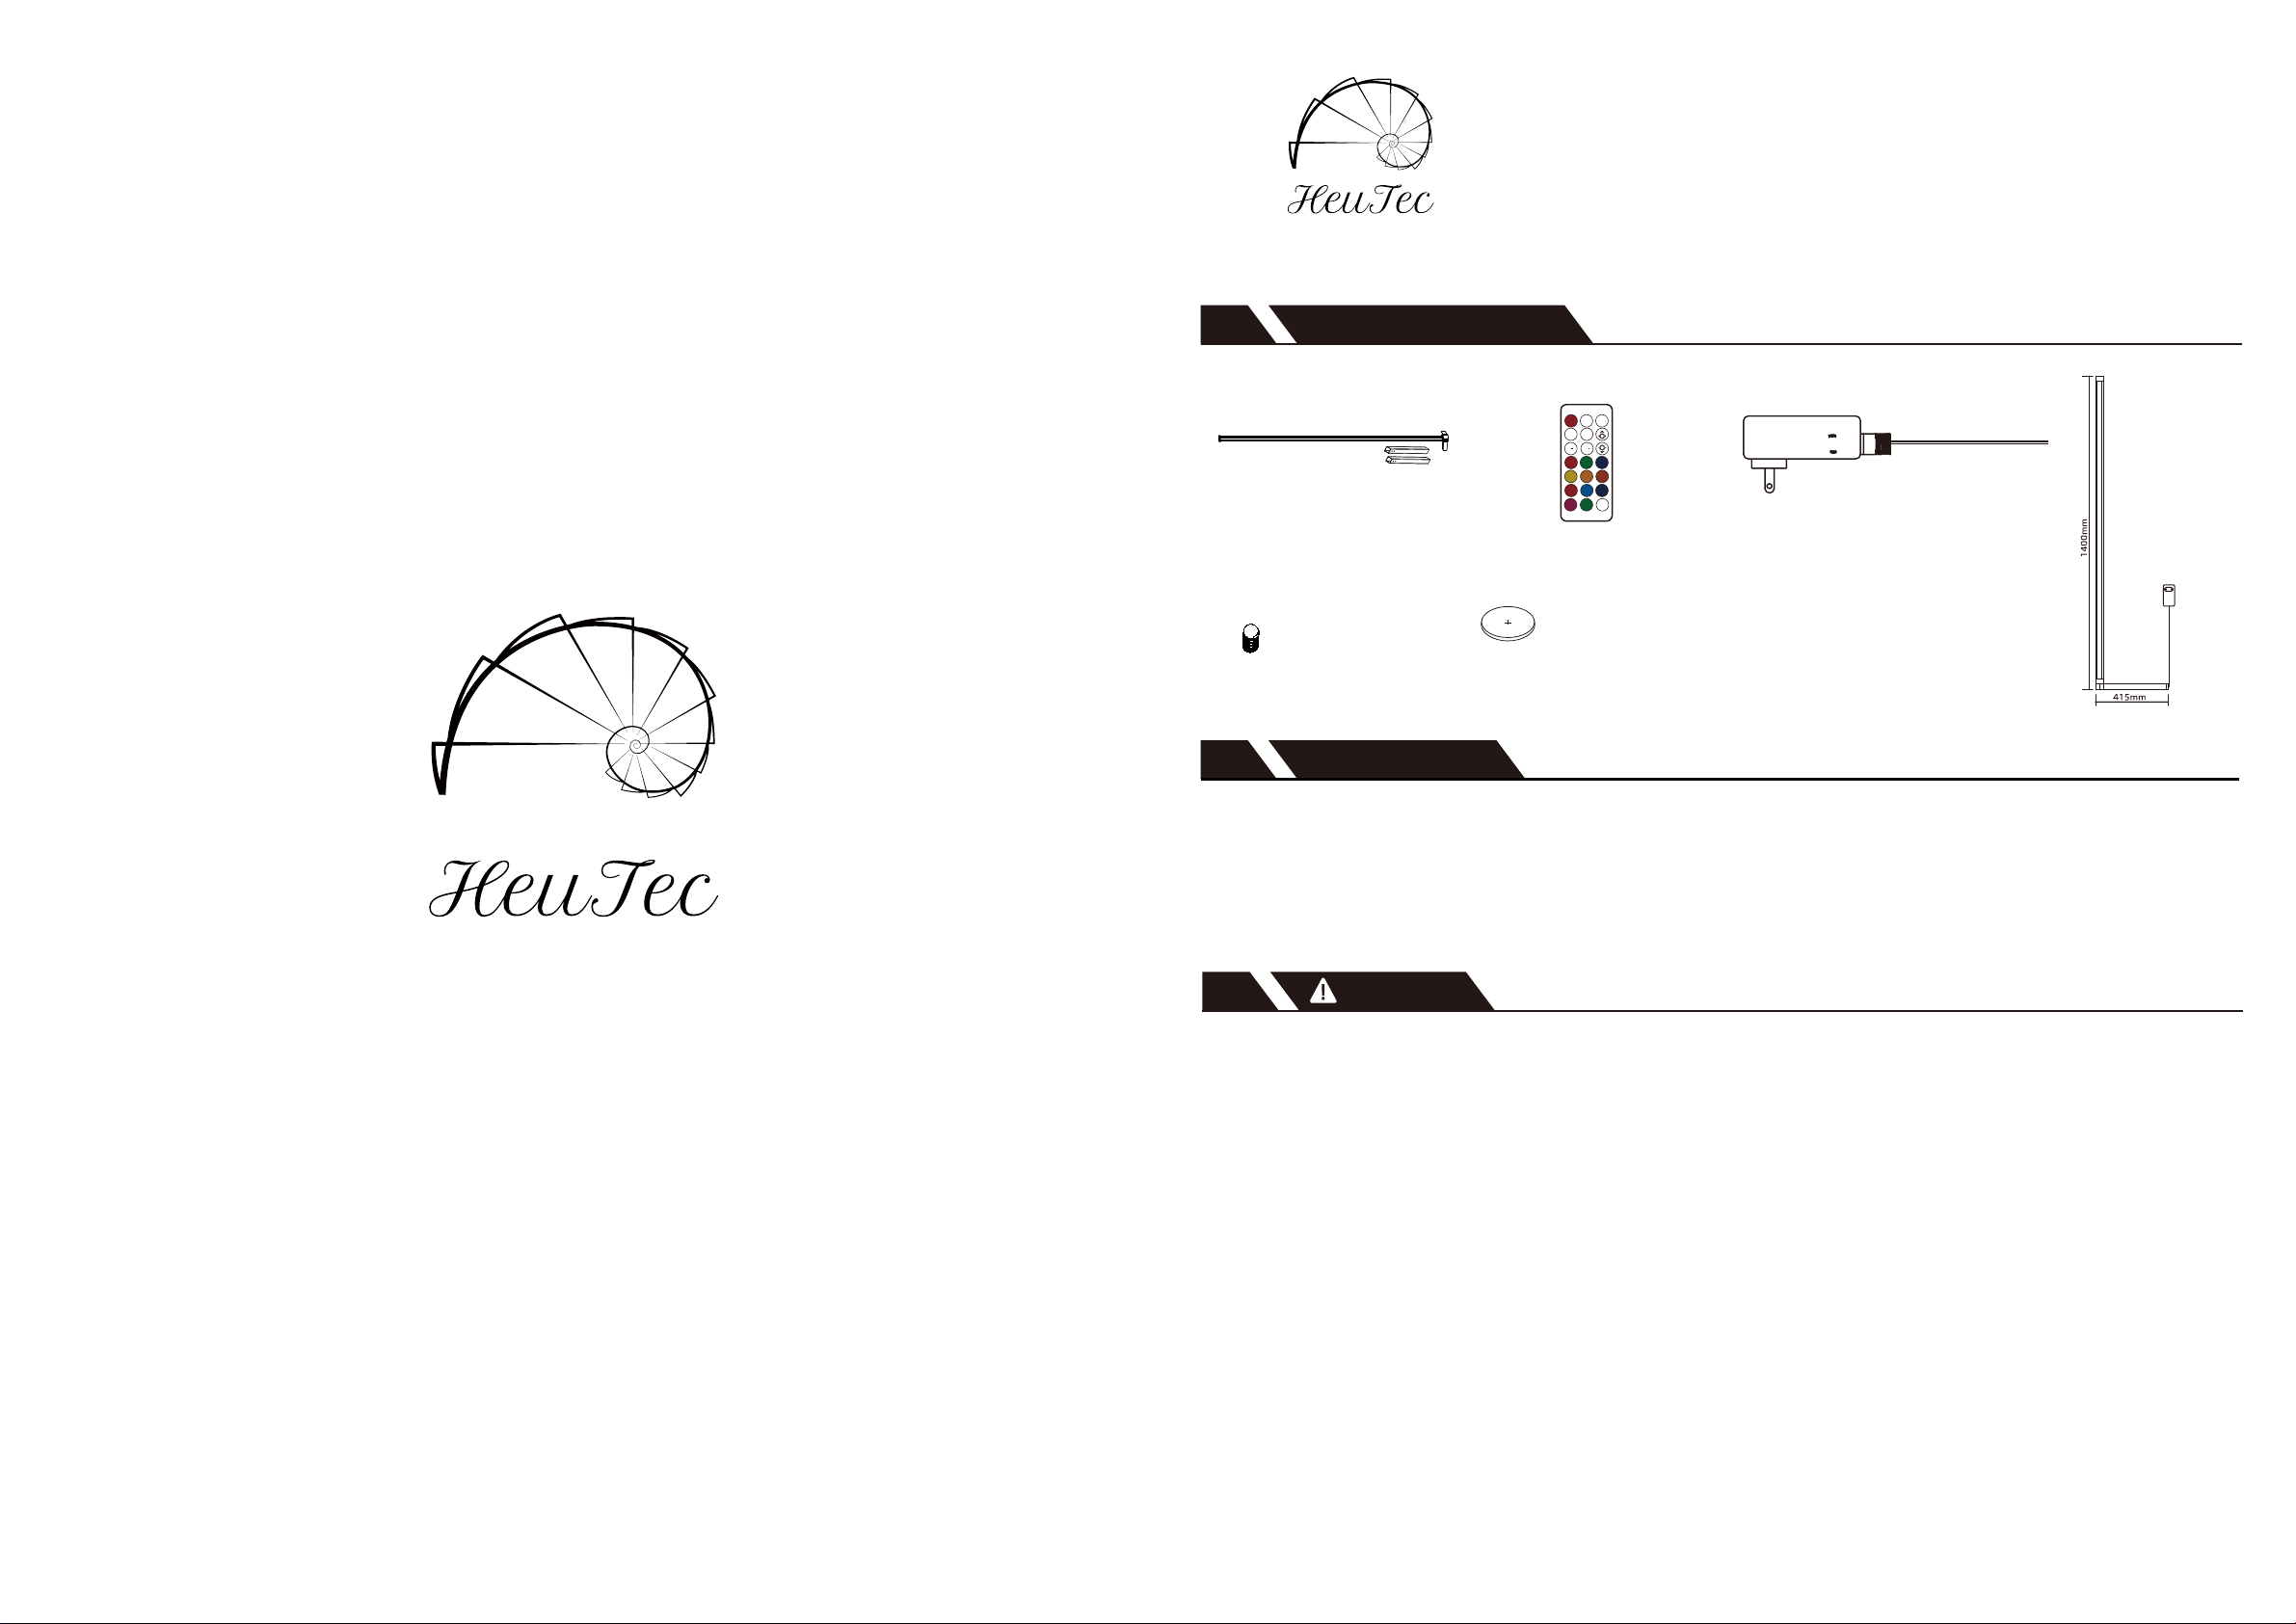
Packungsinhalt1
2
Note: Hardware not shown to actual size.
LED RGBW Ecklampe
X 1
Fernbedienung
X 1
Schraube
X 10
3V CR2025 Batterie
X 1
1.
Dieses Produkt kann bei unsachgemäßer Installation oder Anbringung eine mögliche Stromschlag- oder
Brandgefahr darstellen.
2. Betriebseingangsspannung: 220-240V 50Hz.
3. Betriebliche Ausgangsspannung: DC 12V; 2A.
4. Dieses Produkt ist kein Spielzeug. Wenn es in der Nähe von Kindern verwendet wird, ist eine Überwachung
erforderlich.
5.Decken Sie dieses Produkt nicht ab, da die Abdeckung dazu führen kann dass die LED RGB Ecklampe
überhitzt ,schmilzt oder sich entzündet.
6.Tauchen Sie die LED RGBW Ecklampe nicht in Flüssigkeiten ein und verwenden Sie das Produkt nicht
in der Nähe von stehendem Wasser oder anderen Flüssigkeiten.
7.
WARNUNG - BEWAHREN SIE BATTERIEN AUSSERHALB DER REICHWEITE VON KINDERN AUF!
Batterien sind kein Spielzeug!
8. Bitte entsorgen Sie verbrauchte Batterien sofort und sicher.
9. Ersetzen Sie sie nur durch denselben Batterietyp.
10. Überprüfen Sie die Geräte und vergewissern Sie sich, dass das Batteriefach richtig gesichert ist,
z. B. dass die Schraube oder ein anderer mechanischer Verschluss fest angezogen ist.
3 Sicherheitshinweise
Netzadapterkabel mit Empfänger
X 1
On Off
AUTO
SM
S+ M+
LED RGBW Ecklampe
Art.Nr.: GP-CN-0002/GP-CN-0002b
· Höhe: 1.4M
· Leistung: 12W, 220-240V/50Hz
Lichtquelle: 84 RGB SMD
Nicht erweiterbar
Reichweite der Fernbedienung: Max 7M
·
·
·
·
·
Lumen: 280Lm
· Schalter: 50.000 mal ON/Off
· Lebensdauer: 25000H
Schutzklasse: II
Technische Daten
Size

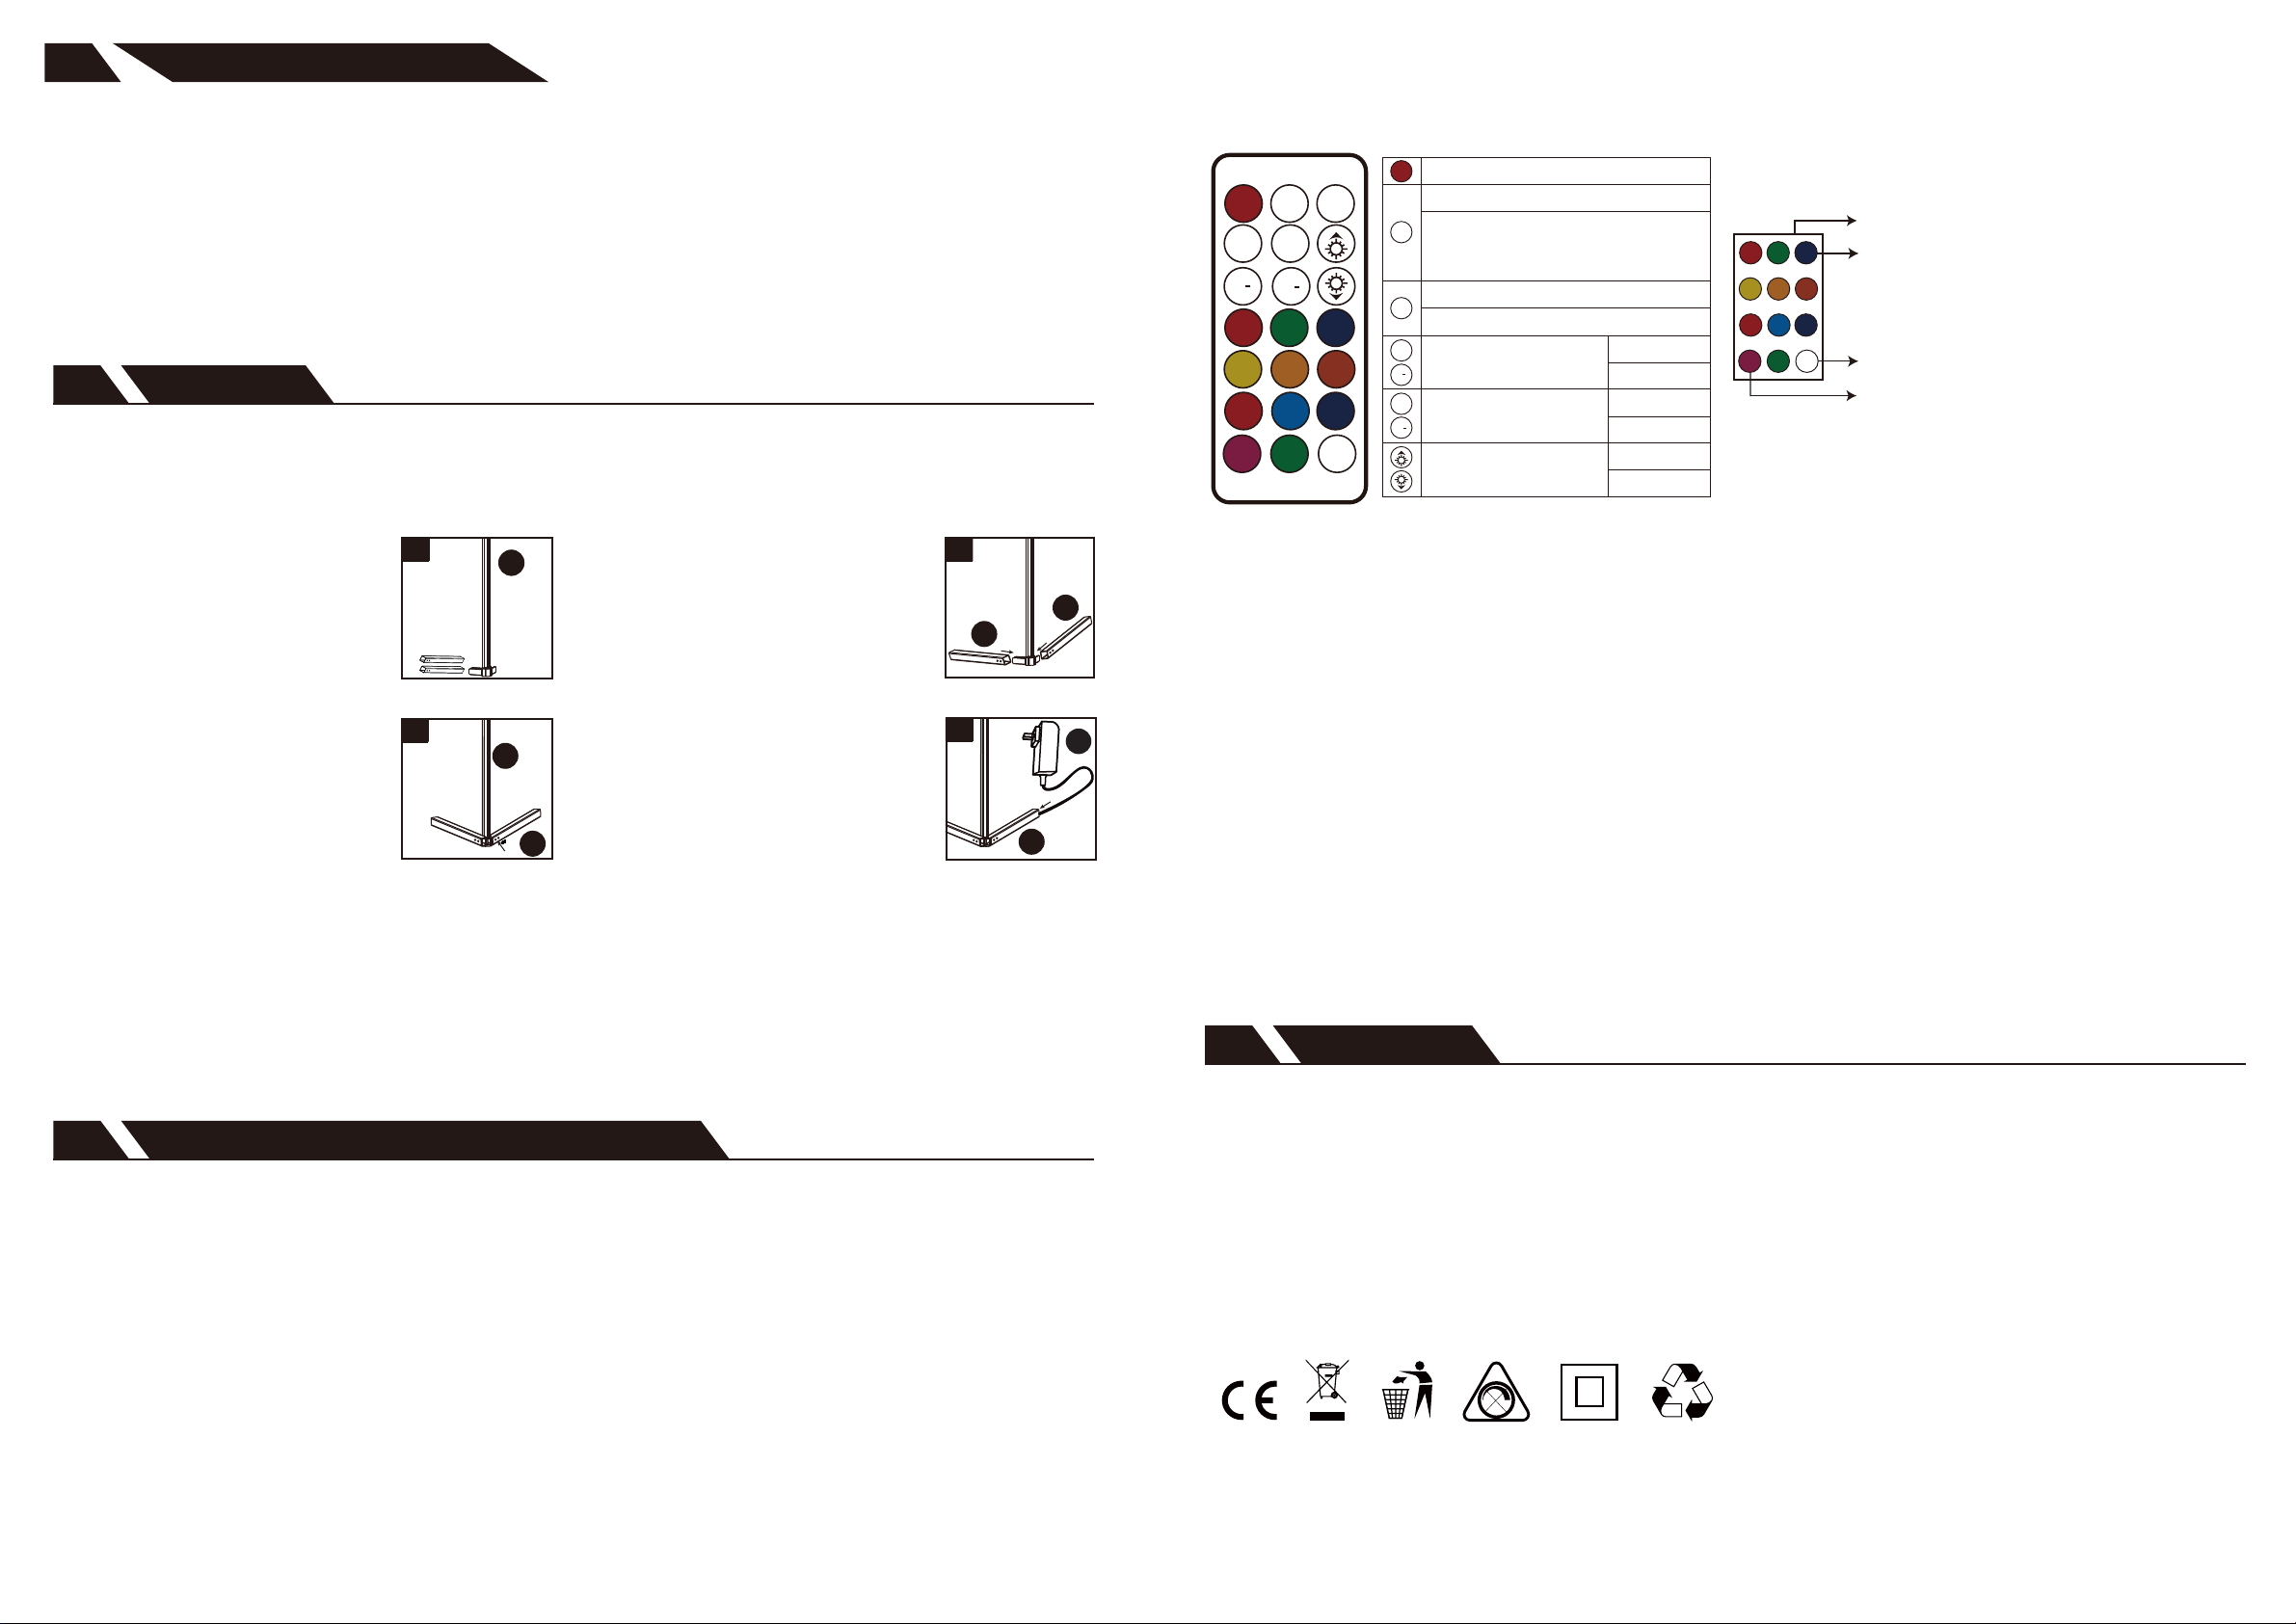
Installationshinweise5
2
• Ziehen Sie vor der Inbetriebnahme die Plastiklasche aus dem Batteriefach der IR- Handfernbedienung.
• Achten Sie darauf, dass die Fernbedienung in Richtung des Neon Flex Schlauch-Empfängers zeigt.
• Schalten Sie das Gerät ein und wählen Sie dann aus, ob Sie 1 oder 2 zusammengeschaltete Geräte verwenden.
• Die besten Ergebnisse erzielen Sie, wenn Sie eine Farbmischung auswählen, bevor Sie einen Lauflichtmodus wählen.
• Reichweite der Fernbedienung: Bis zu 10 m
• Bei Nachkauf von Batterien : Kaufen Sie die richtige Batteriegröße, nehmen Sie für den Ersatzkauf die leere Batterie
mit zum Händler.
• Achten Sie beim Einsetzen der Batterie auf die richtige Polarität (+ und -).
• Entfernen Sie die Batterien aus Geräten, die für längere Zeit nicht benutzt werden.
• Entfernen Sie verbrauchte Batterien umgehend.
AUSWECHSELN DER BATTERIE:
Um die Batterie der Fernbedienung auszutauschen, folgen Sie den Anweisungen auf der Rückseite der
Fernbedienung, um das Batteriefach herauszuschieben. Legen Sie die neue Batterie ein (+ Seite nach oben)
und schieben Sie das Batteriefach wieder ein.
PFLEGE UND WARTUNG:
Waschen Sie sich nach dem Gebrauch die Hände. Verwenden Sie keine chemischen Lösungsmittel
oder scharfen Scheuermittel zur Reinigung des Geräts. Verwenden Sie ein trockenes, weiches Tuch zum
Reinigen, falls erforderlich.
FEHLERSUCHE:
Die LED RGB Ecklampe schaltet sich nicht ein :
- Prüfen Sie, ob der Strom eingeschaltet ist.
- Prüfen Sie, ob die Verbindung zur Steckdose locker ist.
- Tauschen Sie die Batterie in der Fernbedienung aus.
- Reinigen Sie die Vorderseite des Controllers.
- Vergewissern Sie sich, dass die Zuglasche von der Fernbedienung entfernt ist.
- Stellen Sie sicher, dass die Fernbedienung auf den Empfänger gerichtet ist.
Schalten Sie den Strom aus bevor Sie mit der Installation beginnen. Beschädigen oder durchtrennen Sie NICHT
die Kabelisolierung (Ummantelung). Während der Installation der LED RGB Ecklampe das Produkt nicht beschädigen
oder verändern. Achten Sie darauf, dass das Netzkabel oder die Lichtquelle nicht auf Oberflächen mit einer scharfen
Kante liegt. Andernfalls kann die Kabelisolierung beschädigt oder durchtrennt werden, was zu Verletzungen führen
kann.
1. Entfernen Sie das
Verpackungsmaterial und nehmen
Sie alle Teile vorsichtig aus der
Innen Verpackung, und legen
Sie sie auf einer ebenen
Arbeitsfläche aus. Legen Sie die
Teile nebeneinander.
Anleitung Fernbedienung6
Service7
1
AAA
2. Die 2 Boden - Winkelrahmen (B)
an die LED Lichtstange 1,4 Meter
anschließen (A).
3. Befestigen Sie jetzt die beiden
Bodenwinkel mit der Lichtstange
mittels der mitgelieferten Schrauben
und ziehen diese fest. Stellen Sie
sicher das die Verbindung fest und
stabil ist um das Eindringen von
Feuchtigkeit zu verhindern und die
Standsicherheit zu gewährleisten.
2
3
B
B
B
A
C
4
3
4. Verbinden Sie jetzt das Kabel
des Netzteils(D) mit dem Anschluss
im Bodenwinkel.(B)
5
D
Heutec GmbH - Hasselstr.33a - D-41564 Kaarst
E-mail: [email protected]
4 Hinweise zum Umweltschutz:
Heutec bittet zu beachten, dass dieses Produkt gemäß den Richtlinien über Elektro- und Elektronik
Altgeräte entsorgt werden muß. Keinesfalls , gemäß der nationalen Gesetze, über den Hausmüll.
Wir bitten Sie daher um Ihren Beitrag zum Umweltschutz und der Ressourcenschonung. Das Gerät
sollte bei einer autorisierten Sammelstelle für Elektro Altgeräte abgegeben werden.
Informationen zu Sammelstellen für Altgeräte erhalten Sie bei Ihrer Stadtverwaltung, den öffentli-
chen Entsorgungsträgern oder Ihrer Müllabfuhr.
RGB-Sequenz-Anpassungsfunktion im ausgeschalteten Zustand, drücken
Sie AUTO, um das Setup-Menü zu öffnen. Jetzt zeigen die ersten drei Lichter
des LED-Streifens die aktuelle RGB-Sequenz an. Drücken Sie diese Taste,
um die RGB-Sequenz anzupassen, bis die Sequenz der vorherigen drei Lichter
rot, grün und blau ist. Drücken Sie dann die OFF-Taste zum Speichern.
Drücken Sie 5 Sekunden, um den Fernbedienungsabgleich abzubrechen.
Alle Fernbedienungen können ihn steuern
(Diese Funktion ist nur für die RF-Version verfügbar)
Einschalten/Spielpause
366 Arten der
Betriebsartenumschaltung
Modus+
Modus-
Geschwindigkeit+
Geschwindigkeit-
10 Stufen der
Geschwindigkeitseinstellung
Monochromes Display Drücken Sie diese Tasten, der Lichtstreifen
zeigt die entsprechenden Farben an.
Drücken Sie 5 Sekunden, die Fernbedienungen sind eins zu eins
übereinstimmend (nur diese Fernbedienung kann sie steuern).
(Diese Feder ist nur für die RF-Version verfügbar)
Drücken Sie diese Taste im ausgeschalteten
Zustand, um das Setup-Menü aufzurufen, und
drücken Sie dann M+ oder M-, um die LED-Pixel
einzustellen. Drücken Sie die blaue Taste, um die RGB-Sequenz einzustellen.
Nach Abschluss der Einstellung drücken Sie OFF, um zu speichern/zu beenden.
Abschaltung
Automatisches Speichern beim Herunterfahren
Helligkeit+
Helligkeit-
Helligkeitseinstellung (32 Stufen)
On
On
Off
Off
AUTO
AUTO
SM
S+
S
S+
M+
M
M+
Automatische Wiedergabe 366 Modi
Für dieses Produkt bieten wir einen Kundendienst an.
Schicken Sie uns eine E-Mail, wenn Sie Probleme mit der Lampe haben, normalerweise können wir Ihnen z.B.
ein Ersatzteil schicken um das Problem zu lösen. In diesem Fall können wir Ihnen die Rücksendung ersparen.
Im Garantiefall senden Sie bitte die defekte Lampe in der Originalverpackung und mit der Originalquittung
(als Nachweis der Nachweis der gültigen Garantiezeit) an:
1
PACKAGE CONTENTS1
2
Note: Hardware not shown to actual size.
LED RGBW Ecklampe
X 1
Remote Control
X 1
Screws
X 10
3V CR2025 Battery
X 1
1.
These products may represent a possible shock or fire hazard if improperly installed or attached in any way.
Products should
be installed in accordance with these instructions, current electrical codes, and the current
National Electric Code (NEC).
2.Operation input voltage: 220-240V 50Hz.
3.Operation output voltage: DC 12V ; 2A.
4.This product is not a toy. Close supervision is needed when used near children.
5.Do not cover this product as the cover may cause the flexible light to overheat and melt or ignite.
6.Do not submerge the
LED RGBW Ecklampe
light in liquids or use the product in the vicinity of standing water
or other liquids.
7. WARNING - KEEP BATTERIES OUT OF REACH OF CHILDREN! Batteries are not a toy!
8.
Please dispose of used batteries immediately and safely
9. Replace only with the same type of battery
10. Check the devices and make sure the battery compartment is properly secured, e.g.
that the screw or other mechanical lock is firmly tightened.
SAVE THESE INSTRUCTIONS
3 CAUTION
Power Adaptor
X 1
On Off
AUTO
SM
S+ M+
LED RGBW Corner Light
Mod. Nr.: GP-CN-0002/GP-CN-0002b
· Length: 1.4M
· Power: 12W, 220-240V/50Hz
Light Source: 84 RGB SMD
Unlinkable
Remote control range: Max 7M
·
·
·
·
·
lumen: 280Lm
· Switch: 50000 times ON/Off
· Lifetime: 25000H
Protection: II
Corner-Light -1.4M
Size
INSTALLATION5
2
• Make sure all product connections are made prior to connecting power.
• Pull the plastic tab from the IR handheld remote control battery compartment prior to operation.
• Be sure to point the remote control in the direction of the front of the in-line receiver
• Remote Control Signal Distance: Up to 10 m / 32.8 ft
• Always purchase the correct size and grade of battery most suitable for the intended use.
• Clean the battery contacts and also those of the device prior to battery installation.
• Ensure the battery is installed correctly with regard to polarity (+and -).
• Remove batteries from equipment which is not to be used for an extended period of time
• Remove used batteries promptly.
REPLACING THE BATTERY:
To replace the remote control’s battery, follow the directions on the back of the remote control to slide the
battery drawer out. Replace the battery (+ side up) and slide the battery drawer back into place.
CARE AND MAINTENANCE:
Wash hands after use. Do not use chemical solvents or harsh abrasives to clean fixture. Use a dry, soft cloth
to clean if needed.
TROUBLESHOOTING:
The light does not come on at all.
- Check that the power is on.
- Check if the connection to the outlet is loose.
- Change the battery in the remote.
- Clean the front of the controller.
- Make sure the pull-tab is removed from remote.
- Ensure remote control is pointed the in-line receiver
Turn off electricity at the source prior to attempting installation. DO NOT damage or cut the wire insulation
(covering) during fixture installation. Do not permit power cord or PVC housing to contact any surface having
a sharp edge. To do so may damage or cut the wire insulation, which could cause serious injury or death from
electric shock.
1. Carefully remove all the parts
from the packaging, and lay them
out on a smooth workspace.
Remove the packing material and
uncoil the LED RGBW Ecklampe.
REMOTE CONTROL OPERATING INSTRUCTIONS:6
Service7
1
AAA
2. Angle-frame (B) connect on the LED
-Lamp plug (A).
By aligning and tightening the
threaded connections points. Ensure
the connection is tightly secured to
preclude the entrance of water.
3. the mounting screws (C) onto a
sturdy and mechanically sound
surface.
2
3
B
B
B
A
C
4
3
Auto play 366 Modes
RGB sequence adjustment function in the state of shutdown,press the
AUTO to enter the setup menu.Now,the first three lights of LED strip
display the current RGB sequence.Press this button to adjust the RGB
sequence until the sequence of the previous three lights are red,green
and blue.Then press the OFF button to save.
Press 5 seconds to cancel the remote control matching.All remote
controls can control it (This feature is available only for the RF version)
Power/Play pause
366 kinds mode switching Mode+
Mode-
Speed+
Speed-
10 levels speed adiust
Monochrome Display press these buttons,light strip displays its corre
sponding colors.
Press 5 seconds,remote controls are one to one matching(only this
remote control can control it).(This feather is available only for the
RF version)
In the off state,press this button to enter the setup
menu,then press the M+ or M- to adjust LED pixels.
Press the blue button to adjust the RGB sequence.
After complete setting,press OFF to save/exit.
Shutdown
Auto save when shutdown
Brightness+
Brightness-
Brightness adjustment(32levels)
On
On
Off
Off
AUTO
AUTO
SM
S+
S
S+
M+
M
M+
4. Connect the return-line of the
power pack(D) with Alu pipeline(B)
D
D
Heutec GmbH - Hasselstr.33a - D-41564 Kaarst
E-mail: [email protected]
For this product we offer customer service.
Send us an E-mail if you have any problems with the lamp, normally we can send you, for example,a
spare part to solve the problem. In this case we can save your time of sending it back.
In case of a warranty claim, please send the defective lamp in its original packing and the original receipt
(as proof of the valid warranty period) to:
Note on environmental protection:
4
Please note that this product must be disposed of in accordance with the directives on waste electri-
cal and electronic equipment. In no case , according to the national laws, about the domestic waste.
We therefore ask you for your contribution to environmental protection and the conservation of
resources. The device should be taken to an authorized collection point for old electrical devices.In-
formation on collection points for old devices can be obtained from your city council, the public waste
disposal authorities or your waste collection service.
This manual suits for next models
1
Table of contents
Languages:


