HEXA RT226-A Series User manual
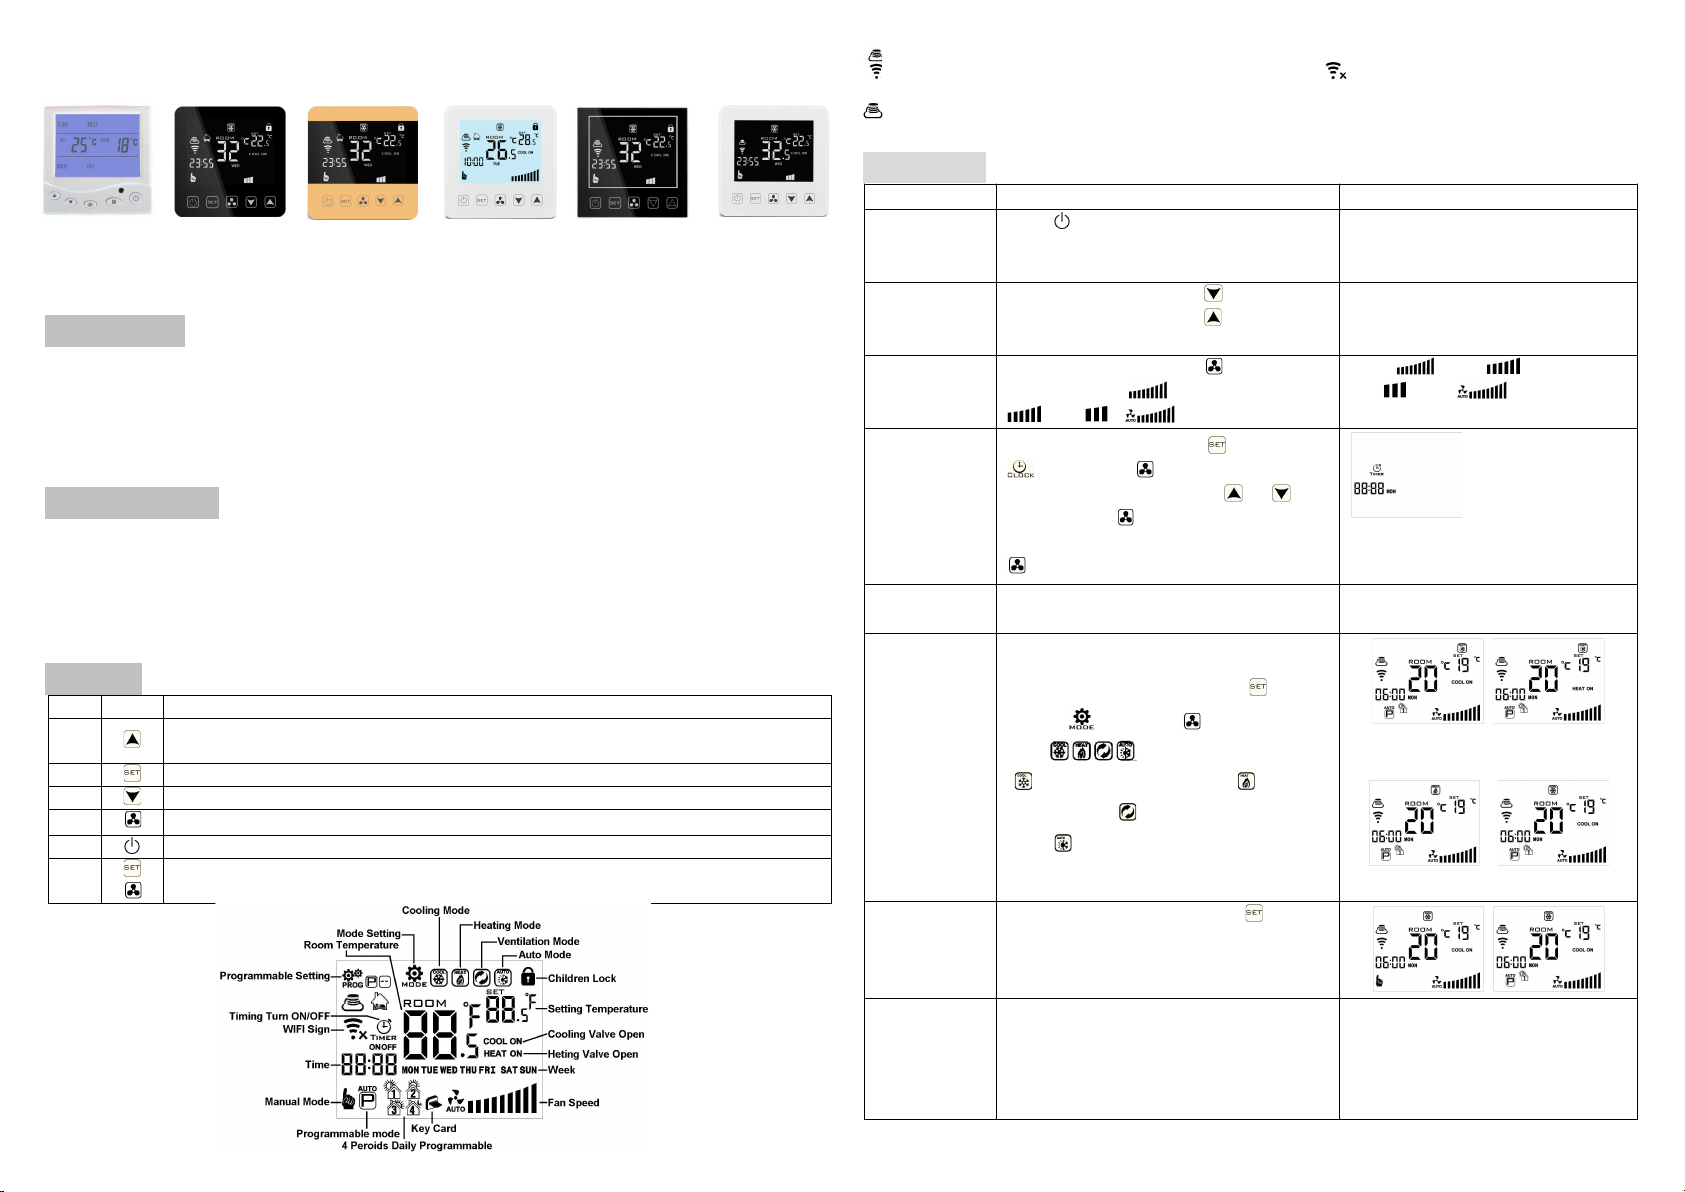
RT226-A Series
RT226-A4
RT226-A3
RT226-A2 RT226-A7RT226-A6RT226-A5
fan coil unit thermostat manual
.
Application
Technical data
VoltageOutputOnoff type
AC200~240V
CurrentIP
AccuracyDisplay temperature range
Setting range orenironment
SensorSie
Mountedin the all type
Button
No.
Icon
Description
A
Increase eyshort press to adust number and temperaturelong press to checexternal
senor temperature
B
To choose setting item
C
Decrease eyshort press to adust number and temperature
D
Fan eyhen or ith
“
SET
”
ey togetherthen
“
confirm
”
ey
E
Poer ey
FPress them together to enter matching ifi mode
WIFI connectedIf flashing then matching ifi mode WiFi disconnection
cloud icon if flashing then enter AP mode
Operation
Operation
Description
Legend
Turn onoff
press“ ”to turn on;press again to turn
offmeanhile closed fan coil unit and
electrical ale
Display main interface
Setting
temperature
Thermostat turn on ;press“ ”to decrease
setting temperaturepress“ ”to increase
settingeach time change by .ºC
Fan Speed
Thermostat turn on press“ ”to choose
fan speed (high (mid
(lo (
(high (mid
(lo (auto
Setting time
Thermostat turn on,press“ ”-s,chose
,then press“ ” to set time
Minute“mm”flashing,press“ ”or“ ”to
adust,press“ ”to next setting.as same
method to set hour and ee.finally press
or ait S to exit
Timer After connected ifi clic“cloud” on the
right corner of APP to set
Woring mode
Thermostat turn on,long press“ ”-S,
choose next press to choose
mode
“ ” is mean cooling mode,“ ”is mean
heating mode“ ”is mean entilation
mode; is mean auto mode
Auto heating mode Auto cooling
mode
Heating mode Cooling mode
Manual
programmable
Thermostat turn onshore press“ ” to run
programmable modepress again to run
manual mode
Control ale
When cooling mode(heating mode,indoor
temperature more(loer ºC than setting
temperatureopen ale;after equal,closed
ale,fan is still running
Ventilation mode(fan is not control
by temperature as default)
If fan be controlled by
temperaturethen ale and fan ill
be closed.
3A
±0.5ºC
IP20
0~70ºC
5ºC - 35ºC
-10~60°C
86*86mm

Locked
function
If open locked function, the will be auto
locked if have not any operation within 10S.
Long press to unlock
Alarm
E1:inner sensor alarm
E2:external sensor alarm
When temperature more than 55ºC,then
display“HI”
When temperature lower than 0ºC,then
display“LO”
Sleep mode
Long press , is flashing,short press
to run it,short press to cancel
Remark:Sleep mode is not available
when run ventilate mode or auto
mode
Set Programmable
HY08AC thermostat support set different time and different temperature;Compatible with 5+2,6+1,7days
Programmable
Long press 3-5S,next short press to choose ,then short press to set
programmable,use and to adjust value.After short press to set next time section setting
Time section
Icon
Time (default)
Temperature(default)
Monday
to
Sunday
1
06:00
20°C
2
8:00
15°C
3
17:30
22°C
4
22:00
15°C
Advance setting
Turn off thermostat ,long press for 5S to enter press“ ”or“ ”to set item.Short press to set next
item
Symbol
Item
Parameter
Default
A1
Temperature Calibration
-9-+9ºC
0.5ºC Accuracy
Calibration
A2
Children Lock
1:half lock;(It is available to turn on/off
and adjust temperature)
0:full lock
1
A3
Setting the lowest limit
temperature
5-15ºC
5ºC
A4
Setting the highest limit
temperature
16-50ºC
35ºC
A5
Fan is control by temperature
0:YES
1:NO
0
A6
Programmable
0:5+2
1:6+1
2:7
0
A7
Choose valve output
2:2pipe
4
4:4 pipe
A8
Choose sensor
N1:inner sensor
N2:external sensor
N3:Double sensor when choose
N3:①In the cooling state, normally
only valve is opened. When the
temperature is detected to be lower
than (X-2) °C, the fan is turned on.
When the fan detects the temperature
≥X°C, the fan is turned off;②In the
heating state, normally only valve is
opened , and the fan is turned on when
the external temperature is detected to
be ≥X°C. When the temperature is
detected to be lower than (X-2) °C, the
fan is turned off.
N1
A9
Set temperature for external
sensor
20-60°C
38°C
AA
Reset
Display A o, press key until whole
show
Ao
Cautions on Installation
1.To prevent the thermostat display from a high fluctuation, special treatment has been made to the
program. Therefore, it is normal that the thermostat cannot immediately display the sudden change of
temperature.
2. The thermostat installed on 1.5m above the ground.
3.For the thermostat installed,please take care not to install it to the wall corner, door / window side or
behind the door or in such unheated area as exterior wall. Avoid hot / cold air duct, radiator, flue or
thermal pipe
4 When install the power supply, make sure that the power cable is well insulated.
5.Don’t open the internal circuit board..
6.HY08AC series thermostat design for the standard 75x75x 35mm wall mount box installed. Follow the
instructions to open the rear cover base, mount it on the wall and wire it.
7.Before installing the thermostat, make sure that the system is disconnected. The maximum voltage of
the system shall meet the requirements specified in the Instruction Manual (Max. AC Voltage: 250V).

WIFI APP Download And Sign Up And Pair Thermostat
Preparation required for Wifi Connection:
A 4G mobile phone and wireless router, reconnect the wireless router on the mobile phone WLAN
interface, and record the WIFI password [need to be used when the thermostat is paired with the Wifi.
Note: Wifi from router must be 2.4G, 4G wifi from the other mobile phone hotspot is also ok, 5G router
wifi is not ok.
Step 1 Download your APP
Scan following QR cod and download APP through browser(Android also can search
“Smart RM” or “Smart Life” at Google Play, IPhone also can search “Smart RM” or
“Smart Life” at App Store
Step 2 Register your account
After install APP,click “register”(Fig 2-1)
Please read the Privacy Policy and press Agree to proceed to the next step. (Fig 2-2)
Registration account name uses your available Email Or mobile phone number, and please select
Region, then click “Continue”(Fig 2-3)
You will receive a 6-digit verification code from your email or SMS and enter your phone (Fig 2-4)
Please set the account password, Password must contain 6-20 letters and numbers. click “Done”(Fig
2-5)
Fig 2-1 Fig 2-2 Fig 2-3 Fig 2-4 Fig 2-5
Step 3 Create family information(Fig 3-1)
1. Fill in the family name(Fig 3-2 ).
2. 2. Select or add a room(Fig 3-2).
3. 3. Set location (Fig 3-4)
Fig 3-1 Fig 3-2 Fig3-3 Fig 3-4
Step 4 Connect your Wi-Fi signal
In the power-on state, press and hold the button and at the same time, the icon flashes to
indicate the EZ distribution mode, the icon flashes to indicate the ap distribution mode, the icon
indicates that the phone has been disconnected with the device.
Press "Add Device" or "+" in the upper right corner to add the device (Fig 4-1) and select the device type
"Thermostat"(Fig 4-2)
On your thermostat,Click Confirm icon rapidly blink. then select your network and back to your app to
enter the password of your wireless router(fig 4-4)and confirm.The app will connect automatically(Fig
4-5)This may typically take up to 5~90 seconds to complete. This is Ez mode which provides fast network
connection between your app and your device.
Your room name could be edited when the device is connected,And you can choose the corresponding
room location. For example, bedroom, kitchen, living room, etc
Fig 4-1 fig 4-2 fig 4-3 fig 4-4

Fig 4-5 Fig 4-6 Fig 4-7
Step 5
If your router doesn’t support it or your wifi signal is weak or you can not connect by EZ mode, press the
AP Mode on the upper right corner in (Fig 5-1)If you have connected your thermostat successfully,
please ignore the app setting as blow On your thermostat
Click Confirm icon rapidly blink then select your network and back to your app to enter the password
of your wireless router(fig 4-4)and confirm.The app will go into the page in (Fig 5-2)
Press Connect now to select the wifi signal Smartlife-XXXX of your thermostat(Fig 5-3)
Go back to your app and click Connect now then the app will connect automatically(Fig 4-5)
This may typically take up to 5~90 seconds to complete.
Fig 5-1 Fig 5-2 Fig 5-3 Fig 5-4
Step 6 APP Device interface operation and How to create a group
1. Power on/off button
2. Mode key: Manual mode, Auto mode, Holiday mode.
3. Child lock: After the child lock turned on, the APP cannot be operated.
4. Set key: After clicking on, you can select the programmed mode (5+2, 61, 7 days) and set the
temperature and time for the six periods of the weekday and weekend.
5. Basic information page(Fig 6-1、Fig6-2)
Device name: The device name can be modified according to your demand.
Device location:
Share device: Share the device to the mobile phone or email account of the registered family
member
Create Group: Add all the devices which need to operate at the same time to the created group
for convenient operation.
Device information;Contains virtual ID;IP address;Mac address;Device time zone
Remove device: After deleting the device, you need to reconnect the network if you want to use
it.
Third-party controls supported: amazon alexa/google assistant/IFTTT, click to enter, you will see
the steps
Fig 6-1 Fig6-2 Fig6-3 Fig6-4
Step 7 Family management(Fig6-3)
Add family: Family naming; family location setting; select room name, you can also add room name, upon
completion, it will enter the Home Setting interface.
Step 8
What is your Smart Scene and How to use it? (Fig6-4)
set your home to automatically turn on thermostat on when you back home(fig ).Press + button into the
setting
Step 1:You can set a condition for task like Temperature below 21 degree,then click save ,
(condition:temp.,Humidity,weather,PM2.5,Air Quality,Sunrise/Sunset,Device)
Step 2: Add a task. Press + to Select Device (Power,Set Temp,Lock
Mode) to act, then Save.If you want to delete the scene,you can press
Delete in the end.
NOTE: The room sound could be turned on/off in PROFILE-SETTING-
SOUND. The sound is matched with the default of your system
This manual suits for next models
6
Other HEXA Thermostat manuals

Popular Thermostat manuals by other brands


alre
alre KR Series manual

White Rodgers
White Rodgers 1F89-211 Installation and operation instructions

Tekmar
Tekmar tekmarNet 532 Installation & operation manual

Climate Technologies
Climate Technologies 43355 owner's manual

Danfoss
Danfoss KP Series instructions

Carrier
Carrier TCSNAC01 installation instructions