Hi-Force BC18X User manual

TDS1343
1010
BATTERY OPERATED HYDRAULIC CRIMPING TOOLS
MODEL NUMBERS BC18X, BC30, BC40, BC63
OPERATING INSTRUCTIONS
INTRODUCTION
The BC self-contained battery operated hydraulic cable crimping tools are fitted with
an automatic pressure relief valve and are supplied complete with standard die sets
and carrying case. With 180° rotating head they are designed for easy access into
confined spaces.
SAFETY NOTES
Always wear suitable personal protection when operating hydraulic equipment.
DANGER: Keep all body parts away from Crimper and work piece during operation.
IMPORTANT: Ensure that the correct size tool and die is selected for the job.
IMPORTANT: Minimum age of operator must be 18 years. The operator must have
read and understood all instructions, safety issues, cautions and warnings before
starting to operate this equipment.
WARNING: Risk of finger trapping. Only hold the tool by means of the handle.
WARNING: Do not overload equipment. Overloading causes equipment failure and
possible personal injury.
CAUTION: Make sure that all system components are protected from external
sources of damage, such as excessive heat, flame, moving machine parts, sharp
edges and corrosive chemicals.
WARNING: Immediately replace worn or damaged parts with genuine Hi-Force
parts.
WARNING: Always wear safety glasses and other appropriate personal protection
equipment. The operator must take precautions against injury due to failure of the
tool or work piece.
DANGER: Do not attempt to crimp on a live cable. The tool is not insulated.
SELECTION AND INSERTION OF DIE SETS
All Hi- Force hydraulic crimpers are supplied complete with Die sets to suit the
applicable range of the Crimper. All Die sets are marked with their applicable size
capacity to avoid accidental mixing of different sizes. Standard die sets are suitable
for use with copper cable connectors ONLY. When aluminium cable connectors are
used
The fitting of dies is a simple process that requires no tools, but the method varies
depending on the crimper in use.
BC18X
Open the Jaws by pushing the end of the jaw in the direction of the arrow in the
diagram below. Select the appropriate die pair, checking that the two halves match in
size. Take care as some of the smaller dies contain two sizes of crimp. Slide the dies
into the recesses in the jaw until they latch into place by means of the ball mounted in
the side of the die. Close the jaw by squeezing the two halves together until they
latch into each other.

TDS1343
1010
BC30 and BC40
To insert the Dies pull the locating button plunger on the end of the head assembly to
retract the locating plunger. Slide one half of the die into position. Release locating
plunger to ‘Lock’ in to the groove in the rear of the die. Slide the other half of the die
into the opposing jaw. If required advance piston to expose Die release plunger to
assist with location. (see instructions below) Check the Die is correctly located by
trying to slide the Die out. It should not move! Check that a matching pair of die
halves has been used.
TDS1343
1010
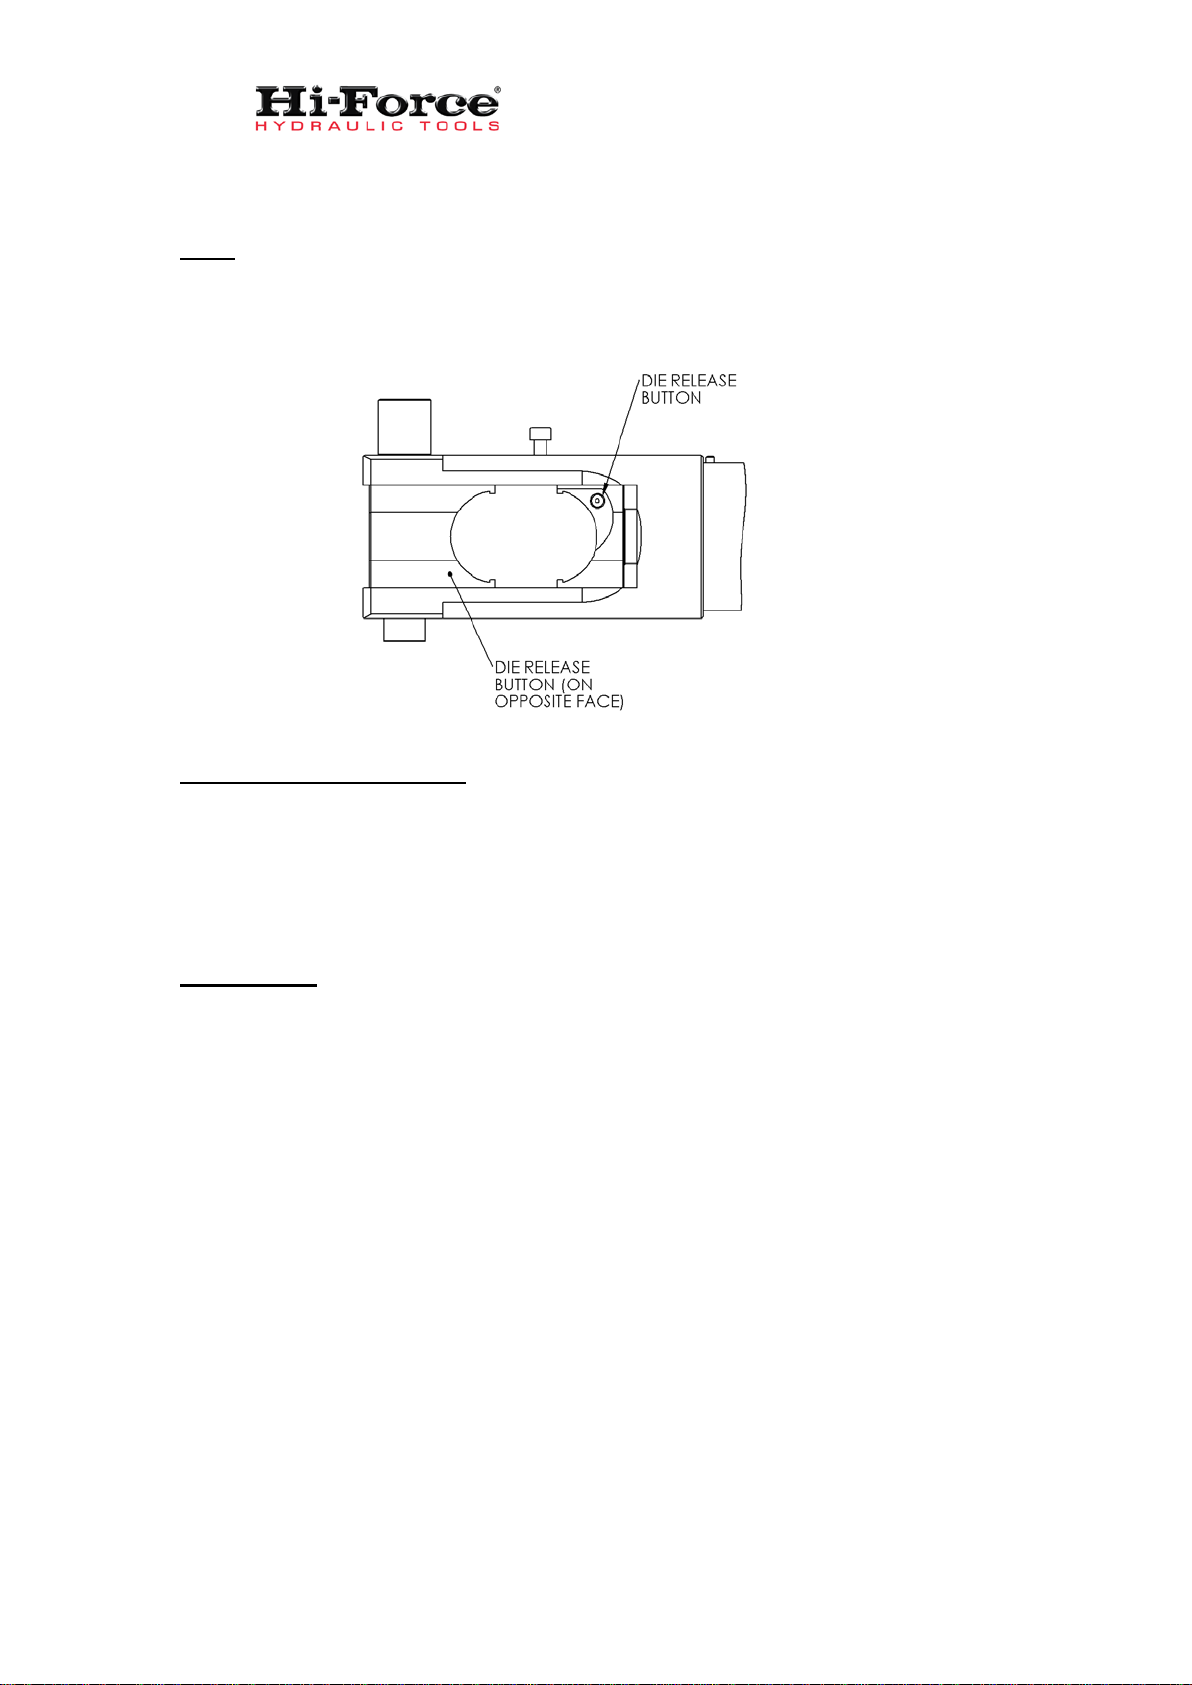
BC63
Press the die release buttons situated on opposite sides of the tool and slide each
die half into place ensuring that a matching pair is used.
FITTING A BATTERY PACK
To fit the battery, Remove the protective cover from the terminals (retain for future
use) push firmly into the housing on the base of the tool handle until it clicks into
place. To remove battery depress battery latch button and pull battery away from the
handle as shown in the diagrams. Charge the battery before use by means of
charger CU110, CU220 or CU1114. Spare battery packs are available from HI-
Force. Order part number BP144.
OPERATION.
Pressing the trigger will advance the piston and close the dies. Pressing the release
button will retract the piston and open the dies.
Correctly position the crimper over the connector to be crimped. Press and hold the
trigger and the dies will close and crimp the connector to the cable.
When the connector is fully crimped to the cable the dies will be fully closed and no
further movement takes place. The pressure relief valve on the tool will then operate
and the motor will be heard to speed up. Release the trigger. Press the release
button and the dies will retract ready for next use. Note, keep the release button
depressed until the dies have fully retracted.
The LED battery indicator gives the status of the battery and shows when it is
necessary to recharge the battery.
Red yellow and green light – battery condition good.
Red and yellow lights – battery running low
Red – Battery exhausted – Recharge required. Or replace with spare battery

TDS1343
1010
BATTERY CHARGING
Batteries should be charged using HI-Force charger supplied (or a HI-Force charging
accessory supplied separately)
Connect charger to the mains. Select the correct voltage (14.4 volt) by pressing the
“select voltage” button until the appropriate LED lights up. Insert battery and charge
for 2-3 hours.
To prolong battery life, discharge fully, using the “discharge” button. Do not carry out
this operation on a fully charged battery.
MAINTENANCE
•Keep your Hi-Force crimper set free from dirt, sand and grease at all times.
Any contamination will greatly reduce the Crimper effectiveness. Crimpers
come complete with either storage boxes or bags. Always store your Hi-Force
Crimper Set properly.
•Regularly check all fastenings to ensure they have not worked loose.
•Always fully retract the Crimper Head Piston between operations and while
stored. Leaving the Piston extended will weaken the Retraction Spring and
also leave the piston exposed to damage/ corrosion.
•For major overhauls/ repairs contact HI-Force or your nearest Hi-Force
service centre.

TDS1343
1010
•After storage for long periods the battery will need to be charged fully before
next use.
•Changing the oil: Remove the two screws on the rear of the unit (see pictures
below) Remove the oil filler cover. Pull out the reservoir plug. Tip out the old
oil and dispose of with respect for the environment. Re-fill with clean hydraulic
oil to ISO viscosity grade 15.
•If storing for long periods spray exposed metal parts with rust preventative
oil.
Oil filling procedure
This manual suits for next models
3
Table of contents


