HYDROSCAND H24DC User manual

USER MANUAL
Edition III - 2015-06-17
Serial number: _________________
H24DC
H32DC

CONTENTS
1. INTRODUCTION........................................ 3
2. SAFETY RULES...................................... 3-4
3. EQUIPMENT...........................................4-7
3.1 WARRANTY....................................... 5
3.2 IMPORTANT...................................... 5
3.3 IDENTIFICATION .............................6-7
4. START - UP ......................................... 8-12
4.1 FILLING THE OIL ............................... 8
4.1.1 MACHINE PLACEMENT ................... 8
4.2 ELECTRICAL INSTALLATION ................. 8
4.3 SELECTING DIE SET............................ 8
4.4 SETTING CRIMPING MEASUREMENTS .. 8-9
4.5 CHANGING DIE SET ........................ 9-10
4.6 CHANGING DIE SET WITH THE
QC- TOOL .......................................11
4.7 CRIMPING.......................................12
5. MAINTENANCE................................... 12-13
5.1 LUBRICATION ..................................12
5.2 CHANGING THE OIL...........................13
5.3 CALIBRATION ..................................13
6. TROUBLE SHOOTING ................................14
7. TECHNICAL DATA.....................................15
8. TECHNICAL / POWERPACK DRAWS........ 16 - 18
Page 2

Page 3
H24/H32DC USER MANUAL EDITION III 2015-06-17
1. Introduction
Do not unpack or operate the crimping machine until you have thoroughly read this
manual.
All who operate the crimping machine must read this manual.
This manual provides necessary information for safe use of this machine.
This manual is the result of continual development, testing and technical evaluations that
are registered and veried by Hydroscand Machine AB according to 2006/42/EC.
This information is intended only for specialized operators who can operate the machine
without risk to themselves, other persons, property, the machine, or the environment. The
operator should have fundamental knowledge in trouble-shooting methods, perform mach-
ine inspections and simple maintenance according to the information provided in this ma-
nual and according to local legislation for protection of health and safety.
This manual does not explain disassembly or comprehensive maintenance in detail. These
may only be performed by an authorized service technician.
It is necessary to store the manual and keep it in good condition for future use. Contact
your closest authorized supplier for a replacement manual or additional information if ne-
cessary.
This manual should be preserved and stored for the length of the machine’s lifetime or at
least ten (10) years in a well-known, easily accessible location together with other machine
documentation.
Hydroscand Machine AB is not liable for injury/damage to persons/machine or property as
a result of improper use, having made prohibited modications to the machine or misinter-
preting this manual’s safety instructions.
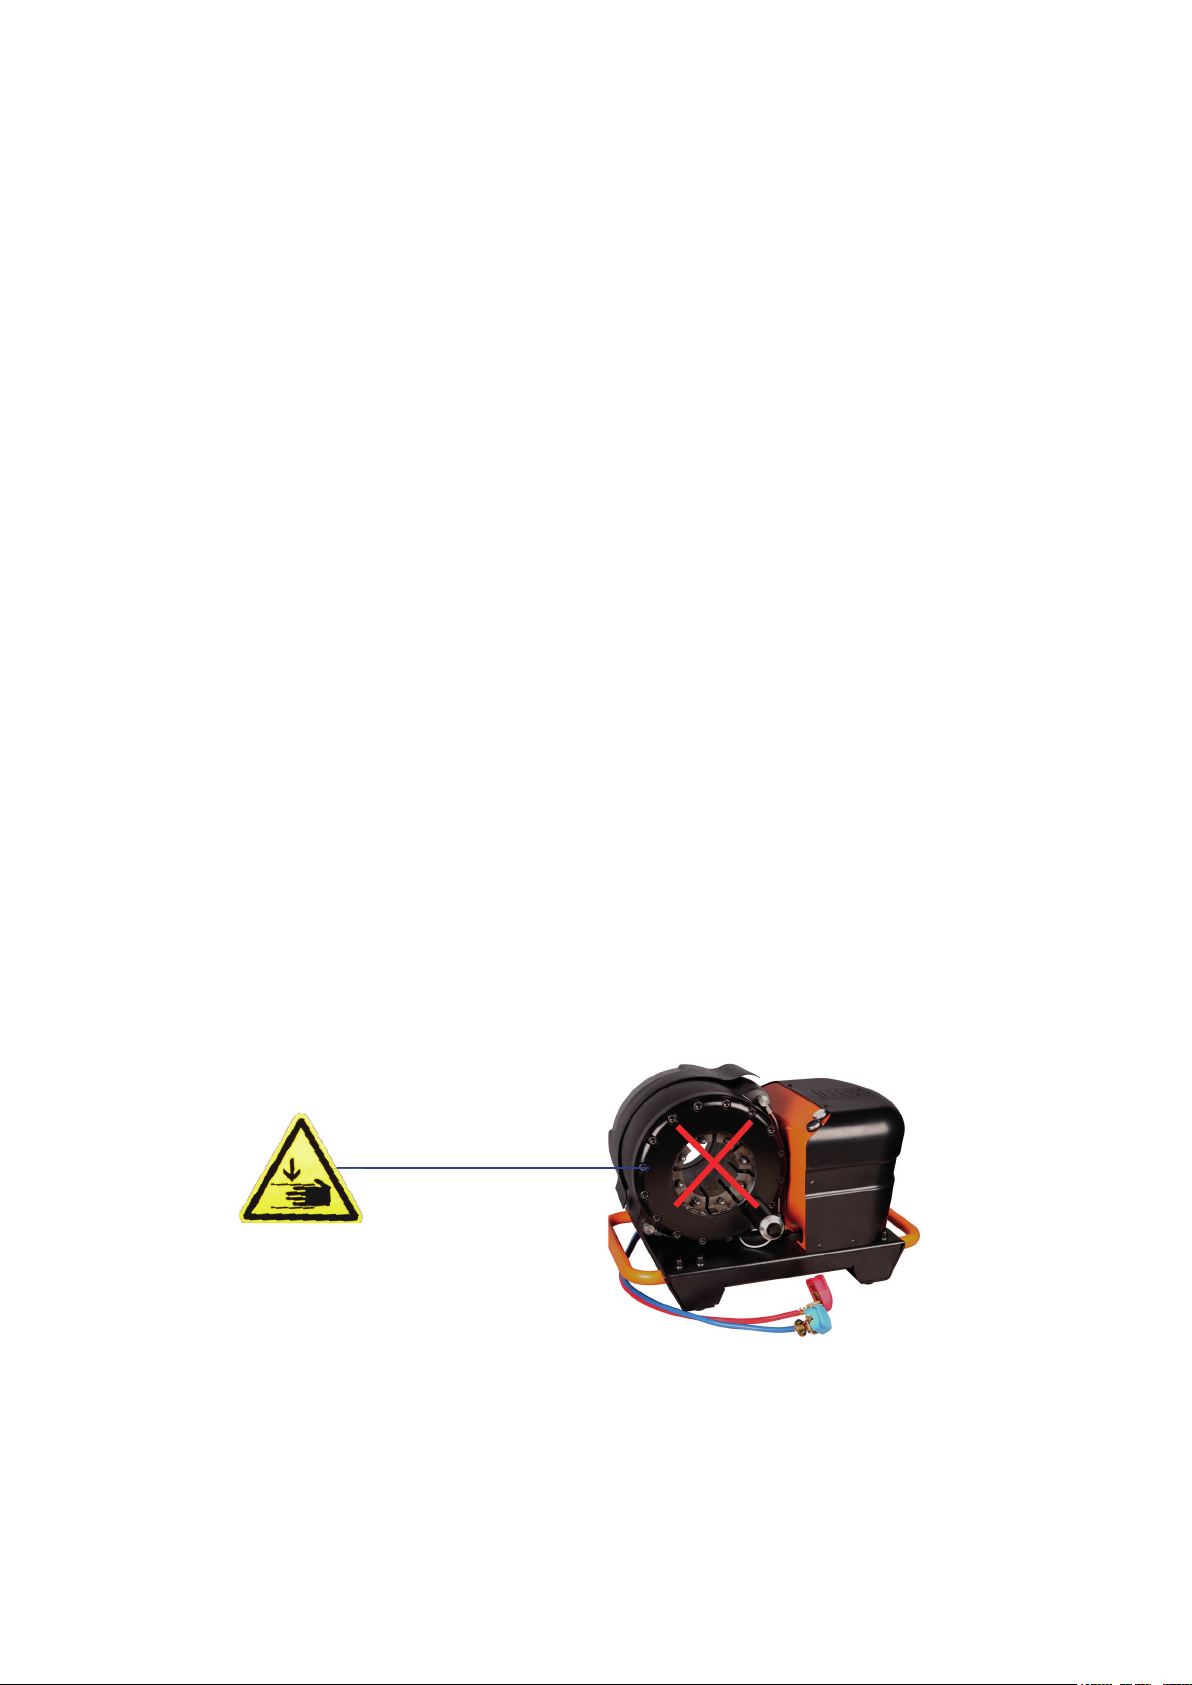
2. Safety rules
Always ensure that the minimum standards for safety, installation and operation are complied with
before operating the machine. Observe the surrounding environmental conditions such as temperature,
humidity, lighting, vibrations, dust and other conditions at the machine operation site. Never remove
the machine’s information or warning plates. Ensure that they remain clearly readable. Contact an aut-
horized service workshop for replacement plates if they become unreadable.
The use of any spare parts that deviate from this manual’s specications, any other changes/manipula-
tions (however insignicant) made to your machine releases Hydroscand Machine AB from any liability
for consequences that arise due to the machine’s performance, level of safety for nearby persons and/
or personal property.

Page 4
H24/H32DC USER MANUAL EDITION III 2015-06-17
Disassembling or side-stepping safety devices or rules is extremely hazardous and
absolutely prohibited. Refusal to follow these requirements puts others at severe risk
of injury!
Always dispose of operation waste according to current local laws and regulations.
Note!
All maintenance not described in this manual must be performed by an authorized service
technician.
3. Equipment
The H24DC and H32DC are battery-powered swaging machines designed for crimping hy-
draulic hose and intended for use in service vehicles in the eld where 12V/24V power
source is available. The machine is designed for smaller hose-crimping series and not for
large-scale production.
The machine consists of a chassis, crimping head and pump unit.
The machine is delivered ready to use, packed in a wooden box on a pallet marked with
serial number, order number, weight and volume. Compare your order with the delivered
product to ensure that everything is correct.
Remove all restraining clamps in the storage box, open the clip in the bottom and remove
the packing material.
Thread a lifting strap through the crimping head to lift the machine to the desired location.
Note! Battery not included
Metal clips, 10pcs

Page 5
H24/H32DC USER MANUAL EDITION III 2015-06-17
Note!
Always dispose of operation waste according to current, local laws and regulations.
The machine is delivered with:
• Lubrication tube
• Die change tool
• Certi cation of compliance according to CE requirements
• Manual
3.1 Warranty
The warranty lasts one (1) year from purchase and only under the strict condition that the manual
instructions have been followed. The warranty covers faulty material/parts and awed workmanship,
replacing faulty parts cost.
The warranty does not cover improper use or normal wear. Travel costs, time for repair and shipping
costs are not covered by the warranty. Repairs under the warranty are to be made only by Hydroscand
Machine AB or an authorized service technician approved by Hydroscand Machine AB. Lost income or
extra costs that may arise for any reason are not covered by the warranty.
Note!
Ensure that the machine is undamaged and that all of the described items are present upon arrival or
shortly after. Hydroscand Machine is not liable for incorrect or missing parts that are not reported
within eight (8) days after delivery.
3.2 Important
H24DC is designed and manufactured for crimping hydraulic hose in dimensions 3/16”-1 ½”, H32DC for
dimensions 3/16”-2”. Any other use of this machine is considered improper and Hydroscand Machine
AB is not liable for injury or damage to persons, property or the machine. The machine shall only be
used for crimping hydraulic hose according to speci cation. Hydroscand Machine AB’s instructions for
operating conditions and limitations for use/operation as well as health and safety regulations must
be complied with.
Warning !
Pinch point!
Keep hands and all other body parts away
from the red-indicated area while crimping.

Page 6
H24/H32DC USER MANUAL EDITION III 2015-06-17
3.3 Identication
The machine can be identied by the CE-label with the following information located on
its backside:
• Manufacturer
• Serial number
• Manufactured year
• Weight
• Voltage
• Pressure
• Force
Always provide the following information and technical explanation of the machine’s
problem when contacting the authorized service workshop:
• Model
• Serial number
• The manual’s version and date
Note!
It is absolutely prohibited to remove or damage the identication plates. Contact an authori-
zed service workshop for new plates if they become damaged and unreadable.

Page 7
H24/H32DC USER MANUAL EDITION III 2015-06-17
1
1
2
2
7
5
5
4
3
3
6
8
6
7
H24/H32DC
1. Pump unit
2. Carrying handles
3. Adjustment dial
4. Crimping contraction buttom
5. Crimping retraction button
6. Dies
7. Plus/minus poles
8. Gas spring retraction
1. Pump unit
2. Carrying handles
3. Adjustment dial
4. Crimping contraction button
5. Crimping retraction button
6. Dies
7. Plus/minus poles
4

Page 8
H24/H32DC USER MANUAL EDITION III 2015-06-17
4. Start-up
4.1 Filling the oil
H24/H32DC is delivered with an empty oil tank.
Fill the tank to the indicator mark on the oil stick. Use only the oil recommended by Hydroscand
Machine AB. Recommended oil: ISO VG46
4.1.1 Machine placement
Place the machine on a stable and at surface. Connect the machine to power source. (battery).
4.2 Electrical installation
Place the machine on a stable and at surface. Set the adjustable machine feet so that they cannot be
over-turned or fall from the surface. Connect the machine to power source. (battery).
4.3 Selecting dies
Determine the crimping dimensions for the current operation and select the die set with the correct
interval that corresponds to the crimping measurement.
For example: A crimping measurement of 17mm, requires the die set size nr 16 (since it covers the 16-
19mm interval).
A die table on the machine indicates the crimping measurement interval for each die set. Crimping any
measurements outside the table crimping measurement interval is not recommended.
Always select the die set within the correct interval to achieve the best crimping results. Every die is
marked with the smallest crimping measurement in the interval.
Note!
Crimping any measurements outside the table crimping measurement interval is not recommended.
Using dies that are too small risk the ferrule becoming oval.
4.4 Setting crimping measurements
Turn the adjustment dial so that the zero (0) on the dial is lined-up with the zero (0) in the window. If
zero (0) is set, the machine will crimp the smallest diameter provided in the interval. Every revolution
of the dial increases the value in the window with one unit. One revolution clock-wise corresponds to
1mm on the crimping measurement. The measurement shall be added to the least-speci ed diameter in
the interval.
For example: Crimping 16 mm hose requires die nr 16 with the adjustment dial set to zero (0) and lined
up with zero (0) in the window. Crimping 21,2mm hose requires die nr 19 with the adjustment dial
turned (two clock-wise rotations) at 2. Selecting 20 on the dial should line up with 2 in the window.
Make sure to lock the measurement dial when the desired crimping measurement is set. See table below:
Locking mechanism to lock
the set crimping measurement
The measured crimping diameter can sometimes differ
slightly from the set (requested) crimping diameter
because of expansion of the ferrule on the coupling.
Compensate this by readjusting the setting dial.
1 litre
2 liters
3 liters
4 liters

Page 9
H24/H32DC USER MANUAL EDITION III 2015-06-17
Die Set Die SetCrimping area Crimping area
20-10
20-12
20-14
20-16
20-19
20-23
20-27
20-31
20-36
20-41
20-47
20-54
10-12 mm
12-14 mm
14-16 mm
16-19 mm
19-23 mm
23-27 mm
27-31 mm
31-36 mm
36-41 mm
41-47 mm
47-54 mm
54-61 mm
32-10
32-12
32-14
32-16
32-19
32-22
32-26
32-30
32-34
32-39
32-45
32-51
32-57
32-63
32-69
32-74
32-78
10-12 mm
12-14 mm
14-16 mm
16-19 mm
19-22 mm
22-26 mm
26-30 mm
30-34 mm
34-39 mm
39-45 mm
45-51 mm
51-57 mm
57-63 mm
63-69 mm
69-74 mm
74-78 mm
78-87 mm
H24 DIES H32 DIES
4.5 Changing individual die segments
Place the machine on a stable and at surface. Adjust the machine’s feet so that they cannot
be over-turned or fall from the surface.
1. Retract the dies completely by pressing the return button twice (2).
The machine stops at the rst button push at the set opening diameter.
2. Remove a die segment by using the included tool and pull the die set pin
until the die releases.
3. Make sure the 8-segment die set is clean, undamaged and that all die seg -
ments are the same size with the die size markings facing towards you.
Insert the dies from the front. Mount the die segment by pulling the die set pin
with the QC-tool, insert the die set pin in the hole in the master die and release
the locking pin with the QC-tool.
4. Ensure that all die segments are correctly inserted in the machine.

Page 10
H24/H32DC USER MANUAL EDITION III 2015-06-17
1. Locking pin
2. Die
3. Die change tool
3
2
1
1 Die size marking
2. Die set pin
3. QC - tool
4. Hole for QC Tool
3
2
1
4

Page 11
H24/H32DC USER MANUAL EDITION III 2015-06-17
4.6 Changing die sets with the QC-tool
The QC-tool allows you to change entire die sets in just one step.
1. Fully contract the dies together to zero (0). Insert the QC-tool in the holes for the
QC change tool in the contracted dies and then completely retract (return) the
dies. Insert the die set in its storage compartment (QC-rack or QC-stand) and turn
the tool counter-clockwise until it stops. Remove the tool.
2. Completely retract the die set.
3. Insert the QC-tool in the desired storage compartment and turn clock-wise until it
stops. Pull out the die set and mount them in the machine.
4. Contract the dies together until they click in place.

Page 12
H24/H32DC USER MANUAL EDITION III 2015-06-17
4.7 Crimping
1. Once the desired die set is mounted, place the hose application between the dies.
2. Press and hold the crimping button until the machine stops.
3. Press the retraction button until the application is freed.
4. Check the crimped hose and make adjustments if necessary.
5. Maintenance
5.1 Lubrication
The machine should be cleaned and lubricated every eight (8) operation hours. Retract the dies to
lubricate. Use a small brush to lubricate the cone-like surfaces in the cylinder. It is better to
lubricate sparingly and more often than seldom and excessively. Without lubrication, the machine
looses power and can damage the gliding surfaces.
Use only the lubrication recommended by Hydroscand Machine AB: Optimol viscogen 4
WARNING!
Pinch point! Keep hands
clear of the dies when
crimping!

Page 13
H24/H32DC USER MANUAL EDITION III 2015-06-17
5.2 Changing the oil
The oil should be changed once per year. Retract the dies. Fill oil to the mark on the oil stick. Use only
the oil recommended by Hydroscand Machine AB: ISO VG46
5.3 Calibration
If the actual crimping measurement differs too much from the set crimping measurements then cali-
brate the machine.
1. Insert a pipe/hose in the machine and crimp.
2. Measure the crimped application thoroughly.
3. Release the setting dial.
4. Turn the setting dial to the crimping measurement previously completed.
5. Return the setting dial.
6. Check. Repeat the procedure if the actual crimping measurement differs from the set crim
ping measurement.
A
19
23
25
26
4
2
24
27
6
37
17
7
3031 3632 3235
38
18
3
5
5
33
12
13
16
34
29
40 41
H32DC 12V Part no. 90280015
A (1 : 1)
15
22
14
33
9
1011
8
27
28
20
1
H32DC 24V Part no. 90280016
H32DC 12V RAL9023 Part no. 90280056
Pos.
Artikelnummer
Part number
Ritningsnummer
Drawing number
Description
Antal
Qty
1 90183644
D055110
Spacer
4
2 90270105
S055094
Crimping head H32
1
3 90270249
D055104
Side plate
1
4
90270226/
90270227
DC PACK
DC PACK 12V/
DC PACK 24V
1
5
90270288/
90270289
E0108
Push button closing/
Push button opening
2
6 90280007
S055033
Control device H32
1
7 90270248
D054013
Handle
2
8 90270814
D055111
DIN Rail L50
1
9 90190275
WEW_35_2
Endsupport WEW35/2
2
10 90190272
WDU_2_5
Terminal WDU 2,5
6
11 90190273
WAP_2_5-10
Endplate WAP 2,5-10
1
12 90270218
D055103
Plastic Cover DC
1
13 90270599
D054082
BASE H24/H32 DC
1
14 90270459
D055107
Cover Bracket
2
15 90270307 6043-06-06-hydroscand
T-skarv H32DC
1
16 90270460
D055108
Cover Bracket
1
17 90181371
Plastic cap
6
18 90270251
kopplingsdon part1
Stifttag G4A5M
1
19 90270303
Matarrör DC PACK
1
20 90270297
Hose H32
Hydraulic hose 3/8" 670 compl.
1
21 90270300 7002-06-06-hydroscand
3/8" x 3/8"
1
22 90270299 7204-08-06-hydroscand
Adapter 1/2"-3/8"
1
23 90270306
6118-06-02-Hydroscand
Banjo
1
24 90270305
6618-06-04-Hydroscand
Banjo
2
25 90270315 7017-06-02-hydroscand
Förminskning
1
26 90181762 5601-01-04-hydroscand
Rubber steel bonded washer
2
27 90270301
Matarrör horisontellt H32DC
1
28 90270302
Matarrör vertikal H32DC
1
29 90270351
Tätring 1-4
Tätring 1/4"
2
30 90175003
SC MC6S 6x30
4
31 90175002
WA BRB M6
4
32 90175031
NU LM6M M8 Locking
12
33 90175222
SC MK6S 5x10
19
34 90175007
SC MC6S 8x20
4
35 90175263
WA FBB M8
4
36 90175020
WA BRB M8
8
37 90175158
SC MC6S 8x40
8
38 90175294
SC MC6S 3x8
2
39 90270157
D055008
Protection cap H32
1
40 90270193
SC MK6S 6x12
8
41 90010423
T0105
Rubber foot
4
42 90180206
S061002
Die change tool
1
Drawn by
Approved by
Drawing size
Scale
Date
Part name
Drw. No.
PART LIST
QTY.
Rev. no.
Checked date
Revision information
Serialno.
Rev.
Material
2014-05-14
NH
H32 DC assy
0
1:2
A1
S055009
For messures without
tolerances ISO 2768-m
is applied.
General surface finish
is: ra 3,2
Sharp edges broken.
1 litre
2 liters
3 liters
4 liters

Page 14
H24/H32DC USER MANUAL EDITION III 2015-06-17
6. Trouble shooting
Problem
Machine starts but cylinder will
not move:
Low crimping force:
Inconsistent crimping
measurements:
Machine will not start:
1. Battery poles connected
incorrectly
2. Low oil level
3. Pump failure
4. Valve failure
1. Too-little lubrication
2. Low oil level
3. On/off valve not tightened
enough
4. Leakage
5. Poor oil quality
6. Pump leakage
1. Too-little lubricant
2. Setting dial lost its posi-
tion
1. Battery not connected
2. Battery must be charged
3. Fuse blown
Switch poles
Fill oil
Check/replace
Control/Change
Lubricate
Fill oil
Tighten
Tighten pipes
Change oil
Replace seals
Lubricate.
Perform calibration.
Connect
Charge/replace
Replace fuse
Reason Solution

DIMENSIONS H32DC:
Depth/ Width/ Height ......................... 420x540x400 mm
Weight ..............................................................115 kg
TECHNICAL DATA H32DC:
Crimping range in mm .................................. 10 - 87 mm
Crimping range in inch ..................................0,39 - 3,42
Crimping force in metric tons ...................................200
Crimping force in kN ............................................. 2000
Maximum hose size in inch ........................................2”
Die Set ............................................................... H32
Maximum travel of dies in mm ..............................33 mm
Master die Diam. /Length in mm ..........................99 / 80
Master die Diam. /Length in inches .................3,90 / 3,15
Machine control ..................................Micrometer Screw
Motor size in kW 12V /24V. ..................... 1,6 kW / 2,2 kW
Motor size in HP 12V / 24V. ............................... 2,1 / 3,0
Colour ................................................... Black / Orange
DIMENSIONS H24DC:
Depth/ Width/ Height ..........................450x520x370 mm
Weight ............................................................... 80 kg
TECHNICAL DATA H24DC:
Crimping range in mm............................ 10 - 61 mm
Crimping range in inch........................... 0,39 - 2,40
Crimping force in metric tons.............................140
Crimping force in kN.......................................1400
Maximum hose size in inch...............................1 ½”
Die Set ......................................................... H24
Maximum travel of dies in mm....................... 25 mm
Master die Diam. /Length in mm................... 84 / 80
Master die Diam. /Length in inches.......... 3,31 / 3,15
Machine control............................ Micrometer Screw
Motor size in kW 12V/24V..................1,6 kW / 2,2 kW
Motor size in HP 12V/24V............................2,1 / 3,0
Colour............................................. Black / Orange
Pungmakarbovägen 1, SE-783 90 Säter, Sweden
Phone: +46-(0)225-573 30 Fax: +46-(0)225-501 08
info@hydroscand-machine.se www.hydroscand-machine.se

Page 16
H24/H32DC USER MANUAL EDITION III 2015-06-17

Page 17
H24/H32DC USER MANUAL EDITION III 2015-06-17
Ersätter Dwg no.
A
B
30
1529
5
25
2
20
14
11
28
11
5
24 26
23
24
27
22
18
16
1 10
3 3
32 3133
H24DC 12V Part no. 90280012
H24DC 24V Part no. 90280013
H24DC 12V RAL9023 Part no. 90280037
A (1 : 1)
21
17
19
B (1 : 1)
4
13
12
30
30
7
9
8
6
Pos.
Artikelnummer
Part number
Ritningsnummer
Drawing number
Description
Antal
Qty
1 90270249
D055104
Side plate
1
2
90270226/
90270227
DC PACK
DC PACK 12V/
DC PACK 24V
1
3
90270288/
90270289
E0108
Push button closing/
Push button opening
2
4 90280006
S054026
Control device H24
1
5 90270248
D054013
Handle
2
6 90270814
D055111
DIN Rail L50
1
7 90190275
WEW_35_2
Endsupport WEW35/2
2
8 90190272
WDU_2_5
Terminal WDU 2,5
5
9 90190273
WAP_2_5-10
Endplate WAP 2,5-10
1
10 90270218
D055103
Plastic Cover DC
1
11 90270599
D054082
BASE H24/H32 DC
1
12 90270459
D055107
Cover Bracket
2
13 90270460
D055108
Cover Bracket
1
14 90181371
Plastic cap
6
15 90270251
kopplingsdon part1
Stifttag G4A5M
1
16 90270297
Hose H24
Hydraulic hose 3/8" 670
1
17 90270300
7002-06-06-hydroscand
3/8" x 3/8"
1
18 90270299
7204-08-06-hydroscand
Adapter 1/2"-3/8"
1
19 90181762
5601-01-04-hydroscand
Rubber steel bonded washer
1
20 90270295
S054028
Crimping head H24
1
21 90270391
7503-00-06-hydroscand R 3/8" insexplugg
1
22 90175002
WA BRB M6
4
23 90175041
SC MC6S 6x16
4
24 90175031
NU LM6M M8 Locking
12
25 90175007
SC MC6S 8x20
4
26 90175263
WA FBB M8
4
27 90175020
WA BRB M8
8
28 90175158
SC MC6S 8x40
8
29 90175294
SC MC6S 3x8
2
30 90175222
SC MK6S 5x10
19
31 90010423
T0105
Rubber foot
4
32 90270193
SC MK6S 6x12
4
33 90180206
S061002
Die change tool
1
Drawn by
Approved by
Drawing size
Scale
Date
Part name
Drw. No.
PART LIST
QTY.
Rev. no.
Checked date
Revision information
Serialno.
Rev.
Material
2014-05-12
NH
H24 DC assy
0
S054011_1
1:2
A1
S054011
For messures without
tolerances ISO 2768-m
is applied.
General surface finish
is: ra 3,2
Sharp edges broken.

Page 18
H24/H32DC USER MANUAL EDITION III 2015-06-17
A
19
23
25
26
4
2
24
27
6
37
17
7
3031 3632 3235
38
18
3
5
5
33
12
13
16
34
29
40 41
H32DC 12V Part no. 90280015
A (1 : 1)
15
22
14
33
9
1011
8
27
28
20
1
H32DC 24V Part no. 90280016
H32DC 12V RAL9023 Part no. 90280056
Pos.
Artikelnummer
Part number
Ritningsnummer
Drawing number
Description
Antal
Qty
1 90183644
D055110
Spacer
4
2 90270105
S055094
Crimping head H32
1
3 90270249
D055104
Side plate
1
4
90270226/
90270227
DC PACK
DC PACK 12V/
DC PACK 24V
1
5
90270288/
90270289
E0108
Push button closing/
Push button opening
2
6 90280007
S055033
Control device H32
1
7 90270248
D054013
Handle
2
8 90270814
D055111
DIN Rail L50
1
9 90190275
WEW_35_2
Endsupport WEW35/2
2
10 90190272
WDU_2_5
Terminal WDU 2,5
6
11 90190273
WAP_2_5-10
Endplate WAP 2,5-10
1
12 90270218
D055103
Plastic Cover DC
1
13 90270599
D054082
BASE H24/H32 DC
1
14 90270459
D055107
Cover Bracket
2
15 90270307 6043-06-06-hydroscand
T-skarv H32DC
1
16 90270460
D055108
Cover Bracket
1
17 90181371
Plastic cap
6
18 90270251
kopplingsdon part1
Stifttag G4A5M
1
19 90270303
Matarrör DC PACK
1
20 90270297
Hose H32
Hydraulic hose 3/8" 670 compl.
1
21 90270300 7002-06-06-hydroscand
3/8" x 3/8"
1
22 90270299 7204-08-06-hydroscand
Adapter 1/2"-3/8"
1
23 90270306
6118-06-02-Hydroscand
Banjo
1
24 90270305
6618-06-04-Hydroscand
Banjo
2
25 90270315 7017-06-02-hydroscand
Förminskning
1
26 90181762 5601-01-04-hydroscand
Rubber steel bonded washer
2
27 90270301
Matarrör horisontellt H32DC
1
28 90270302
Matarrör vertikal H32DC
1
29 90270351
Tätring 1-4
Tätring 1/4"
2
30 90175003
SC MC6S 6x30
4
31 90175002
WA BRB M6
4
32 90175031
NU LM6M M8 Locking
12
33 90175222
SC MK6S 5x10
19
34 90175007
SC MC6S 8x20
4
35 90175263
WA FBB M8
4
36 90175020
WA BRB M8
8
37 90175158
SC MC6S 8x40
8
38 90175294
SC MC6S 3x8
2
39 90270157
D055008
Protection cap H32
1
40 90270193
SC MK6S 6x12
8
41 90010423
T0105
Rubber foot
4
42 90180206
S061002
Die change tool
1
Drawn by
Approved by
Drawing size
Scale
Date
Part name
Drw. No.
PART LIST
QTY.
Rev. no.
Checked date
Revision information
Serialno.
Rev.
Material
2014-05-14
NH
H32 DC assy
0
1:2
A1
S055009
For messures without
tolerances ISO 2768-m
is applied.
General surface finish
is: ra 3,2
Sharp edges broken.

Page 19
H24/H32DC USER MANUAL EDITION III 2015-06-17
Control device
5
Crimp Valve
-
M
R1
+
6
Return ValveReturn
3
Forward/crimp
1
R1
2
4
F1
H24DC_12_24VDC
QTY. Material Date
PART LIST
Part name
Drw. No.
Scale
Drawn by
Approved by
Drawing size
Rev. No. Revision information
PY
Checked date
Serialno. Rev.
A3
Dimension
Weight
1
2014-03-20
Electrical drawing

Page 20
H24/H32DC USER MANUAL EDITION III 2015-06-17
3
Forward/crimp
4
+
2
Crimp Valve
-
6
R1
R1
M
Return Valve
5
Return
Control device
1
F1
1
20140-03-20
H32DC_12_24VDC
QTY. Material Date
PART LIST
Part name
Drw. No.
Scale
Drawn by
Approved by
Drawing size
PY
Rev. No. Checked date
Revision information
Serialno. Rev.
Dimension
A3
Weight
Electrical drawing
This manual suits for next models
1
Table of contents
Other HYDROSCAND Crimping Tools manuals
Popular Crimping Tools manuals by other brands

Tyco Electronics
Tyco Electronics PRO- CRIMPER III instruction sheet

HRS
HRS HT601/TM21P-88P operating instructions

molex
molex 57022 Series operating manual

Textron
Textron Klauke K 63 instruction manual

Klauke TEXTRON
Klauke TEXTRON K502 instruction manual

TE Connectivity
TE Connectivity 528008-4 operating instructions