Hi-Tec QUAD RACER 280 User manual

Operator’s Manual
Ready to Fly FPV Racing Drone

2 3
Introduction ........................................................................................................................................ 2
Warning and Safety Notes............................................................................................................ 3
Package Contents ............................................................................................................................. 4
Specications...................................................................................................................................... 4
Product Layout................................................................................................................................... 5
Getting Started ................................................................................................... ...............................7
Charging the Battery....................................................................................................................... 7
Charging the FPV Monitor............................................................................................................ 7
Install The VTX Antenna..................................................... .............................................. .............8
Attach the Monitor to the Transmitter ................................................................................... 8
Setting the VTX Frequency .......................................................................................................... 9
Attach the Propellers ...................................................................................................................... 9
Installing the Battery ....................................................................................................................10
Preparing for Flight .......................................................................................................................10
Powering on the Quad Racer 280............................................................................................11
Controlling the Quad Racer 280 ..............................................................................................12
Transmitter Mode Change..........................................................................................................13
Replacement Parts .........................................................................................................................14
Warranty and Service Information.........................................................................................15
Disposal and Prop 65 Warning.................................................................................................16
Regulatory Information...............................................................................................................44
Get ready to bring the raceway to the airways with your new Hitec Quad Racer 280
FPV multi-rotor! Our high-performance, styled-for-stealth quad is driven by four
2204 (2300KV) brushless motors for incredible speed and stability. With its 6-chan-
nel transmitter and 4.3”LED FPV monitor, you will experience real-time excitement
and exhilarating imagery. The ecient propulsion and lightweight frame of this
all-in-one, ready-to-y package allows you to enjoy lengthier ight times. FLY in the
blink of an EYE!
The QUAD RACER 280 is not a toy and is not suitable for use by children under the
age of 14. Additionally, the QUAD RACER 280 is an FPV racing type multi-rotor and
requires some skill to y. If you have never own an FPV racing type multi-rotor, it is
recommended you seek out help before attempting to y it on your own.
AWARNING: SPINNING PROPELLERS CAN CAUSE SERIOUS INJURIES
It is recommended that you wait to install the propellers until you are nished
setting up your drone and are ready to y.
Hitec RCD USA accepts no liability or responsibility for injuries or damages
incurred by the use of the QUAD RACER 280. OPERATE RESPONSIBLY!
Flying Safely
Recreational or commercial use? Using a drone in connection with a business is
considered to be commercial use by the FAA. This includes but is not limited to:
• Real estate, wedding or other photography
• Inspection or survey services
• Film or television production
Visit faa.gov/uas for more information. Go to knowbeforeyouy.org to stay up to
date on how and when you can y your drone.
Know Your Surroundings
Some municipalities prohibit the operation of remote controlled aircraft within
public spaces such as parks and school grounds. There are rules of the air you need
to know. Always check with local authorities before you y your drone and keep
the following in mind:
AAlways y below 400 feet
AAvoid ying over groups of people and stadium events
ANever y within 5 miles of an airport without contacting airport authorities and
the airport’s trac control facility
AKeep well away from emergency response eorts such as res
AAvoid ying near other aircraft
ABe aware of FAA airspace requirements faa.gov/go/uastfr
ANever y under the inuence
Battery Charging Safety
ANEVER LEAVE YOUR CHARGER UNATTENDED WHILE IN OPERATION.
ANEVER CHARGE ON OR AROUND COMBUSTIBLE MATERIALS.
ANEVER CHARGE A DAMAGED BATTERY PACK.
AIT IS HIGHLY RECOMMENDED THAT YOU KEEP AN OPERABLE “CLASS A” FIRE
EXTINGUISHER IN THE CHARGING AREA.
AFAILURE TO FOLLOW THESE WARNINGS CAN BE CONSIDERED NEGLIGENCE
BY THE OPERATOR AND MAY NEGATE ANY CLAIMS FOR DAMAGES
INCURRED.
INTRODUCTION
TABLE OF CONTENTS
WARNINGS and SAFETY NOTES

4 5
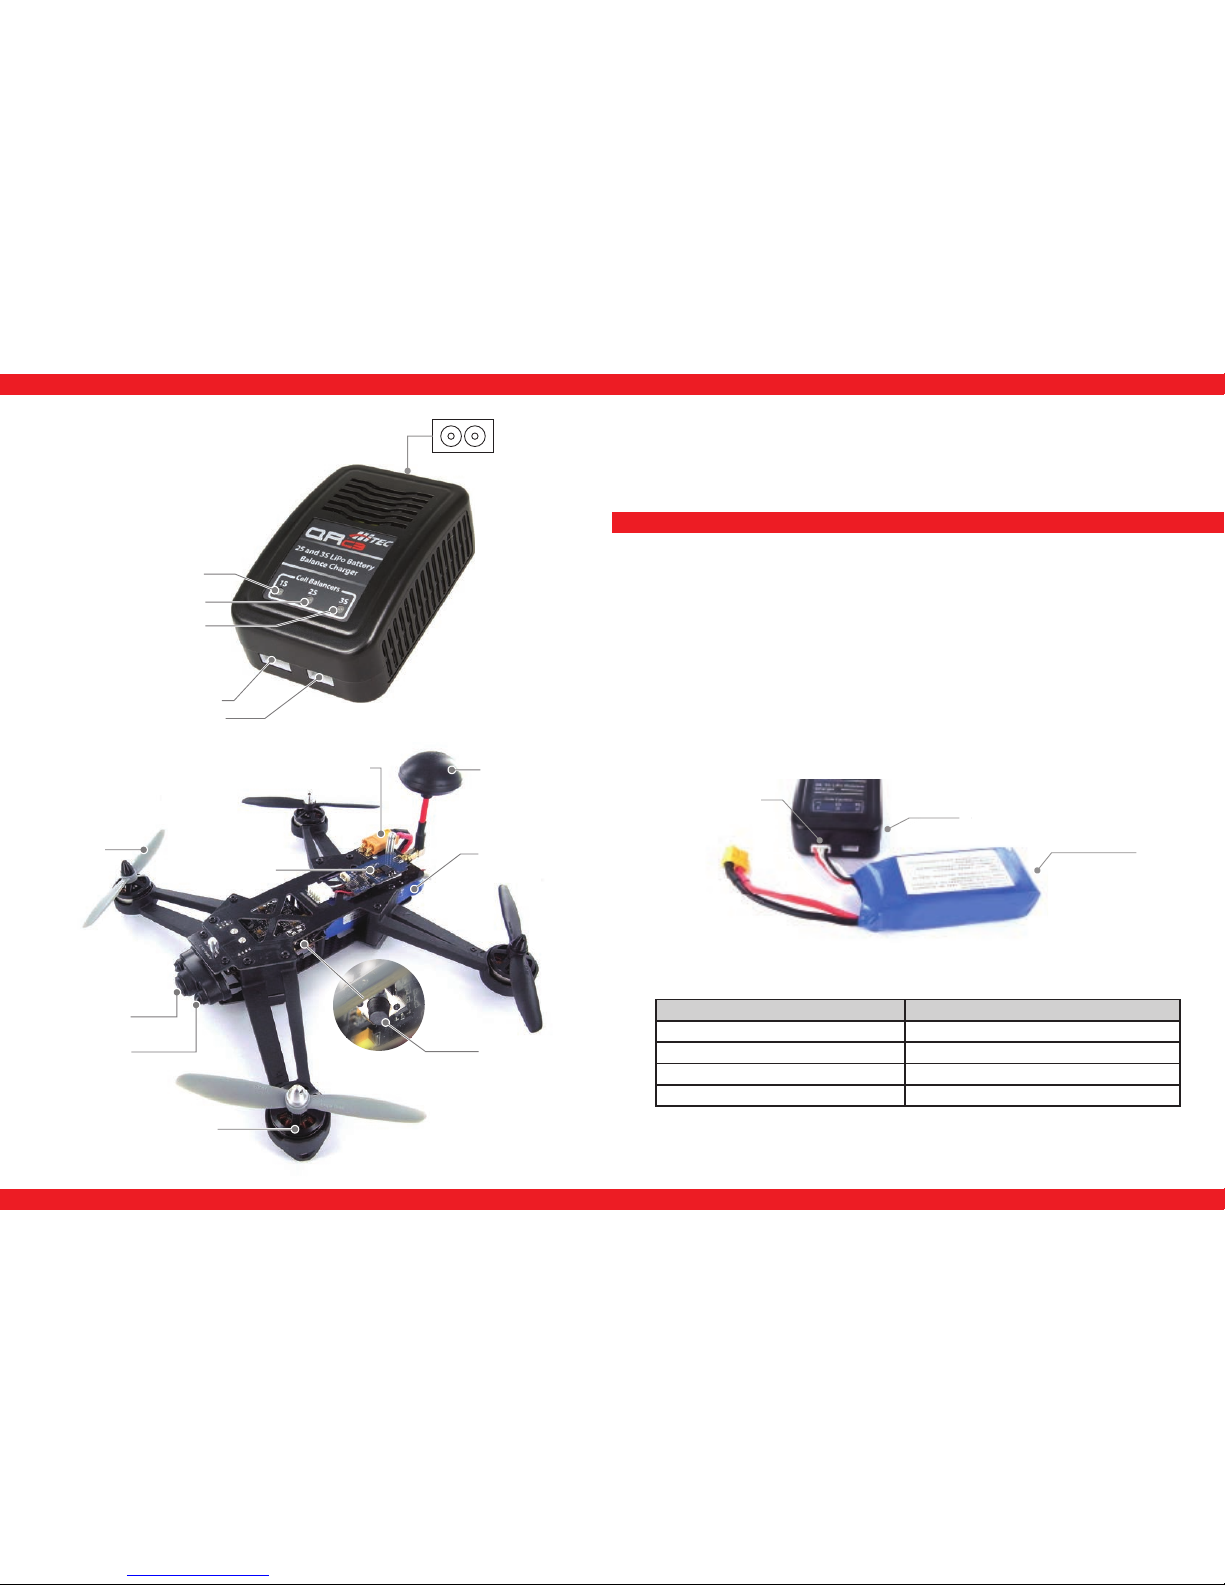
PACKAGE CONTENTS PRODUCT LAYOUT
1. Quad Racer 280 with preinstalled
Motors, Speed Control, Receiver,
Flight Control System, FPV Camera
and Video Transmitter.
2. Clear Paintable Canopy and Clips
3. Mushroom Antenna for VTX
4. 2 sets of Propellers (8pcs)
TRANSMITTER
Quad Racer
280 FPV Drone
Clear Paintable
Canopy
5.8G Video
Transmitter
Mushroom
Antenna
4.3” LCD FPV
Monitor
Monitor
Antenna 2.4G Transmitter
Propellers
(8 pcs)
LiPo Battery
Charger
2000mAh 3S
LiPo Battery
AA Battery x 4 L Wrench
Handle
Stabilization Switch
4.3” LCD Monitor w/5.8GHz
6 Channel Video Receiver
Responsiveness Switch
Right Stick
Pitch Trim
Roll Trim
Transmitter On/O
Switch
Left Stick
Throttle Trim
Yaw Trim
Bind Key
Antenna
Trainer Jack
Frequency Setting
DIP Switch
Battery Door
4 x AA Batteries
Mini USB
Charge Port
Video Out
Battery Indicator
VIDEO MONITOR
SPECIFICATIONS
5. 2000 mAh 3S LiPo Battery
6. 2.4 GHz 6 Channel Transmitter
7. 4.3” Video Monitor & Antenna
8. Battery Charger w/AC Power Cord
9. 4 x AA Alkaline Batteries
10. L Wrench
Size and Weight Flight Controller
Size Class 280mm IMU Invensense 6050 3 Axis Gyro +
3 Axis Accelerometer
Weight 405g w/o Battery
Power System CPU STM32FO31K4 32 bit ARM
Brushless Motors 2204 2300KV FPV System
Propeller Size 5 x 4 Video Camera 300K Pixels 135º Field of View
ESC Rating 12A cont. 17A Max. Video TX 25mw/200mw 5.8GHz
Battery 2000mAh LiPo Monitor 4.3”TFT LCD 480 x 272
Flight Time Up to 12 Minutes Channels 6 5.745~5.845 20Mhz Spacing
200mw
Mode
VIDEO TRANSMITTER
The video transmitter output can be set
at either 25mw or *200mw. The higher
output can improve video quality.
*WARNING: FCC LICENSE MAY BE REQUIRED TO USE THIS
PRODUCT. FPV Video transmitters with an output power
greater than 25mW require a HAM license to operate legally
in the USA. Go to the Amateur Radio Relay Network web page
at www.arrl.org. for more information.
6 7
5 x 4
Propellers
VTX Antenna
Arming Switch
2204-2330KV
Motor
LED Lights
FPV Camera
XT60 Battery
Connector
Video
Transmitter
Battery
PRODUCT LAYOUT (cont.)
DRONE
GETTING STARTED
Once you have unpackaged your Quad Racer 280 FPV drone, there are a few steps
to complete before you are ready to y. You need to charge both the power battery
and the video monitor battery, attach the propellers, mount the video monitor
and set the channel on both the VTX and video monitor. The following section will
guide you through the processes. Please follow the directions carefully to ensure a
successful rst ight.
CHARGING THE BATTERIES
Power Battery
The Quad Racer 280 includes a 3 Cell 2000 mAh power battery and the QRc3 AC
powered charger for charging it. Please use the following procedures in order to
safely and properly charge your power battery.
1. Plug the power cord into th charger and plug the other end into a 100-240V
wall socket. All LEDs will ash green and red indicating the charger is ready
to charge.
2. Insert the battery’s balance lead into the 3S charging port on the front of the
charger. After a couple of seconds, the charger will detect the voltage in the
battery and commence charging.
3. When charging, all 3 LEDs should be illuminated red. Once all 3 LEDs are
illuminated green, the charge process is complete.
NOTE: If you unplug the battery while charging, the charger stops automatically.
Charger
3S LiPoBattery
3S LiPo
Charge Port
Your connection should look like this when charging your battery
LED Indicator Cause of Error
All LEDs ash red once in 1 second intervals The battery is connected incorrectly
All LEDs ash red twice in 1 second intervals There is an overload situation or short circuit
All LEDs ash red 4 times in 1 second intervals The voltage of a single cell is too high or too low
All LEDs ash red 6 times in 1 second intervals Indicates a 300mv voltage dierence in the pack
Error Messages: If the charger encounters a problem, all LEDs will ash red in some type of
sequence. If this happens, immediately disconnect the battery and AC power cord.
FPV Monitor Battery (charger not included)
The FPV monitor contains an internal rechargeable battery that can be charged
using a Mini USB charger like those used for cell phones. An LED indicator light will
glow red while charging, changing to green when fully charged.
3 Cell Balance Port
2 Cell Balance Port
Cell 1 LED Indicator
Cell 2 LED Indicator
Cell 3 LED Indicator
100-240V
AC Input
LiPo CHARGER

8 9
INSTALL THE VTX ANTENNA
To install the video transmitter antenna, rst screw the antenna into the transmitter. Once
the antenna is on, use a small wrench to tighten it 1/4 of a turn. DO NOT OVER TIGHTEN.
ATTACH THE MONITOR TO THE TRANSMITTER
Attach the antenna to the monitor Place the monitor on the
transmitter mount
Insert the screw and tighten the nut
The Quad Racer 280 comes with a high resolution monitor that conveniently at-
taches to the monitor.
With monitor in place, now install the 4 AA
batteries in the transmitter.
SETTING THE VTX FREQUENCY
The frequency of the video transmitter and monitor are set at the factory. If you
need to change the frequency, to avoid interfering with other users, you can do this
by using the DIP switches on the transmitter and monitor. Only the rst 3 switches
are used to change the frequency; the fourth switch does nothing.
NOTE: Both the Transmitter and Monitor must be on the same frequency.
1 2 3 Frequency
CH1 OFF OFF OFF 5.845 GHz
CH2 ON OFF OFF 5.825 GHz
CH3 OFF ON OFF 5.805 GHz
CH4 ON ON OFF 5.785 GHz
CH5 OFF OFF ON 5.765 GHz
CH6 ON OFF ON 5.745 GHz
ON
OFF
CAUTION: You should be aware of local regulations before ying your Quad Racer
280. Transmitting outside a legal band may be prohibited in your area.
ATTACH THE PROPELLERS
CAUTION: Never work on the motors or propellers while the battery is
plugged in. Propellers are sharp and can cause injury or damage. It is best to
completely remove the battery while installing the propellers.
To install the propellers correctly, you must match the propeller direction with the
direction marking on the arm. The picture below shows the proper way to mount
the propellers.
A B
CD
Silver Nut
Black Nut
Silver Nut
Black Nut
L Wrench
To tighten the
propellers, insert the
included L wrench
into the hole in the
nut and turn.

10 11
INSTALLING THE BATTERY
Now plug in the battery as shown in the
picture to the right.
CAUTION: Once the battery is plugged in,
the system is powered up. Use care when
handling to avoid injury.
Install the battery by sliding it into the battery compartment. Thread the Velcro
strap through the slot in the bottom and pull tight.
PREPARING FOR FLIGHT
With everything assembled, it’s time to prepare for your rst ight. Replace the
canopy and secure it with the two clips. For your rst ight, we recommend the
RESPONSIVENESS be set to “Mild” and the STABILIZATION be set to high. You can
change this once you become familiar with how the Quad Racer 280 handles in
ight.
PREFLIGHT CHECKLIST
1. Is the Power Battery fully charged?
2. Are the transmitter batteries full? (Never y when the low indicator is lit)
3. Are the VTX and Monitor on the same frequency?
4. Do you have a clear area free of obstacles to y in?
5. Do you understand the methods of controlling the drone?
6. Make sure others are clear of the drone before starting the motors.
POWERING ON THE QUAD RACER 280
Now that you’ve completed your preight checklist you are ready to y. It is im-
portant to read through the next two sections prior to actually ying so that you
understand the power on sequence, the drone starting procedure, as well as how
the transmitter controls aect your control of the drone.
POWER ON SEQUENCE: It is important to use the proper power on sequence, as
failure to do so may result in injury to yourself and damage to your drone. The
following describes the proper steps to power on your drone.
3. Turn on the Quad Racer 280
4. Starting and Stopping the Motors
A common start command is used to start the
Quad Racer 280. To execute the command,
move both sticks to the lower center position as
shown until the motors start.
Once the drone has landed
hold the throttle to the lowest
position for 10 seconds and
the motors will stop.
1. Turn on transmitter 2. Turn on the FPV Monitor
Push the arming switch to
turn the QR280 ON.
Push and hold the arming
switch for more than
5 seconds to turn the
QR280 OFF.
12 13
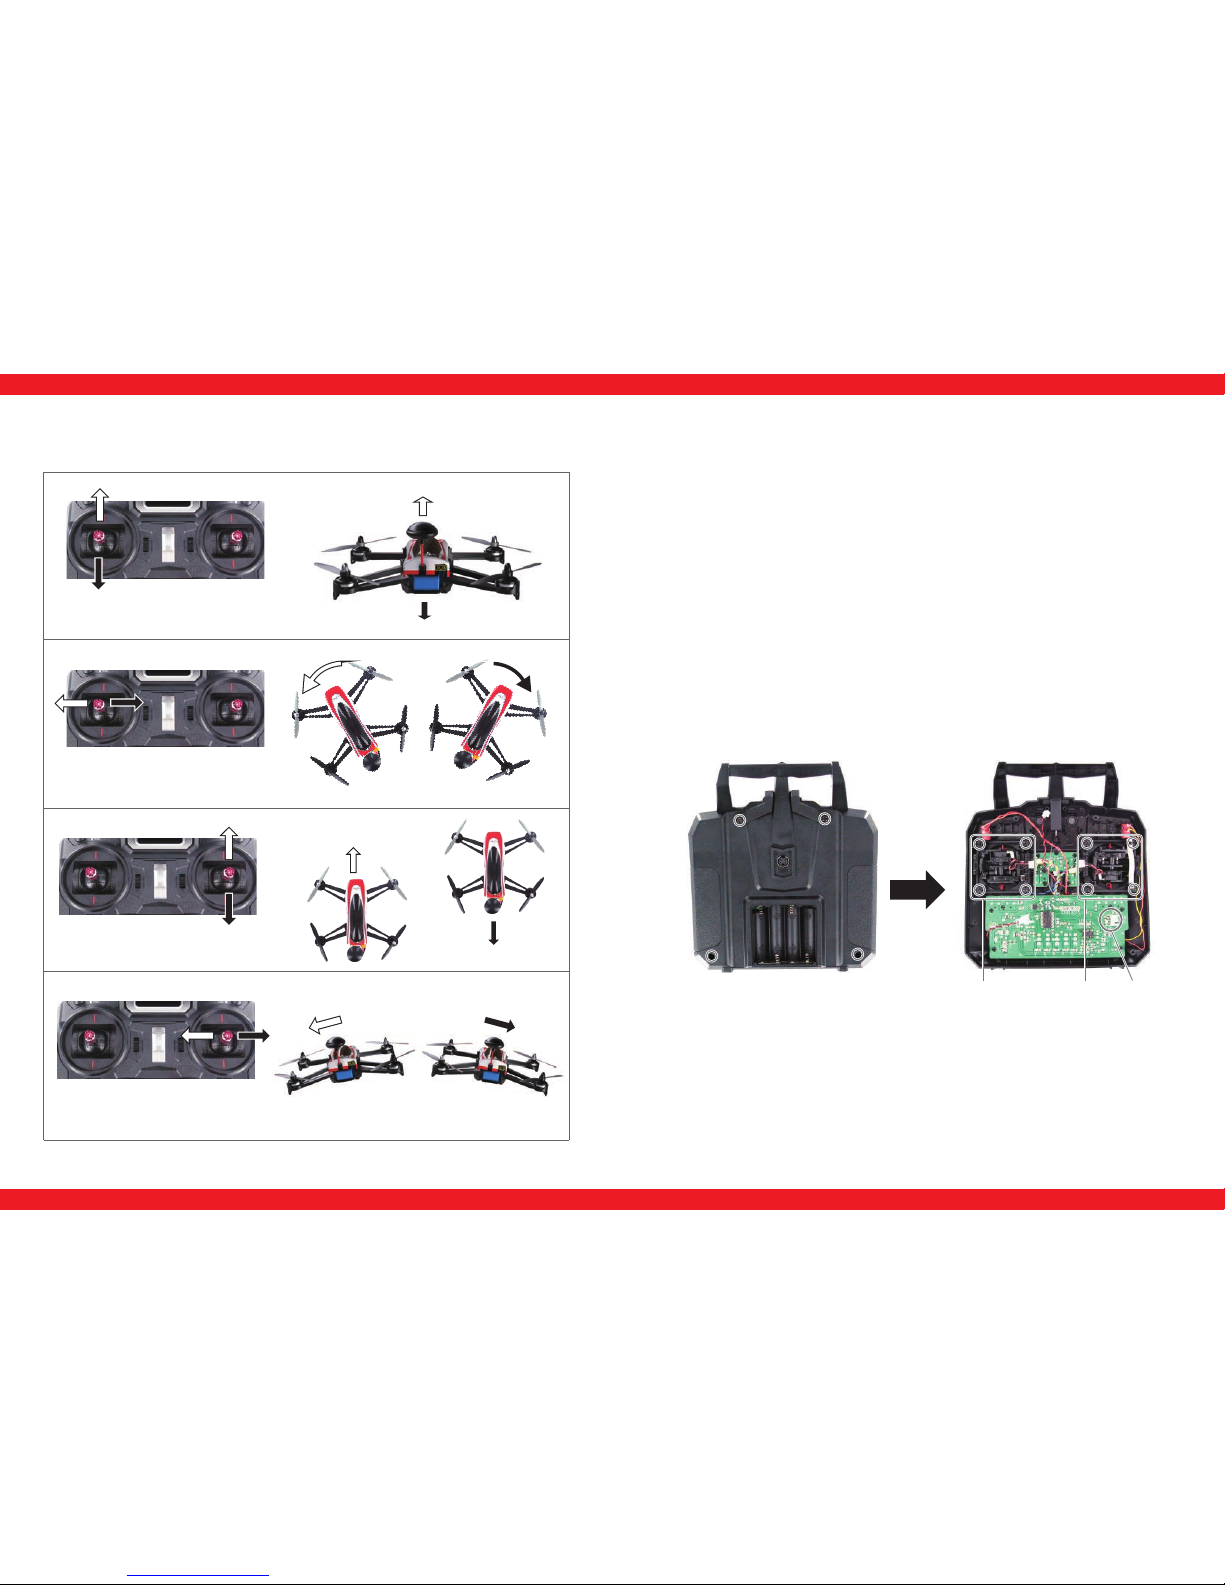
The Quad Racer 280 includes a transmitter setup as Mode 2 where the Throttle and
Yaw controls are on the left control stick and the Pitch and Roll controls are on the
right control stick. The images below explain how each stick movement aects the
control of the drone.
CONTROLLING THE QUAD RACER 280
Altitude Control
Yaw Control
Pitch Control
Roll Control
Push the left stick forward to
increase the altitude or pull it
back to decrease the altitude.
Moving the stick left rotates the drone
left on its vertical axis moving the
stick right rotates the drone to the right.
Moving the stick forward
makes the drone move forward, pull
back on the stick to move backwards.
Moving the stick left rotates the drone
left on its horizontal axis moving the
stick right rotates the drone to the right.
WARNING: It’s best to use minute control inputs until you become familiar with the
ight characteristics of the Drone Racer 280.
TRANSMITTER MODE CHANGE
Some users may want to use the transmitter in Mode 1 conguration rather than
the standard Mode 2 that is the normal conguration. The following instructions
outline how to change the transmitter from Mode 2 to Mode 1.
1. Remove the batteries. Then, using a screw driver, remove the four screws on
the back of the transmitter (Figure 1).
2. Gently unplug the battery and trainer cable from the back of the transmitter
case and set the back aside.
3. Identify the S16 jumper on the right side of the transmitter, in stock. In normal
Mode 2 conguration the jumper is on the L side. Remove the jumper and
replace it on the R side.
4. Using a small Phillips screwdriver, remove the eight screws holding the gimbal
assemblies in place.
5. Now switch the positions of the gimbals, while being careful not to damage
the wires. Secure them by replacing the eight screws.
6. Plug the battery and trainer cables back in to the back of the transmitter case
and replace the four screws securing the back of the transmitter. Replace the
batteries.
7. Turn on the transmitter and move the stick to check for proper operation.
Figure 1
Figure 2
Remove the 4 screws
from back of the transmitter Right Gimbal
Assembly
Left Gimbal
Assembly
S16
In Mode 1 conguration the sticks control the following functions
Left Stick
Left or right movement controls the Yaw
Back or forward movement controls the Pitch
Right Stick
Left or right movement controls the Roll
Back or forward movement controls Altitude

14 15
ONE YEAR LIMITED WARRANTY
For a period of one year from the date of purchase HITEC RCD USA, INC. shall
REPAIR OR REPLACE, at our option, defective equipment covered by this warranty,
otherwise the purchaser and/or consumer is responsible for any charges
for the repair or replacement of the Quad Racer 280. This warranty does not
cover cosmetic damages and damages due to acts of God, accident, misuse,
abuse, negligence, improper installation, or damages caused by alterations
by unauthorized persons or entities. This warranty only applies to the original
purchaser of this product and for products purchased and used in the United States
of America, Canada and Mexico. Plastic cases are not covered by this warranty.
THIS WARRANTY IS IN LIEU OF ANY AND ALL OTHER WARRANTIES, WHETHER FOR
MERCHANTABILITY OR FITNESS FOR A PARTICULAR PURPOSE AND WHETHER
EXPRESS OR IMPLIED. REPAIR OR REPLACEMENT AS PROVIDED UNDER THIS
WARRANTY IS THE EXCLUSIVE REMEDY. HITEC RCD, INC. SHALL NOT BE LIABLE FOR
ANY INCIDENTAL OR CONSEQUENTIAL DAMAGES FOR BREACH OF ANY EXPRESS
OR IMPLIED WARRANTY RELATING TO THIS PRODUCT. EXCEPT TO THE EXTENT
PROHIBITED BY APPLICABLE LAW. ANY IMPLIED WARRANTY OF MERCHANTABILITY
OR FITNESS FOR A PARTICULAR PURPOSE ON THIS PRODUCT IS LIMITED IN
DURATION TO THE DURATION OF THIS WARRANTY. REPAIR AND SERVICE.
To have your Quad Racer 280 serviced:
1. Visit the Hitec website at www.hitecrcd.com and download the service request
form (under Support section).
2. Fill out the service request form completely and include a copy of your original
receipt showing the purchase date.
3. Package your product in its original packaging or use a suspension-type
packaging (foam peanuts or crumpled newspaper). Hitec RCD shall not be
responsible for goods damaged in transit.
4. Ship prepaid (COD or postage-due returns will not be accepted) via a traceable
common courier (UPS, insured parcel post, FedEx, etc.) to:
Hitec RCD USA, Inc.
Customer Service Center
12115 Paine St.
Poway CA 92064
WARRANTY and SERVICEREPLACEMENT PARTS
Motor Arm Set #61117 Motor CW #61118
Motor CCW #61119
Propeller Set # 61128
Speed Controller Board
#61120
Receiver Flight Control
Unit # 61128
Top CF Board w/PD
#61123
Bottom CF Parts #61124 Plastic Parts Set # 61141 Screw Set #61130
VTX Antenna #61126 Video Transmitter #61122 Camera Assembly #61121
Propeller Nuts #61142 Clear Canopy #61127 Canopy Mounts #61143
Power Battery 2000mAh 3S LiPo #61125

16
This symbol indicates that when this type of electronic device reaches
the end of its service life, it cannot be disposed of with normal household
waste and must be recycled. To nd a recycling center near you, refer to the
internet or your local phone directory for electronic waste recycling centers.
STATE OF CALIFORNIA PROPOSITION 65 WARNING:
This product contains chemicals known to the State of California to cause cancer.
Use caution when handling this product and avoid exposure to any electronic
components or internal assemblies.
REGULATORY INFORMATION
FCC Information
Transmitter
Manufacturer: FlySky Co, LTD
Model Name: FS-i4
Operating Frequency: 2.4 GHz
FCC ID: N4ZFLYSKYI4
Video Transmitter
Manufacturer: SKYRC Technology Co. LTD
Model Name: SOKAR
Operating Frequency: 5.8 GHz
FCC ID: REY-SOKAR
These devices comply with part 15 of the FCC Rules. Operation is subject to the following
two conditions:
1. This device may not cause harmful interference.
2. This device must accept any interference received, including interference that may cause
undesired operation.
Drone Registration
At the time this manual was printed users of drones like the Quad Racer 280 are
required to be registered with the by the FAA. For more information visit the regis-
tration website at http://federaldroneregistration.com/.
Copyright 2016 HItec RCD USA, Inc.
12115 Paine St. Poway, CA 92064
(858)748-6948
Table of contents
Other Hi-Tec Drone manuals


