HIDfast HIDfast Series User manual

InstallationManual
2
The HIDfast DeckingSystemwas designedandbuilt for Professional Deck Builders.
This system should onlybe used by qualified and trained deck professionals,it
should not be used by untrained do-it-yourselfers.
WARNING:Alloperatorsof this power tool should read and understand all toollabels,installation
manuals,owner smanuals,and packaging information before connecting the toolto an
airsupply. It isthe operatorsresponsibilitytolearn how to workwith apower tool before
connecting the power supply. If anoperator is unsure or uncomfortableusing a power
tool, STOP,donot continue.
DANGER:Failureto operate orworkwith power tools responsiblycan resultin seriousinjuriesto the
operator,or anyone withinthe workarea. Keep othersout ofthe workarea whenever
possible. Nohorseplay.
Operator and othersnearbymustwear safety glasses,ear protection and a hard hat.
Usethis toolfor installing deckboardsonly,do not usethe tool foranything other than
standard decking materials.
WARNING:This toolhasa safetytrigger inthe handle, this triggermustbe depressed inorder to
lightlyhammerstrikethe blackrubber deflector cap, this deflector isthe trigger to fire the tool.
WARNING:Doing this willtrigger the tool to fireafastener, do this onlywhen the toolis on a work
surfacethat isreadyto be fastened.
AIRPRESSURE DRIVES THEFASTENER,NOTTHE TRIGGER,NOHARDHITSNECESSARY.
WARNING:Failureto pullthe safetytrigger before striking the deflector couldcauseseriousdamageinsidethe
tool.
WARNING: Never pullthe trigger unless the tool is on aworksurfacethat isreadytobefastened.
Keep your handsand bodyawayfromthedischarge area ofthe tool.Neverpoint the tool at
yourselfor others.
DANGER:Do not use oxygen, combustiblegases,or bottled gasesas a power source for this tool astool
may explode, possiblycausing seriousinjury.
DANGER: Do not usean airsupplywhichcan potentiallyexceed 200 psi.
DANGER: Do not usethe toolnear highlyflammable, combustible, or explosivegases,vapors,fumes,
fluidsor anyotherhighlyflammablematerials.
WARNING: Connectthe tool toaclean regulatedairsupplywith acoupling that removesallpressure
from the toolwhenthe coupling isdisconnected.
WARNING: Alwaysdisconnectthe airsupply,before making adjustments,servicingthe tool,clearing
ajam, when tool is not inuse, or when moving to adifferent workarea.
Neverusea tool that is leaking air, hasmissing ordamaged parts. Alwaysmake sure
allscrewsand capsare tight.
Donot use the tool ifthe triggerisinoperable, broken ormissing, do not alter thetool,or
safetiesinanyway.

3
Beforeinstalling anydecking boards,checkalldecking manufacturerrequirements,spacing between board
width and length, ifyou are using wood decking, itmayneed to have asealer coat on allsurfacesand ends
before installing. 304 stainless steel fastenersare not covered byanywarrantyforcoastal,or ocean projects.
Adjustthe footplate to the decking thickness.Ifyou are using agrooved deckboard you maywant to purchase
our optional,adjustable JoistAttachment.See Factory pre-grooveddecking formore information.
Loading fasteners
Pullbackon pusher until itlocksat the end ofthe magazine, awayfromthe
driver. Load fastenersinto the top ofthe magazine (2 clipsof 25pcs)then
releasethe pusher fromthe end ofthe magazine bypulling backand pinching
the two raised tabson the pusher.
Oil the tooleachdaybefore connecting airsupply,and againafterevery1000
shots(3 to5 drops).
WARNING!
Tool must be on aworksurface when connecting the airsupply, Do not hold.
Alwayscheckthe strikefire trigger cap to see that itis inthe up position before connecting airsupply.Do not
point the toolat yourself, anyone else, or anything ofvaluewhen airsupplyis connected. Makesure that there
are no people, or valuablesunder the deckthat you are working on.
Alwayscheckairpressure before connecting airsupplytothe tool,tool hasamax operating pressure of 120 psi.
Placeyourfirstdecking board againstthe houseand install screwsinthe edge closestto the house.
Placeascrew at everyjoist.
Makesure your firstboard isperfectlystraight when fastening.
Placethe toolagainsttheedge ofthedecking that is awayfromthe housewall.
Makecertainthat the foot plate ofthe toolissetting flat on the decking surface.
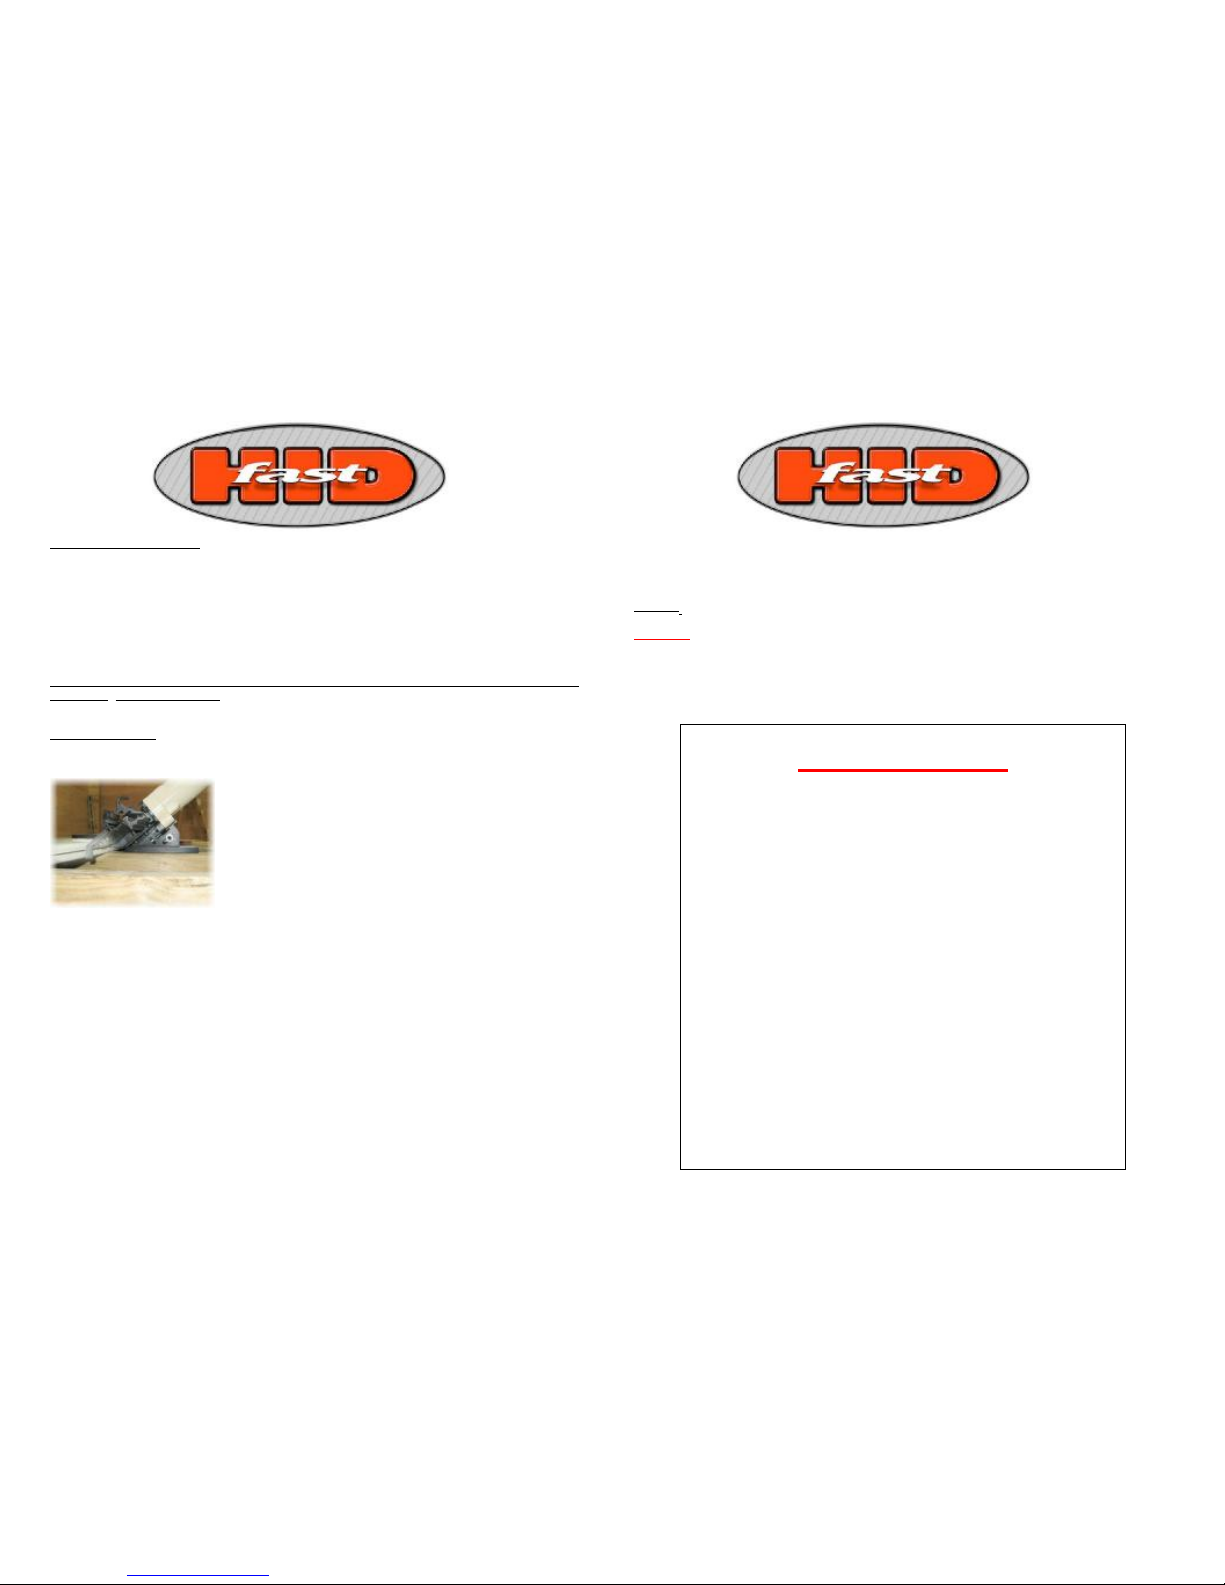
Step on the plate to holdthe toolinproper position. Depress the handlesafetytrigger
and lightlystrikethe rubber deflectorcap. Install afastener at everyjoistalong the
deckingedge.
Alwaysfasten from one side to the other. You can set ajoist pindown on either side
of the joist. This pinactsasa stop againstthe joist.
Just slide it to theside and contactthe joist.
Tomovethe pinup or down you willneed to turn the pinsideways,and the pullup
or push itdown, then turn it tolock.
Onlywhen the tool is inthe proper position and readyto fasten decking materialdo
you touchthe trigger cap.
Do not fire the toolmorethan onceinthe samelocation,
Alwaysstart with alow airpressure setting and workthe psi up untilyou get the
proper set of the fastener. This will saveon airconsumptionwhen you useonlythe
minimumneeded.
Useonlythe dead-blow mallet suppliedwith tool to actuatethe trigger cap. Strikethe cap with amediumforce
to start with. This willshow that your psi is set properly.Then you maylessenthe forceuntilthe it is justenough
to drive the fastener correctly.
4
If the fastener is set correctlythe verticalspacer portion ofthe fastener will be slightly
touching the edge ofdecking when driven.
If afastener isnot set inenough, you canplaceanail set on the drivehead ofthe
fastener and strikewith a hammer until the correctset is reached.
Whenall fastenersare driveninto the lead edge ofdecking, the spacer and short
pointsofthe fastener willbe facing the backedge ofthe nextboard to be
installed.
There are a few optionswhen installing a square edge board onto the short
points.
Driveon
Start from one end again. Line up thenextboard to driveon, and pushthe board
againstthe short points. Now placeyour feet on the board that is to be installed.
Your feet shouldbe at the first two pointsat the starting edge. Now with the
supplied mallet, strikethe leading edge ofdecking board squarelyon the edge to
drivethe decking onto the firsttwo pointsonly.Then moveyour feet to the next
two points,and strike the edge ofdecking, alwayshit backtowards the starting
point, neverstrikedecking at, or ahead ofyourfeet. Your feetmustalwaysbe
ahead of yourmalletstrike. Onlyat the start and end pointsdo you strikethe
decking edge at yourfeet. Repeat until the deckiscomplete. The speed inwhich
you drivethe decking is up to you.
Line up, mark and drill
This method is used when the decking materialmaybe hard todriveonto theshort points.
Start from one end again. Line up thenextboard to install. Pushthe board against the short points.
Whilestanding on the board that istobe installed, lean overand markthe short point locations,alwaysmarkthe
pointsthat are closeto yourfeet. Workfrom one end to the other. Onceallpointsare located you can drill them
to your desired depth. If you want alargergap between decking boardsyou can drill ashallow pilothole. Drill
diameter shouldbe around seven sixty-fourths.Alwaysdrill holesslightlyhigher inthe edge ofthe decking, this
willpushthe decking downtight to the joist, when the decking ispushed onto short points. When the deckingis
set onto the short points,you can now drive fastenersinto the lead edge ofdecking with yourHIDfastDecker.
Installone fastener at eachjoist.
Line up, mark and cut slots or grooves
This method is alsoused when the decking material maybe hard todriveonto theshort points.
Usethe same instructionsasabove. Cut aslot instead ofdrilling ahole. Cutting slotswill giveyousomeend to
end adjustment for positioning decking beforeinstalling fastenersinthe leading edge.
5
Factory pre-grooved decking
You shouldpurchaseour adjustablejoistattachmentwhen installingthis type ofdecking material.
This attachmentwill allow you to adjustto almost anygrooveheight, inafine increment. This attachment will
boltontothe lower housing of the tool.Use the tapped holesintheouter lobs.See the instructionsthat come
with the attachment formounting and adjusting.
You mustdrivethe fastener so that itsetsat the properheight forthe on coming backgrooveofthe nextdeck
board.
Whenthe fastener isset correctlyyou will haveto push the nextdeckboard grooveunder the short pointsofthe
fasteners.This shouldtake reasonableforce. This will keep the decking tight to the joist.
Alwaysmakesure that the short pointsare pushing down on the groovewhen pushing boards on.
For angled decking installations, butt jointsand deckboard replacements, pleasevisit our website for all Video
instructions. www.hidfast.com
Framing tips&other
Alwaysusethe straightest joistpossible. Use lumber withsquare edge, no edges missing.
Framewith your carrying beamunder yourjoistinstead of at the end of
joist. Beamattheend willrequire stainless steel joisthangersat everyjoist,
and this is aslower method. Placing your beamunder willallow you to set
your joiston top and overhang the joist. Youcan installdeckingfromthe
houseout. When you reachthe end ofthejoist, measure sothat you will
finishwith afullpieceofdecking. Cutjoistendsto length, add your rim
joist, and the lastpieceofdecking.
Alwaysplaceabraceto holdyour deckframesquare untilall decking is
installed.Then you can removeit.
Installbridging onlong joistspans.
Usea chalk-line toset your firstdecking board straight.
Usea stainless steeltrim head screw to start at the housewall, orat anyfixed obstruction in, orat the deck.
Checkgap between boards for consistency.
Checkeveryfew boardsto ensure that decking isalwaysstraight, open or closegap to regainstraightness.
Makecertainthat the decking is alwaystight to thejoist.
Wheneverpossiblecut your firstboard tothe length needed, and then let the remaining boardsrun long sothat
you maysnap achalk-line and cut all endsat once.
Alwaysworkfrom small tight areasinto larger open area.
If youuseadecking board with abow or crookalwaysstart with one end in, and let the otherend hookout. You
can workthe other end inasyou go. Never installwith the two endsinand the bow out inthe middle.You will
not be ableto pullthe middlein.
6
Alwayscheckwith decking manufacturer forproper gaping ofdeckboard ends.Compositesand other plastics
willmovewith the change intemperature.The longerthe piece,themore itwill expand and contract.
Wooddecking will expand and contractdue tomoisture, alwayscheckmanufacturersrequirements.
Tool tips,
Oil the tooldaily.
WARNING!
Never point the toolat anyone, or atanything other than asurfacetobe fastened.
Stayawayfrom the trigger cap when the airsupplyisconnected. Do not bumpit.
Do not leavethe tool unattended with the airconnected.
There shouldbe no peopleor valuablesunder adeckthat you areworking on.
WARNING!
Read OperatingInstructions
Alwaysbecomefamiliar withall theinstructionsand warningsbeforeoperatinganypowertool.
Alwayswearapproved eyeprotection
Impactresistanteyeprotection shouldmeet orexceedthestandardsasset forthinthe United
States ANSIZ87.1,
SafetyInstructions
The instructionsare furnished asgeneral guidelinesfor useofyour pneumatictool.
Whenoperating pneumatictools itis ofthe utmostimportancetothinksafetyfirst.
Disconnect tools fromthe airsupplywhen changing accessoriesor when the toolis not in
use. Useeyeprotection. Putting afew dropsof airtooloilinthe tooland running fora
few seconds at the end ofadaywillhelpprotectinternalparts.Follow alloperating
instructionsand operate tool inaccordance with the ANSIB186.1safe operating code.
Tool Applicationand Usage
Portabletools shall beused onlyforthe purposesintended intheirdesign and withinthe
capacityfor which theywere intended and rated. Itshallbe the toolownersand/or
employersresponsibilityto instructeachoperator inthe safe useofthetool.
Tool Maintenance
Itshallbe the toolownersand/or employersresponsibilitytoassurethat tools are
maintained inasafeoperation condition. Toolmaintenanceand repairshall beperformed
byauthorized, trained, competent personnel.

7
Quick reference for psisettings needed indifferent material,
in some cases more or less maybe required.
Cedar MahoganyComposite Ipe-grooved only
Redwood PVC Grooved only(80 to 100)
Cypress (70 to 90) (70 to 100)
Fir
(50 to 70)
Troubleshooting, 1 2
Fastenernot drivenin raisethepsi,decking istoo hard,usegrooveddecking
Fastener issettodeep,lowerpsi
Fastener istohigh,adjustthefoot plateup,or joistattachmentdown.
Fastenertolow, adjust thefoot platedown, orjoist attachmentup.
Decking notflat,notstanding on,ornotdriving decking onproperly,
see instructions,and website.
Fastenerdosenotfire,check magazine for blockage,check clipsforflatness,dose
pusherhavespring pressure,can tfind problemcall forservice.
Popular Nail Gun manuals by other brands

Metabo HPT
Metabo HPT NR 3675DD Instruction and safety manual

EXTOL PREMIUM
EXTOL PREMIUM 8894580 Translation of the original user manual

DeWalt
DeWalt XR Li-Ion DCN680D2 Original instructions

Performance Tool
Performance Tool M643 owner's manual

Hitachi
Hitachi VH650 - Fencing Nailer, Full Head instruction manual

Parkside
Parkside PET 25 B1 Operation and safety notes


