HIGH ONE 976380 User manual

976380
Ventilateur de table
Table Fan
Tafelventilator
Ventilador de mesa
CONSIGNES D'UTILISATION ....................02
INSTRUCTIONS FOR USE ....................10
GEBRUIKSAANWIJZINGEN ....................16
INSTRUCCIONES DE USO ....................24
2/2 10/2022-01
x3

2
FR
Merci !
Merci d’avoir choisi ce produit HIGHONE.
Choisis, testés et recommandés par ELECTRO DEPOT,
les produits de la marque HIGHONE vous assurent
une utilisation simple, une performance fiable et
une qualité irréprochable.
Grâce à cet appareil, vous savez que chaque utilisation
vous apportera satisfaction.
Bienvenue chez ELECTRO DEPOT.
Visitez notre site Internet: www.electrodepot.fr
www.electrodepot.be
VOTRE AVIS COMPTE !
PARTAGEZ
VOTRE EXPERIENCE
SUR LES PRODUITS
Parce que votre satisfaction est notre priorité, nous vous proposons
de donner votre avis sur ce produit. Il sera transmis et analysé par
nos équipes afin d’améliorer continuellement le produit.
Donnez votre avis sur http://www.electrodepot.fr/avis-client

3
FR
Table des matières
Les notices sont aussi disponibles sur le site
http://www.electrodepot.fr/sav/notices/
http://www.electrodepot.be/fr/sav/notices
AAperçu de l’appareil
CNettoyage et
entretien
BUtilisation de
l’appareil
Assemblage
Utilisation
Nettoyage et entretien
Rangement
Description des pièces
Aperçu de l’appareil
Utilisation prévue
Caractéristiques

4
FR
Description des pièces
Aperçu de l’appareil
A
Aperçu de l’appareil
Utilisation prévue
•
Déballez l’appareil. Retirez toutes les étiquettes de l'appareil. Vérifiez qu’il est au complet
et en bon état. Si l’appareil est endommagé ou défectueux, ne l’utilisez pas et rapportez-
le à votre revendeur ou au service après-vente.
•
Conservez tous les emballages hors de la portée des enfants. Il existe un risque d’accident
si les enfants jouent avec les matériaux d’emballage.
•
Cet appareil est conçu exclusivement pour un usage domestique et ne doit pas être
destiné à un usage commercial, industriel ou en extérieur. Cet appareil a été conçu pour
faire circuler de l’air et créer une ventilation dans le cadre d’une utilisation en intérieur.
Utilisez cet appareil dans une pièce à l’atmosphère sèche et dotée d’une aération adéquate.
•
Toute autre utilisation est susceptible d’endommager l’appareil ou de provoquer des
blessures.
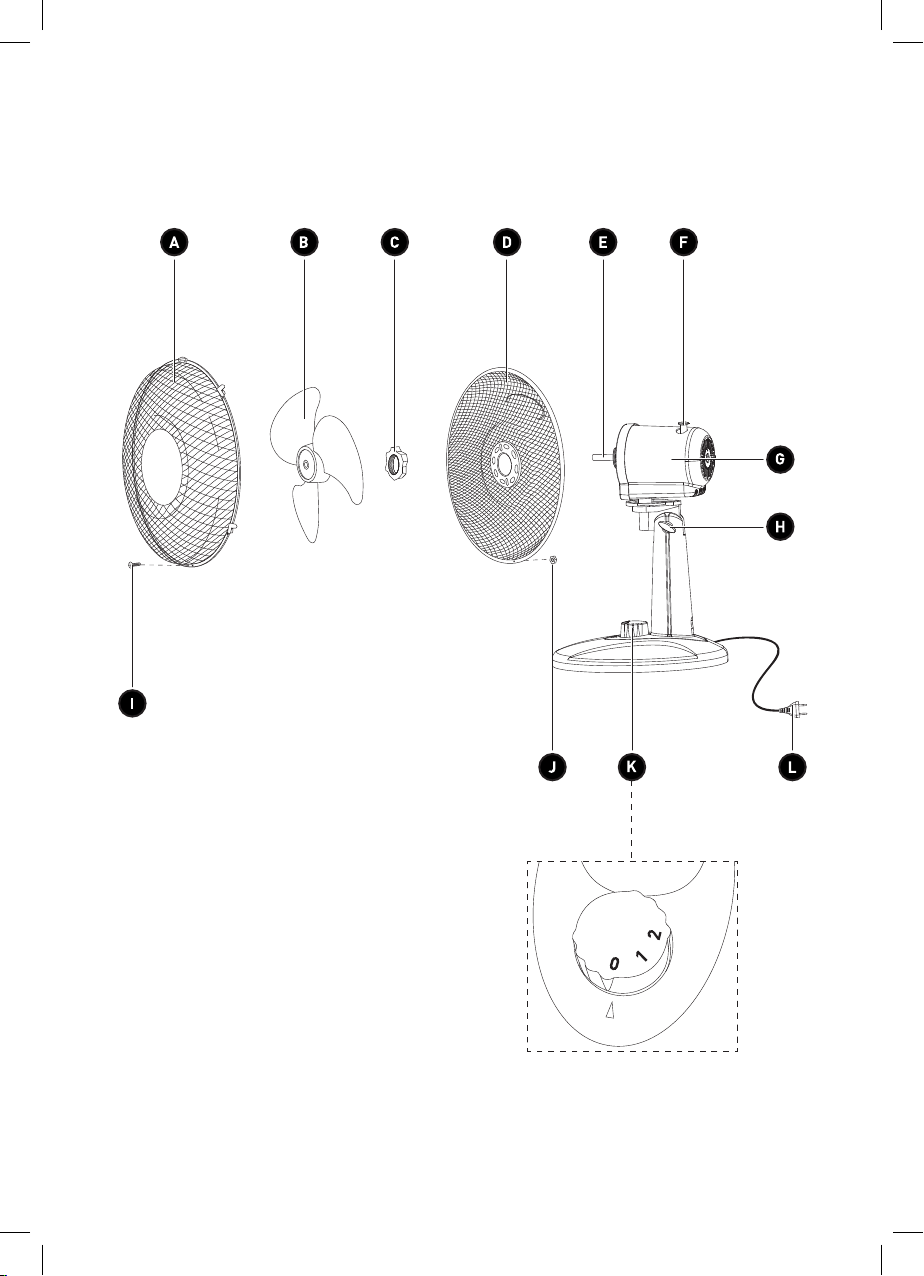
Grille avant Bloc moteur
Hélice Bouton de réglage de l’inclinaison
Écrou de fixation de la grille arrière Vis
Grille arrière Sillet de tête
Arbre du moteur Bouton de commande (0-1-2)
Bouton d’oscillation Cordon et fiche d’alimentation

5
FR
Aperçu de l’appareil
A
Caractéristiques
Modèle: 976380
Tension de fonctionnement: 220-240V~, 50Hz
Consommation : 22W
Dimensions (l x P x H): 27,5 x 18,5 x 38cm
Poids net: Env. 1,18kg
Classe de protection: Classe II

6
FR
Utilisation de l’appareil
B
Assemblage
AVERTISSEMENT
Avant de monter ou de démonter l’appareil, débranchez-le toujours de la source
d’alimentation secteur.
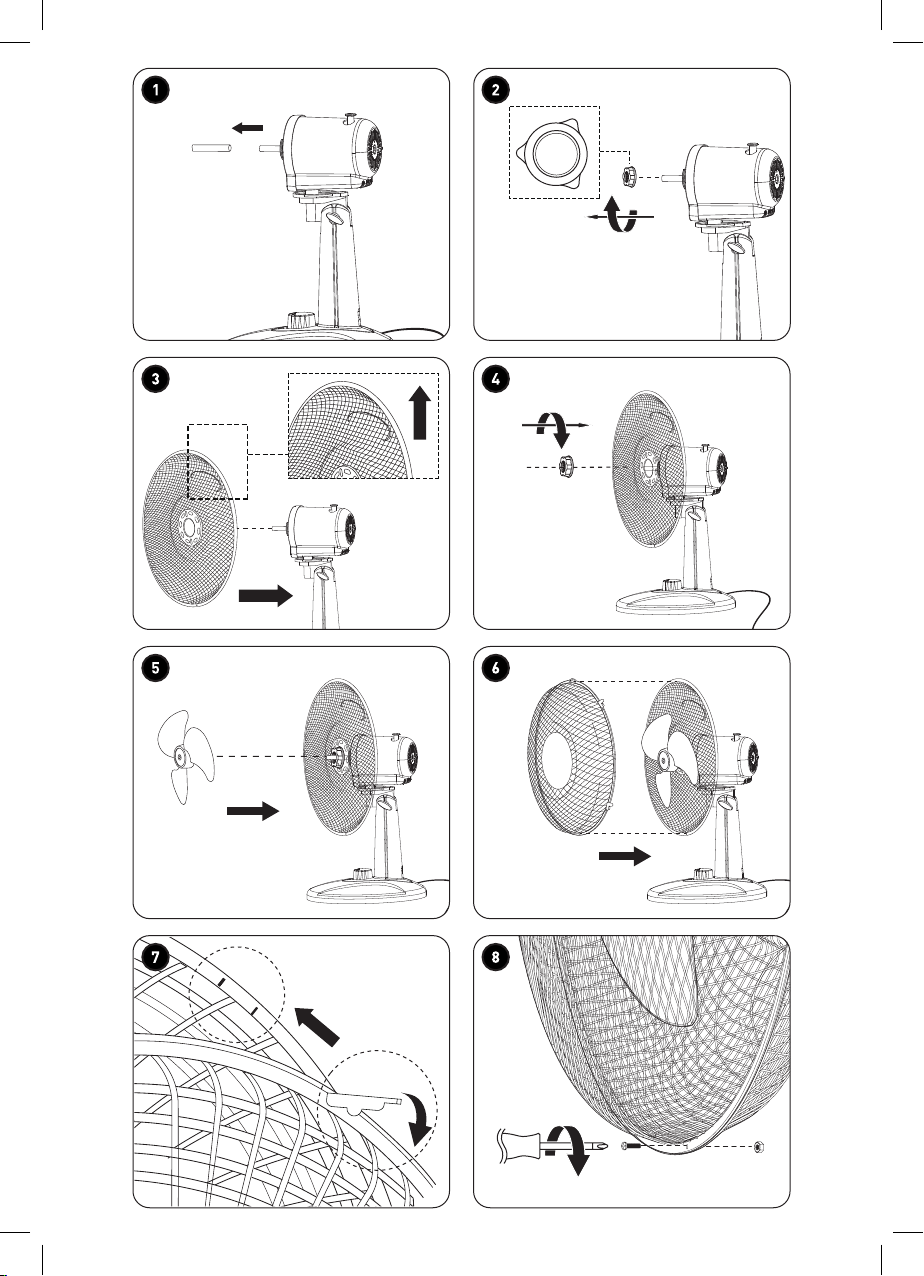
1. Débranchez l'appareil de la prise secteur.
2. Retirez le tube de protection en caoutchouc de l’arbre du moteur (E) et conservez-le
dans l’emballage d’origine pour ranger l’appareil ultérieurement.
3. Retirez l’écrou de fixation (C) de l’arbre du moteur (E) en le faisant tourner dans le
sens inverse des aiguilles d’une montre.
4.
Tenez la grille arrière (D) avec la poignée située en haut et la grille orientée vers
l’arrière. Insérez ensuite la grille arrière sur l’arbre du moteur (E), en veillant à ce qu’elle
s’aligne bien avec les 2points en relief du bloc moteur (G).
5.
Insérez l’écrou de fixation (C) sur l’arbre du moteur (E) et serrez l’écrou dans le sens
des aiguilles d’une montre jusqu’à ce que la grille arrière (D) soit maintenue en place.
6.
Alignez l’hélice du ventilateur (B) avec l’arbre du moteur (E) et poussez-la jusqu’à
ce qu’elle soit fermement fixée.
7.
Ouvrez les attaches autour du bord de la grille avant (A) et fixez le crochet au sommet
sur la grille arrière (D).
8. Alignez le trou au bas de chaque grille et refermez les attaches pour assembler les
deux grilles.
9. Insérez la vis (I) dans le trou et serrez l’écrou (J) (tous deux fournis) à l’arrière pour
fixer les grilles.
Utilisation
1. Placez le ventilateur sur une surface sèche, plane et stable.
2. Assurez-vous que le ventilateur est correctement monté.
3. Branchez le cordon d'alimentation à une prise secteur appropriée.
4.
Tournez le bouton de commande (K) dans le sens des aiguilles d’une montre pour mettre
le ventilateur en marche et sélectionner la vitesse souhaitée.
Pour éteindre le ventilateur, tournez le bouton de commande dans le sens inverse des
aiguilles d’une montre pour le placer sur «0».
0(Arrêt) – 1(Vitesse lente) – 2(Vitesse rapide)
5.
Poussez le bouton d’oscillation (F) vers le bas pour activer l’oscillation gauche-droite
automatique. Pour arrêter l’oscillation, poussez le bouton d’oscillation vers le haut.

7
FR
6. Pour régler l’inclinaison verticale, éteignez d’abord le ventilateur. Tenez le bas de la tête
du ventilateur d’une main, puis tournez lentement le bouton de réglage de l’inclinaison
(H) pour desserrer la tête du ventilateur. Inclinez la tête du ventilateur jusqu’à la position
souhaitée et serrez le bouton de réglage de l’inclinaison.
7.
Éteignez le ventilateur avant chaque utilisation. Débranchez le ventilateur de la prise
secteur si vous prévoyez de ne pas l’utiliser pendant une longue période.
Utilisation de l’appareil
B

8
FR
Nettoyage et entretien
C
Nettoyage et entretien
AVERTISSEMENT
Avant de procéder au nettoyage ou à l’entretien de
l’appareil, veillez à ce qu’il soit éteint et débranché de
la prise secteur. Ne plongez jamais l’appareil dans l’eau
ou tout autre liquide.
•
Nettoyez l'appareil de façon régulière. Protégez les orifices
d’aération de la poussière ou de la saleté.
•
Nettoyez l’appareil à l’aide d’un chiffon doux légèrement
humidifié avec de l’eau ou de l’eau légèrement savonneuse.
Essuyez-le avec un chiffon propre et humide après l’avoir
nettoyé. Veillez à ce qu’il n’y ait aucune humidité entrant dans
l’appareil lors du nettoyage. Laissez-le sécher complètement.
•
N’utilisez en aucun cas des solvants, des produits de nettoyage
chimiques ou abrasifs, des brosses métalliques, des objets
pointus ou des tampons à récurer pour nettoyer l’appareil.
•
Pour un nettoyage en profondeur, démontez les grilles et l’hélice.
•
Laissez tous les éléments sécher complètement avant de
monter à nouveau le ventilateur.
Rangement
• Débranchez toujours l’appareil avant de le ranger.
• Rangez l’appareil dans un endroit frais, sec et sans poussière,
hors de portée des enfants et des animaux domestiques.
•
Veuillez conserver l’emballage et l’utiliser pour y ranger
l’appareil lorsqu’il est prévu de ne pas l’utiliser pendant une
période prolongée.

9
FR

10
EN
Thank you!
Thank you for choosing this HIGHONE product.
HIGHONE products are chosen, tested, and recommended
by ELECTRO DEPOT, so you can be sure you are
getting a top-quality, easy-to-use product that won’t
let you down.
We’re confident your new device will be a pleasure
to use every day!
Welcome to ELECTRO DEPOT.

11
EN
Table of Contents
AProduct overview
CCleaning and
maintenance
BProduct usage Assembly
Use
Cleaning and maintenance
Storage
Parts
Product overview
Intended use
Specifications

12
EN
Parts
Product overview
A
Product overview
Intended use
•
Unpack the unit. Remove all the labels from the product. Check that it is complete and in
a good condition. If the unit is damaged or faulty, do not use it and take it to your retailer
or after-sales service centre.
•
Keep all packaging out of the reach of children. There is a risk of accidents if children
play with packaging materials.
•
This unit is intended for household use only and not for commercial, industrial, or outdoor
use. The unit has been designed for indoor use to circulate air and generate airflow. Use
the unit in a room with dry conditions and adequate ventilation.
• Any other use may damage the unit or cause injury.
Front guard Motor housing
Fan blades Tilt adjustment knob
Rear guard mounting nut Screw
Rear guard Nut
Motor shaft Control knob (0-1-2)
Oscillation knob Power cable and plug

13
EN
Product overview
A
Specifications
Model: 976380
Operating voltage: 220-240 V~, 50 Hz
Rated power: 22 W
Dimensions (W x D x H): 27.5 x 18.5 x 38 cm
Net weight: Approx. 1.18 kg
Protection class: Class II

14
EN
Product usage
B
Assembly
WARNING
Before assembling or disassembling the unit, always disconnect the unit from
the mains supply.
1. Unplug the unit from the mains socket.
2.
Remove the protective rubber tube from the motor shaft (E) and save it with the
original box for future storage of the unit.
3. Remove the mounting nut (C) from the motor shaft (E) by turning it anti-clockwise.
4. Hold the rear guard (D) with the carry handle at the top and facing back. Then insert
the rear guard onto the motor shaft (E), making sure that it is properly aligned with the
2 raised dots on the motor housing (G).
5.
Insert the mounting nut (C) onto the motor shaft (E) and tighten the nut clockwise
until the rear guard (D) is secured in place.
6.
Align the fan blades (B) with the motor shaft (E) and push it in until it is firmly attached.
7. Open the clips around the rim of the front guard (A) and hook the bracket at the top
onto the rear guard (D).
8. Align the hole at the bottom of both guards and close the clips to attach the guards
together.
9. Insert the screw (I) into the hole and tighten the nut (J) (both supplied) on the back
to lock the guards.
Use
1. Place the fan upright on a dry, level and stable surface.
2. Make sure the fan is properly assembled.
3. Plug the power cable into a suitable mains socket.
4. Turn the Control knob (K) clockwise to turn on the fan and select the desired speed.
To turn off the fan, turn the Control knob anti-clockwise to “0”.
0(Off) – 1(Low) – 2(High)
5.
Press the Oscillation knob (F) down to activate the automatic left-right oscillation. To stop
the oscillation, pull the Oscillation knob up.
6. To adjust the vertical tilt, turn off the fan first. Hold the bottom of the fan head with one
hand, and slowly turn the Tilt adjustment knob (H) anti-clockwise to loosen the fan head.
Adjust the fan head to the desired tilt and tighten the Tilt adjustment knob.
7. Turn off the fan after each use. Unplug the fan from the mains socket if it is not going to
be used for a long period of time.

15
EN
Cleaning and maintenance
C
Cleaning and maintenance
WARNING
Before cleaning or maintaining the unit, make sure that
it has been switched off and unplugged from the mains
socket. Never immerse the unit in water or any other
liquid.
•
Clean the unit regularly. Keep the air vents and guards free
from dust or dirt.
•
Clean the unit with a soft cloth, lightly moistened with water
or mild soapy water. Wipe off with a clean moist cloth after
cleaning. Make sure that no moisture gets inside the unit while
cleaning it. Allow to dry completely.
•
Never use solvents, chemical or abrasive cleaning agents, wire
brushes, sharp objects or scouring pads to clean the unit.
•
For a thorough cleaning, disassemble the guards and blades
for cleaning.
• Allow all parts to dry completely before reassembling the fan.
Storage
• Always unplug the unit before storing it.
•
Store the unit in a fresh, dry and dust-free place, out of the
reach of children and pets.
• Please retain the packaging and use it to store your unit when
it is not in use for an extended period of time.

Bedankt!
Proficiat met uw keuze voor een product van HIGHONE.
De selectie en de testen van de toestellen van HIGHONE
gebeuren volledig onder controle en supervisie van
ELECTRO DEPOT. We staan garant voor de kwaliteit
van de toestellen van HIGHONE, die uitmunten in
hun eenvoudig gebruik, hun betrouwbare werking
en hun onberispelijke kwaliteit.
ELECTRO DEPOT beveelt de HIGHONE toestellen aan
en is ervan overtuigd dat u uiterst tevreden zal zijn
bij elk gebruik van het toestel.
Welkom bij ELECTRO DEPOT.
Bezoek onze website: www.electrodepot.be
16
NL

Inhoudstafel
17
NL
AOverzicht van het
toestel
CReiniging en
onderhoud
BGebruik van het
toestel
Onderdelen
Overzicht van het product
Beoogd gebruik
Technische gegevens
Montage
Gebruik
Reiniging en onderhoud
Opslag
18
NL
Onderdelen
Overzicht van het toestel
A
Overzicht van het product
Beoogd gebruik
•
Pak het toestel uit. Verwijder alle labels van het product. Controleer of het product volledig
en in een goede staat is. Als het toestel beschadigd of defect is, gebruik het niet en breng
het naar uw winkel of klantenservice.
• Houd alle verpakking uit de buurt van kinderen. Er is risico op een ongeval als kinderen
met het verpakkingsmateriaal spelen.
•
Dit toestel is alleen bestemd voor huishoudelijk gebruik en niet voor commercieel,
industrieel of buitengebruik. Het toestel is ontworpen voor gebruik binnenshuis om
lucht te laten circuleren en luchtstroom te genereren. Gebruik het toestel in een droge
ruimte met voldoende ventilatie.
• Elk ander gebruik kan het toestel beschadigen of letsel veroorzaken.
Voorste beschermrooster Motorbehuizing
Ventilatorbladen Regelknop voor hellingshoek
Bevestigingsmoer voor achterste
beschermrooster Schroef
Achterste beschermrooster Moer
Motoras Regelknop (0-1-2)
Oscillatieknop Snoer met stekker
Table of contents
Languages:
Other HIGH ONE Fan manuals

Popular Fan manuals by other brands

Big Dutchman
Big Dutchman AirMaster EM50 Operation manual

Bestron
Bestron DFT430 instruction manual

Casablanca
Casablanca Nouvelle owner's manual

Fanimation
Fanimation The Ventana FP8032SB owner's manual

Stanley
Stanley ST-12F-DDF-E User's manual and operating instructions

Dynex
Dynex DX-FANT12-M Guide d'installation rapide


