HighGear Wrist User manual

VIA_Wrist.indb 1IA_Wrist.indb 1 8/2/06 10:57:08 AM8/2/06 10:57:08 AM

english
1
TABLE OF CONTENTS
CARE AND MAINTENANCE 2
KEYS AND THEIR FUNCTIONS 3
MODES OF OPERATION 5
SETTING THE WATCH FUNCTIONS 7
SETTING TIME 7
SETTING USER DATA 8
DETERMINING YOUR STRIDE LENGTH 9
SETTING THE DAILY ALARM 10
OPERATING THE PEDOMETER 11
OPERATING DAILY ALARM 13
OPERATING THE CHRONOGRAPH 13
SPECIFICATIONS & RANGES 14
VIA_Wrist.indb Sec1:1IA_Wrist.indb Sec1:1 8/2/06 10:57:13 AM8/2/06 10:57:13 AM

english
2
CARE AND MAINTENANCE
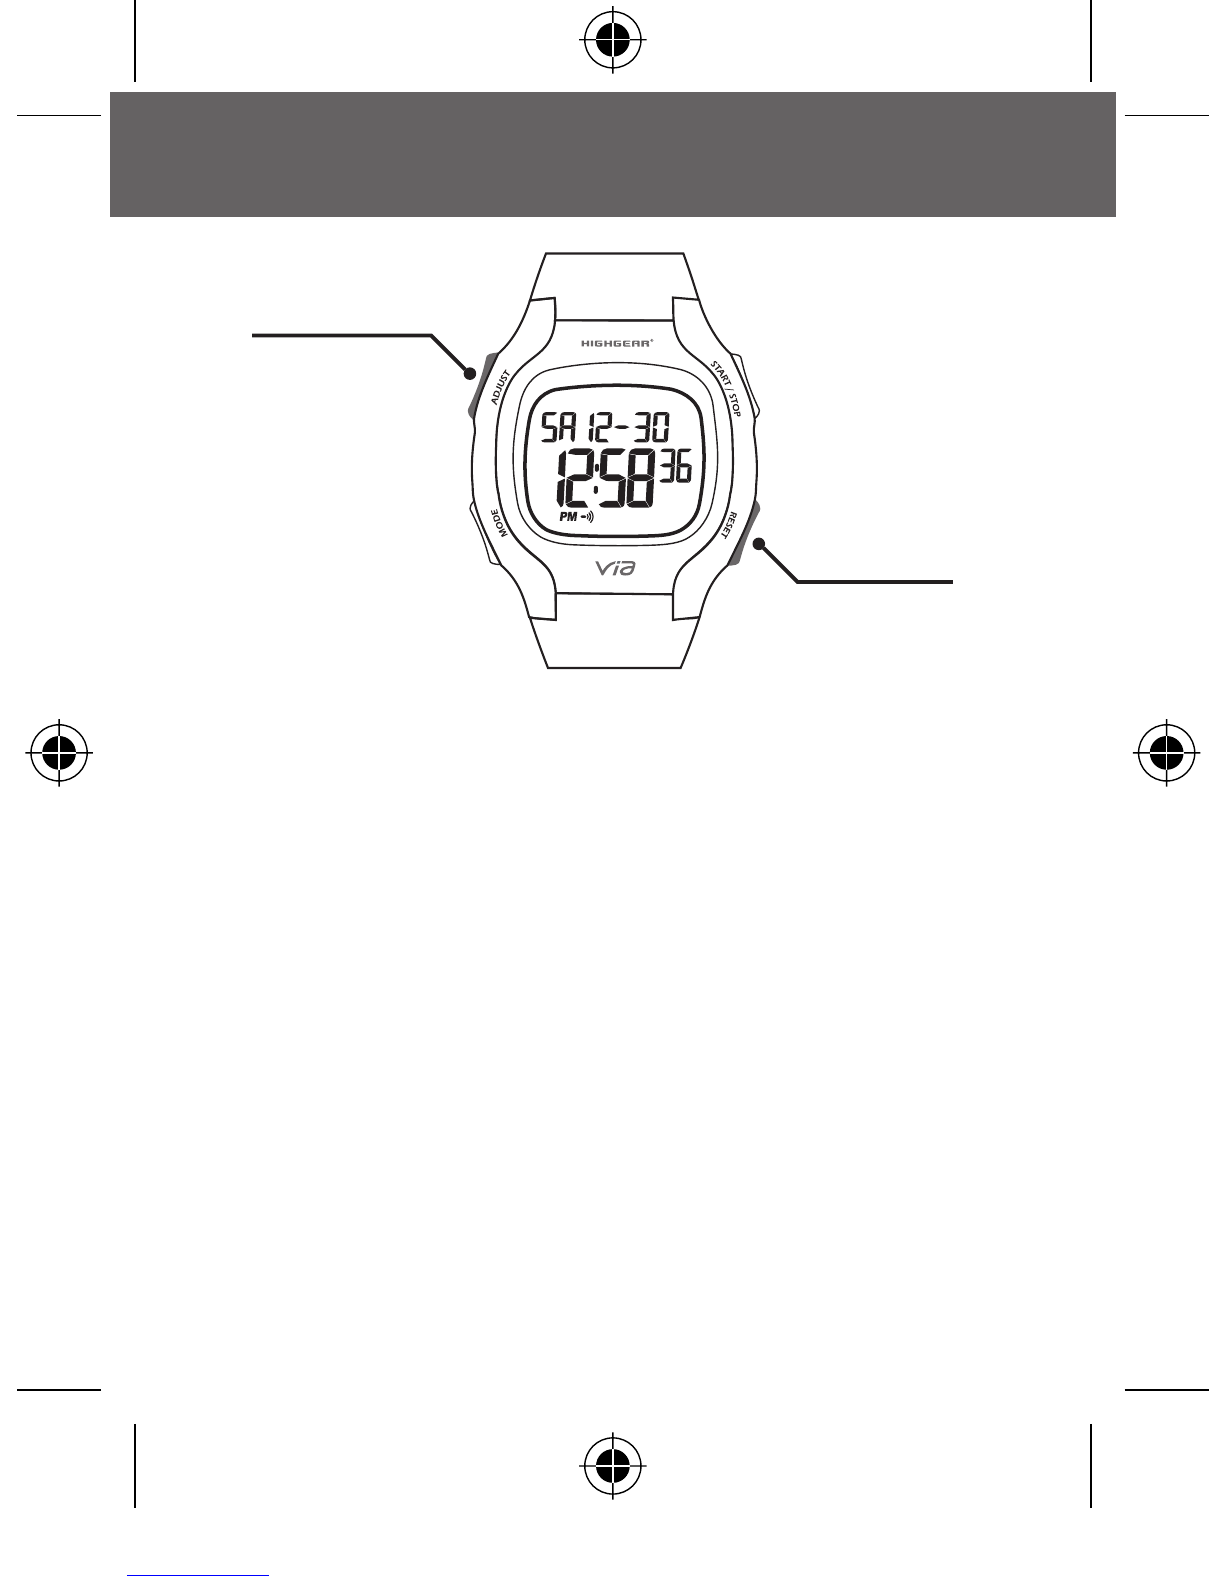
Your VIA WRIST PEDOMETER is a highly accurate and reliable
pedometer and is effective for both walking and running.
WARNING: Before starting any exercise program, we strongly
suggest you visit your doctor for a complete physical and to
discuss your exercise plans.
1. Avoid Extreme Temperatures.
2. To clean the unit, use a dry soft cloth of a soft cloth
moistened in a solution of water and a mild neutral detergent.
Never use volatile agents such as benzene, thinner, spray
cleaners, etc.
3. Store your pedometer unit in a cool, dry place when not in use.
4. Cold temperatures may cause the display to dim or fail
completely. Normal operation should return when the unit
warms up.
5. Keep this manual and any other documentation that comes
with the unit in a safe place for future reference.
BATTERY INSTALLATION
The Via Wrist Pedometer is a technical instrument. To ensure
proper operation and to maintain a water resistant seal, we
recommend that you have your local jeweler or specialty retail
shop to replace the watch batteries. Improper replacement of the
battery may damage the watch and will void the manufacturers
warranty.
VIA_Wrist.indb Sec1:2IA_Wrist.indb Sec1:2 8/2/06 10:57:13 AM8/2/06 10:57:13 AM

english
3
MODE KEY
- Scrolls through various modes of the pedometer
- Advances to next variable in setting sequence.
START/STOP KEY
- Scrolls through sub modes in STEP and DATA modes
- Increases variable in setting sequence
- Starts/Stops the Chronograph
- Turns Daily Alarm On/Off
- Toggles through sub modes in Step mode
- Toggles between pounds/kilograms (weight setting)
- Toggles between inches/centimeters (setting stride length)
KEYS AND THEIR FUNCTIONS
START/STOP KEY
MODE KEY
VIA_Wrist.indb Sec1:3IA_Wrist.indb Sec1:3 8/2/06 10:57:13 AM8/2/06 10:57:13 AM

english
4
KEYS AND THEIR FUNCTIONS
RESET KEY
- Decreases variable in setting sequence
- Clears time in Chronograph
- Toggles between miles/kilometers (Step/Distance mode)
- Clears data (Steps, distance, calories, timer) in Step mode
ADJUST KEY
- Activates EL/Backlight
- Enters the setting sequence for each setting mode
ADJUST KEY
RESET KEY
VIA_Wrist.indb Sec1:4IA_Wrist.indb Sec1:4 8/2/06 10:57:13 AM8/2/06 10:57:13 AM

english
5
MODES OF OPERATION
The VIA Wrist Pedometer has 5, primary operational modes:
TIME MODE
The top line displays Date.
Bottom line displays Time of Day.
STEP MODE
Step mode has 5 sub modes:
Step/Time, Step/KCAL, Step/Distance,
Timer, Steps Target
Scroll through the sub modes by
PRESSING the START/STOP key.
USER DATA MODE
Displays/adjusts User Data
(age, weight, stride, etc.).
VIA_Wrist.indb Sec1:5IA_Wrist.indb Sec1:5 8/2/06 10:57:14 AM8/2/06 10:57:14 AM

english
6
ALARM MODE
Displays/operates daily alarm.
CHRONOGRAPH MODE
Displays/operates the chronograph.
MODES OF OPERATION
The VIA Wrist Pedometer has 5, primary operational modes:
VIA_Wrist.indb Sec1:6IA_Wrist.indb Sec1:6 8/2/06 10:57:15 AM8/2/06 10:57:15 AM

english
7
SETTING THE WATCH FUNCTIONS
SETTING TIME
1. Advance to TIME mode by PRESSING
the MODE key.
2. PRESS & HOLD the ADJUST key
to enter the setting sequence. Hours
digit will flash. ADJUST HOURS
by PRESSING the START/STOP or
RESET keys.
3. Advance to SET MINUTES by
PRESSING the MODE key. ADJUST
by PRESSING the START/STOP or
RESET keys. Hold the keys for fast scrolling.
4. Advance to SET MONTH by PRESSING the MODE key.
ADJUST by PRESSING the START/STOP or RESET keys.
5. Advance to SET DAY by PRESSING the MODE key.
ADJUST by PRESSING the START/STOP or RESET keys.
6. Advance to SET YEAR by PRESSING the MODE key.
ADJUST by PRESSING the START/STOP or RESET keys.
7. Advance to SET 12 OR 24 HOUR FORMAT by PRESSING
the MODE key. ADJUST by PRESSING the START/STOP
or RESET keys.
8. PRESS the MODE key to exit the setting sequence.
VIA_Wrist.indb Sec1:7IA_Wrist.indb Sec1:7 8/2/06 10:57:16 AM8/2/06 10:57:16 AM

english
8
SETTING THE WATCH FUNCTIONS
SETTING USER DATA
1. Advance to YOUR DATA mode by
PRESSING the MODE key.
2. PRESS & HOLD the ADJUST key
to enter the setting sequence. Age
digit will flash. ADJUST AGE by
PRESSING the START/STOP or
RESET keys. Hold the keys for fast
scrolling.
3. Advance to SET GENDER by
PRESSING the MODE key. ADJUST by PRESSING the
START/STOP key.
4. Advance to SET WEIGHT by PRESSING the MODE key.
Select pounds (Lb) or kilograms (KG) by PRESSING the
ADJUST key. ADJUST WEIGHT by PRESSING the START/
STOP or RESET keys.
5. Advance to SET STRIDE by PRESSING the MODE key.
(See “Determining Your Stride Length” pg. 9). Select inches
(In) or centimeters (CM) by PRESSING the ADJUST
key. ADJUST STRIDE by PRESSING the START/STOP or
RESET keys.
6. PRESS the MODE key to exit the setting sequence.
NOTE: To ensure accurate calculation of distance and calories
consumed, it is essential to input correct personal data before
using the Pedometer.
VIA_Wrist.indb Sec1:8IA_Wrist.indb Sec1:8 8/2/06 10:57:16 AM8/2/06 10:57:16 AM

english
9
DETERMINING YOUR STRIDE LENGTH
1. You will need a tape measure to accurately measure your stride.
2. Mark a spot on the ground. Start with your toe to that point and
take 10 natural strides of the type you want to measure (run,
walk, jog, etc).
3. Mark the place where the toe of your forward foot stopped.
4. Measure the distance between the two points, and divide by 10.
SETTING THE WATCH FUNCTIONS
VIA_Wrist.indb Sec1:9IA_Wrist.indb Sec1:9 8/2/06 10:57:17 AM8/2/06 10:57:17 AM

english
10
SETTING THE DAILY ALARM
1. Advance to ALARM mode by
PRESSING the MODE key.
2. PRESS & HOLD the ADJUST key
to enter the setting sequence. Hours
digit will flash. ADJUST HOURS
by PRESSING the START/STOP or
RESET keys.
3. Advance to SET MINUTES by
PRESSING the MODE key. ADJUST
by PRESSING the START/STOP or
RESET keys. Hold the keys for fast
scrolling.
9. PRESS the MODE key to exit the setting sequence.
NOTE: Entering the setting sequence will automatically
activate (turn on) the alarm.
SETTING THE WATCH FUNCTIONS
VIA_Wrist.indb Sec1:10IA_Wrist.indb Sec1:10 8/2/06 10:57:17 AM8/2/06 10:57:17 AM

english
11
OPERATING THE PEDOMETER
IN STEP MODE:
The Via Wrist Pedometer has 5 Step sub modes that give you
real-time information of your workout. Scroll through the sub
modes by PRESSING the START/STOP key. The displays of the
sub modes are as follows:
Step/Time: Top line displays Time of Day. Bottom line
displays Step Counter.
Step/KCAL: Top line displays Calories burned. Bottom line
displays Step Counter.
Step/Distance: Top line displays Distance traveled (in miles
or kilometers). Bottom line displays Step Counter.
Timer: Displays Elapsed Time walking/running (records
automatically).
Steps Target: Counts down number of steps until Step Target
is achieved.
The Via Wrist Pedometer automatically calculates Steps,
Calories Burned, Distance, Elapsed Time (timer) and Steps to
Target. To CLEAR THE INFORMATION in the Pedometer, in
Step/Time, Step/KCAL, Step/Distance or Timer modes, PRESS &
HOLD the RESET key.
VIA_Wrist.indb Sec1:11IA_Wrist.indb Sec1:11 8/2/06 10:57:17 AM8/2/06 10:57:17 AM

english
12
STEPS TARGET
The Via Wrist Pedometer allows you to
set a Steps Target goal (from 1 to 99,999
steps). Target Mode automatically counts
down and displays the number of steps
until this target is achieved. When Target
goal is reached, Alarm will sound.
To SET/RESET the Step Target, in Target
mode:
1. PRESS & HOLD the ADJUST key. All Target information will
be erased and Setting Sequence will automatically begin.
2. Set STEPS TARGET (from 1 to 99,999) by adjusting blinking
digit(s) by PRESSING the START/STOP or RESET keys.
3. Advance to NEXT DIGIT by PRESSING the MODE key. SET
by PRESSING the START/STOP or RESET keys.
4. Repeat through all 5 digits (from left to right). PRESS the
MODE key to exit the setting sequence.
OPERATING THE PEDOMETER
VIA_Wrist.indb Sec1:12IA_Wrist.indb Sec1:12 8/2/06 10:57:17 AM8/2/06 10:57:17 AM

english
13
OPERATING DAILY ALARM
The Via Wrist Pedometer is equipped with
a Daily Alarm. When Alarm is active, it
will sound for 20 seconds. When alarm is
sounding, PRESS any key to stop.
In Alarm Mode: The DAILY ALARM can
be turned on and off by PRESSING the
START/STOP key. The far right of the
display will indicate ON or OFF.
OPERATING THE CHRONOGRAPH
The Via Wrist Pedometer is equipped
with a 24-hour Chronograph. To START
TIMING, PRESS the START/STOP
key. To STOP the Chronograph, PRESS
the START/STOP key. To RESET the
Chronograph, PRESS & HOLD the
RESET key.
NOTE: The Chronograph displays 1/100-sec-
ond resolution for the first hour of operation.
After that, display is 1-second resolution.
VIA_Wrist.indb Sec1:13IA_Wrist.indb Sec1:13 8/2/06 10:57:18 AM8/2/06 10:57:18 AM

english
14
SPECIFICATIONS & RANGES
TIME MODE
12 or 24 hour display. Auto Calendar from 2004 to 2029
STEP COUNTER
To 99,999 steps
CALORIE DISPLAY
To 9,999.9 kcal in .1 kcal resolution
TIMER
To 23 hours, 59 minutes, 59 seconds in
1-second resolution
CHRONOGRAPH
To 23 hours, 59 minutes, 59 seconds in
1/100-second resolution
DISTANCE
To 9,999 mile (or km) in .1 mile (or km) resolution
STEPS TARGET
From 1 to 99,999 steps
WATER RESISTANCE
The Via Wrist Pedometer is water resistant under normal use
up to 50 meters.
DO NOT dive or swim with the watch as its seals are not designed
to withstand the pressures imposed during active swimming.
DO NOT press keys when the unit is wet as this may allow water
to pass into the interior of the watch damaging its electronics.
VIA_Wrist.indb Sec1:14IA_Wrist.indb Sec1:14 8/2/06 10:57:18 AM8/2/06 10:57:18 AM

HIGHGEAR USA INC.
web: www.highgear.com
www.techtrail.com
email: contacts@highgear.com
© 2006 Highgear USA/Techtrail, Inc.
All Rights Reserved.
VIA_Wrist.indb Sec1:15IA_Wrist.indb Sec1:15 8/2/06 10:57:19 AM8/2/06 10:57:19 AM

VIA_Wrist.indb 1IA_Wrist.indb 1 8/2/06 10:57:20 AM8/2/06 10:57:20 AM

françias
1
INDEX
ENTRETIEN 2
LES TOUCHES ET LEURS FONCTIONS 3
MODE DES OPÉRATIONS 5
PROGRAMMATION DES FONCTIONS DE LA MONTRE 7
PROGRAMMATION DE L’HEURE 7
PROGRAMMATION DES DONNÉES DE L’UTILISATEUR 8
DÉTERMINEZ VOTRE LONGUEUR DE FOULÉE 9
PROGRAMMATION DE L’ALARME QUOTIDIENNE 10
FAIRE FONCTIONNER LE PODOMÈTRE 11
FONCTIONNEMENT DE L’ALARME QUOTIDIENNE 13
FONCTIONNEMENT DU CHRONOGRAPHE 13
SPÉCIFICATIONS & PORTÉE D’ÉMISSION 14
VIA_Wrist.indb Sec1:1IA_Wrist.indb Sec1:1 8/2/06 10:57:22 AM8/2/06 10:57:22 AM

françias
2
ENTRETIEN
LES PODOMÈTRES VIA WRIST est très fiable et précis et il
est efficace pour la marche et la course.
AVERTISSEMENT: Avant d’entamer tout programme d’exercice,
nous vous suggérons vivement de vous soumettre à un examen
médical complet et de discuter de vos projets avec votre médecin.
1. Éviter les températures extrêmes
2. Pour nettoyer l’appareil, utilisez un linge sec et doux ou un
linge doux et humide trempé dans une solution d’eau et de
savon neutre et doux. N’utilisez jamais d’agents volatiles tel
que le benzène, éclaircissant, nettoyants en vaporisateur, etc.
3. Entreposez votre podomètre dans un endroit frais et sec lors
que vous ne l’utilisez pas.
4. La température froide peut faire pâlir ou faire cesser
l’affichage complètement. Les opérations normales devraient
revenir lorsque l’appareil se réchauffe.
5. Conservez en lieu sûr ce manuel et tout autre document
fournis avec ce podomètre, vous pourriez en avoir besoin pour
de futures références.
INSTALLATION DES PILES
Le podomètre Via Wrist est un instrument technique. Afin
d’assurer une opération correcte et de maintenir un sceau
d’étanchéité à l’eau, nous conseillons de faire remplacer les
piles de votre montre par votre bijoutier ou par un détaillant
spécialisé. Un remplacement des piles qui est mal effectué peut
endommager la montre et annuler la garantie du fabricant.
VIA_Wrist.indb Sec1:2IA_Wrist.indb Sec1:2 8/2/06 10:57:23 AM8/2/06 10:57:23 AM

françias
3
TOUCHE MODE
- Défile les différents modes du podomètre.
- Avance à la variable suivante en séquence de program-
mation.
TOUCHE DÉMARRER/ARRÊT
- Défile les sous-modes en mode PODOMÈTRE et DONNÉES.
- Augmente la variable en séquence de programmation.
- Démarre/arrête le chronographe.
- Allume ou éteint l’alarme quotidienne (On/Off)
- Alterne les sous-modes en mode podomètre.
- Alterne entre les livres et les kilogrammes (programmation
de la masse)
- Alterne entre les pouces et les centimètres (program-
mation de la longueur de foulée)
LES TOUCHES ET LEURS FONCTIONS
TOUCHE
DÉMARRER/ARRÊT
TOUCHE MODE
VIA_Wrist.indb Sec1:3IA_Wrist.indb Sec1:3 8/2/06 10:57:23 AM8/2/06 10:57:23 AM
Table of contents
Languages:
Other HighGear Pedometer manuals