Highline Manufacturing BalePro Complete Feed Ration 651 User manual

Operator’s
Manual
E12363V1
Feed Chopper
on the
BalePro®
Complete Feed Ration 651

Printed in Canada Copyright © 2012 by Highline Manufacturing Ltd. All rights reserved.
The content of this manual was based on the most current information available as of the date of copyright. It is the policy of
Highline Manufacturing Limited to improve and develop our products continually. We reserve the right to make changes or add
improvements, at any time, without incurring any obligation to make changes or improvements on machines previously sold.
Changes may not be reflected in this manual.
Operator’s
Manual
Highline Manufacturing Limited
HWY #27, P.O. Box 307
Vonda, SK S0K 4N0
Canada
Phone: 306.258.2233
Fax: 306.258.2010
Toll Free: 1.800.665.2010
E12363V1
Feed Chopper
for the
BalePro®
Complete Feed Ration 651

Highline Manufacturing Ltd. Feed Chopper on the CFR651 (FC 651)
Highline Team Message
Congratulations on your purchase of the Feed Chopper for the Complete Feed Ration 651
(FC 651) manufactured by Highline Manufacturing Ltd.
This Operator's Manual has been prepared to provide information necessary for the safe and
efficient operation of your Feed Chopper. In the manual you will find safety procedures,
maintenance routines and detailed operational instructions.
If you find that you require information not covered in this manual, please feel free to consult
yourlocaldealer. Yourdealerisalwaysabletocontact Highline for this technical information.
HighlineManufacturingLtd.thanksand congratulates youforselectinga Feed Chopperforthe
Complete Feed Ration 651 as your machine of choice.
Highline Manufacturing Ltd.

Table of Contents
General Description of the Feed Chopper
Intended Use of the Feed Chopper
Section 1 - Safety
Safety Sign-off Form
Safety Alert Symbol
General Safety
Safety Decals
Safety Decal Locations
Section 2 - Feed Chopper Preparation
General Preparation
Door Setup For Chopping Operation
Door Setup For Bedding Operation
Section 3 - Operating the Feed Chopper
Chopping Operation - Operating With the Feed Chopper
Bedding Operation - Operating Without the Feed Chopper
Unplugging the Feed Chopper
Section 4 - Maintaining the Feed Chopper
Lubrication
Greasing the CFR 651 Rear Flail Drum Bearing
Twine Cutter Access
Rotor Knife Replacement
Belt Tension Adjustment
Section 5 - Troubleshooting

This Page Left Blank

GENERAL DESCRIPTION OF THE FEED CHOPPER
The Feed Chopper (FC651) is an attachment to the Bale Pro ®Complete Feed Ration 651.
When the Feed Chopper is engaged, it uses power from the flail drum of the CFR651 to run a
belt drive for the Feed Chopper rotor.
Whenadditional processingand choppingof feedmaterial is desired, the Feed Chopper clutch
is engaged and the Feed Chopper door is moved to direct material from the CFR 651 into the
Feed Chopper. This further chops the material before discharging it. The CFR 651 must be
turnedoffwhentheFeedChopperdriveclutchisengagedandthedischargedoorispositioned.
When the Feed Chopper clutch is not engaged and when the Feed Chopper door is in the
by-pass position, the CFR 651 discharges material without any additional chopping.
The operator of the CFR 651/Feed Chopper is located in the tractor cab to control the speed
of driving and the speed of operation of the CFR 651/Feed Chopper.
INTENDED USE OF THE FEED CHOPPER
The Feed Chopper is designed to further process and chop animal feed materials that have
been initially processed from a round bale by the CFR 651.
The Feed Chopper is intended for use in farming applications.
The Feed Chopper is intended for off road use only.
The Feed Chopper is intended for use in locations away from people who could be harmed by
the discharged materials.
Any uses of the Feed Chopper other than the above stated Intended Uses shall be considered
misuse of the Feed Chopper. This misuse shall include (but not limited to):
- Using the Feed Chopper in non-farming applications
- Using the Feed Chopper on public roads
- Using the Feed Chopper around people or in public places
- Chopping materials other than animal feed materials
- Chopping materials that have not been initially processed by the CFR651
AlwaysusetheFeedChopperaccordingtotheinstructionscontainedinthisOperator'sManual
and on the safety and instruction decals on the machine.
Perform regular maintenance and repair to ensure that the Feed Chopper operates safely and
efficiently.

This Page Left Blank

Section 1 - Safety
Page 1-1
SERIAL NUMBER
Your serial number is found on the serial number plate attached to the front of the bottom Feed
Chopper panel.
It is important to record the serial number for proof of ownership and for any service or
maintenance assistance.
Serial Number
Owner
Model
Date of Purchase

Section 1 - Safety
Page 1-2
SAFETY SIGN-OFF FORM
Highline Manufacturing Ltd. follows the general Safety Standards specified by the American
SocietyofAgriculturalEngineers(ASAE)andtheOccupationalSafetyandHealthAdministration
(OSHA). Anyone who will be operating and/or maintaining the Feed Chopper 651 should read
and clearly understand all Safety, Operating and Maintenance information presented in this
manual.
Do not operate or allow someone to operate this equipment until this information has been
reviewed. This information should be reviewed by all operator’s before the season start-up.
This sign-off sheet is provided for record keeping to indicate that the person working with the
equipment has read and understood the information in the Operator’s Manual and has been
instructed in the safe operation of the equipment.
Date Employee’s Signature Employer’s Signature

Section 1 - Safety
Page 1-3
SAFETY ALERT SYMBOL
The Safety Alert Symbol means . . .
ATTENTION!
BECOME ALERT!
YOUR SAFETY IS INVOLVED!
The Safety Alert Symbol combined with a Signal Word alert to the presence of a hazard and the
degree of possible injury.
Indicates an imminently hazardous situation that, if not
avoided, WILL result in DEATH OR SERIOUS INJURY.
The color is Red with White lettering.
Indicates a potentially hazardous situation that, if not
avoided, COULD result in DEATH OR SERIOUS
INJURY, and includes hazards that are exposed when
guards are removed or unsafe practices. The color is
Orange with Black lettering.
Indicates a potentially hazardous situation that, if not
avoided, MAY result in MINOR INJURY. The color is
Yellow with Black lettering.

Section 1 - Safety
Page 1-4
GENERAL SAFETY
1. Ensure that anyone who is going to operate, maintain or work near the Feed Chopper 651
isfamiliarwiththerecommendedoperating,maintenanceproceduresandsafetyinformation
contained in this manual and follows all the safety precautions.
2. In addition to the design and configuration of the equipment, hazard control and accident
prevention are dependant upon the awareness, concern, prudence and proper training of
personnel involved in the operation, transport, maintenance and storage of this equipment.
(Adapted from ASAE S474.1 Feb 04 - 5.2.5.1)
3. The Feed Chopper 651 shall not be operated without all the guards in place.
SAFETY DECALS
1. Keep the decals and signs clean and legible at all times.
2. Replace decals and signs that are damaged, missing or have become illegible.
3. Parts that have been replaced should display a current decal.
4. Decals are available from the Parts Department.
5. Be familiar with the decals, the type of warning and the area or function(s) related to the
area(s) that requires your awareness.

Section 1 - Safety
Page 1-5
DO NOT CONTACT THE ROTATING DRIVELINE
Contact with rotating driveline will cause serious injury or death.
Keep all driveline guards in place.
Securely attach drivelines at both ends.
Check that the driveline guards turn freely on driveline.
DO NOT CONTACT ROTATING BLADES
Rotating blades will cause serious injury or death.
Before servicing or adjusting, disengage power take off, shut of the
tractor, remove key, set park brake.
Before servicing or adjusting, wait for all parts to stop rotating.
Keep guards in place and in good condition.
KEEP PEOPLE AND ANIMALS CLEAR OF THE DISCHARGE
AREA
Discharge material exits at a high speed.
Discharged material will cause serious injury or death.
Stand clear of Feed Chopper when it is engaged.
SHUTDOWN THE TRACTOR BEFORE DISMOUNTING
TRACTOR
Shut down the tractor and remove the key before repairing,
servicing, lubricating or cleaning the Feed Chopper.

Section 1 - Safety
Page 1-6
DO NOT OPERATE WITH SHIELDS MISSING
Contact with the moving belt or sheaves may cause serious injury
or death.
Keep shields fastened in place.
Keep away from moving parts.
Do not stand or climb on the machine when operating.
READ, UNDERSTAND AND FOLLOW SAFETY INSTRUCTIONS
Read, understand and follow all instructions and safety messages
included in this manual and on decals attached to the machine.
These instructions and safety messages contain important
information.
Allow only responsible, properly instructed individuals to operate
and service the machine.
Failure to follow the instructions and safety messages in this
manual and on the decals attached to the machine could result in
serious injury or death.
Keep all safety and instruction decals in good condition. Replace
any missing or damaged decals.
CHECK CONDITION OF THE KNIVES BEFORE OPERATING
Check that all the knives are in place and in good condition.
If any vibration is detected during operation, immediately stop the
machine and determine the source of the vibration before
resuming.
Operating the Feed Chopper with knives missing or rotor out of
balance could result in injury or death.

Section 1 - Safety
Page 1-7
45553_B
SAFETY DECAL LOCATIONS

Section 1 - Safety
Page 1-8
This Page Left Blank

Section 2 - Feed Chopper 651 Preparation
Page 2-1
2.0 FEED CHOPPER 651 PREPARATION
General Preparation
1. Park the tractor and CFR 651 on level
ground.
- Engage the tractor parking brake.
2. Shut off the tractor engine and remove
the key.
3. Check the condition of the knives.
Disconnectthe PTO driveline from
the tractor.
Do not place hands in the chopper
when it is rotating. Contact with
exposed rotating blades will cause
serious injury or death.
a. Disengagethechopperclutchpinfrom
the flail drum drive plate. (See Section
3 for procedures.)
b. Spin the rotor by hand to check all the
knives.
i. Checkifthey arebrokenorwornto
the point that they would not
process the material properly.
c. For knife replacement information -
see Section 4 - “Maintaining the Feed
Chopper”.
Check Condition of the Knives 212075
Park On Level Ground 212075

Section 2 - Feed Chopper 651 Preparation
Page 2-2
4. Clear the rotor area of any material
buildup.
a. Clear the chopping area and the
knives.
b. Check the condition of the rotor and
the knife bolts.
c. Remove twine or other materials that
may be wrapped around the ends of
the rotor shafts.
Clear Rotor Area of Buildup 212075
Remove Twine From Rotor Shaft 212077
Section 2 - Feed Chopper 651 Preparation
Page 2-3
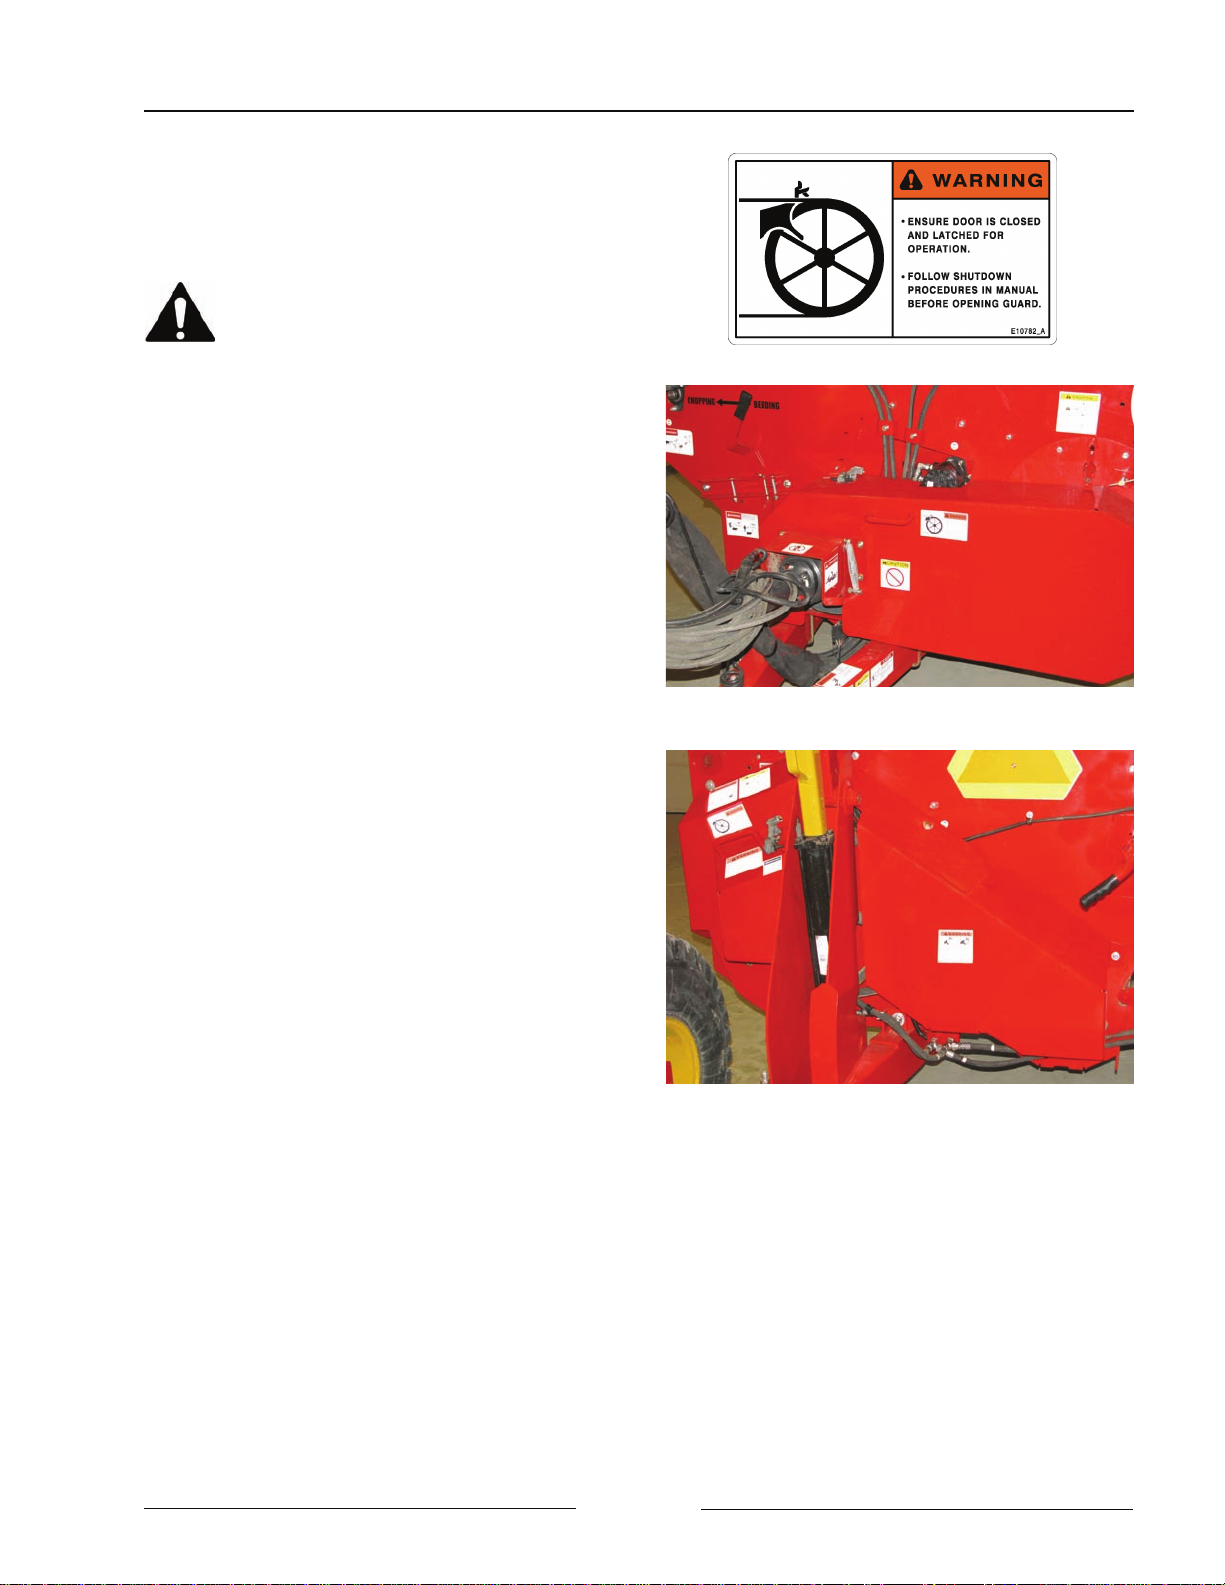
5. Ensure the front and rear drive shields
are good repair and securely closed with
the rubber holder.
The Feed Chopper shall not be
operated without all the driveline
shields in place and secured.
Ensure Front Drive Shield Is Secured 212079
Ensure Rear Drive Shields Are Secured 212078

Section 2 - Feed Chopper 651 Preparation
Page 2-4
Door Setup For Chopping Operation
There are 2 doors to adjust for Chopping
operation. These doors must be set to direct
material from the CFR651 into the Feed
Chopper rotor.
Note:The Feed Chopper drive clutch
mustbedisengagedandallrotation
of the chopper rotor stopped
before moving the chopper door.
Serious damage to the Feed
Chopper knives and Chopper door
will result if the drive clutch is
engaged with the Chopper door in
the Bedding position. The rotating
knives will hit the door.
#1 - Adjust the Feed Chopper Door
1. Move the front adjustment handle to the
Chopping position.
- Remove the quick pin.
- Move the door handle (1) to the
Chopping position (pin on the handle
against the bolt).
- Secure the handle in the Chopping
position with the quick pin (2).
2. Move rear adjustment handle to the
Chopping position.
- Remove the quick pin.
- Move the door handle (3) to the
Chopping position (pin on the handle
against the stop plate.)
- Secure the handle in the Chopping
position with the quick pin (4).
Move Front Handle to Chopping Position 212080C
Move Rear Handle to Chopping Position 212081C

Section 2 - Feed Chopper 651 Preparation
Page 2-5
#2 - Adjust the CFR651 Lower Discharge
Door
1. Remove the adjustment handle from
the storage location.
- Insert the handle onto the adjustment
rod.
- Turnthehandletolowerthedischarge
door to the fully lowered position.
- Turn handle until the the door is
against the door stop.
- This will direct processed material
into the Chopper.
Visually check that the door is fully raised
against the tub wall.
Remove Lower Discharge Door Handle 212045
Check That Door Is Fully Raised 212075
Lower the Discharge Door 201217
Table of contents


