Himedia HD600 User manual

Trademarks: all other products and brand names are trademarks and/or registered
trademarks of their respective holders.
The information contained in this document has been created with the utmost
care. No legal rights can be derived from these contents. The manufacturer
cannot be held responsible nor liable for the information contained in this document.
All specifications and information are subject to changes without further notices.

1.0 Quick Guide
1.1 Connection to HDTV
1. Connect the HDMI cable from media player's HDMI output toHDTV's HDMI input.
2. On the media player, select Setup-Audio-HDMI Output-LPCM.
1 2
1.0 Quick Guide
1.1 Connection toHDTV
1.2 Connection to5.1CH Amplifier (Digital) and HDTV
1.3 Connection to7.1CH Amplifier and HDTV
2.0 Remote Control
2.1 Picture
2.2 Remote ControlOverview
3.0 Setup
3.1 System Settings
3.2 Audio Settings
3.3 Video Settings
3.4 Network Settings
3.5 Intelligent Settings
3.6 MISC Settings
4.0 Main Menu
5.0 Media Library
6.0 File Manager
7.0 Internet Media Service and Web Browser
8.0 Using your Media Player
8.1 Create MediaLibrary
8.2 Play Movies
8.3 Play Music
8.4 Play Photo
8.5 Cover file
8.6 Music Playlist
8.7 PhotoAlbum
8.8 File Copyand Delete
8.9 Play MediaFiles through Local Network
8.10 Share MediaFiles on Windows7 or Smart Phone
9.0 Firmware Upgrade
9.1 Standard ModeUpgrade
9.2 Safe ModeUpgrade
9.3 Tipsfor Upgrading Firmware
Table of Contents
2
2
3
4
5
5
6
7
7
7
8
8
9
9
10
11
12
13
14
14
14
20
20
20
21
21
22
22
24
25
25
25
26
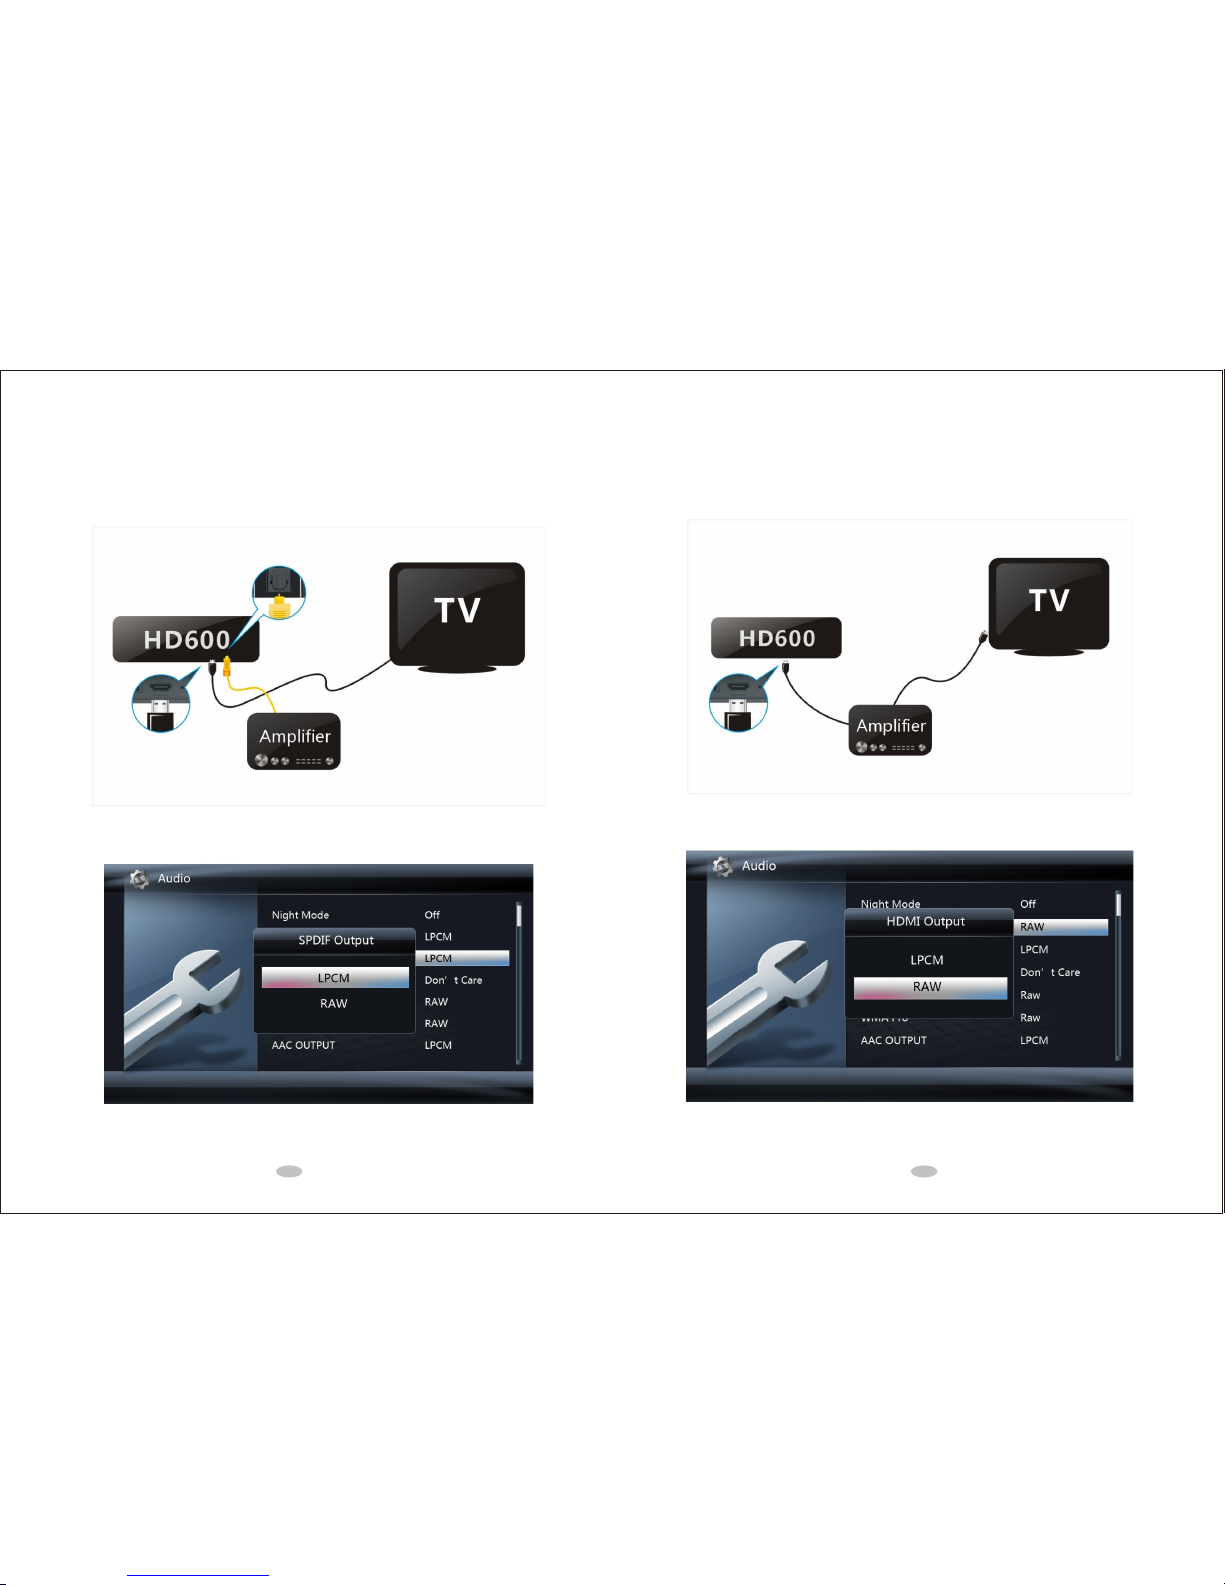
1.3 Connection to 7.1CH Amplifier and HDTV
1. Connect the HDMI cable from media player's HDMI output to7.1CH amplifier's HDMI input.
2. Connect the other HDMI cable from 7.1CH amplifier's HDMI outputto HDTV's HDMI input.
3. On the media player, select Setup?Audio?HDMI Output?RAW.
3 4
1.2 Connection to 5.1CH Amplifier (Digital) and HDTV
1. Connect the HDMI cable frommedia player's HDMI output to HDTV's HDMI input.
2. Connect the optical fiber cablefrom media player's OPTICAL output to 5.1CH amplifier's OPTICAL input.
3. On the media player, select Setup?Audio?SPDIF Output?RAW.
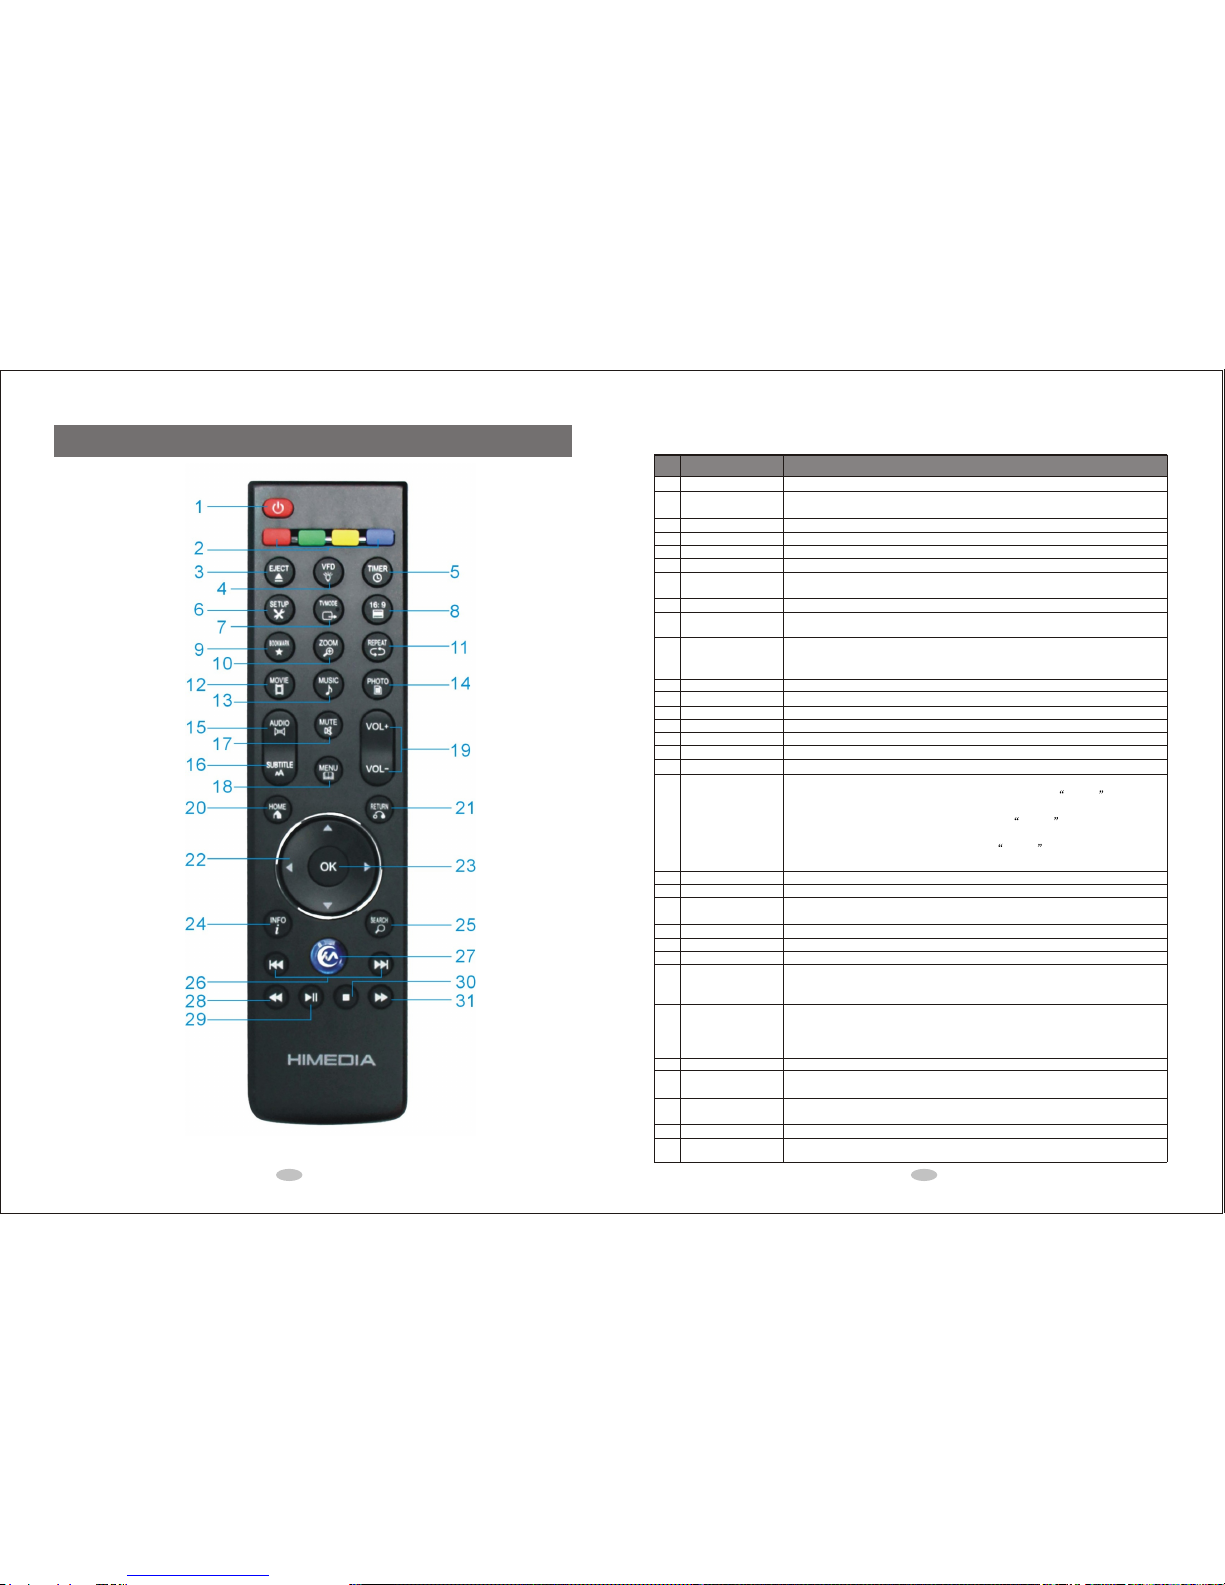
Turns the media player ONor OFF.
They are reservedbuttons with different functions in differentmenus, e.g.
Using Green buttoncan bring up operation menu in media library menu.
Ejects the discof a CD/DVD/BD-ROM drive attached to the media player.
Turns ON or OFF theVFD light on the front panel of the media player.
Sets the timeperiod for auto-power-off.
Switches to theSetup Menu directly for changing system settings.
Switches among NTSC,PAL, 480p, 576p, 720p50/60Hz, 1080i50/60Hz and
1080p50/60Hz video outputmodes.
Switches among 16:9,4:3 Letter Box and 4:3 Pan Scan aspect ratios.
Bring up Bookmarklist to play the video from the position where the playback
was stopped lasttime.
Zoom in/out theplaying photo or video
Available photo zoomscales: 2x, 4x, 8x and 16x.
Available video zoomscales: 1x, 2x, 3x, 4x and 8x.
Switches repeat optionamong Chapter, Title or Offset.
Enter MOVIE library.
Enter MUSIC library.
Enter PHOTO library.
Switches among audiotracks.
Switches among subtitletracks.
Press to muteaudio output, and press again to resume.
It is amultifunction button with different functions in different menus.
In Movies, Music,Photo or File Manager mode, press MENU to show
options.
When playing movies,music or photo, press MENU to show theplayback
menu.
When playing DVD/BDmedia files, press MENU to show DVD/BDMV
navigation menu, subtitlesetup menu, TVoutput resolution menu etc.
Increases or decreasesthe volume.
Switches to MainMenu
Returns to theprevious menu.
Turns offthe subtitle, audio track and time seek menu when playing movie.
Navigates and high-lightens menu items ormedia files.
Confirms the selectionor start to playback
Displays the mediafile information such as the title, format, and so on.
During video playback,shows the searchoperation menu.
In the medialibrary mode, shows the file searching menu.
In the WIFIsetup menu, re-scan the wireless network.
Changes page infile browser.
Jumps to theprevious/next chapter during BD/DVD playback
Plays the previous/nextfile during file playback,.
Jumps to theprevious/next picture in photo slide show.
Enter HIMEDIAonline video service
Fast rewinds thecurrent playback.
Presses repeatedly toswitch among different fast rewind speeds.
Plays the selecteditem.
Pauses/Resumes the currentplayback.
Stop the currentplayback
Fast forwards thecurrent playback.
Presses repeatedly toswitch among different fast forward speeds.
POWER
COLOR buttons
EJECT
VFD
TIMER
SETUP
TV MODE
16:9
BOOKMARK
ZOOM
REPEAT
MOVIE
MUSIC
PHOTO
AUDIO
SUBTITLE
MUTE
MENU
VOL+/VOL-
HOME
RETURN
Directional Keypad
OK
INFO
SEARCH
PAGE UP/PAGE
DOWN
Internet Media Service (IMS)
RWD
PLAY
STOP
Forward
1
2
3
4
5
6
7
8
9
10
11
12
13
14
15
16
17
18
19
20
21
22
23
24
25
26
27
28
29
30
31
Seq. Button Description
2.2 Remote Control Overview
2.0 Remote Control
2.1 Picture
5 6
3.0 Setup
The Setup menu allows you tochange System, Audio, Video, Network, Intelligent and MISC settings.
On the setup mode, please usethe Directional Keypad to navigate and high-lighten the setting items,
and then press OK to enter the submenu to changethe setting.
3.1 System Setting
Changes the OSD(On Screen Display) language.
Changes the text encoding language.
Sets system time.
Auto-Plays the DVD folder.
Timing: Sets the minimum idletime before showing screen saver..
Source: Changes the source of thescreen saver.
Pushes movie, music or photo fromDMC(The DMC should be in conformitywith the
DLNA protocol.) to themedia player. Theknown compatible DMC includes Windows7,
Android and iPhone (The phones shouldinstall the software such as imediashareor
eyecon to enable sharing).
Sets the name of the mediaplayer in LAN.
Sets the default language of thesoft keyboard.
When it's on, you can watcha movie from the last stopposition.
Formats the HDD on internal SATAinterface
Erases the current settings and appliesthe default settings.
Menu Language
Text Encoding
Time
R/RW Auto-Play
Screen Saver
DLNA DMR
Device Name
MiniKBD Language
Resume Play
Format
Factory Default
3.2 Audio Settings
Sets Night Mode to On, Off or Comfort. This function changes the maximum dynamic
audio range.
LPCM: Outputs down-mixed 2.0 decoded audioover HDMI. Use this setting when
connecting to a HDTV with HDMIinput directly.
RAW: Passes-through the originalbit-stream audio over HDMI. Use thissetting when
connecting to an amplifier with HDMIinput and decoding capability.
LPCM: Outputs down-mixed 2.0 decoded audioover SPDIF.
RAW: Passes-through the originalbit-stream audio over SPDIF. Use this setting when
connecting to a digital amplifier withSPDIF input and decoding capability.
5.1 CORE ONLY: Passes-through 5.1 core only forDTS-HDMA and TRUEHD.
HD AUDIO 7.1: Passes-through7.1 bit-stream for DTS-HDMA, TRUEHDand LPCM.
LPCM: Always outputs down-mixed2.0 decoded audio for the specifiedaudio format and
overrides HDMI Output and SPDIF Outputsettings.
RAW(Bitstream): Alwayspasses-through the original bit-stream for the specified audio
format, so the bit-stream setup onHDMI Output and SPDIF Output isavailable.
Night Mode
HDMI Output
SPDIF Output
HD Audio Core
Output
DOLBY(AC3),
DTS, AAC,
WMA Pro Output
3.3 Video Settings
Pan Scan 4:3: Displays a widepicture on the entire screen of4:3 TV and cuts off exceed
parts on two sides.
Letter Box 4:3: Displays a widepicture with two black borders onthe top and bottom of
4:3 TV without cutting offany picture.
16:9: Display the whole picture on16:9 TV.
16:10: Display the whole picture on16:10 monitor.
Switches TV output mode amongHDMI Auto, NTSC, PAL, 480P, 576P, 720P 50Hz,
720P 60Hz, 1080i 50Hz, 1080i60Hz, 1080P 50Hz and 1080P60Hz.
CRT (Over Scan): Shrinks thevideo to compensate the over scanfor CRT TV.
Full Pixel (Just Scan): Plays videosin the original size.
Enables or disables DNR.
On: If the video content is24fps, the media player will playit in 1080P/24Hz mode
automatically before.
Off: Always playsvideos in the selected video outputmode.
Changes HDMI Color Depth.
Aspect Ratio
TV System
Video Zoom
Digital Noise Reduction
1080P 24Hz
Deep Color
3.4 Network Settings
Before using the network function, pleaseconnect your media player to the network
first. Youcan select DHCP(AUTO) or FIX IP(MANUAL).
Notice: Please enable the DHCP serviceon your router before using DHCP(AUTO)
setting.
If you select FIX IP(MANUAL), pleasefill in IP Address, Subnet Mask, Default Gateway
and DNS server IP address.
You can usedefault numbers 8.8.8.8 as DNS serverIP address, or you can change it to
the DNS address provided by yourlocal internet service provider.
Before configuring the WLAN settings, please check thefollowing items:
Please make sure your media player comes with built-in WIFI, or got WLAN USBAdapter
connected to USB host port. Only WLAN USB Adapter using Realtek chipset are supported .
Make sure there is a wireless router or an AP (Access Point) in the network and your media
player is within the effective range.
Setup steps:
1. Once you choose wireless setup, your mediaplayer will automatically search the
available wireless networks.
2. Select your home wireless network.
3. Input the password/key for the wireless network.
If the media player hasn't detected any wireless network, please check your wireless router
and the effective range of the WLAN.You canpress SEARCH button to re-scan the
available wireless network.
Sets PPPoE ID and Password.
Turns on/off the built-in BTclient.
Turns on/off the built-in Sambaservice.
On : Youneed ID and Password to visit Neighbor webinterface.
User ID: admin Password: 123
You can change the password, butcannot change the user ID.
Off : Youdon't need ID and Password to visit Neighborweb interface.
Wired Lan Setup
Wireless Setup
PPPoE Setup
BT Process
Samba Process
BT&Samba
Security
7 8
3.5 Intelligent Settings
Automatically recognizes subtitle encoding type, suchas BIG5, GB2312, UTF8 etc.,
and display it correctly.
On: The group of filesin the same directory such as
xx_yy_zz_01.ts, xx_yy_zz_02.ts and, xx_yy_zz_03.ts will beplayback seamlessly.
Note: It's only valid forTS/PS file and not working for AVI,MKV files.
Off: Plays files one byone with 2 seconds interval between two files
On: When browsing file, pressing OK on the BDMV folder will playBDMV folder
and pressing Play button will play BDMV file.
Sets the default subtitle language trackfor playing BDM.
Sets the default audio language trackfor playing BDMV.
Sets the font's path for externalsubtitle.
Subtitle Automation
Recognition
TS Seamless Playback
BDMV Folder Auto-Play
BDMV default subtitle
BDMV default audio
Subtitle Font Directory
3.6 MISC Settings
Shows firmware version info.
Please check Chapter 9.0 Upgrade Firmware .
Version Info
USB upgrade
4.0 Main Menu
Movies
Go to movie media library.
Music
Go to music media library.
Photo
Go to photo media library.
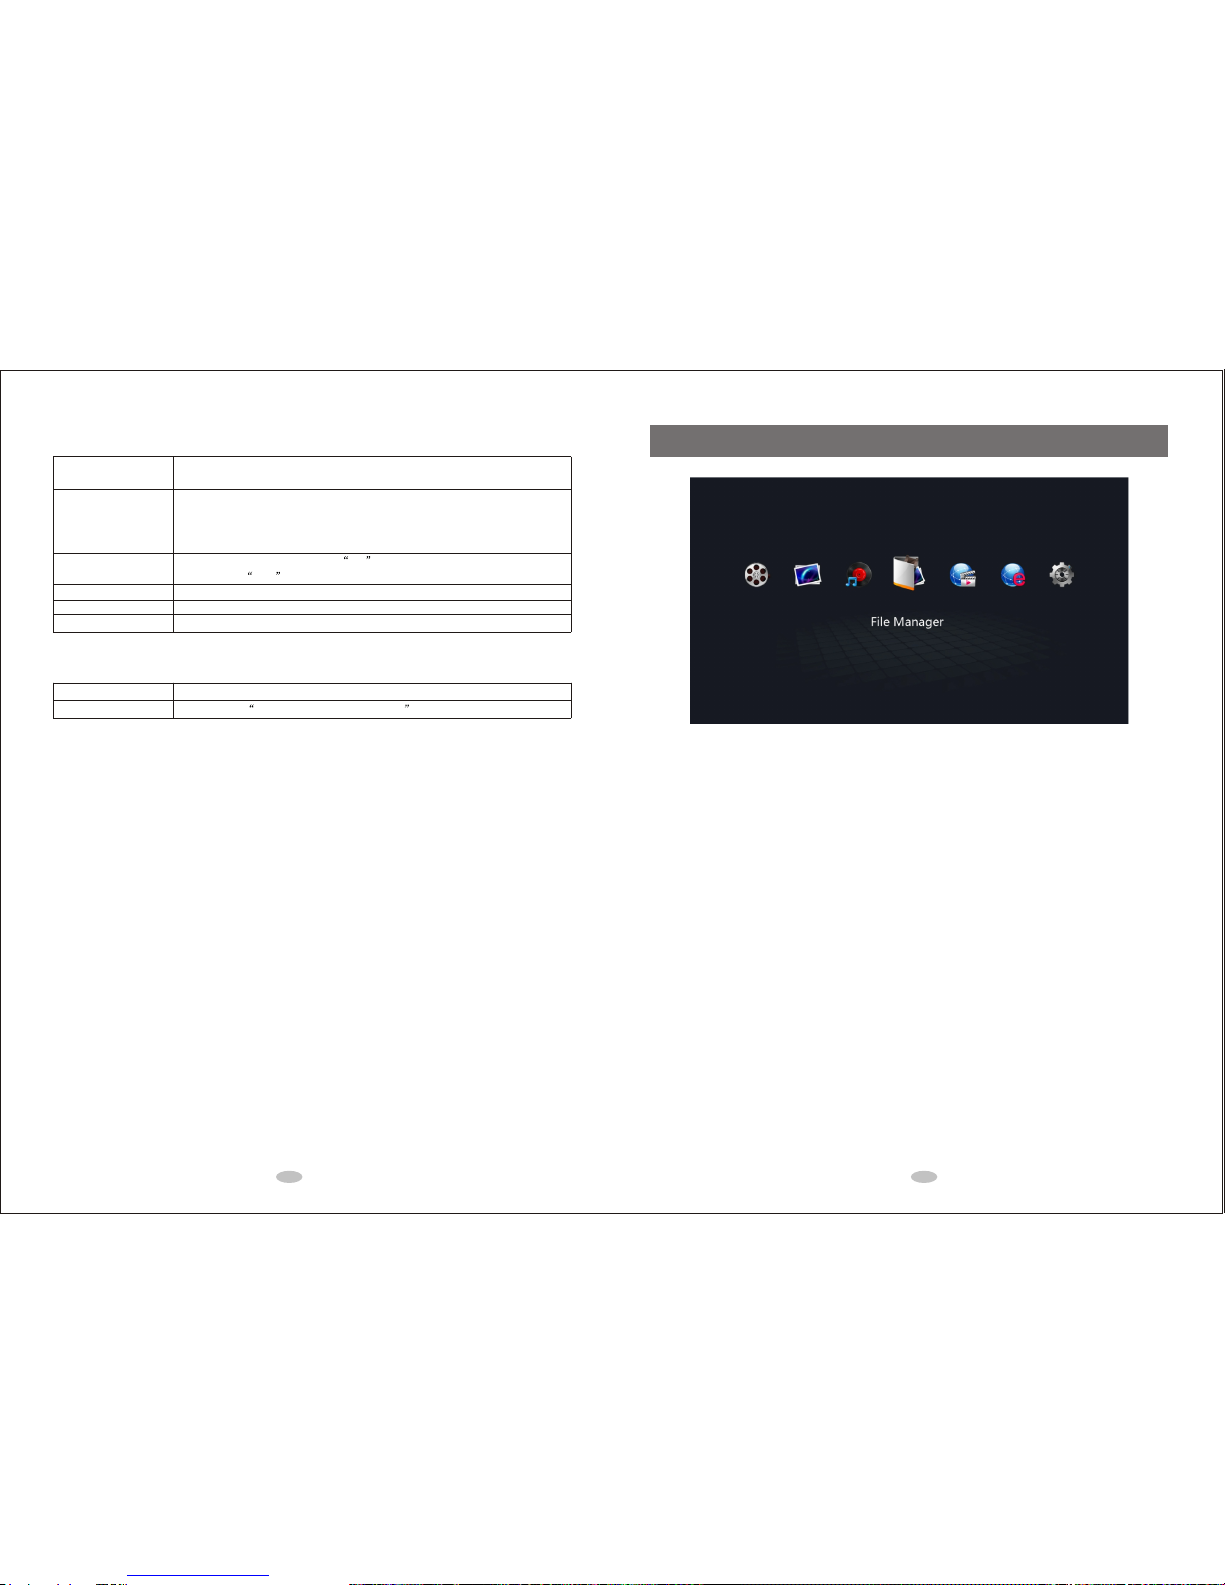
File Manager
Go to file manager to managemovie, music and photo files in USB, CARD, HDD, Network (SAMBA/UPNP), etc.
Internet Media Service
If the wired or wireless networkis connected, various internet services such as YouTube and Video Podcast
are available.
Web Browser
You need toconnect a mouse and keyboard touse the web browser to browse internet.
Setup
Go to setup menu to changesettings for System, Audio,Video, Network, MISC etc.
9 10
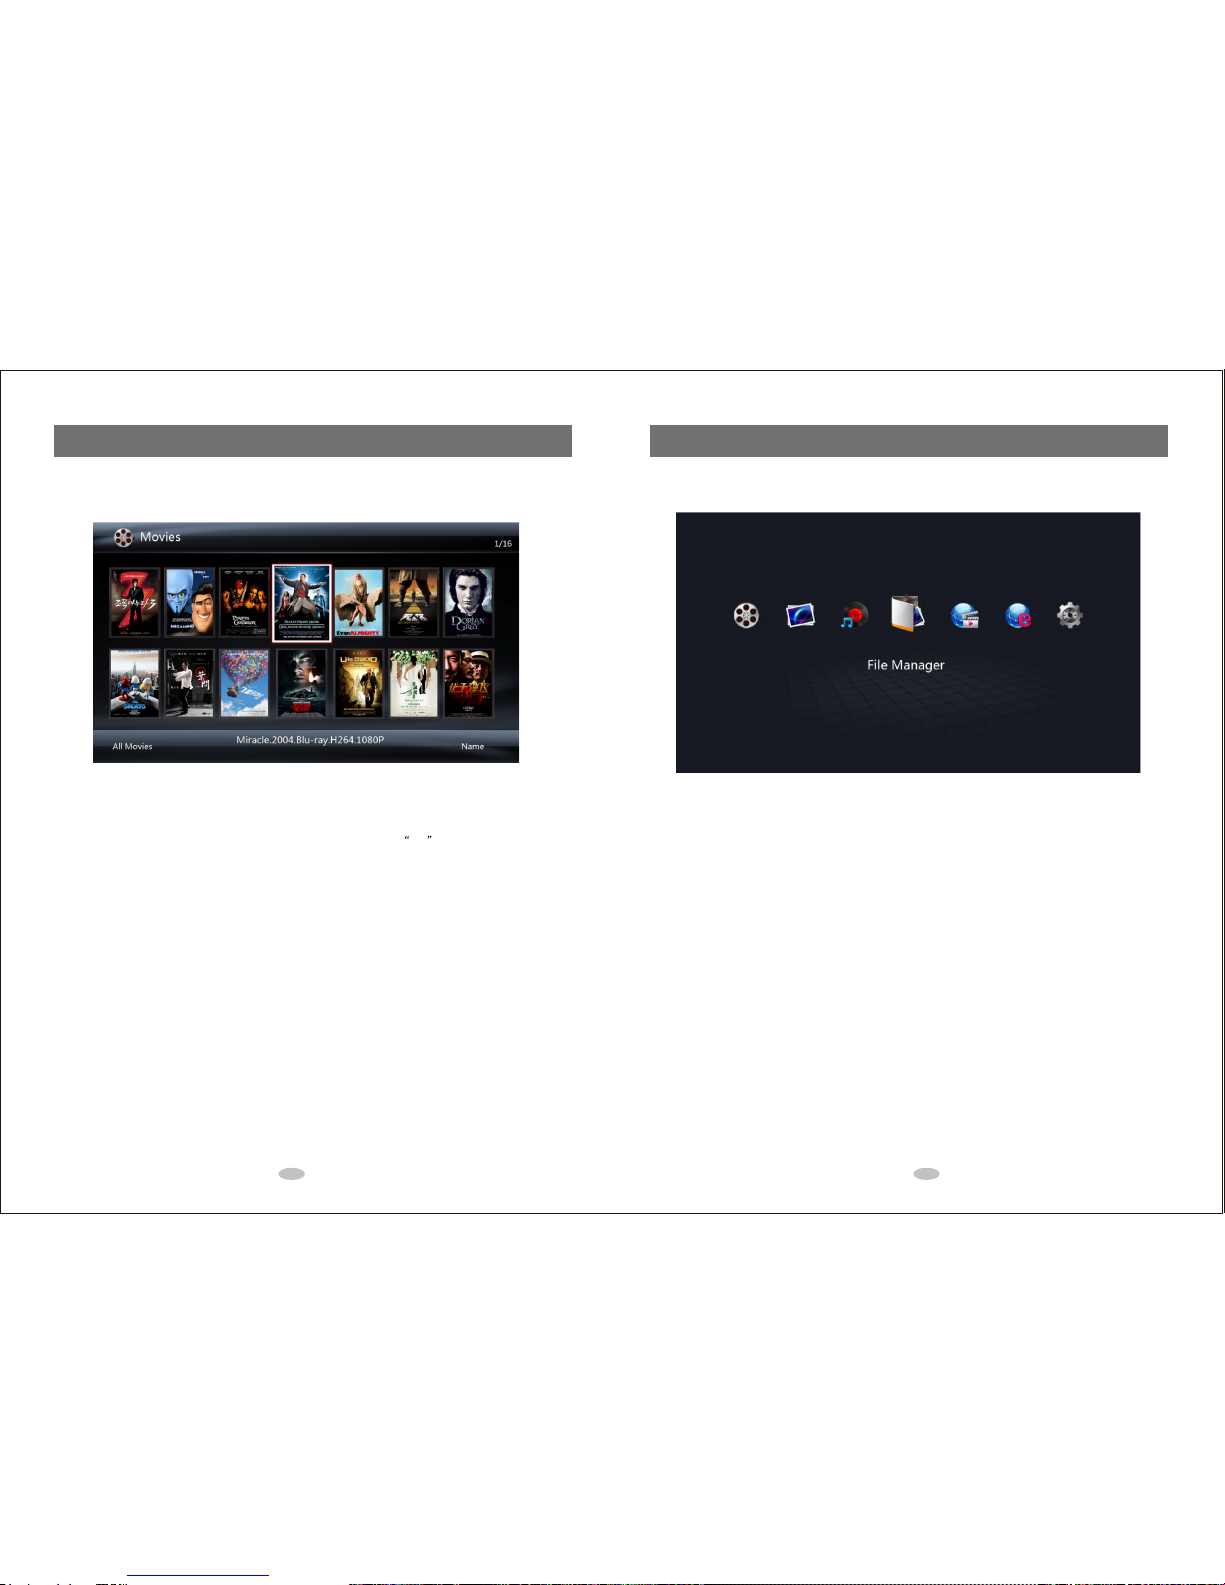
5.0 Media Library
You cango to Movies, Music and Photo Media Library through the main menuor using the shortcut buttons on
the remote control.
In the media library, you can use the followingbuttons.
Directional Keypad: Navigates and high-lightens media files, andpress OK to play the selected file.
Green Button: Shows up the operation menu toadd files to or delete thefiles in the media library. ('Delete'
only removes the file from themedia library. Itdoes not delete the file fromthe storage device).
MENU Button: Changes view mode (such as thumbnail,list, or preview mode), file filteringmode (such as All
Movie or Only BD/DVD), and filesorting mode for displaying the medialibrary.
SEARCH Button: Shows up the file searching menufor you to search the filesin the media library.
6.0 File Manager
You cango to File Manager through the main menu.
In the file manager,you can use the following buttons.
Directional Keypad: Navigates and high-lightens media files, andpress “OK” to enter the selectedfile
folder or to playback the selectedfile.
Green Button: Shows up the operation menu tocopy, delete, move,rename and add the selected file/folder
to the media library.
MENU Button: Changes view mode (such as thumbnail,list, or preview mode) and filefiltering mode (such
as All Media Files,Only Movies, Only Music or OnlyPhoto).
RETURN Button: Returns to the parent directory orto the main menu.
11 12

7.0 Internet Media Service and Web Browse
You canbrowse internet resources and play online media available on internet. Before doingthat, please
make sure that you have finishedthe network related settings.
You cango to Internet Media Service (IMS) through the main menu. Varieties of internet services are
available and you can press OK button to open or enter the selected service.
You cango to Web Browser through the main menu. To use the browser,you need to connect a USBmouse
and keyboard to the media player. In web browser,you can press RETURN button to return to the main
menu.
8.0 Using your Media Player
8.1 Create Media Library
Media Library is a media databasethat makes the media player easyto use. It is very important to create the
media library.
There are many features based onthe media library,such as shortcut key to Movies,One Touch to Enjoy Music,
and One Button to review thephotos
Note: In the media library, all operations are applied todatabase only. Those operations will not affectthe
physical files in the storage devices.If a media file is removedfrom the Media Library, the media file in the
storage device is not deleted.
You canuse the following ways to create and manage the media library
Method 1: Enter Main Menu andthe Media Library Guide will appearto help you to create the media library step
by step if the media libraryis empty.
Method 2: Enter File Manager andselect drive, file folder,or file. Then press Green button to add the
selected item to the media library.
Method 3: In the media library, press Green button to delete a file, allmovies, all music, all photos or all files
in the media library. (The files are only removedfrom the Media Library. The physical files are not deleted from
the storage devices. You can re-scan the storage devicesto create media library in theMedia Library Guide menu.
8.2 Play Movies
Method 1: Open MOVIES media librarythrough main menu or press MOVIE button on the remote control,
then select a movie and press OK to play it.
Method 2: Open file manager menu,enter a storage device and choosea movie to play.
1 When playing a movie, you can use ZOOM button to enlarge the picture by2X, 3X, 4X or 8X.
13 14

2 ) When playing a movie, youcan use SEARCH button to make the movie playfrom certain time point.
3 ) When playing a movie,you can use AUDIO button to switch Left/Right CH oraudio tracks.
4) When playing a movie, you canuse SUBTITLE button to switch subtitles.
5 ) When playing a movie,you can use INFO button to show the information ofthe playing movie.
15 16

6 When playing a movie, you can use RWD , FWD or PLAY button to rewind, fast-forward or
play the movie normally.
7 When playing a movie, you can use MENU button to bring up a setupmenu for changing subtitle,
audio, repeat playback and picture parametersetc.
17 18

8 When playing a movie, you can use UP/DOWN Key to adjust thevertical position of the subtitle.
9 When playing a movie, you can use LEFT/RIGHT Key to rewind/fast-forward 10 seconds.
10 When playing a movie, you can use MENU button to bring up a setupmenu. Under the setup menu,
you can enter the subtitle submenu and have two different sets of settings for two externalsubtitle 1 and
subtitle 2. You can use LEFT/RIGHT Keyto switch between subtitle 1 and subtitle 2.
11 When playing a BDMV folder, you can use MENU button to show BD Lite Navigationmenu.
8.3 Play Music
Method 1: Open MUSIC media library through main menu, select music,and then press OK to play the music.
Method 2: Use MUSIC button to realize One-Touch-Music-Playback.
Method 3: Open file manager, enter a storage device, andselect music to play.
When playing music, you can use MENU button to select differentrepeat modes for playing such as play once,
repeat the single, play one byone, random playback.
When playing music, you can use INFO button to show the information ofthe playing music.
8.4 Play Photo
Method 1: Open PHOTO medialibrary through main menu, select a photo, and then press OK to play.
Method 2: Open file manager menu,enter a storage device, and thenselectc a photo to play.
1) When playing a photo, youcan use LEFT/RIGHT Key to jump to the last/next photo.
2) When playing a photo, youcan use UP/DOWN Key to rotatethe photo.
3) When playing a photo, youcan use ZOOM button to enlarge photo and Directional Keypad to pan
the photo.
4) When displaying a photo infull screen, you can use MENU button to select the background music.
5) When playing a photo, youcan use MENU button to set photo transition effect, slide show timing and
background music etc.
The default settings for photoplayback are 5 seconds time interval, random transition effect and repeatall mode.
8.5 Cover file
In the media library or filemanager, the corresponding coverpictures stored in the file folders will be displayed
when Media Cover Mode is selected.
19 20

The rules for media cover:
1 For folder, it willdisplay the first .bmp or .jpgfile in the current folder. Suggestion name: cover. jpg,folder. jpg
2 For movie, it will display the .bmp or .jpg file with thesame filename as the movie in the same folder.
3 For photo, it will just display the photo.
4 For music, it will display the .bmp or .jpg files with thesame filename as the music inthe same folder.
8.6 Music Playlist
In the music media library orfile manager, you canuse Green button to show Operation Menu , and
then select Multi-File Manage to enter Playlist Manage Menu .
1) Use UP/DOWN Key to high-lightena music, then press PLAY button to add the selected musicto the
playlist.
2) Use Green button to select Save Playlist .
In file manager, youcan select the playlist file andthen press Green button to modify the selected playlist.
8.7 Photo Album
In the photo media library orfile manager, you canuse Green button to show Operation Menu , and
then select Multi-File Manage to enter Playlist Manage Menu .
1) Use UP/DOWN Key to high-lightena photo, and then press PLAY button to add the photo tothe album.
2) Use Green button to show Multi-File Manage Menu , and then select Save Photo Album .
In file manager, youcan select the PhotoAlbum file and then press Green button to modify the selected
photo album.
8.8 File Copy and Delete
In file manager, you can high-lighten a file or folder, press Green button to
show Operation Menu , and then select Multi-File Manage to enter
Playlist Manage Menu .
1) Use UP/DOWN Key to high-lighten a file, and then press PLAY button
to add the file to the playlist.
2) Use Green button to show Multi-File Manage Menu , and then you
can copy, delete or remove the file.
8.9 Play Media Files through Local Network
Network Settings
You can playback the multimedia files shared on the local area network
(Ethernet or WLAN).
Before doing that, please makesure that you have read Network Settings
on Chapter 3.0 and finish the related settings.
Playback from SMB(windows
Do the setting on your PC:
1) Configure the IP address and make sure that the player and the PC are
in the same sub network;
2) Configure the shared folder in window;
3) Disable windows firewall, and other applications with the firewall function;
TESTING
A) On PC side, ping the player's IP address to make sure the network
between the PC and player is working.
B) Test the windows share setting by using another computer (PC) to
access the shared folder.
21 22
Two methods for themedia player to visit the sharedfolder.
Method 1: Through Workgroup andPC ID Login
Make sure that the meida playeris connected to network, enter filemanager, select network, press OK to
find your PC's workgroup and yourPC's ID. In the pop upNetwork Browser, input your PC ID and Password to
login. The PC ID and Password is created when PC shares the filefolder.
Method 2: Through My_Shortcuts Login
Make sure that the meida playeris connected to network, enter filemanager, select network, press OK ,
select My-Shortcuts, press Red button to display Tool Menu, and then you canadd, modify or delete short
cuts in the menu.
Use soft keyboard to input networkUser ID, Password and File Server'sIP. Press OK to add shortcut.
If the input ID and Passwordis correct, it will dispaly LoginSucceed.
After sucessful login, you can navigateand play shared files like localfiles.
Note:
1. While playing high definition videofiles (resolution up to 720p /1080i / 1080p) via Ethernet or WLAN,
the video might be stuttering dueto slow network speed or poorsignal strength.
2. Due to different networkconditions, sometimes the workgroup might not be accessible or shown in thelist.
Then you need to use 'MyShortcuts' to browse shared files
3. Some 1080P videos maynot play smoothly when stream them via network.
Playback from UPNP
Please configure the UPNP server onthe PC. Please refer to
http://en.wikipedia.org/wiki/UPnP_AV_MediaServers for detailedinformation and UPNP setup.
Make sure that the meida playeris connected to network and UPNPserver is on. Then go to file manager
mode and select UPNP. The media player willautomatically search the UPNP server.
After search completes, the media playerwill automatically show the title of available UPNP servers.
After sucessful login, you can navigateand play the remote files like local files.
Note:
1) Different UPNP servers havedifferent rules for file filter. Some UPNP server doesn'tsupport MKV, RMVB file.
2) The external subtitle filecannot stream together with video from the UPNP server.
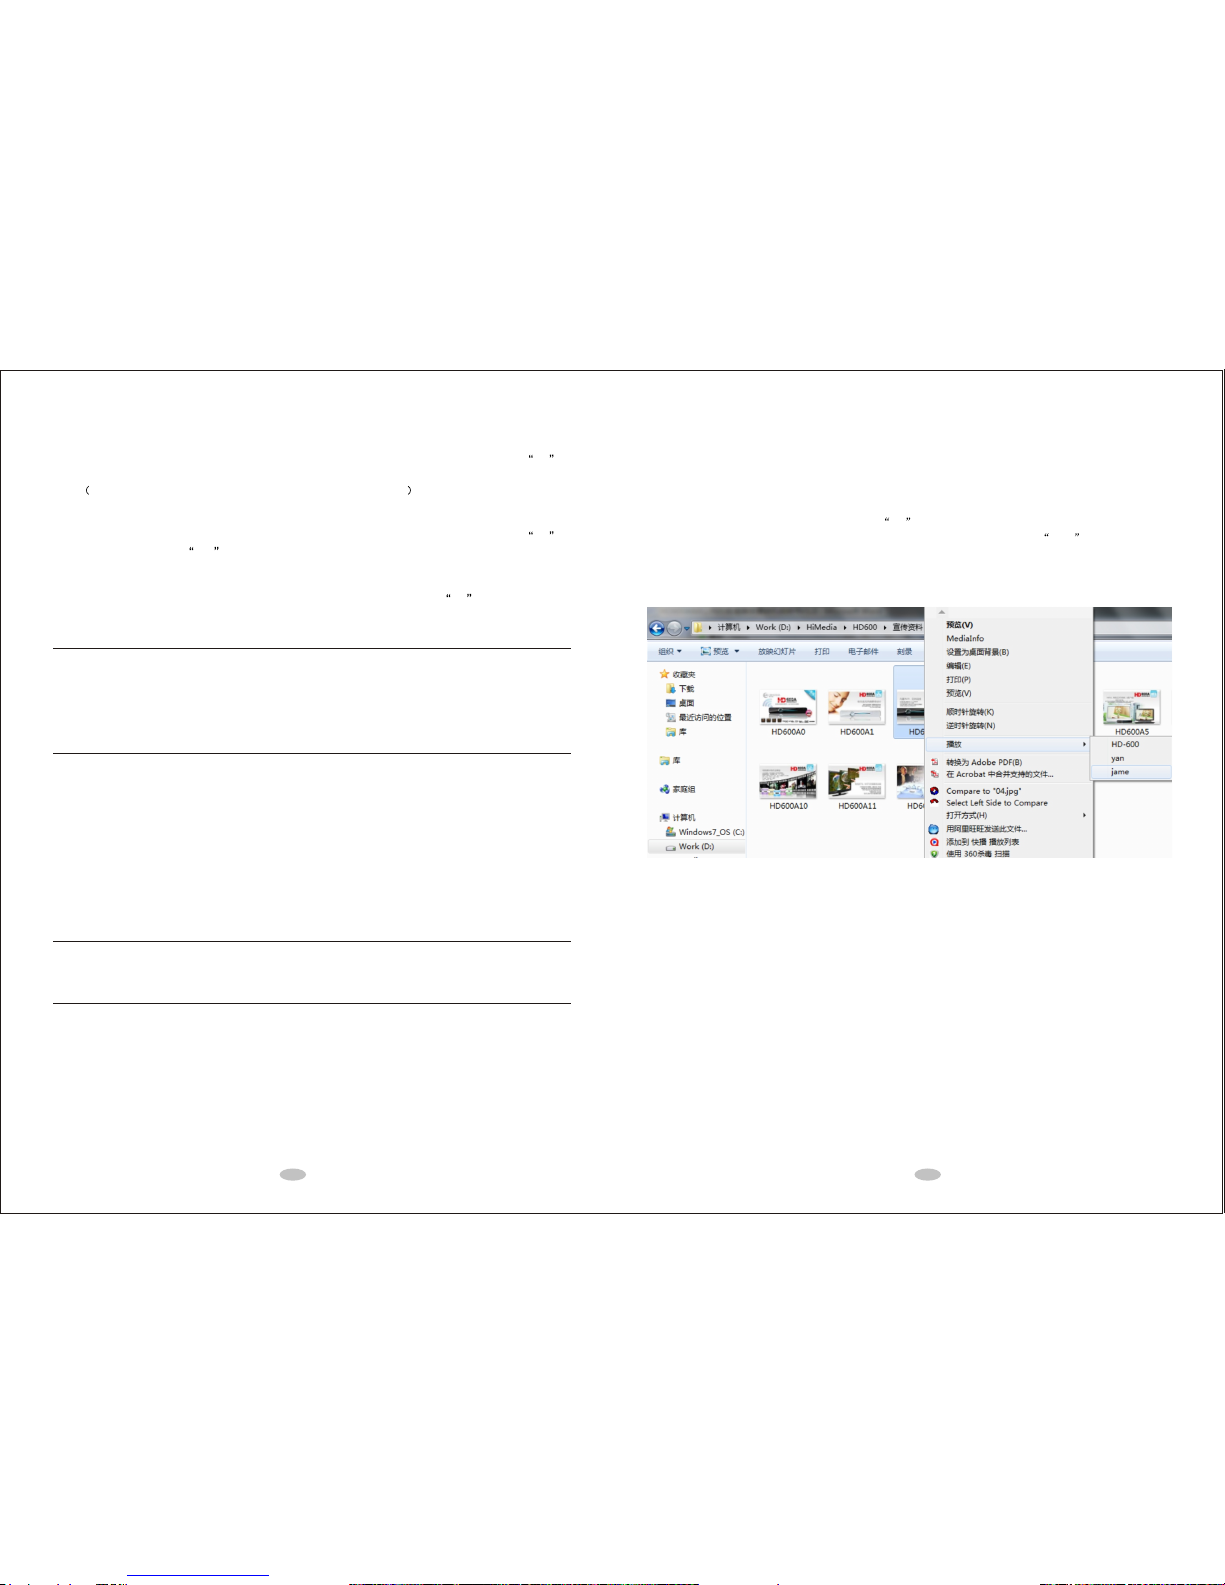
8.10 Share Media Files on Windows7 or Smart Phone
Make sure that the meida playeris connected to network by going to Setup?Network?Network Info to check
the current IP of themedia player.
Share the media files on Windows7
1) Connect Windows7 and your mediaplayer into the same network.
2) Enter Setup?System?DLNA DMRand Select On .
3) Enter Setup?System?Device name and givethe media player a name, such as jame .
4) To share the media file fromWindows7 to the media player, you need to select amedia file (movie, music or
photo) on PC, click mouse's rightbutton to show the context menu, click play in the context menu,and then
select your media player(such as jame)in the sub menu.
Share media files on Smart Phone
Please Install imediashare or eyecon onyour Android Smart Phoneor iPhone. With imediashare or eyecon,
the media player can play themedia file in your smart phone.
Note: The WIFI of your smartphoneand the network of your media player must be in the samenetwork.
Please refer to: http://www.bianor.com/ims/quick_start.html
Note: If the media player didn't appearon your wondows7 or smartphone, youcan turn off and then turn on the
DLNA service again inthe Setup page.
23 24
9.0 Firmware Upgrade
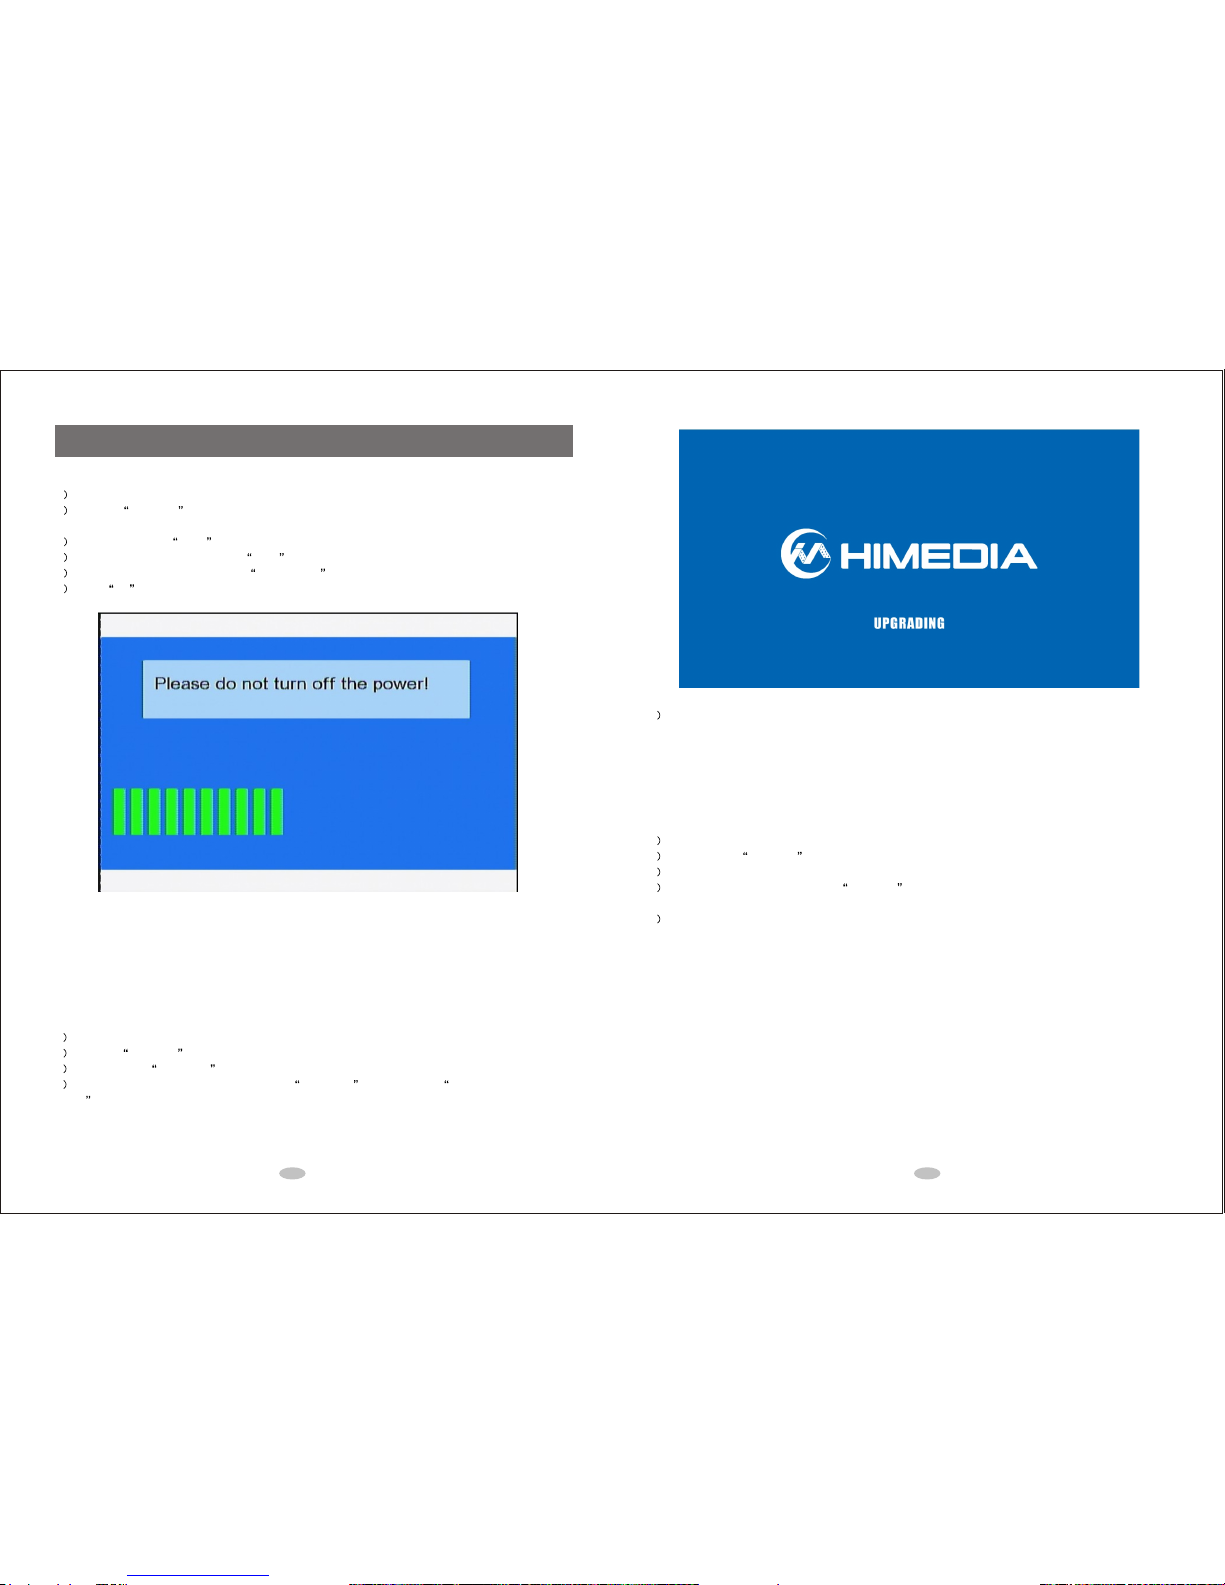
9.1 Standard Mode Upgrade
1 Rename the downloaded firmware to install.img;
2 Copy the install.img to the root directory of USB disk. Insert the USB disk intothe media player,
and then turn on the player;
3 After boot up, enter Setup menu;
4 Use the directional keypad to enter MISC menu;
5 Use the directional keypad to select USB upgrade ;
6 Press OK to start the upgrade process;The following page will show up.
It will take about 3 minutes. (Note:please keep POWER ON during the wholeupdating process.)
9.2 Safe Mode Upgrade
If normal mode firmware upgrade faileddue to power lost during upgradeprocess, you can use the following
method to recover it.
1 Rename the downloaded firmware to install.img;
2 Copy the install.img to the root directory of USB disk. Insert the USB disk intothe media player;
3 Press and hold UPGRADE button in the little hole onthe back panel of the media player;
4 Power on the media player (Don't release the UPGRADE button until the UPGRADING START
PAGE appears);
5 It will take about 3 minutes. (Note: please keep POWER ON duringthe whole updating process.)
9.3 Tips for Upgrading Firmware
1 Must rename the downloaded firmware toinstall.img.
2 Must copy the install.img file to the root directory of USB disk.
3 If your USB disk is notdetected, please format your USB disk or change to a new USBdisk.
4 Please make sure there is onlyone install.img file if there are several USBdisks connected to the
media player.
5 Different models of media playersmay require different firmware. Please use thecorrectfirmware to upgrade.
25 26
Table of contents


