HiRO H50291 User manual

HiRO H50291 11n 300Mbps
802.11b/g/n WiFi WLAN
Signal Repeater Range
Extender
Quick Installation Guide
This device complies with part 15 of the FCC Rules.
Operation is subject to the following two conditions:
(1) This device may not cause harmful interference, and
(2) this device must accept any interference received, including interference
that may cause undesired operation.
Follow each STEP carefullyand onlygo to the next step once you have completed
the previous STEP.
Connection of HiRO H50291 11n 300Mbps 802.11b/g/n WiFi WLAN Signal
Repeater Range Extender
1. Connecting Wired Devices such asPC or SlingBox using the supplied
RJ45 Ethernet cable to the HiRO H50291 11n 300Mbps 802.11b/g/n WiFi
WLAN Signal Repeater Range Extender's LAN Port.
2. Extend Wireless Network Range to otherWireless Devices
STEP 1 – WPS Pairing
WPS Pairing between HiRO H50291 11n 300Mbps 802.11b/g/n WiFi WLAN
Signal Repeater Range Extender and Wireless xDSL/Cable Modem or
AP/Router
1. Connect the HiRO H50291 11n 300Mbps 802.11b/g/n WiFi WLAN Signal
Repeater Range Extender to your wall-mounted power outlet close to the
Wireless xDSL/Cable Modem or AP/Router.
2. Press WPS button on Wireless xDSL/CableModem or AP/Router or
AP/Router for more than 3 seconds or till the WPS light flashes.
3. Press WPS button on HiRO H50291 11n 300Mbps 802.11b/g/n WiFi WLAN
Signal Repeater Range Extender for 3 seconds and release WPS button
4. Now the WPS LED is blinking and the HiRO H50291 11n 300Mbps
802.11b/g/n WiFi WLAN Signal Repeater Range Extender is doingWPS
Pairing with Wireless xDSL/Cable Modem or AP/Router.
5. Make sure to press the button within 120 seconds (2 minutes) after
pressing the Wireless xDSL/Cable Modem or AP/Router's WPS button.
If the HiRO H50291 11n 300Mbps 802.11b/g/n WiFi WLAN
Signal Repeater Range Extender's WiFi signal strength
LED isn't ON, please repeat STEP 1 WPS Pairing or goes
to STEP 2 as show below
***For Verizon FiOS Users w/ MI424WR w/o WPS button or
other devices w/o WPS button, pls goes to STEP 2
STEP 2 – LAN configuration
LAN configuration between HiRO H50291 11n 300Mbps 802.11b/g/n WiFi
WLAN Signal Repeater Range Extender and Wireless xDSL/Cable Modem or
AP/Router
1. From the LAN computer connected launch your web browser, type the
following URL in the web address (or location) box, and press [Enter] on your
keyboard:
http://10.0.0.2
2. Please enter the Login User Name: admin and Login Password: 1234 and
then click on Login button.
3. Ticks on Auto checkbox.
4. Click on Site Survey button and wait for 5 seconds for site surveying.
5. Ticks on “Select” radio button of SSID of the front AP and configure related
parameters
6. Click on Apply & Save button.
7. Click on "OK".
STEP 3 – Wireless Configuration
Wireless configuration between HiRO H50291 11n 300Mbps 802.11b/g/n WiFi
WLAN Signal Repeater Range Extender and Wireless xDSL/Cable Modem or
AP/Router
1. Double click on the wireless icon on your computer andsearch forthe
wireless network that you enter SSID name.
2. Click on the wireless network that you enter SSID name (the default settings
SSID = REPEATERXXXX which could be found on the bottom side of the
device) to connect.
3. If the wireless network isn’t encrypted, click on " Connect Anyway " to
connect.
4. If the wireless network is encrypted, enter your own wireless password at least
8 characters for example 12345678 in the key field / Network key field /
Confirm Network key field (the default settings Security Mode =
WPA/WPA2 Mixed, Pre-Shared Key = XXXXXXXXwhich could be found
on the bottom side of the device). You can later change this network key
via the wireless configuration menu.
5. Click on "Connect" or "Apply".
Repeat STEP 2 to continue configuring between HiRO H50291 11n 300Mbps
802.11b/g/n WiFi WLAN Signal Repeater Range Extender and Wireless
xDSL/Cable Modem or AP/Router
System Requirements
1. Pentium 200MHZ processor or above
2. Windows 8.1 / 8 / 7 / Vista / XP 32-bit 64-bit
Package Content
1. 11n Repeater
2. Quick Installation Guide
3. Ethernet Cable (RJ-45)
LED Meaning
Your HiRO H50291 11n 300Mbps 802.11b/g/n WiFi WLAN Signal Repeater Range
Extender has indicator lights on the Top side. Please seebelow as LED Indicator
definition.
Ethernet Ethernet Active indicator
Power Power indicator
Wireless Wireless Active indicator
WPS WPS Active indicator
Wifi Signal
Wireless Signal Strength
indicator
Table1. LED function
Label Color On Flash Off
Ethernet Blue Ethernet
Connected Transmit /
Receive Data Ethernet
Disconnected
Power Blue Ready Waiting for
device ready Power Off
Wireless Blue WLAN Ready Transmit /
Receive Data WLAN Off
WPS Blue N/A Start WPS pairing
within 2 minutes WPS Idle
WiFi
Signal Blue Ethernet
Connected Transmit /
Receive Data No WAN IP address
from xDSL / Cable
Modem
Connectors
Table 2 shows the function of each connector and button of the device.
Table 2. Function / Description of Connectors
Connecto
r
Description
Ethernet Connects the device via LAN Ethernet to a PC
WPS
WPS
Press this button for 3 full seconds and the WPS LED will
flash to start WPS.
Make sure to press the button within 120seconds (2
minutes) after pressing the Wireless xDSL/Cable Modem
or AP/Router's WPS button.
RESET
RESET
Reset button. RESET the HiRO H50291 11n300Mbps
802.11b/g/n WiFi WLAN Signal Repeater Range Extender to
its default settings.
Press this button for at least 3 full seconds to RESET device
to its default settings.
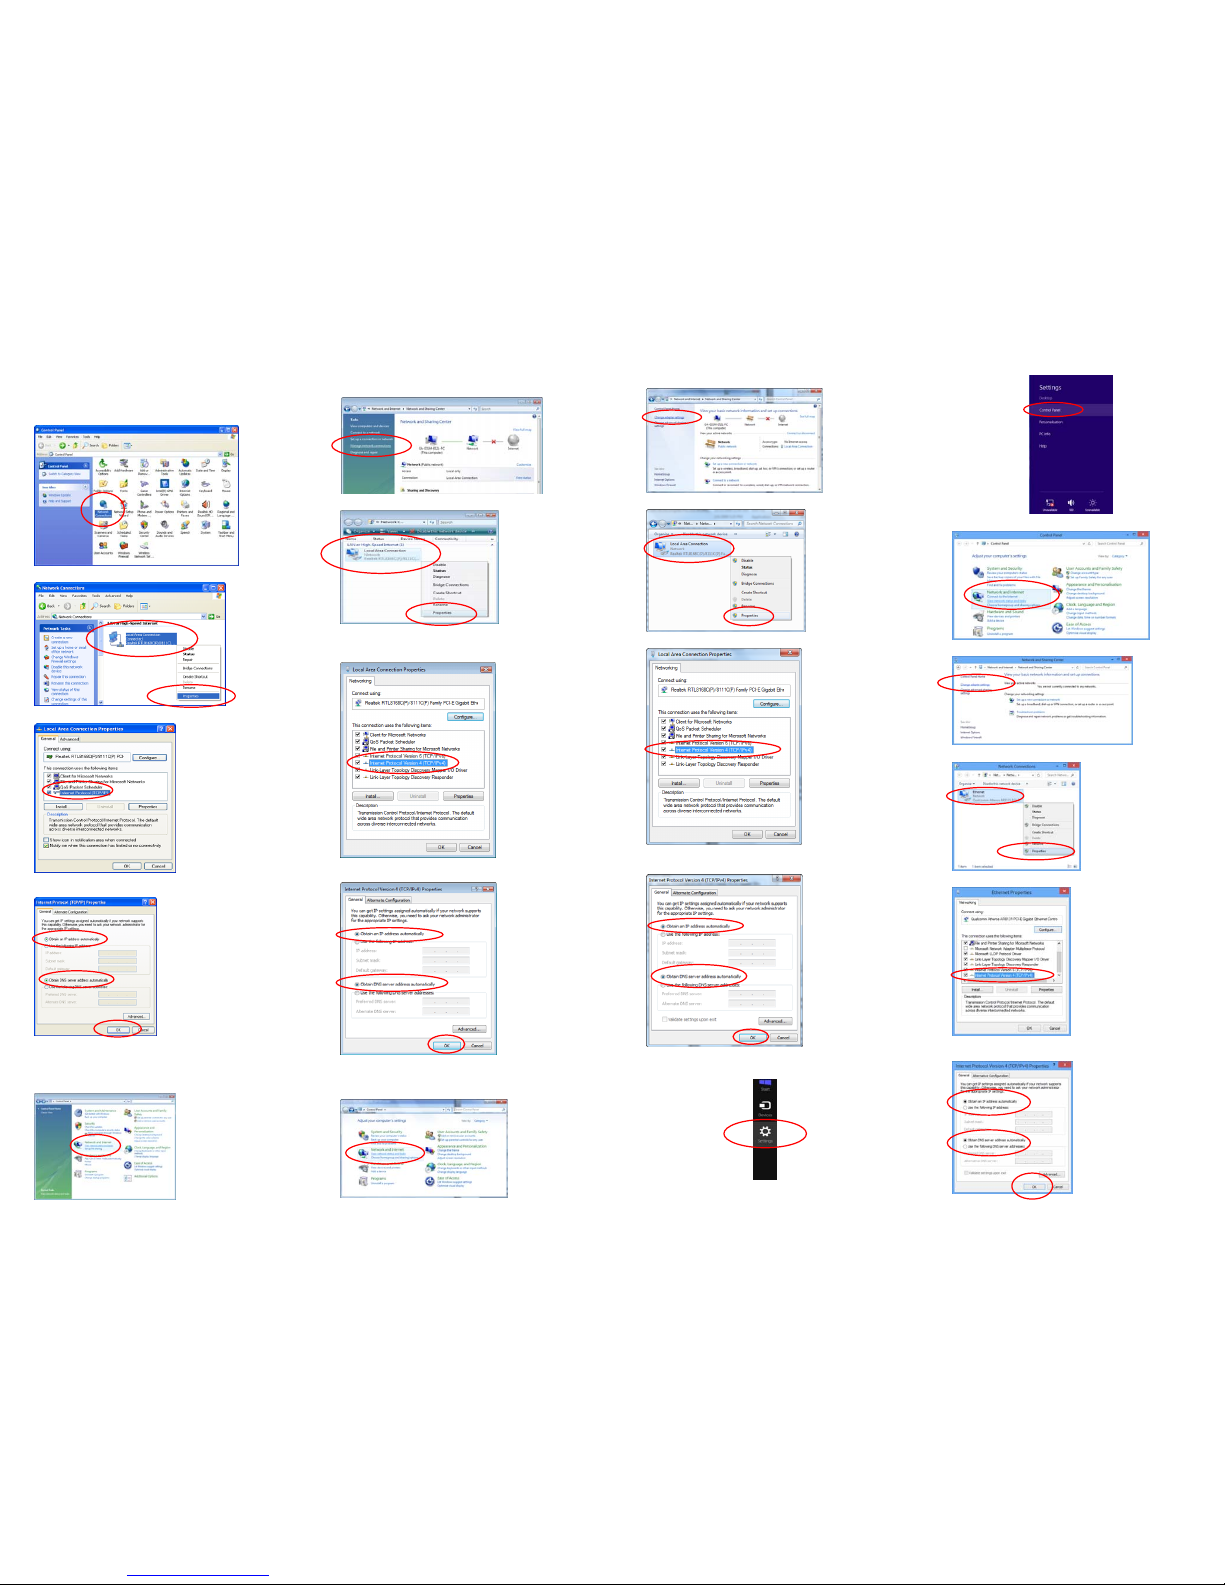
Configure the PC computer as below, to have automatic IP address / DNS Server.
For Windows 98SE/ME/2000/XP
1. Click on "Start" -> "Control Panel" (in Classic View). In the Control Panel,
double click on "Network Connections" to continue.
2. Single RIGHT click on "Local Area connection", then click "Properties".
3. Double click on "Internet Protocol (TCP/IP)".
4. Check "Obtain an IP address automatically" and "Obtain DNS server
address automatically" then click on "OK" to continue
5. Click "Show icon in notification area when connected" (see screen image
in 3. above) then Click on "OK" to complete the setup procedures.
For Windows Vista-32/64
1. Click on "Start" -> "Control Panel" -> "View network status and tasks".
2. In the Manage network connections, click on "Manage network
connections" to continue.
3. Single RIGHT click on "Local Area connection", then click "Properties".
4. The screen will display the information "User Account Control" and click
"Continue" to continue.
Double click on "Internet Protocol Version 4 (TCP/IPv4)".
5. Check "Obtain an IP address automatically"and "Obtain DNS server
address automatically" then click on "OK" to continue.
For Windows 7-32/64
1. Click on "Start" -> "Control Panel" (in Category View) -> "View network
status and tasks".
2. In the Control Panel Home, click on "Change adapter settings" to continue.
3. Single RIGHT click on "Local Area connection", then click "Properties".
4. Double click on "Internet Protocol Version 4 (TCP/IPv4)".
5. Check "Obtain an IP address automatically"and "Obtain DNS server
address automatically" then click on "OK" to continue.
For Windows 8-32/64
1. Move the mouse or tap to the upper right cornerand click on “Settings”.
2. Click “Control Panel”.
3. Click on “View network status and tasks”.
4. In the Control Panel Home, click on “Change adapter settings” to continue.
5. Single RIGHT click on "Ethernet", then click "Properties".
6. Double click on "Internet Protocol Version 4 (TCP/IPv4)".
7. Check "Obtain an IP address automatically"and "Obtain DNS server
address automatically" then click on "OK" to continue.
Popular Extender manuals by other brands


MuxLab
MuxLab 500768 Quick installation guide

Comnet
Comnet FVT414 Installation and operation manual

Synology
Synology DX1211 user guide

Network Technologies
Network Technologies XTENDEX Series Installation and operation manual

J-Tech Digital
J-Tech Digital JTECH-AET1000B operating instructions

ATEN
ATEN CE800b user manual