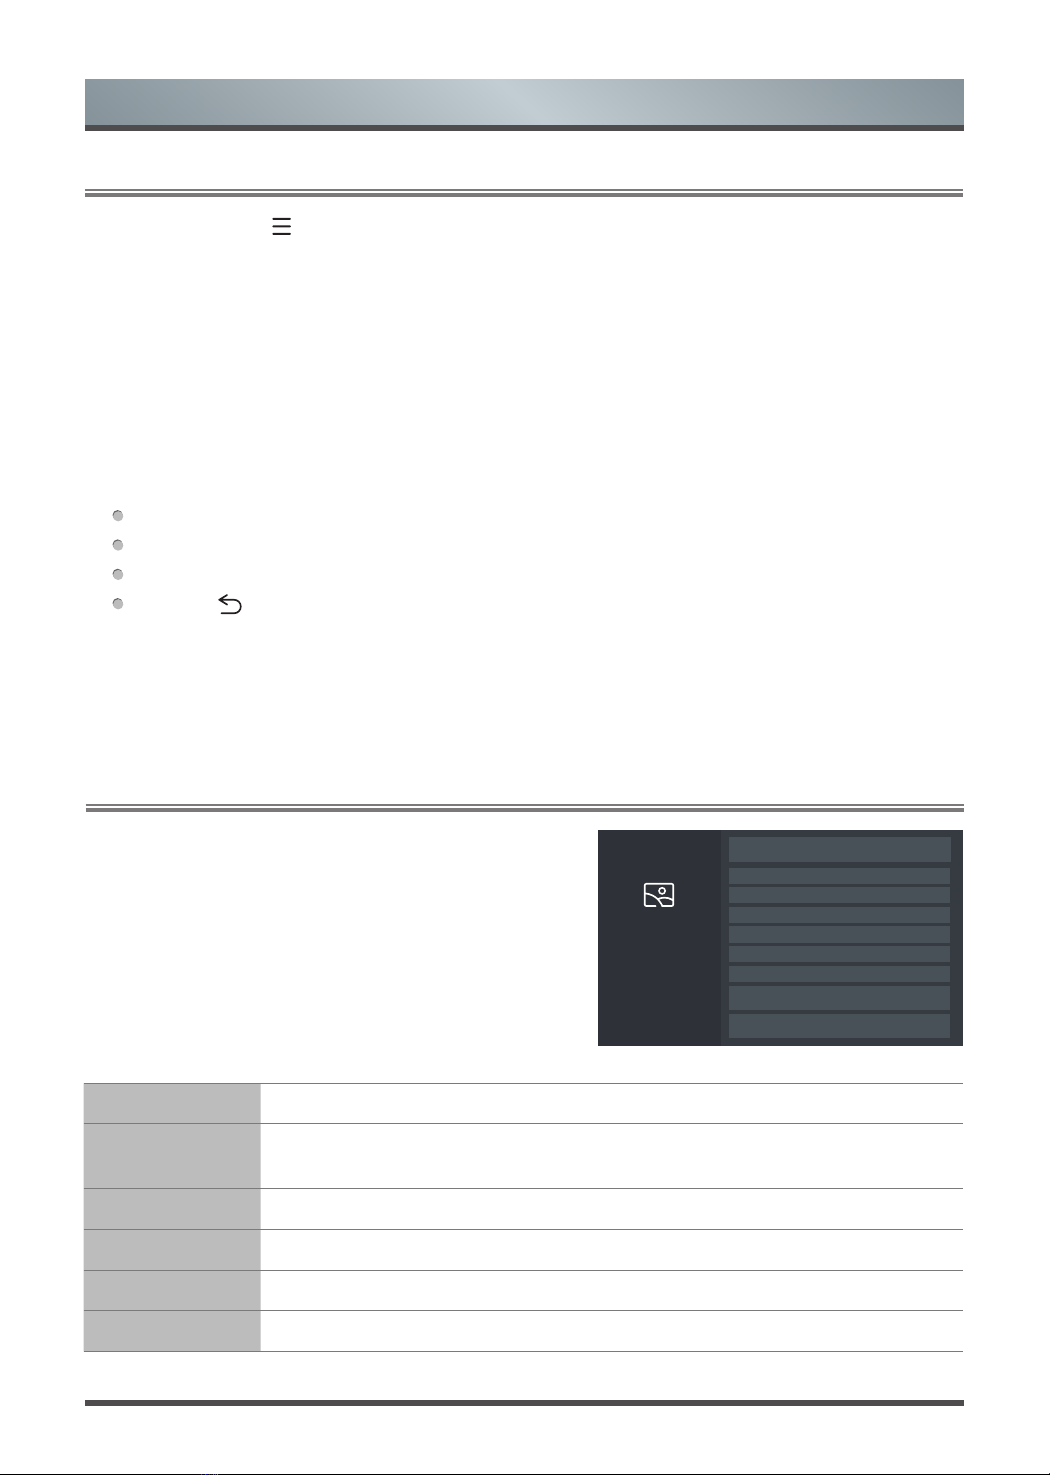
Hisense H80L5UK User manual

LASER TV
Read the manual carefully and ensure you have fully understood
its contents before operating this device for the first time.
ES-A1824M1 English

1
Contents
Shortcuts Instructions ............................................................................................. 2
Turning your TV on or off..................................................................................................................2
Selecting the Input Source................................................................................................................2
Menu ...................................................................................................................... 3
How to use the Settings Menu..........................................................................................................3
Using the Picture Menu .....................................................................................................................3
Using the Sound Menu ......................................................................................................................5
Using the Network Menu ...................................................................................................................6
Using the Channel Menu ...................................................................................................................7
Using the System Menu ....................................................................................................................8
Using the About TV Menu ...............................................................................................................10
Advanced Features ................................................................................................ 11
Guide................................................................................................................................................. 11
PVR/T.Shift .......................................................................................................................................12
(The PVR and T.Shift functions are only applicable in certain models)
Getting familiar with the Home screen ..........................................................................................13
LiveTV ...............................................................................................................................................16
Using Anyview Cast to mirror content from your device to the TV screen................................17
Software updates for your TV ........................................................................................................17
Other Information ................................................................................................... 18
TroubleShooting ..............................................................................................................................18
Service Contact................................................................................................................................20
Thank you for purchasing the TV.
This device lives up to the highest standards, innovative technology and high user comfort.
▐ Welcome

2
Shortcuts Instructions
To turn your TV on or off :
1. Plug the AC power cord into a socket outlet of AC power supply.
2. When the TV is powered on, press the [ ] button to turn on your TV.
To turn your TV off, press the [ ] button on the remote.
Turning your TV on or off
NOTES
When your TV is in standby mode, it is still consuming power. To completely disconnect power, please
remove the mains plug from the mains socket.
If your TV does not receive an input signal for several minutes, it automatically goes into standby mode.
Select the Input Source depending on the video device you have connected to your TV.
To select the input source:
1. Turn on your TV, then press the [ ] button on the remote, the list of Source appears. (If the remote control
does not have [ ] button, press the [] button to select Inputs, the list of Source appears.)
2. Press the [UP / DOWN / LEFT / RIGHT] buttons to select the input source.
3. Press the [OK] button to confirm your selection.
Selecting the Input Source

3
Menu
How to use the Settings Menu
1. You can press the [ ] button to access the Menu, press the [Down]button to select Settings, and then
press [OK] button to enter the Settings Menu.
The Settings Menu consists of the following settings:
• Picture
• Sound
• Network
• Channel
• System
• About TV
2. In each menu, you can:
Press the [UP / DOWN] buttons to select an item,
Press the [OK] button to enter the sub-menu or to set on or off,
Press the [LEFT / RIGHT] buttons to adjust the value,
Press the [ ] button to return to the previous menu.
Using the Picture Menu
Picture Mode Select a preset picture mode to best suit the content you’re viewing.
Apply Picture
Mode Adjust current picture mode to apply to all sources or just current source.
Contrast Adjust the Contrast level to increase or decrease how bright images appear.
Brightness Adjust the Brightness level to generate lighter or darker images.
Colour Saturation Adjust the colour intensity of the picture for a more vibrant image.
Light Level Adjust how bright you want images to appear. Lower settings create darker images.
Select a preset picture mode to
best suit the content you’re
viewing.
Picture
Picture Mode: Standard
Apply Picture Mode < Current Source >
• Contrast: 50
• Brightness: 50
• Colour Saturation: 50
• Light Level : 10
Display
Aspect Ratio
Advanced Picture Settings

4
Menu
Advanced
Picture Settings
Adjust advanced picture settings based on your viewing preference.
•Overscan: Change the video size settings to slightly crop the edges of the
displayed image.
• Sharpness: Adjust how sharp or soft edges of images appear.
• Adaptive Contrast: Automatically darken dark areas and lighten light areas of
images to see more details.
• Colour Temperature: Adjust how warm(red) or cool(blue) the white areas of an
image appears.
• Ultra Smooth Motion: Reduce seeing afterimages that are left on the screen
when viewing fast-moving objects.
•Judder Reduction: To enhance picture fluency, try to reduce picture judder.
However, in some cases this may cause picture blur.
•Blur Reduction: To avoid loosing picture detail, try reducing the screen blur. This
may however, cause screen judder.
• Noise Reduction: Improve how clear the picture appears by reducing noise.
• MPEG Noise Reduction: Reduce picture noise, such as mosquito noise and/or
block noise, in compressed videos.
• Expert Settings:
•ColourTuner:AdjusttheHue,SaturationandBrightnessofcoloursettings.
•WhiteBalance:Adjusttheintensityoflightstoviewthetruecoloursofallimages
in the picture.
•BlackLevel:AdjusttheHDMIsignalrangetobemoresuitableforthecontent.
•GammaAdjustment:AdjusttheGammatochoosehowtheTVwillrespondtothe
content grayscale. In a dark room choose a Higher number like 2.4. In a brighter
area select a Lower number like 2.0. In general, 2.2 is normally recommended.
NOTE
Some models don’t support this function.
•RGBOnlyMode:Viewimagesbasedondefaultsettingsorchoosethecolour
red, blue or green.
Display Adjust advanced picture settings on curent source. (This function is only available in
VGA)
Aspect Ratio Adjust the Aspect Ratio to stretch or zoom in on your picture.
Restore Default
Picture Settings Restore all the picture settings in the current picture mode to the factory default values.
NOTE
For Motion Smoothing, the input video’s frame rate played by player needs to be in accordance with the
frame rate of the video itself.

5
Menu
Using the Sound Menu
Sound Mode Select a preset sound mode to suit the type of content you are listening to.
Apply Sound
Mode Adjust current sound mode to apply to all source or just current source.
Total Sonics
Optimizesoverallsoundqualitybyincreasingbass,makingdialogclearandnatural,
and widening the sound field.
Total Volume
Maintains consistent loudness levels from wide dynamic range programs, too-loud
commercials, and channel or input changes.
Total Surround
Provides surround sound experience with psychoacoustic processing to place sounds
beside, behind, and above the viewer. For best results use with Total Sonics.
Speakers
•Speakers: Select the speakers which you want to use.
• Digital Audio Out: Select the digital audio output format that best suits the audio
device type.
• Digital Audio Delay: Adjust the digital audio output delay time to sync sound from
an external speaker with the images on the TV.
• Lip Sync: Synchronize the displayed image with the audio output.
Advanced Audio
Settings
Tune the audio settings and quality of the TV.
• Balance: Adjust the left and right speaker strength to optimize audio for a specific
location.
• Equalizer: Boost the volume at different frequencies.
• Audio Type: Select the audio type of programs. (This function is only available in
some countries.)
• Voiceover Volume:Independentlyadjustthevolumeofvoiceover.(Onlyavailable
when Audio Type is Visually Impaired)
Restore Default
Audio Settings Restore all of the audio settings in current audio mode to the factory default values.
Sound Mode: Standard
Apply Sound Mode < Current Source >
< Normal Mode >
Speakers
Advanced Audio Settings
Reset Default Audio Settings
Select a preset sound mode to suit
the type of content you are
listening to.
Sound

6
Menu
Network
Conguration
Set up the network to gain full access of Smart TV features.
•Connection Type: Ethernet
Choose a wired network connection to access the Internet.
IP Setting: Configure the IP setting for your network connection.
•Connection Type: Wireless
Choose a wireless network connection to access the Internet.
Advanced Settings: Configure the advanced wireless network settings for the TV.
Refresh: Refresh wireless network.
Add Network: You can add wireless network.
•Connection Type: Off
Turn off the Internet connection.
Connection
Test Start a network connection test.
Network
Information View information about your network connection.
Wake on
Wireless
Network
Using a wireless connection, turn on your TV with a screencast feature inside an app.
Wake on LAN Using an Ethernet connection, turn on your TV with a screencast feature inside an app.
Bluetooth ConnecttotheDevicesusingbluetoothtechnology.
Using the Network Menu
Set up the network to gain full
access of Smart TV features.
Network
Network Information
Wake on Wireless Network
Wake on LAN
Bluetooth
Network Conguration
Connection Test

7
Menu
Using the Channel Menu
Auto Scan Automatically scan for channels to view programming from your TV source.
DTV Manual
Scan ManuallyscanforDTVchannelstoviewprogrammingfromyourTVsource.
ATV Manual
Scan Manually scan for ATV channels to view programming from your TV source.
Channel Edit Manually edit the channel list order to your preference.
Channel List
Auto-Update Allows your TV to auto-update the channel list from the content provider.
Parental
Controls
TurnOnParentalControlstoblockchildrenfrombeingabletoviewcertainprograms.
• Locks:TurntheLocksystemOn orOff.Allselectedlockscanbe turnedofffor
parental viewing and easily turned on again.
• Block Time: Block certain channels and programs during certain periods of time.
• Channel Block:BlockprogramsbychannelswhenyouturnOntheParental
Controls feature.
• Program Block: Certain programs are blocked when you activate the parental
control settings.
•Input Block : Block content from devices that are connected to certain TV ports.
• Restore Parental Control Defaults: Restore Parental Control back to the factory
default setting.
CAM Settings
Review the Advanced Settings menu.
- Common interface
- CI card and PIN
- CAM Profile search
(Available only if inset the CAM card, otherwise grey out.)
Automatically scan for channels to
view programming from your TV
source.
Channel
ATV Manual Scan
Channel Edit
Channel List Auto - Update
Parental Controls
CAM Settings
Auto Scan
DTV Manual Scan

8
Menu
Using the System Menu
Projector
Settings
Adjust the projector settings to suit your TV setup.
• Projection Mode:Flip the image over top-to-bottom and/or left-to-right based on
the positioning of your TV.
• Eye Protection:In order to protect your eyes, keep the Eye Protection setting on.
• Screen Type:Make sure the projected image is of optimal picture quality for your
screen.
Location Choose the location from where you will watch your TV.
System PIN
Change your PIN that you use to access Parental Controls, Auto Channel Scan and
ResetToFactoryDefault.
NOTE
If you forget your password, call the relevant customer service number for your country.
Time
Set the current time based on your location.
• Time Mode: Set the date and time to automatically sync with internet/broadcast or
manual setup by yourself.
• Time Zone: Select your time zone.
NOTES
Some countries have only one time zone, this option does not allow adjustment.
• Daylight Savings:SelectwhethertoapplyDaylightSavingsTimetotheTV.
• Date/Time:SettheDateandTime.(OnlyavailablewhenTimemodeisset“Manual”)
• Time Format: Set the time to display in a 12 or 24-hour format.
Timer
Settings
Adjust the timer settings to suit your preference.
• Sleep Timer:SetthesleeptimertoautomaticallyturntheTVOffwithinaspecified
time
• Power On Timer:SettheclockforthetimeyouwanttheTVtoturnOnautomatically.
• Power Off Timer:SettheclockforthetimeyouwanttheTVtoturnOffautomatically.
• Menu Timeout :
Set the amount of time that you’d like for the menu to display.
• Auto Sleep: Set the amount of time that you’d like for TV auto power off without any
activity. (This function is only available in some countries.)
Language Adjust the default language settings for the TV.
Adjust the projector settings to
suit your TV setup
System
Time
Timer Settings
Language
Application Settings
Location
Projector Settings
System PIN

9
Menu
Application
Settings Set settings for apps on your TV.
HDMI & CEC
Function
Configure how to control CEC-enabled devices with your TV remote.
• CEC Control:AllowHDMIdevicestocontroleachother.
• Device Auto Power Off:AllowCEC-enableddevicestoturnOffwiththeTV.
• TV Auto Power On:AllowtheTVtoturnOnwithCEC-enableddevices.
• HDMI 2.0 Format: Match the connected device output format. Select Enhanced for
devices of 4K, 60Hz, 4:4:4 4:2:2 or 4:2:0, 10bit and above.
• CEC Device Lists: Allow CEC-enabled devices to communicate with each other when
connectedthroughanHDMIcable.
NOTES
HDMIcablesmustbeusedtoconnectHDMICEC-compatibledevicestoyourTV.
TheHDMICECfeatureoftheconnecteddevicemustbeturnedon.
IfyouconnectanHDMIdevicethatisnotHDMICEC-compatible,alltheHDMI-CEC
control features do not work.
DependingontheconnectedHDMIdevice,theHDMI-CECControlfeaturemaynotwork.
Advanced
Settings
Access the Advanced Settings menu.
• PVR & Time Shift Setting: Initialize the external USB disk to support PVR and
Time-Shift. (These functions are only applicable in certain models.)
• Power Indicator:SetthePowerIndicatorlighttostayOnorOffwhenstandby
mode.
• Input Labels: Edit the input labels.
• HbbTV: The global switch to enable or disable HbbTV functionality for all channels.
• Notifications: Allow pop-up notifications to appear for useful information and
events that occur with your TV.
• Setup Wizard: Use the Setup Wizard for instructions to help you set up your TV.
• Store Mode:
Set the TV to use in Home or Store Mode.
• Live TV operating tutorial: Live TV Tutorial shows you Live TV operations with
your TV remote control.

10
Menu
Using the About TV Menu
System Info View system information.
TV Name Choose a name for your TV. The name will be shown to devices that are available for
sharing data.
Disclaimer ClicktoreadtheDisclaimerdetails.
User Data
Protection
View data protection policy or perform user data related operations. (This function is
only available in some countries.)
System Update Set your TV to receive the latest firmware.
Restore To
Factory Default Restore your TV back to the factory default.
View System information.
About TV
Disclaimer
System Update
User Data Protection
Restore To Factory Default
System Info
TV Name: Smart TV

11
Guide
It provides convenience to check TV programs that will be available in the next 7 days. The information displayed
bytheGuideismadeavailablebythecommercialtelevisionnetworksfordigitalchannelsonly.TheGuide also
provides a simple way to program the recording of your favorite programs and a reminder function which can switch
channel automatically at scheduled time so that you do not miss programs of interest. (The availability and amount
of programme information will vary, depending on the particular broadcaster).
Press the [ ] button on your remote, press the [Down] button to select Guide. It will display channel information on
program guide list.
• Watch
When a current program is selected, press the [OK] button to watch it in full screen mode.
• PVR/Reminder
Press the [UP / DOWN] buttons to select the channels. Press the [LEFT / RIGHT] buttons to select program
based on the time schedule.
Press the [OK] button on the remote control to select PVR or Reminder.
Press the [UP / DOWN / LEFT / RIGHT] buttons to change and set a different options.
•Time:
Select and set Start time/End time: Press the [UP / DOWN] buttons to select Start time/End time and then
press the [OK] button to confirm. Press the [LEFT / RIGHT] buttons to move to hour/minute and then
press the [ ] buttons to input the desired numbers. (Selecting and setting End time is only available for
PVR)
•Repeatmode:YoucanselectfromOnce,Daily.
• Page Up/Down
Press the [CH /CH ] buttons to move programme listing page up/down.
• Schedule
Press the [ ] button and press the [UP]buttontoselectREDcolour.You can view a list of scheduled
reminders and recordings.
• Program Colour
Press the [ ] button and press the [LEFT] button to select GREENcolour. You can choose colours to indicate
different genres in the Guide for quick and easy viewing.
• 24−
Press the [ ] button and press the [DOWN] button to selectYELLOWcolour.Youcanselecttheyesterday
programmes.
• 24+
Press the [ ] button and press the [RIGHT] button to select BLUE colour. You can select the next day
programmes.
NOTES
PVR/ReminderintheGuideisonlyavailableforprogrammesthathaven’tbeenairedyet.
A storage device must be attached to the television for recording purposes.
The TV will record the program even in standby mode.
The PVR function is only applicable in certain models.
Advanced Features

12
PVR
The PVR function allows you to easily record digital television content for later viewing. The function is
availableinDTVsourceonly.TheformatofthestoragediskmustbeeitherNTFS,FAT32,EXT4. The PVR
will not function if a data storage device has not been connected.
• Schedule recording
Press the [ ] button on your remote, press the [Down] button to select Guide.Select the program to be
played, press the [OK] button to set the appointment time and period, the reservation is successful.
• Instant recording
1. Press the [DOWN] button to select PVR
2.Selectthepartition,andtheHDDspeedwillbetested(appearwhenusingforthersttime).
3. You can choose to Manual stop or automatically match the program time.
• Standby record
If you press the power button during recording, TV will go into standby mode but the recording process is still
going on. If you press power button again and wake up the TV, recording process will not be affected. After
recording, the recorded file will be automatically saved to the disk.
T.Shift
This option allows you to pause and rewind live TV. This function operates by recording temporarily to
a storage device. Please ensure your storage device is connected and there is enough free disk space.
Otherwisetherecordingwillnotcommence.
Press the [DOWN] button on the remote control to select T.Shift and then the menu will appear.
PVR/T.Shift
NOTES
The USB port supports a voltage of 5V.
If the transfer rate of your hard disk is too slow, a pop-up notice will appear, in this case, you can try
another one.
The PVR and T.Shift functions doesn’t support analogue channels.
The PVR and T.Shift functions are only applicable in certain models.
Advanced Features
T.Shift
- 00:00:13 00:00:16 / 00:03:22
Stop Timeshift
Fast forward
Pause / Play
Rewind forward
Rewind time Current time Total time

13
Advanced Features
Getting familiar with the Home screen
Notifications
App Store
Edit
Indicators and Icons on the top of the Home screen
Names of sections that appear on the Home screen
The simple design of the Home screen menu makes it easy to navigate. It serves as the central location to
access Notifications, FreeviewPlay (only available in UK), Apps, Inputs, Media, Settings and Edit on the
back of the TV that you’ve connected external devices to.
To access the Home screen, press the [] button on your remote control and use the arrows buttons to make
your selection.
You can always view the current time at the top left corner of the Home screen.
If your TV is connected to the Internet through a wireless connection or an Ethernet cable, then an icon will
display at the top right corner of the screen. This location makes it very convenient for you to determine if you
still have Internet connectivity when you use the TV.
The Home screen displays the following section names:
• Notifications
• FreeviewPlay (only available in UK)
• Apps
• Inputs
• Media
• Settings
• Edit
If your TV is connected to an external device, the screen will be prompted.
App Store contains cloud-based apps optimized for your TV. The apps range from Video, Music, Social
Networking,GamesandNewsInformation.
By operating this option, you can edit the home page, add a title, add an input, add an app and add a channel.
Using the [UP / DOWN / LEFT / RIGHT]buttons of your remote to change or remove it, also you can select
reset to return your operation.

14
Media is a central location for you to upload and view or listen to different types of content (for example, your
photos, music and movies) through the following methods:
• A USB thumb drive or hard drive.
• Compatible mobile phone, tablet or other personal devices: You can stream movies, pictures and photos
that are stored on your personal device and play or view the content on your TV.
Panels that appear on the Media screen
The Media screen displays five panels: Search, All, Picture, Video and Music.
File formats that may be supported
NOTE:Duetodifferencesinprogrammingtoolsandotherfactors,someofthefileformatsthatarelistedmay
or may not be supported.
Medium File Format
Videos TRP, M2TS, MKV
Picture JPG,BMP,PNG,GIF
Music MP3
Browsing Content
To browse through content based on the type that you wish to access:
1. Navigate to the appropriate menu tab on far-right top the screen and select All, Picture, Video or Music.
The library of items displays on the right side of the screen.
2. Press the [UP / DOWN / LEFT / RIGHT] buttons to select the name of the folder that contains your
content.
3. Press the [OK] button to enter/play the folder/content.
If you want to close out of the Media center, then press the [ ] button on your remote.
Viewing Pictures
When viewing the picture.
• Play/pause: Press the [OK]buttonontheremotetostarttheautomaticslideshow;re-press[OK]tostopthe
slideshow.
• Browse the previous/next picture: Press the [LEFT / RIGHT] buttons on the remote directly.
• For more functions you can access the Settings menu.
Playing Videos
When playing the video.
•Play/pause:Pressthe[OK] button to play/pause video.
•Fastforward/Fastrewind:Pressthe[LEFT / RIGHT] buttons to select different video forward/rewind speeds.
Long press the [LEFT / RIGHT]] buttons to faster forward/rewind speeds.
•FormorefunctionsyoucanaccesstheSettings menu.
Playing Music
When playing the music.
•Play/pause:Pressthe[OK] button to play/pause music.
•Playtheprevious/nextmusic:Pressthe[LEFT / RIGHT]] buttons to play.
•FormorefunctionsyoucanaccesstheSettings menu.
Media
Advanced Features

15
Advanced Features
Apps
Numerous factory-installed apps are available for you to choose from for your entertainment preferences.
Installing an App
Even though your TV has numerous factory-installed apps, there may be others that you'd like to download.
To install an app: From the Home screen, click on the App Store icon.
Removing an App
You can only delete apps that you’ve downloaded to the TV. Factory-installed apps can not be deleted.
To delete an app:
1. From the Apps screen, click on the Delete icon.
2. Use the navigation buttons on your remote to select the app that you want to remove.
3. Press the [OK] button on your remote. A dialog message displays that asks if you’re sure you want to
remove the app.
4. Click on Delete. A confirmation message displays and the icon is removed from the Apps list screen.
NOTE: If an app is deleted,the information related to that app is also removed.
5. Use the navigation buttons to select the Cancel icon.

16
Advanced Features
Viewing Channel information
As you use the [CH /CH ] buttons on your remote to scroll through channels, an information banner
appears on the top of the screen.
The information banner displays the following information:
1Channel number
2Lock status
3Input
4Program name
5Show identification
6Channel name
7Current date and time
8Prompt
9Beginning and end time of the next program
10
Start/Stop time progress bar of the current program
If you are watching a particular channel, you can also press the up arrow button of your remote to view
channel information.
Viewing a channel list
After you have done an automatic channel scan (if you're using an Antenna) or are receiving your channels
through a cable provider, you can view your list of channels by pressing [OK] on your remote.
You will see the channel list display on the right side of the screen.
Live TV
California’sGoldenParks
7:00PMMon.31Dec. 7:30PM-8:00PMCalifornia’sGold
Cable SubtitleDTV16:91080i
2/4OriginalAudioStereo
mpeg
7:00PM 7:30PM
2 3 4
9
10
51
68
7
Channel search guide
When switching to Live TV, the TV detects the presence of the channel list information (Channel scan must
have been completed). If the scan has not yet been completed, a prompt will appear to begin scanning for
channels. Press the Begin scanning button to enter the channel search interface.
Launch Live TV
Upon first use, the screen will display Live TV operating tips.
·Press[OK]or[CHList]toloadchannellist.
·Press [Up] to load info bar.
·Press[Down]toloadPVR/T.Shift.
(PVR and T.Shift functions are only applicable in certain models.)
·Press [Back] to jump to previous channel.
·Press [Menu] to load more functions.

17
Advanced Features
Creating a ‘Favorites’ list
To quickly access your most-watched channels, you can create a ‘Favorites’ list.
To create your ‘Favorites’ list:
1. Press the [ ] button on your remote.
2. Select Settings > Channel > Channel Edit > FAV > Edit > Add channels
3. Using the up/down arrows of your remote, select a channel and press [OK].
A heart-shaped indicator will appear beside the channel as confirmation that it has been successfully added.
Viewing your 'Favorites' list
To view channels that you've added to your Favorites list simply press [OK] on your remote to call out the
Channel list.
The channel list appears on the right side of the screen and heart-shaped icons are shown next to the
channels that make up your Favorites list.
The Anyview Cast is an app that enables you to share (or cast) a video, audio or image from your Android-
based device to the TV.
From your tablet or phone
To mirror content from your tablet to the TV:
1. Press the [ ] button on your remote, press the [ v ] button to select Settings, press the [OK] button to
entertheSettingsmenu.Goto Network > Network Configuration and select Wireless.
2. Press the [ ] button on your remote and select the Anyview Cast. (If the remote control does not have
[ ] button, press the [] button to select Inputs > Anyview Cast.)
3. Turn on the wireless display function on your Android-based device.
NOTE: Some Android-based devices may not support casting.
4. Find your TV in the list of devices that displays and select it.
5. Wait for the ‘Creating Connection’ progress bar to complete on the TV screen and the video or image will
display in a moment.
Using Anyview Cast to mirror content from your device to the TV screen
Software updates for your TV
The software (also referred to as firmware) is part of what powers your TV. We will provide software updates to
continuously enhance your TV and correct any issues that may impact your user experience; therefore, we
recommend that you keep your TV connected to the Internet to receive updates when they are available.
You can choose to receive updates manually or check for software updates and install them manually.
Checking for the latest firmware
To manually check for the latest firmware:
1. Using your remote, press the [ ] button.
2. GotoSettings > About TV > System Update > Check Firmware Upgrade.
NOTE
This function is only applicable in certain countries.

18
TroubleShooting
Other Information
When you experience an issue with your TV, turn it off and on again. If this does not resolve the problem, then
refer to the tips below. If the problem is still not resolved, then contact us.
ISSUES POSSIBLE SOLUTIONS
No sound or picture
• Check if the power cord is plugged into a powered AC outlet.
• Press the [ ] button on the remote control to activate the unit from
‘Standby’ mode.
I have connected an external
source to my TV and I get no
picture and/or sound
• Check for the correct output connection on the external source and
for the correct input connection on the TV.
• Make sure you have made the correct selection for the input mode for
the incoming signal.
When I turn on my TV, there is a
delay for a few seconds before
the picture appears. Is this
normal?
• Yes, this is normal. The TV is initializing and searching for previous
setting information.
The picture is normal but there is
no sound
• Check the volume settings.
• Checkif‘Mute’modeissettoOn.
• Check if the Settings-Sound-Speakers is set to the correct settings.
• Check the external audio device is power on.
• Check Settings-Sound-Advanced audio is set to correct format which
your external audio device can support.
Sound but no picture or black
and white picture
• If the picture is black and white, unplug the TV from the AC outlet and
replug it after 60 seconds.
• Check that the Color is set to 50 or higher.
• Try different TV channels.
• CheckifsettoAudioOnlymode.
The sound and/or picture is
distorted or appears wavy
• An electric appliance may be affecting the TV. Turn off any appliances
that are nearby and move it farther away from the TV.
• Insert the power plug of the TV set into another power outlet.
The sound and picture is blurry
or cuts out
• If using an external antenna, check the direction, position and
connection of the antenna.
• Adjust the direction of your antenna or reset or fine tune the channel.
• CheckiftheOversanissettooff
• Try different picture mode
A horizontal or vertical stripe
appears on the picture and/or
the picture is shaking
• Check if there is an appliance or electric tool nearby that is causing
interference.
The plastic cabinet makes a
“clicking” type of sound
• The ‘click’ sound can occur when the temperature of the television
changes. This change causes the television cabinet to expand or
contract,whichmakesthesound.ThisisnormalandtheTVisOK.
The remote control does not
work
• Confirm that TV still has power and is operational.
• Change the batteries in the remote control.
• Check if the batteries are correctly installed.
• Check if the remote is paired.

19
Other Information
NOTES
Images throughout this document are for illustrative purposes only and may differ from the actual product.
The picture is blurred or snowflake,
distorted image
• In case of power off, observe whether the Lens is dirty or not. Follow
the product maintenance guide to clean the lens and screen.
The picture does not fit the screen • Check if the screen or projector is moved and move it back.
• UseSettings-Screen-Geometrytoadjustthepicture.
TV is prompt over heat warning
message.
• Check if both vent on the left and right side of the TV is clear.
• Check if any heat source is close to the TV.
TV is no picture intermittently
• TV has eye protection feature, it is normal when walk close to the TV
during operation. It will restore the picture automatically when motion
is away from TV.
Picture is washed out or lack of color
• The TV screen can reject the ambient light from the top. Check if any
light affect the screen from the bottom. Remove the light source from
the lower position.
Table of contents
Other Hisense TV manuals

Hisense
Hisense A9H User manual

Hisense
Hisense 75N9 User manual

Hisense
Hisense 43C350U User manual

Hisense
Hisense LHD4007EU User manual

Hisense
Hisense 32D60TSP User manual

Hisense
Hisense ES-A20020K-1 User manual

Hisense
Hisense 32A4G User manual

Hisense
Hisense 40K220 User manual

Hisense
Hisense 50A7500F User manual

Hisense
Hisense 75N7 User manual

Hisense
Hisense MT9618EUEM User manual

Hisense
Hisense LCDF0104 User manual

Hisense
Hisense ES-G184733 User manual

Hisense
Hisense 65R6E4 User manual

Hisense
Hisense LTDN50D36TUK User manual

Hisense
Hisense 50K366GW User manual

Hisense
Hisense 75H9 User manual

Hisense
Hisense 32P4 User manual

Hisense
Hisense XClass User manual

Hisense
Hisense 65B4E30T User manual