Hitachi HTDK170EUK User manual

Manufactured under license from Dolby Laboratories. “Dolby” , “Pro Logic” and the double D symbol are trademarks of Dolby
Laboratories.
Confidential Unpublished Works. ' 1992-1997 Dolby Laboratories, Inc. All rights reserved.
DVD DIGITAL THEATER SYSTEM
HTDK170EUK
DVD/VCD/CD PLAYER WITH
AV SURROUND RECEIVER
Instruction manual
This product incorporates copyright protection technology that is protected by method claims of certain U.S. Patents
and other intellectual property rights owned by Macrovision Corporation and other rights owners. Use of this
copyright protection technology must be authorized by Macrovision Corporation, and is Intended for home and other
limited viewing uses only unless otherwise authorized by Macrovision Corporation. Reverse engineering or
disassembly is prohibited.
VIDEO CD
Before operating please read all these instructions thoroughly.
English

Ä1
CONTENTS
GENELBLÝKLER
CONTENTS ..................................................................................................... 1
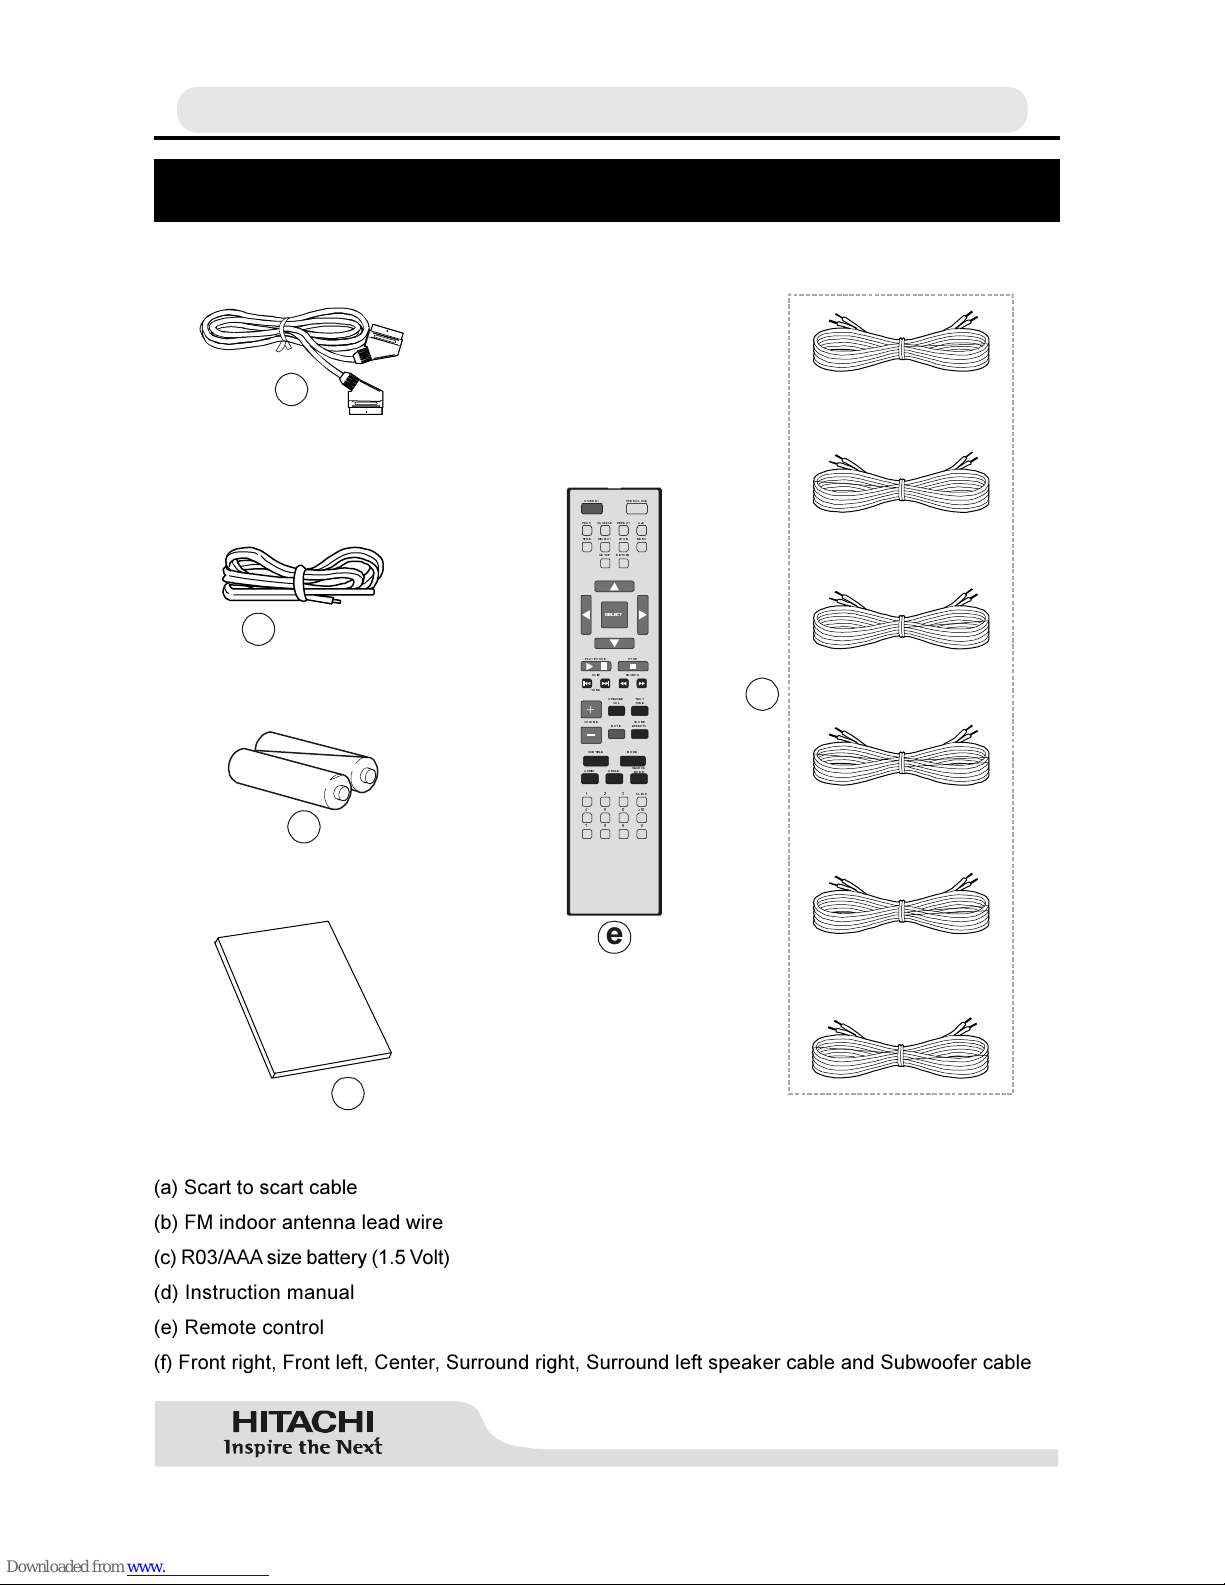
ACCESSORIES ............................................................................................... 2
ABOUT THIS MANUAL ................................................................................... 3
SAFETY INFORMATION .................................................................................. 3
WARNING ....................................................................................................... 3
SAFETY PRECAUTIONS ................................................................................. 4
GENERAL PROPERTIES ............................................................................... 5
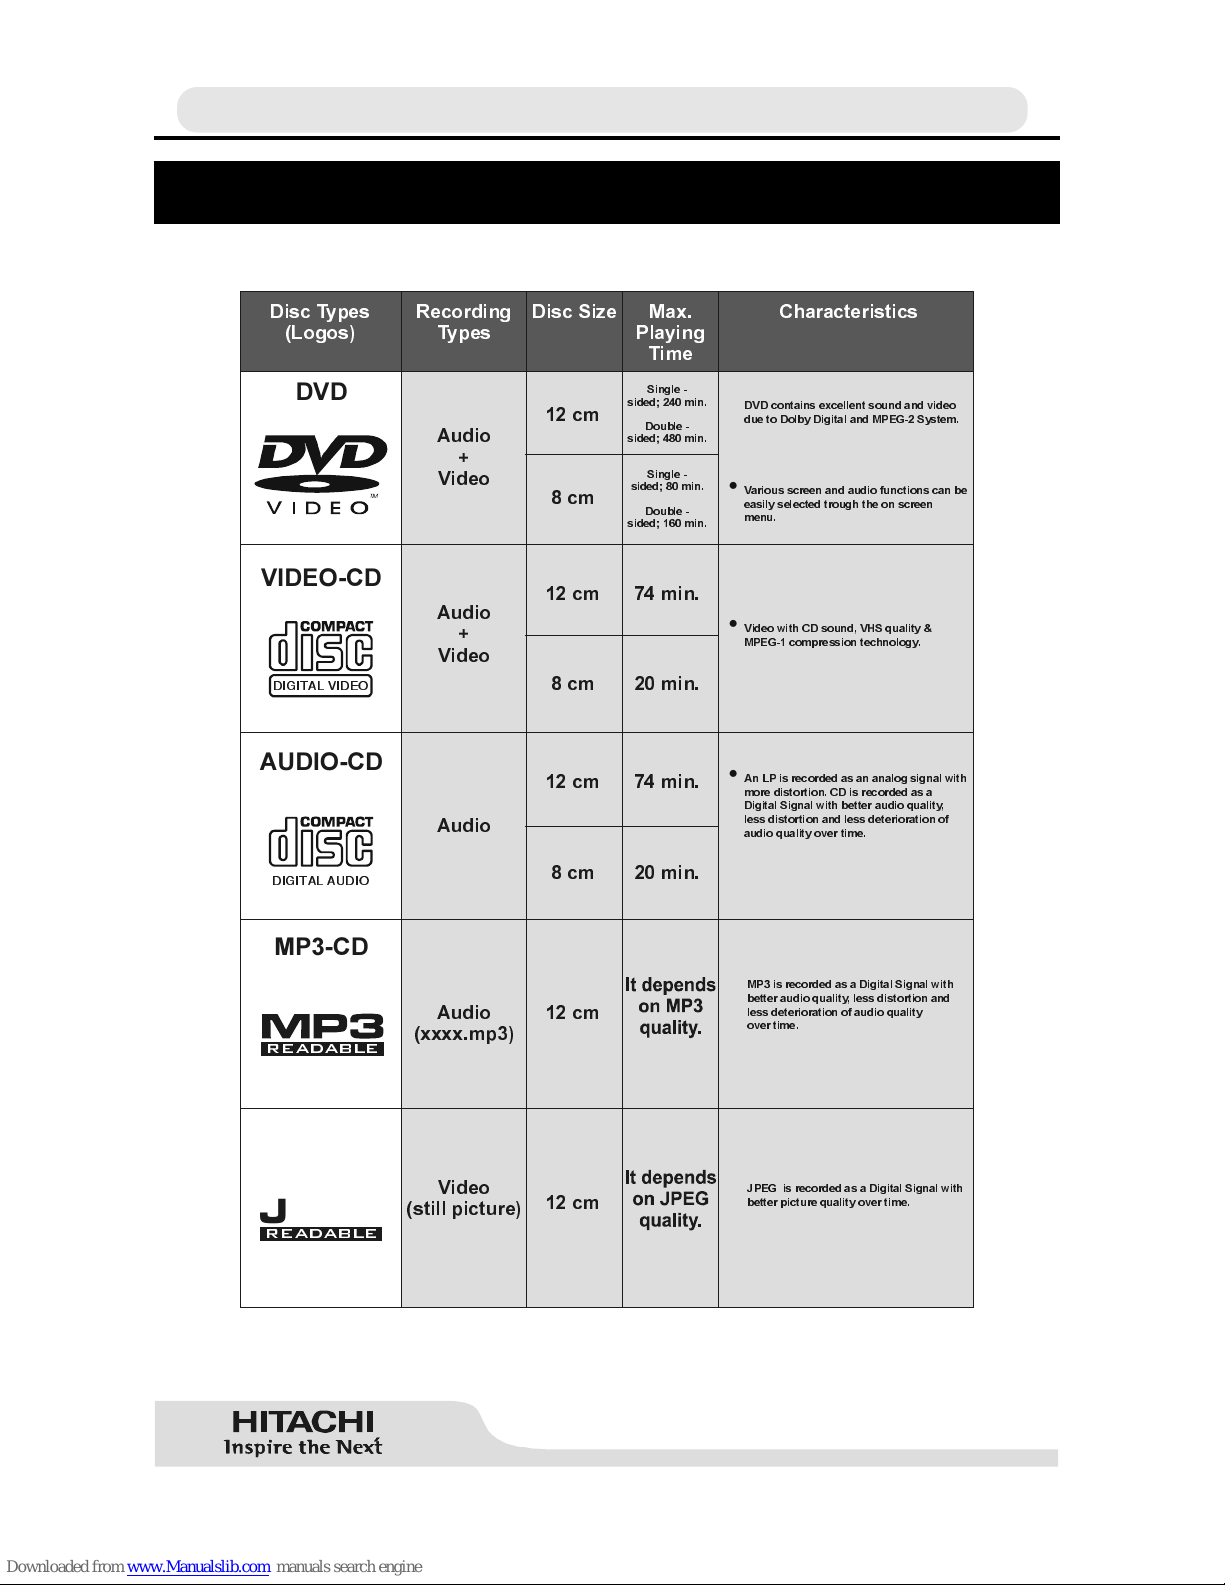
DISC TYPES COMPATIBLE WITH THIS UNIT ............................................... 6
NOTES ON DISCS ......................................................................................... 7
FITTING BATTERIES IN YOUR REMOTE CONTROL ................................... 8
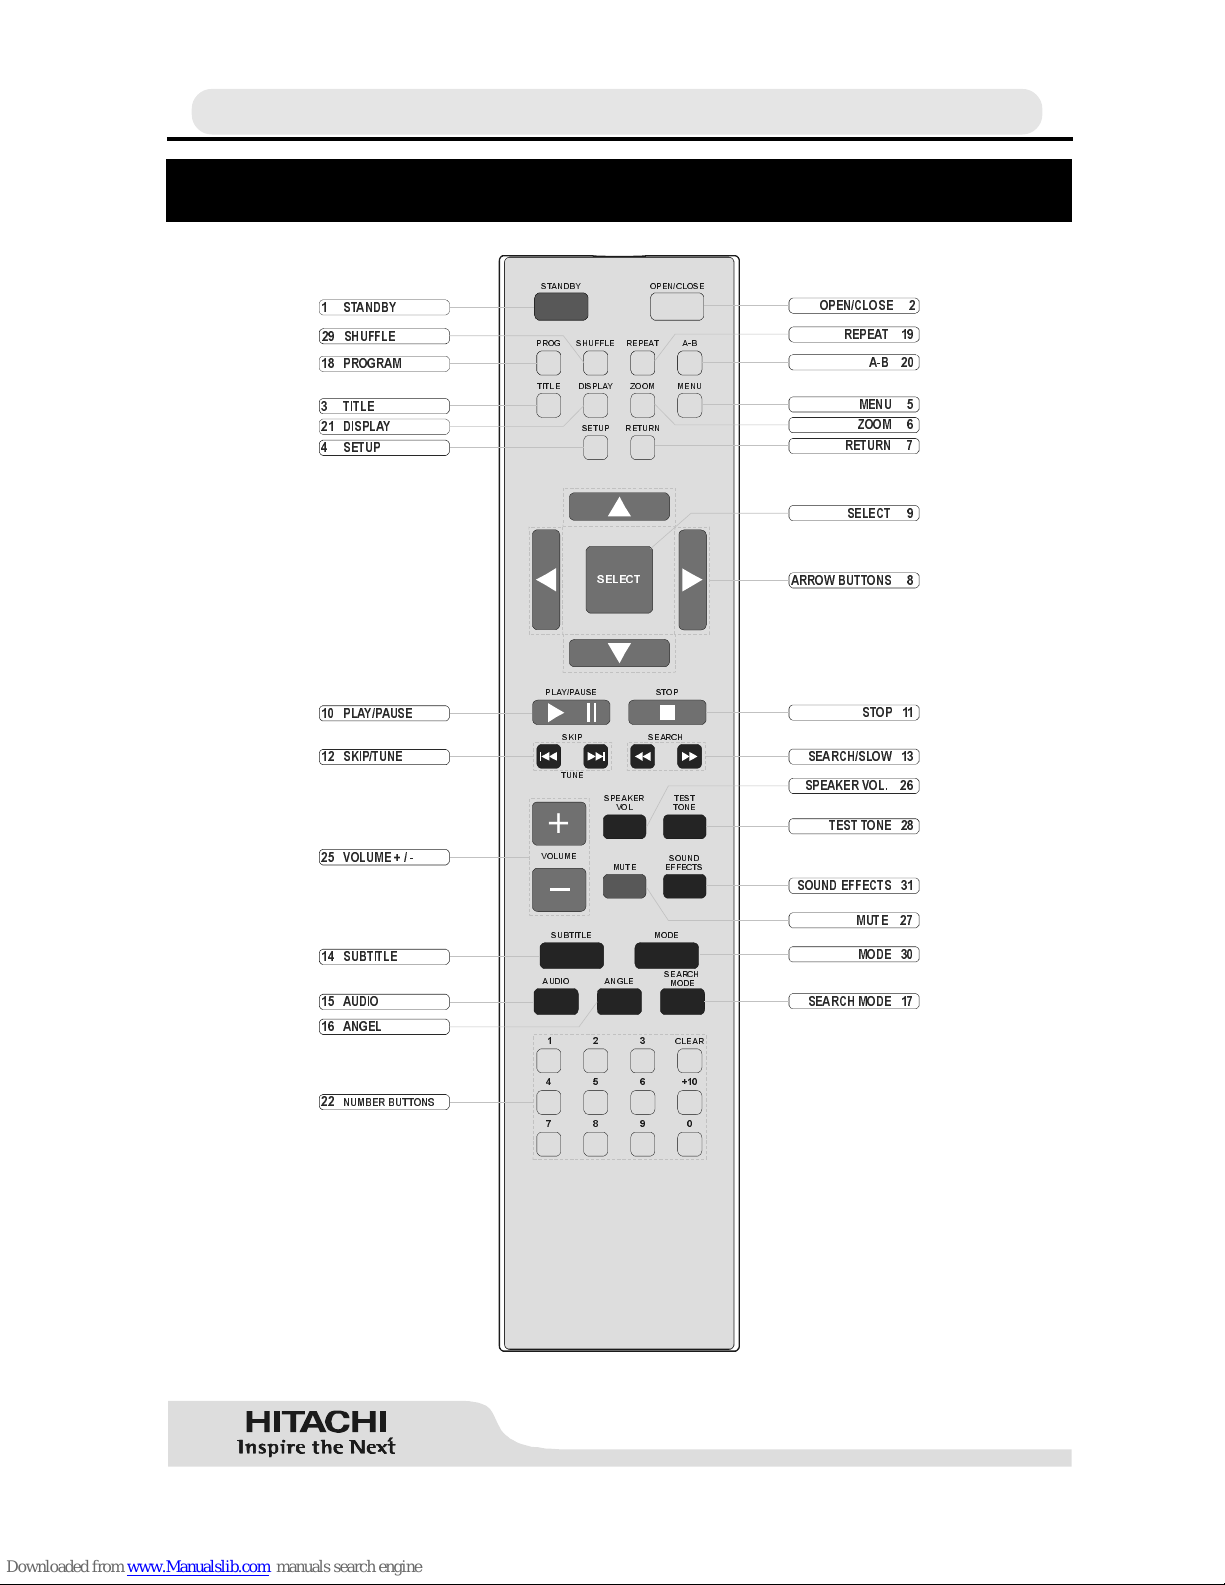
REMOTE CONTROL ....................................................................................... 9
FRONT PANEL FUNCTIONS ....................................................................... 11
FRONT PANEL DISPLAY VFD) ................................................................... 12
REAR PANEL CONNECTIONS .................................................................... 13
CONNECTION OF YOUR AV RECEIVER WITH TV ................................... 14
SCART SOCKET ........................................................................................... 15
VIDEO & AUDIO OUTPUT SOCKETS .......................................................... 15
S-VIDEO OUTPUT SOCKETS ...................................................................... 16
CONNECTION OF YOUR AV RECEIVERS SPEAKERS ............................ 17
CONNECTION OF YOUR ACTIVE SUBWOOFER ...................................... 17
BEST SPEAKER CONNECTION OF YOUR ROOM .................................... 18
CONNECTION OF YOUR AV RECEIVERS AM/FM ANTENNAS ............... 19
CONNECTION OF YOUR VIDEO SOURCES (AV OR SCART) ................. 19
PUTTING INTO OPERATION ........................................................................ 19
SELECTING THE MODE .............................................................................. 20
AV MODE ...................................................................................................... 20
SCART MODE ............................................................................................... 20
IN STAND Y MODE ..................................................................................... 20
IN NORMAL MODE ...................................................................................... 20
RADIO DATA SYSTEM RDS) ........................................................................ 21
AUDIO FUNCTIONS ..................................................................................... 22
DVD PLAYBACK ........................................................................................... 23
DIRECT SELECTION OF SCENES ............................................................. 25
REPEAT PLAY ............................................................................................... 26
USING A DVD MENU ................................................................................... 28
VIDEO CD PLAYBACK ................................................................................. 29
DIRECT SELECTION OF SCENES ............................................................. 30
REPEAT PLAY ............................................................................................... 31
CONVENIENT FUNCTIONS ........................................................................ 31
AUDIO CD PLAYBACK ................................................................................. 32
DIRECT SELECTION OF TRACKS .............................................................. 33
REPEAT PLAY ............................................................................................... 33
CONVENIENT FUNCTIONS ........................................................................ 33
SMART NAVIGATION ..................................................................................... 35
USING SETUP MENU .................................................................................. 38
MENU ITEMS ................................................................................................ 39
VIDEO SETUP .............................................................................................. 39
AUDIO SETUP .............................................................................................. 40
SPEAKER SETUP ......................................................................................... 40
LANGUAGE SETUP ...................................................................................... 41
PARENTAL SETUP ........................................................................................ 42
PREFERENCES ........................................................................................... 43
TROUBLESHOOTING .................................................................................. 45
SPECIFICATIONS ......................................................................................... 46
DEFINITION OF TERMS .............................................................................. 47

Ä2
ACCESSORIES
D
I
F
E
G
6( 783 5 (7 851
3/$ < 3$ 86 ( 67 23
6(/(&7
6.,3
781(
6($5&+
92/8 0(
63($.(5
92/ 7(67
7 21(
087( 628 1'
())(& 76
68% 7,7/( 02 '(
$8',2 $1*/( 6($5&+
02'(
&/($5
67$ 1' %< 23( 1&/ 26(
352 * 6+8 ))/( 5(3( $ 7 $ %
7,7/( ',63/$< =220 0(18
67$ 1' %< 23( 1&/ 26(
352 * 6+8 ))/( 5(3( $ 7 $ %
7,7/( ',63/$< =220 0(18
H
(a) Scart to scart cable
(b) FM indoor antenna lead wire
(c) R03/AAA size battery (1.5 Volt)
(d) Instr ction man al
(e) Remote control
(f) Front right, Front left, Center, S rro nd right, S rro nd left speaker cable and S bwoofer cable

Ä3
ABOUT THIS MANUAL
Instr ctions in this man al describe the controls on the player. Yo can also se the controls on the
remote if they have the same or similar names as those on the player.
Dear Customers
We wo ld like to thank yo for p rchasing this DVD / VIDEO CD / A dio CD / MP3 / JPEG player and with
b ilt-in amplifier and integrated t ner.
We strongly recommend that yo caref lly st dy the operating instr ctions before attempting to operate
the nit and that yo note the listed safety preca tions.
SAFETY INFORMATION
CAUTION
&/$66
/$6(5352'8&7
DVD Player is a class 1 laser prod ct. However this prod ct ses a visible laser beam which co ld
ca se hazardo s radiation expos re.
Be s re to operate the player correctly as instr cted.
While this player is pl gged to the wall o tlet, do not place yo r eyes close to the opening of the disc
tray or other openings to look into the inside of this prod ct for yo r own safety.
Use of controls or adj stments or performance of proced res other than those specified may res lt in
hazardo s radiation expos re. Do not open covers and do not attempt to repair any damaged parts.
Refer prod ct to a service technician or q alified professional for any necessary repair.
WARNING
To red ce the risk of fire or electric shock, do not expose this eq ipment to rain or moist re.
To red ce the risk of fire or electric shock, and any interference, se the recommended accessories
only.
:$51,1*

Ä4
SAFETY PRECAUTIONS
Power Source:
The nit sho ld be operated only from a 220-240V~ 50 Hz o tlet. Please do not open the cover by
yo rself. There is high voltage in the set, which will endanger yo r life. Please contact local service
agent for help and advice. Repairs to be carried o t by a q alified technician only.
The player is not disconnected from the AC power so rce (mains) as long as it is connected to the wall
o tlet, even if the player itself has been t rned off.
If yo are not going to se the player for a long time, be s re to disconnect the player from the wall o tlet.
Power Cord:
Do not place the nit, a piece of f rnit re, etc., on the power cord (mains lead), or pinch the cord. Handle
the power cord by the pl g. Do not p ll o t the pl g by t gging the cord and never to ch the power cord
when yo r hands are wet as this co ld ca se a short circ it or electric shock. Never make a knot in the
cord or tie it with other cords. The power cords sho ld be ro ted in s ch a way that they are not likely
to be stepped on. A damaged power cord can ca se fire or give yo an electrical shock. Check the power
cord once in a while. When yo find it damaged, ask closest service agent for help. When the AC power
cord need to be changed, it sho ld be done at a q alified service shop only.
Choice of Location:
Please do not place the set in a place s bject to direct s n light, excessive d st or mechanical shock
or in a location near heat so rces.
The set sho ld be placed on a solid and safe base. Do not place the player on a soft s rface s ch as
a r g that might block the ventilation holes on the bottom.
A location sho ld not be selected s ch as a room with high h midity, as the condensation, arising in
the kitchen for example, may ca se malf nction or damage the set.
Heating or other thermal radiation nder the set also may ca se malf nction or damage the set.
The hot air, which arises d ring the operation, sho ld be ventilated with s fficient air circ lation. Please
do not p t the set into closed areas and do not cover it.
Please avoid the contact of the set with water or h midity. Do not p t into operation near bath, swimming
pools.
Take care to provide a good air circ lation. Place the player in a location with adeq ate ventilation to
prevent heat b ild- p in the player.
Sho ld any solid object or liq id fall into the cabinet, npl g the player and have it checked by q alified
personnel before operating it any f rther.

Ä5
GENERAL PROPERTIES
1) DVD/VCD/CD/MP3/JPEG playback
2) NTSC/PAL playback (according to di c content)
3) U er-friendly multilanguage OSD menu control
4) Vacuum Fluore cent Di play (VFD)
5) Dolby Digital, DTS, MPEG Multichannel, LPCM audio via analog audio output ( 5.1 and left, right, ubwoofer )
6) 40 (30 FM / 10 AM) pre et radio tation
7) Built in digital amplifier - 20 W RMS output for urround peaker and 35 W RMS output for ubwoofer
8) Te t tone for ea y peaker etup (Remote Control + Setup Menu)
9) Equalizer for DVD/VCD/MP3/Radio (7 pre et & 1 per onel etting ) and frequency di play bar
10) Total and eperate volume control for each peaker & mute function
11) Multiple A pect Ratio upport (16:9 Wide creen, 4:3 Letterbox, 4:3 PAN & SCAN)
12) Multi-Audio (up to 8) upport (According to di c content)
13) Multi-Subtitle (up to 32) upport (According to di c content)
14) Multi-Angle (up to 9) upport (According to di c content)
15) 8 level parental control
16) Fa t forward and rewind in 4 different peed . (2x, 4x, 6x, 8x)
17) Smooth and eamle playback in 2x peed.
18) Slow motion playback in 3 different peed . (2x, 4x, 8x forward and backward)
19) Frame by frame forward and backward playback (Step Forward & Step Backward)
20) Time Search
21) Repeat
22) A →B repeat
23) Program function for Audio CD/MP3 CD
24) Scart input for DVB/VCR/DVD
25) AV input for DVB/VCR/DVD
26) Scart output
27) Video output
28) S-Video output
29) Analog audio output & ( left, right, ubwoofer)
30) 5.1 channel peaker output

Ä6
DISC TYPES COMPATIBLE WITH THIS UNIT
This player can play the following discs.
',*,7$/$8',2
',*,7$/9,'(2
'9'
9,'(2&'
$8',2&'
$XGLR
9LGHR
FP
$XGLR
9LGHR
$XGLR
FP
FP
FP
FP
FP
$XGLR
[[[[PS
03&'
-3(*
5($'$%/(
3,&785(&'
9LGHR
VWLOOSLFWXUH
FP
FP
03LVUHFRUGHGDVD'LJLWDO6LJQDOZLWK
EHWWHUDXGLRTXDOLW\OHVVGLVWRUWLRQDQG
OHVVGHWHULRUDWLRQRIDXGLRTXDOLW\
RYHUWLPH
-3( LVUHFRUGHGDVD'LJLWDO6LJQDOZLWK
EHWWHUSLFWXUHTXDOLW\RYHUWLPH
5($'$%/(
'LVF7\SHV
/RJRV 5HFRUGLQJ
7\SHV 'LVF L]H 0D[
3OD\LQJ
7LPH
PLQ
PLQ
PLQ
PLQ
6LQJOH
VLGHGPLQ
'RXEOH
VLGHGPLQ
6LQJOH
VLGHGPLQ
'RXEOH
VLGHGPLQ
&KDUDFWHULVWLFV
'9'FRQWDLQVH[FHOOHQWVRXQGDQGYLGHR
GXHWR'ROE\'LJLWDODQG03( 6\VWHP
9DULRXVVFUHHQDQGDXGLRIXQFWLRQVFDQEH
HDVLO\VHOHFWHGWURXJKWKHRQVFUHHQ
PHQX
9LGHRZLWK&'VRXQG9+6TXDOLW\
03( FRPSUHVVLRQWHFKQRORJ\
$Q/3LVUHFRUGHGDVDQDQDORJVLJQDOZLWK
PRUHGLVWRUWLRQ&'LVUHFRUGHGDVD
'LJLWDO6LJQDOZLWKEHWWHUDXGLRTXDOLW\
OHVVGLVWRUWLRQDQGOHVVGHWHULRUDWLRQRI
DXGLRTXDOLW\RYHUWLPH

Ä7
NOTES ON DISCS
On handling discs:
To keep the disc clean, handle the disc by its
edge. Do not to ch the s rface.
Do not stick paper or tape on the disc.
If there is gl e (or a similar s bstance) on the disc,
remove the gl e completely before sing the disc.
Do not expose the disc to direct sunlight or heat
sources such as hot air ducts, or leave it in a car
parked in direct sunlight as there can be
considerable rise in temperature inside the car.
After playing, store the disc in its case.
On cleaning:
Before playing, clean the disc with a cleaning
cloth. Wipe the disc from the center out.
Do not use solvents such as benzine, thinner,
commercially available cleaners or anti static
spray intended for vinyl LPs.
Discs that should not be used:
Only the discs including the marks shown on
page 7 can be played.
Note, however, that discs with special shapes
(heart shaped discs, hexagonal discs, etc.)
cannot be played. Do not attempt to play such
discs, as they may damage the player.
NOTE:
Do not use record spray or antistatic. Also do not
use volatile chemicals such as benzene or
thinner.
5(&25'
635(< 7+,11(5 %(1=(1(

Ä8
FITTING BATTERIES IN YOUR REMOTE CONTROL
First open the battery cover on the underside of the remote control. Fit both batteries 1.5Volt (R03/AAA)
referring to the imprinted symbols (+/ ) in the battery case and put on the battery cover again.
While using the remote control, direct it towards the front of the AV receiver. If the remote control does
not work or the chosen function could not be made, the batteries are most probably exhausted and they
should be replaced as soon as possible. Please use only the leak proof batteries. If you will not be using
your remote control for a long time, it is recommended to take out the batteries from your remote control
to avoid possible damage from battery leakage and corrosion. Do not leave the remote in an extremely
hot or humid place.

Ä9
REMOTE CONTROL
6+8))/(
6(783 5(7851
3/$<3$86( 6723
6(/(&7
6.,3
781(
6($5&+
92/80(
63($.(5
92/ 7(67
721(
087( 6281'
())(&76
68%7,7/( 02'(
$8',2 $1*/( 6($5&+
02'(
&/($5
67$1'%< 23(1&/26(
352* 6+8))/( 5(3($7 $%
7,7/( ',63/$< =220 0(18
67$1'%< 23(1&/26(
352* 6+8))/( 5(3($7 $%
7,7/( ',63/$< =220 0(18
67$1'%<
352*5$0
7,7/(
6(783
',63/$<
5(3($7
23(1&/26(
$%
0(18
5(7851
220
$552:%877216
6(/(&7
3/$<3$86(
6.,3781(
92/80(
68%7,7/(
$8',2
$1*(/
180%(5%877216
6723
6($5&+6/2:
7(67721(
63($.(592/
6281'())(&76
02'(
6($5&+02'(
087(

Ä10
1. STANDBY button
Using this button player is changed into Standby or normal mode.
2. OPEN/CLOSE button
Opens or closes the disc tray.
3. TITLE button
Displays the title menu on the TV screen.
4. SETUP button
Displays Setup menu on the TV screen.
5. MENU button
Displays the DVD root menu on screen.
6. ZOOM button
Zooms the picture by 1.5x, x or 3x while playing DVD/VIDEO CD.
7. ETU N button
Press to return to the main page in SETUP menu or to cancel some functions like
title/time search, Radio Memory Set etc.
8. Arrow buttons
Move to the items or settings.
In radio mode Left is used to switch AM mode. and Right is used to switch FM mode.
Up and Down is used for autotune operation.
9. SELECT button
Executes the items or settings.
In radio mode it used to switch to memory set mode.
10. PLAY/PAUSE button
Plays/pauses the disc. For any DVD title that has a root menu with still picture,
this button functions as button select (selects highlighted item) in the root menu.
Otherwise the disc will prohibit this functioning of play/pause button on the root
menu, and
´
symbol will appear.
11. STOP button
Stops playing disc.
12. SKIP/F AME button
Press to go to the next chapter or track, or to go back to the preceding chapter or
track during playback and next/previous frame during pause.
In radio mode these buttons are used to switch to preset channels.
13.SEA CH/SLOW button
Press to adjust the forward and reverse playback speed x , x4, x6 and x8 times during
playback (rapid advance/reverse) and x8, x4, x times during pause (Slow motion).
In radio mode these buttons are used to adjust radio frequency manually or if you
press continuously frequency is adjusted automatically until radio is tuned a channel.
14. SUBTITLE button
Changes the language of the subtitle while playing a DVD.
15. AUDIO button
Changes the language of the sound while playing a DVD. In radio mode it is used
to enable or disable stereo property.
16. ANGLE button
Changes the angles when playing a DVD.
17.SEA CH MODE button
Press to select the unit for search (title, chapter, track, time etc.)
18. P OG AM button
Press to enter the program menu in stop mode for audio CD and MP3 CD.
19. EPEAT button
Press to execute disk/title/chapter repeat.
20. A→B button
Press to execute the A→B repeat play.
21. DISPLAY button
Displays the current playing status on TV screen or changes the playing time
display mode of the disc, title, track etc., on the OSD and front panel display for
VCD and CD.
22. Number buttons
Press to enter track/chapter/title/time/channel/etcnumbers directly.
23. C button
Using this button you can delete the mistyped entries or you can cancel some
functions.
24. +10 button
Using this button you can enter the numbers greater than 9.
In radio mode it is used to enter two digits, cursor is appeared on the VFD.
25. Volume +/- buttons
Using this buttons you can adjust speaker volumes.
26. Speaker Vol button
Using this button you can select each speakers volume to be adjusted by Volume
+/- buttons.
27. Mute button
Using this button you can mute all the system volume.
28.Test Tone button
Using this button you can apply test tone to each speaker.
29. Shuffle button
Using this button you can shuffle the order of the MP3 playback.
30. MODE button
Using this button you can change the receiver mode between DVD/CD-Radio-
AV-SCART.
31. SOUND EFFECT BUTTON
You can select the type of effect, display the frequency bars or turn on/off equalizer,
by pressing this button consecutively. To configure your own effect, when in Effects
menu, press SELECT to change the effect and when PERSONAL is selected,
configure your effect with arrow buttons.

Ä11
FRONT PANEL FUNCTIONS
1. STANDBY button
Turns on and off the standby of the player.
2. Standby LED
Indicates Standby and normal operation modes.
ED: Stand By
3. SKIP buttons
Press to go back to the preceding chapter/track or to go to the next chapter/track.
4. Front Panel Display (VFD)
Indicates the playing time, title, chapter/track, etc.
5. SEA CH buttons
Used to search fast forward or backward at 2, 4, 6 or 8 times normal playback speed.
6. MODE button
Using these button you can change the receiver mode between DVD/CD Radio SCART AV.
7. Disc Tray
Place a disc on the tray.
8. OPEN/CLOSE button
Opens or closes the disc tray.
9. VOLUME + /- buttons
Using these buttons you can adjust speaker volumes.
10. STOP button
Stops playing disc.
11. PLAY/PAUSE button
Plays/Pauses the disc. For any DVD title that has a root menu with still picture, this button
functions as button select (selects highlighted item) in the root menu. Otherwise the disc will
prohibit this functioning of play/pause button on the root menu, and
´
symbol will appear
on screen.

Ä12
FRONT PANEL DISPLAY (VFD)
'9'$8',2
69&'&'
NK]
0K]
G%
/
3%&=RRP5(3($76+8))/(352*5$0
7,7/(35(75.&+3$%$//5(0$,1$1*/(
5
/6 56
/)(
F
GWV
1. Current Disc
2. Play/Pause
3. Playing
4. Repeat mode
5. Title Number
6. Track/ Chapter Number or Preset Radio Channel Info
7. Remain
8. Shuffle
9. Program
10. Angle
11. Dolby Digital DTS audio
12. Zoom
13. Time or Radio Frequency Info
14. Speaker Outputs
15. PBC

Ä13
REAR PANEL CONNECTIONS
:$51,1*
:$51,1*
:$51,1*
7235(9(17) ,5( 256+2&.+$ =$5'
'2127( ;326(7+,6$33/,$1&( 72
5$,12502,6785(
$/:$<65(029(0$,13/8*)520
:$ / / 62 & . ( 7 :+ ( 1 1 2 7 , 1 8 6 ( 2 5
%()25( $1<6(59,&( 23(5$7,21
1286(5 6(59,&($%/( 3$576,16,'(
5()( 56(59,& ,1*7248$ /,) ,('
6(59,&( 3(56211(/1 (9(5 5(029(
&29(5681/(664 8$/,)( '72'262
7+,681,7&217$,16'$1*(5286
92/7$*(6
&$87,215,6.2)(/(&75,&6+2&. '212723(1
&/$66
/$6(5352'8&7
)0 $0
9,'(2
69,'(2
6&$57 ,1387
9,'(2
/()7
5,*+7
5,*+7
68%:22)(5
/()7
)5 2 17
/()7 )5 217
5,*+7 5($5
5,*+7 &(17(5 5($5
/()7 68%
:22)(5
0$18)$& 785(' 81'(5 /,&( 16() 520
'2/%</$%25$ 725,( 6/,&(16,1 *
&25325$7,21
'2/%<352/2*,& $1'7+(
'28%/( ' 6<0%2/$5( 75$ '(0$5.6
2)' 2/%< /$%25$725,(6 /,&(16,1*
&25325$7,21
&21),'( 17$ /8138%/,6+(' :25. 6
'2/%</$%25$7 25,( 6,1& $//
5,*+ 75(6(59('
$33$5$ 786 &/ $, 06 2) 8 6
3$7(17 126
$1'
/,&( 16(')25 /,0,7('9,(:,1*
86(621/<
$17(11$
9,'(2287$9,1387 $8',2287 6& $57 2 87 387
1. AM/FM ANTENNA connectors
Connects to AM and/or FM Antenna .
2. AV Input connector
Connects audio & video component using Video, Audio Left and Audio Right.
3. AUDIO OUT connectors
Outputs Audio Left, Right and Subwoofer Audio signals.
4. VIDEO OUT connector
Outputs a composite video signal.
5. S VIDEO OUT connector
Outputs an S video signal.
6. SCA T connector
The standard 21 pin SCART connector outputs Audio and Video signals.
7. SCA T Input connector
A standard 21 pin SCART connects Audio and Video signals.
8. SPEAKE connectors
Outputs Amplified Audio signals to the speakers.

Ä14
CONNECTION OF YOUR AV RECEIVER WITH TV
Be sure to turn off the standby of each component before making the connections.
:
$
5
1
,
1
*
:
$
5
1
,
1
*
:
$
5
1
,
1
*
7
2
3
5
(
9
(
1
7
)
,
5
(
2
5
6
+
2
&
.
+
$
=
$
5
'
'
2
1
2
7
(
;
3
2
6
(
7
+
,
6
$
3
3
/
,
$
1
&
(
7
2
5
$
,
1
2
5
0
2
,
6
7
8
5
(
$
/
:
$
<
6
5
(
0
2
9
(
0
$
,
1
3
/
8
*
)
5
2
0
:
$
/
/
6
2
&
.
(
7
:
+
(
1
1
2
7
,
1
8
6
(
2
5
%
(
)
2
5
(
$
1
<
6
(
5
9
,
&
(
2
3
(
5
$
7
,
2
1
1
2
8
6
(
5
6
(
5
9
,
&
(
$
%
/
(
3
$
5
7
6
,
1
6
,
'
(
5
(
)
(
5
6
(
5
9
,
&
,
1
*
7
2
4
8
$
/
,
)
,
(
'
6
(
5
9
,
&
(
3
(
5
6
2
1
1
(
/
1
(
9
(
5
5
(
0
2
9
(
&
2
9
(
5
6
8
1
/
(
6
6
4
8
$
/
,
)
(
'
7
2
'
2
6
2
7
+
,
6
8
1
,
7
&
2
1
7
$
,
1
6
'
$
1
*
(
5
2
8
6
9
2
/
7
$
*
(
6
&
$
8
7
,
2
1
5
,
6
.
2
)
(
/
(
&
7
5
,
&
6
+
2
&
.
'
2
1
2
7
2
3
(
1
&
/
$
6
6
/
$
6
(
5
3
5
2
'
8
&
7
)
0
$
0
9
,
'
(
2
6
9
,
'
(
2
6
&
$
5
7
,
1
3
8
7
9
,
'
(
2
/
(
)
7
5
,
*
+
7
5
,
*
+
7
6
8
%
:
2
2
)
(
5
/
(
)
7
)
5
2
1
7
/
(
)
7
)
5
2
1
7
5
,
*
+
7
5
(
$
5
5
,
*
+
7
&
(
1
7
(
5
5
(
$
5
/
(
)
7
6
8
%
:
2
2
)
(
5
0
$
1
8
)
$
&
7
8
5
(
'
8
1
'
(
5
/
,
&
(
1
6
(
)
5
2
0
'
2
/
%
<
/
$
%
2
5
$
7
2
5
,
(
6
/
,
&
(
1
6
,
1
*
&
2
5
3
2
5
$
7
,
2
1
'
2
/
%
<
3
5
2
/
2
*
,
&
$
1
'
7
+
(
'
2
8
%
/
(
'
6
<
0
%
2
/
$
5
(
7
5
$
'
(
0
$
5
.
6
2
)
'
2
/
%
<
/
$
%
2
5
$
7
2
5
,
(
6
/
,
&
(
1
6
,
1
*
&
2
5
3
2
5
$
7
,
2
1
&
2
1
)
,
'
(
1
7
$
/
8
1
3
8
%
/
,
6
+
(
'
:
2
5
.
6
'
2
/
%
<
/
$
%
2
5
$
7
2
5
,
(
6
,
1
&
$
/
/
5
,
*
+
7
5
(
6
(
5
9
(
'
$
3
3
$
5
$
7
8
6
&
/
$
,
0
6
2
)
8
6
3
$
7
(
1
7
1
2
6
$
1
'
/
,
&
(
1
6
(
'
)
2
5
/
,
0
,
7
(
'
9
,
(
:
,
1
*
8
6
(
6
2
1
/
<
$
1
7
(
1
1
$
9
,
'
(
2
2
8
7
$
9
,
1
3
8
7
$
8
'
,
2
2
8
7
6
&
$
5
7
2
8
7
3
8
7
)
0
$
1
7
(
1
1
$
$
0
$
1
7
(
1
1
$
'
9
%
9
&
5
'
9
'
3
/
$
<
(
5
$
&
7
,
9
(
6
8
%
:
2
2
)
(
5
1
R
W
V
X
S
S
O
L
H
G
7
9
9
,
'
(
2
-
$
&
.
/
(
)
7
6
3
(
$
.
(
5
5
,
*
+
7
6
3
(
$
.
(
5
)
5
2
1
7
6
3
(
$
.
(
5
/
(
)
7
6
9
,
'
(
2
-
$
&
.
'
9
%
9
&
5
'
9
'
3
/
$
<
(
5
7
9
)
5
2
1
7
6
3
(
$
.
(
5
5
,
*
+
7
5
(
$
5
6
3
(
$
.
(
5
/
(
)
7
5
(
$
5
6
3
(
$
.
(
5
5
,
*
+
7
6
8
%
:
2
2
)
(
5
&
(
1
7
(
5
6
3
(
$
.
(
5

Ä15
SCART SOCKET
Connecting your DVD player to TV via scart socket with a scart cable gives you the best picture
performance. If your DVD player will not be connected to a hi fi set or A/V amplifier to hear better sound,
scart is enough for both audio & video connections.
:$51,1*
:$51,1*
:$51,1*
7235(9(17 ),5(256 +2&.+$=$5'
'2127( ;326 (7+,6$ 33/, $1&(72
5$,12502, 6785(
$/:$<65(029( 0$,13/8* )520
:$//62&.(7:+(1127,186(25
%()25($1<6 (59, &(23(5 $7, 21
1286(56(59,&($%/(3$576,16,'(
5()(56(59,&,1*7248$/,),('
6(59,&(3(56211(/1(9(55(029(
&29(5681/( 6648$/,)('72 '2 62
7+,6 81,7&217$,16 '$1*(5286
92/7$*(6
6&$57,1387
0$18) $&785('81'(5/,&(16()520
'2/%</$%2 5$725, (6/,&(16,1*
&25325$7,21
'2/%<352/2*,&$1'7+(
'28%/( '6<0%2 /$5( 75$'( 0$5.6
2)'2/%</$%25$725,(6/,&(16,1*
&25325$7,21
&21),'(17$/8138%/,6+(':25.6
'2/%</ $%25$ 725, (6 ,1& $//
5,*+75(6(59('
6&$57287387
'9%9&5'9'3/$<(5
79
VIDEO & AUDIO OUTPUT SOCKETS
Video (yellow) & audio (Red: right, White: left) output sockets can be used to connect the DVD player
to your TV set via cables. To make this connection, your TV set must have Video & audio input connectors.
This type of connection is alternative to scart connection. Picture quality is not as good as Scart
connection but audio performance is the same.
:$51,1*
:$51,1*
:$51,1*
7235(9(17),5(256+2&.+$=$5'
'2127(;326(7+,6$33/,$1&(72
5$,12502,6785(
$/:$<65(029(0$,13/8*)520
:$//62&.(7:+(1127,186(25
%() 25($ 1<6(5 9,&( 23(5$7,21
1286(5 6(59,&($% /(3$5 76 ,16,'(
5() (56(59,&,1*7248$/,) ,('
6(59,&(3(56211(/1(9(55(029(
&29(5681/(6648$/,)('72'262
7+,681,7&217$,16'$1*(5286
92/7$*(6
9,'(2
69,'(2
5,*+7
68%:22)(5
/()7
9,'(2287$8',2287
79

Ä16
S-VIDEO OUTPUT SOCKETS
S Video Output socket can be used to have a better picture quality than the video output. Your TV set must
have S video input connector for this type of connection. This socket is used for only video connection.
For audio, red & white output sockets must be used. S video picture quality is not as good as Scart
connection.
:$51,1*
:$51,1*
:$51,1*
7235(9(17),5(256+2&.+$=$5'
'2127(;326(7+,6$33/,$1&(72
5$,12502,6785(
$/:$<65(029(0$,13/8*)520
:$//62&.(7:+(1127,186(25
%()25($1<6(59,&(23(5$7,21
1286(56(59,&($%/(3$576,16,'(
5()(56(59,&,1*7248$/,),('
6(59,&(3(56211(/1(9(55(029(
&29(5681/(6648 $/, )('72'262
7+,681,7&217$,16'$1*(5286
92/7$*(6
9,'(2
69,'(2
5,*+7
68%:22)(5
/()7
9,'(2287$8',2287
79

Ä17
CONNECTION OF YOUR AV RECEIVERS SPEAKERS
You can connect 5.1 speaker set to the AV receiver as shown in the figure below.
&$87,215,6.2)(/(&75,&6+2&.'212723(1
)5217
/()7 )5217
5,*+7 5($ 5
5,*+7 &(17(5 5($ 5
/()7 68%
:22)(5
$33$5$786 & /$,06 2 ) 86
3$ 7(1 7 12 6
$ 1'
/,&(16(')25/,0,7('9,(:,1*
86(621/
)521763($.(5
/()7
5($563($.(5
/()7
68%:22)(5
)521763($.(5
5,*+7
5($563($.(5
5,*+7
&(17(563($.(5
CONNECTION OF YOUR ACTIVE SUBWOOFER
An Active Subwoofer can be connected to the AV receiver as shown in the figure below.
9,'(2
69,'(2
9,'(2
/()7
5,*+7
5, *+7
68%:22)(5
/()7
9,'(2287
$9,1387 $8',2287
$&7,9(68%:22)(5
1RWVXSSOLHG

Ä18
BEST SPEAKER CONNECTION OF YOUR ROOM
To get the best performance form your AV receiver system you have to arrange your speaker set
according to your room shape as shown in the figures below.
&HQWHUVSHDNHU
5HDUVSHDNHUULJKW
5HDUVSHDNHUOHIW
6XEZRRIHU
)URQWVSHDNHUOHIW
)URQWVSHDNHUULJKW
After finishing the speaker connection use Test Tone button to test if the speaker connection is right
or not. A test tone will be applied to each speaker (Left, Right, Surround Left, Surround Right, Center and
Subwoofer). You can press test tone again to stop this function.

Ä19
CONNECTION OF YOUR AV
RECEIVERS AM/FM ANTENNAS
To get the best radio performance connect the AM
and FM antenna as shown in the figure below.
&/$66
/$6(5352'8&7
)0 $0
$17(11$
)0
$17(11$
$0
$17(11$
You can switch to Radio Mode by using MODE
button.
CONNECTION OF YOUR VIDEO
SOURCES (AV OR SCART)
You can connect your Video Sources (DVB, VCR,
VDP etc) to your AV receiver as shown in the figure
below.
:$51,1*
:$51,1*
:$51,1*
7235(9(17),5(256+2&.+$=$5'
'2127 (;326(7+,6$33/,$1&(72
5$,12502,6785(
$/:$<65(029(0$,13/8*)520
:$//62&.(7:+(1127 ,186(25
%()25($1<6(59,&(23(5$7 ,21
1286(56(59,&($%/(3$576,16,'(
5()(56(59,&,1*7 248$/,),('
6(59,&(3(56211(/1(9(55(029(
&29(5681/(6648$/,)('72'262
7+,681,7&217$,16'$1*(5286
92/7$*(6
9, '( 2
69,'(2
6&$57 ,1387
9, '( 2
/() 7
5,* +7
5,* +7
68 %:2 2) ( 5
/() 7
9,'(2 287$9,1387 $8',2287 6&$57287387
'9%9&5'9'3/$<(5
'9%9&5'9'3/$<(5
You can switch to AV or SCART using mode
button.
PUTTING INTO OPERATION
After making the necessary connections stated
above, plug the power cord to the mains socket.
Unit will be in standby mode. Press standby to
turn on the unit. Press MODE to switch between
Disc Player, Radio, AV and SCART.
Other manuals for HTDK170EUK
1
Table of contents
Other Hitachi Home Theater System manuals

Hitachi
Hitachi HTD-K210 User manual

Hitachi
Hitachi DV-S522U Manual

Hitachi
Hitachi HTDK150EBS User manual

Hitachi
Hitachi DV-S522U User manual

Hitachi
Hitachi L32R200 User manual

Hitachi
Hitachi HTD-K180UK User manual

Hitachi
Hitachi HTDK170E User manual

Hitachi
Hitachi HTDK150EBS User manual

Hitachi
Hitachi HTD-K180UK User manual

Hitachi
Hitachi HTD-K200E User manual