manuals.online logo
Brands
  1. Home
  2. •
  3. Brands
  4. •
  5. Hitachi
  6. •
  7. Industrial Electrical
  8. •
  9. Hitachi E-102SN User manual

Hitachi E-102SN User manual

INSTALLATION MANUAL FOR MULTI-KITS
Models:
E-102SN, E-162SN, E-242SN and E-302SN
!
NOTE:
Hand over this installation manual to the next installation work
personnel.
1 APPLICABLE OUTDOOR UNITS
These multiple pipe connecting kits can be applied to the R410A
SET-FREE series:
2 TRANSPORTATION
Transport the product as close to the installation location as practical
before unpacking.
"
CAUTION:
Do not put any material on the product.
3 BEFORE INSTALLATION
■Confirm the number of the following parts by referring to the model
printed on the package before unpacking.
■Do not put foreign materials into the parts. Check to confirm that
no foreign materials are inside the parts before the fixing work is
initiated.
Name of parts
E-102SN
E-162SN
E-242SN
E-302SN
Figure
Branch Pipe for Gas Line 1
Branch Pipe for Liquid Line 1
Insulation for Gas Line 1
Insulation for Liquid Line 1
Reducer for Gas Line –114
Expander for liquid Line 2111
Acces
sories
Tape 2222
!
NOTE:
In any of these parts is not contained, please contact your
distributor
4 INSTALLATION WORK
4.1. Piping Connection Size
■ The end of the multi-Kits is finished as shown in the following
figures. Cut the end of the pipe to meet with the pipe size.
E-102SN
GAS LINELIQUID LINE
E-162SN
GAS LINELIQUID LINE
E-242SN
GAS LINELIQUID LINE
E-302SN
GAS LINELIQUID LINE
Do not place the piping
directly on the ground.
Straight length
min 0.5 m
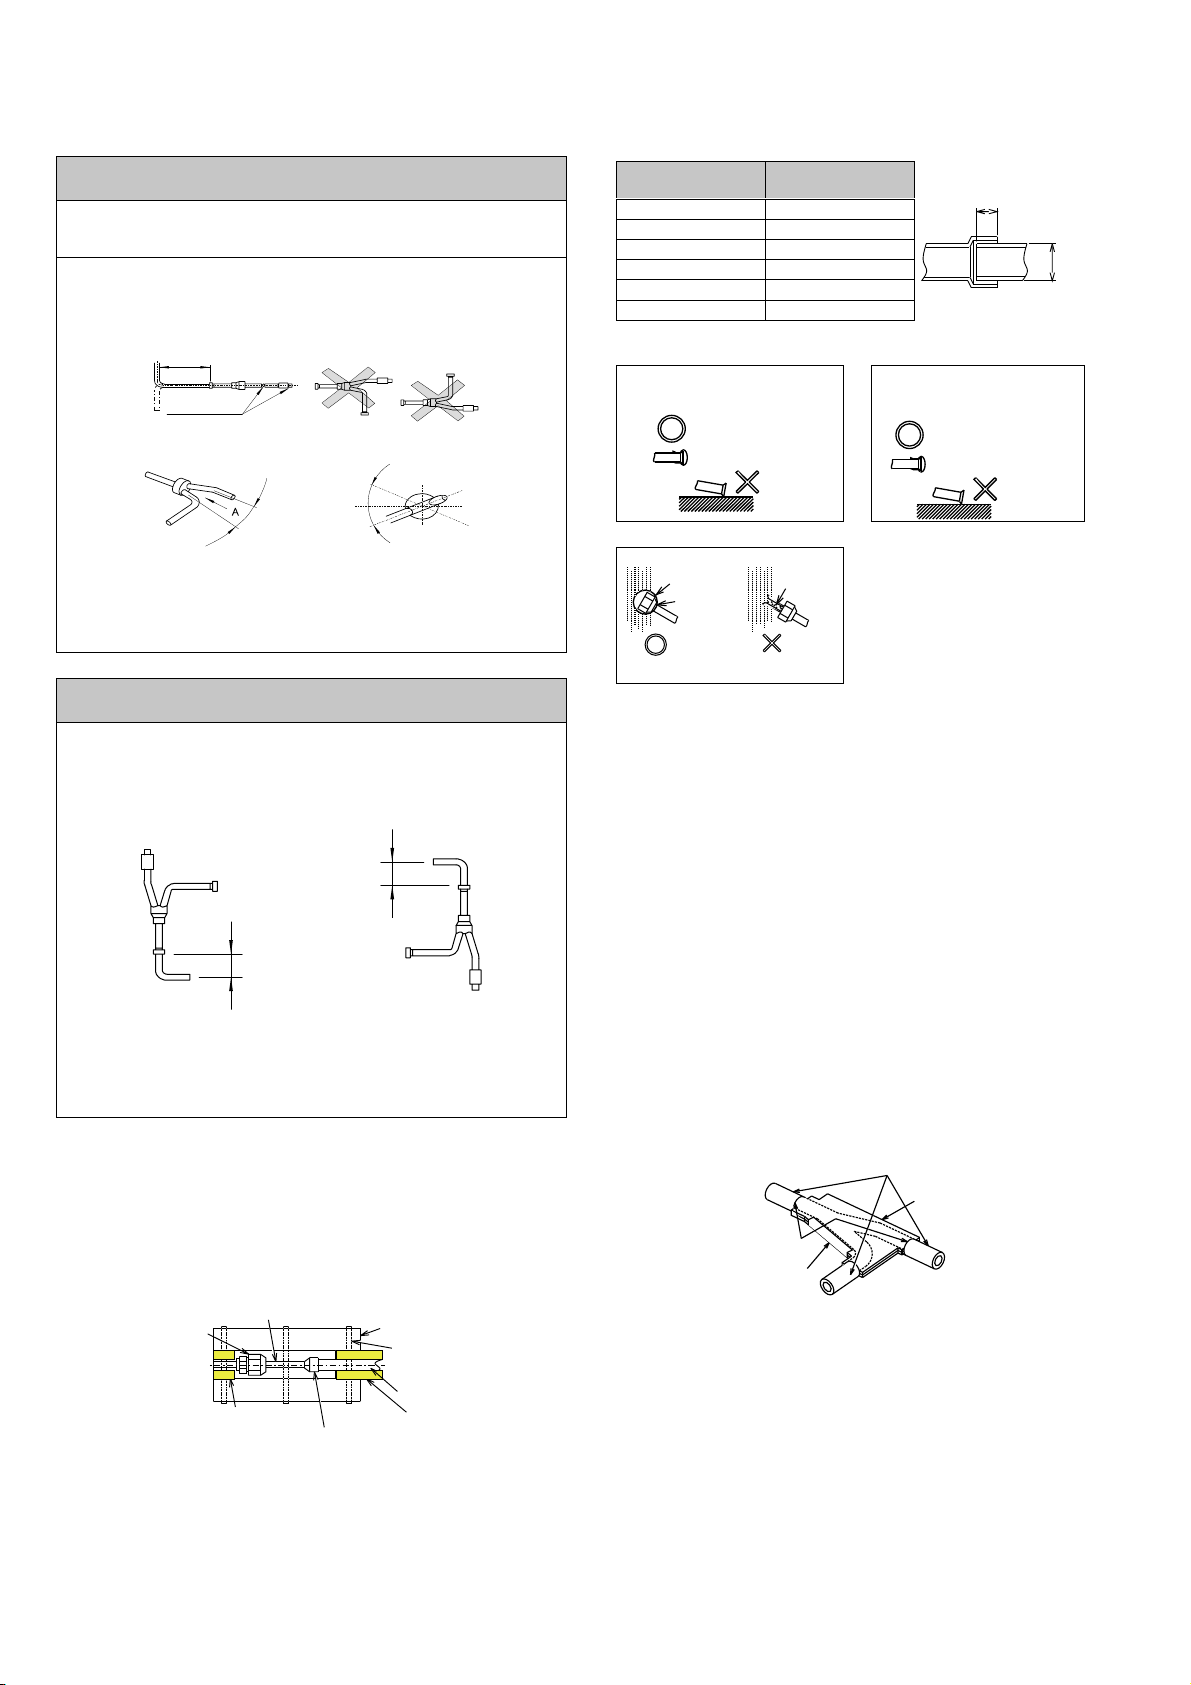
4.2. Installation Position
Horizontal Installation
Locate the branch pipes on the same horizontal plane. (Inclination
Max. 30°) Make the straight length a minimum of 0.5 m after the
vertical bend.
Vertical Installation
4.3. Piping Connection
■When connecting liquid piping for the unit with a capacity of 2HP or
smaller and with the length of piping is 15 meters or longer, apply a
piping size of φ9.53mm. Fix the connecting pipe as shown in the
figure below. Utilize the insulation attached to the Multi-Kit.
Make flares after attaching flare nut to
the connecting pipe. (Accessory) Insulate this part with insulation.
Fix this part with the
cord band or vinyl tape.
Field-supplied refrigerant piping.
Field- upplied insulation
Utilize the flare nut
of the indoor unit.
Indoor Unit
Brazing
Insulation attached
to indoor unit.
(Accessory)
□(1) Utilize clean copper pipes without any moisture and foreign
materials on the interior surface of pipes.
When connecting refrigerant piping, cut copper pipes with a pipe
cutter and blow the pipes with nitrogen, remaining no dust inside the
pipe. Do not utilize a saw and a grindstone and others which
causes a great amount of powder.
□(2) When cutting the pipe, secure the part for brazing as shown in
the following table.
A: Outer
Diameter
B: Minimum
Depth
5 O.D. <8 6
8 O.D. <12 7
12 O.D. <16 8
16 O.D. <25 10
25 O.D. <35 12
35 O.D. <45 14
B
A
Cautions for Refrigerant Piping
Put the cap
or vinyl tape.
Incorrect
Correct
Put the cap
or vinyl tape.
Incorrect
Correct
Cap or Vinyl
Bag Rubber
Rain
IncorrectCorrect
Rain can
invade.
Band
□(3) Make sure that the stop valves are closed completely.
□(4) Blow the inside of the pipes with nitrogen when brazing.
#
DANGER:
  
Check for the refrigerant leakage in detail. If a large refrigerant
leakage occurs, it will cause difficulty with breathing or harmful
gases would occur if a fire were being used in the room.
□(5) An air tight test pressure of this product is 4.15MPa.
□(6) Attach insulation packed with Multi-Kit to each branch utilizing
a vinyl tape.
Also attach insulation to piping supplied in the field.
Set up the insulation closely by field supplied tape.
!
NOTE:
When polyethylene foam is applied, a thickness of 10mm for
the liquid piping and 15mm to 20mm for the gas piping is
recommended. (Utilize insulation for gas piping with a heat
resistance of 100℃)
Field upplied Insulation
Factory upplied Insulation
Tape (Accessory)
Do not make a space.
"
CAUTION:
(1) When the temperature of the piping decrease to room
temperature, perform insulation work. If insulation work is
performed immediately after brazing, insulation can melt.
(2) If the ends of piping system are open to the atmosphere for
a while after accomplishing piping work, securely put caps
or vinyl bags to the ends of the piping, avoiding the intrusion
of moisture and dust.
After installing work has been finished, it is recommend that
this manual shall be retained carefully by a customer.
ENG -P5413706, PMML0099A-rev.2-10/04
When installing the pipe
through the wall, secure a
ca
p
at the end of the
p
i
p
e.
INCORRECT
Upward
Upward
Downward
Downward
CORRECT
Inclination
Max. ±30°
Inclination
Max. ±30°
CORRECT CORRECT
Straight length
min 0.5 m
Straight length
min 0.3 m
Downward
Downward Branch
Downward
Upward Upward
Downward Branch

Other manuals for E-102SN

1

This manual suits for next models

3

Other Hitachi Industrial Electrical manuals

Hitachi SV.LINK User manual

Hitachi

Hitachi SV.LINK User manual

Hitachi Relion 670 Series User manual

Hitachi

Hitachi Relion 670 Series User manual

Hitachi J.NET User manual

Hitachi

Hitachi J.NET User manual

Hitachi SD.LINK User manual

Hitachi

Hitachi SD.LINK User manual

Hitachi S10mini LQS070 User manual

Hitachi

Hitachi S10mini LQS070 User manual

Hitachi Relion RER670 Quick start guide

Hitachi

Hitachi Relion RER670 Quick start guide

Popular Industrial Electrical manuals by other brands

Murata GJM1555C1HR70BB01 Series Reference sheet

Murata

Murata GJM1555C1HR70BB01 Series Reference sheet

Murata GRM21BC8YA106ME11 Series Reference sheet

Murata

Murata GRM21BC8YA106ME11 Series Reference sheet

CONTACLIP RK 50 operating instructions

CONTACLIP

CONTACLIP RK 50 operating instructions

Murata GRT31CR60J476KE13 Series Reference sheet

Murata

Murata GRT31CR60J476KE13 Series Reference sheet

Murata GRT188R61H225KE13 Series Reference sheet

Murata

Murata GRT188R61H225KE13 Series Reference sheet

LevelOne ESP-2400 Quick installation guide

LevelOne

LevelOne ESP-2400 Quick installation guide

Murata GRM32NR71H684KA01 Series Reference sheet

Murata

Murata GRM32NR71H684KA01 Series Reference sheet

Meltric PN20 operating instructions

Meltric

Meltric PN20 operating instructions

ABB GSC Series Installation and maintenance guide

ABB

ABB GSC Series Installation and maintenance guide

Murata GRM0335C1E3R5CA01 Series Reference sheet

Murata

Murata GRM0335C1E3R5CA01 Series Reference sheet

Murata GRM0335C2AR70BA01 Series Reference sheet

Murata

Murata GRM0335C2AR70BA01 Series Reference sheet

Murata GRM0335C1H5R9BA01 Series Reference sheet

Murata

Murata GRM0335C1H5R9BA01 Series Reference sheet

Murata GQM1555C2D200JB01 Series Reference sheet

Murata

Murata GQM1555C2D200JB01 Series Reference sheet

Murata GRM0225C1ER50BA03 Series Reference sheet

Murata

Murata GRM0225C1ER50BA03 Series Reference sheet

Murata GRM1885C1H221JA01 Series Reference sheet

Murata

Murata GRM1885C1H221JA01 Series Reference sheet

Murata GRM21BC81C106ME15 Series Reference sheet

Murata

Murata GRM21BC81C106ME15 Series Reference sheet

Murata GQM22M5C2H470FB01 Series Reference sheet

Murata

Murata GQM22M5C2H470FB01 Series Reference sheet

Murata GCM2165C1H331JA16 Series Reference sheet

Murata

Murata GCM2165C1H331JA16 Series Reference sheet

manuals.online logo
manuals.online logoBrands
  • About & Mission
  • Contact us
  • Privacy Policy
  • Terms and Conditions

Copyright 2025 Manuals.Online. All Rights Reserved.