manuals.online logo
Brands
  1. Home
  2. •
  3. Brands
  4. •
  5. Hitachi
  6. •
  7. TV Receiver
  8. •
  9. Hitachi HDB60 User manual

Hitachi HDB60 User manual

Other manuals for HDB60

1

Other Hitachi TV Receiver manuals

Hitachi HDB60 User manual

Hitachi

Hitachi HDB60 User manual

Hitachi HDR080 User manual

Hitachi

Hitachi HDR080 User manual

Hitachi HDB72 ARGOS User manual

Hitachi

Hitachi HDB72 ARGOS User manual

Hitachi HDB73 User manual

Hitachi

Hitachi HDB73 User manual

Hitachi HDR160 User manual

Hitachi

Hitachi HDR160 User manual

Hitachi HDR080 User manual

Hitachi

Hitachi HDR080 User manual

Hitachi HDB71 User manual

Hitachi

Hitachi HDB71 User manual

Hitachi HDB65 User manual

Hitachi

Hitachi HDB65 User manual

Popular TV Receiver manuals by other brands

AXIL RT 0401 HD user manual

AXIL

AXIL RT 0401 HD user manual

Motorola DCT700 installation manual

Motorola

Motorola DCT700 installation manual

Edision Piccollino user guide

Edision

Edision Piccollino user guide

Strong SRT 2401 Troubleshooting

Strong

Strong SRT 2401 Troubleshooting

TerraTec CINERGY DT USB XS DIVERSITY Technical data

TerraTec

TerraTec CINERGY DT USB XS DIVERSITY Technical data

Haier 34F9K owner's manual

Haier

Haier 34F9K owner's manual

TechniSat DigiCom 1 operating instructions

TechniSat

TechniSat DigiCom 1 operating instructions

Haier LT19A1 user manual

Haier

Haier LT19A1 user manual

Triax CR 317 user manual

Triax

Triax CR 317 user manual

DirecTV D10-300 user guide

DirecTV

DirecTV D10-300 user guide

Motorola VIP2502W installation guide

Motorola

Motorola VIP2502W installation guide

Micro Prose MPI-500 user manual

Micro Prose

Micro Prose MPI-500 user manual

TechniSat DIGIT ISIO S Quick start manual

TechniSat

TechniSat DIGIT ISIO S Quick start manual

Rextor 3488 user manual

Rextor

Rextor 3488 user manual

Matsui DTR1 user manual

Matsui

Matsui DTR1 user manual

Sky Sat Royal HD PVR Ready user manual

Sky Sat

Sky Sat Royal HD PVR Ready user manual

Dyon Raptor Specifications

Dyon

Dyon Raptor Specifications

Best Buy Easy Home DVB-T Flip HD user manual

Best Buy

Best Buy Easy Home DVB-T Flip HD user manual

manuals.online logo
manuals.online logoBrands
  • About & Mission
  • Contact us
  • Privacy Policy
  • Terms and Conditions

Copyright 2025 Manuals.Online. All Rights Reserved.

Instruction manual
To obtain the best performance and ensure years of
trouble-free use. please read this instruction manual
completely.
Model
HDB60
Digital Terrestrial TV Receiver
- 1 -
CONTENTS
IN THE BOX ....................................................................................... 2
AV SWITCHING ................................................................................. 2
OVER AIR DOWNLOAD .................................................................... 2
YOUR DIGITAL RECEIVER ................................................................ 3
REMOTE CONTROL HANDSET ......................................................... 4
REMOTE CONTROL HANDSET ......................................................... 5
PREPARATION 1 .............................................................................. 6
PREPARATION 1 .............................................................................. 7
EVERYDAY OPERATION 2 .............................................................. 8
ADVANCED OPERATION 3 ........................................................... 13
APPENDIX A SAFETY .................................................................. 19
APPENDIX B SPECIFICATION .................................................. 20 21
APPENDIX C CONNECTING A VCR .............................................. 22
APPENDIX D TROUBLESHOOTING GUIDE .................................. 23
- 2 -
IN THE BOX
Inside your HDB60 receiver package you should have:
This user guide
HDB60 digital terrestrial television receiver
Mains adaptor
Set of batteries for the handset
Aerial cable
SCART cable
AV SWITCHING
If after connecting the HDB60 to your TV as shown you do not see a picture, press AV button on your
TV remote until you see the First Time Install screen.
OVER AIR DOWNLOAD
Over Air Download: To ensure that your digital receiver always has the most up todate information. Please
ensure that after use it is set to its standby mode. The HDB60 automatically powers up at 3AM each day
and searches for any new information which may be broadcast and will download this to your box
automatically. This operation will normally take approximately 30 seconds.
If you have an important recording to make at 3AM which must not have a 30 second interrupt then you
can disable the auto OAD search by performing the following:
1. Press Menu button and using the up / down buttons highlight CONFIG and press the SELECT button,
2. Use the up and down buttons to highlight "RECEIVER UPGRADE" and press SELECT button.
3. Using the left / right button change function from Enable to Disable.
4. Press SELECT button then MENU and MENU to return to Normal l operation.
Do not forget to re enable the automatic OAD function after you have made your recording by repeating
the above instructions but this time selecting ENABLE.
- 3 -
)URQW
5HDU
79287 $17(11$
9&579 $8',2 9'&
/5
$QWHQQDLQ
79RXW
796&$57VRFNHW 9&56&$57VRFNHW
$8',2RXWSXW
/HIW5LJKW
9'&
,QSXW
,5,QIUDUHG
6WDQGE\/HG
YOUR DIGITAL RECEIVER
- 4 -
79'79
6WDQGE\
1XPHULF
:LGH
3URJUDPPHXS
3URJUDPPHGRZQ

9ROXPHXS
9ROXPHGRZQ

,QIR+HOS
3DJHXS5HG
8S
/HIW
3DJHGRZQ*UHHQ
([LW
6XEWLWOH
0XWH
*XLGH
0HQX
%OXH
5LJKW
'RZQ
6HOHFW
<
HOORZ
7H[W
REMOTE CONTROL HANDSET
- 5 -
REMOTE CONTROL HANDSET
REMOTE BUTTO S
Button Function
1 Standby Turn the receiver on and off
2 Mute Silence received audio
3 TV/DTV Exit most menus to return to television viewing
Switch the TV set between analogue, digital TV and VCR
4Menu Display the Main Menu. Exits menus
5 Up, Down, Left, Right Move between menu items
6 Select Make selection in a menu
7 umber keys Change channels
Enter PIN code
Enter numbers and letters into menus
8 Guide Display and exit electronic programme guide
9 V+, V- Adjust the received audio volume
10 P+, P- Change channels
11 Page Up/Red Move up a page through channel list
Move to top in EPG programme details
Select red option in digital teletext
12 Page Down/Green Move down a page through channel list
Select green option in digital teletext
Move to bottom in EPG programme details
13 Yellow Scroll up through EPG programme details
Select yellow option in digital teletext
14 Blue Scroll down through EPG programme details
Select blue option in digital teletext
15 Wide Select screen format
16 i Display menu help
17 Text Start and stop digital teletext
18 Exit Return to Exit from menu
19. Subtitle Turn Subtitles ON and OFF
- 6 -
PREPARATION 1
CO ECTIO S
Place your HDB60receiver on a firm, level surface with at least a 10cm gap around all sides of the case
and in a position convenient for connection to your television, a mains power outlet and a TV aerial wall outlet
(or the 'flying lead' from your TV aerial, as appropriate).
Please refer to the safety section in Appendix A.
Turn off your television at the mains and disconnect the lead going to the aerial wall outlet (or the flying aerial
lead) and connect this to the ANT IN socket on the rear of the receiver. Connect the aerial cable supplied
from the TV OUT socket on the receiver to the TV set's aerial socket.
Connect the TV SCART socket on the rear of the receiver to a suitable SCART socket on your television.
There may be more than one SCART socket on your television and, if unsure which to use, you should refer
to its manual for guidance.
79$HULDO
+L)L
7
9
79
$HULDO
,Q
796FDUW,Q
79287 $17(11$
9&579 $8',2 9'&
/5
2
S
WLRQDO/HDGV
79,1
6&$57
6&$57
I
If you have a VCR or other equipment connected to your television, please connect the receiver as
described here and refer to Appendix D later when satisfied that the receiver is functioning normally.
Finally, plug the receiver into the mains outlet.
Remove the battery compartment cover from the rear of the remote control handset by lifting the catch
at one side. Insert two AAA (MN2400) sized batteries, taking care to observe the correct orientation as marked
on the inside of the compartment. Replace the compartment cover.
- 7 -
PREPARATION 1
SWITCHI G O
Turn on your TV set and select the SCART input (with
the AV key, or similar, on thetelevision remote
control). Turn on the mains supply to the HDB60
receiver (the indicator on the front of the receiver
will glow red) and press the [STANDBY] key on the
HDB60remote control handset. The indicator light
will glow green and the receiver's menu will be seen
on the TV screen.
If you do not see the receiver's menu on the
television screen, refer to the Troubleshooting Guide
in Appendix E.
TU I G I
Because this is the first time that the receiver has
been used, there are no channels stored in the
receiver's memory and the First Time Installation
menu is displayed on the screen.
3OHDVH FKRRVH 79 7\SH XVLQJ      NH\V
3UHVVWRVWDUWLQVWDOODWLRQ
6(/(&7
1250$/  
First you should select the type of TV set you have
connected to the HDB60receiver. Press the [LEFT]
or [RIGHT] keys on the remote control handset to
switch the indicator on the screen to show either
16:9, if you have a 16:9 or 'widescreen' TV, or to 4:3
if you have a standard TV set. Then press [SELECT]
to start the installation process. The next menu will
ask if you want to tune in the digital terrestrial
television channels.
Using the [LEFT] or [RIGHT] keys on the remote
control, make sure that the YES button is highlighted
in yellow, and press the [SELECT] key to start the
automatic search.
'R\RXZDQWWRVWDUWDXWRPDW LF VHDUFK"
<HV 1R
The HDB60 receiver will automatically tune to the
UHF transmission channels 21 to 68 looking for
digital terrestrial TV broadcasts and displaying the
names of channels found. This process will take
about five minutes.
When the search is finished, the first channel of the
channel list and the information banner is displayed
you can now watch digital terrestrial television,
selecting the channel you require as described in
the next section.
HINT
Depending on the reception conditionsin your
particular area, you may find that the list of
channels found includes one or more repeated
names. This is because the receiver may detect
and store some channels, including those it
cannot receive clearly, from adjacent areas
alongside the strong channels from a
transmitter nearby. This is not a problem and
the weaker channels can be deleted from the
receiver later, as described in ection 3 -
ADVANCED OPERATION - Editing the channel
list.
If no digital terrestrial television broadcasts are
found the receiver will display a message:
You should then refer to the Troubleshooter Guide
in Appendix E to establish the cause of the problem.
When you have finished watching digital terrestrial
TV, you may wish to switch the receiver to standby
to save power - although the HDB60receiver can
remain powered up continuously, even when the
television is turned off, without harm to the
television or itself. The receiver is returned to
standby by pressing the [STANDBY] key on the
remote control handset.
Hint
In standby, the HDB60 receiver still consumes
power and thereby contributes to air and water
pollution and the exhaustion of the World's
natural resources. Overnight, or when your
receiver is not going to be used for long
periods of time, you can turn it off at the mains
and this will save energy (and save you money).
You will not have to re-install the receiver when
it is turned on again.
- 8 -
EVERYDAY OPERATION 2
While using the HDB60 receiver to the full there are
great many keys to use in different situations. Many
of the menu screens displayed by the receiver
have reminders as to which keys do what, at the
base of the screen. In addition, many screens have
further help available which is displayed when the
[i] key is pressed, as prompted at the bottom right
of the screen.
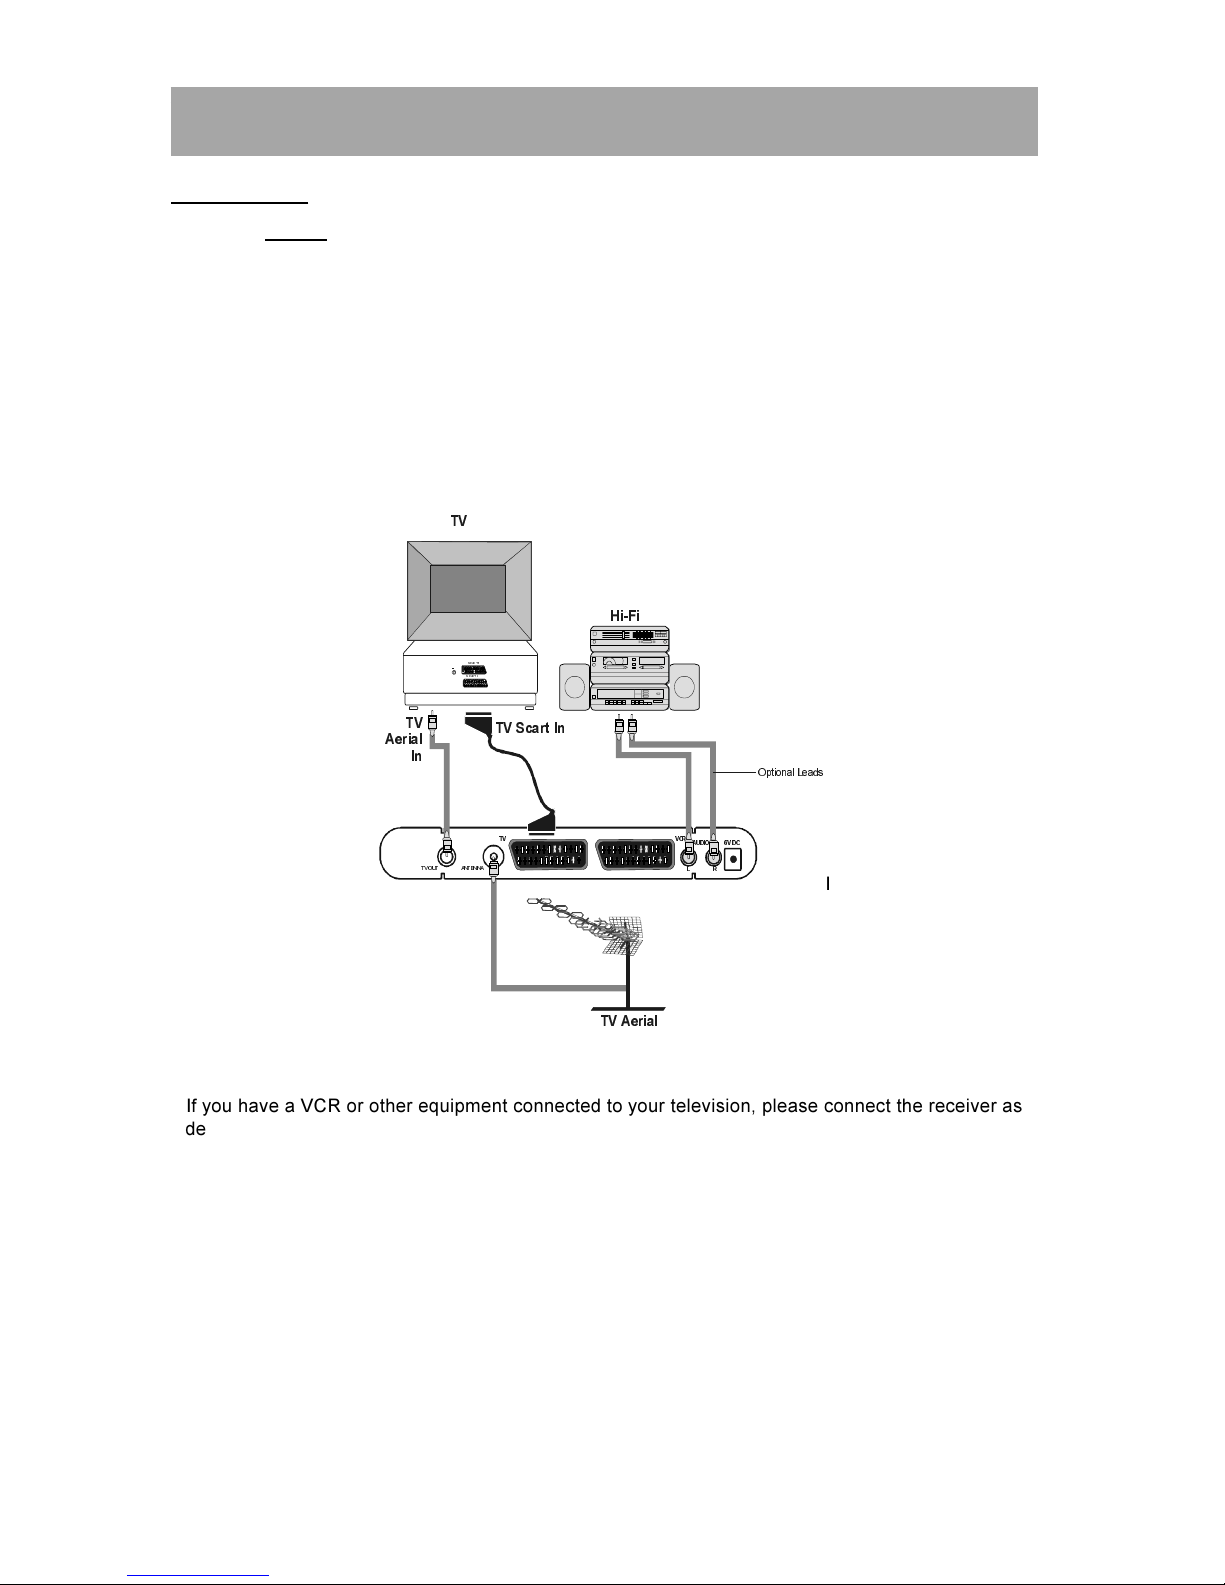
Providing your TV set SCART socket has switch
control, pressing the [TV/DTV] key at any time while
watching television programmes will switch the TV
set between displaying the digital terrestrial
television programme and its normal analogue
television reception.
CHA GI G CHA ELS
You can select the channel you wish to watch in one
of four ways - stepping through the channel list,
selection by number, from the on-screen channel
list, and using the electronic programme guide
(EPG).
To move through the channel list, press the [P+] or
[P-] keys on the remote control. Pressing the [P+]
key will select the channel next in the channel list.
Pressing the [P-] key will select the previous channel
in the list.
Pressing the [P+] key when the last channel in the
list is being viewed will select the first channel.
Similarly, pressing the [P-] key when the first
channel is displayed will select the last channel in
the channel list.
You can also select the required channel using its
channel list number. Channel numbers are entered
using the number keys on the remote control
handset and can be up to three digits long.
Hint
The channel list numbers are assigned by the
broadcasters. Because not all channels are
broadcast free-to-air and stored by the receiver,
the channel list numbers do not run
continuously. The fifteenth channel in the list,
for example, may not be channel number 15 but
channel number 17.
When you press a number key on the remote
control, a small box appears in the top left of the
screen to show the entered number. After each digit
is entered, the receiver will wait up to two seconds
for the next digit to be pressed until either three digits
have been entered or you do not press a digit in time.
The channel corresponding to the entered number
in the box will then be selected.
Hint
If you enter a number which does not
correspond to a stored channel, the next valid
channel number is selected instead. If you enter
a number greater than the highest numbered
channel in the channel list, the receiver will
select the last channel in the list.
Information Banner
Whenever you change channel, using the [P+] and
[P-] keys or the number keys, the receiver displays
the channel picture along with an information banner
at the bottom of the screen. This will remain on the
screen for approximately three seconds. The
information banner can also be displayed at any
time while watching TV by pressing the [i] key on the
remote control. Pressing the [i] key again removes
the banner.
Hint
Not all channels broadcast the programme
data. If the name and times of the programme
is not available then 'Not available' is displayed
in the information banner.
The information banner gives a number of facts on
the channel selected and the programmes on it. The
name of the channel is displayed, along with its
channel list number and an indication of the strength
of the signal received on this tuning channel.
The name and the start and finish time of the
programme currently showing on the selected
channel are given, and the current time.
- 9 -
Icons are also displayed in the information banner
and if this channel is a favourite channel (see
Section 3 - ADVANCED OPERATION - Favourite
Channels).
favourite channel
If the channel selected is locked (see Section 3 -
ADVANCED OPERATION - Channel Protection),
you must enter the correct four digit code to view
the channel.
Alternatively, the [P+] or [P-] keys are used to move
to another, unlocked channel.

CHA EL LIST
You can also select the required channel directly
from the on-screen channel list. This is displayed
using the HDB60 receiver's Main Menu. First bring
up the menu with the [MENU] key on the remote
control handset.
Using the [UP] or [DOWN] keys on the remote
control, make sure that the first item, Channel List,
is highlighted in yellow and press the [SELECT] key,
to display the channel list.
6(/(&7
L
Here, you can preview any channel stored by the
receiver before viewing it full screen. The complete
list of channels is displayed in pages of 10 channels
at a time, with their channel list number and a
favourite channel icon if appropriate (see Section
3 - ADVANCED OPERATION - Favourite Channels).
The name and a quarter-screen image of the
channel last viewed is displayed in the top right of
the screen.
Using the [UP] or [DOWN] keys, the highlight is
moved through the list to the channel required.
Pressing [SELECT] now changes the quarter-screen
display to show the highlighted channel.
Hint
From the Channel List screen, it is possible to
edit the channel list, including changing the
name of stored channels or deleting them.
Editing the list is covered in ection 3 -
ADVANCED OPERATION - Editing The Channel
List. When using the Channel List to select
channels, use the [LEFT] or [RIGHT] keys to
ensure that the highlighted button at the bottom
of the screen is ELECT, so no editing functions
are accidentally begun.
When you leave the Channel List screen, by
pressing [MENU] the channel showing on the quarter
screen is selected for normal viewing on the whole
screen.