Hitachi HDB72 ARGOS User manual

Model
HDB72
Digital Terrestrial TV
Receiver
Instruction Manual
To obtain the best performance and ensure years of trouble-free use,
please read this instruction manual completely.

1
CONTENTS
1. INTRODUCTION....................................................................................................................................................2
SOME DOS AND DON'TS ON THE SAFE USE OF EQUIPMENT..........................................................................3
POWER CORD(MAINS LEAD).................................................................................................................................4
2. SAFETYPRECAUTIONS......................................................................................................................................4
YOUR DIGITALRECEIVER......................................................................................................................................6
3. PREPARING..........................................................................................................................................................6
3.1. REMOTECONTROL..........................................................................................................................................6
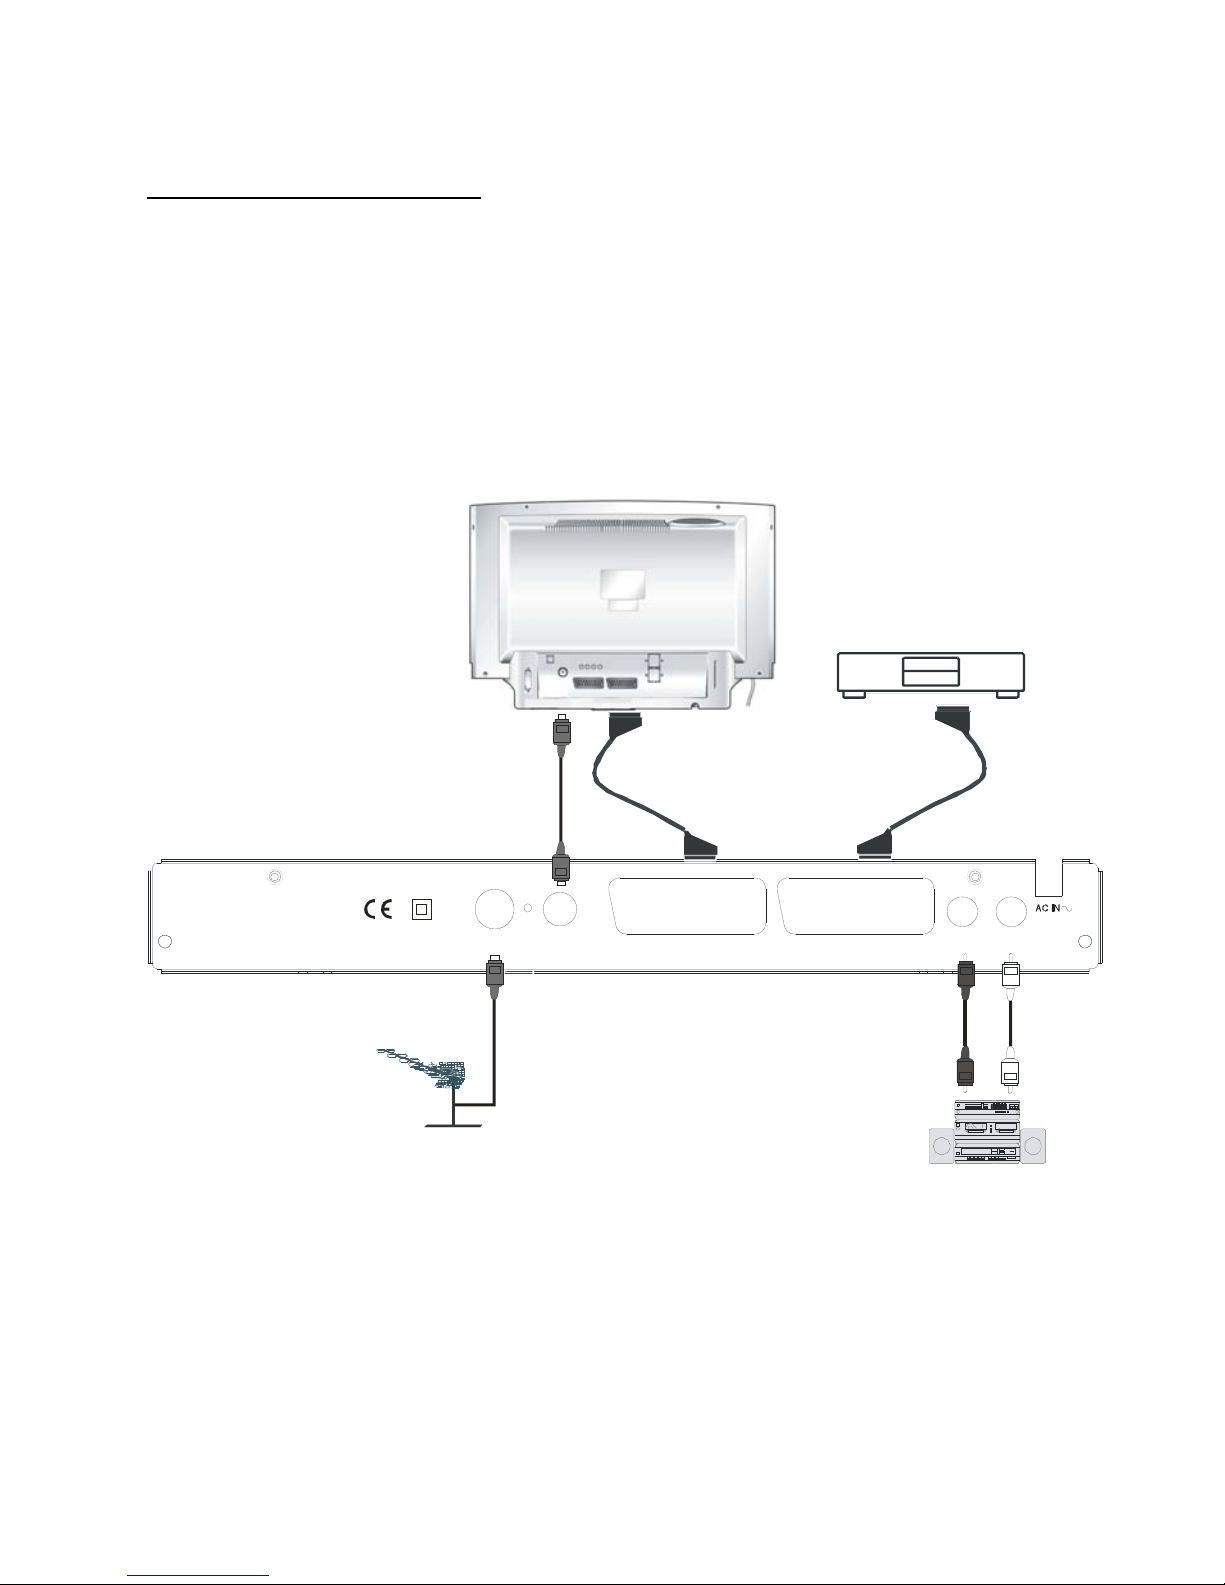
3.2. CONNECTIONS..................................................................................................................................................6
3.2.1.CONNECTION TO THE TV.............................................................................................................................6
3.2.2.CONNECTION TO A VCR..............................................................................................................................7
3.2.3.AERIAL CONNECTION...................................................................................................................................8
3.2.4.PUTTINGINTO OPERATION.........................................................................................................................8
3.2.5.SOCKETS........................................................................................................................................................8
4. REMOTE CONTROL FUNCTIONS.......................................................................................................................9
4.1. REMOTECONTROL LAYOUT...........................................................................................................................9
5. MENU INTERFACE.............................................................................................................................................11
FIRSTTIMEINSTALLATION...................................................................................................................................11
5.1. MAIN MENU......................................................................................................................................................11
5.1.1.CHANNEL LIST.............................................................................................................................................11
5.1.1.1. NAVIGATINGTHE WHOLE LISTOF CHANNELS....................................................................................12
5.1.1.2. DELETING UNWANTEDCHANNEL..........................................................................................................12
5.1.1.3. RENAMINGCHANNELS............................................................................................................................12
5.1.1.4. ADDING LOCKS TO CHANNELS..............................................................................................................12
5.1.1.5. SETTINGFAVOURITES............................................................................................................................12
5.2. INSTALLATION.................................................................................................................................................13
5.2.1.ADD NEW CHANNELS.................................................................................................................................13
5.2.1.1. AUTOMATIC SEARCH...............................................................................................................................13
5.2.1.2. MANUALSEARCH.....................................................................................................................................13
5.2.2.FIRSTTIMEINSTALLATION........................................................................................................................14
5.3. CONFIGURATION............................................................................................................................................14
5.3.1.AUDIO LANGUAGE.......................................................................................................................................14
5.3.2.SUBTITLE......................................................................................................................................................14
5.3.3.TV TYPE........................................................................................................................................................14
5.3.4.TV OUT..........................................................................................................................................................14
5.3.5.FAVOURITE MODE.......................................................................................................................................15
5.3.6.EPG PREFERENCE......................................................................................................................................15
5.3.7.SCAN ENCRYPTED CHANNELS.................................................................................................................15
5.3.8.RECEIVER UPGRADE..................................................................................................................................15
5.3.9.PARENTAL SETTINGS.................................................................................................................................16
5.3.10.i. Menu Lock..................................................................................................................................................16
5.3.10.ii.Set LockKey.............................................................................................................................................16
5.4. TIMERSMENU.................................................................................................................................................16
5.5. LANGUAGE......................................................................................................................................................17
6. ADVANCED OPERATION...................................................................................................................................17
6.1. ELECTRONIC PROGRAMGUIDE (7DAYSEPG)..........................................................................................17
6.2. MESSAGES......................................................................................................................................................18
6.3. CHANNEL NAVIGATION..................................................................................................................................18
6.3. CHANNEL NAVIGATION..................................................................................................................................19
6.4. VOLUMECONTROL........................................................................................................................................19
6.5. DIGITAL TELETEXT.........................................................................................................................................20
6.6. WIDESCREEN..................................................................................................................................................20
6.7. SUBTITLE.........................................................................................................................................................20
6.8. TV / DTVKEY...................................................................................................................................................20
7. TROUBLE SHOOTINGGUIDE...........................................................................................................................21
8. SPECIFICATIONS...............................................................................................................................................22
9. IMPORTANTNOTICE.........................................................................................................................................23
DIGITAL SWITCHOVER AND YOUR TV EQUIPMENT.........................................................................................23

2
1. INTRODUCTION
Thank you for purchasingthisproduct. It will giveyou good serviceif youtake note ofallsafetynotices and
recommendations.
Contents supplied :
Remotecontroller
RC 2545B Batteries
2xAAA
SET TOPBOX
HDB72 INSTRUCTIONBOOK QUICK SETUPGUIDE
SCART CABLE
1X
RF CABLE
1X

3
SOME DOS AND DON'TS ON THE SAFE USE OF EQUIPMENT
Thisequipmenthasbeendesigned and manufacturedtomeet international safetystandards but,like anyelectrical
equipment,caremust be takenif you aretoobtain thebest resultsandsafetyistobe assured.
**************
DO read theoperatinginstructions before you attempt to use the equipment.
DO ensurethatall electrical connections(includingthemainsplug,extensionleadsandinter-connections between
the pieces of equipment)are properlymade andin accordancewith the manufacturer's instructions.Switchoffand
withdrawthe mains plugbefore making or changing connections.
DO consult your dealer if you are ever in doubt about the installation,operationor safetyof your equipment.
DO be careful with glass panelsordoorson equipment.
DO route the mainslead sothat it isnotlikelyto be walkedon, crushed, chafed,orsubjected to excessivewear
and tear orheat.
**************
DON'T remove anyfixed cover asthismayexpose dangerousvoltages.
DON'T obstructtheventilationopeningsof the equipmentwith itemssuchasnewspapers,tablecloths,curtains,
etc. Overheating will cause damage andshorten thelifeof theequipment.
DON'T allowelectrical equipmenttobe exposed to dripping or splashing,or objectsfilledwith liquids,suchas
vases,tobe placedon the equipment.
DON'Tplacehot objectsor nakedflamesourcessuchaslighted candlesornightlightson,orcloseto equipment.
High temperaturescan melt plastic andleadto fires.
DON'T use makeshiftstandsand NEVER fixlegs with wood screws- toensure
completesafetyalwaysfitthemanufacturer'sapprovedstand or legs with the fixings
providedaccording tothe instructions.
DON'T useequipment such aspersonal stereosor radiosso thatyou aredistracted from
therequirementsoftrafficsafety.Itisillegal to watchtelevision whilstdriving.
DON'T listen to headphones athighvolume,assuch use can permanentlydamage your
hearing.
DON'T leave equipment switched on when it isunattended unlessit isspecifically stated
that itisdesigned forunattended operationor hasastand-bymode. Switchoff using the
switch ontheequipment and make sure that yourfamilyknowhowto do this. Special
arrangementsmayneedto be made forinfirmorhandicapped people.
DON'T continue tooperate theequipment ifyou are in anydoubt aboutit working
normally,orifit isdamaged inanyway-switch off, withdrawthe mainsplug and consult
yourdealer.
ABOVE ALL
---NEVER let anyoneespeciallychildren pushanything into holes,slotsor any otheropening inthecase -
this could result in a fatal electricalshock;
--- NEVER guessor takechanceswith electricalequipment of any kind itisbetter tobesafethan sorry!

4
POWER CORD (MAINS LEAD)
Donotplace theproductwhereapiece offurniture orother heavyobjectcould trap thepowercord (mains lead).
Handle the powercordbytheplug.Donotpullouttheplugbytugging the cordand nevertouchthe powercord
whenyourhands are wetas this could cause ashort circuit or electric shock.Never makea knot inthe cord or tie it
withothercords.The powercordsshould berouted insuchawaythattheyarenotlikelytobesteppedon. A
damaged power cordcan causefire or giveyou anelectricalshock.Check thepowercord periodicallytosee if it is
damaged. Ifit isdamaged, please ask anapproved service agenttoreplace it.
For yourownsafetyreadfollowing instructionscarefullybefore attemptingto connectthis device tothemains.
Thisunit is designedto operateon a220V-240V AC -50Hzsupplyonly.Connectingit to other powersources
maydamage it. Ensure thatthe supplycorrespondsto theinformation on the rating label onthebottomof the unit.
Thisdigitalterrestrial receiver issupplied with amoulded mainsplug. This plug mustnot be cutoff asitmay
contain aspecial radiointerferencefilter,theremovalof which could leadtoimpaired performance.If youwishto
extend thelead, obtain anappropriatesafetyapprovedextension lead orconsult your dealer.
Observe themanufacturersinstructionswhenconnecting extensionleadsto theset. Checkthe fuse rating on the
newplug,thisshould befitted witha5Ampfuse whichconformsto eitherASTAor BSI (BS1362) approvals,these
areeasilyidentifiable byeither the or symbols.If you arein anydoubtabout theinstallation of an
extension lead, please consulta competent electrician.
Thissymbol means that thisunit isdoubleinsulated. An earthconnection isnot required.
CAUTION
Topreventelectricshock,donot removethe cover. No userservicablepartsinside. Refer servicing to qualified
service personnel.Disconnectfromthemains supplybeforecleaning.
2. SAFETY PRECAUTIONS
Power Source.
Thisunit shouldonlybe connected toa220-240VAC50-60 Hzpowersupply.Do not connecttoanyothersupply.
Power Lead.
Donot place theleadwhere itmaybe stepped onor tripped over. Do not placeheavyobjectsonthe lead. Ifthe
lead becomescut or damaged, please disconnect the unitfromthe mainssupply.
The mainsplug orthe appliancecouplerisusedasthe disconnectdevice,thedisconnect deviceshallremain readily
operable.
Location.
Place onasolid basesuchas ashelf or inaTVcabinet or similar. Do notplacenearheat sourcessuchas
radiators, fires or similar.
Donot blockventilation holesor place in alocationthatdoes notallowa freeairflow.
Donot placetheunitnear water orin highhumidityareas.Avoid splashing.Iftheunitdoesget wetpleasecall an
approved service agent.
Apparatusshallnot beexposed todripping orsplashingandno objectsfilledwithliquids,suchasvases,shall be
placed onthe apparatus.

5
Nonaked flamesources,such as lighted candles, should be placed onthe apparatus.
Donot place anyobjectsintothe ventilation slots.
Shouldanyof theabovetakeplace,doNOT open theunit yourself. Youwillinvalidateyourwarrantyand causea
possible safetyhazard, as there are high voltagesinside.
Lightning
During thunderstormsor going onholiday,itisrecommended that theaerial (ifoutdoor) is disconnected, to prevent
damage to the aerialinput circuits.
WARNING
Battery Disposal.
When the batteriesintheremotecontrol arewornout, do NOTbreakopenorthrowonafire.Donotplacein
householdwaste. Contactyourlocal wasteauthorityforadvice.
Cleaning.
Donot use chemical cleaners.Use adryduster.If thereare stubbornstains, use adamp cloth with dilutesoap.

6
YOUR DIGITAL RECEIVER
FRONT PANEL:
ON/OFF PROG
UP
PROG
DOWN
REAR PANEL:
35021695
AUDIOLAUDIORANT. IN TVOUT SCART(VCR/AUX)SCART(TV)
AERIAL
IN AERIAL
OUT VCR
SCART
TV
SCART AUDIOOUT
LEFT/RIGHT
3. PREPARING
3.1. REMOTE CONTROL
Firstopenthe batterycover on theunderside of the remote control.Putin both batteries1.5Volt (RO3/AAA)
referringtothe imprintedsymbols(+/-) in the batterycaseandput on the batterycoveragain. While usingthe
remote control,directit towardsthe front side of thereceiver.Iftheremote controldoes not workor the chosen
functiondoesnot work,thebatteriesaremostprobablyexhaustedandtheyshould be replacedassoon as
possible. Please useonlytheleakproof batteries.Itisbestto remove thebatteries fromthe remote unit ifyou will
not beusing the remotecontrolunitfor long time.
3.2. CONNECTIONS
3.2.1. CONNECTIONTOTHE TV
Connectyour set topbox(STB) with the scartlead supplied,fromthe TV socket ontheSTB to thescartsocket on
yourTV.If your TV does not have a scart socket,you willneed to purchase a suitablescart adapter lead.
ThisSTBhasRGB orCVBSoutputsfromthe scart socket.If your TVhasRGB inputsyoumayselectthisinthe
STBConfiguration menufor bestresults.

7
3.2.2. CONNECTIONTOA VCR
1) ConnectoneendofaSCARTcable to theTVSCARTconnector on the STBandthe other endto aSCART
socketonyour TV
2) Connectone endofasecond SCARTcable to the VCRSCART connectorontheSTB and the otherendtoa
SCARTSocket on your VCR(Video CassetteRecorder).
ØWhenthe receiverisin standbymode: Whenconnecteddevice(VCRorDVD)isswitchedon,thedevice will
be automaticallyrouted to TV.
ØWhenthereceiver ison: If the VCRor DVDisselectedthiswill be routed tothe TV. If the VCRor DVDisnot
selected the TVwill displaytheSTB.
35021695
AUDIOLAUDIORANT. IN TV OUT SCART(VCR/AUX)SCART(TV)
VCR
TV
TVAerial
Hi-Fi
TV SCART VCR SCART

8
3.2.3. AERIAL CONNECTION
If thelead fromyour TVaerialiscurrentlyconnected intoyour TV,thenremovethislead fromyour TVand connect
to the “AntennaIn” socket on yourSTB.
Pleasenotethatreception ofDigitalTV requires agoodqualityexternalTVantenna.Itisnot recommended that
theSTB isconnected toan internal aerial.
3.2.4. PUTTINGINTOOPERATION
Ensure that all connectionshavebeenmade before connection tothe mainssupply. Plug theSTBinto the mains
supplyandaRED LEDwilllight(standbymode)on thefront panel. Waitforabout7secondsto allowtheSTB to
“boot”.PresstheStandbybuttonand the LED willturn to BLUE.
3.2.5. SOCKETS
·TVSCART
·VCR SCART
·2 xCoaxconnectors.Aerial In (ANTIN)and Aerial out (TVOUT). TheTV OUTsocket simplyloops theAerial
signal to the TV or VCR. It isnotan output fromtheSet Top Box.
·2 xRCA(phono) Audio output L/R to external HiFi.

9
4. REMOTE CONTROL FUNCTIONS
4.1. REMOTE CONTROL LAYOUT

10
BUTTON FUNCTION
1 Standby Switchesthe receiver on andinto Standby.
2 Mute Mutesreceived audio.
3 TV/DTV Switchesbetween DTV andSTB (see page 20 for
details).
4 Menu Displays the MainMenu / Exitsmenus.
5 Up, Down,Left, Right Movesbetween menuitems.
6 Select Makesselection in a menu.
7 Number keys Changes channels.
Entersnumbersand lettersintomenus.
8 Guide Displays and exit electronicprogrammeguide.
9 V+, V- Adjuststhe receivedaudiovolume.
10 P+, P- Changes channels.
11 PageUp/Red Movesup a page through channel list.
Selectsred optionin digitalteletext.
Movesto top inEPG programme details.
12 PageDown/Green Movesdown apage through channel list.
Selectsgreenoptionin digital teletext.
Mo vesto bottom inEPG programme details.
13 Yellow Selectsyellowoptionindigitalteletext.
Scrollsup through EPG programmedetails.
14 Blue Selectsblue option in digital teletext.
ScrollsdownthroughEPG programmedetails.
15 Wide Selectsscreen formats(4:3 / 16:9)
16 i Displays menu help.
Enables /DisablesInfo bar.
17 Text Startsandstopsdigitalteletext.
18 Back Exits menus.
19 SubtitleTurnsSubtitlesON and OFF.

11
5. MENU INTERFACE
FIRST TIME INSTALLATION
When the boxisstartedfromstandbyfor the firsttimethere willbe nochannelsstoredinmemory.A“Firsttime
Installation”menu will bedisplayed. Select the TVtype (screen format). Tocontinue,presstheSELECTkey.
Awarning messagewillappear,whichasks you,ifyou want tostart automaticsearchor not. Choosetheoption
YES,press theSELECT button tostart Automaticsearch. TheSTBwill start to searchfor all thestationsin your
area andwillstore them.
5.1. MAIN MENU
The MainMenuisaccessed bypressing the Menubutton. The itemsaccessed in the
Main Menuare:
1.) ChannelList
2.) Installation
3.) Configuration
4.) Timers
5.) Language
5.1.1. CHANNEL LIST
The following operationscan beperformedinthismenu
1. Navigatingthe whole list ofchannels
2. Deletingunwanted channels
3. Renaming channels
4. Addinglocksto channels
5. Settingthe favoritelist
ChannelTableis where the channelsare managed.

12
5.1.1.1. NAVIGATINGTHEWHOLE LIST OF CHANNELS
In thechannel table movesthecursorto selectthe previousor nextchannel. RED andGREEN buttons
select pageupanddown.
Towatch aspecificchannel,highlightit using the buttonsorthe Red/Green buttons,thenpress SELECT,
if theSELECTboxishighlighted. The nameandnumber ofthe selectedchannelwill be displayedinthetop-right
corner of the screen.
If the selectedchannelispasswordprotected, apopupmenu will bedisplayed. If the correctcodeisenteredthe
selected channelcan bewatched. After thePassword boxhasdisappeared you can use the buttonsto
navigate toother channels.Thescroll barin the middle ofthe screen showstherelativeposition of the current
channel with respect to thewholelist.
5.1.1.2. DELETINGUNWANTED CHANNEL
To delete a channelhighlight it using “5/6” RED/GREEN, thenhighlightthe “Delete”button using“3/4”and press
SELECT. A message is displayed toconfirmyourdecision, ifyou still want todelete press SELECT once moreand
thechannelwill bedeleted, the operation willbe cancelledif you select“NO”.
5.1.1.3. RENAMINGCHANNELS
Torename a specificchannel, the channel mustbe highlighted.Select“EditName"buttonandpress SELECT.The
nameappearsontheright sideofthemenu with the firstcharacter highlighted.Bymeansof “3/4/5/6” keysthe
characterscan be changed.Pressing MENU cancelsthe editing and SELECT savesthenewname.
5.1.1.4. ADDINGLOCKS TOCHANNELS
Channel Locking provides apassword-protected access to channelsselected byparents.In orderto lock achannel
you should knowtheparentalLock password(set to 0000 inthe factoryandcan onlybe changedfromthe
Configuration Menu),highlightthechannel tobe locked andselectthe “Lock”button,whenSELECTispressed a
passworddialogisdisplayed.Entertheparental Lockcode andtheLock iconwill bedisplayedin frontof the
selected channel. Repeatthe sameoperation to cancel theLock.
5.1.1.5. SETTINGFAVOURITES
Therewill besomechannelsthatyoutendtowatch more
often and someonlyoccasionally.Thefavourite mode
allowsthemost-watchedchannelsto accessedmore
easily,leaving theless-watched channelsaccessible but
outof theway.Anychannelcanbe afavourite channel
andtheChannelListmenuisusedto labelthose
channelsyouwantas favourites.DisplaytheChannel List
menu screen byhighlighting ChannelListon theMain
Menu andpressing [SELECT].
Usethe “3” or“4“ keysto highlightthe FAVOURITE
button at thebaseof the screenand then, inturn,
highlighteachchannel that isrequired to beafavourite
channel, usingthe“5” and“6” keysand press
[SELECT]. Achannelselected asafavourite appearsin
themainchannel listwith a favouritesiconagainst the channelname.
Achannelcan haveitsfavourites statusremovedbyrepeatingthisprocedure,to removetheicon. Leavethe
ChannelListmenu bypressing [MENU].Oncetherequiredchannelshave been markedasfavourite channels,the
favourite modecan be activated to alloweasyaccessto them.Press the [MENU] keyto displaythe Main Menu,the
“6”keytwice tohighlightConfiguration, andpress [SELECT]to displaytheConfigurationscreen. Press the “6”
keyfour timesto highlighttheFavourite Modelineand usingthe“3” or “4“keyschange the setting fromOffto
On.

13
When you leavetheConfigurationmenu bypressing[MENU]the favouritemode isactivated.Now,changing
channel using the[P+] or [P-] keys willswitch to onlythose channelsmarked asfavouritesinthechannellist.
You canstill accessall the channelsin thechannellistbykeyingin their channel listnumberor byselectionfrom
the Channel Listscreen. Alternativelyyou canswitchoff the favouritemodefromtheFavourite Modelineof the
Configuration menu.
NOTE: The favouritemodecanonlybeactivatedifone or morechannelsin thechannellistare markedas
favourites.Similarly,ifthe favourite statusisremoved fromall thechannelsin theChannelList,the favourite mode
isturnedoff automatically.
5.2. INSTALLATION
The options located in Installation Menu are:
1. Add NewChannels
- AutomaticSearch
- Manual Search
2. First Time Installation
5.2.1. ADD NEWCHANNELS
The receiver cansearchfor channelsautomatically(searchingall thebroadcastfrequenciesforfree-to-air
channels) or manually(searchingone specified broadcast frequencyonlyforanychannels to be foundthere).Press
the [MENU] keytodisplaytheMain Menu and usingthe “5”or “6” keys,highlighttheInstallationlineand
press[SELECT] to displaytheInstallation Menu. Highlight theAddNewChannelslineand press “4“ todisplay
the options.SelectAutomaticSearchwith the “5” or “6” keysand press[SELECT]. Awarningmessage is
displayed.Thisstartsthe automatictuningprocessand searchesthroughall the available broadcastfrequencies
for free-to-air channels. Previouschannels willbe replaced on automaticsearch.
5.2.1.1. AUTOMATIC SEARCH
Automaticsearchisstarted byselecting YESinthe auto-searchpop
upmenu.All the multiplexes are searchedand achanneltableis
created automatically.All channels foundarestored in asorted form
withrespecttotheir channelnumbers.
5.2.1.2. MANUAL SEARCH
In manualsearchthe numberof the multiplexis entered
manuallyandonlythat multiplex issearched forthechannels.
In manualand autosearch,anyexisting channelin the
databaseisnot re-storedto avoid redundant duplicates ofthat
channel.

14
5.2.2. FIRST TIME INSTALLATION
The user can usethisitemto loaddefaultsettings,
which had been loadedto thereceiverat thefactory.
Toinstallfactorysettings,highlight‘FirstTime
Installation’ menuand pressSELECTkey,thenyou
willbeasked toconfirmfordeletingall channelsand
settings.IfyouselectYES andpressthe SELECT
button,all channelsin thechanneltable willbe
deleted.
5.3. CONFIGURATION
You can configure thesettingsofyour box.Select
Configuration fromMain MenuandPress SELECT
to enterthismenu.Press MENU buttontoexit.
Configuration Menuincludesthe following main
items:
ØAudioLanguage
ØSubtitle
ØTV Type
ØTV Out
ØFavouriteMode
ØEPG Preference
ØScan EncryptedChans
ØReceiver Upgrade
ØParentalSettings
5.3.1. AUDIOLANGUAGE
Digitalterrestrial televisionchannelscanbroadcastsimultaneous soundtracksin more than onelanguage.This
function selectswhichlanguagesoundtrackyouwill hear when switchingtoachannel broadcasting withmultiple
soundtracks.Highlightthe AudioLanguage line in the Configurationmenuand usethe“3”or“4“ keystocycle
throughthelanguageoptions. ReturnNo Menuto normal TVviewing bypressingthe [MENU]key.
5.3.2. SUBTITLE
Digitalterrestrial televisionchannelscanbroadcastwithsubtitlesdisplayedon-screen for the hard-of-hearing. This
functionselectsthe desired subtitlelanguage andenablestheautomaticdisplayofsubtitleswhenever subtitle
informationisbroadcast.Highlightthe Subtitleline in theConfigurationmenuandusethe“3” or“4“ keystocycle
throughthedisableand languageoptions.ReturnNOMENU to normalTVviewing bypressing the [MENU] key.
5.3.3. TVTYPE
Digitalterrestrial televisionchannelscan broadcastprogrammesin awidescreenformat.Thisformatmustbeset
correctlytonormalorwidescreen TV’s.ThisfunctiontellstheTV the screen format sothat broadcastsare
displayed correctly.Inthe Configuration menu, highlight TVTypeanduse the “3/4” buttonsto select 4 : 3 or
16:9depending whichTVyou have.Thissettingduplicatesthe settings whenyoufirstinstalledtheSTB,
therefore ifyouchangeyourTVyou canset theSTB tomatchthe newTV. Toreturn to programmespress the
MENU key.
5.3.4. TVOUT
The receiver can output either anRGB orCVBSsignalfromtheTV SCART on the rear panel.Although theRGB
format resultsinabetter qualitypicture, not all equipment - particularlysomeVCRs- cancope with an RGB signal.

15
5.3.5. FAVOURITE MODE
Thisfunctionenables ordisablesthe favouritechannel listmodeby
pressing“3/4”buttonsand pressOK.Ifthereisnofavourite channel,a
warningmessage isdisplayed.
5.3.6. EPGPREFERENCE
Digitalterrestrial televisionchannelscan broadcastsimultaneousNext&Nowand7-Dayselectronicprogram.
Highlight theEPG Preferencelineinthe Configurationmenu and usethe“3” or“4“keysto selectNext&Nowor
7-Days.
5.3.7. SCAN ENCRYPTEDCHANNELS
If selected when searching, the“Encrypted” channels will also be stored and displayed. If NO ischosen only“Free
to Air” channels will be stored.
5.3.8. RECEIVER UPGRADE
Toensurethatyour digitalreceiver alwayshasthe most
upto date software. Please ensurethatafteruseitisset
to itsstandbymode.TheReceiver automaticallypowers
upat 3AMeach dayand searches for anynewinformation
which maybebroadcastandwilldownload thisto your
boxautomatically.This operationwill normallytake
approximately30 minutes.If you haveanimportant
recordingtomakeat3AMwhichmustnot havea30
minutesinterruptthen you candisable theautoOAD
search byperforming thefollowing:
1. Press Menubutton and using the “5/6” buttons
highlight CONFIGURATION and press the SELECT
button.
2. Use the“5/6”buttons tohighlight "RECEIVER
UPGRADE" andpress SELECT button.
3. Using the “3/4” button change “AutomaticDownload” fromEnabledtoDisabled.
4. Utilize the “5/6” button tohighlight“Search for NewVersion”and pressSELECT.
5. Ifthere is a newsoftwareversionthereceiver will start to search.
Donot forget toreenable theautomaticOAD function after youhave madeyourrecording byrepeating theabove
instructions.
NOTE: If there isnonewsoftware todownload,thisprocedure will take onlyabout20-30 seconds.

16
5.3.9. PARENTALSETTINGS
Use“5/6”buttonstogo toParentalSettingsoption. Press
SELECT button toenterParentalSettingsMenu.Aboxasking
for thelock keyis displayed.There is onlyonekeywhichis set to
“0000”initially.Enter lock key.Ifitisincorrect,it isreturned back.
If itiscorrect,the ParentalSettings Menuincludingfollowing
itemsisdisplayed:Thereyoucanset/reset lockingfor the MainMenu,orthe InstallationMenu to restrictaccess.If
themenu lockisdisabled, therewill befree access tothe menusystem.You can change thelockkey.
5.3.10.i. Menu Lock
Use “5/6” buttons to go to Menu Lock option. Use “3/4”buttonsto toggleMenu Lock Mode.
DISABLED : All menusare unlocked.
MAINMENU: Main Menu isaccessible onlywith thecorrectlock key.Sotheusercan’t add, delete, rename,
channels,can’t settimers.
INSTALLATION: Installation menu islocked. Sotheuser can’t add channels.
Changeswill beupdatedafter exiting‘Configuration Menu’.
5.3.10.ii. Set LockKey
Use“5/6”buttonstogoto Set
LockKeyoption.UseSELECT
button toenter newpassword.
NewPasswordMenuisdisplayed.
UseNUMERIC buttons to enter newpassword. NewPassword isasked twice for confirmation.Ifboth passwords
are four digitslong and the same,the password ischanged. It isupdatedafterexiting theParentalMenu.
5.4. TIMERS MENU
Timer Menu is enteredfromtheMainMenu.There isafive
columnsummaryinformation, suchastimer no,channel
name,starttime,endtime, start date and mode,foreach
of the five timers.
Thereare twowaystoset atimer. If thestart/endtimeand
datearevalid numbers,thetimer can be set directlyby
changingthemodefrom“Inactive” to “Active”using
“3/4”cursors.Ifthe start/end timesanddateareinvalid or
if theset valuesare tobe changedtotally,OK mustbe
pressedwhilethedesired timerishighlightedinthe
summarylist.Anewwindowwhere thetimer detailsare to
beenteredwill be displayedonthe lower part of the
screen.The timer detailsare asfollows:
Name: Accordingtothetype that ischosenabove,“3”/
“4”keyswill navigate the user through the TVor Radiolistandnameof
theprogramisselected.
Start: Byusing “0,1,2…,9” keysstart timeof thetimer is entered.
End: Byusing“0,1,2…,9” keys endtimeof the timer isentered.
Date: Byusing“0,1,2…,9”keysdateof the timerisentered.
Mode: Byusing “3”/“4” keys, timer modeisselected as “Once”, “Daily”
or“Weekly” .

17
Start,Endand Datefield dataareenteredusingnumber keys.Currenttimeand dateare shownonthe lower-right
part of thescreento help you.
Afterthe desireddetail fieldsare filled,one can turnbacktothe timerinfo summarylistbypressing“OK” to save
the settings,orbypressing “Menu”to cancelthesenewsettings.Aset timeriscancelled(disabled)bychanging
the modeto “Inactive” intimersummarylist. Whenatimerstart timecomes,the Set-Top-Boxswitchesto theset
channel,then whenthe end time isreached, the boxgoes toit’slaststate.
5.5. LANGUAGE
In thismenutheuser canadjustthepreferred language.Language ischanged
bypressing “5/6” and SELECT key(English onlyavailable with thismodel).
6. ADVANCED OPERATION
6.1. ELECTRONIC PROGRAM GUIDE (7 DAYS EPG)
In no menumode, EPG Menuisreached bypressing
GUIDE key,quitbypressing GUIDE keyagain.In EPG
Menuall channelsaredisplayed. Current programis
highlighted. Use “5/6” buttonstochange channels.
Some,but not all, channelssendinformation about the
current andnextevents.Please notethatevent
informationisupdated automatically. Ifthereisno event
informationdataavailable in channels,onlychannel
names with“No Information”banner isdisplayed.
In EPGMenu, youcaneasilyseethe extended help
informationbypressing INFO keyandbypressingthis
keyagainyou canclosethiswindow.Ifyouhighlight an
event, short eventdescription,extended event
description,start andfinishtimes ofevent are displayed
onthescreen.
When thecurrent programishighlighted,theboxis
switchedtothehighlighted channel bypressing SELECT
key.
If you press SELECTwhen anexteventishighlighted, a
reminder isset forthehighlightedprogramandaclock
appearsonthe screen. Programreminderscanbesetto
signal that aprogramisabout to start whenyou are
watchinganotherchannel.Ifyouset reminderto a
program,then you willbeasked forswitchingto that
channel when thereminder timeis reached.

18
Press MENU to viewthe 7dayEPG. Press “5/6” to
navigateinChannelsor Programmes.“3/4”keyto
navigatethrough thechannel and programlist.With
RED/GREEN keysyoucan change schedule time.By
pressingYELLOW/BLUE you can advance the schedule
backward/ forwardof aday.Ifyou press infokeyyou
canseeeasilythedetailedhelpinformation and by
pressing info keyagainyou can exitHelp menu.
The startingtimeforEPG isthe current time.You can
seethe event informationforthe nexttwohours.By
pressing“5/6” key,youcan goto the
next/previous hours.If youpressSELECTwhenanext
event ishighlighted,areminderisset for thehighlighted
programand aclockappearson the screen. Program
reminderscanbe set to signalthat aprogramisaboutto
startwhen you arewatchinganotherchannel. Ifyouset
reminder toaprogram,thenyouwill beasked for
switchingto that channel when the reminder timeis
reached.
6.2. MESSAGES
When theboxreceivesnosignal (e.g.theantennacable isdisconnected), “NO
SIGNAL” message isseen on the screen.
When thereisnochannel stored in thebox,TimerMenu,ChannelTableMenus are not accessible. Channel
navigation isnot allowed.Therefore, tryingtoenterthese menusor do channelnavigationwilldisplayawarning
message onthe screen.

19
6.3. CHANNELNAVIGATION
Thereare twowaystonavigatethroughthechannels:
1. Pressing P+/P- keys will helpyou togotothe nextor thepreviouschannel in the list.
2. Pressing a numberkeywill activate asmall digit entrywindowon the left upper cornerof thescreen.After a digit
isentered,theboxwillwait for2secondstill you enteranotherdigit. Ifnodigitisenteredduring these2seconds,
thenthe boxwill switch to theentered number channel.
If anumberthatisgreater than themaximumnumberof channelsisentered, thebox willswitchautomaticallyto
the lastchannel. Eachtimetheboxswitchesto thedesired channel,aninformationwindowisdisplayedonthe
lowerpartof the screen.Thesmallbarontopright of the bannerindicatesthecurrent signalquality.Onthis
channel infowindowthereare:
ØCurrent event namenexteventname, and their startand endtimes.
ØTime
ØChannelnumber
ØNameofthe channel
ØAniconindicating thatthe channel isset as favourite (if the channelis notset asfavourite the field isleft empty)
ØTV/ Radio icon
When switchingtoalocked channel, lockcodeisrequestedvia awindowasshownin
the picture.Onlyafterthecorrectcode isentered,it isallowedtoaccess tothis
channel.To skip thischannel, P+/P-cursor keys mustbe used.
6.4. VOLUMECONTROL
The volumelevel ofthe soundfromthereceiver canbealteredwith
the [V+]and[V-] keysonthe remotecontrol handset.Pressing either
keydisplaysabar graph of thesoundvolumeon theTVscreen.The
volumelevel selected will remain set,even whenthereceiveristurned
offand onagain, untilitisalteredwith the[V+]and[V-]keys.
Pleasenote, that if you decreasethe normal volume,theVCR outputvolumewill alsobedecreased. Thiswill
affect any recording that youaremaking fromyourset-topbox.
The audiovolumeadjustmentforthe receiver isindependentofthe volumecontrolon yourTVset.Be carefulthat
bothvolumecontrolsarekeptwithinreasonablelevelsso thatwhen switchingfromanaloguetodigitaltelevision
viewing, orwhen first turningonyourTV set, the sound levelisnotsuddenlyveryhigh.
You cansilencethe sound fromthereceiver bypressing the[MUTE] key.Thesound remainsmuted
untilthe[MUTE] keyispressedagain,the[V+]or[V-]keysare pressed, oruntilthereceiveristurned
offandonagain.Whilethe soundismutedin thisway,the mutesymbolisdisplayed inthe topleft of
the TV screen. Thesymbolisremoved after3seconds,but thesoundwillremainmuteduntilthe
[MUTE]keyispressed for thesecondtime,and themute symbolwill displayfor3seconds.
Table of contents
Other Hitachi TV Receiver manuals