HJM NERIS500 Manual

EHC-NERIS_ENG-Rev.0-23-09-2021
1/19
INSTALLATION
&
OPERATING INSTRUCTIONS
NERIS500 & NERIS750

EHC-NERIS_ENG-Rev.0-23-09-2021
2/19
IMPORTANT WARNINGS
Dear Customer:
Thank you for purchasing our NERIS Towel Rail. As with all our products they
are manufactured to the highest quality using the finest materials that gives us
confidence that you will have many years of good use and comfort from your
product.
NERIS Towel Rails are extremely safe, Virtually Silent easy to install and do
not require any special maintenance. They are made of aluminum, a material
of high durability. Before use for the first time, carefully read these
instructions.
GENERAL SAFETY INSTRUCTIONS
1. Please carefully read these instructions before using the device for the
first time. Please keep these instructions, Your Guarantee, and your
Invoice in the unlikely you have to make a warranty claim on the product.
2. The Guarantee will be invalidated if the heater is not installed as per
the instructions within this manual.
3. Before connecting the appliance, make sure the mains voltage is the 230
Volts, and corresponds to the marked label of the appliance.
4. Check that the power is sufficient to supply the appliance. The total draw
of the Towel Rail currents must not exceed the capacity of the circuit and
the breaker that protects them.
5. This Towel Rail cannot be used in rooms with presence of gases or other
flammable products (glues, etc...).
6. WARNING: To prevent overheating, do not completely cover the heater
and do not use it to dry wet clothes.
7. Make sure the power cable or other objects does not come in contact
with the Towel Rail surface while in operation.
8. If the power cable becomes damaged it must be replaced with a genuine
replacement part supplied from the manufacturer and installed by a fully
qualified electrician. Failure to comply may cause danger to your safety
and will void the product warranty.
9. Check the device and the supply cord regularly. Do not use the device if
the cable has been damaged.

EHC-NERIS_ENG-Rev.0-23-09-2021
3/19
10. PRECAUTION: Some parts of this product can reach high temperatures
and could cause burns. Pay special attention when children or vulnerable
people are around to protect them from the heater.
11. Do not mount the heater directly under a power socket.
12. Children under the age of three should not be allowed to touch or play
with Towel Rail and should always be supervised.
13. This device can be used by children under 8 years of age, as well as by
people with reduced physical, sensory or mental capabilities when
suitably supervised and only when they have been provided the
instructions regarding the use of the device and have understood the
risks that could derive from it. Cleaning must only be carried out by an
appropriate adult using a damp cloth with a non-abrasive cleaner,
abrasive cleaners my damage the product.
14. Children between 3 and 8 years should not turn the heater on or off,
unless this is installed or placed in a normal position and that children are
under proper supervision or have received instructions regarding the use
of the device as security and they have perfectly understood the potential
dangers. Children between 3 and 8 years old should not connect, adjust,
or clean the appliance or perform any maintenance measure.
15. Warning: Do not use this heater near baths, showers, or swimming
pools. It should not be possible to access the device's controls from a
bath, shower or any other surface that is in contact with water.(the use of
this heater in zones 0 or 1 in bathrooms is totally prohibited:!
(Seek advice from a qualified electrician).
16. For greater safety, this appliance is provided with a device that interrupts
its operation in the case of overheating.
17. This Towel Rail has been designed exclusively to be fixed to the wall. For
further information on the fixing systems, Go to Section “INSTALLATION
AND WALL MOUNTING" Within this manual.
18. Do not use accessories that have not been recommended by the
manufacturer, as they could entail a potential risk to the user and damage
the device. Use only original accessories.
19. Keep all the packaging elements (plastic bags, cardboard, and
polyethylene) out of the reach of children, as it can be potentially
dangerous and could cause suffocation.

EHC-NERIS_ENG-Rev.0-23-09-2021
4/19
20. This device has been designed for domestic and light commercial use.
This device has not been designed for industrial use. It must not be
used Outdoors, in Greenhouses or in Animal or Agricultural
environments. Keep the heater away from excessive heat, direct
sunlight and in an environment that has a constant humidity. Under No
Circumstances should the heater be immersed in water or use the device
with wet hands. In the case of humidity or water entering the device, it
should be immediately disconnected from the power supply and left to
fully dry. Do Not touch any Wet parts of the heater before it has been
isolated from the main power supply.
21. Do not attempt to service the device yourself. Contact a qualified
technician for any service or repair work.
22. Respect the "SPECIFIC SAFETY INSTRUCTIONS FOR THIS
APPLIANCE" listed below.
23. WARNING: To avoid danger to very young children or people with
impaired capacity. This appliance should be installed at higher level to
avoid anyone touching the heater.
24. WARNING: This appliance is only intended for drying towels that have
become damp with fresh water and not any other substance as this could
result in damaging the heater and invalidate its warranty.
SPECIFIC SAFETY INSTRUCTIONS FOR THIS DEVICE
•The appliance must remain in a vertical position.
•Make sure the appliance is always secured. Please adhere to the
installation clearances indicated in this manual.
•The Towel Rail is designed to be hard wired in accordance with BS7671
for Bathrooms or Shower Rooms.
Follow the instructions in "INSTALLATION".
•The Guarantee will be invalidated if the heater is not installed as per
the instructions within this manual.
INSTALLATION
•During the first Start Up the heater might create a slight odour and some
slight expansion noise due to some internal part movement. This is
normal and you must provide adequate ventilation when this occurs. The
odours are momentary and will quickly dissipate in a well-ventilated area.
•Fix the Towel Rail onto a firm wall and making sure it is level.
•The Towel Rail must be a minimum distance of 15cm from any
combustible material.
EHC-NERIS_ENG-Rev.0-23-09-2021
5/19
•Allow for a minimum distance of 1m from the front of the unit to any
obstacles that could hinder its operation.
•Keep a minimum distance of 15 cm between the appliance and the side
walls and any other obstacles (walls, for example) that may affect its
function.
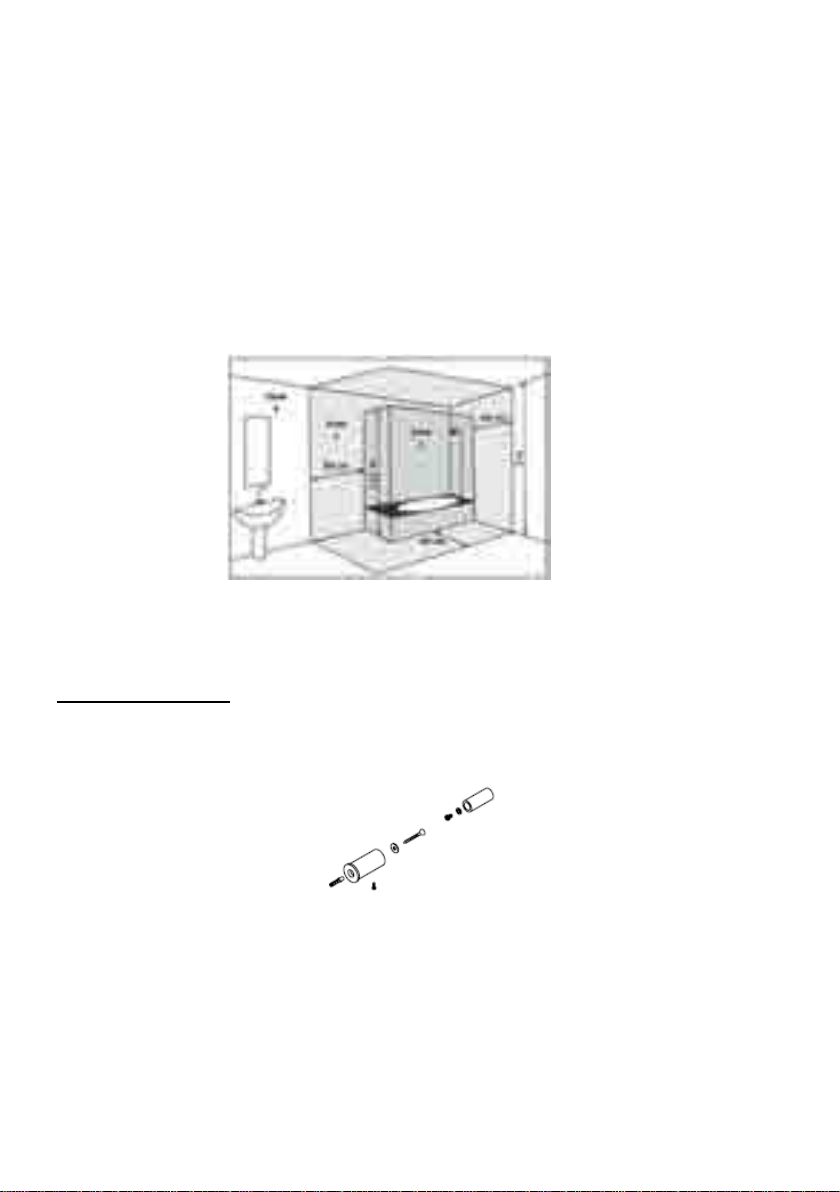
•WARNING: When this appliance is installed in a bathroom, it must be
installed within Zone 2 in accordance with BS7671. Requirements for
Electrical Installations, Section 701. The installation of this appliance
within Zones 0 or 1 of a bathroom is totally prohibited. Figure 2 bellow is
only for information purposes, we suggest you contact a professional
electrician for installation of your heater.
Zone 1: Appliances supplied to Safety Extra Low Voltage (SELV).
Zone 2: Electrical Appliances Class II – IP X24
Fig.2
WALL-MOUNTING
The towel radiator is equipped with the following components:
- 4 towel radiator suspension brackets as shown in (Fig 1).
Fig. 1
1. Cut and place the template on the wall at a minimum recommended
height of 600mm. (This is for ease of controller use) The heater can
be mounted lower if this is your preference however care should be
taken where young children are present.
EHC-NERIS_ENG-Rev.0-23-09-2021
6/19
2. Mark the position of the 4 holes on the wall.
3. Drill 4 holes suitable for 8 mm wall plugs.
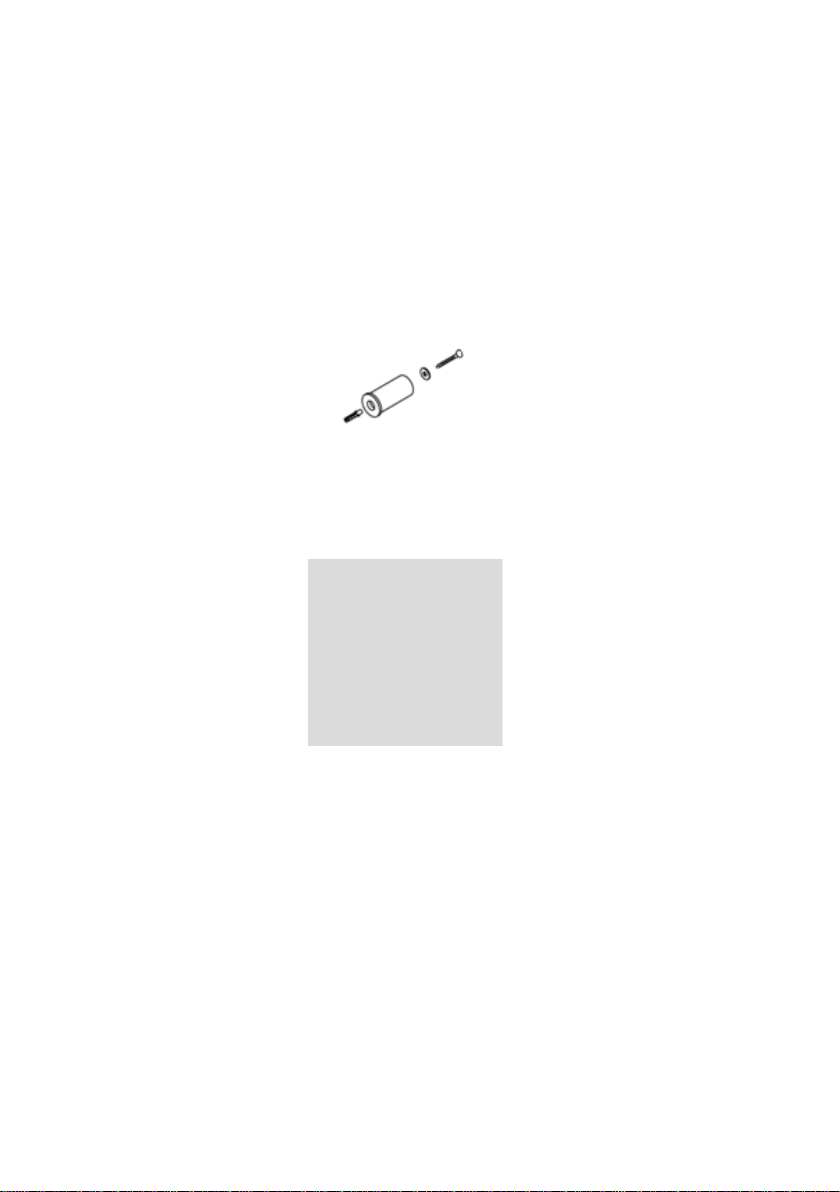
4. Screw the larger diameter brackets onto the wall (∅26) as shown in Fig
2. Fix using the screws, washers and plugs provided as shown in Fig. 2.
Fig. 2
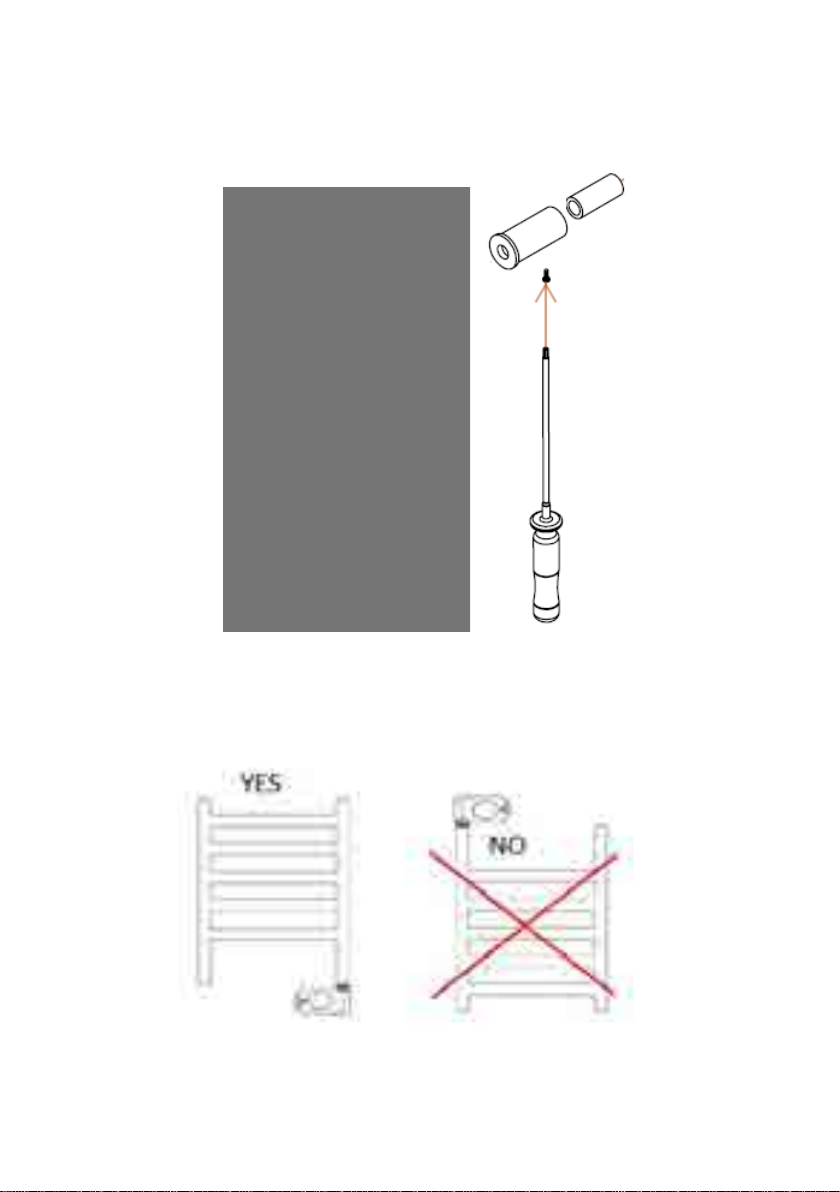
5. Screw the smaller diameter brackets (∅19) onto the heater with the 4 x
M4 screws and 4 x M4 washers as shown in Fig 3.
Fig. 3
6. Insert the brackets (∅19) fixed to the heater into the brackets (∅26)
fixed to the wall and secure using the fixing screws as shown in Fig 4 & 5.
EHC-NERIS_ENG-Rev.0-23-09-2021
7/19
Fig. 4 Fig. 5

EHC-NERIS_ENG-Rev.0-23-09-2021
8/19
ELECTRIC SUPPLY CONNECTION
This appliance is equipped with a supply cable H05V2V2-F 2x1.0mm² that
should be connected to a fused spur in accordance with BS7671.
Requirements for Electrical Installations, Section 701.
It is recommended that the cable ends are crimped before connecting the
heater to the spur. This is to prevent any lose strands of flex being present
within the connection.
This appliance does not require earthing connection as it is double insulated.
Contact a fully qualified electrician for assistance.
TECHNICAL CHARACTERISTICS
Type
NERIS 500
NERIS 750
Rated Voltage
230 V~
230 V~
Rated
Frequency
50 Hz 50 Hz
Rated Power
Input
500 W 750 W
Electrical
Protection
Class
II II
IP Protection
Deg.
IP24 IP24
Dimensions
(LxHxD) (mm)
505x780x100 505x1140x100
Weight (kg)
3,8
5,1
HOW TO PLACE TOWELS
Hang the towels on the heater horizontally across the rail from back to front.
It is recommended to use the upper horizontal tube of each tube set.
Do Not Cover completely as this will cause the rail to overheat!

EHC-NERIS_ENG-Rev.0-23-09-2021
9/19
PROGRAMMABLE DIGITAL THERMOSTAT
Introduction
There are 7 operational modes: Comfort, Night, Frost, Pilot Wire, Program,
2hr Boost, Stand-by.
"Comfort" mode: The thermostat keeps the room temperature at the value
set by the user.
"Night" mode: The electronic control keeps the room temperature to a level
below the configured “Comfort” value.
"Frost ' mode: The electronic control keeps the room temperature above 7°C.
"Pilot Wire"mode: The operations of device are controlled through the signal
received from the "Pilot Wire" system.
"2hr Boost" mode: The electronic control powers the heating element for a
period of 2 hours independently of the configured temperature. At the end of
the 2-hour time period, the device returns to previous operational mode. For
safety reasons, during the 2-hour time period the room temperature is
automatically controlled in order not to exceed 32°C.
"" mode: The electronic control operates according to a daily/weekly
program. The program is user defined.
"Stand-by": The electric resistance is not powered, and all lights are turned
off, however the device is still operative.
Further features:
•Large display showing the configured temperature, time, program and current
operational mode.
•The user according to their needs can configure the daily/weekly program.
•The “Open Window Detection” function enables detecting of an open window
by sensing a sudden decrease of the temperature in the room. In such a case,
the device deactivates the heating element for a maximum of 30 minutes or
until an increase of the room temperature reveals that the window has been
closed.

EHC-NERIS_ENG-Rev.0-23-09-2021
10/19
1. POWER ON / STAND-BY
1.POWER ON / STAND-BY
Press the [On/Stand-by] key to turn on the device or to enter the "Stand-by"
mode.
When activated, the bottom part of the display shows the current time, while
the configured operative mode and
the temperature are shown in the upper part. When in "Stand-by" mode
current time, day of the week and the
message: " Stb" are displayed.
NOTE: When the device goes into "Stand-by" mode it beeps twice for 0.5s.
When the device is activated it beeps once for 1s.

EHC-NERIS_ENG-Rev.0-23-09-2021
11/19
2.“COMFORT” and “NIGHT” MODES
Two different levels of temperature can be set:
-"COMFORT" temperature: It is the temperature used for "Program Timer",
"Pilot Wire" and "Comfort" modes.
-"NIGHT" temperature: It is the temperature used for the "Night" and "Program
Timer" modes.
The desired temperature can be set pressing the [+] e [-] buttons. The range
of configurable temperature is 7°C - 32°C.
IMPORTANT!
The temperature of "Night" mode must be below to the “Comfort” mode
temperature. For this reason, the
“Night” mode temperature can be set to a value between 7°C and the
(configured "Comfort" mode temperature - 0.5°C).
The temperature of "Comfort" mode can be configured in the whole (Night
temperature + 0.5°C) ÷ 32°C range.
3. OPERATING THE DEVICE
Press the [PROG] button to select the desired operative mode. An icon on the
display indicates the selected operating mode, according to the following
table:
COMFORT MODE
The "Comfort" stably maintains the room temperature to a selected value. To
set this operative mode:
-Press the [Prog] button until the display shows the “Comfort” icon
-Set the desired temperature through [+] and [-] buttons.

EHC-NERIS_ENG-Rev.0-23-09-2021
12/19
NIGHT MODE
The "Night" mode sets a value of temperature below the "Comfort"
temperature value.
It is suggested to set this operating mode during the night or when the room is
not occupied for 2 or more hours.
-Press the [Prog] button until the display shows the " Night" icon
-Set the desired temperature through [+] and [-] buttons.
FROST PROTECTION
In "Frost " mode the temperature is fixed to 7°C. The device activates the
heating element when the room temperature falls below 7°C. It is suggested to
set this operating mode when the room is not occupied for several days. Press
the [Prog] button until the display shows the "Frost " icon
2HR BOOST MODE
The "Timer 2h" mode can be used to quickly warm up the room or to speed up
towel drying.
-Press the [Prog] button until the display shows the "2h" icon.
The device is activated at the maximum power for 2 hours, up to a maximum
room temperature of 32°C. The
“2hr Boost” mode is automatically deactivated after a period of 2 hours and
the device returns to the operative
mode previously set. The user can switch to another operative mode at any
time by simply pressing the [PROG] button.
PILOT WIRE MODE (Only for product versions equipped with "Pilot Wire".
Only France)
In "Pilot Wire" mode the device is managed by a central control system that
sets the operating mode for all the
connected devices. The device operates with the most advanced "Pilot Wire"
system with six commands, which
allows the following functions:
1.Standby: power off the heating element, the device remains active.
2.Comfort: maintains the "Comfort" temperature set by the user.
3.Eco: maintains the room temperature 3,5°C below the "Comfort"
temperature.
4.Anti-freeze: maintains the room temperature at 7°C.
5.Eco-1: maintains the room temperature 1°C below the "Comfort"
temperature.
6.Eco-2: maintains the room temperature 2°C below the "Comfort"
temperature.
The user can set the desired temperature on the device:
-Press the [Prog] button until the "Pilot Wire" icon is displayed.
Set the desired temperature through the [+] and [-] buttons.

EHC-NERIS_ENG-Rev.0-23-09-2021
13/19
PROGRAM TIMER MODE
This operating mode allows the user to configure different temperature values
for each hour of each day of the week. The “Comfort” / “Night” temperatures
and the related time intervals can be thus programmed.
-To activate this function, press the [PROG] button until the “Timer” icon is
displayed.
Programming the “Programmer” mode
a) Setting the current day of the week and time
- Enter into “Stand-by” mode and press the [-] button at least 3 seconds.
- On the upper part of the display the message “Set” will be displayed
- To set the day and time press the [+] button until the bottom part of the
display the message “TED” is displayed (see picture).
Press the [Prog] button to enter the editing mode
- The blinking arrow indicates the currently selected day: Pressing the [+] / [-]
buttons the desired day can then be set
- Press again the [Prog] button to confirm the selected day. After that, the
procedure for entering the time starts and the display shows the currently
selected time. “Hours”: Use the [+] and [-] buttons to set the correct hour and
confirm the selected value pressing the [Prog] button.
Minutes: Same procedure as for the hours. Confirm the selected value by
pressing the [Prog] button.
- At the end of the procedure, the thermostat returns into “Stand-by” mode.
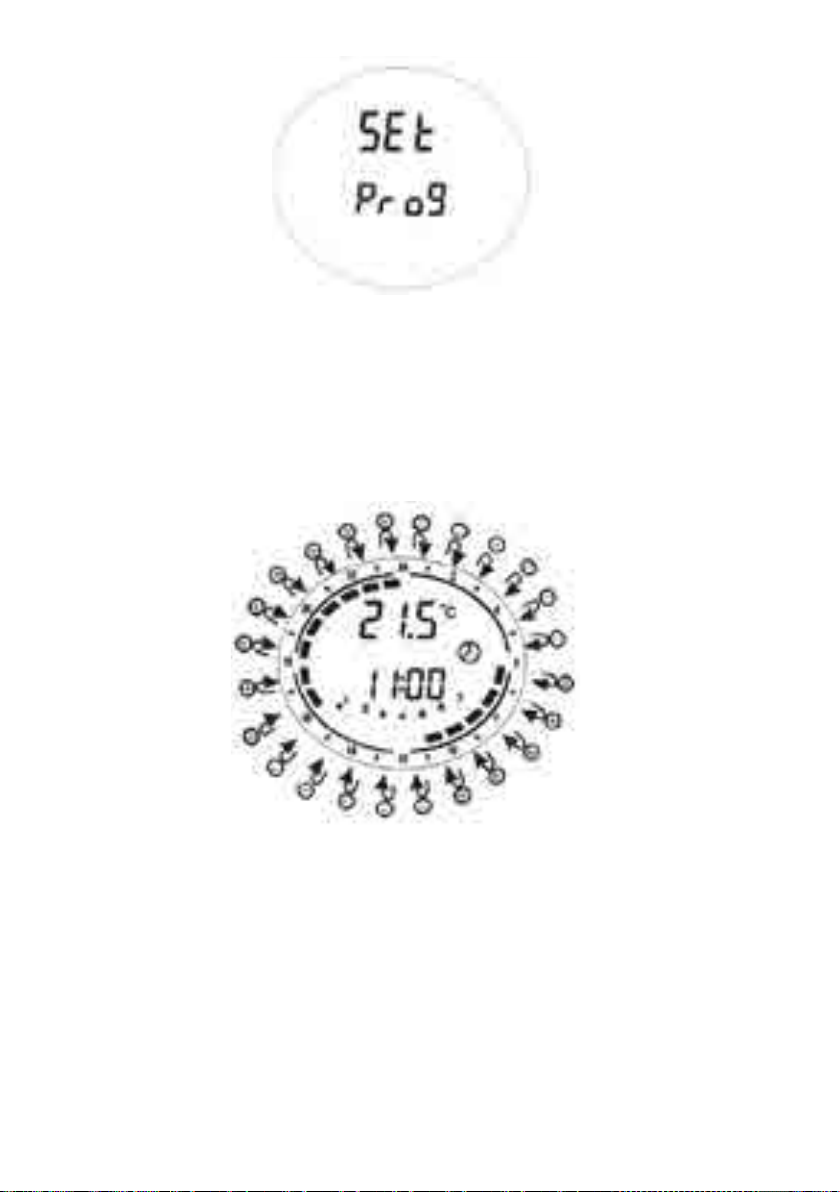
b) Setting the program for the “Program timer” mode
- Enter into “Stand-by” mode and press the [-] button at least 3 seconds.
- On the upper part of the display the message “Set” will be displayed
- To set the day and time press the [+] button until the bottom part of the
display the message “Prog” is displayed (see picture).
EHC-NERIS_ENG-Rev.0-23-09-2021
14/19
- Press the [Prog] button to enter the editing mode
- Now a time sequence can be defined for each day of the week.
The procedure starts with day 1, and the desired sequence can be configured
with the [+] and [-] buttons:
For each hour of the day, it is then possible to assign either the “Comfort”
temperature (full bar indication displayed) by pressing the [+] button or the
“Night”
temperature (empty bar) by pressing the [-] button (see picture).
Press [PROG] to confirm the entered configuration for day 1, and repeat the
same procedure for the remaining 6 days of the week.
KEY LOCK
It is possible to lock the buttons of the device to avoid inadvertent
modifications of the settings.
Press together the [PROG] buttons for 3 seconds to lock all the buttons
except the [On/Stand-by] button. The key-lock icon is activated on the
display.
To unlock the buttons press again together the [PROG] buttons for 3 seconds.
The key-lock icon disappears on the display

EHC-NERIS_ENG-Rev.0-23-09-2021
15/19
“Open Window Detection” function
The “Open Window Detection” function enables detecting of an open window
by sensing a sudden decrease of the temperature in the room. In such a case,
the device deactivates the heating element for a maximum of 30 minutes or
until an increase of the room temperature reveals that the window has been
closed.
To activate this function:
- Enter into “Stand-by” mode.
- Press the [+] button for 3 seconds.
- Press the [+] button to activate / deactivate the function
- Press the [Prog] button to commit and return into “Stand-by” mode.
When this function is enabled, the “Open Window” icon on the display is lit.
When the device detects that the window is potentially opened, the “Open
Window” icon starts blinking
When the function is disabled the “Open Window” icon is not shown on the
display.
Note: The device could fail in detecting an opened window e.g. if the
thermostat is located on an isolated area of the room and far from air currents
or if the thermostat is placed close to an external heating source, or if the
temperature variation in the room is too slow.
THERMAL SAFETY
In the case of overheating, a safety device automatically cuts the radiators
operation. After cooling the radiator will automatically reset.
MAINTENANCE

EHC-NERIS_ENG-Rev.0-23-09-2021
16/19
Your radiator requires no regular maintenance, however, to ensure its good
operation:
Always disconnect the device from the mains before performing any cleaning
or maintenance operation.
Let it cool down before cleaning.
Do not use detergent, solvent, abrasive products or any other chemical
product to clean the radiator.
NEVER immerse the device in water or any other liquids.
You can use a vacuum or flexible brush to clean the air grilles. This
maintenance must be carried out regularly to ensure optimum performance.
Ensure the radiator is totally dry before turning it back on.

EHC-NERIS_ENG-Rev.0-23-09-2021
17/19
EU Declaration of Conformity
Product:
TOWEL RAIL
Trademark:
Models:
NERIS 500, NERIS 750
Batch & Serial No.:
Mx YYDDD-XXX (1)
(1) Explanation of code "Lot & Serial No."
Batch = Mx YYDDD; where: Mx = Assembly Line No. YY = year (15,16,17...99) DDD = Correlative day
(001,..., 365)
Serial No. = XXX (001,..., 999)
We:
HERMANOS JULIÁN M., S.L.
Oficina: Esposos Curie,44 / Fábrica: Gutenberg,91-93
Polígono Industrial “Los Villares”. 37184 Villares de la Reina. Salamanca. España
Tf.+34 923 222 277 +34 923 222 282. Fax +34 923 223 397
http://www.hjm.es
Hereby declare, that the following equipment complies with all the essential requirements for health and safety
of European Directives.
2014/30/EC EMC DIRECTIVE 2014/35/EC LV DIRECTIVE
2011/65/UE RoHS DIRECTIVE 2009/125/EC (ErP Directive)
With reference to the application of the followinf standards: / Em aplicação das seguintes normas:
2014/30/EC EMC DIRECTIVE
EN 55014-1:2006 + A1:2009 + A2:2011
EN 55014-2:1997 + A1:2001 + IS1:2007 + A2:2008 ===> Cat. 2
EN 61000-3-2:2014
EN 61000-3-3:2013
2014/35/EC LV DIRECTIVE
EN 60335-2-30:2009 + CORR:2010 +A11:2012
EN 60335-1:2012 +AC:2014 +A11:2014 + A13:2017
EN 60335-2-43:2004
EN 62233:2008 +CORR:2008
2011/65/UE RoHS DIRECTIVE
EN 62321-1:2013
2009/125/EC (ErP Directive)
(2005/32/EC)
UE 2015/1188

EHC-NERIS_ENG-Rev.0-23-09-2021
18/19
ECDESIGN TABLE
Models
NERIS 500 NERIS 750
Heat output
Nominal heat output
(Pnom)
0.5 kW 0.75kW
Maximum continuous
heat output
(Pmax,c)
0.5 kW 0.75kW
Auxiliary electricity consumption
At nominal heat output
(el max)
0.0005 kW 0.0005 kW
At minimum heat output
(el max) 0.0005 kW 0.0005 kW
In standby mode
(el SB)
0.0005 kW 0.0005 kW
Type of heat output/room
temperature control:
Electronic room
temperature control plus
week timer
Other control options:
Room temperature control,
with open window
detection.
With adaptive start control.
HERMANOS JULIÁN M., S.L.
Oficina: Esposos Curie,44 / Fábrica: Gutenberg,91-93
Polígono Industrial “Los Villares”. 37184 Villares de la Reina.
Salamanca. España
Tf.+34 923 222 277 +34 923 222 282. Fax +34 923 223 397
http://www.hjm.es

EHC-NERIS_ENG-Rev.0-23-09-2021
19/19
RECYCLING (Disposal of the product at the end of its useful life)
According to European Directive 2012/19/UE, on waste electrical and
electronic equipment (WEEE), old electrical household appliances
cannot be disposed of in the usual municipal containers; they have to
be collected separately to optimise the recycling of the components
and materials that comprise it, and reduce the impact on human health
and the environment.
The crossed-out wheeled bin is marked on all Electrical and Electronic
products, to remind the consumer of their obligation dispose of them
separately.
The consumer must contact the local authority or the vendor to learn
about the correct disposal of his/her old electrical household appliance.
Fábricado por / Fabricado por
HERMANOS JULIAN M., S.L.
Fábrica: Gutenberg,91-93
Polígono Industrial “Los Villares”
ES-37184 Villares de la Reina . Salamanca . Spain
+34 923 222 277 - +34 923 222 282
Fax: +34 923 223 397
Web: www.hjm.es
ESB-37295664
This manual suits for next models
1
Table of contents
Other HJM Bathroom Fixture manuals

Popular Bathroom Fixture manuals by other brands

HOESCH
HOESCH SenseSation Installation and operation instructions

Helvex
Helvex Premier H-3005 installation guide

Omnires
Omnires Y1238/KROBL Installation and Maintenance

Boon
Boon FROG POD instructions

Tavistock
Tavistock RSM050 Installation & Aftercare Instructions

Aquademy
Aquademy EVO TOUCH PRE-INSTALLATION AND INSTALLATION MANUAL


Hans Grohe
Hans Grohe AXOR PuraVida 28557 Series Assembly instruction

Bradley
Bradley WF2705 Installation

Graff
Graff GX-6170-LM3F installation instructions

Gessi
Gessi 39818 installation manual

Spectrum Brands
Spectrum Brands Pfister Courant LF-049-CO Quick installation guide

Duscholux
Duscholux Air X installation instructions