Tavistock RSM050 Parts list manual

COVER
BACK PAGE
RESONATE
LED Illuminated Mirror with Bluetooth
®
Wireless Technology
Installation & Aftercare Instructions
Retain for future reference AO|08.20|V1
© Tavistock Bathrooms. 2021
Tavistock Bathrooms, Brassmill Lane Trading Estate, Bath, BA1 3JF
www.tavistock.co.uk
Product code: RSM050 Product code: RSM600C
PAGE 2 PAGE 7
Page 2 Page 7
Cleaning your product
When cleaning the mirror or any mirrored surfaces it is recommended to use a soft,
dry, non abrasive cloth with the mirror turned off. Do not use cleaning agents or
abrasive materials.
Do not allow moisture to come into contact with any electrical components.
Troubleshooting & After care service
For any further assistance, please contact our tech support team at:
10 Year Guarantee
We have complete confidence in this Tavistock bathroom mirror and as such it is
offered with a 10-year guarantee against defects in manufacture.
The guarantee requires that this product be used in the manner for which it was
intended and that it is installed and maintained in accordance with the fitting
instructions.
The guarantee covers products in domestic use only and is not transferable.
In the unlikely event that this product should fail during the guarantee period we will
either replace the faulty part or the complete unit as appropriate.
Compliance
This product complies with all relevant British and European safety standards.
After care service
DO NOT connect
to a plug & socket outlet.
WIRING DIAGRAM - MAINS SUPPLY
COLOUR CODING:
L - Live = Brown
N - Neutral = Blue
- Earth = Green & Yellow
22
2
OUTSIDE
ZONES
2
ZONE
1
0.75m
2.25m
3.0m
0.6m
0.6m
0.75m
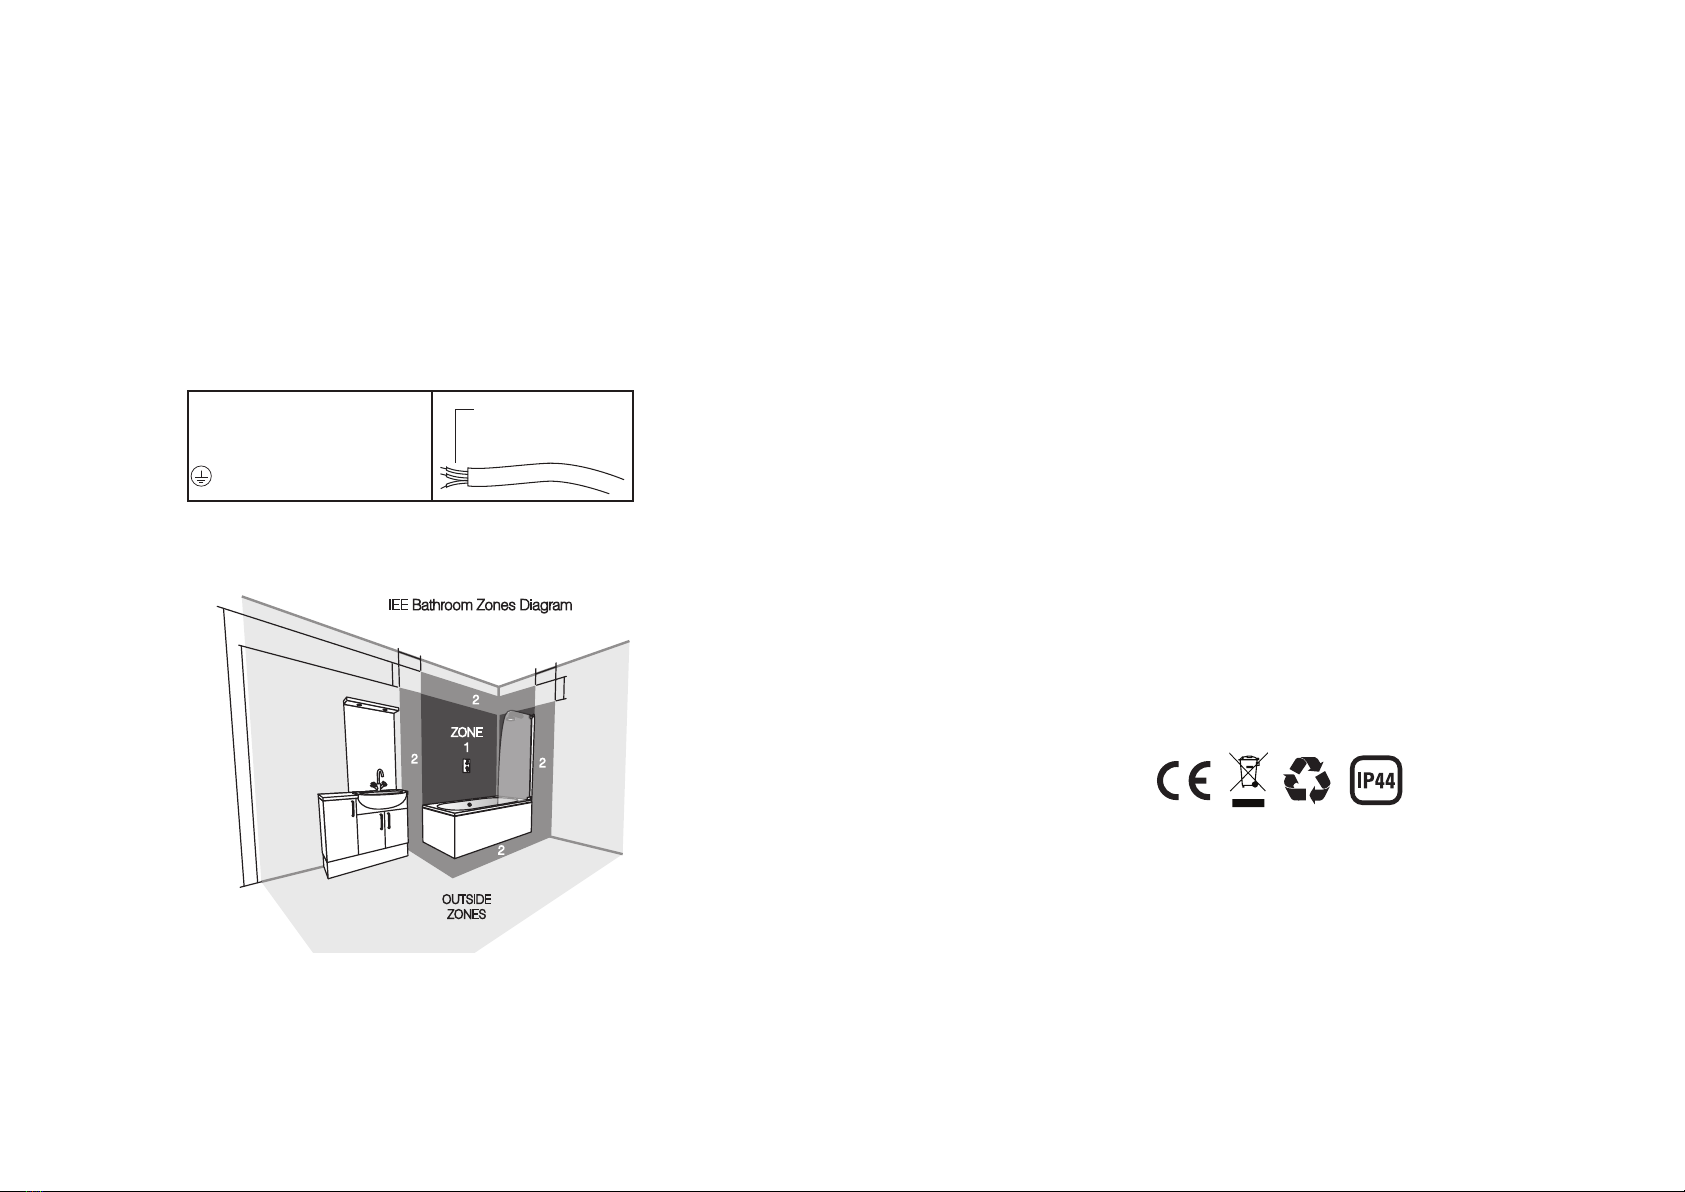
IEE Bathroom Zones Diagram
Distances from a bath tub or shower tray
Bathroom fittings are subject to the appropriate zones in accordance with IEE
Regulations. This product is only suitable for permanent indoor installation in Zone 2
and outside zones. (See above) This product is not suitable for installation in Zone 0
or 1, saunas, steam rooms or shower cubicles. Do not connect to a trailing plug and
socket. Do not install onto surfaces that are either damp or electrically conductive.
Bathroom Zones
Electrical Safety
Suitable for UK Installations only.
All fittings must be installed by a competent person, in accordance with current IEE
wiring regulations. If in doubt consult a qualified electrician.
Important: Always switch off the electrical supply at the mains before installation and
maintenance. It is recommended that the fuse is withdrawn or the circuit breaker is
switched off for the necessary circuit before installation commences.
This product is manufactured to class I category and must have an earth connection.

PAGE 3PAGE 6
Page 6 Page 3
Installation Procedure
Important: Before starting the installation process, make sure the electrical supply
is switched off. It is recommended that the fuse is withdrawn or the circuit breaker
is switched off for the necessary circuit.
Important: Before starting the installation process, ensure the wall construction is
suitable and can support the weight of the mirror.
Note: The wall plugs supplied are suitable for solid stone / brick walls. For any
other wall material use specialist wall plugs.
1)
Measure the distance (X) between the keyhole slots on the back of the mirror.
2)
Mark out the fixing screw positions on the wall using a pencil to the desired
height, ensuring they are spaced at distance (X).
3)
Drill the marked out positions and fit the wall plugs accordingly. Fix the screw into
position, leaving a small amount of the screw head proud of the wall for hanging.
4) Make the electrical connection from the mirror to the mains supply. Use the
connection wire found at the rear of the mirror to make the necessary connections in
accordance with the current IEE regulations. A second person will need to hold the
mirror in place whilst electrical connections are made.
5)
The mirror should easily slide onto the fixing screws and secure into place.
NOTE: To secure the mirror further, a small amount of silicone sealant can be applied
to the side of the extrusions to prevent the mirror being accidently pulled away from
the wall.
To remove the mirror, the mirror should first be lifted and then pulled away from the
wall.
Portrait (X)
Landscape (X)
Bluetooth
®
Pairing to your device
1. Turn your iOS, Android, or Windows device’s Bluetooth
®
ON and search for new
devices Bluetooth
®
.
2. Turn on the Bluetooth
®
by pressing the symbol. The mirror will sound to signal
that Bluetooth
®
is on. It will sound again to state it’s in pairing mode.
3. Select “Resonate” on your device list. If asked for a passcode, enter “0000”, and
the device will pair.
4. Once connected the mirror will sound again to signal that the pairing has been
successful.
Note: The paired device will be saved on the product and the pairing process will
only need to be re-initiated if the pairing is forgotten on your device.
Note: The mirror can store up to 4 devices on its memory. If you connect 5 devices,
the mirror will forget the first device.
Repairing to your device
1. Turn Bluetooth
®
connectivity off on any previously paired devices
2. Follow the “Pairing to your device” above
Note: If a previously paired device is not present within the Bluetooth
®
range then
the product will re-enter pairing mode.
Playing music on your speakers
When connected via Bluetooth
®
, play music on your device and the sound will play
through the Resonate Mirror.
Notes:
• Some devices may require you to select the audio output.
• Only your device can be used to change volume, skip songs and play/pause the
selected media.
• Make sure your device is within 7-10 meters of the product playing music.
• Only 1 device can play music at a time.
Connecting via Bluetooth
®

PAGE 4
Page 4 Page 5
PAGE 5
The Resonate mirror comes with LED lighting and a heated demister pad, which are
controlled via a touch sensor located on the front face of the product. The product
can be controlled as detailed below:
Operating Instructions
Installation Procedure
Important: Before starting the installation process, make sure the electrical supply
is switched off. It is recommended that the fuse is withdrawn or the circuit breaker
is switched off for the necessary circuit.
Important: Before starting the installation process, ensure the wall construction is
suitable and can support the weight of the mirror.
Note: The wall plugs supplied are suitable for solid stone / brick walls. For any
other wall material use specialist wall plugs.
1)
Measure the distance (X) between the keyhole slots on the back of the mirror.
2)
Mark out the fixing screw positions on the wall using a pencil to the desired
height, ensuring they are spaced at distance (X).
3)
Drill the marked out positions and fit the wall plugs accordingly. Fix the screw into
position, leaving a small amount of the screw head proud of the wall for hanging.
4) Make the electrical connection from the mirror to the mains supply. Use the
connection wire found at the rear of the mirror to make the necessary connections in
accordance with the current IEE regulations. A second person will need to hold the
mirror in place whilst electrical connections are made.
5)
The mirror should easily slide onto the fixing screws and secure into place.
NOTE: To secure the mirror further, a small amount of silicone sealant can be applied
to the side of the extrusions to prevent the mirror being accidently pulled away from
the wall.
To remove the mirror, the mirror should first be lifted and then pulled away from the
wall.
Installation Procedure
Turn Mirror ON/OFF
To turn the product on/off, press
the button.
Mains Supply
Distance X
Wall Screws
Wall plugs
(2)
(3)
(4)
(5)
This manual suits for next models
1
Other Tavistock Bathroom Fixture manuals


Popular Bathroom Fixture manuals by other brands


Aquademy
Aquademy EVO TOUCH PRE-INSTALLATION AND INSTALLATION MANUAL

Sterling Plumbing
Sterling Plumbing Shower Receptor and Wall Surround 72240100 Specification sheet

Toto
Toto TMC95 V101 Operation manual

Symmons
Symmons FS installation guide

Nadoli
Nadoli DO503442C-CL quick start guide

Sanela
Sanela SLU 93N Instructions for use

Glacier bay
Glacier bay BRINDLEY HDBD48VG Assembly instructions

Sanela
Sanela SLU 33NB Mounting instructions

Kallista
Kallista Tuxedo P72037 installation guide

A&E Bath and Shower
A&E Bath and Shower Risco-38 NEO SK-PNR-38-KIT-M installation guide

Jacuzzi
Jacuzzi flexa DOUBLE Use & maintenance

Nadoli
Nadoli DW1-3736 instruction manual