Hobby People activator 80 User manual

ACTIVATOR 80 CHARGER USER’S GUIDE
1
The Activator 80 Multi-Chemistry AC/DC Charger is a high-performance,
microprocessor-controlled charger/discharger with built-in Lithium cell balancer.
The Activator 80 is suitable for charging LiIon, LiPo, LiFe, NiCd, NiMH and Lead
Acid (Pb) batteries from an 11 to 18V DC or 100 to 240V AC power source. With a
maximum internal circuit output power of 80 watts and a variable charge current
of up to 7.0 amps, the Activator 80 is a versatile and easy-to-use charger that
works with most batteries used in the hobby today. The Activator 80 features
multiple charge modes, discharge and cycling capability, a cooling fan and
built-in XH balance ports, so balance charging Lithium battery packs is easy.
And of course, other balance adapters are available if needed. A temperature
sensor is included for added safety, giving you the ability to monitor your battery’s
temperature during the charging or discharging process.
USER’S GUIDE
P/N 118552

2
ACTIVATOR 80 CHARGER USER’S GUIDE
TAblE Of COnTEnTS
Service and Support .............................................. 2
Package Contents ................................................... 3
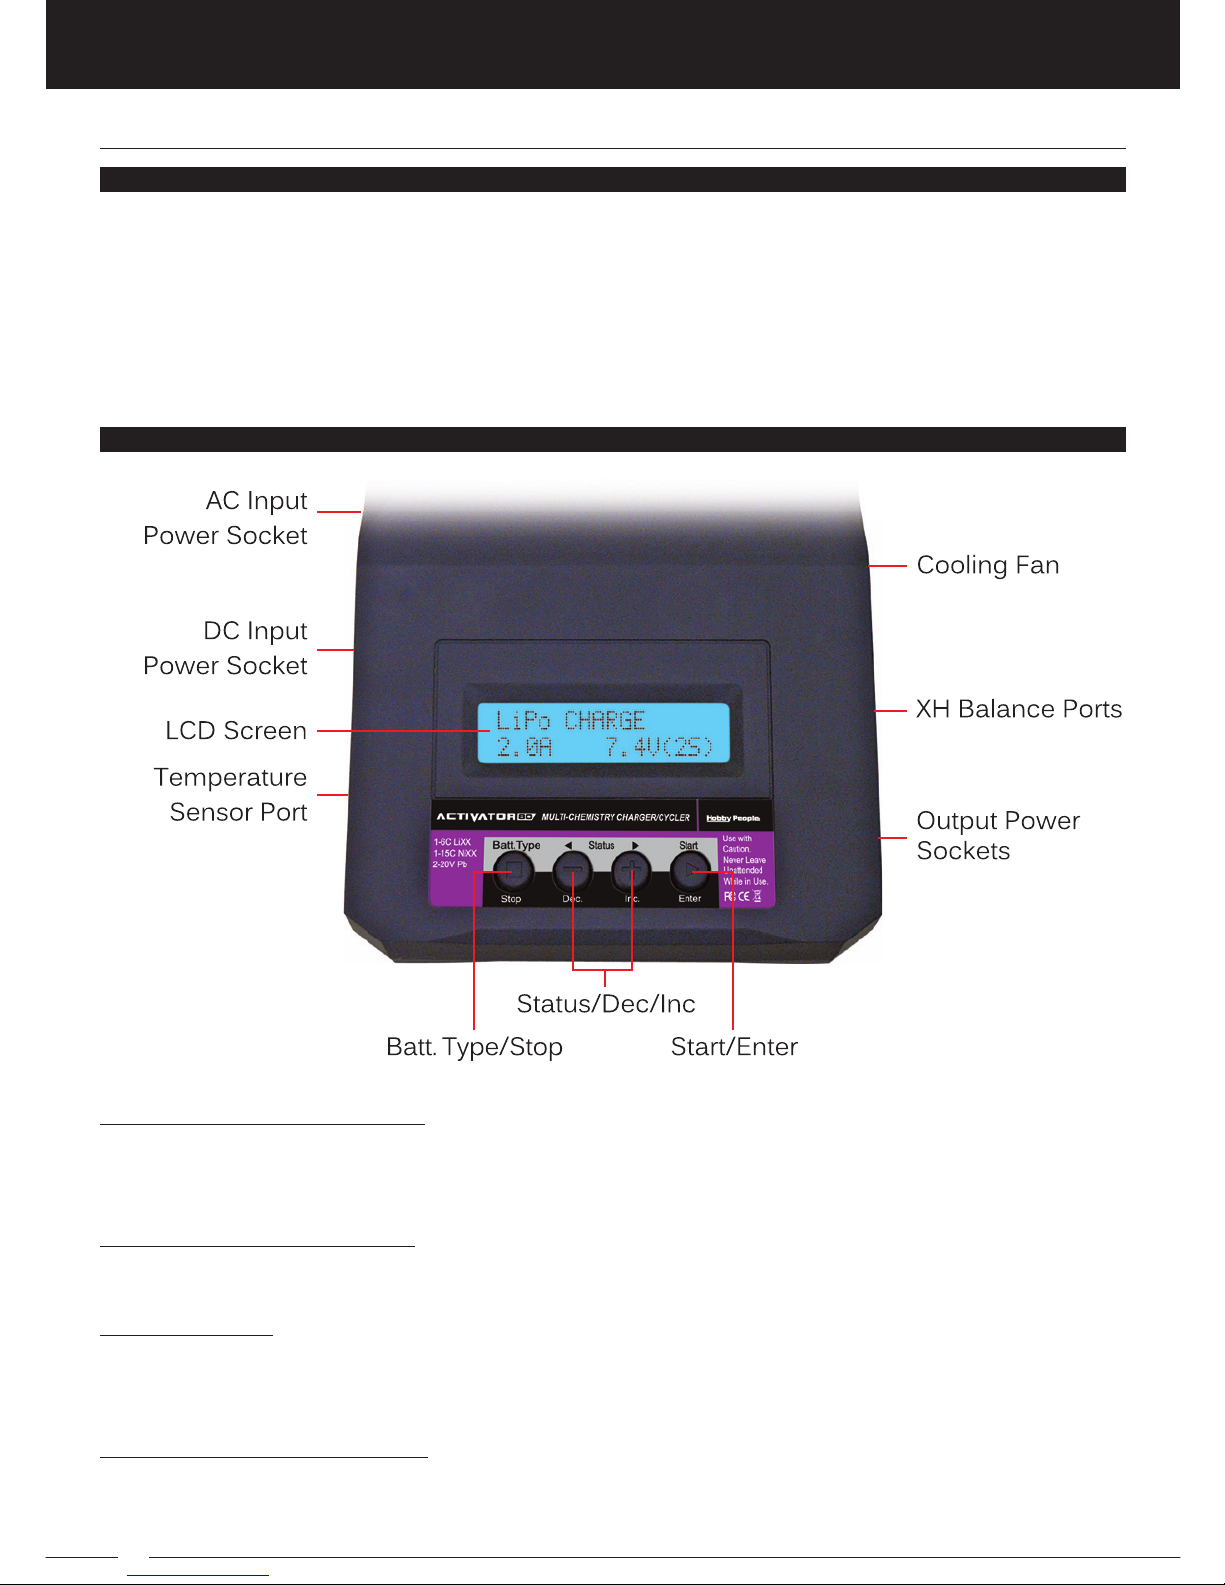
Detailed Features................................................. 3-5
Overview .................................................................. 5-7
Warnings and Safety Notes .........................7-10
Pro Tips .......................................................................10
Connections .............................................................11
Programming Flow Chart ..................................12
Navigating Programming Menus ..................13
Using the Temperature Sensor ............... 13-14
Initial User Parameter Setup ..................... 14-19
If you should have trouble with any of the information listed in this User's Guide,
or if you require additional information or help with this product, please contact
our Customer Service Center at the address below:
SERVICE AnD SUppORT
Lithium Cell Voltage Meter ......................... 19-20
Lithium Battery Programming .................. 20-29
NiCd/NiMH Battery Programming ......... 29-33
Pb Battery Programming ............................ 33-35
Save/Load Programming Data ............... 36-37
Status Screen Process Information ....... 37-38
Status Screen Error Messages ................38-39
Blank Programming Data Sheets...........40-41
Notes ............................................................................42
Warranty and Liability Information ................43
Warranty Service Information..........................43
Incorrect Charging of Lithium Batteries
Can Cause a Fire or Explosion!
Be sure to fully understand the information for the battery to be charged or
discharged. If the programming values are incorrect, the battery can be
severely damaged.
Please read this entire User’s Guide prior to operating your new charger. It
contains all the information pertaining to your charger’s correct and safe use.
Using your charger as intended and in a safe manner will ensure your safety
and help prevent possible damage to your charger or batteries. Selecting the
correct parameters for your specific battery is the sole responsibility of the
user. Incorrect parameter selections or incorrect use can result in damage to
your batteries or to your charger.
The Activator 80 Multi-Chemistry AC/DC Charger is not intended for use by
persons under 14 years of age, unless closely supervised by an adult. Before
using your new charger, read and understand the Warnings and Safety Notes
section on pages 7 through 10. In addition, you should also read and understand
any warning information provided with your batteries.
Global Services
18480 Bandilier Circle
Fountain Valley, CA 92708
Phone: (714) 963-0329
Fax: (714) 964-6236
Email: [email protected]

ACTIVATOR 80 CHARGER USER’S GUIDE
3
pACKAGE COnTEnTS
Before using your Activator 80 Multi-Chemistry AC/DC Charger, make sure
that the items listed below are included in the box. This is also a good time to
become acquainted with these various items.
• 1 PC. Activator 80 Multi-Chemistry AC/DC Charger
• 1 PC. AC Input Power Cord
• 1 PC. DC Input Power Cord
• 2 PC. Plug-In Alligator Clips for DC Input Power Cord
• 1 PC. Output Power Adapter Cord
• 1 PC. Temperature Sensor
DETAIlED fEATURES
The Activator 80 Multi-Chemistry AC/DC Charger is a high-performance,
microprocessor-controlled charger with built-in Lithium cell balancer. It’s a versatile
and easy-to-use charger that works with most batteries used in the hobby
today. A temperature sensor is included for added safety, giving you the ability to
monitor your battery’s temperature during the charging or discharging process.
Optimized Operating Software:
When charging or discharging, an AUTO function sets the feed current automatically.
For Lithium batteries especially, this can help prevent over-charging that can
potentially lead to an explosion. Every program in the charger is controlled with
specialized software to detect almost any error, providing maximum safety. If
desired, charging and discharging parameters can be manually programmed,
giving the user more control over the process.
High-Power and High-Performance Circuit:
The charger features a maximum output power of 80 watts. As a result, it can
charge or discharge high capacity 6S Lithium batteries (in series) and 15-Cell
NiCd or NiMH batteries with a maximum current of 7.0 amps. An efficient auto-on
cooling fan allows the charger to hold that power without any trouble running
the CPU or operating programs.
OpTIOnAl pARTS
The following optional parts can be purchased separately and used with your
Activator 80 Multi-Chemistry AC/DC Charger. For more information, visit your
local Hobby People retail store or our website at www.hobbypeople.net.
• 118505 6-n-1 Parallel Balance Board
• 118519 Universal Balance Board
• 118525 Multi-Plug Output Adapter
• 118526 Output Adapter Cord Set

4
ACTIVATOR 80 CHARGER USER’S GUIDE
Accepts Various Types of Lithium Battery:
The charger can accept three different types of Lithium battery: Lithium
Ion, Lithium Polymer and Lithium Phosphate. They have different characteristics
and require different parameters for charging and discharging. You can select
any one of them and the associated parameters as required.
Maximum Safety:
Delta-Peak Sensitivity - This automatic charge termination program works
on the principle of the Delta-peak voltage detection when charging NiCd
or NiMH batteries.
Auto-Charge Current Limit - When charging NiCd or NiMH batteries using
AUTO current mode, you can program the upper limit of the change current
to avoid over-current charging. This is very useful when charging low
impedance and small capacity batteries in AUTO mode.
Capacity Limit - The charging capacity is always calculated by multiplying
the charge current by time. If the charging capacity exceeds the programmed
limit, the process will be terminated automatically. This limit can be changed
if required.
Temperature Limit - The temperature of the battery during charging will rise
due to its internal chemical reaction. If you program a temperature limit, the
charging process will be terminated when the limit has been reached.
Processing Time Limit - You can limit the maximum process time (total
charge time) to prevent any possible defect in the battery confusing your
programming values.
Input Power Monitor - To protect the source battery from being damaged,
the input voltage is always monitored. If it drops below the lower limit, the
process will be terminated automatically.
Auto-On Cooling Fan - The cooling fan activates automatically when the
internal temperature of the unit is raised.
Integrated Cell Voltage Balancer for Lithium Batteries:
The charger features an integrated cell voltage balancer. This allows you to
charge Lithium batteries without a separate cell balancer. The charger will
automatically balance the individual cell voltages when charging LiIon, LiPo
and LiFe batteries.
Cyclic Charging and Discharging:
The charger is capable of performing 1 to 5 cycles of charge-discharge or
discharge-charge continually for battery refreshing.
DETAIlED fEATURES

ACTIVATOR 80 CHARGER USER’S GUIDE
5
DETAIlED fEATURES
Lithium Cell Voltage Meter:
The charger features a Lithium cell voltage meter that allows you to quickly and
easily check the current total voltage of your Lithium battery. In addition, it also
displays the current voltage of the highest voltage cell and the current voltage
of the lowest voltage cell in your battery.
Individual Cell Balancing During Discharge:
The charger can monitor and balance the individual cells of a Lithium battery
during the discharging process. If the voltage of any one cell varies abnormally,
the process will be stopped with an error message.
Lithium Battery Fast and Storage Charge Modes:
You can choose two special Lithium battery charge modes for special purposes.
Fast charge reduces the charging time of a Lithium battery and Storage mode
controls the final voltage of the battery destined for long term storage.
Data Store/Load:
Data storage and loading programs allow you to save up to 5 different battery
data programming presets. Once saved, these presets can be loaded at a later
time when needed. This allows you charge, discharge or cycle your batteries
without the need to enter the programming values each time.
• AC/DC Power Input In a Compact and Lightweight Design
• 80 Watts of Power and Charge Rates Up to 7.0 Amps
• Built-In XH Balance Ports
• Includes Temperature Sensor for Added Safety
• Built-In Auto-On Cooling Fan
• High-Performance, Digital, Intelligent Charging
• Lithium Cell Voltage Meter with Total and High/Low Cell Voltage Display
• Charges, Discharges and Cycles
• Standard, Balance, Fast and Storage Lithium Charge Modes
• Charges 1 to 6 LiIon, LiPo or LiFe Cells and 1 to 15 NiCd or NiMH Cells
• Charges Pb (Lead Acid) Batteries from 2 to 20 Volts
OVERVIEw
fEATURES
Use the information in this section to familiarize yourself with your Activator 80
Multi-Chemistry AC/DC Charger.

6
ACTIVATOR 80 CHARGER USER’S GUIDE
OVERVIEw
AC Input Power Socket:
Powers the charger from a 100 to 240V AC power source, using the supplied
AC input power cord.
Batt Type/Stop Button:
Press to select upper level programming options or to stop the current process.
Cooling Fan:
Helps keep the charger cool during the charging and discharging processes.
The cooling fan features an auto-on function, so it turns on only when required.
DC Input Power Socket:
Powers the charger from an 11 to 18V DC power source, using the supplied DC
Input power cord and plug-in alligator clips.
OVERVIEw DIAGRAm AnD DESCRIpTIOnS
• DC Input Voltage: 11 to 18V
• AC Input Voltage: 100 to 240V
• Charge Power Output: 80W
• Discharge Power: 5.0W
• Charge Current: 0.1 to 7.0A
SpECIfICATIOnS
• Discharge Current: 0.1 to 1.0A
• LiPo Balancing Current: 300mA/Cell
• NiCd/NiMH Cell Count: 1 to 15C
• Lithium Cell Count: 1 to 6S
• Pb (Lead Acid) Voltage: 2 to 20V

ACTIVATOR 80 CHARGER USER’S GUIDE
7
OVERVIEw
LCD Screen:
Displays programming and process information on an easy-to-read 16
character, 2-line screen.
Output Power Sockets:
Used to charge Lithium, NiCd, NiMH and Pb (Lead Acid) batteries, using the
supplied output power adapter cord. Red is positive and black is negative.
Start/Enter Button:
Press to start or resume the process.
Status/Dec/Inc Buttons:
Press to select lower level programming options or to increase or decrease
programming values.
Temperature Sensor Port:
Allows you to monitor battery temperature during the charging or discharging
process, using the included temperature sensor.
XH Balance Ports:
Used to balance charge 2 to 6S Lithium batteries that feature an XH balance
connector. An optional Universal Balance Adapter Board with XH, EH, HP/PQ
and TP/FP balance ports can be used and is available separately. For more
information, see the Optional Parts section on page 3.
wARnInGS AnD SAfETy nOTES
These warnings and safety notes are important and must be followed closely.
Please abide by this information, and follow the instructions in this User’s Guide
closely for maximum safety, otherwise the charger and your battery may be
severely damaged. Failure to follow these instructions can also result in fire,
injury to your person or others, or loss of property.
• Only use the charger with the intended battery types. Do not attempt to
charge or discharge any other type of battery.
• Observe any cautions and warnings included with your battery. This is
especially true with Lithium batteries.
• Never leave the charger unsupervised when it’s connected to its power
source. If any malfunction is observed, immediately terminate the process.
• Keep the charger away from moisture, dust, dirt, heat, direct sunlight and
vibration. Do not drop it.
OVERVIEw DIAGRAm AnD DESCRIpTIOnS, COnTInUED....

8
ACTIVATOR 80 CHARGER USER’S GUIDE
wARnInGS AnD SAfETy nOTES
• The charger is designed to be powered by an 11 to 18V DC or 100 to 240V
AC power source only. Do not connect both power sources to the charger
at the same time!
• Double-check all connections prior to starting the charging or discharging
process.
• The charger and the battery to be charged or discharged should be placed
on a heat-resistant, non-flammable and non-conductive surface. Never
place them on a car seat, carpet or similar. Keep flammable and volatile
materials well away from the operating area. When charging Lithium
batteries, we suggest always using a charging safety bag, available
from most hobby retailers.
• Be sure to fully understand the information for the battery to be charged or
discharged. If the programming values are incorrect, the battery can be
severely damaged. Incorrect charging of Lithium batteries can cause a
fire or explosion.
• Never charge a Lithium battery that is swollen or damaged in any way.
• To avoid short-circuits between the output power adapter cord connectors,
connect the adapter cord to the charger first and only then to the battery to
be charged or discharged. Reverse the sequence when disconnecting.
• Carefully verify the capacity and voltage of your Lithium battery before
charging or discharging it. It may be composed of mixed parallel and
series connected cells. In parallel, the capacity of the battery is multiplied by
the number of cells in parallel (2P means x 2), but the voltage remains the
same. The voltage imbalance possible in parallel packs can cause a fire
or explosion during the charging process. We recommend using Lithium
batteries in series cell format only.
• Never attempt to open the charger or disassemble the charger in any way.
Any signs of tampering will void the charger’s warranty.
Number of Cells
1 Cell
2 Cells
3 Cells
4 Cells
5 Cells
6 Cells
bATTERy pACK nOmInAl VOlTAGE VAlUES
LiIon
3.6V
7.2V
10.8V
14.4V
18.0V
21.6V
LiPo
3.7V
7.4V
11.1V
14.8V
18.5V
22.2V
LiFe
3.3V
6.6V
9.9V
13.2V
16.5V
19.8V
NiCd/NiMH: Number of Cells x 1.20V
(e.g. 8 Cells = 9.6V)
Pb: Number of Cells x 2.0V
(e.g. 6 Cells = 12.0v)

ACTIVATOR 80 CHARGER USER’S GUIDE
9
wARnInGS AnD SAfETy nOTES
RECOmmEnDED SAfE CHARGInG-DISCHARGInG VAlUES
NiCd/NiMH
Nominal Voltage Level: 1.2V/Cell
Maximum Charge Voltage: 1.5V/Cell
Discharge Cut-Off Voltage: 0.85V/Cell (NiCd) 1.0V/Cell (NiMH)
Recommended Charge Rate: 1C to 2C
Recommended Discharge Rate: 1C
Nominal Voltage Level: 3.6V/Cell
Maximum Charge Voltage: 4.1V/Cell
Discharge Cut-Off Voltage: 2.5V/Cell
Recommended Charge Rate: 1C or Less
Recommended Discharge Rate: 1C
Nominal Voltage Level: 3.7V/Cell
Maximum Charge Voltage: 4.1V/Cell
Discharge Cut-Off Voltage: 3.0V/Cell
Recommended Charge Rate: 1C or Less. Some LiPo cells can be
charged at 2C or more, but check with the battery manufacturer first.
If in doubt, charge at 1C.
Recommended Discharge Rate: 1C
Nominal Voltage Level: 3.3V/Cell
Maximum Charge Voltage: 3.6V/Cell
Discharge Cut-Off Voltage: 2.0V/Cell
Recommended Charge Rate: 3C or Less. Check with the battery
manufacturer first.
Recommended Discharge Rate: 1C
Nominal Voltage Level: 2.0V/Cell
Maximum Charge Voltage: 2.46V/Cell
Discharge Cut-Off Voltage: 1.72V/Cell
Recommended Charge Rate: 0.4C or Less
Recommended Discharge Rate: 1C
C = X ÷ 1000 Where X = Battery Capacity (eg: 3000mAh, therefore, 1C = 3.0 amps Charge Rate)
LiIon
(Lithium Ion)
LiPo
(Lithium Polymer)
LiFe
(Lithium Phosphate)
Pb
(Lead Acid)
Discharging is typically used to determine the residual capacity of the battery
or to lower the voltage of the battery to a defined level. When you discharge
the battery you should take as much care as when you charge it. To avoid
the
battery becoming deep-discharged, program the final discharge voltage
correctly as described in the Recommended Safe Charging-Discharging
Values
chart above.
DISCHARGInG

10
ACTIVATOR 80 CHARGER USER’S GUIDE
• At any time during the charging or discharging process you can alter the
charge or discharge current values. To do this, press the ENTER button. The
current value will flash. Press the DEC or INC buttons to change the current
value, then press the ENTER button again to store that new value.
• The charger will automatically stop the process when it detects the battery is
fully charged or when it detects the battery is discharged to the programmed
voltage. If at any time you want to stop the process before its completed,
press the STOP button.
• At any time during the charging or discharging process, more detailed
information can be displayed by pressing the DEC or INC buttons.
• For maximum safety during the charging and discharging processes,
the charger may throttle the charge or discharge current lower than you
programmed. Whether the charger will automatically lower the charge or
discharge current will vary based on a number of factors and the charge
or discharge current you programmed.
• You must press and hold the START button for more than 3 seconds to begin
the programmed process. If an error is displayed, press the STOP button, then
carefully check the battery, programming values and connections.
pRO TIpS
DISCHARGInG, COnTInUED....
wARnInGS AnD SAfETy nOTES
Lithium batteries should never be deep-discharged to lower than the
minimum voltage, as this leads to a rapid loss of capacity or total failure.
• Some rechargeable batteries are said to have a memory effect. If they are
partly used and recharged before the whole charge is used, they remember
this and next time will only use that part of their capacity. This is referred
to as memory effect. NiCd batteries are said to suffer from memory effect.
They prefer complete cycles. Fully charge them, then use them until empty.
Do not fully recharge before storage. Allow them to self-discharge during
storage and give them an occasional short charge to keep them above the
0.85V per cell minimum.
• Lithium batteries prefer a partial, rather than a full discharge. Frequent full
discharges should be avoided if possible. Instead, charge the battery more
often or use a larger capacity battery. When storing a Lithium battery, we
recommend using the charger’s Lithium Storage program.
• A brand-new NiCd battery will not yield its full capacity until it has been
subjected to 10 or more charge cycles. The cyclic process of charge and
discharge will lead to optimized capacity.

ACTIVATOR 80 CHARGER USER’S GUIDE
11
2) Plug your battery into the output power adapter cord. Depending on the
connector type on your battery, you may need to use an adapter.
3) If you’re charging a 2 to 6S Lithium battery, plug your Lithium battery’s balance
connector into the matching balance port in the charger. If your battery does
not feature an XH balance connector, an adaptor board can be used. For
more information, see the Optional Parts section on page 3.
If charging a 1S Lithium battery, or if your multi-cell Lithium battery
features an internal balance circuit, since a balance connector is not
utilized, make the connection using the NiCd/NiMH Connection method. The
charge method used should be LiIon, LiPo or LiFe to match your battery type.
1) Connect the charger to a power source, using either the AC input power cord
(plugged into an AC wall outlet or a power strip) or the DC input power
cord (plugged into a power supply or connected to a vehicle battery).
If you’re connecting the DC input power cord to a vehicle battery, plug-in
alligator clips are included for this purpose. When connecting to a DC power
source, verify the polarity carefully before plugging the DC input power cord
into the charger.
Do not connect both power sources to the charger at the same time! If
using a DC power source from your vehicle, do not start your vehicle
before or during the charging or discharging process.
COnnECTIOnS
Use the information in this section to connect your Activator 80 Multi-Chemistry
AC/DC Charger and battery. Failure to make the connections correctly can result
in damage to the charger and/or your battery.
COnnECTInG THE pOwER InpUT
COnnECTInG yOUR bATTERy
1) Plug the output power adapter cord into the power outputs of the charger,
making sure to observe correct polarity.
Lithium w/Balance Plug Connection NiCd/NiMH Connection

12
ACTIVATOR 80 CHARGER USER’S GUIDE
pROGRAmmInG mEnUS flOw CHART
Use this programming flow chart to familiarize yourself with your Activator 80
Multi-Chemistry AC/DC Charger’s various programming menus.
When the charger is connected to a power source, the last active
programming menu will be displayed.
Press the STOP/DEC button at any
time to return the current upper level
programming menu.
At any time during the charging or
discharging process, more detailed
information can be displayed by pressing the
DEC or INC buttons.
Upper Level Lower Level

ACTIVATOR 80 CHARGER USER’S GUIDE
13
nAVIGATInG pROGRAmmInG mEnUS
When the Activator 80 Multi-Chemistry AC/DC Charger is plugged in, the last
active programing menu you were in will be displayed. To navigate through the
various programming screens and make programming selections, use the four
buttons on the charger’s front panel as described below.
Press to scroll forward through upper level programming
menus. Press to return to the upper level programming menu
after programming the lower level programming menu.
Press to scroll backward through upper level programming
menus. Press to scroll backward through lower level programming
menus. Press the to decrease programming values.
Press to scroll backward through upper level programming
menus. Press to scroll forward through lower level programming
menus. Press the to increase programming values.
Press to enter the selected upper level programming menu
and display its lower level programming menus. Once in a
lower level programming menu, press to select and store
programming values.
fUnCTIOnbUTTOn
USInG THE TEmpERATURE SEnSOR
The Activator 80 Multi-Chemistry AC/DC Charger includes a temperature sensor
that should ALWAYS be used to monitor the temperature of your battery during
the charging or discharging process. In addition to temperature monitoring, you
are able to program a Safe Temperature Cut-Off value that will stop the current
process should your battery’s temperature reach the programmed value. This
provides an extra measure of safety during the charging or discharging process.
Battery Type
NiCd
NiMH
Lithium
SAfE TEmpERATURE RAnGE VAlUES
Safe Temperature Range
37 to 60ºC (100 to 140ºF)
37 to 54ºC (100 to 130ºF)
Ambient Temp + 10ºF
For information about changing the
Safe Temperature Cut-Off value, see
the Safety Temp Cut-Off Menu section
on pages 16 and 17.
For Lithiums, we recommend setting the Safe Temperature Cut-Off value to
10ºF above ambient temperature (e.g., 80ºF Ambient + 10º = 90ºF or 32ºC).

14
ACTIVATOR 80 CHARGER USER’S GUIDE
1) Plug the temperature sensor into the temperature sensor port in the left side
of the charger, then secure the temperature sensor to your battery. A small
square magnet is imbedded in the curved side of the sensor to attach it to the
curved side of a NiCd or NiMH battery.
To secure the temperature sensor to a
Lithium battery, use a rubber band to
hold the flat side of the sensor securely
to the flat side of the battery.
2) To view the temperature of the battery
during the charging or discharging
process, press the DEC button to scroll
through the various Status screens.
USInG THE TEmpERATURE SEnSOR
The safe temperature range values shown in the table on the previous
page are a good starting point. When the battery reaches the programmed
Safe Temperature Cut-Off value, the process will stop and will not restart. We
recommend starting with a value in the middle of the recommended range. Using
too low a value can cause the process to stop before the battery is fully charged
or discharged. In this case, increase the Safe Temperature Cut-Off value by a
small amount, making sure not to allow the battery to overheat. Alternately,
setting the Safe Temperature Cut-Off value too high may cause the battery to
overheat before the battery has been fully charged or discharged. In this case,
decrease the Safe Temperature Cut-Off value.
USInG THE TEmpERATURE SEnSOR
InITIAl USER pARAmETER SETUp
Prior to using your charger, you should program and verify the user parameters
described in this section. For example, if you’re charging a LiPo battery, you’ll
need to program the battery type to LiPo using the LIXX V.TYPE menu. In addition,
there are a number of other parameters than can be user-defined, such as NiCd
and NiMH delta peak cut-off sensitivity, safety timers and more.
1) Connect the charger to its power source,
then press the STOP or DEC buttons to scroll
to the USER SET PROGRAM menu.
This menu controls the type of Lithium battery you’re going to charge. The nominal
voltage varies based on the battery type. There are three kinds of Lithium battery
that can be charged: LiFe (3.3V), LiIon (3.6V) or LiPo (3.7V). Choose the type that
matches the type of Lithium battery you’re going to charge.
lIXX V.TypE mEnU

ACTIVATOR 80 CHARGER USER’S GUIDE
15
2) Press the ENTER button. The voltage value will flash. Press the DEC or INC
buttons to select the desired Lithium battery type, then press the ENTER
button to store that value. Choose 3.3V for LiFe, 3.6V for LiIon or 3.7V for LiPo.
This setting is very important! Make sure you check your battery type
carefully and select the correct program option. If you select the incorrect
program option, the battery can explode during the charging process!
lIXX V.TypE mEnU, COnTInUED....
InITIAl USER pARAmETER SETUp
1) Press the ENTER button to open the V.TYPE
menu.
This menu controls the time limit the charger has to auto-detect the number of
cells in your Lithium battery when it’s connected to the charger. The charger
recognizes the cell count of a Lithium battery automatically at the beginning of
the charging or discharging process to help avoid incorrect settings by the
user. Deeply discharged batteries can be perceived incorrectly. To prevent
this kind of error, you can program the time interval to verify the cell count by
the charger. Normally, 10 minutes is enough to perceive the cell count correctly.
For batteries of larger capacity, you may extend the time interval, but if you
program the time interval too long for small capacity batteries, the charging or
discharging process can be finished within the time interval with an erroneous
cell count. If the processor recognizes the cell count incorrectly at the beginning
of the charging or discharging process, you may extend the time. Otherwise,
you are advised to use the default value.
lIpO, lIIO, lIfE CHK TImE mEnU
2) Press the ENTER button. The minutes value
will flash. Press the DEC or INC buttons to
select the desired minutes value, then press
the ENTER button to store that value. Choose from 5 to 60 minutes.
• The default value is 10 minutes.
1) From within the USER SET PROGRAM
menu, press the DEC or INC buttons to
display the LiPo/LiIo/LiFe CHK TIME menu.
This menu controls the trigger voltage for automatic charge termination of a
NiMH battery. The effective value ranges from 5 to 20mV per cell. If the trigger
voltage is programmed higher, there is a danger of overcharging the battery. If
it is programmed lower, there is a possibility of premature termination.
nImH SEnSITIVITy D.pEAK mEnU

16
ACTIVATOR 80 CHARGER USER’S GUIDE
1) From within the USER SET PROGRAM menu,
press the DEC or INC buttons to display the
NiMH SENSITIVITY D.PEAK menu.
2) Press the ENTER button. The voltage value
will flash. Press the DEC or INC buttons to
select the desired voltage value, then press
the ENTER button to store that value. Choose from Default or 5mV/Cell to
20mV/Cell. Refer to the technical specification for your battery to determine
the setting to use.
• The default value is Default (7mV/Cell).
nImH SEnSITIVITy D.pEAK mEnU, COnTInUED....
This menu controls the trigger voltage for automatic charge termination of a
NiCd battery. The effective value ranges from 5 to 20mV per cell. If the trigger
voltage is programmed higher, there is a danger of overcharging the battery. If
it is programmed lower, there is a possibility of premature termination.
1) From within the USER SET PROGRAM menu,
press the DEC or INC buttons to display the
NiCd SENSITIVITY D.PEAK menu.
2) Press the ENTER button. The voltage value
will flash. Press the DEC or INC buttons to
select the desired voltage value, then press
the ENTER button to store that value. Choose from Default or 5mV/Cell to
20mV/Cell. Refer to the technical specification for your battery to determine
the setting to use.
• The default value is Default (12mV/Cell).
nICD SEnSITIVITy D.pEAK mEnU
SAfETy TEmp CUT-Off mEnU
This menu controls the safe battery temperature cut-off function when used
with the temperature sensor. When the temperature sensor is plugged into the
charger and the temperature probe is attached to the surface of your battery,
the battery’s temperature will be monitored during the charging or discharging
process. If the battery’s temperature reaches the programmed temperature,
the process will stop.
1) From within the USER SET PROGRAM menu,
press the DEC or INC buttons to display the
SAFETY TEMP CUT-OFF menu.
InITIAl USER pARAmETER SETUp

ACTIVATOR 80 CHARGER USER’S GUIDE
17
InITIAl USER pARAmETER SETUp
2) Press the ENTER button. The temperature
value will flash. Press the DEC or INC buttons
to select the desired value, then press the
ENTER button to store that value. Choose from 20ºC to 80ºC. See the Using
the Temperature Sensor section on pages 13 and 14 for information about
what value to use.
• The default value is 80ºC.
SAfETy TEmp CUT-Off mEnU, COnTInUED....
This menu controls the time delay in minutes between charge-discharge cycles.
A battery on the cyclic process of charge and discharge can often become warm
after a charge or discharge period. The program can insert a time delay to occur
after each charge-discharge cycle to allow the battery adequate time to cool
down before being subjected to the next charge-discharge cycle. This helps to
prevent your battery from overheating and being damaged.
1) From within the USER SET PROGRAM menu,
press the DEC or INC buttons to display the
WASTE TIME menu.
2) Press the ENTER button. The minutes value
will flash. Press the DEC or INC buttons to
select the desired minutes value, then press
the ENTER button to store that value. Choose from 0 to 60 minutes.
• The default value is 5 minutes.
wASTE TImE mEnU
This menu controls the charger’s safety timer. When you start the charging
process, the safety timer automatically starts running. The safety timer helps
to prevent overcharging the battery if the battery proves to be faulty, or if the
termination circuit cannot detect the battery as being fully charged. The value for
the safety timer should be generous enough to allow a full charge of the battery.
The value you program will differ based on the capacity of the battery you’re
charging and how many amps you’re charging it at. For example, if you’re
charging a 3000mAh NiMH battery at 3.0 amps, it will take approximately 1 hour
to charge, therefore, program the safety timer value to approximately 90 minutes.
1) From within the USER SET PROGRAM menu,
press the DEC or INC buttons to display the
SAFETY TIMER menu.
SAfETy TImER mEnU

18
ACTIVATOR 80 CHARGER USER’S GUIDE
2) Press the ENTER button. The ON/OFF value
will flash. Press the DEC or INC buttons to
select the desired value, either ON or OFF,
then press the ENTER button to store that value. The minutes value will flash.
3) Press the DEC or INC buttons to select the desired minutes value, then press
the ENTER button to store that value. Choose from 10 to 720 minutes.
• The default values are ON and 120 minutes.
SAfETy TImER mEnU, COnTInUED....
InITIAl USER pARAmETER SETUp
This menu controls the charger’s capacity cut-off value. This feature sets the
maximum charge capacity that will be supplied to the battery during charge.
As an extra measure of safety, if the delta-peak voltage is not detected or if the
safety timer fails for any reason, this feature will automatically stop the charging
process at the selected capacity value.
CApACITy CUT-Off mEnU
2) Press the ENTER button. The ON/OFF value
will flash. Press the DEC or INC buttons to
select the desired value, either ON or OFF,
then press the ENTER button to store that value. The mAh value will flash.
3) Press the DEC or INC buttons to select the desired mAh value, then press the
ENTER button to store that value. The minimum value is 10mAh.
• The default values are ON and 5000mAh.
We don’t recommend using a value that adds any more than 10% of
your battery’s capacity.
1) From within the USER SET PROGRAM menu,
press the DEC or INC buttons to display the
CAPACITY CUT-OFF menu.
This menu controls the charger’s audio functions. A key tone sounds each time
you press one of the buttons to confirm your action.
There is also an audible tone and/or melody at various times during operation
to alert you to different mode changes, charging process completion, etc. These
audible sounds can be turned ON or OFF.
1) From within the USER SET PROGRAM menu,
press the DEC or INC buttons to display the
KEY BEEP - BUZZER menu.
KEy bEEp - bUzzER mEnU

ACTIVATOR 80 CHARGER USER’S GUIDE
19
2) Press the ENTER button. The key beep value
will flash. Press the DEC or INC buttons to
select the desired key beep value, then
press the ENTER again to store that value. Choose from ON or OFF.
3) Press the ENTER button. The buzzer value
will flash. Press the DEC or INC buttons to
select the desired buzzer value, then press
the ENTER button to store that value. Choose from ON or OFF.
We recommend keeping the buzzer option ON to hear alerts during use.
• Key Beep and Buzzer default values are ON.
InITIAl USER pARAmETER SETUp
KEy bEEp - bUzzER mEnU, COnTInUED....
This menu controls the charger’s automatic input battery voltage cut-off limit.
When charging from a DC power source, the charger monitors the voltage of
the input battery (your DC power source). If the input battery’s voltage drops
below the programmed value, the operation will be terminated to protect the
integrity of the input battery. Please refer to the technical specification of your
DC input battery to determine the setting to use.
1) From within the USER SET PROGRAM menu,
press the DEC or INC buttons to display the
INPUT POWER LOW CUT-OFF menu.
2) Press the ENTER button. The voltage value
will flash. Press the DEC or INC buttons to
select the desired voltage value, then press
the ENTER button to store that value. Choose from 10.0 to 11.0 volts.
• The default value is 10.0 volts.
InpUT pOwER lOw CUT-Off mEnU
lITHIUm CEll VOlTAGE mETER
The charger features a Lithium cell voltage meter that allows you to quickly and
easily check the current total voltage of your Lithium battery. In addition, it also
displays the current voltage of the highest voltage cell and the current voltage of
the lowest voltage cell in your battery. The Lithium battery’s balance connector
must be plugged into the charger for this function to work.
1) Press the STOP or DEC buttons to scroll to
the PROGRAM SELECT LI BATT METER menu.

20
ACTIVATOR 80 CHARGER USER’S GUIDE
lITHIUm bATTERy pROGRAmmInG
The Lithium Battery Programming menu is suitable for charging and discharging
Lithium batteries with a nominal voltage per cell of 3.3V (LiFe), 3.6V (LiIon) and
3.7V (LiPo). Lithium batteries are charged using the “Constant Current/Constant
Voltage” method (CC/CV). Constant Current is delivered during the first part of
the charging process and once the battery reaches a pre-set voltage, Constant
Voltage is applied to the battery. As the battery’s voltage becomes equalized to the
voltage on the charger’s output, the charge current will steadily drop. When the
current reaches an approximate value of 1/10C, the charging process will end.
The charge current varies according to the battery capacity and performance.
The final voltage of the charging process is also very important; it should be
precisely matched with the specific maximum voltage of the battery type being
charged. They are 3.6V (LiFe), 4.1V (LiIon) and 4.2V (LiPo).
The charge current and nominal voltage you program must always be
correct for the battery to be charged or damage can result.
2) Press the START/ENTER button to open the Individual Cell Voltage screen. The
current voltage of each cell that comprises
your Lithium battery will be displayed.
3) Press the DEC or INC buttons to view the
total current voltage of your battery (MAIN),
the current voltage of the highest voltage
cell (H) and the current voltage of the
lowest voltage cell (L). The values displayed
for each cell will not be exactly the same, but they should be close. The
following can be determined by the results:
Individual Cell Deterioration - If the value of the lowest voltage cell is 15%
or more less than the value of the highest voltage cell, then that cell may be
starting to fail. If you see this, cycle the battery one to two times at 0.5C or
lower, then balance charge the battery at 0.5C and check again.
Overall Battery Deterioration - When the Lithium battery is new, check the
voltages after the battery has been cycled 5 times (and balance charged).
Record that data. After many uses, balance charge the battery and check the
voltages again. If the voltages are significantly lower, the battery is probably
starting to deteriorate. You can cycle the battery at 0.5C (or less) and check
the voltages again. If the voltages don’t increase after this, the battery may
need to be replaced.
4) Press the DEC or INC buttons to return to the Individual Cell Voltage screen,
or press the STOP button to return to the top PROGRAM SELECT menu.
lITHIUm CEll VOlTAGE mETER
Table of contents
Other Hobby People Batteries Charger manuals
Popular Batteries Charger manuals by other brands

Deltran
Deltran Battery Tender Power Tender Plus User instructions

Parkside
Parkside PDSLG 20 B1 Translation of the original instructions

ProMariner
ProMariner ProSport6 PFC Owner's manual and installation guide

Arjo
Arjo NDA8200 Instructions for use

Wallbox
Wallbox PULSAR installation guide

DeWalt
DeWalt XR DCB118 Original instructions