Billard
3
Montageanleitung zu Art.Nr. 3523009
Montage des Ballrücklaufs (Forts.) Autoball return assemby (Contin.)
1. Hinter der breiten Önung an einer kürzeren Seite bendet sich der
sogenannte Ballkasten. Wenn Sie hineingreifen merken Sie, dass
sich innen links im Ballkasten und auch ganz rechts jeweils ein
senkrechtes, holzernes Brettchen (etwa Postkartengrolle) bendet.
Diese Brettchen bewirken, dass die Kugeln nicht aus dem Ball-
kasten herausfallen. Diese Brettchen müssen aber entfernt werden,
sofern der Billardtisch in der Variante „mit Ballrücklauf‘ aufgebaut
wird.
Also diese beiden Brettchen bitte zunächst entfernen. Dazu ist es
am sinnvollsten, den kompletten hölzernen Ballkasten auszu-
bauen.
Wichtig: bei dem dann wieder erfolgenden Einbau bitte darauf
achten, dass das längere Brett senkrecht steht, das kürzere Brett
muss also als Boden gelten. Würde der Ballkasten nicht so wie
gerade beschrieben eingebaut, hätte dies zur Folge, dass die Bälle
nicht richtig zum Ballkasten zurück rollen würden. Sie würden
irgendwo hängen- bzw. liegen bleiben.
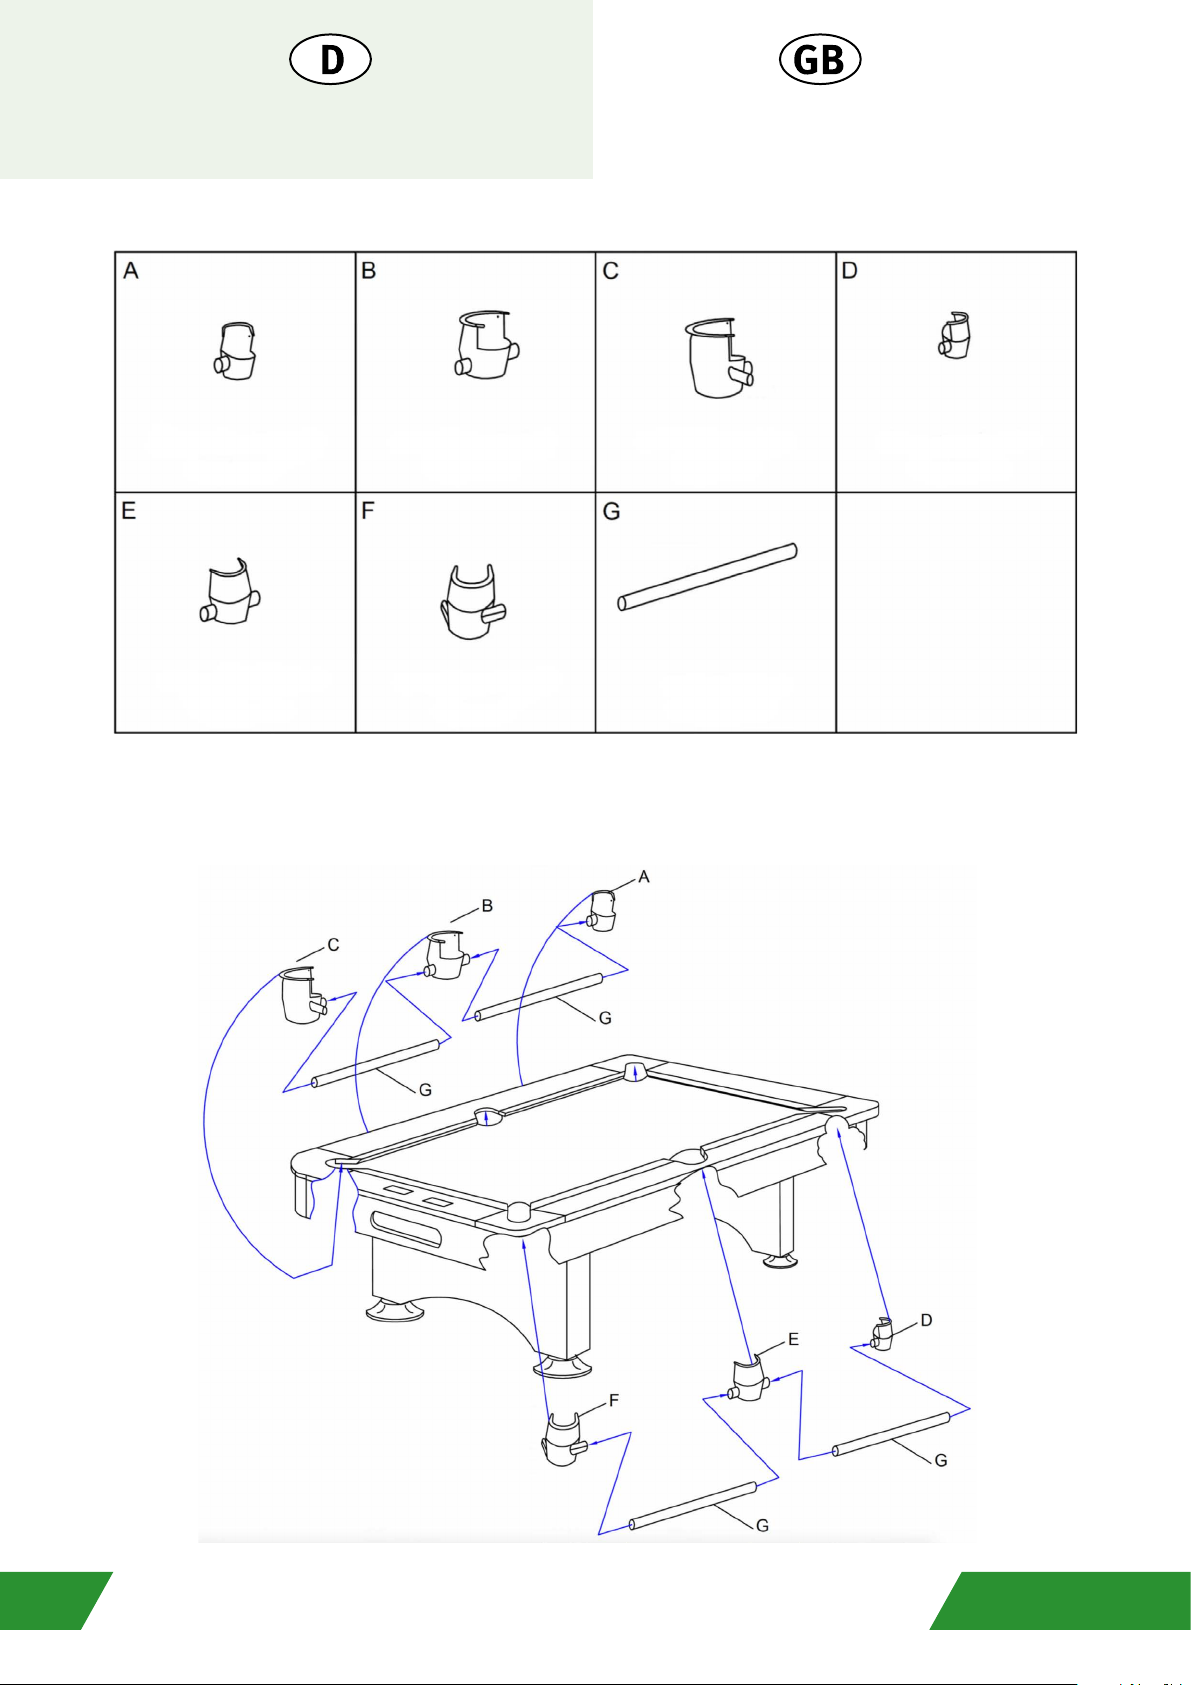
2. Der nächste Arbeitsschritt besteht darin, die beiden Ballfangkörbe
A+D auf der gegenüber liegenden Seite des Ballkastens einzu-
bauen, also hinten links und hinten rechts. Diese beiden Ballfang-
körbe erkennen Sie daran, dass beide Korbe jeweils nur ein Abfluß-
loch (für die Kugeln) nach unten haben.
3. Der nächste Arbeitsschritt besteht darin, die beiden Ballfangkörbe
B+E in der Mitte einzusetzen. Die Körbe erkennen Sie daran, dass
sie jeweils 2 Durchgangslöcher im unteren Bereich aufweisen.
Wichtig: diese beiden Ballfangkörbe im mittleren Bereich müssen
so eingesetzt werden, dass das Gefälle Richtung Ballkasten zeigt.
4. Dann müssen noch die beiden restlichen Ballfangkörbe C+F einge-
setzt werden. Diese beiden Korbe sind daran zu erkennen, dass sie
einen Ballrücklauf „über Eck“ haben. Auch hier ist darauf zu
achten, dass die beiden Ballfangkörbe so eingesetzt werden, dass
das Gefälle in Richtung des hölzernen Ballkastens zeigt.
5. Jetzt sind alle 6 Ballfangkorbe eingebaut. Aber bitte noch nicht mit
den kleinen Nägelchen endgültig befestigen, da die Ballfangkörbe
während des Einbaues der Zwischenröhren noch etwas bewegt
werden müssen.
6. Der nächste Arbeitsschritt besteht darin, die 4 schwarzen Kunst-
storöhren einzusetzen. Beachten Sie bitte, dass diese Rohren bei
der Billardgröße „7 Fuß“ (etwa mit einem scharfen Messer) gekürzt
werden müssen.
Am einfachsten setzen Sie die Röhren so ein, indem Sie das eine
Stück zunächst auf den hinteren Ballfangkorb aufschieben und
danach das andere Ende der Reihe in den mittleren Ballfangkorb
einschieben.
Das nächste Röhrenstück an derselben Seite des Billardtisches
setzen Sie dann genauso ein, also anfangend am mittleren Ball-
fangkorb (aufschieben) und danach am vorderen Ballfangkorb rein-
schieben. Auf der anderen Seite des Billardtisches wiederholen Sie
den Einbau der anderen 2 Verbindungsröhren bitte in identischer
Weise.
Wenn Sie die Röhren wie zuvor beschrieben einbauen, vermeiden
Sie, dass es kleinere Übergangsstufen ergibt und dass dann even-
tuell die Balle daran hängen bleiben können. Bei richtigem Einbau
aller 6 Ballfangkorbe und aller 4 Kunststoröhren rollen alle Bil-
lardkugeln automatisch zum Ball-Sammelkasten.
7. Der nächste Arbeitsschritt besteht nun darin, ein paar Billardku-
geln zu nehmen und diese in die verschiedenen Löcher zu geben.
Dann stellen Sie selbst leicht fest, ob denn nun alle Ballfangkörbe
richtig sitzen. Eventuell müssen die einzelnen Ballfangkörbe noch
etwas nachjustiert werden. Sobald alle Kugeln richtig laufen,
müssen alle 6 Ballfangkörbe jeweils noch mit kleinen Nägelchen
befestigt werden.
1. Behind the wide opening at one of the short table sides you nd
the ball return box. Reaching inside, you nd that the space is
limited to the le an right by two wooden boards, of ca. postcard
size; these boards hinder the balls from falling out. In case you
wish to build the ball return mechanism into your table, these two
boards must be carefully taken out, ideally by deconstructing the
entire ball return box.
Note: In case you later decide to remove the ball return mecha-
nism again, when again putting the two limiting boards to the le
and right of the ball return box, please make shure the longer
board stands vertically, so that the shorter board is the ground. In
any other case, balls would not return to the ball return box cor-
rectly, but may instead get stuck.
2. Now add, at the opposite short table side, drop pockets A and D,
on the right and le side. These two drop pockets have only one
side opening respectively.
Note: make sure you build in both pockets with the openings
facing the ball return box.
3. Now add, at the middle of both long table sides, drop pockets B
and E, on the right and le side. These two drop pockets have two
opposing side openings, respectively.
Note: make sure you build in both pockets with the downhill slope
towards the ball return box.
4. And lastly, add, at the ball return box’ side, drop pockets C and F,
on the right and le table side. These two drop pockets have two
opposing side openings at a 90 degrees angle, respectively.
Note: make sure you build in both pockets with one of the side
openings directly leading into the ball return box.
5. Though all 6 drop pockets are installed, please don’t x them with
nails yet – in order to add the pipes the entire construction may
still need some wiggle room.
6. Now insert the four black pipes between the six drop pockets, as
seen on the previous page.
Note: With table size 7 , these standard sized pipes may have to
be shortened a bit, with a sharp knife e.g.
The easiest way to insert the pipes one by one, is to work your way
from the end of the table towards the ball return box side: e.g.
insert one pipe in pocket A, than in middle pocket B, than another
pipe in the other opening of pocket B and in end corner pocket C –
same on the other table side.
Note: make sure the pipes do not reach too far in the pocket
openings, as to not hinder the balls from easily running through.
7. Now that all parts of your ball return are assembled, test the cor-
rect functioning by letting some balls run through all 6 table
pockets.
Fix all 6 drop pockets to the table with short nails.
Vielen Dank, dass Sie sich für ein Automaten Hoffmann Produkt entschieden haben.
Bei Fragen stehen wir Ihnen gerne zur Verfügung.
c/o Sport-Thieme · Helmstedter Straße 40 · 38368 Grasleben, Germany
Telefon +49 5357 181-45 · Fax +49 5357 181-91
info@automaten-hoffmann.de · automaten-hoffmann.de