manuals.online logo
Brands
  1. Home
  2. •
  3. Brands
  4. •
  5. Hoffmann
  6. •
  7. Indoor Furnishing
  8. •
  9. Hoffmann Garant 91 4780 User manual

Hoffmann Garant 91 4780 User manual

GARANT Bambus-Arbeitsplatte
für Werkstattwagen
91 4780 – 91 4785
GARANT bamboo worktop/ GARANT plan de travail en bambou /
GARANT plano di lavoro in bambù /GARANT puesto de trabajo de bambù
06141-in Copyright © Hoffmann Group
Hoffmann GmbH Qualitätswerkzeuge
Haberlandstr. 55, 81241 Munich, Germany
www.hoffmann-group.com
Identifikationsdaten / Identification data
Hersteller / Manufacturer Hoffmann GmbH Qualitätswerkzeuge
Haberlandstr. 55, D-81241 Munich,
GERMANY
Produkt / Product Bambus-Arbeitsplatte für Werkstattwagen
Typ /Type GARANT
Artikel-Nummer / Item number 91 4780 – 91 4785
Formales zur Montageanleitung
Version / Revision 1-international
Erstelldatum / Date of creation 01/2018
DE Grundlegende Sicherheitshinweise
Gebrauchsanweisung lesen, beachten, für späteres Nachschlagen aufbewahren und jederzeit verfügbar
halten.
VORSICHT
Quetschungsgefahr bei der Montage der Bambus-Arbeitsplatte.
XSchutzhandschuhe zum Schutz der Finger tragen.
VORSICHT
Verletzungsgefahr durch herabfallende Gegenstände.
XFußschutz tragen.
XVor dem Umbau des Werkstattwagens Feststellbremse an den Lenkrollen betätigen.
Die maximale Traglast des Werkstattwagens darf auch nach Austausch der
Bambus-Arbeitsplatte nicht überschritten werden.
Bestimmungsgemäßer Gebrauch
Die Bambus-Arbeitsplatte ist nur zur Montage auf einem GARANT-Werkstattwagen geeignet und für keine
anderweitige Verwendung bestimmt.
Zur Montage des Schraubstocks beiliegende Bedienungsanleitung des Schraubstocks
beachten.
GB Grouped safety messages
Read the instructions for use, follow them and keep them available for later reference.
CAUTION
Crush hazard during the installation of a bamboo worktop.
XWear protective gloves to protect the fingers.
CAUTION
Risk of injury due to falling objects.
XWear safety shoes.
XBefore starting to modify the roller cabinet, apply the parking brake to the castors.
The safe working load of the roller cabinet must not be exceeded,
even after installation of the bamboo worktop.
Use for the intended purpose
The bamboo worktop is suitable only for installation on to a GARANT
roller cabinet and is not intended for any other purpose.
For assembling the bench vice, please see the manual fo the bench vice.
FR Consignes de sécurité
Lisez, respectez et conservez la notice d’utilisation à des fins de consultation ultérieure, et gardez-la toujours
à disposition.
ATTENTION
Risque d‘écrasement lors du montage du plan de travail en bambou.
XPortez des gants de protection pour protéger les doigts.
ATTENTION
Risque de blessure dû à la chute d‘objets.
XPortez des chaussures de sécurité.
XAvant de transformer la servante d‘atelier, actionnez le frein de blocage au niveau des roulettes
directrices.
La capacité de charge maximale de la servante d‘atelier ne peut pas être dépassée,
même après le remplacement du plan de travail en bambou.
Utilisation conforme à l‘emploi prévu
Le plan de travail en bambou est uniquement destiné au montage sur une servante d‘atelier GARANT
et ne peut pas être utilisé à d‘autres fins.
Pour le montage de l‘étau, consultez le manuel d‘instructions accompagnant l‘étau.
IT Avvertenze per la sicurezza
Leggere le istruzioni per l‘uso, seguirle, conservarle per riferimento futuro e tenerle sempre a portata di mano.
ATTENZIONE
Pericolo di schiacciamento durante il montaggio del piano di lavoro in bambù.
XIndossare i guanti per proteggere le dita.
ATTENZIONE
Pericolo di lesioni causate dalla caduta di oggetti.
XIndossare scarpe di sicurezza.
XPrima di modificare il carrello portautensili per officina,
azionare il dispositivo di bloccaggio delle ruote piroettanti.
Il carico massimo del carrello portautensili per officina non deve essere superato
nemmeno dopo la sostituzione del piano di lavoro in bambù.
Impiego conforme allo scopo previsto
Il piano di lavoro in bambù si presta esclusivamente al montaggio su un carrello portautensili GARANT
per officina e non è concepito per finalità diverse.
Per montare la morsa, attenersi al manuale di istruzioni in dotazione con la stessa.
ES Indicaciones de seguridad
Lea, observe y conserve las instrucciones de uso para consultas posteriores, y téngalas siempre disponibles.
ATENCIÓN
Peligro de aplastamiento durante el montaje del puesto de trabajo de bambú.
XUtilice guantes de protección para mayor seguridad de los dedos.
ATENCIÓN
Riesgo de lesiones por caídas de objetos.
XLleve calzado de protección.
XAntes del montaje del carro de taller accione el freno de estacionamiento del rodillo de dirección.
La carga máxima del carro de taller no debe superarse tras la sustitución
del puesto de trabajo Bambus.
Uso conforme a lo previsto
El puesto de trabajo Bambus está diseñado exclusivamente para el montaje en un carro de taller GARANT y
no está destinado a ningún otro uso.
Para el montaje del tornillo de banco consulte el manual de instrucciones del tornillo
de banco que encontrará adjunto.
Werkzeug und Material / Tool – Material / Outil – Matériel /
Utensile – Materiale / Herramientas – material
Mitgeliefertes Material / Supplied Material / Matériel fourni /
Materiale in dotazione / Material contenido
2 ×
Benötigtes Werkzeug / Required Tool / Outil nécessaire /
Utensile necessario / Herramientas necesarias
Montageanleitung / Assembly instructions / Instructions de montage / Instruzioni di montaggio / Instrucciones de montaje
➊
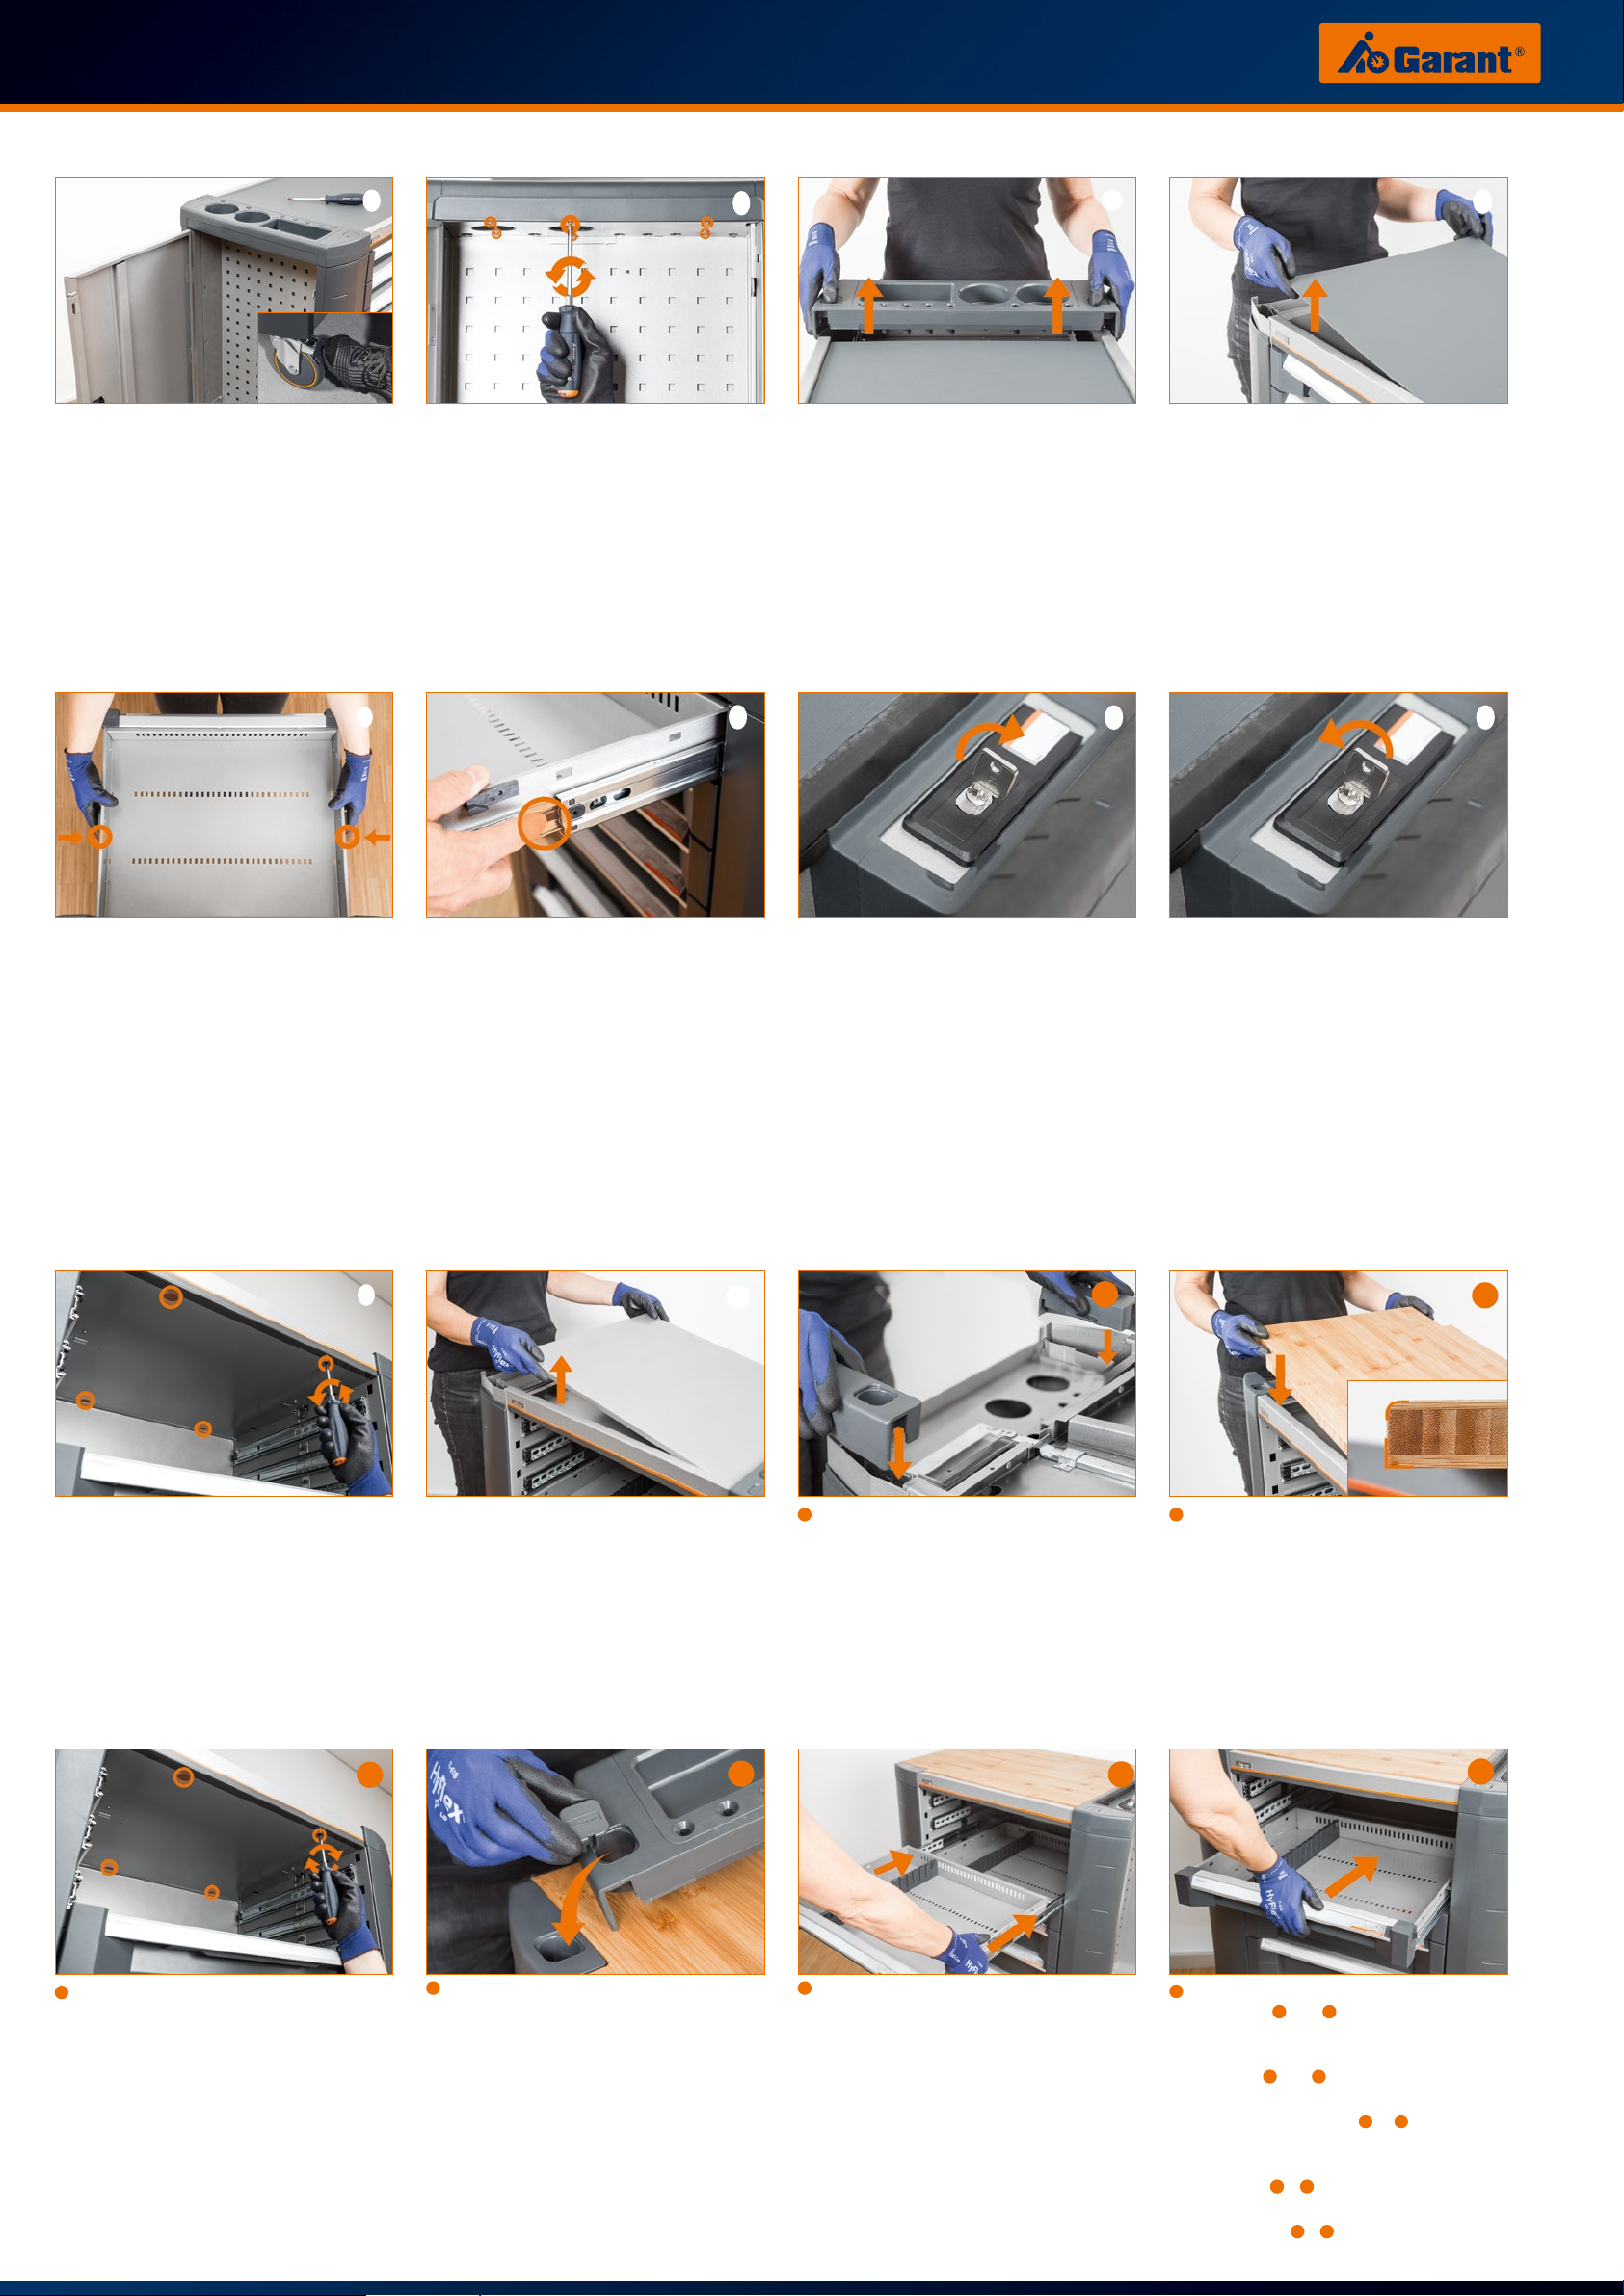
➊ DE Feststellbremse an den Lenkrollen
betätigen und Seitenfach öffnen.
EN Apply the parking brake to the castors
and open the side compartment.
FR Actionnez le frein de blocage au niveau
des roulettes directrices et ouvrez le com-
partiment latéral.
IT Azionare il dispositivo di bloccaggio delle
ruote piroettanti e aprire il vano laterale.
ES Active el freno de estacionamiento de los
rodillos de dirección y abra los bolsillos
laterales.
➋
➋ DE Sechs Schrauben unter der Kunststoff-
abdeckung herausdrehen.
EN Unscrew six screws under the plastic
cover.
FR Desserrez les six vis sous le couvercle
en plastique.
IT Svitare sei viti sotto la copertura in
plastica.
ES Destornille seis tornillos debajo de la
cubierta plástica.
➌
➌ DE Kunststoffabdeckung entfernen.
EN Remove the plastic cover.
FR Retirez le couvercle en plastique.
IT Rimuovere la copertura in plastica.
ES Extraiga la cubierta plástica.
➍
➍ DE X-ABS-Ablage entfernen.
EN Remove the X-ABS tray.
FR Retirez la tablette en X-ABS.
IT Rimuovere il ripiano in X-ABS.
ES Extraiga la bandeja X-ABS.
➎
➎ DE Oberste Schublade herausziehen.
EN Pull out the uppermost drawer.
FR Retirez le tiroir supérieur.
IT Estrarre il cassetto più alto.
ES Saque el cajón superior.
➏
➏ DE Schublade entriegeln.
EN Release the drawer.
FR Déverrouillez le tiroir.
IT Sbloccare il cassetto.
ES Desbloquee el cajón.
➐
➐ DE Werkstattwagen sperren.
EN Lock the roller cabinet.
FR Verrouillez la servante d‘atelier.
IT Bloccare il carrello portautensili
per officina.
ES Bloquee el carro de taller.
➑
➑ DE Werkstattwagen entsperren, Schublade
entnehmen. Schritt ➎ bis ➑ bei zwei
weiteren Schubladen wiederholen.
EN Unlock the roller cabinet, remove the
drawer. Repeat steps ➎ to ➑ for two
further drawers.
FR Déverrouillez la servante d‘atelier,
retirez le tiroir. Répétez les étapes ➎ à➑
pour les deux autres tiroirs.
IT Sbloccare il carrello portautensili per offici-
na, rimuovere il cassetto. Ripetere le fasi da
➎ a➑ per altri due cassetti.
ES Desbloquee el carro de taller, extraiga el
cajón. Repita los pasos ➎ a➑ con los dos
cajones restantes.
➒
➒ DE Vier Schrauben im Inneren des
Werkstattwagens herausdrehen.
EN Unscrew four screws from the inside
of the roller cabinet.
FR Desserrez les quatre vis à l‘intérieur
de la servante d‘atelier.
IT Svitare quattro viti all‘interno del
carrello portautensili per officina.
ES Destornille cuatro tornillos
del interior del carro de taller.
➓
➓ DE Metallplatte entfernen.
EN Remove the metal plate.
FR Retirez la plaque métallique.
IT Rimuovere l‘inserto metallico.
ES Extraiga la placa metálica.
11
11 DE Kunststoffkappen auf beiden Seiten
einsetzen.
EN Insert plastic caps into both sides.
FR Placez les capuchons en plastique
des deux côtés.
IT Inserire i puntali in plastica su
entrambi i lati.
ES Coloque las tapas de plástico en
ambos lados.
12
12 DE Abgerundete Kante nach oben ausrichten,
Bambus-Arbeitsplatte einsetzen.
EN With the rounded edge facing upwards,
insert the bamboo worktop.
FR Positionnez le bord arrondi vers le haut, met-
tez en place le plan de travail en bambou.
IT Allineare il bordo arrotondato verso l‘alto,
inserire il piano di lavoro in bambù.
ES Oriente los cantos redondeados hacia arriba
y coloque el puesto de trabajo de bambú.
13
13 DE Entnommene Schrauben aus Schritt ➒
wieder eindrehen.
EN Take the screws that were removed
in step ➒ and reinsert them.
FR Resserrez les vis ôtées à l‘étape ➒.
IT Avvitare le viti tolte nella fase ➒.
ES Vuelva a atornillar los tornillos
extraídos en el paso ➒.
14
14 DE Abdeckkappen aus Kunststoffabdeckung
entfernen und in Kunststoffkappen einset-
zen.
EN Remove the cover caps from the plastic
cover and insert them into the plastic caps.
FR Retirez les capuchons du couvercle en
plastique et insérez-les dans les capuchons
en plastique.
IT Rimuovere i cappucci dalla copertura in
plastica e inserirle nei puntali in plastica.
ES Extraiga las tapas de la cubierta plástica y
colóquelas en las tapas de plástico.
15
15 DE Schublade wieder einsetzen.
EN Reinsert the drawer.
FR Remettez le tiroir en place.
IT Reinserire il cassetto.
ES Vuelva a insertar el cajón.
16
16 DE Schublade mit Schwung einfahren.
Schritt 15 und 16 mit restlichen Schubladen
wiederholen.
EN Push the drawer home firmly. Repeat
steps 15 and 16 for the other drawers.
FR Faites glisser le tiroir pour le remboîter.
Répétez les étapes 15 et 16 pour les autres
tiroirs.
IT Far avanzare il cassetto con forza. Ripetere
la fase 15 e16 per gli altri cassetti.
ES Introduzca el cajón con un impulso. Repita
los pasos 15 y16 en el resto de cajones.

This manual suits for next models

1

Popular Indoor Furnishing manuals by other brands

Costway HW66508 user manual

Costway

Costway HW66508 user manual

Oeseder Möbelindustrie 991 960 Assembly instructions

Oeseder Möbelindustrie

Oeseder Möbelindustrie 991 960 Assembly instructions

mingitav illia Assembly instructions

mingitav

mingitav illia Assembly instructions

LDI Spaces SAFCO 6689 Assembly instructions

LDI Spaces

LDI Spaces SAFCO 6689 Assembly instructions

PATIO TIME DB133S instruction manual

PATIO TIME

PATIO TIME DB133S instruction manual

Naterial ORION GAMMA II 2022R09P01-0050 Assemby - Use - Maintenance Manual

Naterial

Naterial ORION GAMMA II 2022R09P01-0050 Assemby - Use - Maintenance Manual

Wilding Wallbeds Brittany Installation booklet

Wilding Wallbeds

Wilding Wallbeds Brittany Installation booklet

Spectrum Industries 22860 Assembly instructions

Spectrum Industries

Spectrum Industries 22860 Assembly instructions

Bechara RACK RECIFE Assembly instructions

Bechara

Bechara RACK RECIFE Assembly instructions

EXPEDO ONESIA RTV Assembly instruction

EXPEDO

EXPEDO ONESIA RTV Assembly instruction

moll Easy Assembly instructions

moll

moll Easy Assembly instructions

Asko VITA 2 U-FORM Assembly instructions

Asko

Asko VITA 2 U-FORM Assembly instructions

Next MALVERN DOVE 669363 Assembly instructions

Next

Next MALVERN DOVE 669363 Assembly instructions

Manhattan Comfort BE 42-06 Assembly instructions

Manhattan Comfort

Manhattan Comfort BE 42-06 Assembly instructions

Costway HW57048 user manual

Costway

Costway HW57048 user manual

SweetGo MONICA Assembly instructions

SweetGo

SweetGo MONICA Assembly instructions

Next ISABELLA 938182 Assembly instructions

Next

Next ISABELLA 938182 Assembly instructions

Habitat Trio 908656 quick start guide

Habitat

Habitat Trio 908656 quick start guide

manuals.online logo
manuals.online logoBrands
  • About & Mission
  • Contact us
  • Privacy Policy
  • Terms and Conditions

Copyright 2025 Manuals.Online. All Rights Reserved.