hogar AF-001 User manual

3.5L Digital Air Fryer
3.5 升電子空氣炸鍋
Model / 型號 : AF-001
220-240V ~50/60Hz,
1300W
Instruction Manual
說明書

SAFETY INSTRUCTIONS - General
• Please read these instructions carefully and retain them for
future reference.
• Use this appliance solely in accordance with these instructions.
• This appliance is not intended for use by persons (including
children) with reduced physical,
sensory or mental capabilities, or lack of experience and
knowledge, unless they have been given
supervision or instruction concerning use of the appliance by a
person responsible for their safety.
• Children should be supervised to ensure that they do not play
with the appliance.
• Cleaning and maintenance must not be done by children,
except if they are older than 8 years
and supervised.
• Keep the appliance and the cable out of reach of children under
8 years.
• Have any repairs carried out solely by a qualied electrician.
Never try to repair the appliance yourself.
The device is not suitable to be installed in an area that can be
used where water spray.
Do not clean the device by spraying water.
In the event of any malfunction or damage in one of the parts.
Do not repair the device by
yourself, please visit the nearest Certied service center or
specialized experts.
The appliances are not intended to be operated by means of an
external timer or separate
remote-control system.
This appliance is intended to be used in household and similar
applications such as:– staff
kitchen areas in shops, ofces and other working environments;
– farm houses;
– by clients in hotels, motels and other residential type
Page 2

Page 3
environments;
– bed and breakfast type environments.
This appliance can be used by children aged from 8 years and
above and persons with
reduced physical, sensory or mental capabilities or lack of
experience and knowledge if they have
been given supervision or instruction concerning use of the
appliance in a safe way and
understand the hazards involved. Children shall not play with
the appliance. Cleaning and user
maintenance shall not be made by children unless they are older
than 8 and supervised.
16- Keep the appliance and its cord out of reach of children less
than 8 years.
SAFETY INSTRUCTIONS - Electricity
and heat
• Verify that the mains voltage is the same as that indicated on
the type plate on the appliance before use.
• Make sure that you always use an grounded wall socket to
connect the appliance.
• Always remove the plug from the socket when the appliance is
not in use.
• Make sure that the appliance, the power cord and plug do not
make contact with water.
• Remove the plug from the wall socket by pulling the plug, not
the power cord.
• Check the appliance’s power cord regularly to make sure it is
not damaged.
Do not use the appliance if the power cord is damaged. Have a
damaged power cord
replaced by a qualied repair service.

• When using an extension lead always make sure that the entire
cable is unwound from the reel.
• Use solely approved extension leads.
• Certain parts of the appliance may get hot. Do not touch these
parts to prevent burning yourself.
• The appliance needs space to allow heat to escape, thereby
preventing the risk of re. Make
sure that the appliance has sufcient space around it, and does
not come in contact with
ammable material. The appliance must not be covered. Make
sure the air vents are not covered or blocked.
• Never use the appliance in the vicinity of ammable materials.
• Make sure that the appliance, the power cord or the plug do not
make contact with hot
surfaces, such as a hot hob or naked ame.
SAFETY INSTRUCTIONS - Use
• Never use the appliance outdoors.
• Never use the appliance in humid rooms.
• Place the appliance on a stable, flat, heat-resistant surface
where it can’t fall.
• Do not let the power cord hang over the edge of the draining
board, worktop or table.
• Make sure that your hands are dry when you touch the
appliance, the power cord or the plug.
• Do not pick up the appliance if it falls into water. Remove the
plug from the wall socket
immediately. Do not use the appliance any more.
• Switch off the appliance and remove the plug from the wall
socket in the event of a
malfunction during use, and before cleaning the appliance, tting
or removing an accessory, or
storing the appliance after use.
• Never leave the appliance unattended when in use.
Page 4

Page 5
• Never immerse the housing, the power cord or the plug in water
or other liquids.
• Make sure that the appliance has sufcient ventilation whilst in
use.
• Never move the appliance when it is switched on or is still hot.
Switch off the appliance and
wait until it has cooled down before moving it.
• Do not put too much food in the frying basket at one time.
• Thoroughly clean the exterior of the appliance after use.
• This appliance may not be used through an external timer or by
means of a remote control.
• Do not ll the appliance with food during pre-heating.
OPERATION - General
This appliance is only intended for domestic use, not for
professional use.
1、Bakin Plate
2、Handle
3、Frying Pot
4、Air Outlet
5、Cavity
6、Control Panel

Page 6
Control panel
Touch sensitive control buttons(Can be operating) 1 → 5:
1.Start/stop button
2.Temperature and time setting button
3.Preset menu selection button
4.temperature/time decrease button
5.temperature/time increase button
Indicator Icons(Can not be operating) ① → ⑥:
①:Temperature selection icon(when it light up, means now
enter the temperature adjustment)
②:Time selection icon(when it light up, means now enter the
temperature adjustment)
③:Temperature and time display (Alternately indicate the
temperature / time)
④: Fahrenheit degree icon(when it light up, means now the
temperature displayed is in fahrenheit degree)

Page 7
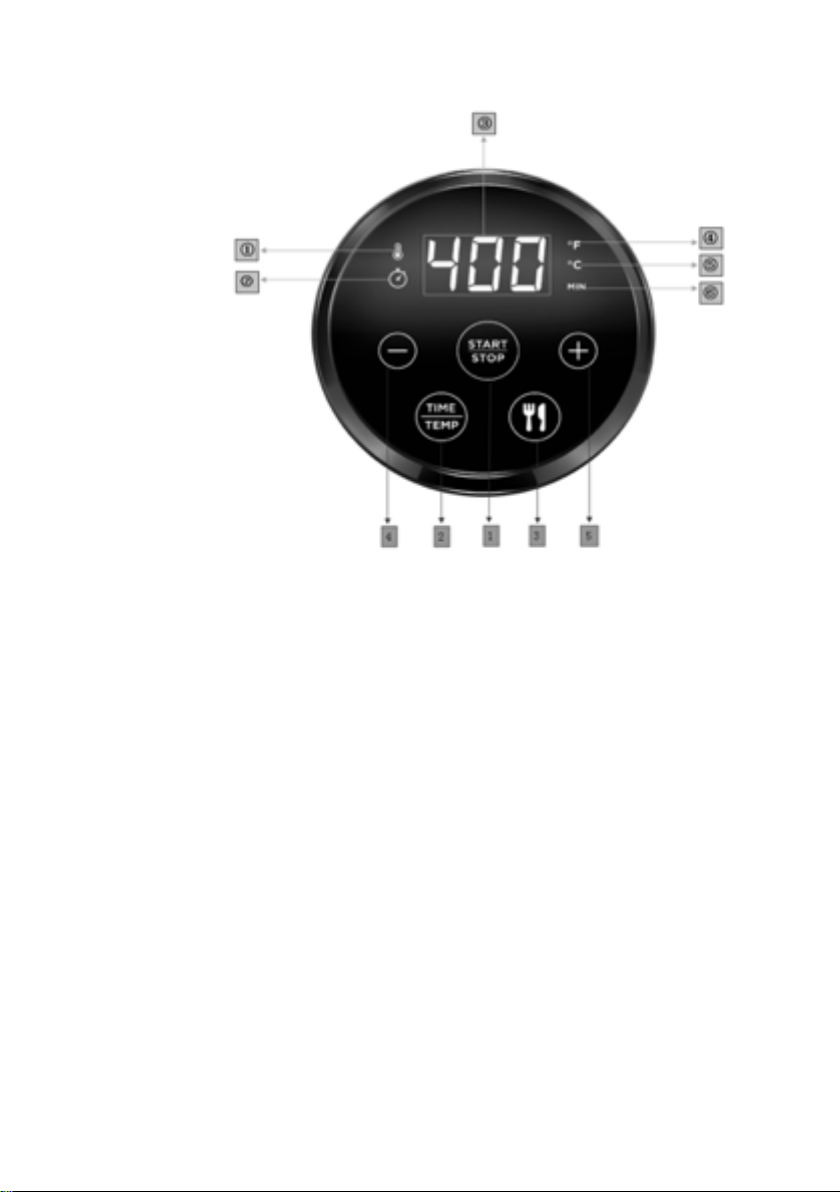
⑤:Degree centigrade icon(when it light up, means now the
temperature displayed is in Degree centigrade)
⑥:Time icon (when it light up, means now the the number
displayed is the remaining cooking time)
Using the appliance
The air fryer can be used to prepare a large range of ingredients.
The recipe booklet included serves as a guide to using the
appliance better.
Part 1
1- Carefully pull the pot out of the fryer horizontally, and put
the ingredients into the basket.
Note: Never fill the basket exceed the amount indicated in the
table, as this could affect the quality of the end result.
2- Slide the pot back into the fryer.
Never use the pot without the basket in it.
Warning: Do not touch the pot during and some time after use, as
it gets very hot. Only hold the pot by the handle.
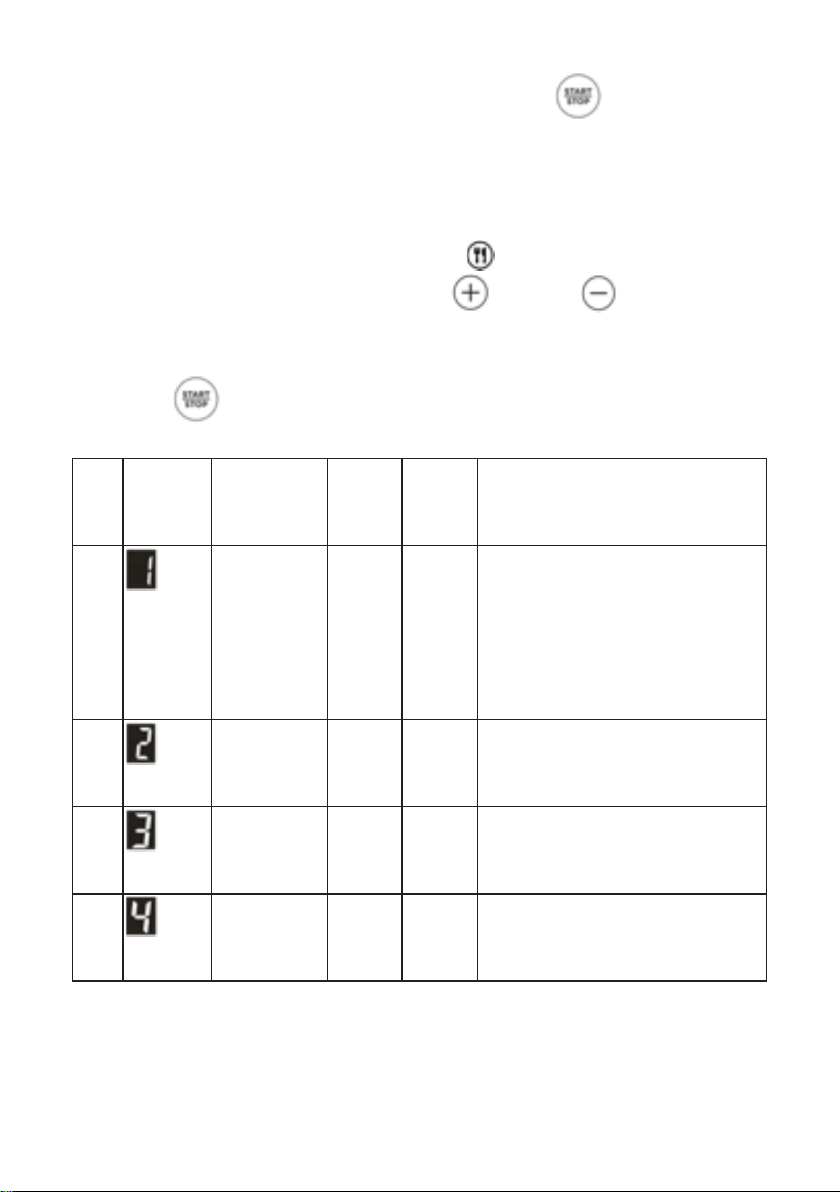
3- Standby mode: connect the mains plug to an earthed wall
socket, then hear chord ringtone notice, the display will show
nothing, the light of button 1 “ ” will light on in white color. After
nish cooking or without any operation for 1min, the fryer will turn
to standby mode automatically.
4- Unlock: press button 1“ ” to unlock, then display will
light on and show “400 ℉”or“10Min” circularly every 5 seconds.(all
buttons can not be operated before the item was unlocked)
5- Temperature type switching: Press button 2 “ ” for 5
seconds, to switch the temperature type from “ ℉”to“℃” and with
have 1 second ring, temperature display will also change from
“400 ℉” to “200℃”
6- Temperature setting: Press button 2 “ ” enter the
temperature setting(when icon ①light up), and use button

Page 8
5“ ” or 4 “ ” to increase or decrease the temperature,
temperature“±10 ℃”or “±25 ℉” with every press or long press
to the wanted temperature. *Max: 200 ℃/400 ℉, Min:
90℃/200 ℉.
7- Time setting: press button 2 “ ” again to enter the
cooking time setting(when icon ② light up), and use button
5“ ” or 4 “ ” to adjust the working time from 10min, time will
“±1min” with every press or long press to the wanted time. *Max:
59min, Min: 1min.
8- Start cooking:
1) After unlock the item, press button 1 “ ” to start
working directly without any other setting, the light under button
1“ ” will change from white to red, all other buttons will off
light, press button 1 “ ” again to suspend working.
2) After unlock the item and nish setting of temperature and
time, press button 1 “ ” to start cooking, the light under button
1“ ” will change from white to red, light of all other buttons will
be white, press button 1 “ ” again to suspend working.
3) Pull out the frying pot during working, the item will stop
working with display turned off, once the frying pot was inserted
back, the item will continue working with a ring.
4) During working, press button 1“ ” for 5 seconds to
enter into standby mode, press button 1“ ” for 5 seconds
again to unlock.
9- Finish cooking: when cooking time out, can hear chord
ringtone notice, the item will stop heating, then turn to standby

Page 9
mode automatically, and the light of button 1 “ ” will light on in
white color.
10- Memory function: Pull out the frying pot or unplug the item
during working, display will be off, when the frying pot is inserted
back or the item is plug in again, the item will continue working
11- Pre-set menu: press button 3 “ ” to enter pre-set cooking
menus selection, and use button 5“ ” or 4 “ ” to select the
pre-set cooking program from the total 10 programs, the number
of selected program icon will be on the display, press down the
button 1“ ” to start the selected cooking program.
No. No.
on
display
Program Temp.
(℃)
Time
(Min)
Remark
1Fresh
Fries
200 30 Need to shake twice
during cooking:
1. at time remaining 15
mins
2. at time remaining 5
mins
2Frozen
Fries
200 20 Need to shake during
cooking:
at time remaining 11 mins
3 Steak 180 15 Need to turn over during
cooking:
at time remaining 7 mins
4 Drumstick 180 22 Need to turn over during
cooking:
at time remaining 6 mins

Page 10
5 Shrimp 180 10 Need to turn over during
cooking:
at time remaining 4 mins
6 Meat 180 25 Need to turn over during
cooking:
at time remaining 8 mins
7 Fish 200 12 Need to turn over during
cooking:
at time remaining 4 mins
8 Pizza 200 15 /
9 Cup Cake 180 15 /
10 Nuggets 190 12 Need to shake during
cooking:
at time remaining 5 mins
12- Always to use Pre-Heat function when the appliance is
cold, or you can use Fast Cooking for 3~4 minutes..
13- Some ingredients require shaking halfway through the
preparation time. To shake or turn over the ingredients, pull the
pot out of the appliance by the handle and shake it or turn over
the ingredients by fork (or tongs). Then put the pot back into the
fryer.
Caution: Do not press the basket release button during shaking
or turn over the ingredients.
14- After nishing cooking, pull the pot out of the appliance and
place it on a heat-resistant surface. And check if the ingredients
are ready. If the ingredients are not ready yet, simply slide the pot
back into the appliance and set the timer to a few extra minutes.
15- To remove the ingredients, press the basket release
button and lift the basket out of the pot. The frying basket and the
ingredients are hot. You can use a fork (or tongs) to take out the

Page 11
ingredients. To remove large or fragile ingredients, use a pair of
tongs to lift the ingredients out of the basket. Empty the basket
into a bowl or onto a plate.
OPERATION - Use
This multi-function appliance can not only be used as a air fryer
but as an oven as well, so with its
simple settings you can easily and endlessly vary. The baking
time for oven dishes is often much
shorter as well, and pre-heating only takes two to three minutes.
1. Place the hot appliance on a stable, horizontal, at surface.
2. Pull the cooking pot by the grip from the appliance and place it
on a stable, horizontal, at
surface.
3. Put the foods into the frying pan and enter it into the cooking
pot until you hear a click.
Never ll the frying basket overload.
4. Enter the cooking pot with the frying basket into the appliance
until you hear a click.
5. Set the desired time and temperature. See “Program settings”.
• It’s recommended to pre-heat the appliance for three minutes
without any foods if
the appliance is still cold.
• It is recommended to occasionally take out the cooking pot
and shake the food
around a bit to make sure it’s being properly browned on all
sides.The timer will not stop
running if you do this but the heating element will pause until the
cooking pot has been entered
into the appliance again.
• Do not touch the cooking pot and frying basket, they can
become very hot. Take
precautions against burns.

Use a coaster or something similar when taking out the cooking
pot.
6. When the air fryer is done you will hear a beep. The appliance
will stop heating. Pull the
cooking pot from the appliance by the grip and place it on a
stable, horizontal, at surface.
• Do not press the release button when taking the cooking pot
from the appliance.
• Do not touch the cooking pot and frying basket, they can
become very hot. Take
precautions against burns.
Use a coaster or something similar when taking out the cooking
pot.
7. Place the foods on a dish or plate.
8. Switch off the device if you do not plan on using it. Press (4)
and take the plug out of the
socket. If you do nothing, the air fryer will switch to its standby
mode after 5 minute.
Recommended Settings
The table below helps you to select the basic settings for the
ingredients you want to prepare.
Note: Please keep in mind that these settings are indications only
as ingredients differ in origin,
size, shape, freshness as well as brand, we cannot guarantee
that these are the best settings for
your ingredients
Page 12

Type Min to
Max(g)
Time
(min)
Temp
(℃)
Remark
Frozen
chips
100-500 9-20 200 Shake
Home-made
chips
100-500 12-20 200 Add 1/2 spoon of oil.
Shake
Chicken
Nuggets
100-400 10-15 200
Chicken
Fillet
100-350 18-24 200 Turn over if needed
Drumsticks 100-400 18-24 180 Turn over if needed
Steak 100-400 8-12 180 Turn over if needed
Hamburger 100-400 7-14 180 Add 1/2 spoon of oil
Frozen sh
ngers
100-300 10-14 200 Add 1/2 spoon of oil
Breadcrumb
Cheese
Snacks
100-400 7-14 180 Add 1/2 spoon of oil
Cup Cake 4 units 13-15 180
Because the rapid hot air technology instantly reheats the air
inside the appliance, pulling the
cooking pot briey out of the appliance during hot air frying barely
disturbs the process.
NOTE: Use the Preheat Function before cooking or add 3
minutes to the cooking time if the
appliance is cold.
NOTE: Please be aware that whilst the air fryer can cook foods
with a high fat content (such as
sausages) these will tend to produce a significant amount of
smoke particularly when using a high temperature setting. This
will not harm the air fryer or affect the nal result of the food.
Page 13

CLEANING AND MAINTENANCE
Clean the appliance and its loose parts thoroughly after each
use.
1. Press (4) and take the plug out of the socket.
2. Let the appliance cool down.
3. Take the cooking pot from the appliance.
4.Grasp the frying pan handle with your hands and take it out.
5. Remove remaining food parts by wiping them off with
absorbent paper towels.
6. Clean the cooking pot and frying basket thoroughly with hot
water, dish-washing soap and a
non-grating sponge.
The cooking pot and frying pan can also be cleaned in a dish-
washing machine. Dry them off
thoroughly after cleaning.
7. Clean the housing with a moist towel, if need be with some
dish-washing soap added to it.
Dry it off thoroughly after cleaning.
8. Reassemble the parts.
9. Store the appliance in a dry place.
• Verify that the appliance is not connected to the power supply
before you clean it.
• Never use corrosive or scouring cleaning agents or sharp
objects (such as knives or
hard brushes) to clean the appliance.
• Never immerse the heating element unit in water or another
liquid and never place it
under owing water.
Page 14

THE ENVIRONMENT
• Dispose of packaging material, such as plastic and boxes, in the
appropriate waste containers.
• When this product reaches the end of its useful life do not
dispose of it by putting it in a dustbin; hand it in at a collection
point for the reuse of electrical and electronic equipment. Please
refer to the symbols on the product, the user’s instructions or the
packing.
• The materials can be re-used as indicated. Your help in the re-
use, recycling or other means of making use of old electrical
equipment will make an important contribution to the protection of
the environment.
• This marking indicates that this product should not be disposed
with other household wastes.
To prevent possible harm to the environment or human health
from uncontrolled waste disposal, recycle it responsibly to
promote the sustainable reuse of material resources. To return
your used device, please use the return and collection systems or
contact the retailer where the product was purchased. They can
take this product fro the environmental safe recycling.
Page 15

Page 16
Guarantee list
The warranty card (service card) prove that the product is one of
our Company’s qualied products.
1. For warranty period, buyer has the products protection (free
repair) from the date of purchasing.
2. During warranty, the product can only get repaired in the
designated place. When getting repair, the buyer should show
this warranty card and the document of purchasing time.
These two tips should be pay high attention:
a. There will be no replacement for this warranty card, please
keep it well.
b. This warranty card only for Hong Kong.
From the date of purchasing, the whole machine has one year
warranty for the problem during daily common using.
Any one of these situations, even during warranty time, we
provide reparation with cost
1. Purchased one year ago
2. Without warranty card and the document of purchasing time
3. Problem caused by act of God, like re, earth quake, typhoon ,
ood, war, or other external factors
4. Scars, stains and other appearance damage during using
5. The problem caused by rebuilt, dismantle or repair the product
by yourself
6. LED light, battery and other consumables, the damage of
accessories
7. The problems exist because of outside using, not using at
home, like commercial activities.

Page 17

圖示說明
1. 烤板
2. 炸籃把手
3. 炸籃
4. 外出風口
5. 內腔
6. 觸摸控制面板
注意
在使用本機前請先認真閱讀產品使用說明書,並妥善保存以備日後
查閱。
危險
1,切勿將外殼浸入水中或在水龍頭下沖洗,因為外殼中有電子元
件和加熱元件。
2,切勿讓水或其他液體進入該產品,以免發生電擊。
3,始終將食材放在炸籃中煎炸,以免接觸到加熱元件。
4,產品正在工作時,不要蓋住其進風口和出風口。
5,切勿在炸鍋中倒油,這樣將導致火災發生的危險。
6,切勿在產品工作時觸碰它的內部。
警告
1,本產品不適合由 8 歲或以上的兒童以及肢體不健全,感覺或精
神上有障礙或缺乏相關經驗和知識的人使用,除非有人已指導他們
Page 18

Page 19
如何安全使用本產品,監督他們掌握安全使用方法。
2,在將產品連接電源之前,請先檢查產品所標電壓與當的地電源
電壓是否相符。
3,如果插頭,電源線或產品本身損壞,請勿使用本產品。
4,如果電源軟線損壞,為了避免危險,必須由製造商,其維修部
或類似部門的專業人員來更換。
5,應照看好兒童,確保他們不玩耍本產品。
6,當產品已通過或正在冷卻時,應將產品及其電源線插入 8 歲以
下兒童觸及不到的地方。
7,不要讓電源線接觸到高溫表面。
8,切勿用浸濕的手插入產品插頭或操作控制面板。
9,產品必須插入有接地的插座,並且必須確保其已正確插入。
10,器具不能在外接定時器或獨立的遙控控制系統的方式下運行。
11,切勿將產品放置在諸如桌布,窗簾等易燃材料的上面或附近。
12,切勿將產品靠牆或靠其他產品擺放。產品的後面,上下中上
方應至少留出 10 厘米的自由空間。切勿在產品上方放置物品。
13,請勿將本產品用於本手冊中說明以外的任何其他用途。
14,產品使用時必須有人看管。
15,在利用熱空氣煎炸期間,會從出風口釋放出高溫蒸汽。手部
和臉部應與蒸汽和出風口保持安全距離。並且在將炸鍋從產品上挪
開時也要注意高溫蒸汽和熱氣。
16,使用產品時,其可接觸的表面可能會變得很熱。
17,如果產品冒出黑煙,立即拔掉電源。等待產品停止冒煙後再
將炸鍋從產品上挪開。
首次使用之前
1,除去所有包裝材料。
2,去除產品上的不干膠或標籤。
3,用熱水,洗滌濟和非研磨性海綿徹底清潔炸籃和炸鍋。
注意:也可以用洗碗機清洗這些部件。
4,用濕布擦拭產品的內部和外部。
該款無糖炸鍋採用熱空氣加熱。切勿在炸鍋中倒油或油脂。
使用準備

Page 20
1,將本產品放在穩固,水平且對準的表面上。切勿將產品放在不
耐熱的表面上。
2,將炸籃正確的放置在炸鍋中。
3,切勿在炸鍋中倒入油或其他液體。切勿在產品上方放置物品。
這會阻隔氣流並影響熱空氣加熱的效果。
4
數控電子觸屏
觸摸按鍵(可觸控操作)編號 1 → 5:
1: - 開關按鍵(長按 3 秒解鎖,一旦一次停止工作至待機鎖
定狀態)
2: - 溫控 / 時間調節切換按鍵
3: - 菜單 / 快捷功能調節切換按鍵
4: - 溫度 / 時間遞減按鍵;菜單 / 快捷功能選擇按鍵
Table of contents