HOLDEN JH CRUZE Series ll User manual

holden.com.au
JH Cruze Series ll
Infotainment System Handbook
JH CRUZE Series ll
MY12_JH Cruze_Nav_Cover PMS273C.pdf 1 6/09/2011 9:58:04 AM

GM Holden Ltd, ABN 84 006 893 232 (hereinafter Holden)
Change of name, address or ownership
In the event of a Safety Recall, or for various reasons,
Holden may need to contact you as the owner of this vehicle.
If you have recently changed your address, or name, or purchased this
vehicle second-hand, please help us to help you by taking a few minutes
to ll in and mail the forms at the beginning of the Service/warranty booklet.
For information about GM Holden’s privacy policy or to update owner
details online, please visit Holden’s website at www.holden.com.au
Note Please refer to the inside front cover of the Service/
warranty booklet for the Vehicle Identication Certicate.
Printed in Australia
Part No. 92260165
February 2012 (MY12 JH Cruze. Print 3)
© 2012 GM Holden Ltd
Reproduction in whole or part is prohibited
without written approval from GM Holden Ltd,
ABN 84 006 893 232
MY12_JH Cruze_NAV_IFC.indd 1 21/02/2012 1:23:50 PM

2012 Holden Cruze Navigation System M
Infotainment System . . . . . . 3
Introduction ................. 3
Overview . . . . . . . . . . . . . . . . . . . . . . . 3
Radio ....................... 11
AM-FM Radio . . . . . . . . . . . . . . . . . 11
Audio Players ............. 15
CD/DVD Player . . . . . . . . . . . . . . . 15
MP3 . . . . . . . . . . . . . . . . . . . . . . . . . . 21
Hard Drive Device (HDD) . . . . . 24
Auxiliary Devices . . . . . . . . . . . . . . 33
Navigation ................. 34
Using the Navigation
System . . . . . . . . . . . . . . . . . . . . . . 34
Maps . . . . . . . . . . . . . . . . . . . . . . . . . . 37
Navigation Symbols . . . . . . . . . . . 39
Destination .................... 44
Configure Menu . . . . . . . . . . . . . . . 55
Global Positioning
System (GPS) . . . . . . . . . . . . . . . 56
Vehicle Positioning . . . . . . . . . . . . 57
Problems with Route
Guidance . . . . . . . . . . . . . . . . . . . . 57
If the System Needs
Service . . . . . . . . . . . . . . . . . . . . . . 58
Map Data Updates . . . . . . . . . . . . 58
Database Coverage
Explanations . . . . . . . . . . . . . . . . . 58
Voice Recognition . . . . . . . . 59
Phone ...................... 64
Bluetooth . . . . . . . . . . . . . . . . . . . . . 64
Trademarks and Licence
Agreements .............. 74
Index ..................... i-1
®


Infotainment System 3
Introduction
GENERAL MOTORS, GM, the GM
Emblem, GM Holden LTD, and the
name Cruze are registered
trademarks of General Motors LLC.
The information in this manual
supplements the owner's handbook.
This manual describes features that
may or may not be on your specific
vehicle either because they are
options that you did not purchase or
due to changes subsequent to the
printing of this owner manual.
Please refer to the purchase
documentation relating to your
specific vehicle to confirm each of
the features found on your vehicle.
Keep this manual with the owner's
handbook in the vehicle, so it will be
there if it is needed. If the vehicle is
sold, leave this manual in the
vehicle.
Notice: When entering an
Australian Capital Territory (ACT)
address, it is necessary to enter
New South Wales (NSW) instead
of ACT as the State/Province.
Overview
Read this manual thoroughly to
become familiar with how the
navigation system operates.
All functions are available when the
vehicle is parked. Before driving:
.Become familiar with the
navigation system operation and
the buttons and knobs on the
faceplate of the navigation
system.
.Set up the audio by presetting
favourite stations, setting the
tone, and adjusting the
speakers.
.Set up the navigation features
before beginning to drive, such
as entering an address or a
preset destination.
.Set up phone numbers in
advance so they can be called
easily by pressing a single
button or a single voice
command for navigation systems
equipped with phone capability.
{WARNING
Taking your eyes off the road too
long or too often while using the
navigation system could cause a
crash and you or others could be
injured or killed. Focus your
attention on driving and limit
glances at the moving map on the
navigation screen. Use voice
guidance directions whenever
possible.

4 Infotainment System
Use the navigation system to:
.Plan a route by selecting a
destination using the various
methods and choices.
.Follow turn-by-turn instructions
and map guidance with voice
prompts, when permitted by
traffic laws, controls, and
conditions.
Always be alert and obey traffic and
road laws and instructions,
regardless of the guidance from the
navigation system. Because the
navigation system uses street map
information that does not include all
traffic restrictions or the latest road
changes, it could suggest using a
road that is now closed for
construction or a turn that is
prohibited by signs at the junction.
Because the system uses limited
information, always evaluate
whether following the system's
directions is safe and legal for the
current conditions.
When the navigation system is
turned on, a screen may appear
with information that must be read
and acknowledged before accessing
some navigation features.
After acknowledging the start-up
information, the NAV (Navigation)
and DEST (Destination) functions
are accessible. Information can now
be entered or deleted, and other
functions accessed. See
instructions later in this section.
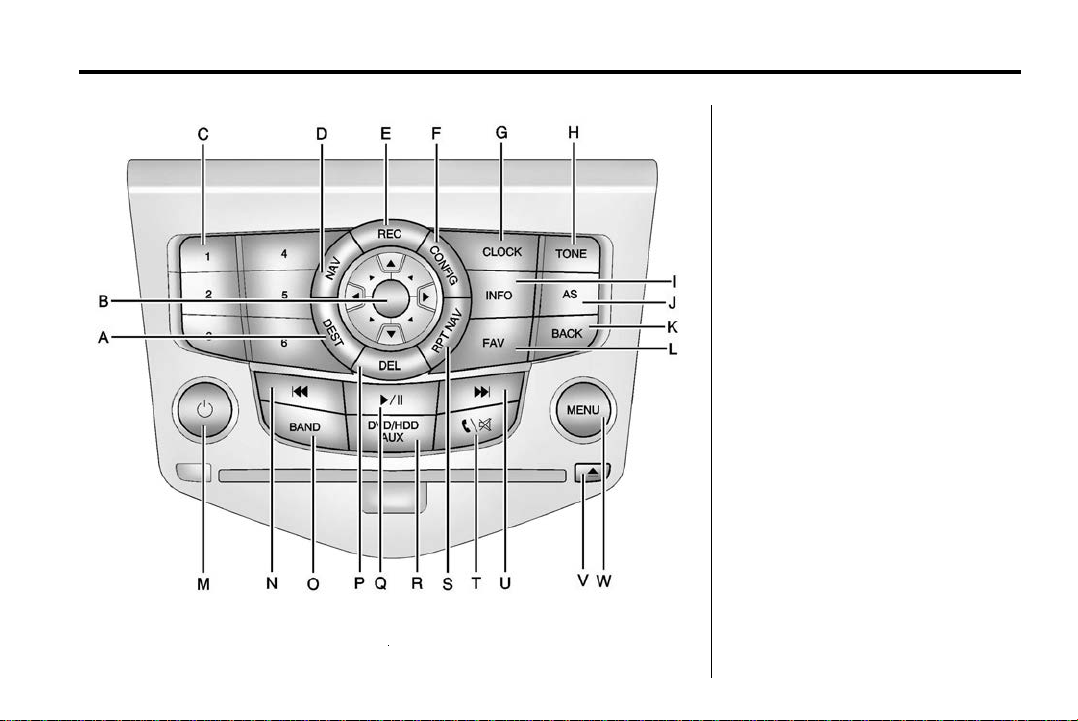
Navigation System Overview
The navigation system in the vehicle
is a touch screen system. It is
controlled by pressing the screen
display buttons, using the MENU
knob, eight-way selector arrows,
preset buttons, and other buttons on
the faceplate.
The eight-way selector arrows can
be pressed from side to side, up,
or down to navigate through many
of the menus. The MENU knob can
be turned and then pressed to
complete any of the highlighted
screen functions.
See "Navigation Control Buttons"
under Using the Navigation System
on page 34 for more information.

Infotainment System 5
A. DEST (Destination)
B. Eight-Way Selector Arrows
C. Radio Preset Buttons (1-6)
D. NAV (Navigation)
E. REC (Record)
F. CONFIG (Configuration)
G. CLOCK
H. TONE
I. INFO (Information)
J. AS (Autostore)
K. BACK
L. FAV (Favourite)
M. O(Power/Volume)
N. g(Seek/Reverse)
O. BAND (AM or FM)
P. DEL (Delete)
Q. k(Play/Pause)

6 Infotainment System
R. DVD/HDD/AUX (Source)
S. RPT NAV (Repeat Navigation)
T. 5\>(Phone/Mute)
U. l(Seek/Forward)
V. X(Eject)
W. MENU
NAV (Navigation) Menu
The Navigation menu screen
accesses the navigation system
settings.
1. Press the NAV button to view
the navigation map screen. The
map and current vehicle location
display.
2. Press the NAV button again to
change between a map/audio
split view or a full map view.

Infotainment System 7
Config Setup Menu
Press the CONFIG control button to
display the Config Menu. This menu
is used for changing audio options,
navigation display, phone, vehicle
configuration, and time features.
Turn the MENU knob to scroll
through the available setup features.
Once the desired feature displays,
press the MENU knob or press the
desired feature on the screen, to
display more options within that
feature.
Languages
The vehicle supports English.
English and Metric Unit
Conversion
To change the display units between
English and metric units, see the
vehicle owner's handbook.
Deleting Personal Information
The navigation system can record
and store destinations and personal
information such as names and
addresses.
At times, such as when selling or
disposing of your vehicle, you may
want to delete this information:
.Previous Destinations.
.Address Book, Fav Route,
Preset Destinations and HDD
music files.
Storing Radio Station Presets
Up to 36 preset stations can be
stored. AM and FM can be mixed.
To store presets:
1. Press Oto turn the system on.
2. If viewing a map screen, press
the BAND, FAV, or the source
screen button.
3. Select the band.
4. Press the Seek arrows on the
faceplate or turn and press the
MENU knob to select a station.
5. Press and hold one of the preset
buttons for more than one and a
half seconds.
6. Repeat the steps for each
preset.
To change the number of preset
pages, see AM-FM Radio on
page 11 for more information.

8 Infotainment System
Entering an Address and Point
of Interest and Storing Preset
Destinations
The vehicle must be in P (Park) for
these operations.
Entering an Address
If having trouble finding a city or a
street name:
.Enter the street name first
instead of the city name, or vice
versa.
.Enter more characters or reduce
the amount of characters to
reduce or expand the available
options.
To set a destination by entering a
street name:
1. Press the DEST button.
2. If necessary, enter the State/
Province name. The last State/
Province name is automatically
recalled.
3. Select the street name field by
using the MENU button or
touching the screen. Enter the
street name. Do not enter
directional information or street
type. Select the backspace q
screen button to delete an
incorrect character.
A list displays if four or fewer
names are available. If there are
more than four, there is a match
counter with a number of
available streets. Press the List
button to view the list and select
the street.
4. Select the city from the list or
enter the city name.
5. Enter the house number. This
field is automatically selected.
6. Press OK. The address
information screen displays the
address entered.
7. Press Start if correct. The route
will calculate.
8. Select the route preference for
Fastest, Shortest, or Easiest.
The chosen route preference
highlights.
9. Press the Start screen button.
The route is now ready to be
started.
See "Address Entry" under
Destination on page 44 for more
information.
Entering a Point of Interest (POI)
To set a destination by entering a
Point of Interest (POI):
1. Press Oto turn the system on.
2. A Caution could appear. Press
OK to proceed.
3. Press the DEST button.
4. Press the Points of Interest
screen button.

Infotainment System 9
5. Enter the specific title of the POI
in the POI name space.
If four or less names are
available, a list displays. If more
than four are available, there is a
match counter with a number in
it, representing the number of
available POI names. Press the
List button to view the list. Select
the POI.
6. The information screen displays
the POI selected.
7. Press Start if correct. The route
will calculate.
8. Select the route preference
preset for Fastest, Shortest,
or Easiest. The system
highlights the route.
9. Press the Start screen button.
The route is now ready to be
started.
See "Point of Interest (POI)" under
Destination on page 44 for more
information.
Storing Preset Destinations
1. Press Oto turn the system on.
2. A Caution could appear. Select
OK to proceed.
3. Press the DEST button.
4. Enter a destination. See
Destination on page 44 for
information on how to enter a
destination.
5. Press the Save screen button to
add the current final destination
to the address book.
The address book screen
appears.
6. Press the Edit screen button.
Select Change name using the
menu. An alpha-keyboard
displays. Enter the name.
7. Press the OK screen button to
accept.
8. Press and hold one of the preset
buttons until the text in the
button changes.
The address book entry name
appears in that preset
destination and is now available
to select from the Select
Destination screen. See "Using
the Stored Preset Destinations"
next in this section to select it as
a destination.
See Destination on page 44 for
more information on how to add
preset destinations.

10 Infotainment System
Using the Stored Preset
Destinations
These destinations are available for
selection while driving.
1. Press Oto turn the system on.
2. A Caution could appear. Press
OK to proceed.
3. Press the DEST button.
4. Select one of the available
preset destination buttons. The
system calculates the route.
5. Select the route preference for
Fastest, Shortest, or Easiest.
The system highlights the route.
6. Select the Start screen button.
The route is now ready to be
started.
See Destination on page 44 for
more information.
Cancelling Guidance
Guidance is cancelled once you
arrive at the final destination. To
cancel guidance prior to arrival at
the final destination:
1. Press the DEST button.
2. Press Cancel route guidance.
3. Press Yes to confirm
cancellation.
Voice Guidance
To adjust the volume of voice
guidance prompts:
1. Press the CONFIG button to
enter the menu options. Turn
MENU until Nav displays. Press
MENU knob to select Nav or
press the Nav screen button to
display more options within that
feature.
2. Select Voice prompt from
the list.
3. Select Voice volume.
4. Press + or - to increase or to
decrease the volume of the
voice prompts.
5. Press Back to store and exit.
Cleaning the Display
Notice: Using abrasive cleaners
when cleaning glass surfaces
could scratch the glass. Use only
a soft cloth and do not spray
cleaner directly on the system as
it could affect the mechanical
parts.
Do not apply spray cleaner directly
to the system. The cleaner could
affect the mechanical parts.
Do not wipe the panel with a hard
cloth or use a volatile liquid such as
paint thinner; it could scratch the
surface or erase the characters on
the buttons.

Infotainment System 11
Radio
AM-FM Radio
Playing the Radio
Audio Source Menu
O(Power/Volume):
.Press to turn the radio on or off.
.Turn to increase or decrease the
volume. The volume is adjusted
for the current audio source,
active navigation voice
guidance, or voice prompts.
Also, see "Radio Settings" and
"Automatic Volume Control" in this
section.
MENU: Turn the knob to change
the radio station. See "Finding a
Station" following for more
information.
BAND: Press to select the AM or
FM band.
DVD/HDD/AUX: Press this button
until the desired source is selected.
If the audio system is on and a map
screen is being viewed, a touch
sensitive source indicator tab
appears at the top of the map
screens.
Press the source indicator tab to
display the current audio source
screen. The display shows a split
screen with the audio source screen
on the left-hand side and the map or
guidance screen on the right-hand
side. Press Map view to exit the
split view screen.

12 Infotainment System
Sound Menu
To access the Sound Menu, press
the TONE button.
Use the Sound Menu to adjust the
following features:
.Setting the Tone
.Adjusting the Speakers
Setting the Tone
Scroll through the settings by
repeatedly pressing the TONE
button.
To adjust the tone using the
sound menu:
.Treble: Press + or - to change
the level.
.Middle (Midrange): Press +
or - to change the level.
.Bass: Press + or - to change the
level.
Adjusting the Speakers
To adjust the speaker balance using
the Sound menu:
.Press and hold the left arrow for
more sound from the left
speakers or the right arrow for
more sound from the right
speakers. The middle position
balances the sound between the
left and right speakers.
To adjust the speaker fade:
.Press and hold the front arrow
for more sound from the front
speakers and the rear arrow for
more sound from the rear
speakers. The middle position
balances the sound between the
front and rear speakers.
EQ Settings
EQ (Equalisation): The EQ
settings are selected through the
Sound Menu. EQ provides a choice
of Manual, Talk, Country, Pop, Rock,
or Classical settings.

Infotainment System 13
Radio Settings
To access the Radio settings menu:
.Press the CONFIG button.
.Turn the MENU knob until Radio
displays. Press the MENU knob
to select Radio or press the
Radio screen button to display
more options within that feature.
Audio system settings or features
can be customised for:
Speed Dependent Volume
Select Off, Low, Medium, or High
sensitivity to automatically adjust
the volume to minimise the effects
of unwanted background noise that
can result from changing road
surfaces, driving speeds or open
windows. This feature works best at
lower volume settings where
background noise is typically louder
than the sound system volume.
Number of Radio Favourite Pages
Change the number of mixed-band
preset pages when using FAV.
Press to select the number of preset
lists.
HDD FAV Modes (Number of
Favourite Categories for HDD
Favourite Mode)
Selects the categories such as
Playlist, Artist, Album, and Genre to
be used as a favourite category
during HDD mode.
DivX® VOD
The DivX® VOD feature must be
registered before it can be used.
1. Press the DivX® VOD screen
button to display the DivX®
Video on Demand menu.
2. Press the Registration Code
screen button to display the
Registration Code information
display.
3. Press the Deactivation option to
unregister this device.

14 Infotainment System
Finding a Station
Select a band such as AM or FM.
Turn the MENU knob to find a radio
station. To select a preset station,
press the corresponding preset
button.
See "Mixed-Band Presets" following
for more information.
Seeking a Station
Press lor gto search for a
station.
Local Station List Search
To find a list of local stations in the
current band AM or FM band, press
MENU. The radio performs a search
for available stations.
Mixed-Band Presets
Up to 36 preset stations can be
stored. Each page can store six
preset stations. The presets within a
page can be from different radio
bands.
To scroll through the pages, press
the FAV (favourites) button. The
current page number displays above
the preset buttons. The stored
stations for each list display on the
touch-sensitive preset buttons at the
bottom of the screen. The number of
preset FAV lists can be changed.
To store a radio station to a
mixed-band preset list:
1. Press the BAND button until the
desired band is selected.
2. Turn the MENU knob to the
station.
3. Press the FAV button to scroll
the list.
4. Press and hold one of the preset
buttons for more than
two seconds. The station
frequency appears on the preset
button at the bottom of the
display.
5. Repeat the steps for each preset
in each page.
To recall a preset station from a
FAV page:
1. Press the FAV button to scroll to
the page.
2. Press the preset button. The
stored preset station is recalled.
Autostore
The strongest stations in a radio
band can be searched and
automatically stored through the
Automatic Store feature. Press and
hold the AS button until an
autostore message displays. The
12 stations with the strongest signal
strength in the current radio band
will be stored.

Infotainment System 15
Timeshift
The timeshift feature automatically
begins recording the audio when
listening to the radio.
The recording allows playback of
content that was missed.
Timeshift stores up to 20 minutes of
content. After 20 minutes, it
removes the oldest content and
continues recording new content.
While listening to the radio, press
the kbutton to stop hearing the
information through the speaker.
During this paused time, timeshift
keeps recording. A status bar
displays the length of the recording.
To resume listening to the broadcast
at the point left off, press the
kbutton again.
Timeshift stops recording and
erases the buffer when the vehicle
is turned off or the station or source
is changed.
Before turning the vehicle off, press
the kbutton to keep timeshift
recording for 20 minutes. If the
vehicle is still off after 20 minutes,
the system stops recording and all
information is lost. If a low battery
condition occurs, timeshift stops
recording and all information is
erased.
Press BAND to return to a live radio
broadcast.
Audio Players
CD/DVD Player
The player can be used for CD,
MP3 and DVD audio and as a DVD
video player.
With the ignition on, insert a CD/
DVD into the slot, label side up. The
player pulls it in and begins playing.
While playing, the navigation
system is available.
The vehicle must be in P (Park) for
video to display.
The DVD player is only compatible
with DVDs of the appropriate region
code that is printed on the jacket of
most DVDs.

16 Infotainment System
The system is capable of playing:
.Most audio CDs
.CD-R
.CD-RW
.MP3 or unprotected WMA
formats
.DVD-Video
.DVD-Audio
.DVD-R/RW
.DVD+R/RW
When playing any compatible
recordable disc, the sound quality
can be reduced due to disc quality,
the method of recording, the quality
of the music or video that has been
recorded, or the way the disc has
been handled.
There can be increased skipping,
difficulty in recording tracks,
difficulty in finding tracks/chapters
and/or difficulty in loading and
ejecting. If these problems occur,
check the disc for damage or try a
known good disc.
To avoid damage to the CD/DVD
player:
.Do not use scratched or
damaged discs.
.Do not apply labels to discs. The
labels could get caught in the
player.
.Insert only one disc at a time.
.Keep the loading slot free of
foreign materials, liquids, and
debris.
If a description label is needed, try
labelling the top of the disc using a
marker pen.
Loading and Ejecting Discs
To load a disc:
1. Turn the ignition on.
2. Insert a disc into the slot. The
player pulls it in the rest of the
way. If the disc is damaged or
improperly loaded, there is an
error and the disc ejects.
The disc automatically plays once
loaded.
Press Xto eject a disc from the
CD/DVD player.
Playing a CD/DVD
A disc must be loaded to select the
source.
When a disc is loaded, the disc icon
displays.
There are two ways to play a
CD/DVD:
.Insert the disc and playback
starts automatically.
.Press the DVD/HDD/AUX
button, then press DISC.

Infotainment System 17
Playing an Audio CD
A track number displays at the
beginning of each track. Song,
Artist, and Album information
displays when available.
Use the following controls to play
the disc:
k(Play/Pause): Press to start,
pause, or resume play.
l(Seek/Forward):
.Seeks to the next track.
.Press and hold to fast forward
through a track. Release to
return to playing speed. Elapsed
time displays.
g(Seek/Reverse):
.Seeks to the beginning of the
current or previous track.
‐If the track has been playing
for less than five seconds, it
seeks the previous track.
‐If longer than five seconds, the
current track starts from the
beginning.
.Press and hold to fast reverse
through a track. Release the
button to return to playing
speed. Elapsed time displays.
MENU: Turn this knob to display
the track list. Press to select the
track from the list. The system plays
the selected track and returns to the
CD screen.
CD Menu
Press the CD Menu button or press
MENU while on the CD audio
screen to display the CD Menu.

18 Infotainment System
Shuffle: Select to play the tracks
randomly rather than in sequence.
Select again to stop shuffle.
A checkmark indicates shuffle is on.
This icon displays when Shuffle
mode is on. See "CD Menu."
Track List: Select to display the list
of tracks on the disc. Select the
track from the list. The selected
track plays and the CD screen
displays.
Playing an Audio and
Video DVD
To view the DVD video, the vehicle
must be in P (Park) for an automatic
transmission or the parking brake
must be engaged for a manual
gearbox.
After the DVD is loaded, the menu
options display on the DVD screen.
The menu options time out and a
full screen appears after about
10 seconds. Press the FAV, DVD/
HDD/AUX, or BACK button to view
the menu screen again.
Use the screen buttons to operate
the DVD options.
There are two pages of DVD
options. Select the arrow button
located in the bottom right corner of
the screen, to access the next page.
Only the highlighted functions are
available for use. Some menu
options are only available when the
disc is not playing.
DVD Options
Full Screen:
1. The menu options time out and
a full screen appears after about
10 seconds.
2. Press the FAV, DVD/HDD/AUX,
or BACK button to re-display the
source screen options over the
video image.
Other manuals for JH CRUZE Series ll
1
Table of contents
Other HOLDEN Car Video System manuals
Popular Car Video System manuals by other brands

BOSSCO
BOSSCO BV6824B user manual

Sound Storm
Sound Storm SDVD350MT user manual

CarShow
CarShow Dual Mutimedia Headrest Replacement Entertainment... quick start guide

PowerAcoustik
PowerAcoustik PT-622TS instruction manual

XO Vision
XO Vision XOD1740BT instructions

Panasonic
Panasonic CQ-VD6505W operating instructions