CarShow Dual Mutimedia Headrest Replacement Entertainment... User manual

Dual Mutimedia
Headrest Replacement
Entertainment System
Quick Start Guide

NOTICE OF INTENDED USE
CarShow Electronics are designed to enable viewing of
video ONLY for rear-seat occupants, and are not intended
for viewing by the driver when the vehicle is in motion.
Such use might distract the driver or interfere with the
driver’s safe operation of the vehicle, and thus result in
serious injury or death. Such use might also violate state
or local laws.
Rosen Electronics, LP disclaims any liability for any bodily
injury or property damage that might result from any im-
proper or unintended use.
About the Registered Marks
This item incorporates copy protection technology that is protected by U.S. patents
and other intellectual property rights of Rovi Corporation. Reverse engineering and
disassembly are prohibited.
NOTE: Features and specications listed in this manual are subject to change
without notice
Manufactured under license from Dolby Laboratories.“Dolby” and the double-D
symbol are trademarks of Dolby Laboratories.
iPod®and iPhone®are registered trademarks of Apple, Inc.
NOTICES

For complete Owner’s Manual, please visit
CarShow Electronics online at
www.carshowelectronics.com
POWER
SPEAKER
SOURCE
PLAY/PAUSE
EJECT
1
Front Panel Controls
DIMMER
ENTER
Front Panel Controls - Monitor Only Systems
POWER
MUTE
SOURCE PLAY/PAUSE
N/A
DIMMER
PREVIOUS
Turn On The System
A) Turn vehicle ignition to ON or ACC
NEXT
Source Button
A) Short Press: Switches internal sources between Main and Aux 1.
B) Long Press: Enables CarShow supported Dash System* to be accessed
by the monitor only system.
* Please contact an authorized CarShow dealer for a list of supported sys-
tems.
B) Press POWER on the front display or wireless remote on each system

Pause
Stop
Play
Day/Night
Power
Speaker
Source
A) Turn on by pressing the OFF/ON button located on the ear piece. The power
LED on the ear piece should illuminate. If not, check that the batteries are
inserted properly and have a charge.
A) Press the SOURCE button on the front control panel or remote control until
“DVD Player” appears.
B) With the label facing away from you, insert a disc into the disc slot. Do not
force disc into slot. If a DVD/CD menu appears on the screen, press PLAY or
ENTER as instructed on the screen. Most disc will load and play automatically.
C) To obtain best viewing angle, adjust the screen display as needed by pressing
the bottom corners.
Note: Not all discs are supported by this system. You may nd a disc that will not play
on this system, but works ne on other players. Various manufacturers of discs change
technology from time to time which may create compatibility issues. This is not a probelm
with the unit and is not covered by warranty.
Please check with the Owner’s Manual for more detailed information.
32
Use The Headphones
Remote Control
Play A Disc
Label side facing away
C) To adjust the volume, use the knob on the ear piece.
B) The headphones each have a two-position slide switch labeled “Ch.A/
Ch.B”. They must have a clear line of sight to the headrest monitor and must be
switched to the designated A/B Channel to operate properly
(Does not apply for Monitor Only systems)
NextPrevious
(Functions as Mute on
Monitor Only systems)

Use the DOC
4 5
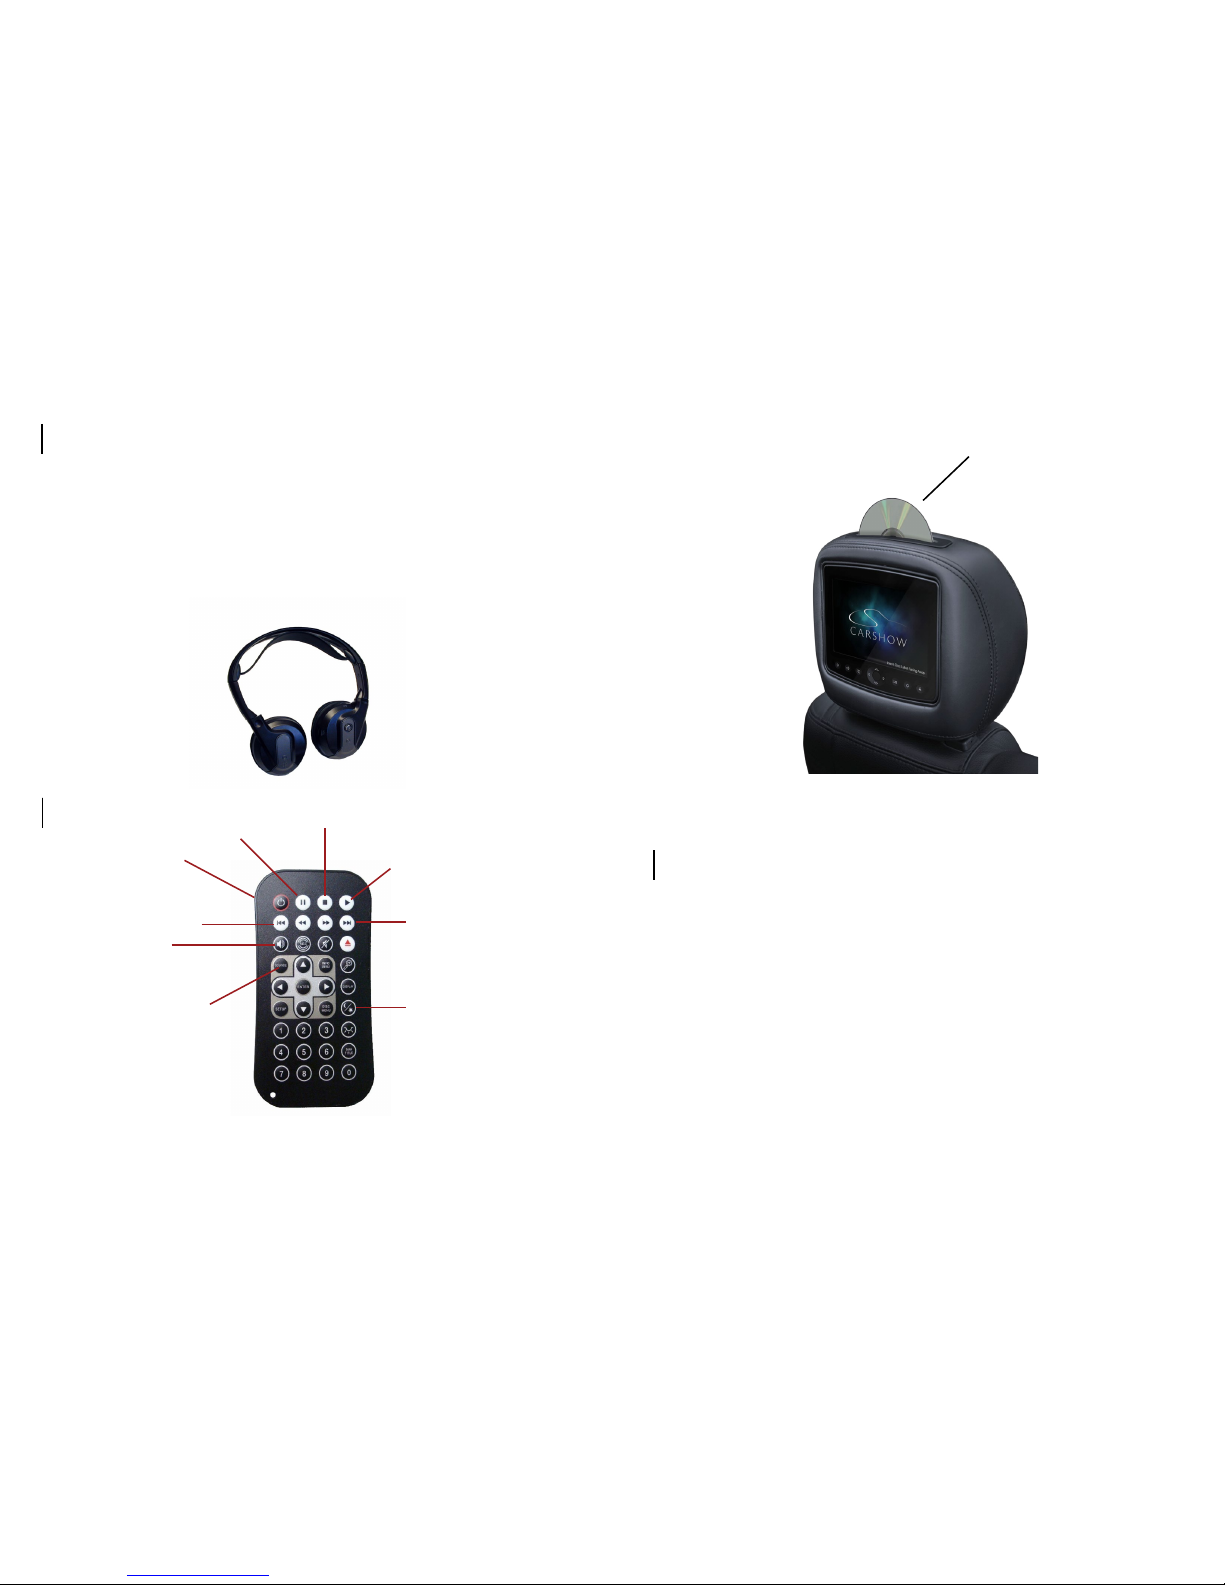
Insert your iPod®or iPhone®into the DOC. All controls are located on the front
panel of the unit.
Ringtones from incoming calls and SMS/MMS are projected through the DOC
audio outputs as long as they are enabled on the iPhone. The current media
playing will pause when receiving an incoming call but not incoming SMS/MMS.
The iPhone can be set to Airplane mode to avoid these interruptions.
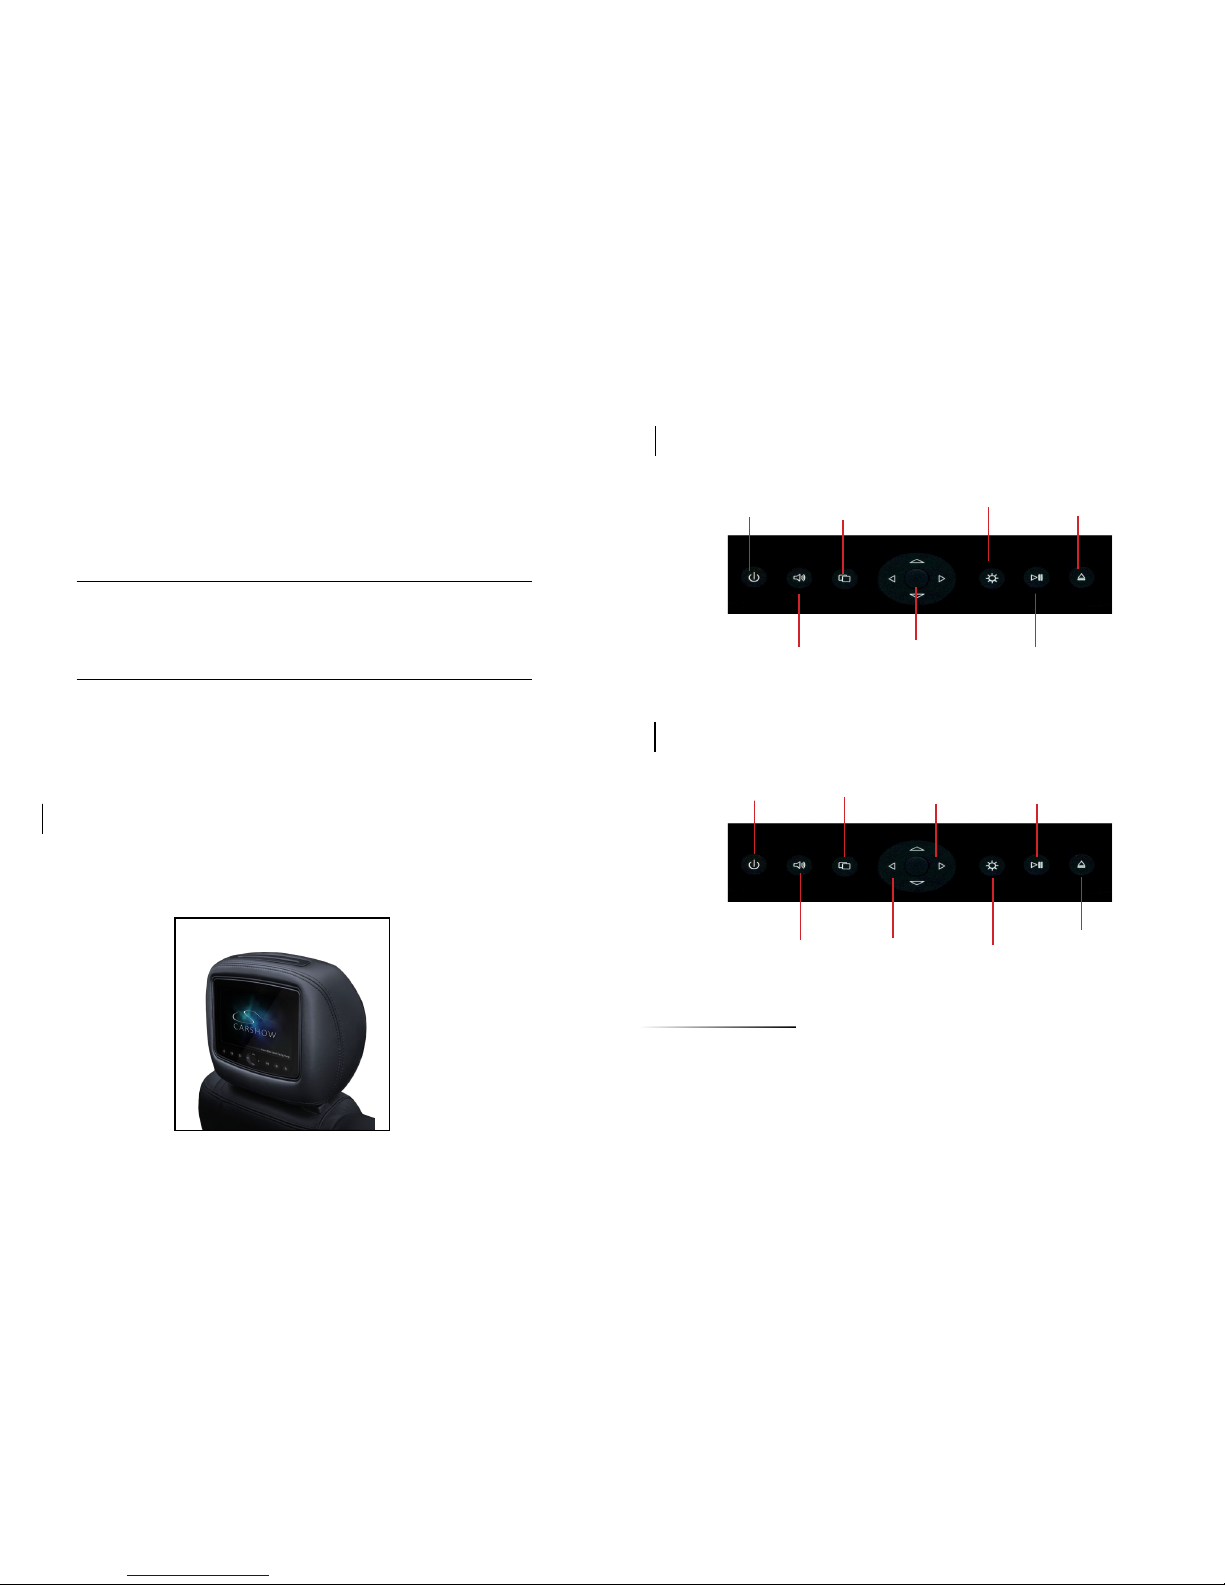
1) Use the UP/DOWN arrows on the
front panel of the unit to scroll through
the media options
Press the ENTER button to select
your option.
Use the EJECT button to go back to
the previous screen.
◄►Use the left & right arrows to skip
to the next or previous track/chapter
▲▼ Long press to Rewind or Fast
Forward
►Play/Pause
On the remote control, this button
cycles through Repeat Once, Repeat
All or Repeat Off . This does not
function in the Video Source.
Controls
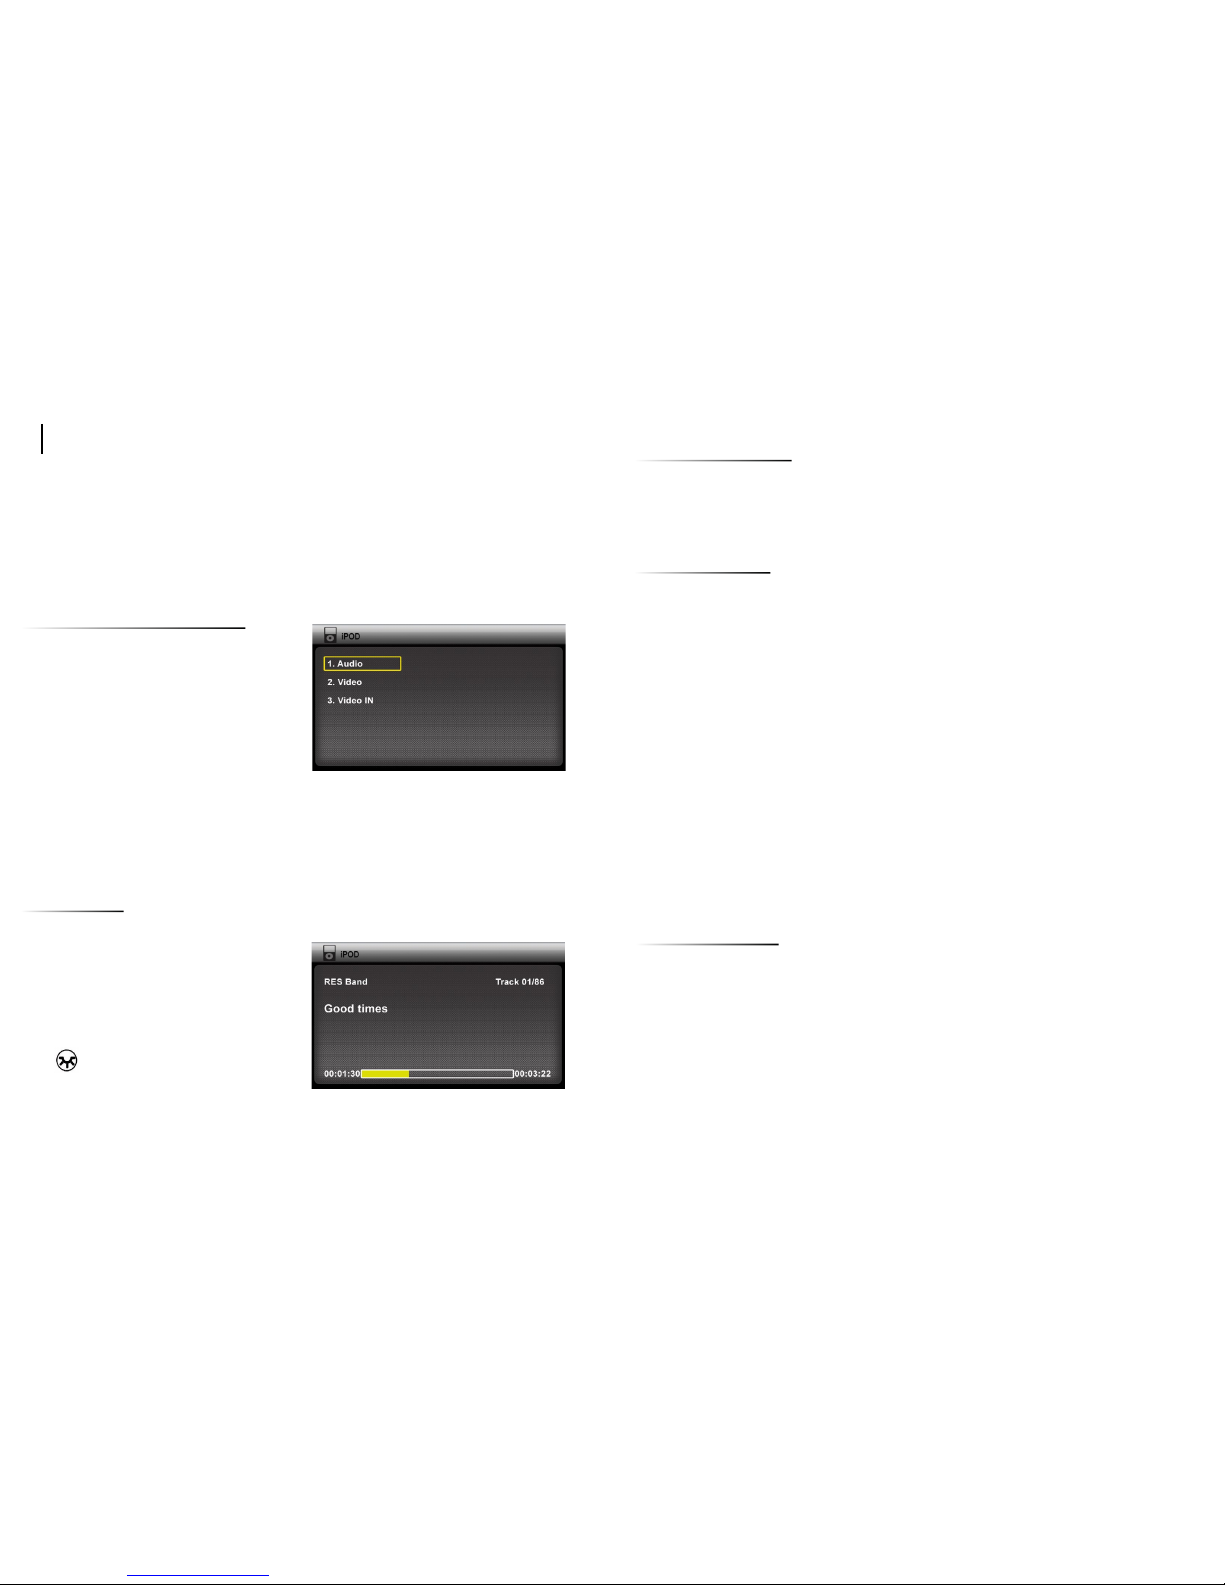
Selecting media source
▬
◄
˩
▲
▬
Note: In the “Video In” source, you will need to pull up the slideshow on the iPod
or iPhone before inserting into the DOC.
The USB and Micro SD sources can be used for media playback, such as video,
audio, and photos.
◄►Use the left & right arrows to go to previous or next le (If the media does
not support chapters, then the next video will play)
▲▼ Long press to Rewind or Fast Forward
►Play/Pause
▬
Viewing Photos
While the iPhone or iPod is not inserted in the DOC, select the photo app and
start the slideshow. Once the slideshow is on, insert the iPhone or iPod into the
DOC and select “Video In” from the menu and press PLAY. Your photos will now
be displayed on the unit screen.
App Support
Disclaimer : Apple Inc. limits certain functions and control capabilities of third par-
ty applications when in a docking station. As such, some features and con-
trols in third party applications are not directly available to the end user when the
third party application is used in the CarShow DOC system. Therefore, CarShow
can not guarantee full control of third party applications such as, but not limited
to,YouTube, Netix, Facebook, and others.
Netix
While the iPhone or iPod is not inserted in the DOC, select the Netix app.
Select the video and start playback mode. Once the video is on, insert the
iPhone or iPod into the DOC and select “Video In” from the menu.
USB/Micro SD
While the iPhone or iPod is not inserted in the DOC, select the YouTube app.
Select the video and start playback mode. Once the video is on, insert the
iPhone or iPod into the DOC and select “Video In” from the menu. Then, on the
exposed iPhone or iPod touch screen, re-enable playback mode.
YouTube

6
A) Press SPEAKER on the remote or touch front control panel.
“SPEAKER SOUND ON FM__ PRESS LEFT OR RIGHT TO ADJUST” will
appear on the screen.
B) Turn the vehicle’s radio on and tune to the FM frequency displayed on the
screen.
C) If radio interference is heard, try another frequency (see Owner’s Manual for
more information.
A) Connect the RCA audio and video outputs of the device to the Carshow RCA
adapter cable. Plug into AUX input port on front of monitor.
B) Press SOURCE on the remote or front control panel until “AUX 1” appears on
the screen.
Selecting a display mode: The system’s “widescreen” display has a 16:9 aspect
ratio - wider than a standard television. While many DVDs provide widescreen
video images that t the screen, standard broadcast TV and many video games
do not.
• To view a widescreen DVD, press the DISPLAY button on the remote until
“WIDE” is displayed on the screen.
• To watch a fullscreen DVD, the internal game system, or
broadcast television, select “STANDARD.”
Change the Display Adjustments Remote Control Only: The display has
adjustable video settings. To change these settings, press and hold the DISPLAY
button on the remote control to bring up the following menu:
BRIGHTNESS 32
CONTRAST 32
COLOR 32
TINT 32
To select a setting to be changed: Press the DOWN arrow button to move the
cursor down the menu list. Once you have selected the item to change, use the
LEFT and RIGHT arrows on the remote or the front panel to adjust the settings.
After you have nished making your desired changes, press the DISPLAY button
on the remote to exit and save the changes you have made.
To change the value of a setting: Use the LEFT and RIGHT arrow buttons. The
range is from 0 to 63.
Listen Over Vehicle Speakers
Use An External Video Source
Adjust The Display

All rights reserved. Copyright 2012 CarShow Electronics
PN: CS1012 Rev B
Table of contents
Other CarShow Car Video System manuals