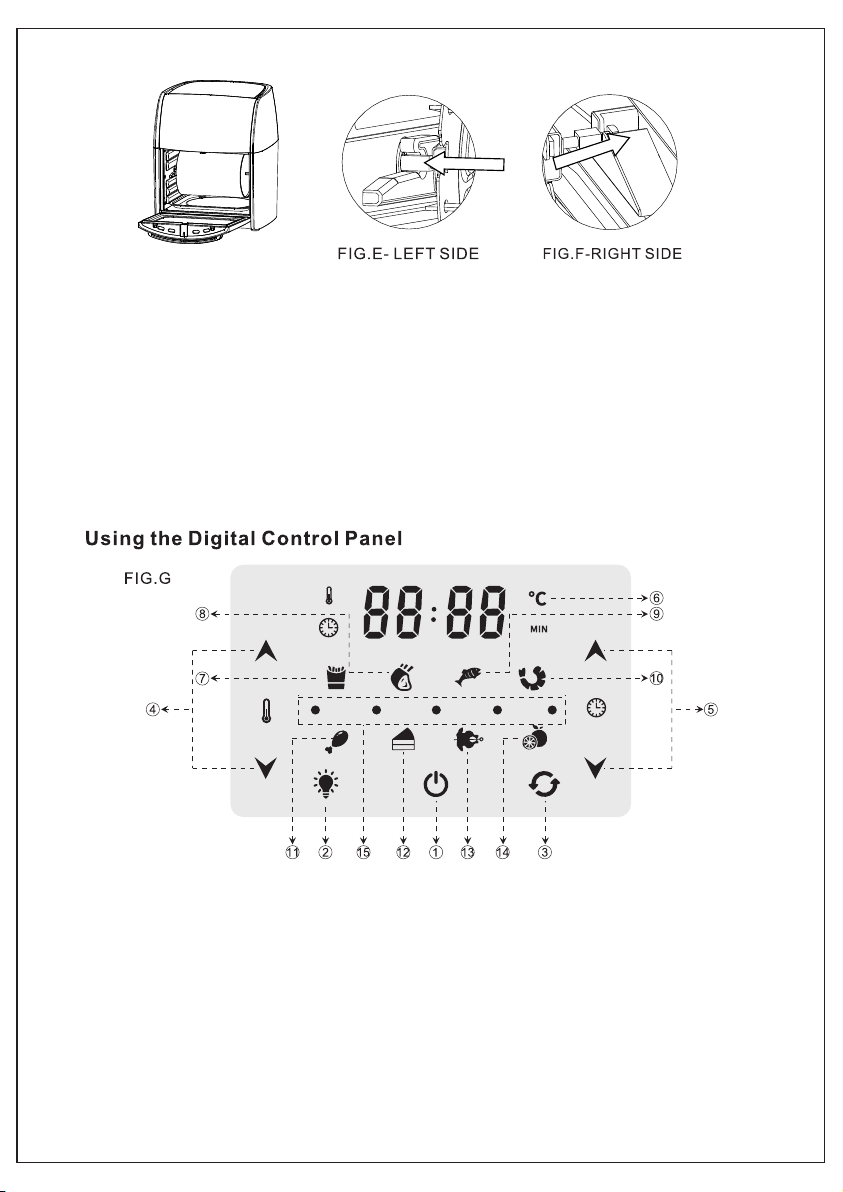
manuals.online logo
Brands
  1. Home
  2. •
  3. Brands
  4. •
  5. HOMCOM
  6. •
  7. Oven
  8. •
  9. HOMCOM 800-149V70 User manual

HOMCOM 800-149V70 User manual

Other HOMCOM Oven manuals

HOMCOM 800-152V90 User manual

HOMCOM

HOMCOM 800-152V90 User manual

HOMCOM 800-170V70 User manual

HOMCOM

HOMCOM 800-170V70 User manual

HOMCOM 800-087 Installation guide

HOMCOM

HOMCOM 800-087 Installation guide

HOMCOM 800-171V70 User manual

HOMCOM

HOMCOM 800-171V70 User manual

HOMCOM 800-085V90 Installation guide

HOMCOM

HOMCOM 800-085V90 Installation guide

HOMCOM 800-083V70 Installation guide

HOMCOM

HOMCOM 800-083V70 Installation guide

HOMCOM 800-095 Installation guide

HOMCOM

HOMCOM 800-095 Installation guide

HOMCOM 800-146V80 User manual

HOMCOM

HOMCOM 800-146V80 User manual

HOMCOM 800-168V90 User manual

HOMCOM

HOMCOM 800-168V90 User manual

HOMCOM 800-085V70 Installation guide

HOMCOM

HOMCOM 800-085V70 Installation guide

HOMCOM 800-083V90 Installation guide

HOMCOM

HOMCOM 800-083V90 Installation guide

Popular Oven manuals by other brands

Brandt FC 222 user manual

Brandt

Brandt FC 222 user manual

aumate TOA20M04N-1E instruction manual

aumate

aumate TOA20M04N-1E instruction manual

Maytag CWE4100AC - 24" Single Electric Wall Oven Dimension Guide

Maytag

Maytag CWE4100AC - 24" Single Electric Wall Oven Dimension Guide

Kernau KBO 1076 S PT B instruction manual

Kernau

Kernau KBO 1076 S PT B instruction manual

Bosch HB 37 N Series User manual and installation instructions

Bosch

Bosch HB 37 N Series User manual and installation instructions

Electrolux EOD5420AA user manual

Electrolux

Electrolux EOD5420AA user manual

Mx Onda MX-HC2183 instruction manual

Mx Onda

Mx Onda MX-HC2183 instruction manual

Daewoo F6EV19SM2 Service manual

Daewoo

Daewoo F6EV19SM2 Service manual

Blodgett MT3870 Specifications

Blodgett

Blodgett MT3870 Specifications

GE ZET2F owner's manual

GE

GE ZET2F owner's manual

GE JK3000DF3WW owner's manual

GE

GE JK3000DF3WW owner's manual

eka EKF 523 NT Operating and instruction manual

eka

eka EKF 523 NT Operating and instruction manual

AEG Electrolux E3191-5 user manual

AEG Electrolux

AEG Electrolux E3191-5 user manual

Pratica Rocket Express quick start guide

Pratica

Pratica Rocket Express quick start guide

Viking Professional VGSO260T user guide

Viking

Viking Professional VGSO260T user guide

FM RX203 instruction manual

FM

FM RX203 instruction manual

Bosch HBN331 9B Series instruction manual

Bosch

Bosch HBN331 9B Series instruction manual

NEFF B95M42N0MK Instructions for use

NEFF

NEFF B95M42N0MK Instructions for use

manuals.online logo
manuals.online logoBrands
  • About & Mission
  • Contact us
  • Privacy Policy
  • Terms and Conditions

Copyright 2025 Manuals.Online. All Rights Reserved.

INcsb090_UK
800-149V70
ASSEMBLY INSTRUCTION
IMPORTANT, RETAIN FOR FUTURE REFERENCE: READ CAREFULLY
Air circulation fryer, rotisserie, dehydrator and more
Before you begin
It is very important that you read this entire manual, making certain you
are completely familiar with the unit's operation and precautions.
The air oven
It can cook your favourite fried food – it also broils and bakes other
favourites like air-fried burgers, calzones and doughnuts. There are
eight one-touch presets to set the time and temperature – great for
crispy shrimp, fries and southern-style chicken.
There is a rotisserie and dehydrator preset, which preserves fresh
fruits and other foods for future use.
We all love fried food
Crispy fried chicken, french fries, coconut shrimp, chicken parmesan,
hot spicy wings and much more. Until now, it was impossible to get that
crispy-fried crunch and flavour without frying in deep fat or oil.
1
2
Important
- Before and after using, hand wash the rotating mesh basket and other cooking
accessories. Wipe the outside and inside of the unit, using a warm, damp cloth and
mild detergent. Preheat the air oven for a few minutes to burn off any residue.
Electric power
- If the electrical circuit is overloaded with other appliances, your unit may not
operate properly. It should be used on a dedicated electrical circuit.
Automatic shut down
This appliance has a built-in 'power off' device, which automatically shuts down the
unit when the timer reaches zero. You can manually switch the appliance off by
holding the power button for two seconds.
Electromagnetic fields (EMF)
- This appliance applies with all standards regarding electromagnetic fields (EMF). If
handled properly and according to the instructions in this user manual, the appliance
is safe to use.
Parts and accessories
NOTE: Unpack all listed contents from packaging. Varies by model. Please remove
any clear or blue protective film from components.
3
5. Air flow racks
Can be used for dehydration, cooking crispy snacks or reheating foods such as
pizza.
6. Rotating mesh basket
Great for fries, roasted nuts and other snacks. Use the fetch tool to place basket
into the unit.
7. Drip tray
Cook with the tray in place, so it is easy to clean residue.
8a. Skewers (*optional)
Great for kebabs, meat, fish and vegetables.
8b. Adjustable skewer racks (*optional)
Used for making kebabs. Skewer racks fits over shaft and locks in place with set
screws.
9. Rotisserie shaft, forks and set screws
Use for roasts and whole chicken. Ensure shaft is lengthwise, through the meat
and centre. Slide forks onto shaft from either end, into meat – lock in place with set
screws. There are indications on the shaft for set screws. You can adjust the
screws closer to the middle if needed – it cannot be adjusted outward towards the
ends.
NOTE: Ensure roast or chicken is not too large, so it can rotate freely within the
oven. Maximum weight for chicken or roast should be 1000-1500g.
10. Rotisserie fetch tool
Use to remove cooked roasts and chicken, which have been prepared using the
rotisserie or skewer method. Place under rotisserie shaft and lift (left side first),
then gently extract the food.
4
Important
Check all components are present before using. If parts are missing or
damaged, do not use this product. Use the customer service number,
located at the back of the manual, to contact the shipper.
NOTE: Some accessories may not be included with the purchase.
Warning
Forks, skewers and other metal parts are sharp and will get extremely hot
during use.
Take great care to avoid injury. Wear protective oven mitts or gloves.
Using accessories
Placing air flow racks into the unit:
1. Place the drip tray into the bottom of the unit.
2. Place the air flow racks in the unit by sliding through the side grooves
and onto the back lip (fig. A).
3. For faster cooking and added crisp, place air flow racks closer to the top
(fig. B).
4. Rotate the air flow racks mid-cycle for even cooking.
Rotisserie shaft and skewer racks
1. Place two skewer racks on each end of the rotisserie shaft. Ensure the
set screws are on the outer side of the shaft.
2. Slightly tighten set screws. Do not over tighten – you may need to adjust
the tightness after you insert the skewers.
5
1. Insert each skewer point through the holes on the skewer rack (fig. C).
2. Squeeze the clip end of each skewer as you insert into the opposite skewer
rack slot to secure.
3. Release the clip to securely rest in slot as shown (fig. D).
4. Repeat steps 1-3 around the skewer rack. Ensure skewers are evenly
spaced.
5. Tighten the set screws, ensuring they are securely in place.
6. Be cautious when inserting the spit into the unit to prevent getting poked by
the skewer ends.
1. Insert the left side of the assembled spit or basket into the
rotisserie shaft socket. Ensure the rotisserie shaft is in place for
rotation (fig. E).
2. Place the right side onto the hanger (Fig. F).
6
IMPORTANT
See the final assembly diagram (page 5) to identify the left and right sides
of the rotisseries shaft. The ride side has two notches, the left has one.
Removing rotisserie spit or rotating basket from unit
1. Open unit door to stop cooking – turn unit off by pressing power button.
2. Insert rotisserie fetch tool beneath the shaft.
3. Lift the right side of the fetch tool at a slight angle to clear the bracket.
4. Carefully remove the food from the oven.
1. Power button
When plugged in, the power button will light up. Holding the power button for two
seconds will cause the full panel to be illuminated. Pressing the power button for a
second time will start the cooking process at a default temperature of 185°C (185°F)
– it will run for 15 minutes. When cooking, press the power button to pause the unit.
Hold the power button for two seconds to shut down the unit. When you see the
screen display 'OFF', the motor will stop working after 15 seconds – the machine with
'beep' three times.
7
2.Internal light
- Pressing this button lets you check on your food.
NOTE: Opening the door when cooking will pause the unit. Internal light will
illuminate if doors open.
3. Rotation button
- Press this button when cooking anything using the rotisserie mode. Function can
be used with any preset. The icon will blink while in use.
4. Temperature control
- Press these buttons to raise or lower cooking temperature by 5°C/°F, ranging from
65°C (150°F) to 200°C (400°F). Dehydration ranges from 30°C (90°F) to 80°C
(175°F).
5. Time control
- These buttons let you choose your cooking time to the exact minute, from 1-60
minutes. All modes (except dehydrating, which uses 0.5hrs), intervals and
operating times range from 2-24 hours.
6. LED digital display
- When cooking, the numeric display will switch between temperature and time
remaining.
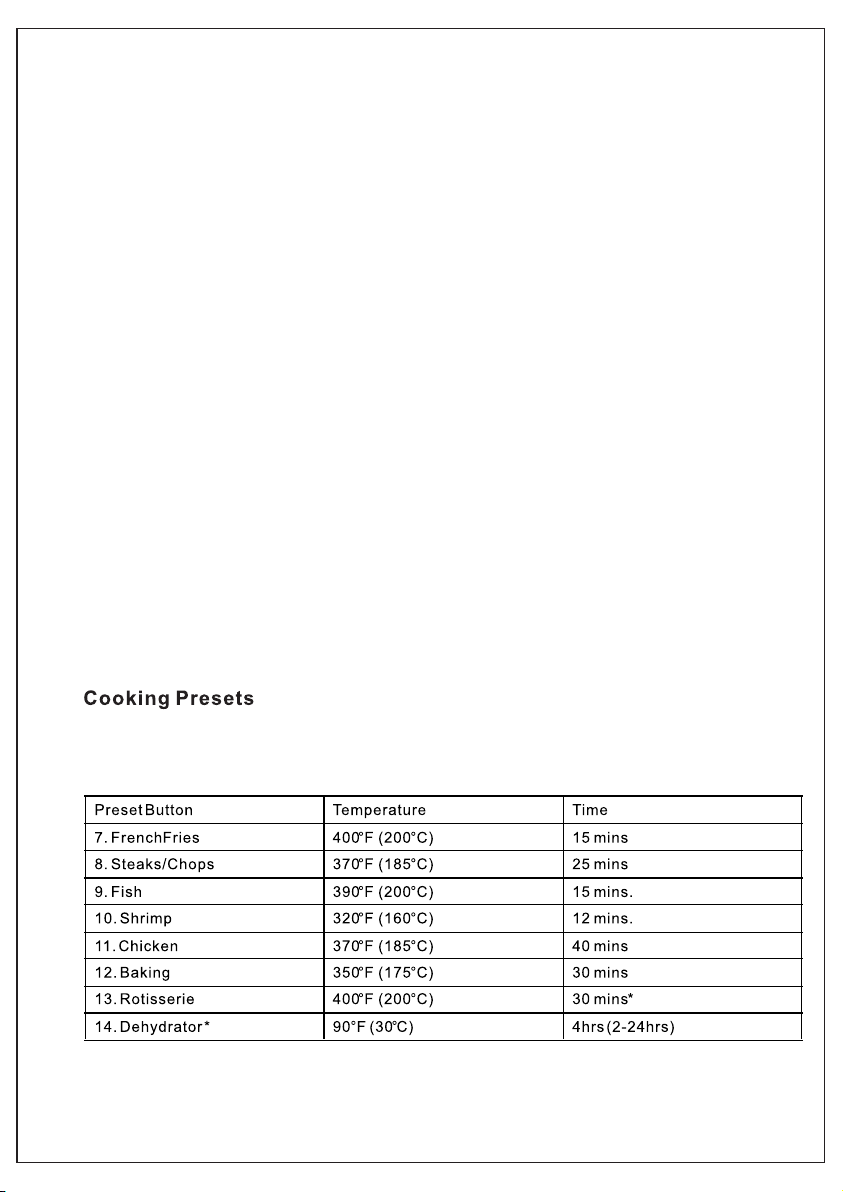
7-14. Cooking presets
- Selecting any of these will give you a default time and temperature for different
foods. You can override these presets with the time and temperature buttons. View
presets on the next page. Whilst in use, the function menu lets you switch your
settings.
15.Running lights
These lights will blink in sequence when cooking. Once the unit is shut down, the
lights will continue to blink for up to 15 seconds.
Preset cooking chart
* Cooking time for a whole roasted chicken varies with weight. Use a meat
thermometer to check internal temperature as per chart below.
Using the air oven without presets
Once you are familiar with the unit, you can experiment with your own time and
temperature.