manuals.online logo
Brands
  1. Home
  2. •
  3. Brands
  4. •
  5. Home Accents
  6. •
  7. Indoor Furnishing
  8. •
  9. Home Accents TY133-1724-2 User manual

Home Accents TY133-1724-2 User manual

USEAND CARE GUIDE
74in 200 Light LED Haunted Carriage and Skeleton
THANK YOU
We appreciate the trust and confidence you have placed in Home Accents through the purchase
of this 74in 200 Light LED Haunted Carriage and Skeleton. We strive to continually create quality
products designed to enhance your home. Visit us online to see our full line of products available
for your home improvement needs. Thank you for choosing Home Accents!
Guarantee
What is Covered
The product is intended for residential seasonal use for approximately 90 days per year. This
product is covered by a 90 days limited guarantee due to defects in material and workmanship.
Return the product with purchase receipt to the location of purchase for refund within 90 days of purchase.
What is Not Covered
This warranty does not cover commercial use, normal wear and tear, products not used in
accordance with directions provided on or with the product, burn out of bulbs or LEDS, batteries,
products that have been subjected to unauthorized repair and/or modification and damage caused
by shipping and improper handling, alterations, misuse or accidents. Questions, problems, missing
parts? Before returning to the store, call HomeAccents Holiday Customer Service 8 a.m.-6 p.m., EST, Monday-Friday
1-877-527-0313
HOMEACCENTSHOLIDAY.COM
SKU # 1002 369 901
YOW SKU # 760 925
Model # TY133-1724-2
Pre-Assembly
PLANNING ASSEMBLY
Carefully remove all the parts from the box and place them on a flat surface. Read
the entire manual prior to assembly and identify all the parts included in the package
against the parts list. If any parts are missing or damaged do not attempt assembly.
Contact our customer service center or return to place of purchase with proof of
purchase receipt. Assembly of this product may require more than one person.
PACKAGE CONTENTS
Package Contents/Parts List
Part
Description Quantity
A Skeleton 1
B Carriage Roof 1
C Halves of Carriage 2
D Wheel 4
E Bracket 2
F Bench Seat 1
Package Contents/Parts List
Part
Description Quantity
G Foot Rest 1
H Bolt & Wingnut 8
I Ground Stakes 4
J Plastic Tie 10
K Spare Fuse 2
L Spare Bulb 8
A
F
E
D
B
C
H
G
IJKL
Assembly
Assembling the LED Haunted Carriage and Skeleton
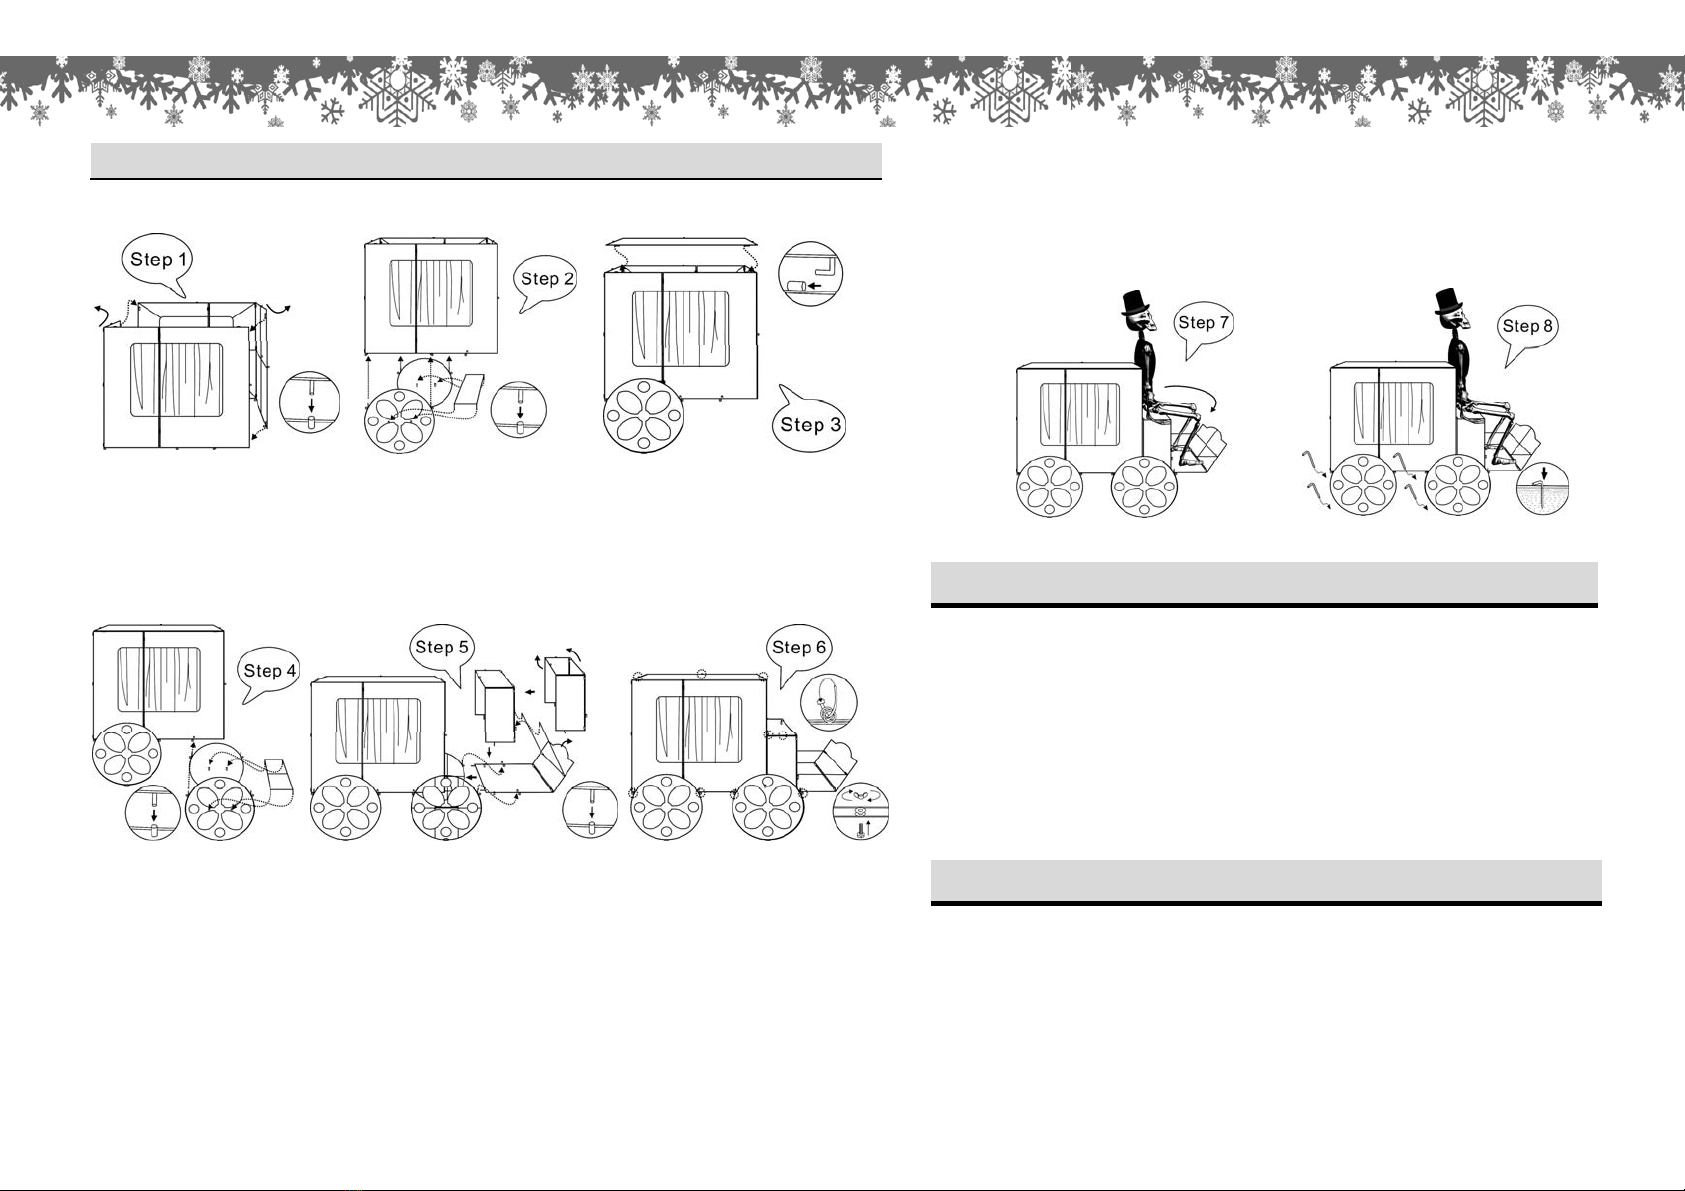
Step 1.Align the Halves of Carriage (C) then insert the rods of one half into the matching holes of the
otherhalf.(FIG.1)
Step 2. Insert the rods of two of the Wheels (D) into the matching holes at the rear bottom of the
Carriage (C).Attach one of the Bracket (E) to the two rear wheels. (FIG.21)
Step 3. Insert the rods of the Carriage Roof (B) into the matching holes on the top of Carriage (C). (FIG.3)
Step 4. Insert the rods of the other two Wheels (D) into the matching holes on the front bottom of the
Carriage (C). Insert the rods on the remaining Bracket (E) into the matching holes on the two front
Wheels (D). (FIG.4)
Step 5. Insert the rods on the Foot Rest (G) into the holes on the front of the Carriage (C). Open the Bench
Seat (F) then insert the rods at the bottom of Bench Seat (F) into the matching holes on the Foot
Rest (G). Insert the hooked supporting rods on the inside front of Foot Rest to the holes on the
lower front of the Bench Seat. (FIG.2). Insert the rods on the bottom of Foot Rest (G) into the
matching holes on the top of the front Wheels (D). (FIG.5)
Step 6. Secure the Wheels and Carriage together using the Bolt & Wingnuts (H). Secure the Bench Seat,
Foot Rest and Carriage Roof to the Carriage with the Plastic Ties (J). (FIG.6)
Step 7. Place the Skeleton (A) on the Bench Seat of the Carriage and secure using Plastic
Ties. (FIG.7) Use the large Plastic Ties to secure the Skeleton to the Carriage.Attach
the Plastic Ties thru the loop on the Carriage and wrap around the arm just below the
shoulder.
Step 8. Secure the Haunted Carriage and Skeleton to the ground with Ground Stakes (I).At
the base of Wheels. (FIG.8)
Pre-Operation
CAUTION:Grasp the plug to insert or remove from the power source.
Do not unplug by pulling on cord.
CAUTION:The lighting string on this product is rated at 12 Watts
(0.1 Amps) for Haunted Carriage and Skeleton. Do not connect to another lighting
string, decorative outfit or other electrical products. Before you use or re-use this
product inspect it carefully. Return to place of purchase with receipt if the product
has cuts, damage, frayed wire insulation on cords, cracks in the socket enclosures,
loose connections or exposed copper wire.
CareandCleaning
a. Carefully remove the product from wherever it is placed. This helps to avoid any
undue strain or stress on the product conductors, connections, and wires. If the
product is placed somewhere other than the ground it should be well secured and
stable.
b. Wipe the product with a damp cloth and allow the product to dry before storing.
c. Store the product neatly in a cool, dry location protected from sunlight.
FOR INDOOR AND OUTDOOR USE
FIG.1
FIG.2
FIG.3
FIG.4
FIG.5
FIG.6
FIG.7
FIG.8

This manual suits for next models

1

Other Home Accents Indoor Furnishing manuals

Home Accents TY405-1911 User manual

Home Accents

Home Accents TY405-1911 User manual

Home Accents Spellbinding Witch Sisters Parts list manual

Home Accents

Home Accents Spellbinding Witch Sisters Parts list manual

Home Accents TY017-1619 User manual

Home Accents

Home Accents TY017-1619 User manual

Home Accents TY169-1824-2 User manual

Home Accents

Home Accents TY169-1824-2 User manual

Home Accents 22SV23277 Parts list manual

Home Accents

Home Accents 22SV23277 Parts list manual

Home Accents 22SV23269 User manual

Home Accents

Home Accents 22SV23269 User manual

Popular Indoor Furnishing manuals by other brands

Regency LWMS3015 Assembly instructions

Regency

Regency LWMS3015 Assembly instructions

Furniture of America CM7751C Assembly instructions

Furniture of America

Furniture of America CM7751C Assembly instructions

Safavieh Furniture Estella CNS5731 manual

Safavieh Furniture

Safavieh Furniture Estella CNS5731 manual

PLACES OF STYLE Ovalfuss Assembly instruction

PLACES OF STYLE

PLACES OF STYLE Ovalfuss Assembly instruction

Trasman 1138 Bo1 Assembly manual

Trasman

Trasman 1138 Bo1 Assembly manual

Costway JV10856 manual

Costway

Costway JV10856 manual

moss DESIGN Caisson Credenza Assembly instructions

moss DESIGN

moss DESIGN Caisson Credenza Assembly instructions

Aquaglide FULL DECK 15.0 owner's manual

Aquaglide

Aquaglide FULL DECK 15.0 owner's manual

AREBOS AR-HE-SW30 user manual

AREBOS

AREBOS AR-HE-SW30 user manual

Till-Hilft Fulda 87005.330 Assembly instructions

Till-Hilft

Till-Hilft Fulda 87005.330 Assembly instructions

Twoey Outside 2010 quick start guide

Twoey Outside

Twoey Outside 2010 quick start guide

Hettich Easys 200 operating instructions

Hettich

Hettich Easys 200 operating instructions

The bedboss RELAX 404 Series owner's manual

The bedboss

The bedboss RELAX 404 Series owner's manual

Oeseder Möbelindustrie Bern 991 720 Assembly instructions

Oeseder Möbelindustrie

Oeseder Möbelindustrie Bern 991 720 Assembly instructions

Costway HW68469 user manual

Costway

Costway HW68469 user manual

Next ALIX A27743 Assembly instructions

Next

Next ALIX A27743 Assembly instructions

BROSA Hans Assembly guide

BROSA

BROSA Hans Assembly guide

Prodigg MINIKA PBA015T-FUR installation manual

Prodigg

Prodigg MINIKA PBA015T-FUR installation manual

manuals.online logo
manuals.online logoBrands
  • About & Mission
  • Contact us
  • Privacy Policy
  • Terms and Conditions

Copyright 2025 Manuals.Online. All Rights Reserved.