Home Decorators Collection 20535-000 User manual

USE AND CARE GUIDE
THANK YOU
Questions, problems, missing parts? Before returning to the store,
call Home Decorators Collection Customer Service
8 a.m. -7 p.m., EST, Monday - Friday, 9 a.m. - 6 p.m., EST, Saturday
1-800-986-3460
HOMEDEPOT.COM/HOMEDECORATORS
2-LIGHT WALL SCONCE
We appreciate the trust and condence you have placed in Home Decorators Collection through the purchase of this lamp unit.
We strive to continually create quality products designed to enhance your home. Visit us online to see our full line of products available for your
home improvement needs. Thank you for choosing Home Decorators Collection!
Item #1002433046
1002433049
Model #20535-000
D20535-001

2
Table of Contents
Table of Contents . . . . . . . . . . . . . . . . . . . . . . . . . . . . . . . . . . . 2
Safety Information . . . . . . . . . . . . . . . . . . . . . . . . . . . . . . . . . . 2
Warranty . . . . . . . . . . . . . . . . . . . . . . . . . . . . . . . . . . . . . . . . . . 2
Pre-Installation. . . . . . . . . . . . . . . . . . . . . . . . . . . . . . . . . . . . . 3
Tools Required . . . . . . . . . . . . . . . . . . . . . . . . . . . . . . . . . . . . 3
Hardware Included. . . . . . . . . . . . . . . . . . . . . . . . . . . . . . . . . 3
Installation . . . . . . . . . . . . . . . . . . . . . . . . . . . . . . . . . . . . . . . . 5-6
Care and Cleaning . . . . . . . . . . . . . . . . . . . . . . . . . . . . . . . . . . 7
Package Contents . . . . . . . . . . . . . . . . . . . . . . . . . . . 4. . . .. .
Troubleshooting . . . . . . . . . . . . . . . . . . . . . . . . . . . . . . . . . . 7. .
Warranty
THREE YEARS MANUFACTURER WARRANTY
WHAT IS COVERED
The manufacturer warrants this unit to be free from defects in materials and workmanship for a period of three (3) years from date of purchase.
This warranty applies only to the original consumer purchaser and only to products used in normal use and service. If this product is found to be
defective, the manufacturer’s only obligation, and your exclusive remedy, is the repair or replacement of the product at the manufacturer’s
discretion, provided that the product has not been damaged through misuse, abuse, accident, modifications, alterations, neglect, or mishandling.
This warranty shall not apply to any product that is found to have been improperly installed, setup, or used in any way not in accordance with the
instructions supplied with the product. This warranty shall not apply to a failure of the product as a result of an accident, misuse, abuse,
negligence, alteration, faulty installation, or any other failure not relating to faulty material or workmanship.
This warranty shall not apply to the finish on any portion of the product, such as surface and/or weathering, as this is considered normal wear
and tear.
WHAT IS NOT COVERED
Safety Information
WARNING:
Inspect the wire insulation for any cuts,
abrasions, or exposed copper that may have resulted
during shipping. If there is a defect in the wire, do not
attempt installation. Please call our Customer Service
Team at 1-800-986-3460.
The manufacturer does not warrant and specifically disclaims any warranty, whether express or implied, of fitness for a particular purpose,
other than the warranty contained herein. The manufacturer specifically disclaims any liability and shall not be liable for any consequential
or incidental loss or damage, including but not limited to any labor/ expense costs involved in the replacement or repair of said product.
Contact the Customer Service Team at 1-800-986-3460 or visit www.HOMEDEPOT.com/HOMEDECORATORS.
WARNING: RISK OF ELECTRIC SHOCK. Before starting the
installation, disconnect the power by turning off the circuit
breaker or by removing the appropriate fuse at the fuse
box. Turning the power off at the switch is not sufficient to
prevent electrical shock. CONSULT A QUALIFIED ELECTRICIAN
IF YOU HAVE ANY ELECTRICAL QUESTIONS.

3
Pre-Installation
HOMEDEPOT.COM/HOMEDECORATORS
Please contact 1-800-986-3460 for further assistance.
Read all instructions before assembling.
To avoid damaging this product, assemble it on a soft, non-abrasive surface such as a carpet or cardboard.
Keep the receipt and these instructions for proof of purchase.
□
□
□
□
TOOLS REQUIRED
Ladder Safety goggles Phillips
screwdriver Electrical tape
Wire strippers Wire cutters Pliers
HARDWARE INCLUDED
NOTE: Hardware not shown to actual size.
QuantityDescriptionPart
3
Anchor
AA
2
BB
CC
Screws
1
Plastic clip
1
1
DD
Flathead
screw
Mounting bracket
2
Junction box screws
EE
3
FF
Wire Connector
CC
BB
FF
EE
GG
AA
GG
DD
Use two 60 Watt E12 Type B Bulbs or CFL or LED equivalent (not included).

4
Pre-Installation (continued)
PACKAGE CONTENTS
A1
1
Tubes
Shade
Fixture assembly
B
C
4
1
Canopy screw
Cap
D
E
2
ytitnauQnoitpircseDtraP
A
B
C
D
E

5
HOMEDEPOT.COM/HOMEDECORATORS
Please contact 1-800-986-3460 for further assistance.
Installation (as a portable luminaire)
1 Preparing the unit for installation
2 Installing the mounting hardware
3 Installing the xture
Carefully unpack and lay all parts on a clean, level surface.
Assemble the tubes (B) to the xture assembly (A).
4 Installing the shade and light bulb
Place the shade (C) over the xture assembly (A) and insert the
shade frame into the two ears of the xture assembly (A).
Install two 60 Watt E12 Type B Bulbs or CFL or LED equivalent
(not included).
Determine the desired location of the xture making sure you have
access to an electrical outlet and there are no electrical lines or
plumbing where you intend to attach the mounting hardware.
Mark the anchor (AA) locations on wall and drill each hole 7 mm
in diameter.
Insert the anchors (AA) and tap into the wall until secure.
Set two screws (BB) into the anchors (AA) using a screwdriver, leaving
enough exposed to set into the keyhole slots on the xture assembly.
B B B B
A
C
A
Align the keyhole slots on the xture assembly (A) with the
screws (BB) on the wall and then gently push the canopy toward
the wall and slide down until secure.
Attach the plastic clip (CC) to the appropriate location on the
bottom tube (B) and mark the outside edge of the plastic
clip (CC). Unthread the bottom tube (B) and move it away, drill a
hole 7 mm in diameter at the center of this marked location and
install the anchor (AA). Remove the pre-attached plastic clip (CC)
from the bottom tube (B) and secure it to the anchor (AA) with
the athead screw (DD).
Slide the bottom tube (B) through the plastic clip (CC) and thread
it to the assembled tubes (B).
ABB
B
DD
CC
AA
CC
B
BB AA
2.75 in./6.98cm

6
Installation (as a xed luminaire)
1 Preparing the unit for installation
Carefully unpack and lay all parts on a clean, level surface.
Remove the preassembled mounting back plate by unscrewing
the canopy screws (D).
Cut off the power cord and leave minimum 6.5 inches for
electrical connections and slide the wire through the bottom
hole toward back of canopy, then carefully split the cord into
two separate wire leads, ensuring there is no damage to the
cord insulation and trim each wire 1/2 inch back to bare metal
conductor.
4
Installing the xture
Place the xture assembly (A) over the mounting bracket (EE)
and align the holes of mounting bracket (EE) with holes on the
xture assembly (A) and secure with canopy screws (D).
Thread the cap (E) to the bottom hole on the xture assembly.
Place the shade (C) over the xture assembly (A) and insert the
shade frame into the two ears of the xture assembly (A).
Install two 60 Watt E12 Type B Bulbs or CFL or LED equivalent
(not included).
Restore power at source. Turn light on at wall switch and lamp switch.
2
Installing the mounting bracket
Attach mounting bracket (EE) to the junction box (not included)
with junction box screws (FF).
NOTE: The ears of the mounting bracket (EE) should be in a
horizontal position.
EE
EE
A
DFF
3
Making the electrical connections
Make the connections to a 120V AC 60Hz circuit.
NOTE:
Connect the cord with the ribbed surface to the white wire of the
supply circuit.
Connect the half with the markings and smooth surface to the
black wire of the supply circuit.
Wrap the bare copper grounding wire from the xture around the
green screw on the mounting bracket (EE), then connect it to the
grounding conductor of the supply circuit.
Use U.L./CSA Listed wire connectors (GG) suitable for the size,
type and number of conductors. No loose strands or loose
connections should be present. Secure the wire connectors (GG)
with U.L./CSA Listed electrical tape.
GG
6.5in./16.51cm
A
C
EE
A
D
E

7
HOMEDEPOT.COM/HOMEDECORATORS
Please contact 1-800-986-3460 for further assistance.
Care and Cleaning
Clean the unit with a soft, dry cloth.
Do not use any cleaners with chemicals ,
solvents, or harsh abrasives.
Troubleshooting
Possible Causes
The bulb will not light. The bulb is burned out.
There is an exposed wire.
Replace the light bulb.
The power is off. Ensure the power supply is on.
The circuit breaker is off.
Ensure the circuit breaker is in the ON position.
The fuse blows or circuit breaker
blows when the light is turned on.
Discontinue use of the lamp.
Contact a qualified electrician or call the
Solutions
Problem
Customer Service Team at 1-800-986-3460.

1-800-986-3460
HOMEDEPOT.COM/HOMEDECORATORS
Retain this manual for future use.
Questions, problems, missing parts? Before returning to the store,
call Home Decorators Collection Customer Service
8 a.m. -7 p.m., EST, Monday - Friday, 9 a.m. - 6 p.m., EST, Saturday

GUÍA DE USO Y CUIDADO
¿Tiene preguntas, problemas o faltan piezas? Antes de regresar a la tienda,
llame a Servicio al Cliente de Home Decorators Collection
de lunes a viernes de 8 a.m. a 7 p.m.,
sábado de 9 a.m. a 6 p.m., hora local del Este
GRACIAS
Apreciamos la conanza que ha depositado en Home Decorators Collection por la compra de estas unidades de iluminación. Nos esforzamos por crear
continuamente productos de calidad diseñados para mejorar su hogar. Visítenos en internet para ver nuestra línea completa de productos
disponibles para sus necesidades de mejorar su hogar. ¡Gracias por elegir a Home Decorators Collection!
1-800-986-3460
HOMEDEPOT.COM/HOMEDECORATORS
2 CANDELEROS DE PARED
Artículo #1002433046
1002433049
Modelo #20535-000
D20535-001

2
Índice
Índice . . . . . . . . . . . . . . . . . . . . . . . . . . . . . . . . . . . . . 2
Información de seguridad . . . . . . . . . . . . . . . . . . . . . . . . . . . . 2
Garantía. . . . . . . . . . . . . . . . . . . . . . . . . . . . . . . . . . . . . . . . . . . 2
Previo al ensamblaje . . . . . . . . . . . . . . . . . . . . . . . . . . . . . . . . 3
Herramientas requeridas. . . . . . . . . . . . . . . . . . . . . . . . . . . . . . 3
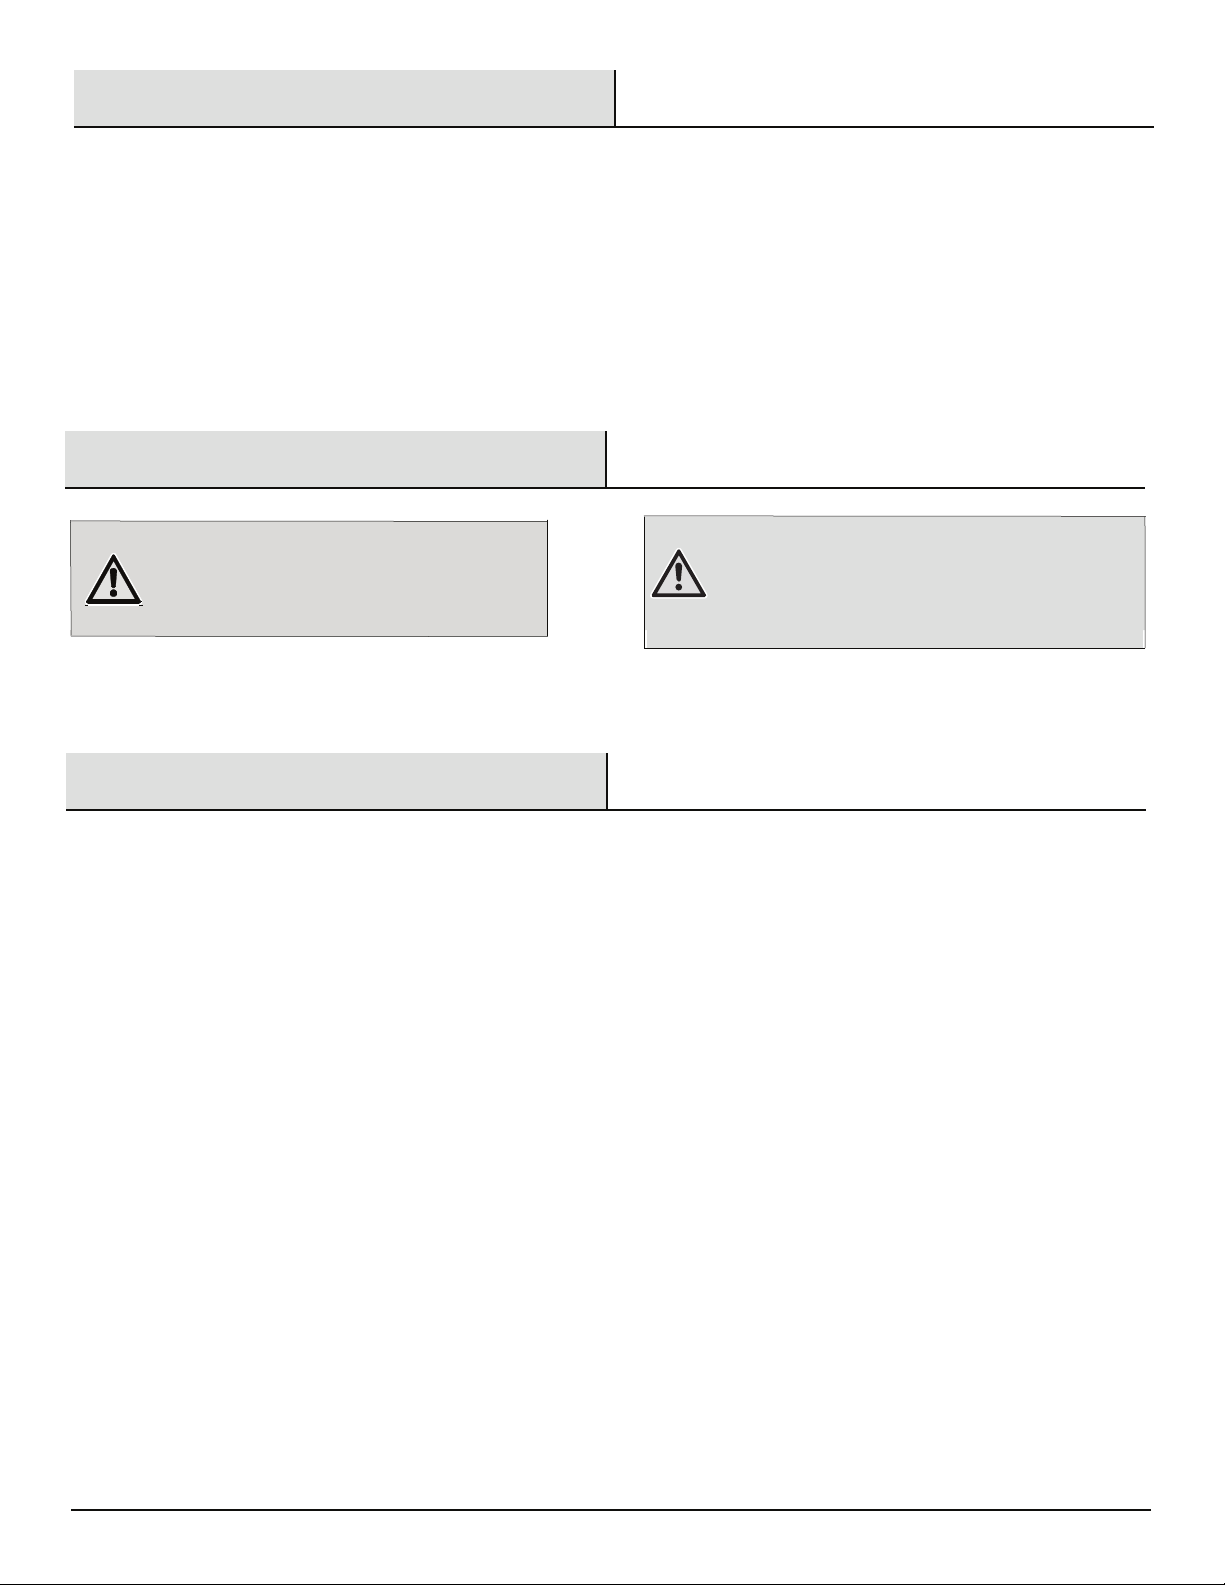
Accesorios de montaje incluidos . . . . . . . . . . . . . . . . . . . . . 3
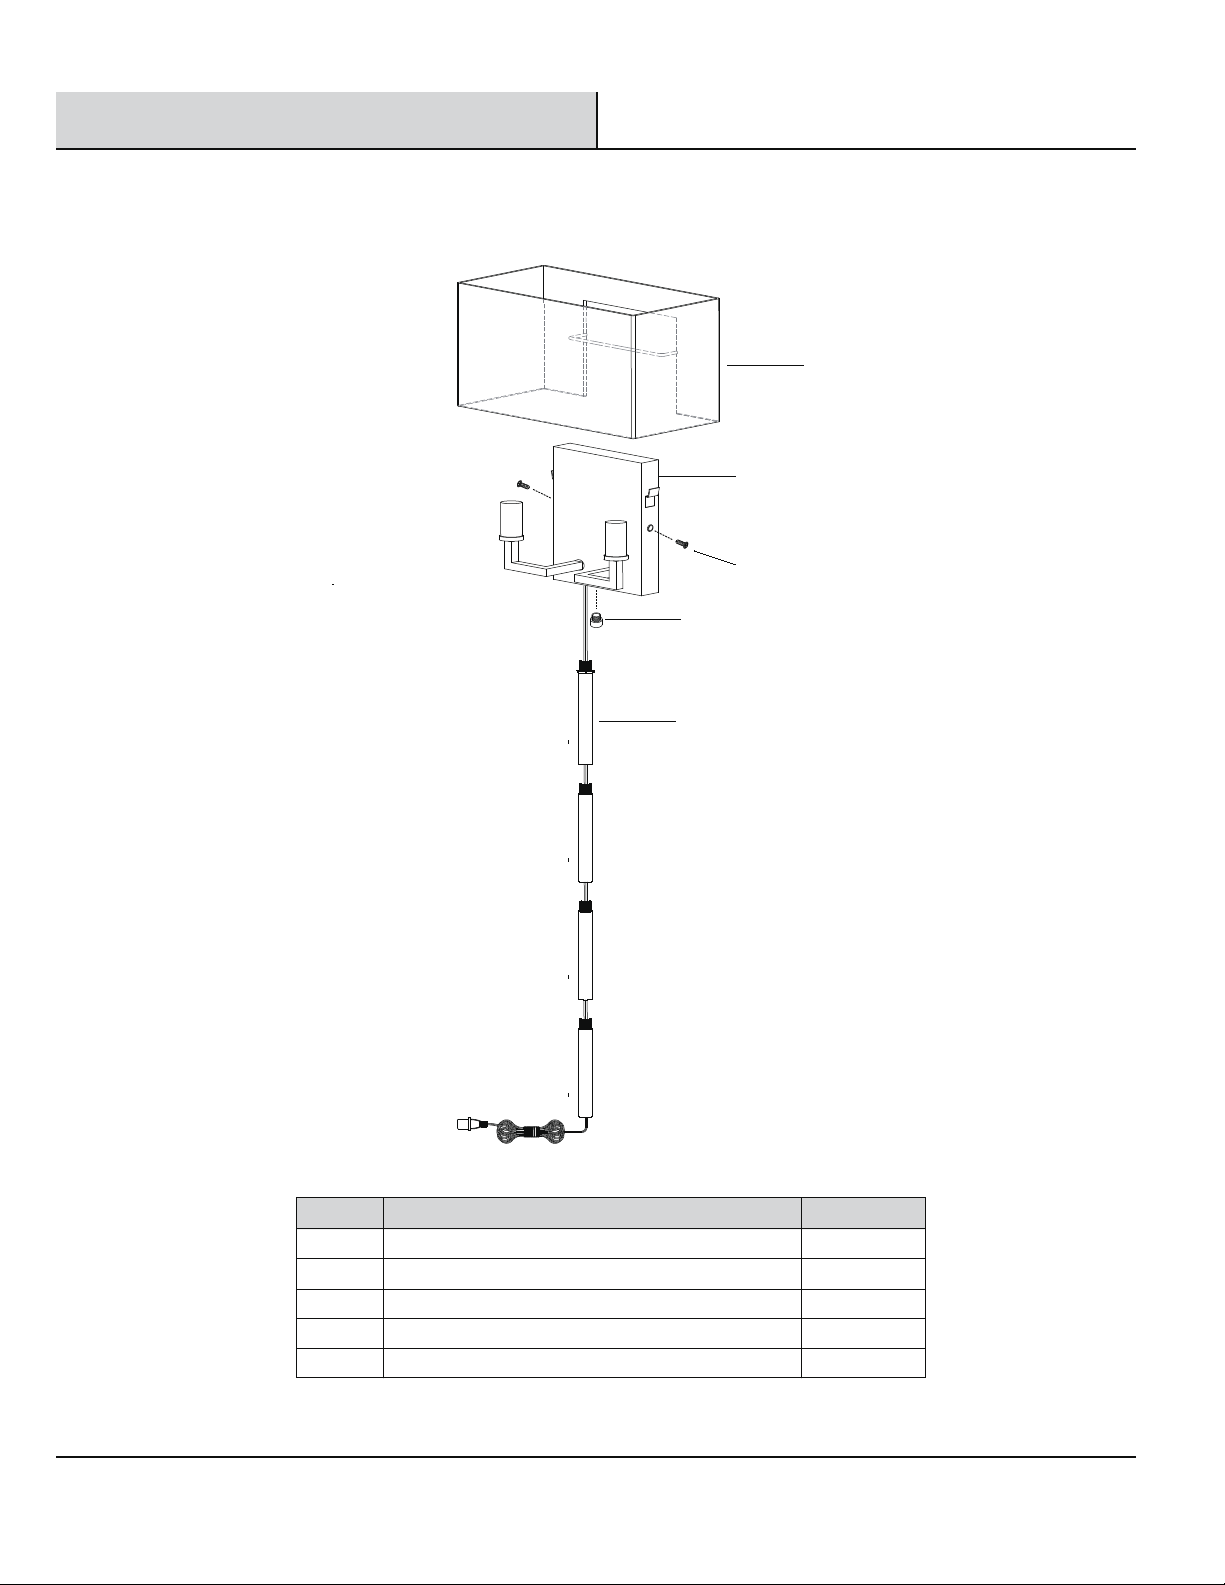
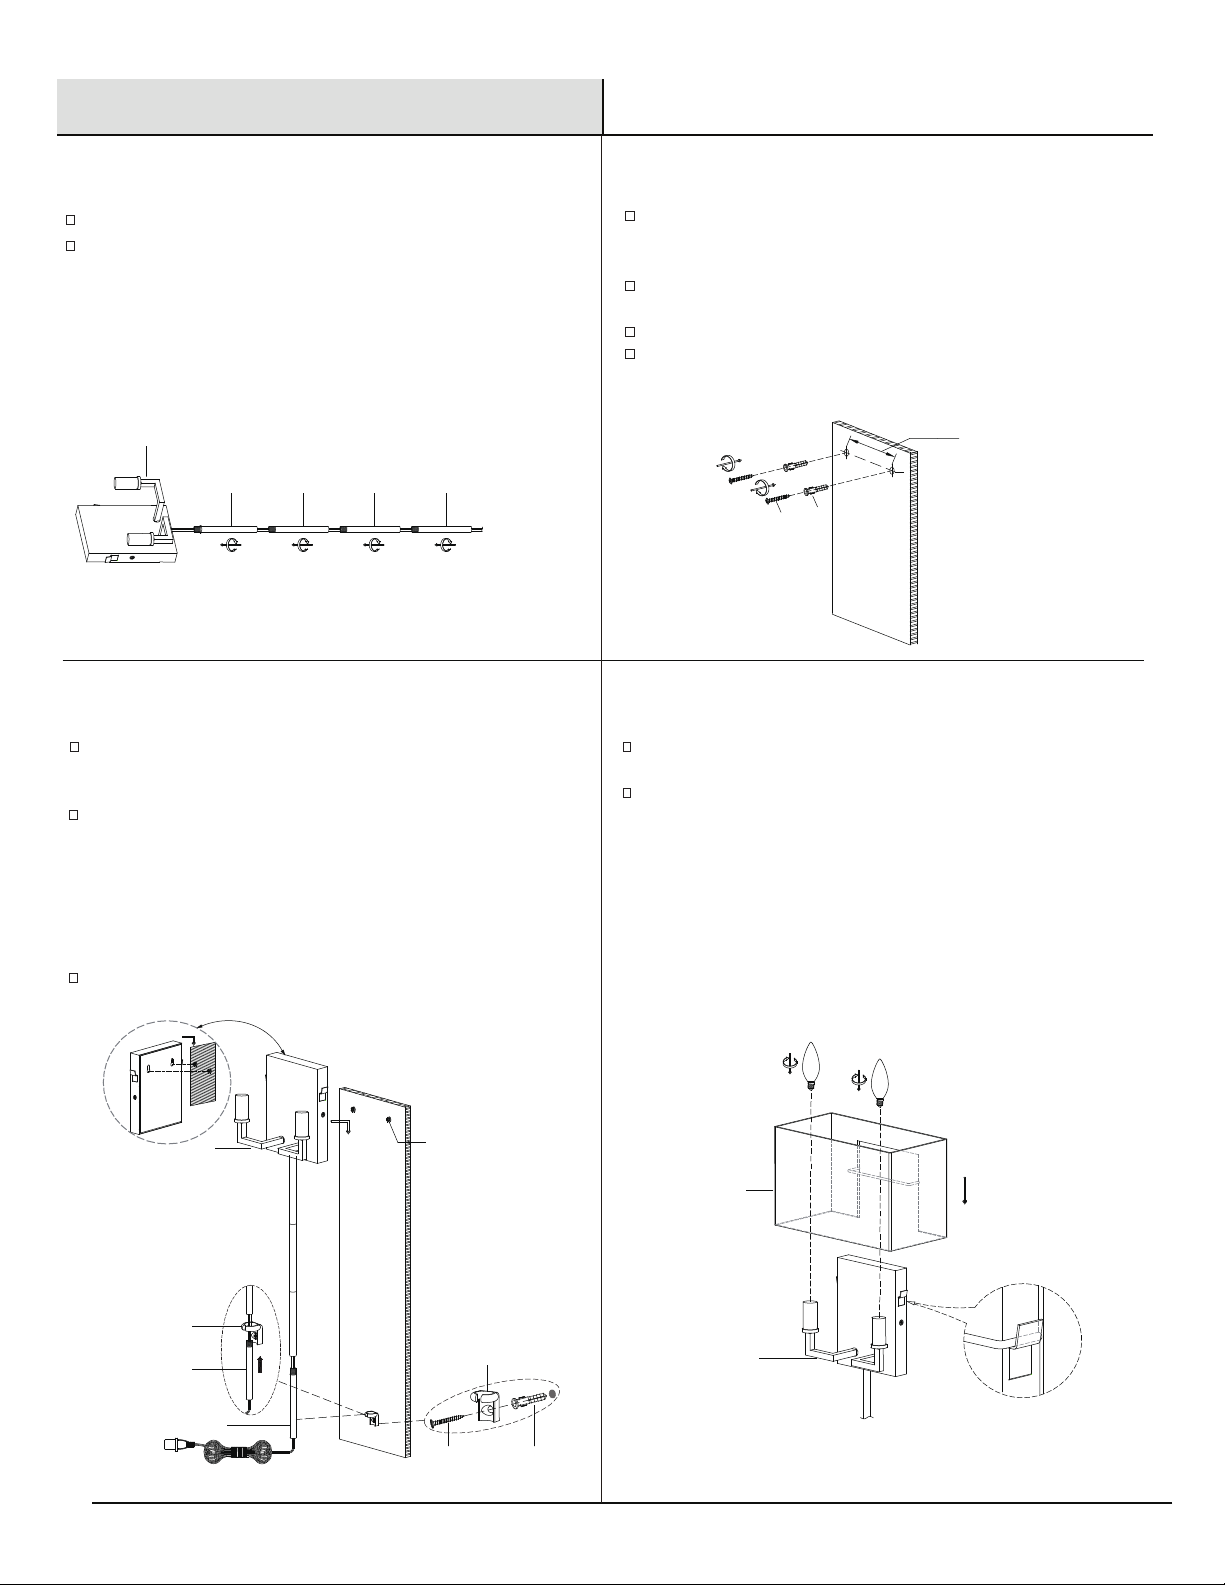
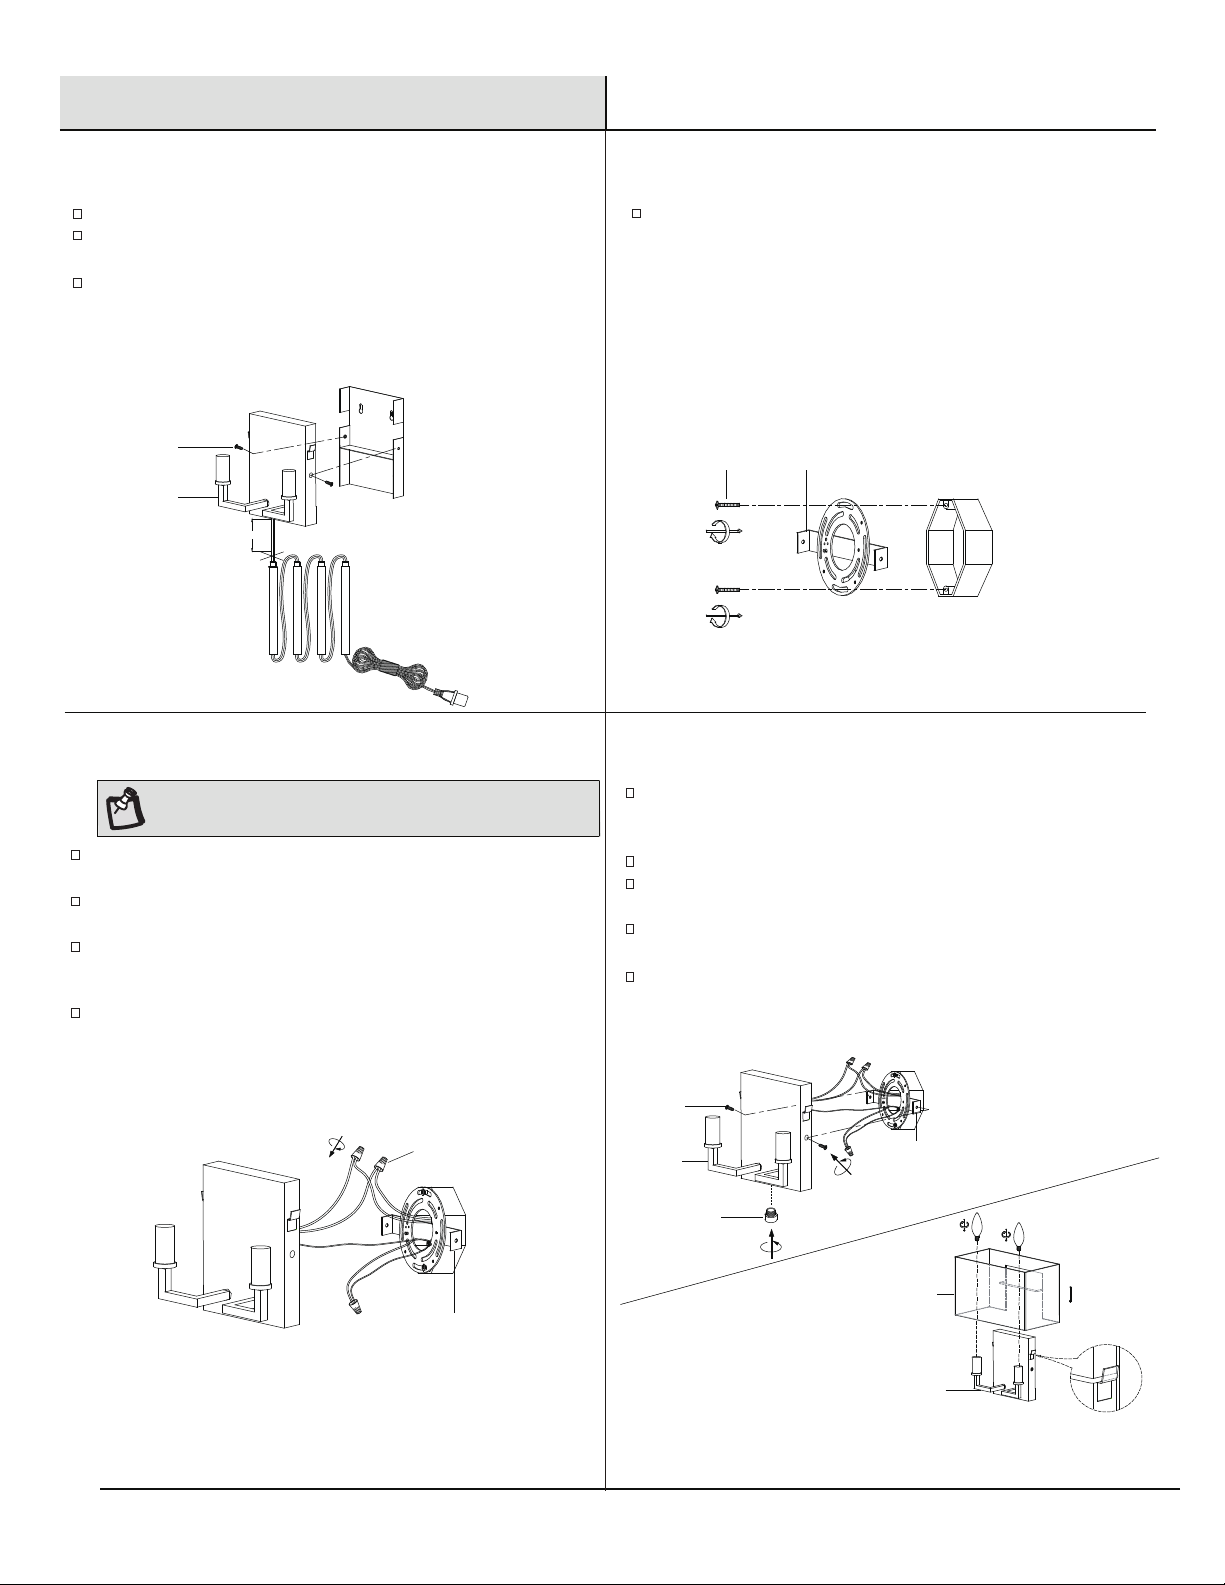
Instalación . . . . . . . . . . . . . . . . . . . . . . . . . . . . . . . . . . . . . . . . 5-6
Cuidado y limpieza . . . . . . . . . . . . . . . . . . . . . . . . . . . . . . . . . . 7
Contenido del empaque . . . . . . . . . . . . . . . . . . . . . . . . . . . 4.
Resolución de problemas
. . . . . . . . . . . . . . . . . . . . . . . . . . . . . .7
Información de seguridad
Garantía
GARANTÍA DE TRES AÑOS DEL FABRICANTE
QUÉ CUBRE
El fabricante garantiza esta unidad contra defectos de materiales y de mano de obra por un período de tres (3) años a contar de la fecha
de compra.
Esta garantía aplica sólo al consumidor comprador original y sólo a productos que han tenido un uso y servicio normal. Si este producto
tiene fallas, la única obligación del fabricante, y el único recurso del consumidor, será la reparación o el reemplazo del producto, a discreción
del fabricante, siempre que el producto no haya cambiado como consecuencia de su mal uso, abuso, accidente, modicaciones, alteraciones,
abandono o maltrato. Esta garantía no aplica a ningún producto que haya sido instalado o montado indebidamente, o utilizado de una manera
que no aparezca indicada en las instrucciones que vienen con el producto. Esta garantía no aplicará a un producto cuya falla se deba a accidente,
mal uso, abuso, abandono, alteración, instalación defectuosa o cualquier otra falla que no se relacione con defectos de materiales o de mano de
obra. Esta garantía no aplicará al acabado de ninguna parte del producto, por ejemplo la supercie, ni al desgaste producido por los elementos,
ya que esto se considera un desgaste normal.
QUÉ NO CUBRE
ADVERTENCIA:
Revise el aislamiento del hilo para
conrmar que durante el transporte no se haya cortado
o raspado, o que no tenga cobre expuesto. Si el hilo
tiene algún defecto, no proceda con el ensamblaje.
Llame a nuestro equipo de atención al cliente al
1-800-986-3460.
El fabricante no garantiza y especícamente niega ofrecer una garantía, explícita o implícita, de que el producto sea apropiado para un propósito
en particular, fuera del contenido en esta garantía. El fabricante especícamente niega tener responsabilidad, y no se hará responsable de
cualquier pérdida o daño consiguiente o secundario, que incluya pero no se limite a cualquier costo de mano de obra o gastos incurridos para
reemplazar o reparar el producto en cuestión.
Llame al Equipo de Atención al Cliente al 1-800-986-3460 o visite www.HOMEDEPOT.com/HOMEDECORATORS.
ADVERTENCIA: RIESGO DE DESCARGA ELÉCTRICA. Antes
de comenzar la instalación, desconecte la electricidad en el
interruptor de circuitos o caja de fusibles. No basta con
apagar el interruptor para evitar descargas eléctricas.
SI TIENES ALGUNA PREGUNTA AL RESPECTO, CONSULTA A
UN ELECTRICISTA CALIFICADO.

3
Por favor llame al 1-800-986-3460 si requiere mayor atención.
HOMEDEPOT.COM/HOMEDECORATORS
□
□
□
HERRAMIENTAS NECESARIAS
ACCESORIOS DE MONTAJE INCLUIDOS
Escalera de mano Gafas de seguridad Destornillador
Phillips
Cortaalambres Pinzas
Cinta aislante
Pinzas pelacables
Lea todas las instrucciones antes del ensamblaje.
Para evitar dañar este producto, ármelo sobre una supercie suave y no abrasiva, como una alfombra o cartones.
Conserve su recibo y estas instrucciones como prueba de compra.
□
Previor al ensamblaje
NOTA: El equipo de montaje no aparece a escala.
Utilise
dos bombillas E12 tipo B de 60 vatios o bombillas CFL o LED equivalentes (no incluidas).
3
Tarugo
AA
2
BB
CC
Tornillos
1
Gancho de plástico
1
1
DD Tornillo
de cabeza plana
2
Caja de empalme
Soporte de montaje
EE
3
FF
Conectores de hilo
CantidadDescripciónPieza
CC
BB
AA DD
FF
EE GG
GG

4
CONTENIDO DEL EMPAQUE
Pre-instalación (continuación)
A1
1
Tubos
Pantalla
Luminaria
B
C
4
1
Tornillos de la cubierta
Tapa
D
E
4
CantidadDescripciónPieza
A
B
C
D
E

5 Por favor llame al 1-800-986-3460 si requiere mayor atención.
HOMEDEPOT.COM/HOMEDECORATORS
Instalación (como luminaria portátil)
1 Preparación de la unidad para la
instalación
2 Instalación del soporte de montaje
3 Instalación de la luminaria
Desembale con cuidado todas las piezas y colóquelas sobre
una supercie limpia y pareja.
Instale los tubos (B) a la unidad de la luminaria (A).
4 Instalación de la pantalla y la bombilla
Ponga la pantalla (C) sobre la unidad de la luminaria (A) e inserte
el marco de la pantalla en los dos extremos redondeados de la
unidad de la luminaria (A).
Instale dos bombillas E12 tipo B de 60 vatios o bombillas CFL o LED
equivalentes (no incluidas).
Determine el lugar donde desea instalar la lámpara, y verique que
tenga acceso a una toma de corriente; asegúrese que no haya cableado
eléctrico o cañerías de agua en la pared donde piensa montar la lámpara.
Marque los lugares donde irán los tarugos (AA) en la pared y perfore en
cada marca un oricio de 7 mm de diámetro.
Inserte los tarugos (AA) y golpéelos para insertarlos debidamente en
la pared.
Ponga los dos tornillos (BB) en los tarugos (AA) con el destornillador,
dejando expuesto el largo del tornillo necesario para insertarlos en las
ranuras de la unidad de la luminaria.
B B B B
A
C
A
Deslice el tubo inferior (B) por el gancho de Alinee las ranuras de
la unidad de la luminaria (A) con los tornillos (BB) de la pared y
empuje delicadamente la cubierta hacia la pared, para luego
deslizarla hacia abajo y jarla en su lugar.
Fije el gancho de plástico (CC) al lugar apropiado del tubo
inferior (B) y marque el borde exterior del gancho de plástico (CC).
Desenrosque el tubo inferior (B) y sepárelo; perfore un oricio de
7 mm de diámetro en el centro de esta ubicación marcada e
instale el tarugo (AA). Retire el gancho de plástico (CC) que viene
enganchado al tubo inferior (B) y fíjelo al tarugo (AA) con el
tornillo
de cabeza plana (DD).
Deslice el tubo inferior (B) por el gancho de plástico (CC) y
enrósquelo a los tubos ensamblados (B).
ABB
B
DD
CC
AA
CC
B
BB AA
2.75 pulg. /6.98 cm

6
Instalación (como luminaria ja)
1
Preparación de la unidad para la
instalación
Desembale con cuidado todas las piezas y colóquelas sobre una
supercie limpia y pareja.
Destornille los tornillos de la cubierta (D) para retirar la placa
posterior de montaje que viene jada.
Corte el cable de alimentación y deje un mínimo de 6,5 pulgadas
(16,5 cm) para hacer las conexiones eléctricas, y deslice el hilo
eléctrico por el oricio inferior hacia la parte de atrás de la
cubierta, y luego separe los dos hilos del cable con cuidado,
vericando que el aislamiento del cable no esté dañado; recorte
1/2 pulg. (1,3 cm) del aislamiento para exponer el metal del hilo
conductor.
4
Instalación de la luminaria
Ponga la unidad de la luminaria (A) sobre el soporte de montaje (EE)
y alinee los oricios del soporte de montaje (EE) con los de la
luminaria (A); je con los tornillos de la cubierta (D).
Enrosque la tapa (E) en el oricio inferior de la unidad de la lámpara.
Ponga la pantalla (C) sobre la unidad de la luminaria (A) e inserte el
marco de la pantalla en los dos extremos redondeados de la unidad
de la luminaria (A).
Instale dos bombillas E12 tipo B de 60 vatios o bombillas CFL o LED e
quivalentes (no incluidas).
Vuelva a conectar la alimentación eléctrica. Encienda la luz con el
interruptor de la pared y de la luminaria.
2
Instalación del soporte de montaje
Ajuste el soporte de montaje (EE) a la caja de empalme (no incluida)
con los tornillos de la caja de empalme (FF).
NOTA: Los extremos redondeados del soporte de montaje (EE)
deberían quedar en posición horizontal.
EE
EE
A
D
FF
3
Conexiones eléctricas
Haga las conexiones a un circuito de 120V AC 60Hz.
NOTA:
Conecte el hilo con la supercie acanalada al hilo blanco del
circuito de alimentación.
Conecte el hilo con marcas y supercie lisa al hilo negro del
circuito de alimentación.
Enrolle el hilo de cobre pelado de conexión a tierra de la
luminaria alrededor del tornillo verde del soporte de montaje (EE),
y luego conéctelo al conductor de conexión a tierra del circuito
de alimentación.
Utilice conectores de hilo (GG) aprobados por U.L./CSA
adecuados para el tamaño, tipo y número de conductores.
No deberían quedar hilos o conexiones sueltos. Asegure los
conectores de hilo (GG) con cinta aislante aprobada por U.L./CSA.
GG
6,5 pulg. /16,51 cm
A
C
EE
A
D
E

7
Por favor llame al 1-800-986-3460 si requiere mayor atención.
HOMEDEPOT.COM/HOMEDECORATORS
Care and Cleaning
Clean the unit with a soft, dry cloth.
Do not use any cleaners with chemicals ,
solvents, or harsh abrasives.
Troubleshooting
Possible Causes
The bulb will not light. The bulb is burned out.
There is an exposed wire.
Replace the light bulb.
The power is off. Ensure the power supply is on.
The circuit breaker is off.
Ensure the circuit breaker is in the ON position.
The fuse blows or circuit breaker
blows when the light is turned on.
Discontinue use of the lamp.
Contact a qualified electrician or call the
Customer Service Team at 1-855-HD-HAMPTON.
Solutions
Problem

Conserve este manual para uso futuro.
¿Tiene preguntas, problemas o faltan piezas? Antes de regresar a la tienda,
llame a Servicio al Cliente de Home Decorators Collection
de lunes a viernes de 8 a.m. a 7 p.m.,
sábado de 9 a.m. a 6 p.m., hora local del Este
Conserve este manual para uso futuro.
1-800-986-3460
HOMEDEPOT.COM/HOMEDECORATORS
This manual suits for next models
3
Table of contents
Languages:
Other Home Decorators Collection Home Lighting manuals

Home Decorators Collection
Home Decorators Collection HDP98266BLBN User manual

Home Decorators Collection
Home Decorators Collection TOBIAS W775A03BKG User manual

Home Decorators Collection
Home Decorators Collection 530- 675 User manual

Home Decorators Collection
Home Decorators Collection NEEDHAM HDP98266BS User manual

Home Decorators Collection
Home Decorators Collection RS20190724-1 BN User manual

Home Decorators Collection
Home Decorators Collection 7986HDCBN User manual