Home Decorators Collection RS20190724-1 BN User manual

THANK YOU
We appreciate the trust and condence you have placed in Home Decorators Collection through the purchase of this light xture. We strive
to continually create quality products designed to enhance your home. Visit us online to see our full line of products available for your home
improvement needs. Thank you for choosing Home Decorators Collection!
USE AND CARE GUIDE
SHELSTON 1 LIGHT PENDANT
Questions, problems, missing parts? Before returning to the store,
call Home Decorators Collection Customer Service
8 a.m. - 7 p.m., EST, Monday – Friday, 9 a.m. – 6 p.m., EST, Saturday
1-800-986-3460
HOMEDEPOT.COM/HOMEDECORATORS
Item #1005751299 / 1005751303 / 1005751298
1005751304 / 1005818893 / 1005818900
Model #RS20190724-1 BN / RS20190724-1 CH / RS20190724-1 BK
RS20190724-1 ORB / RS20190724-1-AG / DIS-RS20190724-1-AG

2
Table of Contents
Table of Contents ............................2
Safety Information............................2
Warranty ..................................2
Pre-Installation..............................3
Planning Installation ...............................3
Tools Required ....................................3
Hardware Included.................................3
Package Contents .................................4
Installation.................................5
Operation..................................7
Care and Cleaning............................7
Troubleshooting .............................7
Safety Information
□Consult a qualied electrician if you have any electrical
questions. CAUTION: Inspect the wire insulation for any cuts,
abrasions, or exposed copper that may have resulted during
shipping. If there is a defect in the wire, do not attempt
installation. Please call our Customer Service Team at
1-800-986-3460.
WARNING: Before starting installation of this xture
or removal of a previous xture, disconnect the power by
turning off the circuit breaker or by removing the fuse at the
fuse box.
Warranty
The manufacturer warrants this lighting xture to be free from defects in materials and workmanship for a period of ve (5) years from
date of purchase. This warranty applies only to the original consumer purchaser and only to products used in normal use and service. If
this product is found to be defective, the manufacturer’s only obligation, and your exclusive remedy, is the repair or replacement of the
product at the manufacturer’s discretion, provided that the product has not been damaged through misuse, abuse, accident, modications,
alterations, neglect, or mishandling. This warranty shall not apply to any product that is found to have been improperly installed, set-up,
or used in any way not in accordance with the instructions supplied with the product. This warranty shall not apply to a failure of the
product as a result of an accident, misuse, abuse, negligence, alteration, faulty installation, or any other failure not relating to faulty material
or workmanship. This warranty shall not apply to the nish on any portion of the product, such as surface and/or weathering, as this is
considered normal wear and tear. The manufacturer does not warrant and specially disclaims any warranty, whether express or implied,
of tness for a particular purpose, other than the warranty contained herein. The manufacturer specically disclaims any liability and
shall not be liable for any consequential or incidental loss or damage, including but not limited to any labor / expense costs involved in the
replacement or repair of said product.
Contact the Customer Service Team at 1-800-986-3460 or visit www.homedepot.com/homedecorators.

3 HOMEDEPOT.COM/HOMEDECORATORS
Please contact 1-800-986-3460 for further assistance.
Pre-Installation
PLANNING INSTALLATION
□Read all instructions before installation.
□To avoid damaging this product, assemble it on a soft, non-abrasive surface, such as carpet or cardboard.
□Keep your receipt and these instructions for proof of purchase.
TOOLS REQUIRED
Ladder Safety
goggles
Electrical
tape
Phillips
screwdriver
Flat blade
screwdriver Pliers Wire
strippers
HARDWARE INCLUDED
NOTE: Hardware not shown to actual size.
AA BB CC DD
Part Description Quantity
AA Mounting bracket 1
BB Mounting screw 2
CC Wire nut 3
DD Cap nut 2

4
Pre-Installation (continued)
PACKAGE CONTENTS
E FD
AB C
Part Description Quantity
A Light xture 1
B Shade 1
C Lock ring 1
D Canopy 1
E Short rod 2
F Long rod 2

5 HOMEDEPOT.COM/HOMEDECORATORS
Please contact 1-800-986-3460 for further assistance.
Installation
1 Assembling the light xture
□Screw the short rods (E) to the top of the light xture (A)
rst. Then screw in the remaining long rods (F). Make sure
to feed the branch wires through the rods during assembly.
□Attach the canopy (D) to the last long metal rod (F).
□Secure the metal shade (B) to the light xture (A) with the
lock ring (C).
NOTE: Before assembling the rods with the branch wire,
choose the number of tubes to adjust the height.
E
A
B
C
F
D

6
Installation
2 Attaching the mounting bracket to the
junction box
□Attach mounting unit (AA) to the junction box (not included)
with mounting screws (BB).
NOTE: The pre-installed support screwson the mounting
bracket (AA) should protrude outaway from the junction
box.
BB
AA
3 Making the electrical connections
□Connect the copper wire on the light xture (A) to the
mounting bracket (AA) by securing it with the preinstalled
ground screw.
□Connect the black to black (power), the white to white
(neutral) and copper wire to ground wire with the wire
nuts(CC) and secure with electrical tape (not included).
NOTE: If the wires from the xture are the same color,
attach the side with markings or letters to the black
(positive) wire and the other to the white (neutral) wire.
CC
A
AA
4 Secure the light xture
□Secure the light fixture (A) to the junction box by placing
the canopy (D) over the support screws on the mounting
unit (AA) and securing it with the cap nuts (DD).
5 Install the light bulb
□Install one medium base incandescent 60-watt max bulb
(not included).
DD
D
AA

7 HOMEDEPOT.COM/HOMEDECORATORS
Please contact 1-800-986-3460 for further assistance.
Operation
1 Secure the light xture
□Turn the light switch on to activate the xture.
Care and Cleaning
□Clean the lamp with a soft, dry cloth.
□Do not use any cleaners with chemicals, solvents, or harsh abrasives.
Troubleshooting
Problem Possible Cause Possible Cause
The bulb will not light. The bulb is burned out. Replace the light bulb.
The power is off. Ensure the power supply is On.
There is a faulty wire connection. Check the wiring.
The circuit breaker is off. Ensure the circuit breaker is in the ON position.
The fuse blows or circuit
breaker trips when the
light is turned on.
There are crossed wires or the
power wire is grounding out.
Check the wire connections.
Contact a qualied electrician or call the Customer Service Team at
1-800-986-3460.

Questions, problems, missing parts? Before returning to the store,
call Home Decorators Collection Customer Service
8 a.m. – 7 p.m., EST, Monday – Friday, 9 a.m. – 6 p.m., EST, Saturday
1-800-986-3460
HOMEDEPOT.COM/HOMEDECORATORS
Retain this manual for future use.

GRACIAS
Apreciamos la conanza que ha depositado en Home Decorators Collection por la compra de esta luminaria. Nos esforzamos por crear
continuamente productos de calidad diseñados para mejorar su hogar. Visítenos en internet para ver nuestra línea completa de productos
disponibles para sus necesidades de mejorar su hogar. ¡Gracias por elegir a Home Decorators Collection!
GUÍA DE USO Y CUIDADO
SHELSTON LÁMPARA COLGANTE DE 1 LUZ
¿Tiene preguntas, problemas, o faltan piezas? Antes de regresar a la tienda,
llame a Servicio al Cliente de Home Decorators Collection
de lunes a viernes de 8 a.m. a 7 p.m., sábado de 9 a.m. a 6 p.m., hora local del Este
1-800-986-3460
HOMEDEPOT.COM/HOMEDECORATORS
Artículo #1005751299 / 1005751303 / 1005751298
1005751304 / 1005818893 / 1005818900
Modelo #RS20190724-1 BN / RS20190724-1 CH / RS20190724-1 BK
RS20190724-1 ORB / RS20190724-1-AG / DIS-RS20190724-1-AG

2
Tabla de contenido
Tabla de contenido ...........................2
Información de seguridad.......................2
Garantía. . . . . . . . . . . . . . . . . . . . . . . . . . . . . . . . . . . 2
Pre-instalación ..............................3
Planicación de la instalación ........................3
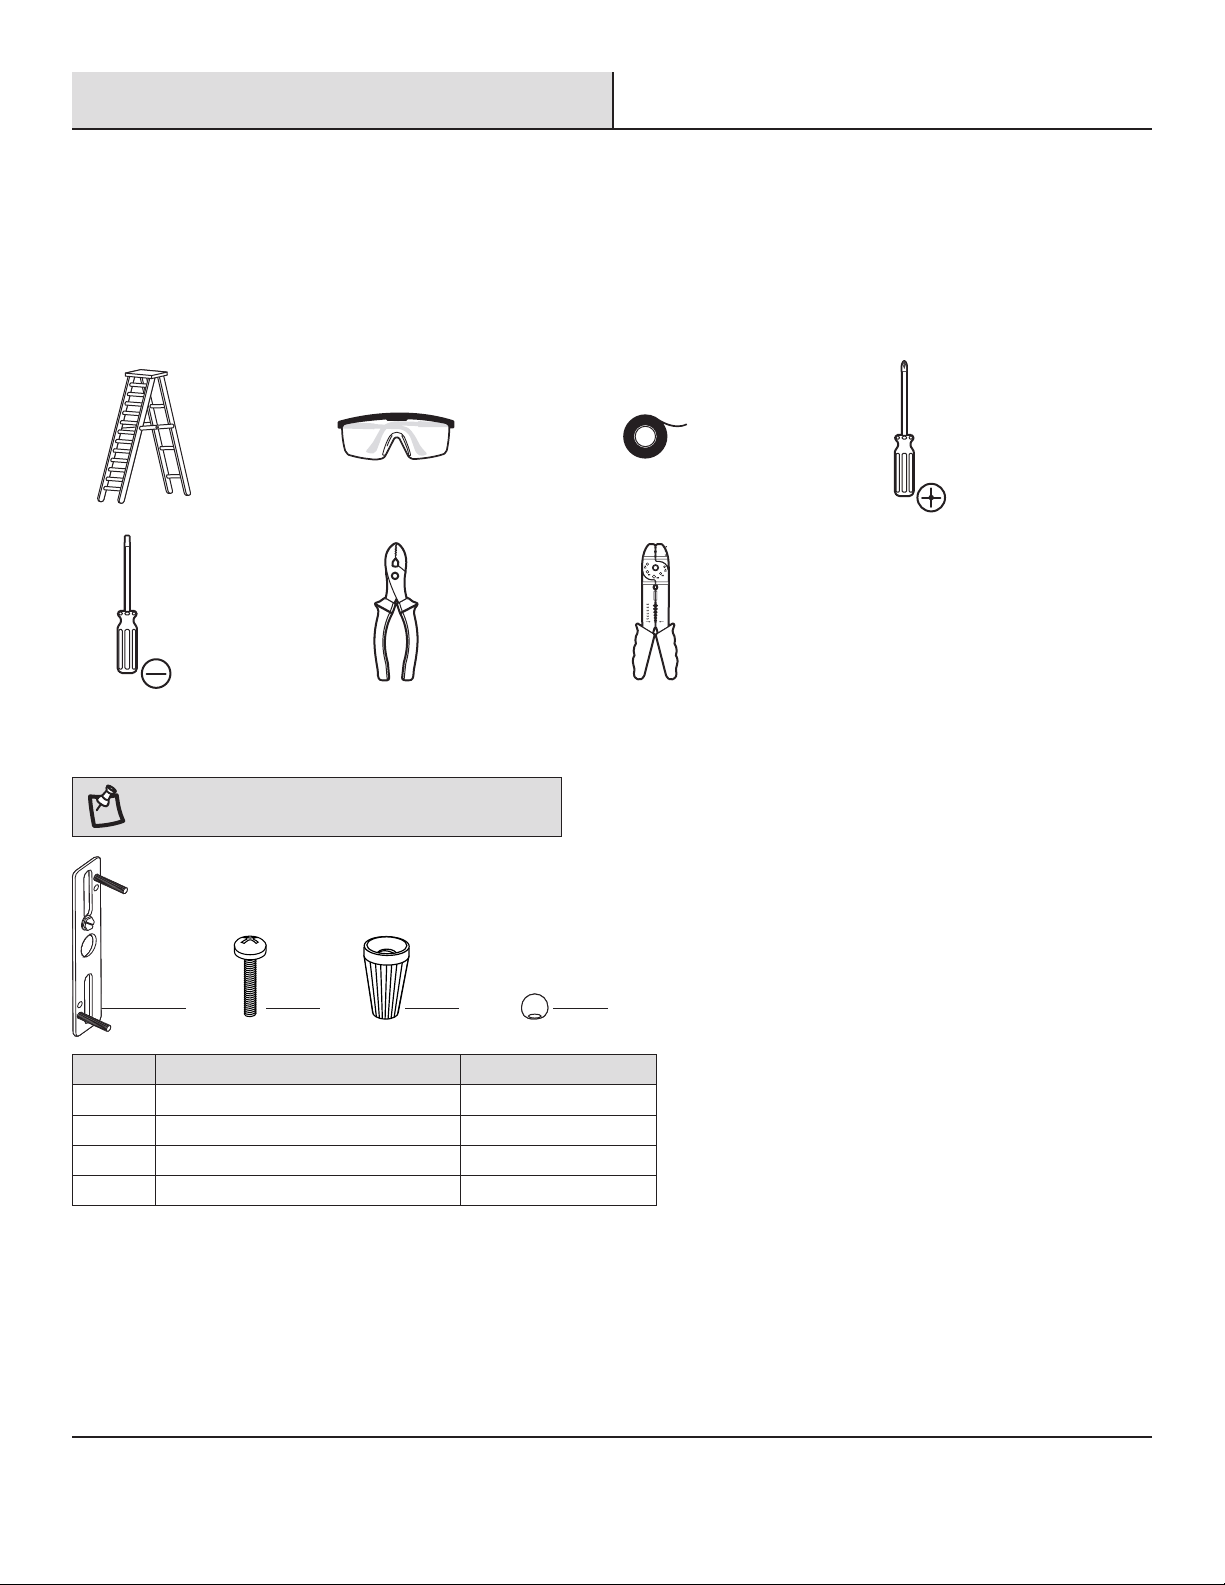
Herramientas requeridas ............................3
Herraje incluido ...................................3
Contenido del paquete..............................4
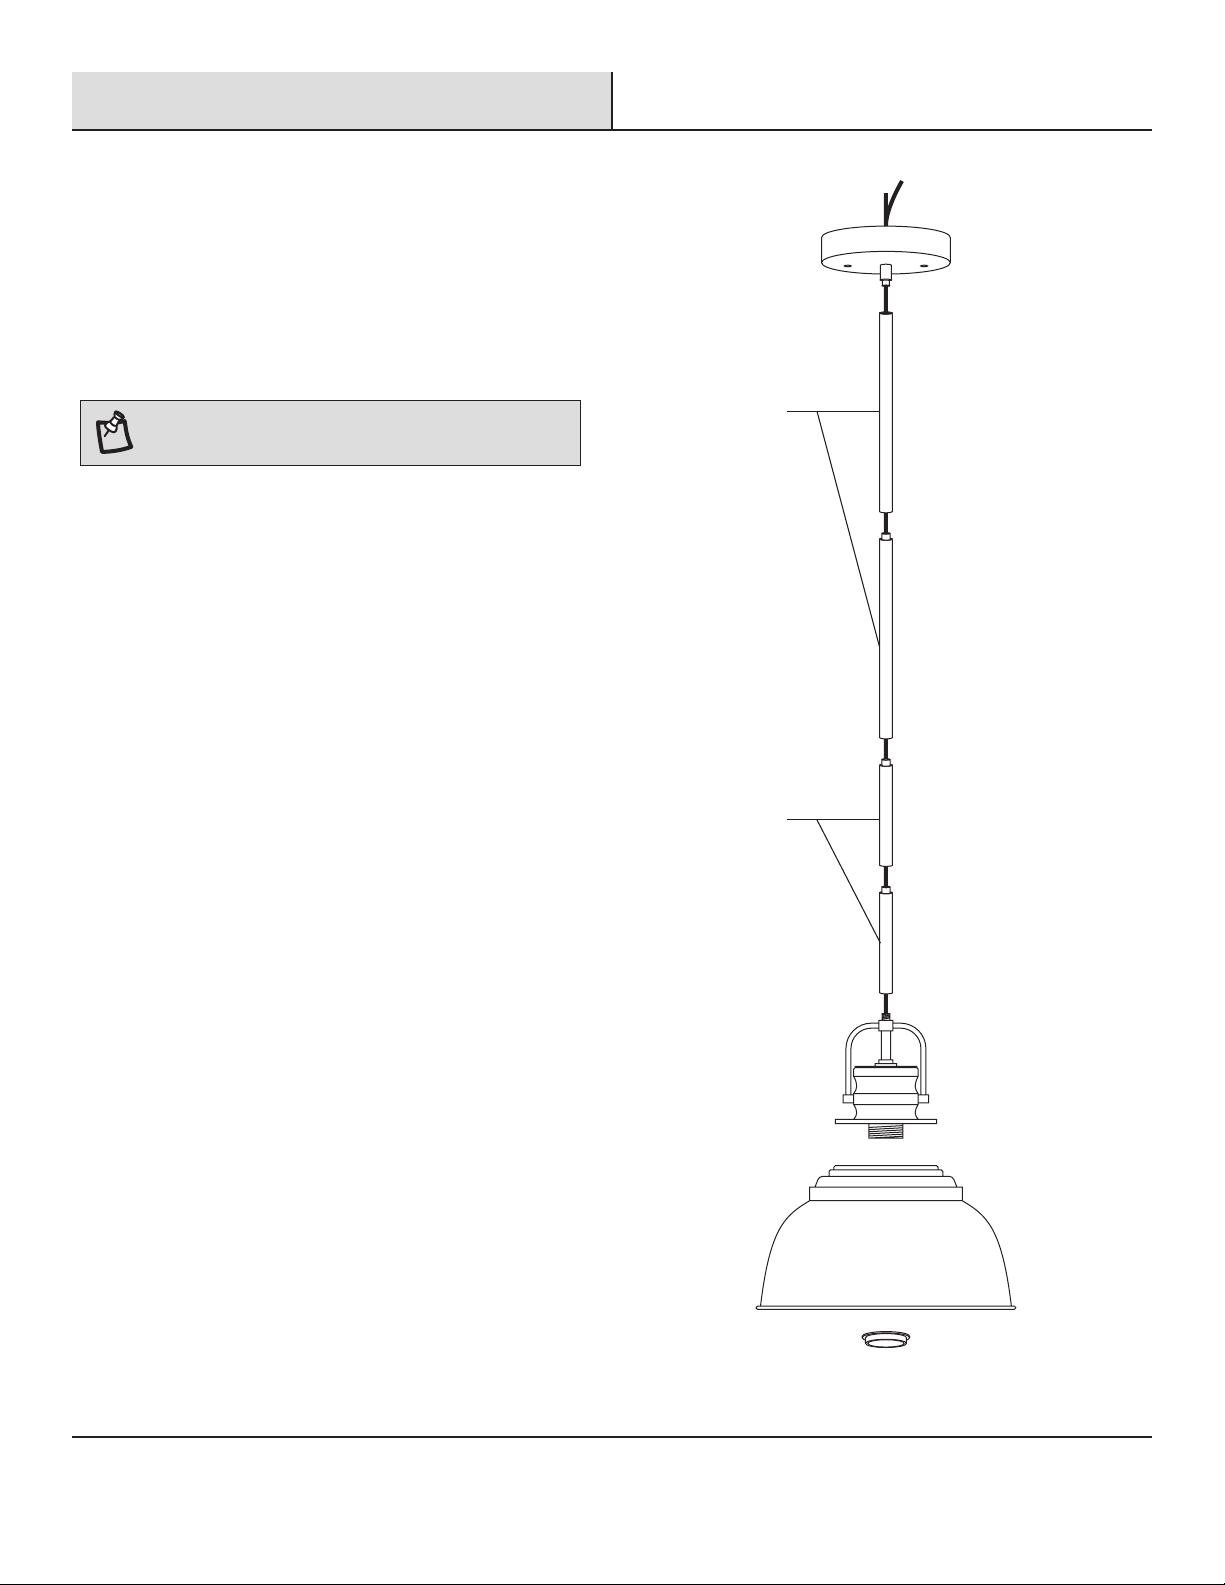
Instalación .................................5
Operación .................................7
Cuidado y limpieza ...........................7
Resolución de fallas ..........................7
Información de seguridad
□Consulte con un electricista calicado sobre cualquier
preguntaque pueda tener sobre electricidad. PRECAUCIÓN: Revise el aislamiento del cable en busca
de cortes, abrasiones o cobre expuesto que pueda haber
resultado durante el envío. Si hay un defecto en el cable, no
intente la instalación. Llame a nuestro Equipo de Servicio al
Cliente al 1-800-986-3460.
ADVERTENCIA: Antes de proceder con la instalación de
esta luminaria o retirar una luminaria anterior, desconecte
la energía apagando el interruptor de circuito o retirando el
fusible de la caja de fusibles.
Garantía
El fabricante garantiza que esta luminaria está libre de defectos en materiales y mano de obra por un periodo de cinco (5) años a
partir de la fecha de compra. Esta garantía aplica únicamente al comprador consumidor nal y únicamente para los productos usados
en condiciones de uso y servicio normal. Si este producto está defectuoso, la única obligación del fabricante y su exclusiva solución,
es reparar o reemplazar el producto a discreción del fabricante, siempre y cuando el producto no ha sido dañado por mal uso, abuso,
accidente, modicaciones, alteraciones, negligencia o mal manejo. Esta garantía no aplicará a ningún producto que se detecte que se
haya instalado, congurado o usado incorrectamente de alguna manera que no sea de acuerdo con las instrucciones proporcionadas
con el producto. Esta garantía no aplicará a fallas del producto como resultado de un accidente, mal uso, abuso, negligencia, alteración
o instalación incorrecta o cualquier otra falla no relacionada a una falla por fabricación material o de mano de obra. Esta garantía no
aplicará al acabado de cualquier parte del producto, como la supercie y/o intemperización, ya que esto es considerado deterioro por uso.
El fabricante no garantiza ni deniega especícamente ninguna garantía, sea expresa o implícita, o idoneidad para un propósito particular,
que no sea la garantía contenida en el presente. El fabricante renuncia especícamente a cualquier responsabilidad civil y no se hará
responsable por daños y perjuicios, por pérdida o daños accesorios, incluidos pero no limitados a los gastos de mano de obra u otros
gastos relacionados al reemplazo o reparación de dicho producto.
Póngase en contacto con el Equipo de Servicio al Cliente llamando al 1-800-986-3460 o visite www.homedepot/homedecorators.

3 HOMEDEPOT.COM/HOMEDECORATORS
Para obtener asistencia, póngase en contacto llamando al 1-800-986-3460.
Pre-instalación
PLANIFICACIÓN DE LA INSTALACIÓN
□Lea todas las instrucciones antes de la instalación.
□Para evitar dañar el producto, ensámblelo sobre una supercie suave y no abrasiva, como una alfombra o cartones.
□Conserve su recibo y estas instrucciones como prueba de compra.
HERRAMIENTAS REQUERIDAS
Escalera de seguridad
Anteojos
Cinta
aislante
Phillips
Destornillador
de punta plana
Destornillador Tenazas Pelador
de cables
HERRAJE INCLUIDO
NOTA: No se muestra el herraje en el tamaño real.
AA BB CC DD
Pieza Descripción Cantidad
AA Unidad de montaje 1
BB Tornillo de montaje 2
CC Tuerca de cable 3
DD Tuerca de bola 2

4
Pre-instalación (continuación)
CONTENIDO DEL PAQUETE
E FD
AB C
Pieza Descripción Cantidad
A Luminaria 1
B Pantalla 1
C Anillo de receptáculo 1
D Dosel 1
E Varilla corta 2
F Varilla larga 2

5 HOMEDEPOT.COM/HOMEDECORATORS
Para obtener asistencia, póngase en contacto llamando al 1-800-986-3460.
Instalación
1 Ensamblaje de la luminaria
□Fije primero las varillas cortas (E) a la parte superior de
la luminaria (A). Fije las varillas largas restantes (F). Hale
el conjunto de los cables de la lámpara a través de las
varillas metálicas y de la cubierta.
□Fije el dosel (D) a la última varilla metálica larga (F).
□Coloque la pantalla de vidrio (B) sobre la lámpara (A) y
fíjela en su lugar con el anillo de receptáculo (C).
NOTA: Puede elegir la cantidad de varillas metálicaspara
regular el largo de la lámpara.
E
A
B
C
F
D

6
Instalación
2 Instalación del soporte de montaje en
la caja de empalmes.
□Instale la unidad de montaje (AA) en la caja de empalmes
(no incluida) con los tornillos de montaje (BB).
NOTA: El tornillo de soporte preinstalado en la unidad
de montaje (AA) debe sobresalir hacia afuera de la caja de
conexiones.
BB
AA
3 Cómo hacer las conexiones eléctricas
□Conecte el cable de cobre de la luminaria (A) en la unidad
de montaje (AA) asegurándolo con el tornillo de tierra
preinstalado.
□Conecte el cable negro en el negro (energía), el blanco en
el blanco (neutro) y el de cobre al de tierra con las tuercas
de cable(CC) y asegúrelos con cinta aislante (no incluida).
NOTA: Si los cables de la luminaria son del mismo color,
instale el lado con marcas o letras en el cable negro
(positivo) y el otro en el cable blanco (neutro).
CC
A
AA
4 Cómo asegurar la luminaria
□Fije la cubierta de la lámpara (A) al cajetín colocando los
agujeros de la cubierta (D) sobre los tornillos de soporte en
la unidad de montaje (AA) y asegurándola con las tuercas
de bola (DD).
5 Instalación de las bombilla
□Instale una bombilla incandescente de base media de 60
vatios máx (no incluidas).
DD
D
AA

7 HOMEDEPOT.COM/HOMEDECORATORS
Para obtener asistencia, póngase en contacto llamando al 1-800-986-3460.
Operación
1 Cómo encender la lámpara
□Encienda el interruptor de la lámpara para activar la luminaria.
Cuidado y limpieza
□Limpie la lámpara con un paño suave y seco.
□No use ningún limpiador con químicos, solventes o abrasivos ásperos.
Resolución de fallas
Problema Posible causa Solución
La bombilla no alumbra. La bombilla está quemada. Reemplace la bombilla.
La energía está desconectada. Asegúrese de que el suministro de energía esté conectado.
La conexión del cable eléctrico
está defectuosa.
Revise el cableado.
El disyuntor de circuito está
apagado.
Asegúrese de que el interruptor de circuito esté en la posición ON.
El fusible explota o el
interruptor se dispara
cuando la bombilla está
encendida.
Los cables están cruzados o el
cable de energía se descarga a
tierra.
Revise las conexiones de los cables.
Contacte a un electricista calicado o llame a Servicio al Cliente al
1-800-986-3460.

¿Tiene preguntas, problemas, o faltan piezas? Antes de regresar a la tienda,
llame a Servicio al Cliente de Home Decorators Collection
de lunes a viernes de 8 a.m. a 7 p.m., sábado de 9 a.m. a 6 p.m., hora local del Este
1-800-986-3460
HOMEDEPOT.COM/HOMEDECORATORS
Conserve este manual para uso futuro.
This manual suits for next models
11
Table of contents
Languages:
Other Home Decorators Collection Home Lighting manuals

Home Decorators Collection
Home Decorators Collection TOBIAS W775A03BKG User manual

Home Decorators Collection
Home Decorators Collection 7986HDCBN User manual

Home Decorators Collection
Home Decorators Collection 20535-000 User manual

Home Decorators Collection
Home Decorators Collection NEEDHAM HDP98266BS User manual

Home Decorators Collection
Home Decorators Collection 530- 675 User manual

Home Decorators Collection
Home Decorators Collection HDP98266BLBN User manual