Home Decorators HRP1691A User manual

THANK YOU
We appreciate the trust and confidence you have placed in Home Decorators Collection through the purchase of this exterior wall
lantern. We strive to continually create quality products designed to enhance your home. Visit us online to see our full line of
products available for your home improvement needs. Than you for choosing Home Decorators Collection!
Item
#
1
00
0
-
306
-
241
Model #HRP1691A
USE AND CARE GUIDE
CULVERDEN 1-LIGH EX ERIOR WALL LAN ERN
Questions, problems, missing parts? Before returning to the store,
call Home Decorators Collection Customer Service
8 a.m. - 6 p.m., ST, Monday-Friday
1-877-527-0313
HOMEDEPO .COM

2
able of Contents
able of Contents .......................................................... 2
Safety Information ......................................................... 2
Warranty ......................................................................... 2
Pre-Installation .............................................................. 3
Planning Installation ............................................................3
Tools Required .....................................................................3
Hardware Included ..............................................................3
Package Contents ...............................................................4
Installation ..................................................................... 5
Care and Cleaning ........................................................ 7
roubleshooting ............................................................ 7
Safety Information
WARNING:
Carefully read and understand the
information given in this manual before beginning the
assembly and installation. Failure to do so could lead to
electric shock, fire, or other injuries which could be
hazardous or even fatal.
WARNING:
nsure the electricity to the wires you are
working on is shut off. ither remove the fuse or turn off
the circuit breaker.
NO ICE:
Changes or modifications not expressly approved by
the party responsible for compliance could void the user’s
authority to operate the equipment.
Warranty
WHA IS COVERED
The manufacturer warrants this lighting fixture to be free from defects in materials and workmanship for a period of three
(3) years from date of purchase. This warranty applies only to the original consumer purchaser and only to products used
in normal use and service. If this product is found to be defective, the manufacturer’s only obligation, and your exclusive
remedy, is the repair or replacement of the product at the manufacturer’s discretion, provided that the product has not
been damaged through misuse, abuse, accident, modifications, alterations, neglect, or mishandling.
WHA IS NO COVERED
This warranty shall not apply to any product that is found to have been improperly installed, set-up, or used in any way not
in accordance with the instructions supplied with the product. This warranty shall not apply to a failure of the product as a
result of an accident, misuse, abuse, negligence, alteration, faulty installation, or any other failure not relating to faulty
material or workmanship. This warranty shall not apply to the finish on any portion of the product, such as surface and/or
weathering, as this is considered normal wear and tear.
The manufacturer does not warrant and specifically disclaims any warranty, whether express or implied, of fitness for a
particular purpose, other than the warranty contained herein. The manufacturer specifically disclaims any liability and shall
not be liable for any consequential or incidental loss or damage, including but not limited to any labor / expense costs
involved in the replacement or repair of said product.
Contact the Customer Service Team at 1-877-527-0313 or visit www.HomeDepot.com.

3 HOM D POT.COM
Please contact 1-877-527-0313 for further assistance.
Pre-Installation
PLANNING INS ALLA ION
Read all instructions before assembly. Before starting installation of this fixture or removal of a previous fixture, disconnect
the power by turning off the circuit breaker or by removing the fuse at the fuse box. To avoid damaging this product,
assemble it on a soft, non-abrasive surface, such as carpet or cardboard.
NO E: Keep your receipt and these instructions
for proof of purchase.
OOLS REQUIRED
Wire
Strippers
Flathead
Screwdriver
Phillips
Screwdriver
Wire
Cutters
Silicone
Caulk
lectrical
Tape
Safety
Goggles
Ladder
Gloves
HARDWARE INCLUDED
NO E: Hardware not shown to actual size.
Part
Description
Quantity
AA Cross Bar 1
BB Ground Screw 1
CC Outlet Box Screw 2
DD Mounting Screw 2
Wire Connector 3
AA BB CC DD EE

4
Pre-Installation (continued)
PACKAGE CON EN S
Part
Description
Quantity
A Top Cover 1
B Shade 1
C Socket 1
D Finial 1
Screw Cap 1
Part
Description
Quantity
F Bushing A 1
G Wall Plate 1
H Washer 2
I Lock Nut 2
J Bushing B 1
A
B
C
D
J
I
H
G
F
E

5 HOM D POT.COM
Please contact 1-877-527-0313 for further assistance.
Installation
1
Attaching the cross bar to the
outlet box
2
Making the electrical
connections
□ Screw the mounting screws (DD) into the cross bar
(AA).
□ Mount the cross bar (AA) to the outlet box using the
two outlet box screws (CC).
□ Wrap the ground wire from the fixture around the
ground screw (BB) on the cross bar (AA), and then
connect the ground wire from the fixture to the
ground wire from the outlet box.
□ Connect the white wire from the fixture to the white
wire (neutral wire) from the outlet box.
□ Connect the black wire from the fixture to the black
wire (live wire) from the outlet box.
□ Cover the three connections using the three wire
connectors ( ). Wrap the three wire connections
with electrical tape for a more secure connection.
□ Position the wires back inside the outlet box.
3
Securing the fixture to the
wall
□ Align the mounting screws (DD) through the holes
on the wall plate (G).
□ Place the washers (H) onto the protruding mounting
screws (DD).
□ Screw the lock nuts (I) onto the protruding mounting
screws (DD).
AA
CC
DD
AA
EE
BB
G
H
I
DD

6
Installation (continued)
4
Installing the light bulb
5
Attaching the shade
□ Install a 60-Watt maximum, medium-base
incandescent bulb (sold separately) into the socket
(C).
NO E:
You can also use a CFL-equivalent energy-
saving bulb that does not exceed 13 Watts (sold
separately).
□ Place the shade (B) around the socket (C).
6
Secur
ing the shade
7
Attaching the finial
□ Place the top cover (A) onto the shade (B) and the
screw cap ( ) onto bushing A (F).
□ Screw the screw cap ( ) onto bushing A (F).
□ Screw the finial (D) into bushing B (J).
C
B
C
A
B
E
F
J
D

7 HOM D POT.COM
Please contact 1-877-527-0313 for further assistance.
Installation (continued)
8
Applying caulk
□ Once the fixture is mounted on the wall, caulk
the space between the wall and the upper 3/4
area of the wall plate (G) to prevent water seeping
into the outlet box.
□ Leave the bottom 1/4 area uncaulked for drainage
of any water which might leak into the enclosure.
Care and Cleaning
CAU ION
:
Before attempting to clean the fixture,
disconnect the power to the fixture by turning the
breaker off or removing the fuse from the fuse box.
□ Clean the fixture with a soft, dry cloth.
□ Do not use any cleaners with chemicals, solvents, or harsh abrasives.
roubleshooting
Problem
Possible Cause
Solution
The fixture will not light. The power is off. nsure the power supply is on.
The circuit breaker is off. nsure the circuit breaker is in the on position.
The fuse blows or the circuit
breaker trips when the light is
turned on.
The wires are crossed or the
power wire is grounding out.
Check the wire connections.
Contact a qualified electrician or call the Customer
Service Team at 1-877-527-0313.
G

Questions, problems, missing parts? Before returning to the store,
call Home Decorators Collection Customer Service
8 a.m. – 6 p.m., ST, Monday - Friday
1-877-527-0313
HOMEDEPO .COM
Retain this manual for future use.

GRACIAS POR TU COMPRA
Agradecemos la confianza que ha tenido en Home Decorators Collection a traves de de la compra de este araña farola de pared
para exteriores. Nos esforzamos para continuamente crear productos de calidad diseñados para mejorar tu hogar. Visítanos por
Internet para ver nuestra línea completa de productos disponibles para las necesidades de mejoras de tu hogar. Gracias por
elegir Home Decorators Collection!
Artículo
#
1
00
0
-
306
-
241
Modelo #HRP1691A
GUÍA DE USO Y MAN ENIMIEN O
CULVERDEN FAROLA DE PARED PARA EX ERIORES DE 1 LUZ
Preguntas, problemas o piezas faltantes? Antes de regresar a la tienda, llama
al Servicio al Cliente de Home Decorators Collection
de lunes a domingo entre 8 a.m. y 6 p.m., (hora del ste de . UU.)
1-877-527-0313
HOMEDEPO .COM

10
Índice
Índice ............................................................................ 10
Información de Seguridad .......................................... 10
Garantía ........................................................................ 10
Pre-Instalación............................................................. 11
Planificación de la Instalatión .........................................11
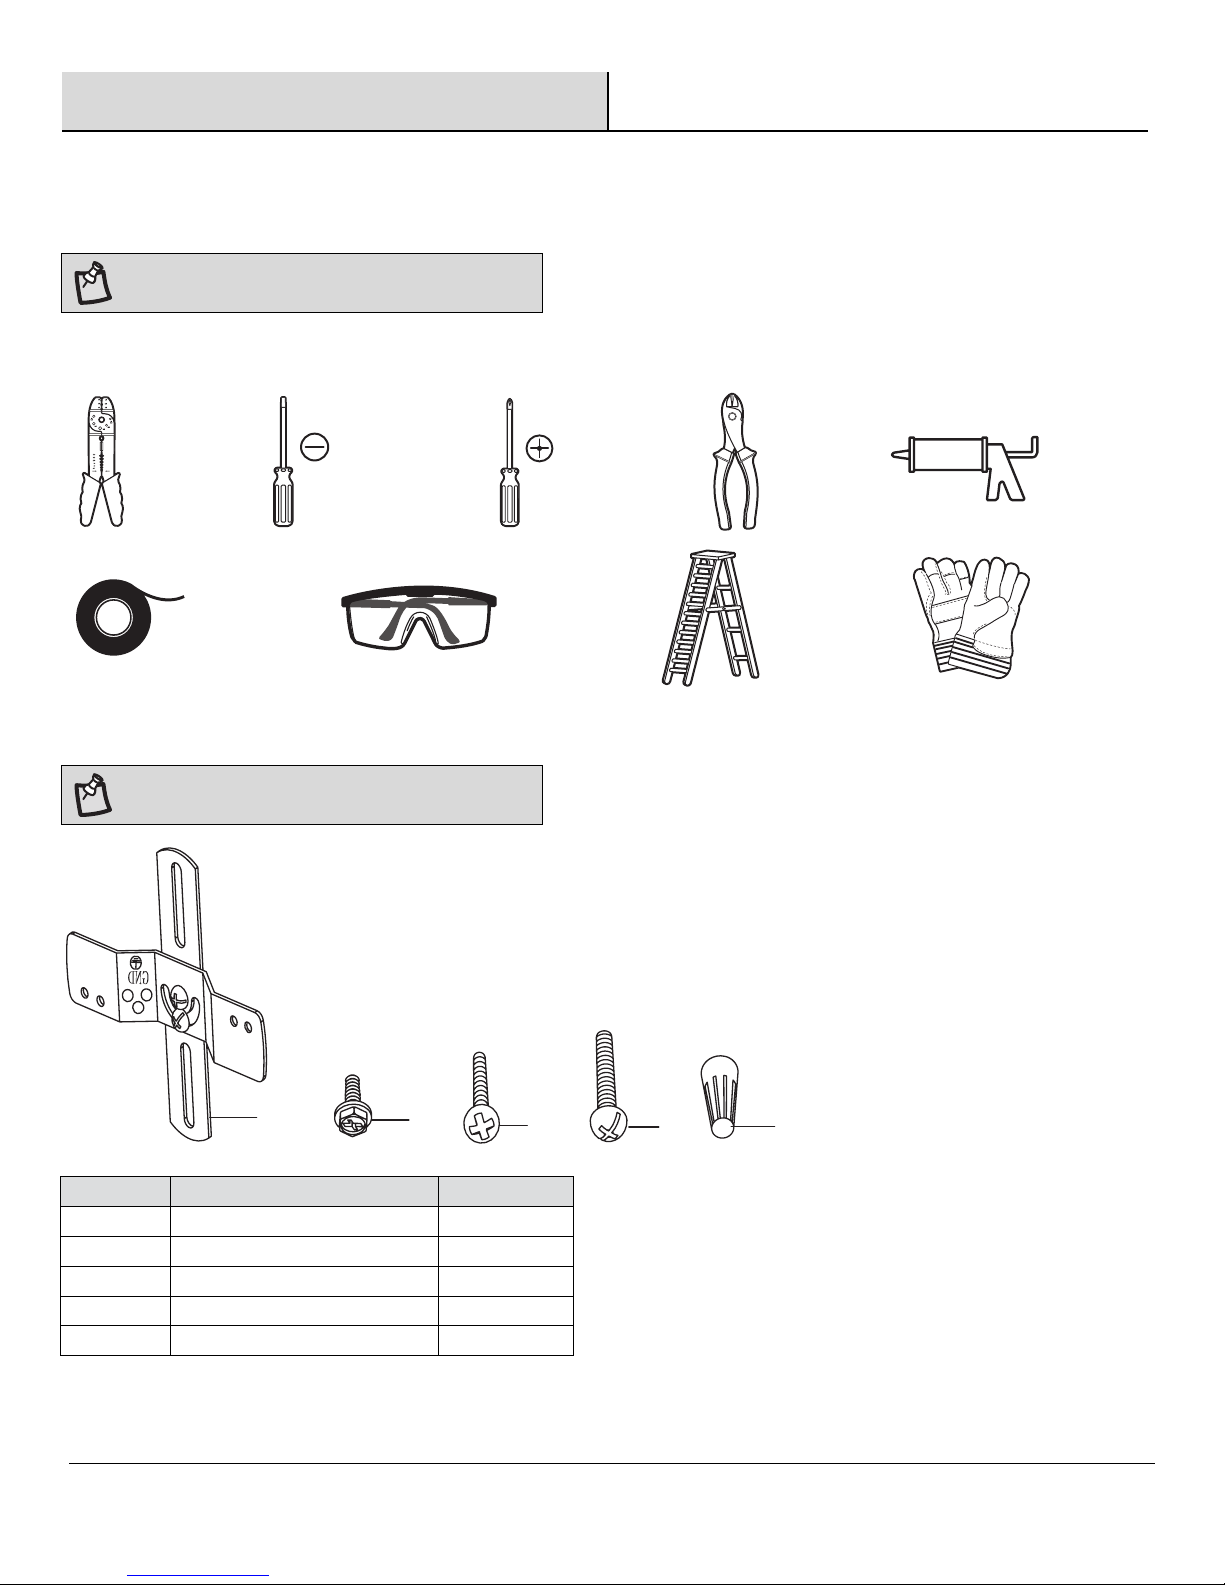
Herraminentas Necesarias..............................................11
Requiere de Hardware .....................................................11
Contenido del Paquete ....................................................12
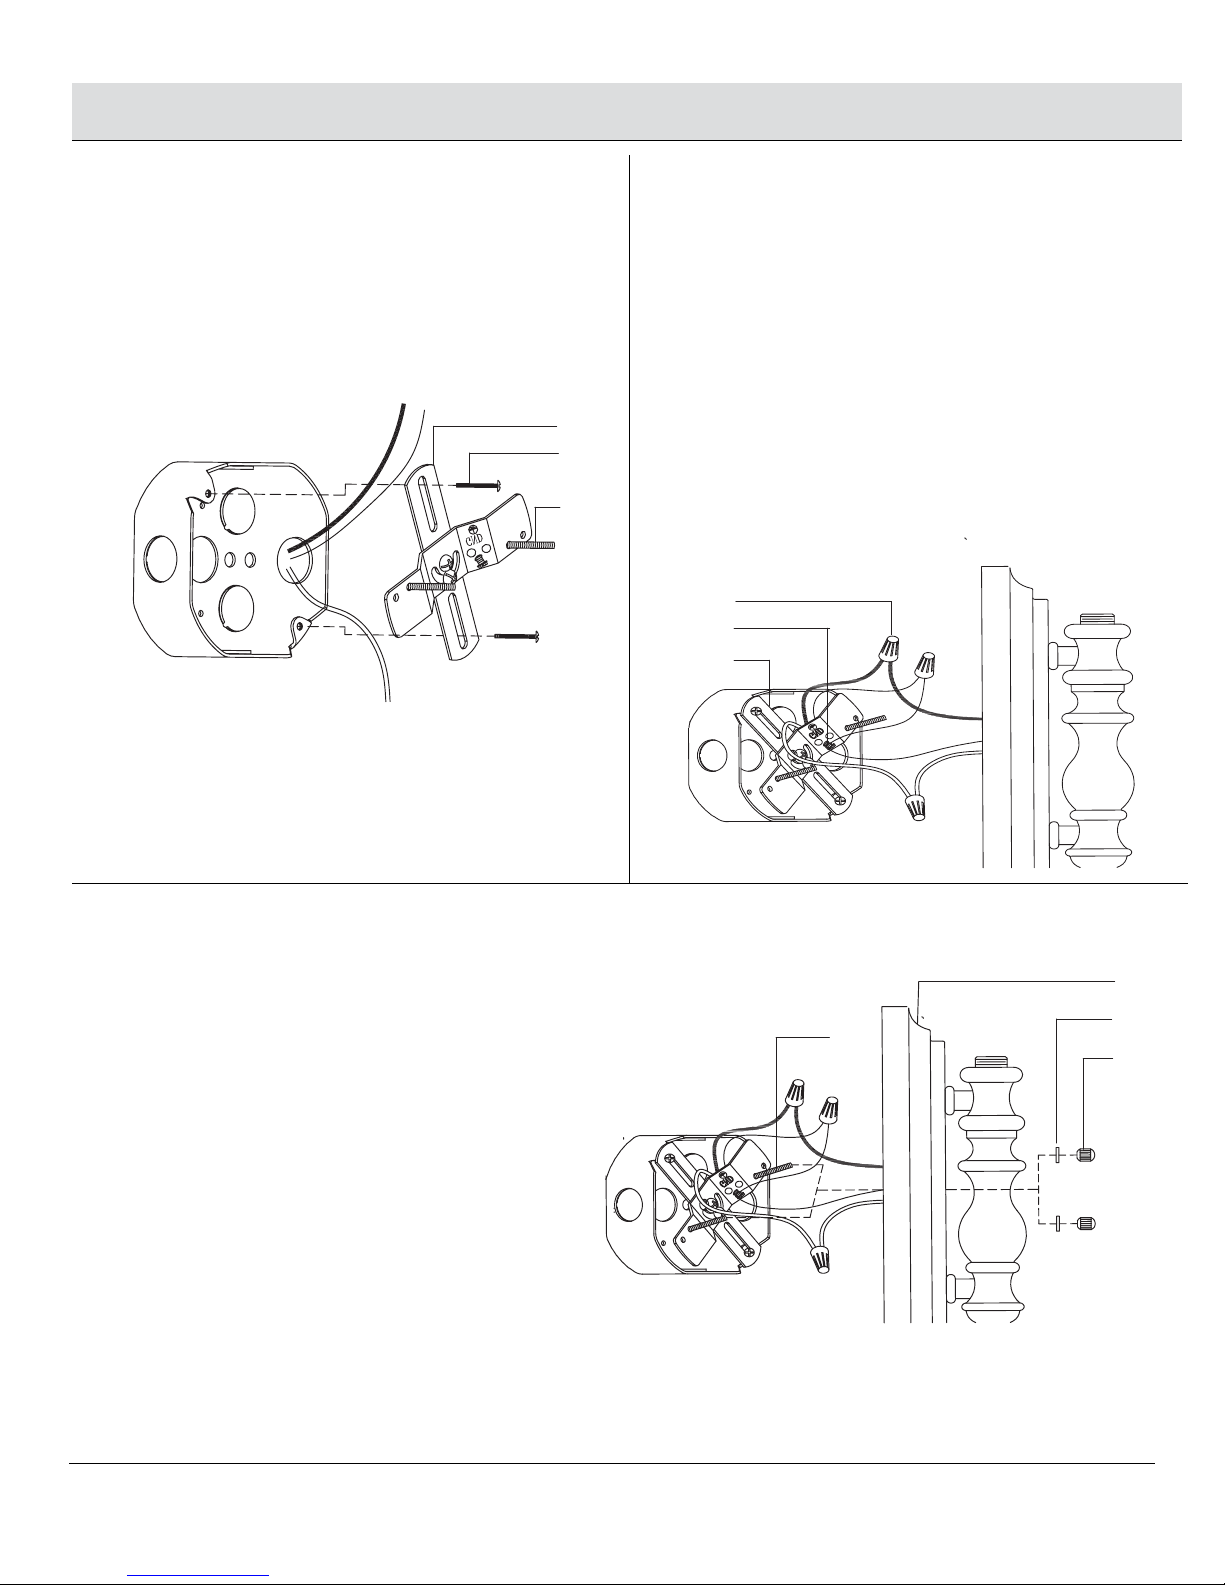
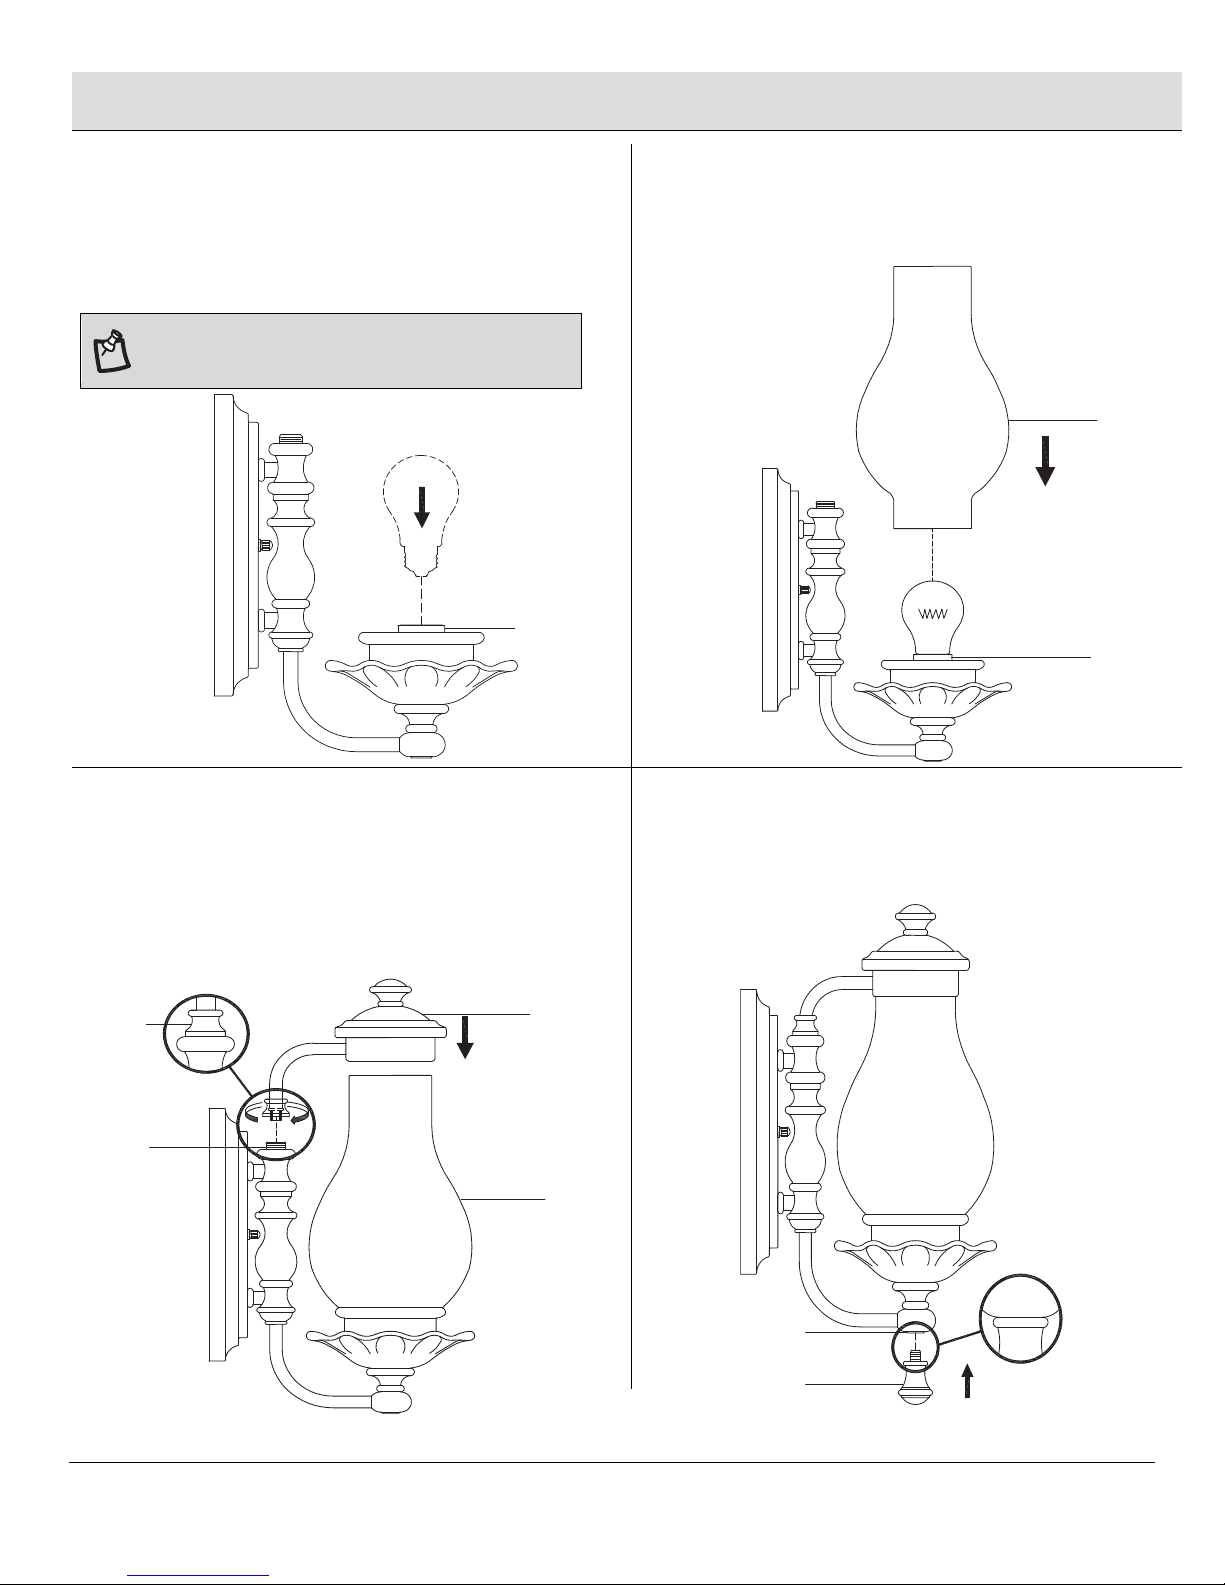
Instalación ................................................................... 13
Mantenimiento y Limpieza ......................................... 15
Solución de Problemas .............................................. 15
Información de Seguridad
ADVER ENCIA
:
Lea cuidadosamente y entienda la
información dada en este manual antes de empezar el
proceso de ensamble e instalación. Si falla en hacerlo,
puede ocasionar un choque eléctrico, incendio u otros
daños que pueden ser perjudiciales o fatales.
ADVER ENCIA
:
Asegúrese de que la electricidad que
llega a los cables con los que se encuentra trabajando
estén apagados. Remueva el fusible o apague el
interruptor.
ANUNCIO
:
Cualquier cambio o modificación que no se encuentre
expresamente aprobada por el proveedor responsable del
cumplimiento puede revocar la autorización del usuario a utilizar
el equipo.
Garantía
LO QUE ES A CUBIER O
l fabricante garantiza que esta lámpara no presentará defectos materiales o de fabricación por un período de tres (3)
años a partir de la fecha de compra. sta garantía es válida sólo para el comprador original y sólo cubre los productos en
uso y funciones normales. Si se descubre algún defecto en este producto, la única obligación y solución exclusiva del
fabricante, a criterio del mismo, será reparar o reemplazar el producto siempre y cuando el defecto no sea resultado de
un mal uso, abuso, accidente, modificaciones, alteraciones, negligencia o manejo indebido.
LO QUE (NO) ES A CUBIER O
sta garantía no cubre ningún producto instalado, configurado o usado incorrectamente sin seguir las instrucciones
adjuntas al producto. sta garantía no cubre fallas del producto a consecuencia de un accidente, mal uso, abuso,
negligencia, modificaciones o instalaciones defectuosas, o cualquier otra falla no relacionada con defectos materiales o
de fabricación. sta garantía no se aplica al acabado de ninguna parte del producto, como por ejemplo el de la superficie,
ni al deterioro por condiciones ambientales, ya que eso se considera un desgaste normal.
l fabricante no garantiza y rechaza especialmente cualquier garantía, expresa o implícita, de idoneidad para un
propósito en particular, distinta de la garantía indicada aquí. l fabricante se exime específicamente de cualquier
obligación y no es responsable por daños o pérdidas directas o indirectas, lo que incluye cualquier costo de mano de
obra o gastos relacionados con el reemplazo o reparación de dicho producto.
Comunícate con el quipo de Servicio al Cliente al 1-877-527-0313 o visita www.HomeDepot.com.

11 HOM D POT.COM
Para obtener asistencia, llama al 1-877-527-0313.
Pre-Instalatión
PLANIFICACIÓN DE LA INS ALACIÓN
Lee todas las instrucciones antes de ensamblar. Antes de comenzar la instalación o de quitar la instalación anterior,
desconecte la alimentacion apagando el interruptor del circuito o quitando el fusible en la caja de fusible. Para evitar
dañar el artículo, ensámblalo sobre una superficie suave, no abrasiva, como por ejemplo una alfombra o cartón.
NO A: Conserva el recibo y estas Instrucciones
como Comprobante de Compra.
HERRAMIEN AS NECESARIAS
Peladors
de Cables
Destornillador
de Cabeza
Plana
Destornillador
Phillips
Pinzas
Cortacables
Selladr
calafatear
Cinta
Aislan
Gafas de
Seguridad
scalera
Guantes
REQUIERE DE HARDWARE
NO A: l objeto no se muestra en su tamaño
real.
Pieza
Descripción
Cantidad
AA Barra Cruzada 1
BB Tornillo de Toma de Tierra 1
CC Tornillo de la Caja de Salida 2
DD Tornillo de Montaje 2
Conector de Cable 3
AA BB CC DD EE

12
CON ENIDO DEL PAQUE E
Pre-Instalación (continuación)
Pieza
Descripción
Cantidad
A Cubierta Superior 1
B Pantalla 1
C Portalámpara 1
D mbellecedor 1
Casquillo con Rosca 1
Pieza
Descripción
Cantidad
F Buje A 1
G Placa de la Pared 1
H Junta 2
I Tuerca de Cierre 2
J Buje B 1
A
B
C
D
J
I
H
G
F
E

13 HOM D POT.COM
Para obtener asistencia, llama al 1-877-527-0313.
Instalación
1
Acoplar la barra cruzada a la
caja de salida
2
Conectar los cables eléctricos
□ Atornille los dos tornillos de montaje (DD) en la
barra cruzada (AA).
□ Monte la barra cruzada (AA) a la caja de salida
usando los dos tornillos de la caja de salida (CC).
□ nvuelva el cable de toma de tierra de la instalación
alrrededor del tornillo de toma de tierra (BB) que hay
en la barra cruzada (AA), y después conecte el
cable de toma de tierra de la instalación al cable de
toma de tierra de la caja de salida.
□ Conecte el cable blanco de la instalación con el
cable blanco (cable néutro) de la caja de salida.
□ Conecte el cable negro de la instalación con el cable
negro (cable vivo) de la caja de salida.
□ Cubra las tres conexiones usando los tres
conectores de cables ( ). nvuelva las tres
conexiones de cables con cinta aislante para una
conexión más segura.
□ Posicione los cables de vuelta al interior de la caja
de salida.
3
Fije la instalación en la pared
□ Alinee los dos tornillos de montaje (DD) a través de
los dos agujeros que hay en el placa de la pared
(G).
□ Coloque los dos juntas (H) sobre los dos tornillos
protuberantes de montaje (DD).
□ Atornille las dos tuercas de cierre (I) en los dos
tornillos protuberantes de montaje (DD).
AA
CC
DD
AA
EE
BB
G
H
I
DD

14
Instalación (continuación)
4
Instalar la bombilla
5
Acoplar la pantalla
□ Instala una bombilla incandescente de base mediana
de hasta 60 Vatios (vendida por separado) en el
portalámpara (C).
NO A:
Puedes usar también una bombilla CFL
equivalente, de ahorro de energía que no exceda
los 13 Vatios (vendida por separado).
□ Coloque la pantalla (B) alrrededor del portalámpara
(C).
6
Fij
ar la pantalla
7
Acoplar la e
mbellecedor
□ Coloque la cubierta superior (A) en la pantalla (B) y
el casquillo con rosca ( ) en la parte superior del
buje A (F).
□ Atornille el casquillo con rosca ( ) sobre el buje A
(F).
□ Atornille el embellecedor (D) en la buje B (J).
C
B
C
A
B
E
F
J
D

15 HOM D POT.COM
Para obtener asistencia, llama al 1-877-527-0313.
Instalación (continuación)
8
Aplicar el calafateado
□ Una vez que la instalación haya sido montada en la pared,
calafatear el espacio entre la pared y la 3/4 partes del área
superior de la placa de la pared (G) para prevenir que el agua
se filtre en la caja de salida.
□ Deje 1/4 parte del área inferior si calafatear para el drenaje
de posible agua que haya podido filtrarse en el recinto.
Mantenimiento y Limpieza
PRECAUCIÓN:
Antes de intentar limpiar la pieza,
desconéctela o apague el interruptor o remueva el
fusible de la caja de fusibles.
□ Limpia la lámpara con un paño suave y seco.
□ No uses limpiadores con químicos, solvents, o productos abrasivos.
Solución de problemas
Problema
Causa Posible
Solución
La bombilla no enciende. La electricidad está apagada. Asegúrate de que el suministro de electricidad
esté encendido.
l cortacircuito está apagado.
Verifica que el cortacircuitos está en la posición de “
(encendido).
l fusible se funde o el cortacircuito
se activa cuando se enciende la
luz.
Los cables están cruzados o el
cable de poder tiene polo a tierra.
Compruebe las conexiones del cableado.
Contacta a un electricista calificado o llama al
equipo de Servicio al Cliente al 1-877-527-0313.
G

Preguntas, problemas o piezas faltantes? Antes de regresar a la tienda, llama
al Servicio al Cliente de Home Decorators Collection
de lunes a domingo entre 8 a.m. y 6 p.m., (hora del ste de . UU.)
1-877-527-0313
HOMEDEPO .COM
Conserva este manual para referencias futuras.

MERCI
Nous vous remercions de la confiance que vous avez place en Home Decorators Collection en achetant ce luster lanterne murale
d’extérieur. Nous nous efforçons en permanence de créer des produits de qualité conçus pour perfectionner votre maison. Vous
pouvez visiter notre site en ligne pour consulter notre gamme complète de produits pour vos besoins de rénovation résidentielle.
Merci d'avoir choisi Home Decorators Collection!
Article
#
1
00
0
-
306
-
241
Modèle #HRP1691A
GUIDE D'U ILISA ION E D'EN RE IENE
CULVERDEN LAN ERNE MURALE D’EX ERIEUR 1 AMP
Questions, problèmes, pièces manquantes? Avant de retourner au magasin, veuillez communiquez avec le
service à la clientèle Home Decorators Collection
entre 8h00 et 18h00 (HN ) du lundi au vendredi au
1-877-527-0313
HOMEDEPO .COM

18
able des Matières
able des Matières ...................................................... 18
Consignes de Sécurité ............................................... 18
Garantie ........................................................................ 18
Pré-Installation ............................................................ 19
Planification de l’Installation ............................................19
Outils Requis ......................................................................19
Materiel Requis ..................................................................19
Contenu de l' mballag .....................................................20
Installation ................................................................... 21
Entretien et Nettoyage ................................................ 23
Dépannage ................................................................... 23
Consignes de Sécurité
AVER ISSEMEN :
Veuillez soigneusement lire et
comprendre les informations contenues dans ce manuel
avant de commencer l’assemblage et l’installation. Vous
vous exposez, dans le cas contraire, à des risques
dangereux ou mortels d’électrocution, d’incendie ou
d’autres blessures.
AVER ISSEMEN :
Be nlevez les fusibles concernés
ou désactivez le disjoncteur afin de vous assurer de
mettre hors tension les fils électriques à manipuler.
AVER ISSEMEN :
Be nlevez les fusibles concernés ou
désactivez le disjoncteur afin de vous assurer de mettre hors
tension les fils électriques à manipuler.
Garantie
CE QUI ES COUVER
Le fabricant garantit que ce luminaire sera exempt de défauts de fabrication et de matériaux pendant une période d'un
trois (3) ans à compter de la date d’achat. Cette garantie ne vise que l’acheteur original et uniquement un usage et un
entretien normaux des produits. Si ce produit est défectueux, la seule obligation du fabricant, et votre seul recours, est de
remplacer ou de réparer le produit, au choix du fabricant, pourvu que le produit n’ait pas été endommagé par une
utilisation inadéquate ou abusive, par un accident, une modification, une altération, la négligence ou une mauvaise
manipulation.
CE QUI ES COUVER (E PAS)
Cette garantie ne s’applique pas à un produit qui est déclaré avoir été mal installé, mal posé ou utilisé d’une façon non
conforme aux instructions qui l’accompagnent. Cette garantie ne s’applique pas à un défaut du produit qui découle d’un
accident, d’un mauvais usage, d’un usage abusif, d’une négligence, d’une modification ou d’une installation incorrecte, ou
à tout défaut étranger à un défaut de matériaux ou de fabrication. Cette garantie ne s’applique pas au fini de toute partie
du produit, comme la surface, ni à l’altération par le climat, puisqu’il s’agit d’une usure normale.
Le fabricant ne garantit aucunement, et réfute expressément toute garantie, explicite ou tacite, d’adaptation à un usage
particulier autre que celui exprimé aux présentes. Le fabricant réfute expressément toute responsabilité et ne peut être
tenu responsable de toute perte ou de tout dommage indirect ou accessoire, y compris mais non de façon limitative, tous
les frais de main-d’œuvre ou autres encourus pour le remplacement ou la réparation dudit produit.
Communiquez avec l’équipe du service à la clientèle au 1 877 527-0313 ou visitez le site www.HomeDepot.com.

19 HOM D POT.COM
Veuillez composer le 1 877 527-0313 pour une assistance supplémentaire.
Pré-Installation
PLANIFICA ION DE L'INS ALLA ION
Lisez toutes les instructions avant de procéder à l’assemblage. Avant de commencer à installer ce luminaire ou d’enlever
l’ancien luminaire, déconnectez le courant en eteignant le disjoncteur ou en enlevant le fusible correspondent du coffret à
fusibles. Pour éviter d’endommager ce produit, assemblez-le sur une surface molle et non abrasive telle qu’un tapis ou un
carton.
REMARQUE: Conservez le reçu, ainsi que ces
instructions, à titre de preuve d’achat.
OU ILS REQUIS
Dénudeur de
Câbles
Électriques
Tournevis à
Tête Plate
Tournevis à
Croisillon
Pince pour
Câbles
Électriques
Siliconeco
lmater
Ruban
Adhésif
Isolant
Lunettes de
Protection
chelle
Gants
MA ERIEL REQUIS
REMARQUE: Le matériel n’est pas illustré à sa
taille réelle.
Pièce
De
scription
Quantité
AA ntretoise 1
BB Vis de Terre 1
CC Vis Boite de Sortie 2
DD Vis de Montage 2
Serre-fil 3
AA BB CC DD EE

20
CON ENU DE L'EMBALLAG
Pré-Installation (suite)
Pièce
Description
Quantité
A Cache Supérieur 1
B Abat-jour 1
C Douille 1
D Écrou Décoratif 1
Cache Vis 1
Pièce
Description
Quantit
é
F Bague A 1
G Plaque Murale 1
H Rondelle 2
I Écrou de Verrouillage 2
J Bague B 1
A
B
C
D
J
I
H
G
F
E
Table of contents
Languages:
Other Home Decorators Lantern manuals
Popular Lantern manuals by other brands

Gama Sonic
Gama Sonic GS-145 instruction manual

Hubbell
Hubbell Killark KFL-DARK INSTALLATION, OPERATION & MAINTENANCE DATA SHEET

Portfolio Outdoor
Portfolio Outdoor FY05-030 User instruction

Glamox
Glamox C20-S3/P3 Service manual

Sternberg Lighting
Sternberg Lighting OLD TOWN A850HID WITH 990 FITTER Customer installation instructions

olympia electronics
olympia electronics GR-938/15L quick start guide