HOMEDEPOT Stylewell SK19238E2r1-V User manual

THANK YOU
We appreciate the trust and confidence you have placed in StyleWell through the purchase of this kitchen cart. We strive to continually create quality
products designed to enhance your home. Visit us online to see our full line of products available for your home improvement needs. Thank you for
choosing StyleWell!
USE AND CARE GUIDE
KITCHEN CART
Questions, problems, missing parts?
Before returning to the store, call Customer Service.
8 a.m. – 7 p.m., EST, Monday – Friday, 9 a.m. – 6 p.m., EST, Saturday
1-877-527-0313
HOMEDEPOT.COM
Item # 1004237663
Model # SK19238E2r1-V
Item # 1004237664
Model # SK19238E2r1-B
Item # 1004237665
Model # SK19238E2r1-C

2
Table of Contents
Table of Contents..........................................................2
Safety Information.........................................................2
Warranty.........................................................................3
1 Year Warranty .......................................................................3
What is Covered .......................................................................3
What is Not Covered ................................................................3
Pre-assembly.................................................................4
Planning Assembly...................................................................4
Tools Required .........................................................................4
Hardware Included...................................................................4
Pre-assembly (continued) ............................................ 5
Package Contents ....................................................................5
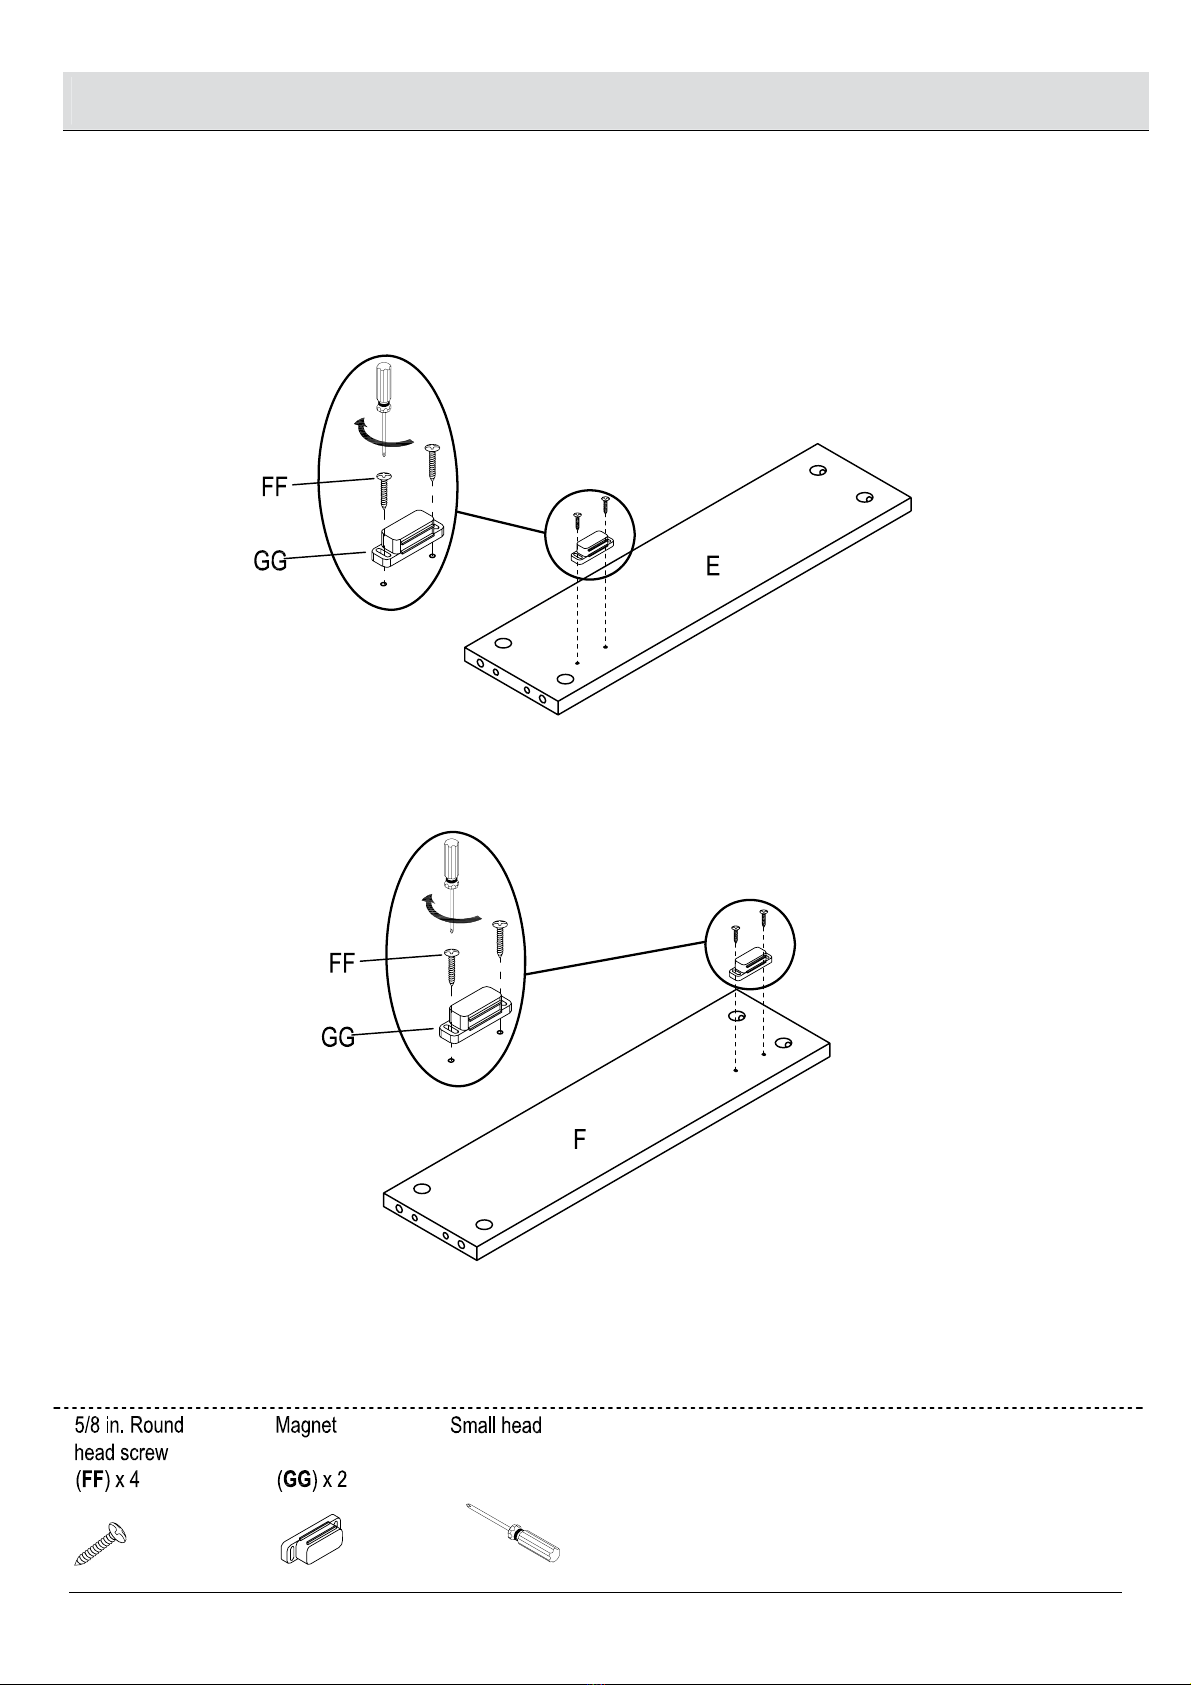
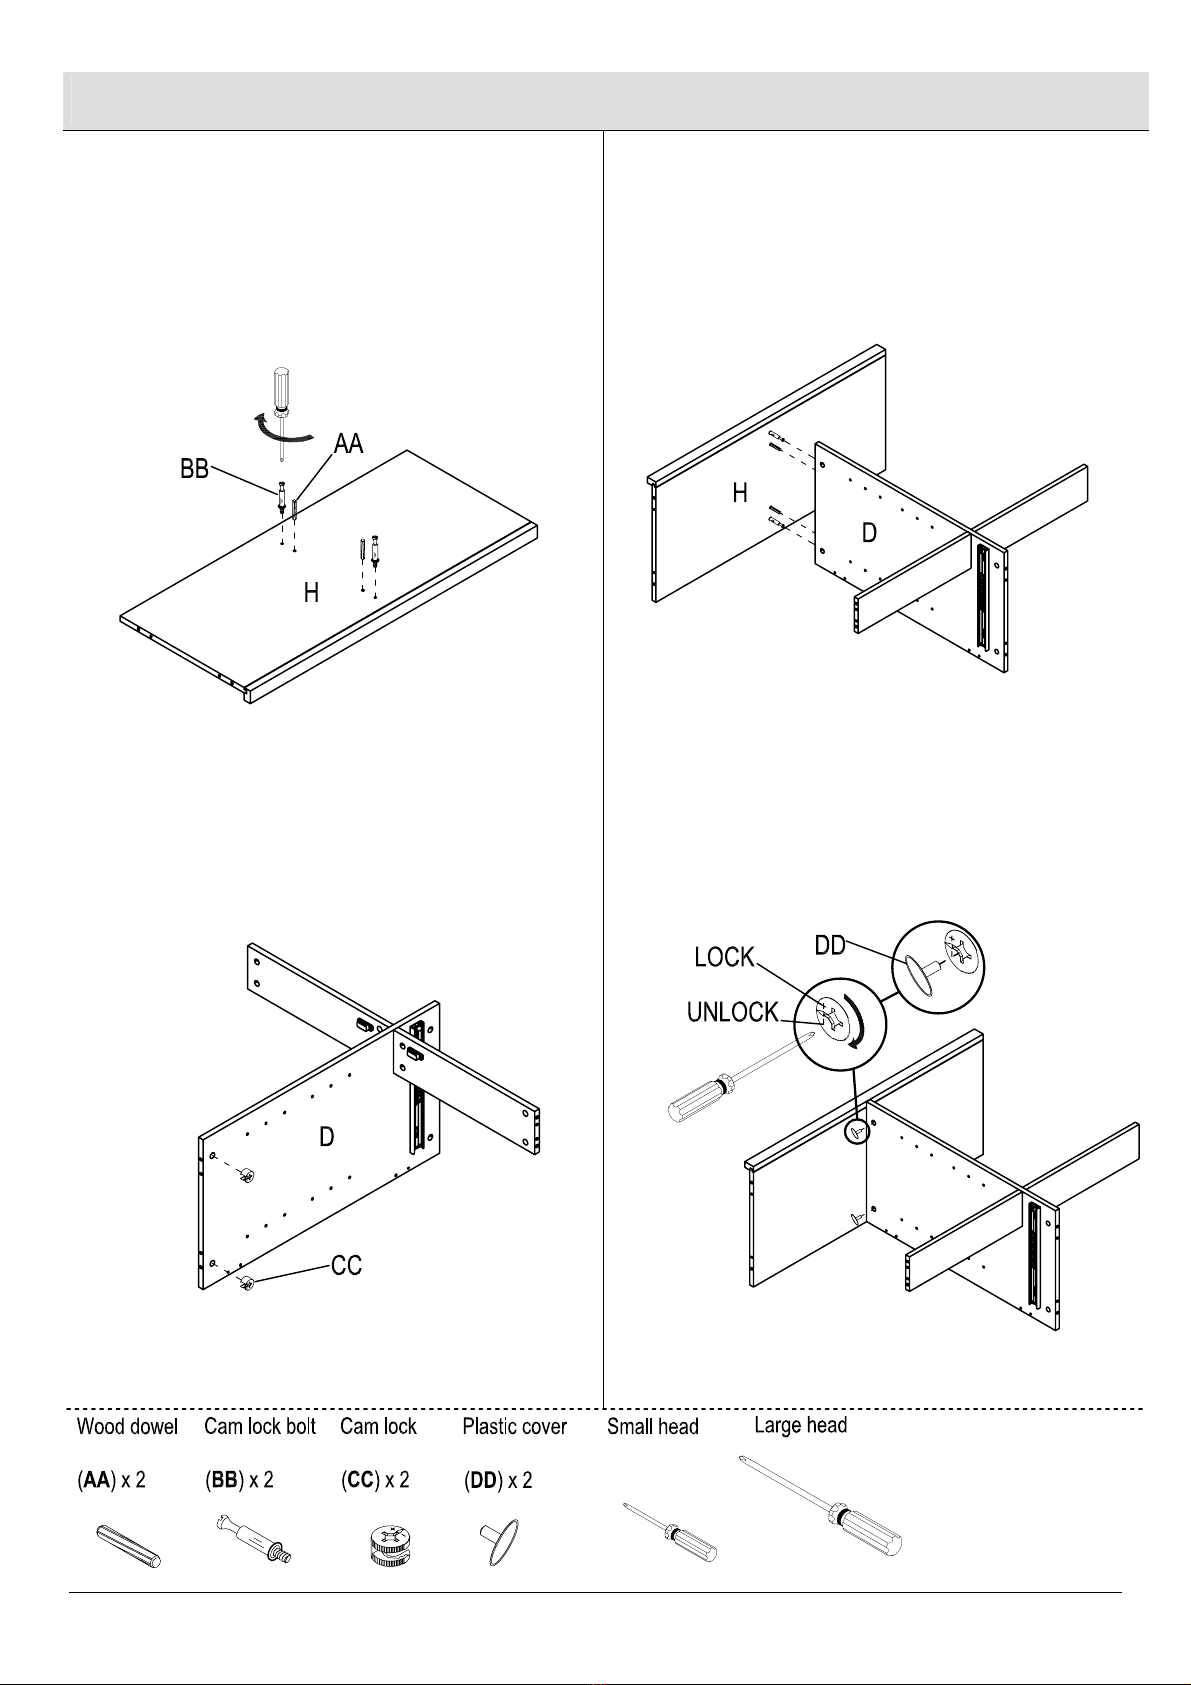
Assembly ...................................................................... 6
Safety Information
DANGER
□Keep small parts away from children during assembly.
□Read and follow instructions carefully.
WARNING
□Read these instructions carefully and keep in a safe place.
□TO GUARANTEE THE SAFE USE OF THIS PRODUCT, FOLLOW
THE WARNINGS, GUIDELINES AND RECOMMENDATIONS IN
THIS MANUAL.
□Adult assembly required.
□Small parts may present choking hazard prior to assembly.
□Do not use power tools to assemble your furniture. Power
tools may strip or damage parts/product.
□Do not overtighten connectors (screws, bolts, etc.).
Overtightening can lead to product damage.
□Be sure to check all packing materials carefully for small
parts that may have come loose inside the carton during
shipment. If parts are missing, contact THE HOME DEPOT to
obtain any missing parts.
□DO NOT USE SUBSTITUTE PARTS.
□This product should only be used on a flat, level surface.
□Product is designed to hold 142 pounds. Exceeding this limit
may damage the product or cause injury to the user.
NOTE: If you are unsure about your wall type or what
mounting method you should use, consult a qualified
professional.
CAUTION

3 HOMEDEPOT.COM
Please contact 1-877-527-0313 for further assistance.
Warranty
1 YEAR WARRANTY
WHAT IS COVERED
We guarantee this product to be free of manufacturing defects to the original purchaser for one year.
WHAT IS NOT COVERED
This warranty does not cover commercial use, acts of nature, and abusive use.

4
Pre-assembly
PLANNING ASSEMBLY
Keep children and pets away from build area. Make sure your area is large enough to unpack, sort and assemble the unit.
TOOLS REQUIRED
Small head
Phillips
screwdriver
Large head
Phillips
screwdriver
HARDWARE INCLUDED
NOTE: Hardware not shown to actual size.
Part Description Quantity
AA Wood dowel 28
BB Cam lock bolt 28
CC Cam lock 28
DD Plastic cover 6
EE 1 in. Flat head screw 16
FF 5/8 in. Round head screw 4
GG Magnet 2
Part Description Quantity
HH Shelf support 16
II 1/2 in. Flat head screw 8
JJ Handle 2
KK Small bolt 6
LL Knob for drawer 2
MM Knob for towel rack 2
NN Large bolt 4
OO Wrench 1

5 HOMEDEPOT.COM
Please contact 1-877-527-0313 for further assistance.
Pre-assembly (continued)
PACKAGE CONTENTS
Part Description Quantity
A
Top panel 1
B Left side panel 1
C Right side panel 1
D Partition 1
E Left crossbar 1
F Right crossbar 1
G Adjustable shelf 4
H Bottom panel 1
I Left door 1
J Right door 1
Part Description Quantity
K
Back panel 2
L Universal wheel with brake 2
M Universal wheel 2
N Left side towel rack 1
O Right side towel rack 1
P Towel rack bar 1
Q Drawer front panel 2
R Drawer left side panel 2
S Drawer right side panel 2
T Drawer back panel 2
U Drawer bottom panel 2

6
Assembly
1 Attaching the magnet
□Attach magnet (GG) to bars (E) and (F) with screw (FF) as shown.

7 HOMEDEPOT.COM
Please contact 1-877-527-0313 for further assistance.
2 Attaching the right bar to
partition
□a) Install dowel (AA) and bolt (BB) into partition (D).
□
b) Insert lock (CC) into bar (F).
□
d) Tighten bolt (BB) with lock (CC) in the pre-drilled holes.
Assembly (continued)
□c) Join bar (F) to the partition (D).

8
Assembly (continued)
3 Attaching the left bar to partition
□a) Install dowel (AA) and bolt (BB) into partition (D).
□
b) Insert lock (CC) into bar (E).
□c) Join bar (F) to the partition (D).
□
d) Tighten bolt (BB) with lock (CC) in the pre-drilled holes.

9 HOMEDEPOT.COM
Please contact 1-877-527-0313 for further assistance.
Assembly (continued)
4
□a) Install dowel (AA) and bolt (BB) into panel (H).
□
b) Insert lock (CC) into partition (D).
□c) Join partition (D) to the panel (H) with dowel (AA).
□
d) Tighten bolt (BB) with lock (CC) in the pre-drilled holes.
□
e) Cover the cam holes with the cover (DD).
Attaching the bottom panel

10
Assembly (continued)
5
□a) Install dowel (AA) and bolt (BB) into partition (D).
□
b) Insert lock (CC) into panel (K).
□c) Join panel (K) to the assembled body with dowel (AA).
□
d) Tighten bolt (BB) with lock (CC) in the pre-drilled holes.
□
e) Cover the cam holes with the cover (DD).
Attaching the back panel

11 HOMEDEPOT.COM
Please contact 1-877-527-0313 for further assistance.
Assembly (continued)
6
□a) Install dowel (AA) and bolt (BB) into partition (D).
□
b) Insert lock (CC) into panel (K).
□c) Join panel (K) to the assembled body with dowel (AA).
□
d) Tighten bolt (BB) with lock (CC) in the pre-drilled holes.
□
e) Cover the cam holes with the cover (DD).
Attaching the back panel

12
Assembly (continued)
7
□a) Install dowel (AA) and bolt (BB) into panel (B).
□c) Join panel (B) to the assembled body with dowel (AA).
□
d) Tighten bolt (BB) with lock (CC) in the pre-drilled holes.
□
e) Cover the cam holes with the cover (DD).
□b) Insert lock (CC) into panels (K) and (H), and bar (E).
Attaching the left side panel

13 HOMEDEPOT.COM
Please contact 1-877-527-0313 for further assistance.
Assembly (continued)
8 Attaching the towel rack
□a) Join towel rack side panels (O) and (N) to the towel bar (P) with knob (MM).
□
b) Attach towel rack side panels (O) and (N) to the panel (C) with bolt (NN). Turn and tighten bolt (NN) with wrench (OO).

14
Assembly (continued)
9 Attaching the right side panel
□a) Install dowel (AA) and bolt (BB) into panel (C).
□c) Join panel (C) to the assembled body with dowel (AA).
□
d) Tighten bolt (BB) with lock (CC) in the pre-drilled holes.
□e) Cover the cam holes with the cover (DD).
□b) Insert lock (CC) into panels (H) and (K), and bar (F).

15 HOMEDEPOT.COM
Please contact 1-877-527-0313 for further assistance.
Assembly (continued)
10 Assembling the universal wheel
□Insert wheels (U) and (V) into panels (B) and (C) as shown.

16
Assembly (continued)
11 Attaching the top panel
□a) Install bolt (BB) into panel (A).
□c) Join panel (A) to the assembled body with dowel (AA).
□
d) Tighten bolt (BB) with lock (CC) in the pre-drilled holes.
□b) Insert lock (CC) and dowel (AA) into panels (B) and
(C), and partition (D).

17 HOMEDEPOT.COM
Please contact 1-877-527-0313 for further assistance.
12 Assembling the adjustable shelf
□Insert shelf supports (HH) in desired positions and place shelf (G) on the supports.
Assembly (continued)

18
Assembly (continued)
13 Attaching the door
□a) Attach left door (I) and right door (J) to the assembled body with screw (II) as shown.
□
b) Attach handle (JJ) to door (I) and door (J) with the bolt (KK).
NOTE: A helper who can hold the door in position makes the door installation easier.

19 HOMEDEPOT.COM
Please contact 1-877-527-0313 for further assistance.
Assembly (continued)
14 Assembling the drawer
□a) Tighten panels (R) and (S) to the panel (Q)
with screw (EE).
□
b) Slide panel (U) into the grooves on
panels (R) and (S).
□
c) Tighten panel (T) to the assembled body
with screw (EE).
□
d) Tighten knob (LL) to panel (Q) with bolt (KK).

20
15 Finalizing the assembly
□Insert the six drawers into the assembled body as shown.
NOTE: Make sure the slide piece is at the front end of
the glide when installing the drawer into the body.
NOTE: When removing the drawer, tip-up the safety
release tab to remove the drawer from the body.
SAFETY RELEASE TAB
Assembly (continued)
This manual suits for next models
5
Table of contents
Other HOMEDEPOT Outdoor Cart manuals