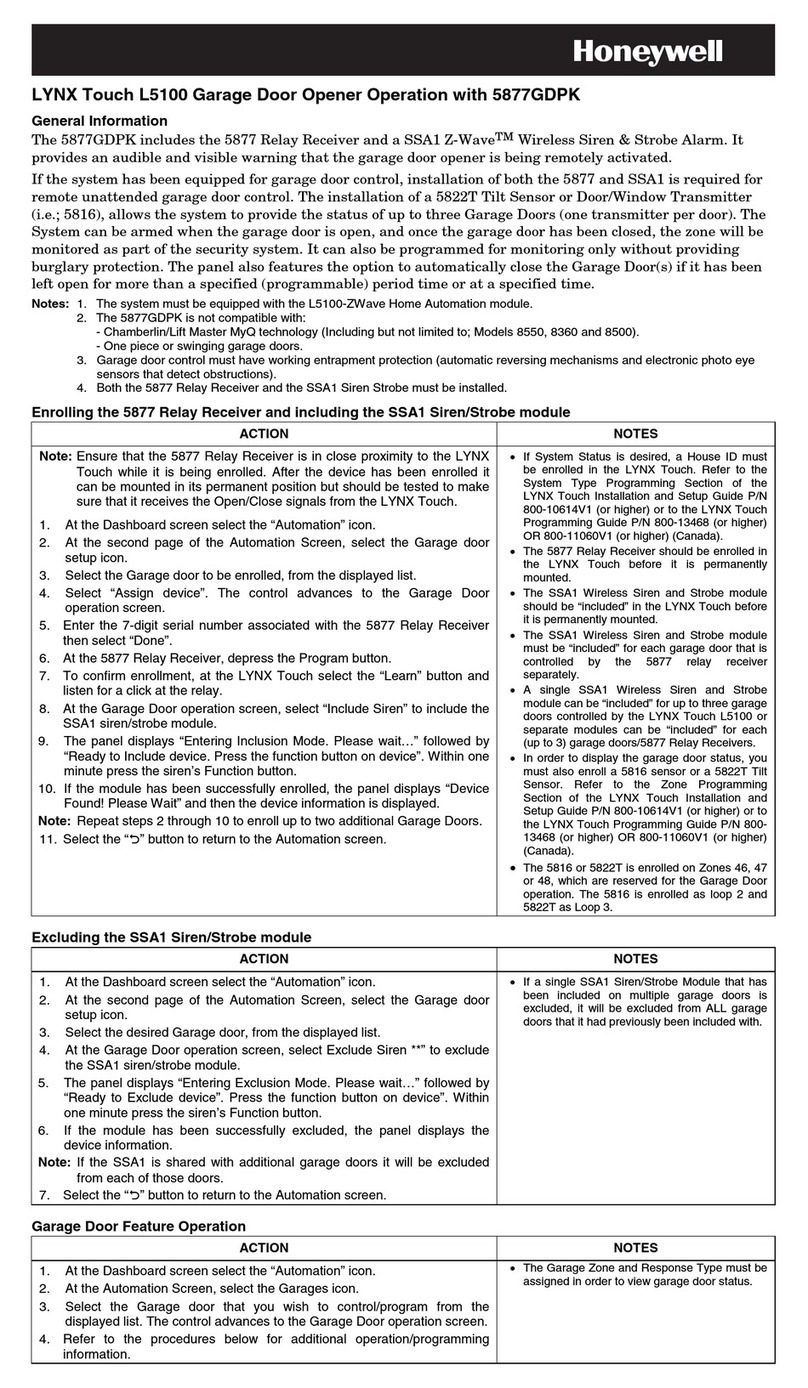
Honeywell 5877GDPK Configuration guide

Garage Door Opener Operation with the 5877GDPK and the LYNX Touch, Lyric
®
Controller
and the Lyric Gateway
General Information
The 5877GDPK includes the 5877 Relay Receiver and a SSA1 Z-Wave
®
Wireless Siren & Str be Alarm. It
pr vides an audible and visible warning that the garage d r pener is being rem tely activated.
If the system has been equipped f r garage d r c ntr l, installati n f b th the 5877 and SSA1 is required f r
rem te unattended garage d r c ntr l. The installati n f a 5822T Tilt Sens r r D r/Wind w Transmitter
(i.e.; 5816) all ws the c ntr l panel t pr vide the status f up t three (LYNX T uch) r f ur (Lyric C ntr ller
and Gateway) Garage D rs ( ne transmitter per d r). The System can be armed when the garage d r is
pen, and nce the garage d r has been cl sed, the z ne will be m nit red as part f the security system. It can
als be pr grammed f r m nit ring nly with ut pr viding burglary pr tecti n. The LYNX T uch and Lyric
C ntr ller panels als feature the pti n t aut matically cl se the Garage D r(s) if it has been left pen f r
m re than a specified (pr grammable) peri d f time (Cl se in) r at a specified time (Cl se at).
Do not use the 5877GDPK garage door automation with any garage door opener that lacks the safety features
required by U.S. federal safety standards (this includes any garage door opener model manufactured before January
1, 1993). A garage door opener that cannot detect an object and stop and reverse the door – does not meet current
U.S. federal safety standards. Your garage door opener also must signal before unattended door operation. For more
information please consult your garage door opener manual.
Notes: 1. The LYNX Touch L5100, L5200/5210, or L7000 Control Panel must be equipped with the L5100-ZWave Home Automation
module.
2. The 5877GDPK is not compatible with:
- Chamberlin/Lift Master MyQ technology (Including but not limited to; Models 8550, 8360 and 8500).
- One piece or swinging garage doors.
3. Garage door control must have working entrapment protection (automatic reversing mechanisms and electronic photo eye
sensors that detect obstructions).
4. Both the 5877 Relay Receiver and the SSA1 Siren Strobe must be installed.
5. Programming for the Lyric Gateway is accessed via the MyHome Gateway app Home screen.
Enrolling the 5877 Relay Receiver and Including the SSA1 Siren/Strobe module
ACTION NOTES
Note: Ensure that the 5877 Relay Receiver is in close proximity to the control
panel while it is being enrolled. After the device has been enrolled it can
be mounted in its permanent position but should be tested to make sure
that it receives the Open/Close signals from the control panel.
1. At the Home or Dashboard Screen select the “Automation” icon.
Note: For the LYNX Touch of Lyric Controller go to step 4. For the Lyric
Gateway go to step 3.
2. For the LYNX Touch or Lyric Controller, select the “Garage door setup”
icon from the first or second page of the Automation Screen.
3. Select “Setup”
4. Select the “Garage door setup icon”.
5. Select the Garage door to be enrolled, from the displayed list.
6. Select “Assign device.” The control advances to the Garage Door
operation screen.
7. Enter the 7-digit serial number associated with the 5877 Relay Receiver
then select “Done.”
8. At the 5877 Relay Receiver, depress the Program button.
9. To confirm enrollment, at the Control Panel select the “Learn” button and
listen for a click at the relay.
10. At the Garage Door setup screen, select “Include Siren” to include the
SSA1 siren/strobe module.
11. The panel displays “Entering Inclusion Mode. Please wait…” followed by
“Ready to Include device. Press the function button on device.” Within one
minute press the siren’s Function button.
12. If the module has been successfully enrolled, the panel displays “Device
Found! Please Wait” and then displays the device information.
Note: Repeat steps 2 or 4 through 12 to enroll additional Garage Doors.
13. Select the “” button to return to the Automation screen.
•If System Status is desired, a House ID must be
enrolled in the control panel. Refer to the System
Type Programming Section of the appropriate
control panel Installation and Setup Guide.
•The 5877 Relay Receiver should be enrolled in
the control panel before it is permanently
mounted.
•The SSA1 Wireless Siren and Strobe module
should be “included” in the control panel before it
is permanently mounted.
•The SSA1 Wireless Siren and Strobe module
must be “included” for each garage door that is
controlled by the 5877 relay receiver separately.
•A single SSA1 Wireless Siren and Strobe
module can be “included” for up to three (LYNX
Touch) or four (Lyric Controller or Gateway)
garage doors or separate modules can be
“included” for each (up to 3 LYNX Touch or 4
Lyric Controller/Gateway) garage doors/5877
Relay Receivers.
•In order to display the garage door status, a
5816 sensor or a 5822T Tilt Sensor must also be
enrolled. Refer to the Zone Programming Section
of the appropriate Control Panel Installation and
Setup Guide or Programming Guide.
•The 5816 is enrolled as loop 2 and 5822T as
Loop 3 on the following Garage Door Zones as
applicable:
Control Zones
LYNX Touch 46, 47, 48
Lyric Controller 127, 128, 129, 130
Lyric Gateway 65, 66, 67, 68

Excluding the SSA1 Siren/Strobe module
!
This procedure may ONLY be used in the event that the SSA1 Siren is not operating properly, has lost
communication with the control or if the 5877 Relay Receiver has been replaced.
ACTION NOTES
1. At the Home or Dashboard screen select the “Automation” icon.
Note: Depending upon the control panel that is being connected the Garage
Door Setup icon is located on either the first or second page of the
Automation Screen.
2. Select the Garage door setup icon.
3. Select the desired Garage door, from the displayed list.
4. At the Garage Door setup screen, select Exclude Siren **” to exclude the
SSA1 siren/strobe module.
5. The panel displays “Entering Exclusion Mode. Please wait…” followed by
“Ready to Exclude device.” Press the function button on device.” Within
one minute press the siren’s Function button.
6. If the module has been successfully excluded, the panel displays the
device information.
Note: If the SSA1 is shared with additional garage doors it will be excluded
from each of those doors.
7. Select the “” button to return to the Automation screen.
8. Include the SSA1 by repeating steps 8-11 of the “Enrolling the 5877 Relay
Receiver and Including the SSA1 Siren/Strobe module” above.
•If a single SSA1 Siren/Strobe Module that has
been included on multiple garage doors is
excluded, it will be excluded from ALL garage
doors that it had previously been included with.
Garage Door Feature Operation
ACTION NOTES
1. At the Home or Dashboard screen select the “Automation” icon.
2. At the Automation Screen, select the Garages icon.
3. Select the Garage door that you wish to control/program from the
displayed list. The control advances to the Garage Door operation screen.
4. Refer to the procedures below for additional operation/programming
information.
•
The Garage Zone and Response Type must be
assigned in order to view garage door status.
Control Panel Garage Door Opener Operation
Ready To Arm
5200-100-128-V0
Garage Door 1
OPENED
Press to close
Edit Back
Close in Close at
Ready To Ar m
lyric-069-V0
Edit
Close at
Press to close
Not Applicable to Lync Gateway
Close in
LYNX Touch Lyric Controller/Lyric Gateway
Garage Door Operation Screens
Button or Icon
Function
Edit
Used to modify description of Garage Door
Close in* Provides access to keypad used to set a specific period of time (up to 12 hours and 59 minutes)
before an open garage door closes automatically. If programmed the time will also be displayed.
Close at* Provides access to keypad used to set a specific time that an open garage door closes
automatically. If programmed the time will also be displayed.
Back
Used to return the control to the Garage Door list.
OR
Press to open
Indicates Garage Door is Closed. Used to Open Garage Door.
OR
Press to close
Indicates Garage Door is Open. Used to Close Garage Door.

Activate Garage Door from Control Panel
ACTION NOTES
1. At the Home or Dashboard screen select the “Automation” icon.
2. At the Automation Screen, select the Garages icon.
3. Select the Garage door that you wish to control/program from the
displayed list. The control advances to the Garage Door operation screen.
4. At the Garage Door operation screen, select the Opened or Closed
Garage Door icon to Close or Open the door.
5. The SSA1 Siren sounds and the strobe flashes before garage door
operation begins. Siren operation ceases after approximately 5 seconds
but the strobe continues flashing until the garage door position changes or
after 1 minute if the door status does not change.
6. When the door position has changed the icon will switch from Opened to
Closed, as applicable, and CLOSED or OPENED is displayed.
•
When the garage door is open, “Ready to Arm
– Fault” is displayed in a yellow band at the top
of the display.
•If a “Close in” or “Close at” time has been
programmed, the garage door will always
operate as programmed until the selection has
been cleared.
•
The SSA1 Siren & Strobe will only operate
when the opener is activated remotely or
automatically (via the Close in or Close at
feature) from the Control Panel, or using
TotalConnect.
Program the “Close in” feature at the Control Panel (LYNX Touch and Lyric Controller only)
ACTION NOTES
1. At the Home or Dashboard screen select the “Automation” icon.
2. At the Automation Screen, select the Garages icon.
3. Select the Garage door that you wish to program from the displayed list.
The control advances to the Garage Door operation screen.
4. Select the “Close in” tab at the bottom of the screen.
5. On the displayed keypad, enter a desired 4-digit period of time (hh:mm)
that the door will remain open before automatically closing (up to 12
hours, 59 minutes).
6. Select “Done.”
7. The panel returns to the Garage Door operation screen and the “Close in”
time is displayed in the tab.
•
The maximum period of time that can be
programmed for the “Close in” feature is 12
hours and 59 minutes.
•
If a “Close in” time has been programmed, the
garage door will always operate as
programmed until the selection has been
cleared.
Program the “Close at” feature at the Control Panel (LYNX Touch and Lyric Controller only)
ACTION NOTES
1. At the Home or Dashboard screen select the “Automation” icon.
2. At the Automation Screen, select the Garages icon.
3. Select the Garage door that you wish to program from the displayed list.
The control advances to the Garage Door operation screen.
4. Select the “Close at” tab at the bottom of the screen.
5. On the displayed keypad, enter a desired 4-digit time (hh:mm) that the
door automatically close if it has been left open.
6. Select the AM/PM button to toggle between the options.
7. Select “Done.”
8. The panel returns to the Garage Door operation screen and the “Close at”
time is displayed in the tab.
•
If a “Close at” time has been programmed, the
garage door will always operate as
programmed until the selection has been
cleared.
Clearing the “Close at” or “Close in” programs at the Control Panel (LYNX Touch and Lyric Controller only)
ACTION NOTES
1. At the Home or Dashboard screen select the “Automation” icon.
2. At the Automation Screen, select the Garages icon.
3. Select the Garage door that you wish to program from the displayed list.
The control advances to the Garage Door operation screen.
4. Select the “Close in” or “Close at” tab at the bottom of the screen.
5. Select the “Clear” button then select “Done.”
6. The panel returns to the Garage Door operation screen and the “Close in”
or “Close at” time is removed from the tab.
•
If a “Close in” or “Close at” time has been
programmed, the garage door will always
operate as programmed until the selection has
been cleared.

2 Corporate Center Drive, Suite 100
P.O. Box 9040, Melville, NY 11747
Copyright © 2014 Honeywell International Inc.
www.honeywell.com/security
Ê800-15234"Š
800-15234 6/13 Rev. D
This manual suits for next models
2
Other Honeywell Garage Door Opener manuals
Popular Garage Door Opener manuals by other brands

Automatic Technology
Automatic Technology Axess Pro Series 1101 Owner's installation instructions

Chamberlain
Chamberlain Security+ 7420 owner's manual

CAME
CAME V700E installation manual

Assa Abloy
Assa Abloy Highlands HI1000 - HI2000 - HI3000 installation instructions

Seip
Seip RP60A installation instructions

DIGIWAY PTY
DIGIWAY PTY SL1000 instruction manual

Chamberlain
Chamberlain 950EV quick start guide

RIB
RIB R50 quick start guide

Dormakaba
Dormakaba CS 80 MAGNEO Installation and troubleshooting manual

Elite Entry Phone
Elite Entry Phone Dial Code owner's manual

Chamberlain
Chamberlain LIFTMASTER 3275 owner's manual

Downee
Downee WS200S Instructions for installation and use