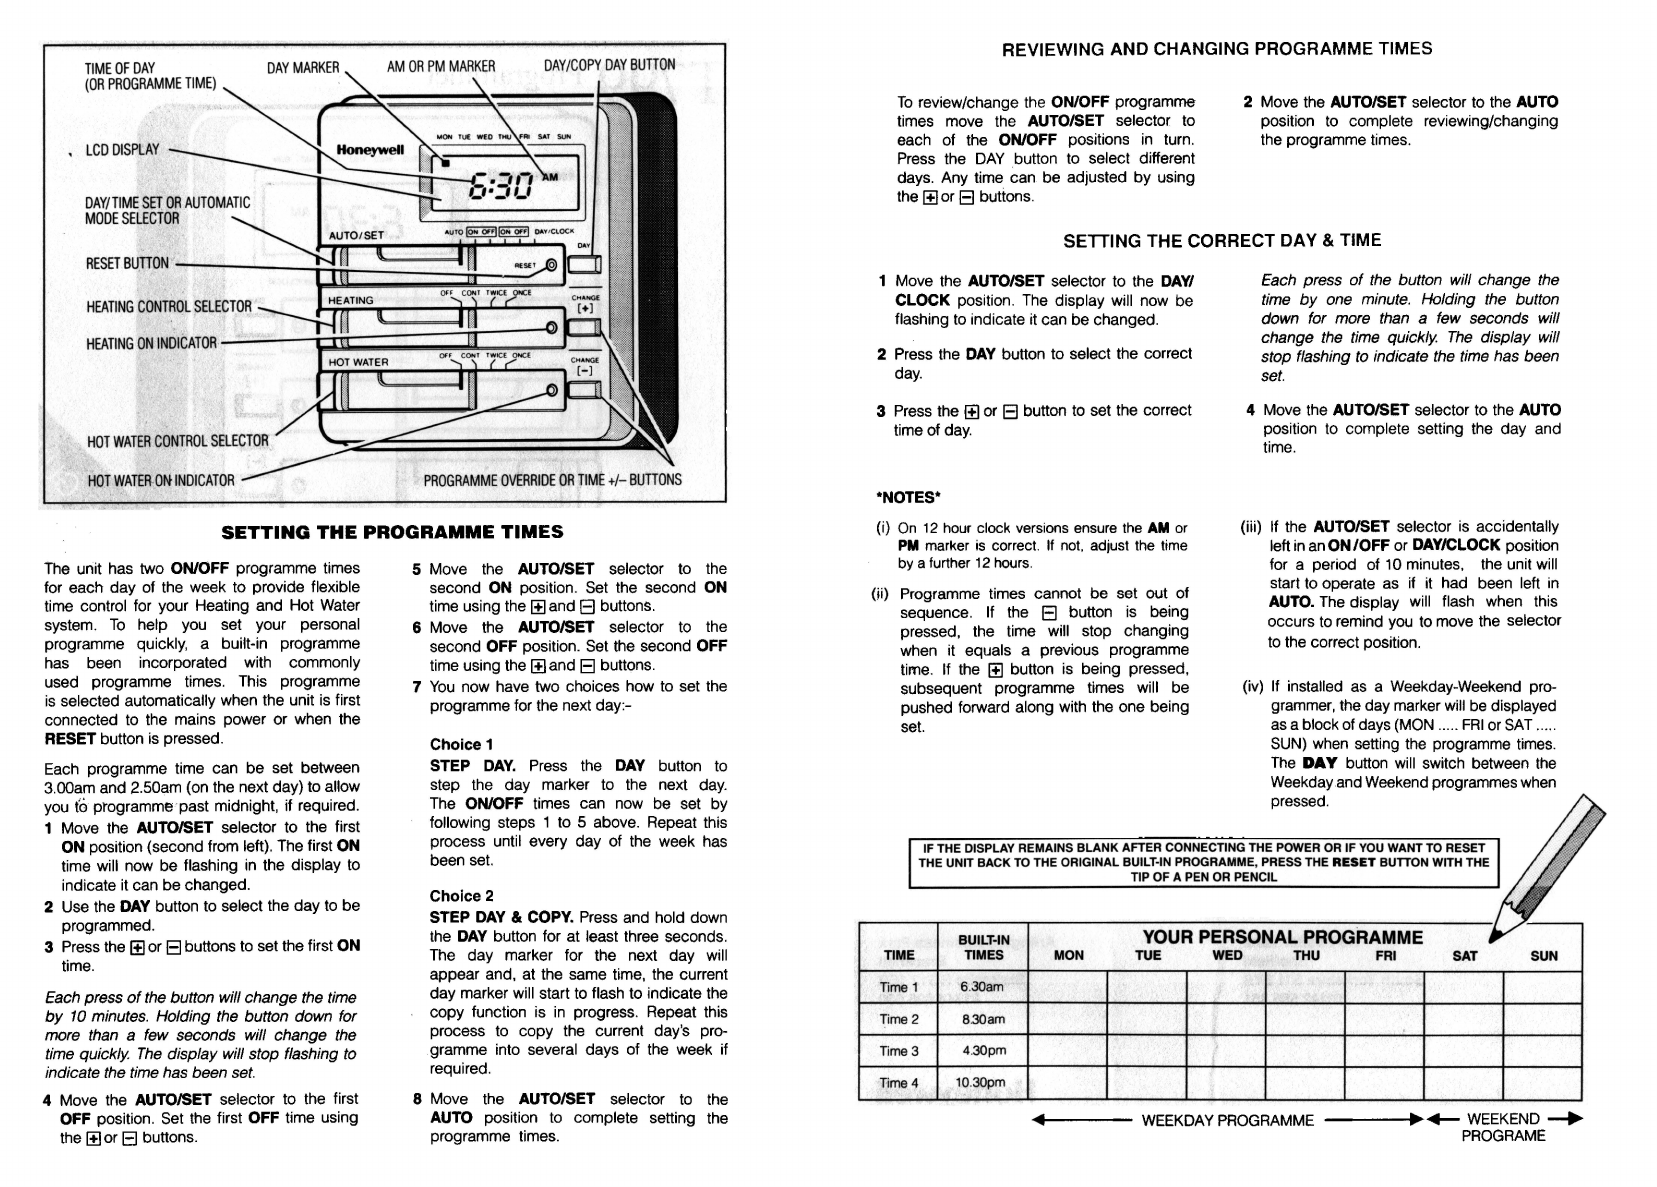
manuals.online logo
Brands
  1. Home
  2. •
  3. Brands
  4. •
  5. Honeywell
  6. •
  7. Motherboard
  8. •
  9. Honeywell ST799 User manual

Honeywell ST799 User manual

OPERATING
YOUR
PROGRAMMER
For
normal operation the AUTO/SET selector
must be
in
the AUTO position.
Red
indicator lamps show
when
the Heating
or
Hbt Water
is
switched ON.
The
two lower selectors are used to control
your Heating and Hot Water
as
follows:
HEATING SELECTOR
OFF
The
heating will remain
OFF
perma-
nently.
CONT
The
heating will remain ON perma-
nently.
TWICE
The
heating will be switched ON and
OFF automatically
at
the programme
times.
ONCE
The
heating will be switched ON
automatically after the first pro-
gramme
ON
time and
OFF
at the last
OFF time.
The
first OFF and second
ON times will be ignored.
HOT WATER SELECTOR
The
HOT WATER selector operates
in
the
same manner
as
described above for the
Heating.
119
Psalter Lane
Sheffield
South Yorkshire
S11
8YR
01142
556
451
CHANGE
The
two
CHANGE buttons switch the output
ON
or
OFF (without altering the programme)
when the AUTO/SET selector
is
in
the AUTO
position and the HEATING and/or HOT
WATER selectors are set to ONCE
or
TWICE.
When
the indicator lamp
is
ON, pressing
the
CHANGE button switches the output OFF
until the next programme ON time.
When
the indicator lamp
is
OFF, pressing the
CHANGE button switches the output ON until
the
next programme OFF time.
POWER FAILURE
This
unit has a built-in battery
to
ensure.
correct operation after a mains power cut.
No action should be necessary following a
power cut
of
up to 7 days. Longer power cuts
may require
you
to reprogramme the unit.
Honeywell Control Systems Limited
Arlington Business Park
Bracknell
Berkshire RG12 1EB
01344 826 000
Honeywell
Helping
You
Control Your World
ST799
Progrru
1
1mer
Hone;rwe
ll
co\$
, •
I
,-
-
=,
,~,
Ilic
,:,
..
_,
,_,
AU'TO/SET
1200Eld95
,002
R:2
INTRODUCTION
The
ST799
electronic programmer
is
used to
control the ON/OFF timing of your heating
and hot water system.
The
system may also
incorporate a
room
temperature thermostat
and a hot water' cylinder thermostat to switch
the heating appliance ON and
OFF
to main-
tain the correct temperatures.
ST799 INCORPORATES THE FOLLOWING
FEATURES:
• 7-day programme (or weekday-weekend)
• Independent Heating and Hot Water
control
• Choice of
two
ON/OFF programme times
per day {TWICE)
or
one programme time
per day {ONCE)
• Programme times can be copied from day
to day
{DAY)
• Built-in programme
• Temporary ON/OFF override {CHANGE)
• Continuous ON
or
OFF control {CONT.
or
OFF)
• RESET button
Honeywell
AM
TIME
OF
DAY
DAY
/
COPY
DAY
BUTTON
(OR
PROGRAMME
T
IME)
LCD
DISPtAY
HEATING
CONTROL
SELECTOR
HEATING
ON
INDICATOR
------i~J:
m;
;;;;;:;;;;;-:-::,:,:,~it
:_:_:_
-_-_
\JI
_,
HOT
WATER
CONTROL
SELECTOR
HOT
WATER-ON
INDICATOR
PROGRAMME
OVERRIDE
OR
TIME
+/-
BUTTONS
SETTING
THE
PROGRAMME
TIMES
The
unit has two ON/OFF programme times
for each day of the week to provide flexible
time control for your Heating and Hot Water
system.
To
help you set your personal
programme quickly, a built-in programme
has been incorporated with commonly
used programme times. This programme
is
selected automatically when the unit
is
first
connected to the mains power or when the
RESET button
is
pressed.
Each
programme time can be set between
3.00am and 2.50am (on the next day) to allow
you
(6
programme past midnight, if required.
1 Move the AUTO/SET selector to the first
ON position (second from left).
The
first ON
time will now be flashing
in
the display
to
indicate it can be changed.
2 Use the
DAY
button to select the day to be
programmed.
3
Press
the
1±1
or
El
buttons to set the first ON
time.
Each press
of
the button will change the time
by
10
minutes. Holding the button down for
more than a few seconds will change the
time quickly.
The
display will stop flashing
to
indicate the time has been
set.
4 Move the AUTO/SET selector to the first
OFF position.
Set
the
first OFF time using
the
1±1
or
El
buttons.
5 Move the AUTO/SET selector to the
second ON position.
Set
the second ON
time using the
1±1
and
El
buttons.
6 Move the AUTO/SET selector
to
the
second OFF position.
Set
the second OFF
time using the
1±1
and
El
buttons.
7
You
now have two choices how to set the
programme for the next day:-
Choice 1
STEP
DAY.
Press
the
DAY
button to
step the day marker to the next
day.
The
ON/OFF times can
now
be set by
following steps 1 to 5 above. Repeat this
process until every day of the week has
been
set.
Choice 2
STEP
DAY
& COPY.
Press
and hold down
the
DAY
button for at least three seconds.
The
day marker for the next day will
appear and, at the same time, the current
day marker will start
to
flash to indicate the
copy function
is
in
progress. Repeat this
process to copy the current day's pro-
gramme into several days of the
week
if
required.
8 Move the AUTO/SET selector
to
the
AUTO position
to
complete setting the
programme times.
REVIEWING AND CHANGING PROGRAMME TIMES
To
review/change the ON/OFF programme
times move the AUTO/SET selector to
each of the ON/OFF positions
in
turn.
Press the
DAY
button to select different
days. Any time can be adjusted by using
the
1±1
or
El
buttons.
2 Move the AUTO/SET selector to the AUTO
position
to
complete reviewing/changing
the programme times.
SETTING THE CORRECT DAY & TIME
1 Move the AUTO/SET selector to the
DAY/
CLOCK position.
The
display will now be
flashing
to
indicate it can be changed.
2
Press
the
DAY
button to select the correct
day.
3
Press
the
1±1
or
El
button
to
set the correct
time of
day.
*NOTES*
(i)
On
12
hour
clock
versions
ensure
the
AM
or
PM
marker
is
correct.
If
not,
adjust
the
time
by
a
further
12
hours.
(H)
Programme times cannot be set out of
sequence.
If
the
El
button
is
being
pressed, the time will stop changing
when it equals a previous programme
time.
If
the
1±1
button
is
being pressed,
subsequent programme times will be
pushed forward along with the one being
set.
Each press
of
the button will change the
time
by
one minute. Holding the button
down for more than a
few
seconds will
change the time quickly.
The
display will
stop flashing
to
indicate the time has been
set.
4 Move the AUTO/SET selector to the AUTO
position
to
complete setting the day and
time.
(iii)
If
the AUTO/SET selector
is
accidentally
left
in
an
ON
/OFF
or
DAY/CLOCK position
for a period of
10
minutes, the unit will
start to operate
as
if
it had been left
in
AUTO.
The
display will flash when this
occurs
to
remind
you
to move the selector
to
the correct position.
(iv)
If
installed
as
a Weekday-Weekend pro-
grammer, the day marker
will
be
displayed
as
ablock
of
days
(MON
.....
FRI
or
SAT
.....
SUN)
when
setting
the
programme
times.
The
DAY
button
will
switch between
the
Weekdayand
Weekend
programmes
when
pressed.
IF THE DISPLAY REMAINS
BLANK
AFTER CONNECTING THE POWER OR
IF
YOU WANT TO RESET
THE UNIT
BACK
TO THE ORIGINAL BUILT-IN PROGRAMME, PRESS THE
RESET
BUTTON WITH THE
TIP OF A PEN OR PENCIL
BUILT-IN YOUR PERSONAL PROGRAMME
TIME TIMES MON
TUE
WED
THU
FRI SAT SUN
Time1 6.30am
Time2 8.30am
Time3 4.30pm
Time4
10
.30pm
,._
____
WEEKDAY
PROGRAMME----~•+-
WEEKEND-+
PROGRAME
Check out our full range of Heating Products
Central Heating Controls
Honeywell Heating Controls
Danfoss Heating Controls
Radiator Valves
Fernox
Sentinel
Magnaclean
Warmup underfloor heating
Water Heaters
Hand Dryers

Other Honeywell Motherboard manuals

Honeywell T5820XL Installation and maintenance instructions

Honeywell

Honeywell T5820XL Installation and maintenance instructions

Honeywell GENT S4-BASE-PROGRAM Installation manual

Honeywell

Honeywell GENT S4-BASE-PROGRAM Installation manual

Honeywell ST9400A User manual

Honeywell

Honeywell ST9400A User manual

Honeywell ST6400A User manual

Honeywell

Honeywell ST6400A User manual

Honeywell DCP551 Mark ll User manual

Honeywell

Honeywell DCP551 Mark ll User manual

Honeywell ST9500C User manual

Honeywell

Honeywell ST9500C User manual

Honeywell ST6400S User manual

Honeywell

Honeywell ST6400S User manual

Honeywell 7720P Installation manual

Honeywell

Honeywell 7720P Installation manual

Honeywell ST9400S User manual

Honeywell

Honeywell ST9400S User manual

Honeywell Gamewell FCI ILI-MB-E3 Technical manual

Honeywell

Honeywell Gamewell FCI ILI-MB-E3 Technical manual

Honeywell SEK001 User manual

Honeywell

Honeywell SEK001 User manual

Honeywell ST9400C User manual

Honeywell

Honeywell ST9400C User manual

Honeywell ST699 User manual

Honeywell

Honeywell ST699 User manual

Honeywell ST9400S Operating instructions

Honeywell

Honeywell ST9400S Operating instructions

Honeywell IDENT-KEY 3 Instruction manual

Honeywell

Honeywell IDENT-KEY 3 Instruction manual

Honeywell ST6400A User manual

Honeywell

Honeywell ST6400A User manual

Honeywell N4300 Series User manual

Honeywell

Honeywell N4300 Series User manual

Honeywell ST699 User manual

Honeywell

Honeywell ST699 User manual

Honeywell GENT S4-INTERFACE-PROG User manual

Honeywell

Honeywell GENT S4-INTERFACE-PROG User manual

Honeywell SEK002 User manual

Honeywell

Honeywell SEK002 User manual

Popular Motherboard manuals by other brands

Intel D33217CK specification

Intel

Intel D33217CK specification

Ski-Doo Bombardier MPEM 219 700 090 user guide

Ski-Doo

Ski-Doo Bombardier MPEM 219 700 090 user guide

Intel S3000PT specification

Intel

Intel S3000PT specification

G.B.T GA-7VTX-P user manual

G.B.T

G.B.T GA-7VTX-P user manual

Teridian 73S1215F user guide

Teridian

Teridian 73S1215F user guide

ASROCK ALIVENF7G-HDREADY user manual

ASROCK

ASROCK ALIVENF7G-HDREADY user manual

National Semiconductor LM32 user guide

National Semiconductor

National Semiconductor LM32 user guide

Winmate FA30-210 user manual

Winmate

Winmate FA30-210 user manual

FIC VC11 manual

FIC

FIC VC11 manual

Gigabyte M5NM1I user manual

Gigabyte

Gigabyte M5NM1I user manual

ASROCK FM2A55M-VG3 user manual

ASROCK

ASROCK FM2A55M-VG3 user manual

Intel BOXD850MVSE Quick reference guide

Intel

Intel BOXD850MVSE Quick reference guide

Seco SBC-C57 user manual

Seco

Seco SBC-C57 user manual

Asus M5A99X EVO user manual

Asus

Asus M5A99X EVO user manual

Teridian 71M6513 user manual

Teridian

Teridian 71M6513 user manual

ASROCK FM2A88X-ITX Quick installation guide

ASROCK

ASROCK FM2A88X-ITX Quick installation guide

Redpine Signals WyzBee user manual

Redpine Signals

Redpine Signals WyzBee user manual

EPOX EP-4BDM user manual

EPOX

EPOX EP-4BDM user manual

manuals.online logo
manuals.online logoBrands
  • About & Mission
  • Contact us
  • Privacy Policy
  • Terms and Conditions

Copyright 2025 Manuals.Online. All Rights Reserved.