Honeywell PRIMAIR PLUS Series User manual

1793675 - NU0304-00 - 11/12
PRIMAIR PLUS
INSTRUCTIONS EN
GEBRUIKSAANWIJZING NL
ت
AR
BRUKSANVISNINGEN NO
UŽIVATELSKÁ PŘÍRUČKA CZ
INSTRUKCJA PL
BEDIENUNGSANLEITUNG DE
INSTRUÇÕES DE UTILIZAÇÃO PT
BRUGSANVISNING DK
ИНСТРУКЦИЯ RU
INSTRUCCIONES DE USO ES
POUŽÍVATEĽSKÁ PRÍRUČKA SK
KÄYTTÖOHJE FI
BRUKSANVISNING SV
NOTICE D'UTILISATION FR
TALİMATLAR TR
LIBRETTO D'ISTRUZIONI IT

Figure 1
Figure 2
Figure 3
Figure 4
Figure 5
Figure 6
Figure 7
Figure 8

EN-1
EN
1. INTRODUCTION
The Honeywell PRIMAIR PLUS Series comprises headgear assemblies with fabric head coverings designed for use with the
Honeywell Powered Air Purifying Respirator (PAPR), Compact Air series. These respirators are ideally suited for applications where
non-powered air-purifying respirators are not practical or the higher protection factor of a hood is required, yet where the
atmospheres are not immediately dangerous to life and health. Honeywell PRIMAIR PLUS Series hoods are used in conjunction with
the Honeywell Compact Air blower battery assembly and particle, gas and combined filters.
This “Operating and Maintenance User Manual” is a supplemental manual only. You must also refer to the Instruction
Manuals provided with the other components of a complete respirator for all other instructions, cautions and warnings, and
the appropriate approvals.
The PRIMAIR PLUS Series comprises:
PA111 EU PRIMAIR PLUS Assembly with bibbed hood, adjustable length, and one package peel-away cover lens
PA121 EU PRIMAIR PLUS Assembly with coated bibbed hood, adjustable length, and one package peel-away cover lens
In addition to PRIMAIR 100 series hoods, the following combinations must be used to form a complete EN 12941-approved
respirator:
The PRIMAIR PLUS Series combination matrix is variable based on the filters and the Powered Air Purifying Respirator Compact Air
series (see attached Declaration of Conformity)
1.1. IMPORTANT INFORMATION
This respirator should only be used and maintained by individuals who have completely read and understood the instructions,
cautions and warnings contained in this Instruction Manual and all Operating and Maintenance Instruction Manual(s) included with
the other components used as part of a complete respirator.
1.1.1. TERMINOLOGY
Warnings, cautions and notes used in this manual have the following significance:
WARNING
Procedures and techniques that, if not carefully followed, will expose the user to the risk of serious injury,
illness or death.
CAUTION
Procedures and techniques that, if not carefully followed, will result in damage to the equipment
NOTE
Procedures and techniques that are considered important enough to emphasize.
2. DESCRIPTIONS OF MAJOR COMPONENTS OF THE RESPIRATOR
An approved respirator consists of the following components, which must be from a single manufacturer. The air supply system may
be from Honeywell Respiratory Safety Products only. POWERED AIR PURIFYING RESPIRATOR (with Compact Air series)
•Hood or Loose Fitting Facepiece
•Breathing Tube
•Belt
•Blower and Battery Assembly
•Filter, Cartridge or Filter/Cartridge Combination
The approval and all Honeywell warranties for this respirator are void if components other than Honeywell
components and replacement parts are used. Using another manufacturer’s components will expose the user
to the risk of injury, illness or death
2.1. LOOSE FITTING HEAD COVER
Honeywell PRIMAIR PLUS head covers include a fabric head covering and a headgear. The head covering may be a hood with neck
seal or hood with bib. The hoods with neck seals and bibs are also available with a coating to protect against chemical splashes. The
headgear has three types of adjustments for maximum comfort and fit.
The PA111EU and PA121EU are classified as loose fitting hoods with bibs.
Coated hoods are for intermittent splashes only, and not intended to replace a hood designed as part of a
chemical suit with sealed seams. Misuse of coated hoods will result in the risk of serious injury, illness or
death.

EN-2
2.2. COMPACT AIR ASSEMBLY AND FILTER/CARTRIDGE (PAPR ONLY)
2.2.1. The Compact Air series assembly includes a blower that holds a set of three filters/cartridges, a battery, a straight breathing
tube to connect to the PRIMAIR headgear, a fabric cover for the breathing tube, an air flow indicator, and a carrying case.
2.2.2. Filters, cartridges and filter/cartridge combinations come in sets of three and include Particulate filters, gas filters and
combination filters.
3. PRE-USE INSTRUCTIONS
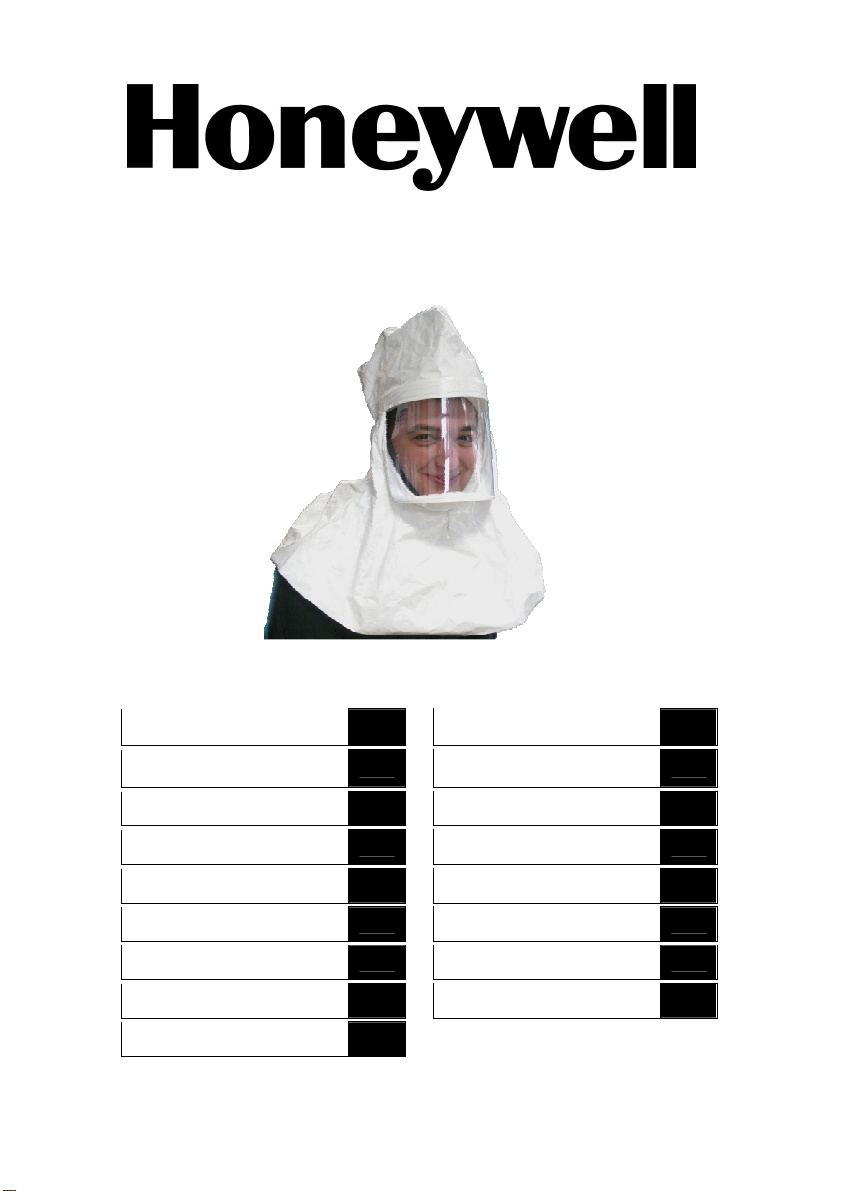
Visually check the HONEYWELL PRIMAIR PLUS assembly to make certain that all components are in place and in good working
condition. The PRIMAIR components consist of a headgear and loose fitting facepiece, the PRIMAIR PLUS consists of a bibbed hood
or hood with neck seal, and one set of peel-away lenses. The PRIMAIR PLUS Series is shipped from the factory with the head cover
(loose fitting facepiece or hood) preassembled on the headgear.
The respirator includes blower/battery assembly and filter/cartridges (PAPR). Do not use this respirator
unless all of the required components are attached. See the end of the User Instructions for the Honeywell
Compact Air PAPR for a list of approved components, or check with your safety manager or industrial
hygienist, or with Honeywell Respiratory Safety Products Customer Service.
3.1. ADJUSTING THE HEADGEAR
You will need to remove the head cover to make all three adjustments noted below. Refer to Section “5.2. REMOVING THE HEAD
COVER FROM HEADGEAR”.
The PRIMAIR headgear has three adjustments to maximize comfort and fit. Adjust the headgear to the proper size by following the
steps noted below. Adjustment A is the primary adjustment and need not be readjusted after a comfortable and secure fit is achieved.
Adjustment B sets the height of the headgear on your head, and may be adjusted more frequently if desired. Adjustment C is the
ratchet that sets the circumference of the headgear to your head, and will be adjusted each time you put the PRIMAIR PLUS
headgear on.
1) Adjustment A: The primary adjustment is preset to a “medium” size. To readjust to a smaller or larger size, slip your finger
under the top lateral strap located towards the back of the headgear, unsnapping it from the yellow locking pin (Figure 1).
Repeat this procedure with the lower lateral strap. Move the lower strap so the desired hole (small, medium or large) is aligned
with the yellow locking pin and snap the strap back onto the pin. Move the top strap so the desired hole is over the yellow pin
and snap into place (Figure 2). Ensure that the ends of the lateral straps are under the yellow air duct attachment.
2) Adjustment B: To set the height of the headgear on your head, squeeze the two tabs on the centre lateral strap with your
thumb and forefinger, releasing the locking mechanism, and pull each side of the centre strap to widen the strap. Place the
headgear on your head. Squeeze the centre tabs again to release the locking mechanism, and push or pull each side of the
centre strap to shorten or lengthen the strap. Adjust until the headgear is comfortable and at the desired height on your head
(Figure 3).
3) Adjustment C: Turn the ratchet clockwise to tighten the headgear so that you have a snug and comfortable fit (Figure 4).
Readjustments of the centre lateral strap (Adjustment B) and the ratchet (Adjustment C) can be made at this time for the most
comfortable and secure fit. If you are unable to achieve a snug and comfortable fit, readjust the back lateral straps to a smaller
or larger size. Repeat steps 2 and 3.
3.2. ASSEMBLING THE HEAD COVER ON THE HEADGEAR
1) Slip the head cover over the headgear, so the two openings of the head cover line up with the ratchet and manifold orifice.
2) Pull the yellow end of the manifold orifice through the upper hole of the head cover, making sure the yellow connector is
completely through the hole.
3) Pull the ratchet through the lower hole, so that the ratchet is easily accessible, and the elastic strap is under the ratchet wheel
(Figure 5).
4) Snap the head cover onto the male snaps on the headgear. The PA111 and PA121 have two (2) female snaps. For the
PRIMAIR PLUS, snap the female snaps to the male snaps that are closest to the front of the headgear (Furthest away from the
ratchet adjustment at back).
5) Pull the bottom of the lens on the head cover down, so the headgear manifold is completely under the fabric portion of the head
cover. Make sure that the fabric on the inside of the PRIMAIR PLUS does not block the opening of the manifold (Figure 6).
6) Remove the protective plastic covers (inside and outside) on the lens of the head cover before using the respirator.
7) The bib length of the PRIMAIR PLUS head cover may be adjusted by using the two sets of snaps on the inside of the bib front.
This adjustment may be done now or at any point while using this respirator (Figure 7).
4. PRE ENTRY PROCEDURES
4.1. INSPECTION
Each and every time you put on your respirator you must inspect all components.
1) Refer to the Instruction User Manual of the Compact Air series PAPR for inspection procedures of those components
2) Inspect the hood and headgear for wear or damage.
a) Check the hood for tears or holes.
b) Check the headgear for any cracks or other damage.
c) Check the fitting on the breathing tube.
d) Check that head cover snaps are attached to the headgear.
e) Ensure that the headgear is adjusted properly to fit your head.

EN-3
3) If any parts are missing, damaged or worn, replace them or tag your respirator and remove it from service.
If you notice any wear or damage, replace the damaged component if possible. If you are unable to replace
the damaged component, do not use this respirator. Remove the respirator from service, tag the unit and
return it for repair. Repairs shall only be carried out by someone familiar with the unit’s Instruction Manual
and respirator type.
Failure to replace any damaged components or the entire respirator may result in illness, injury or death.
Failure to correct anomalies can result in serious injury, illness or death.
4.2. PUTTING ON THE HEADGEAR ASSEMBLY
1) Refer to the Instruction Manual of the Compact Air PAPR for donning procedures of those units. A copy of the Instruction
Manual is located on the Honeywell web site www.honeywellsafety.com.
2) After following these instructions and when the respirator is operating properly, you are ready to put on the headgear assembly.
3) Putting on the headgear:
a) Slip the headgear assembly onto your head, opening up the ratchet if necessary.
b) For PA111, pull the front of the head cover down so the elastic fits comfortably under your chin. Note that the
elastic of the PRIMAIR PLUS is located inside the hood. The end of the manifold should be positioned at the top of
your forehead.
c) Tighten the ratchet so the headgear fits comfortably and securely.
d) The bib of the PA111 and PA121 can be worn inside or outside of your shirt or coveralls. If the bib is too long,
connect the two (2) sets of male and female snaps located on the inside of the front bib.
The lens on the Honeywell PRIMAIR PLUS Series does not provide eye or face protection. Primary eye
protection, such as safety glasses, must also be worn in conjunction with PRIMAIR 100 Series head covers.
Failure to wear primary eye protection may result in eye injury to the worker.
Do not use the Compact Air 200 apparatus with the power turned off; a rapid build-up of carbon dioxide and
depletion of oxygen within the hood may occur.
Filters must not be fitted directly to the hood.
5. REMOVING AND CLEANING THE HEADGEAR ASSEMBLY
5.1. REMOVING THE HEADGEAR
1) Loosen the headgear by turning the knob behind your head in an anti-clockwise direction.
2) When the headgear has expanded, remove the head cover assembly by pulling the elastic front of the head cover up and over
your face.
3) Remove the headgear assembly from the breathing tube by pushing down the yellow tab and twisting the breathing tube swivel
fittings from the headgear assembly.
5.2. REMOVING THE HEAD COVER FROM HEADGEAR
1) Unsnap the two (2) snaps of the PA111 and PA121 that connect the hood to the headgear.
2) Pull the cover back over the manifold, slipping the ratchet out through the opening.
Because the hood was exposed to contaminants during use, it is recommended that the appropriate
chemical-resistant gloves be worn while handling the head cover.
5.3. CLEANING THE HEADGEAR
1) Clean the headgear by using a mild cleaning solution, EPI U-S 19a cleaning and disinfecting agent, and a cloth or sponge.
Rinse the headgear in clean water.
2) Dry the headgear with a clean cloth and/or leave to air dry in a clean area.
3) Inspect the headgear. Refer to Section “4.1. INSPECTION”.
4) After the headgear is completely dry and has been inspected, put on a new head cover. Refer to Section “8.1. REPLACEMENT
PARTS” for a list of PRIMAIR replacement hoods. Refer to Section “3.2. ASSEMBLING THE HEAD COVER ON THE
HEADGEAR” for instructions on putting the new hood on.
Do not immerse the headgear as this may remove the lubricant in the ratchet system. If you should
inadvertently get water inside the manifold air duct, connect the headgear to your PAPR and blow air through
the air duct for several minutes to remove any traces of water. Storing or using the headgear with water
inside may damage the component, and may also result in fungal growth.
Do not use liquid solvents when cleaning the headgear. Liquid solvents may chemically weaken the plastic.
If the headgear assembly will be stored at temperatures below freezing, 0˚C, all components must be dried
thoroughly prior to storage.
5.4. REPLACING THE SWEATBAND
1) The sweatband is held in place by a tape. Gently peel off the sweatband and discard.
2) Use cloth wetted with isopropyl alcohol to remove any glue residue.
3) Centre the new sweatband, P/N PA104 and press into place.

EN-4
6. STORAGE
All respirators are stored in a clean, dry environment away from any contaminants. You may store your Honeywell PRIMAIR PLUS
series headgear in its original box, any carrying case, or in an enclosed wall case with other respirator components (Compact Air
series).
1) The headgear may be left attached to the breathing tube and belt assembly, or it can be removed for storage.
2) Store the respirator components in a clean environment away from contaminants. If the cloth cover of your head cover assembly
will be reused, store it so it will not contaminate other respirator components, including the interior of the headgear.
3) If any parts are missing, damaged or worn, replace them or tag your respirator for repair. DO NOT STORE A RESPIRATOR
WITH DAMAGED OR MISSING PARTS.
Do not tuck any surplus material of a used hood, including the bib, into the headgear assembly. This will
contaminate the internal breathing area and can result in serious injury, illness or death.
Do not expose the head cover assembly to excessive heat (above 60°C), moisture or contaminating
substances during storage. Excessive heat may distort components, exposing the user to the risk of injury,
illness or death.
7. MAJOR COMPONENTS OF PRIMAIR HOODS
The complete assembly includes one disposable loose fitting hood and one adjustable headgear.
PA111EU PRIMAIR PLUS Assembly with bibbed hood, adjustable length, and one package peel-away cover lens
PA121EU PRIMAIR PLUS Assembly with coated bibbed hood, adjustable length, and one package peel-away cover lens
8. REPLACEMENT PARTS & ACCESSORIES
8.1. REPLACEMENT PARTS
PA112 PRIMAIR PLUS with bibbed hood for PA111EU
PA122 PRIMAIR PLUS with coated bibbed hood for PA121EU
PA103 Replacement headgear, bulk packaged
PA104 Sweatband
PA105 Peel Away cover lens for PA111EU
8.2. ACCESSORIES
EPI U-S 19a Cleaning and disinfecting agent
9. PICTOGRAMS
See the information brochure
End of storage period: yyyy=year/mm=month
Temperature range for storage conditions
Maximum humidity for storage conditions

EN-5
10. YEAR OF MANUFACTURE
Information about the year of manufacture of the major components can be recognized as described here:
Air hood / mask: Silver sticker with date of manufacture. To be found on the inside of the head section;
Filters: See separate operating instructions for filters;
Hose assembly: See bayonet connection;
Blower and battery: See reverse of the blower unit.
11. STATUTORY REQUIREMENTS AND REGULATIONS
89/686/EEC European directive on personal protective devices
EN12941 Powered filtering devices incorporating a helmet or hood.
Production control according to
article 11B INSPEC, 56 Leslie Hough Way, Salford
Greater Manchester, M6 6AJ, United Kingdom
Marks on the system: CE 0194
The EC standards apply to complete equipment complying with the CE configurations certified by the notified
bodies having conducted the CE type examination.
Failure to comply with this procedure invalidates the CE marking.
12. GENERAL
Honeywell Respiratory Safety Products cannot, in general terms, accept responsibility for damage incurred by the owner, user, other
person or third party using the safety product, which results either directly or indirectly from incorrect use and/or maintenance of the
safety product, including use of the product for any purpose other than that for which it was supplied and/or non-compliance with or
incomplete observance of the instructions contained in this user manual and/or in connection with repairs to the safety product which
have not been carried out by us or on our behalf.
Our General Sales and Supply conditions are applicable to all transactions. Honeywell Respiratory Safety Products continually strives
to improve its products and reserves the right to change the specifications mentioned in this manual without prior notification.
The European Directive 89/686/EEC covering Personal Protective Devices stipulates that only inspected
protective devices bearing the CE mark may be traded and used. Use of substitute, non-original spare parts,
invalidates the CE approval and also all rights relating to the guarantee, whereby the user and also the
person initially marketing these spare parts shall be punished by the relevant authorities of the EEC member
countries, whereby additionally, the entire product will be excluded from use and withdrawn from commercial
transactions, respectively. Original spare parts can be recognized by the affixed code numbers,
supplemented with the manufacturer's mark and the "CE approval" mark, possibly supplemented with a year
of applicability.
13. WARRANTY
Honeywell Respiratory Safety Products will repair or, if necessary, replace this product free of charge in the event of a material or
manufacturing defect within 12 months of the purchase date, provided that the product has only been subjected to normal usage in
accordance with the user manual. The guarantee is invalidated if the type or serial number marking is modified, removed or made
illegible.
Products specified in this manual are products of:
Honeywell Respiratory Safety Products, an ISO 9001 certified Manufacturer of Respiratory Protective Devices.
ZI PARIS NORD II – B.P. 50288
33, rue des Vanesses
95958 ROISSY CDG Cedex
FRANCE
Products specified in this manual are manufactured in:
NORTH Safety Products
900 Douglas Pike Smithfield
Rhode Island
USA

AR-1
AR
.
ا PRIMAIR PLUS Honeywell ا ا ا ةأ ماا أ ا ا سأا ةدوا سأا تاو ت
ا ءاHoneywell )PAPR( ا ،Compact Air . ،ا ا ةأ ا ةأ ماا ا ت ، ٍ
ا ا ي ا تا ً ،ء ا آأ رد م ا ت وأ ا ا ا ءا ا ا
ة ةرا ا وأ ةا . ا أ ماا PRIMAIR PLUS Honeywell زا ا و تر Compact Air و
ا او تازاو تا.
إ"او ما د " إ د ةر اه .ًأ عا ،ا ع آ ز ىا تا ما تا د إ
ا تاداو تااو تاو تا .
ا PRIMAIR PLUS :
PA111 EU ا ةرPRIMAIR PLUS لا و دو ء ةا از ا ءا ت ةاو ةو PA121 EU ا ةرPRIMAIR PLUSاز ا ءا ت ةاو ةو لا و دو ل ء ةا
ا أ إ PRIMAIR 100أ ا تا ماا ، ر آ ز EN 12941:
ا ت PRIMAIR PLUS ا ا ءا ا ا ا ةأو ًو Compact Air) ا إ إ را
ا(
1.1 .ه ت
أ ماا و ا ا ة د ً ، اه تا ةدراا تااو تاو تا باو ةءا ا ا داا ا
)دأ (آ ز ءآ اا ا ىا تا ا ا ت. 1.1.1 .تا
إ ا اه ا تاو تاو تاا :
ر ا إ ،ةا وأ ضا وأ ة ما ض ا او تاءاا.
ر ا إ ،زا إ يد ا او تاءاا
ه اً ا او تاءاا.
2 .ا ا ز ا تا فوأ
ا تا ةاو لا ا ، ز . آ ءا داا م لا Honeywell Respiratory Safety Products . يا ءا ا ا ا ز) دوCompact Air(
•و وأ ء •ا بأ •ما •را و ا ةو •ا وأ ا وأ ا/اا
ا تا و تادا Honeywell ا را و تا ف ىأ ت ماا اذإ Honeywell .
ا ما ض إ ىأ ت ماا يدةا وأ ضا وأ
2.1 .ا سأا ء
زا سأا أ يPRIMAIR PLUS Honeywellسأ ٍقاوو سأر ء . دو ء وأ دو ء ةر سأا ء و
. ةدو تو ت ة أ ،آا ا ء . ت أ أ سأا او ت ث ،و
آا مإو اا.
ا PA111EUو PA121EUت ةدوا ا ا أ .
ءآ ء أ و ، ا ا ا ء ا ا م ا أ ب ت ةدو
ا داا .ةا وأ ضا وأ ة ضا إ ء ا ا لا ةءإ يد .

AR-2
2.2 . اCOMPACT AIRاو / ا) ا ءا ا ا ا ةأ (
2.2.1.. ا يCompact Air ةدو ةو / زا سأا ا ا أ بأو رو ا PRIMAIRا و ا و ا ب ء ا . 2.2.2..ا و ااو ا قرإ /ا او زا و تا ي ت ث اا. 3 .ماا ت
ا اPRIMAIR PLUS HONEYWELLة أو تا دو آ . ا ت PRIMAIR ٍقاو
ا أ ، و و سأPRIMAIR PLUSاز ا ءا ت ةاو و وأ دو ء ، . ا PRIMAIR PLUS سأر ء ا )وأ و ء (سأا او ً آ .
ا ز يا ةو ا /ا و را/ اا)PAPR.( آ اذإ إ اه ا ا ز م
ا تا . زا ا ءا ا ا ا ة ا ما ت إ راCompact Air Honeywell ا ا ز ا ا ت ءا ا صا وأ ةا ت ع Honeywell ،
ا .
3.1 .سأا او
دأ ا ا ا ت ءاإ أ سأا ء م . ا إ را"5.2 .سأا او سأا ء ."
زا سأا او ت ث PRIMAIRآا مإو اا ت أ أ .دأ ا تاا ع ا ا سأا او ا .
ا )أ :(ا ا ةرآا مإو ا ٍل ى ىأ ة مو . ا )ب :( سأا او عرا
ا م إ ،ر ىأ ة و ،سأا . ا )ـ :( و ،سأ سأا او يا جا ةر او ماا ة آ
زا سأاPRIMAIR PLUS.
1( ا )أ:( س ً ا ا " ." دا ا ماا أ إ ا ،آأ وأ أ س ىأ ة و
ا ر ،سأا او ا ا ا )ا1 .(ا ا ماا ءاا اه رّآ . ا ا ةاذ ا ماا كّ
)ةآ وأ وأ ة (ر ىأ ة ماا را ،ا ا ر . ا را ق ا يا ماا كّ
)ا2 .(ا ءاا و أ ا ماا دو آ. 2( ا )ب:( ،او ما إ ما ا ماا دا ا ا ،سأا سأا او عرا ا
أ ماا و .أر سأا او . آ ا ،ا ىأ ة ا ا
ماا ل أ ا وأ ماا . او با سأا عرا لا ا ما ً سأا) ا3.( 3( ا )ـ:( و آا ،سأا او آ م ا بر آ جا ردأ) ا4 .( ا ا ماا
ىأ ة) ا )ب (( جاو) ا )ـ (( ىأ ةم آاو ا ت أ أ ةا ه . آا رّ اذإ
آأ وأ أ إ ا دا ا ماا ٍ ،و . ا رّآ2و 3.3.2 .سأا او سأا ء آ
1(ا او ق سأا ء كّا او ج سأا ء ةاذ أ سأ. 2( ا ا آا ،سأا ء ا ا ا ا ا فا ا. 3( جا إ لا ،ا ا جا ا جا أ د ا ماا و)ا5.( 4(سأا ا ا ا سأا ء آ . إ )2 ( زاا PA111و PA121 . زا PRIMAIR PLUS ا را ،
أ دا ا ا سأا او ب)ا دا جا ا ا هو.( 5(سأا ء ا ا أ آ سأا او ،سأا ء أ دا ا ا ءا ا . ةدا ا ا أ آ
ا ا PRIMAIR PLUS ا )ا6.( 6( اا ا ا )جراو ا ةدا (ا ا ز ماا سأا ء ا. 7( زا سأا ء ل PRIMAIR PLUS اا زأ ما ا . و يأ وأ ا ه ا ءاإ
ا ا ز ماا ءأ)ا7.(
4 .لدا تاءاإ
4.1 .ا
ة آ ا ا ز ماا تا . 1( ا ت ما د إ را يا ءا ا ا ا زCompact Air ا تاذ تاءااو ا ف
تا 2( وأ آ دو ً سأا اوو ءا ا. a(ب وأ تاءاها دو ً ءا ا. b(أ ق يأ دو ً سأا او اىأ ت و. c(ا بأ و ا. d(سأا ا سأا ء زأ آ آ. e(سأا سأا او آ.

AR-3
3( ّ و ،ا ا ز و وأ اا صا ،آ وأ وأ ةد ءاأ يأ دو أ .
ص ، وأ آ يأ دو اذإأ إ ،ا ا لاا . ا ز ماا ا ٍ ،ا ا لاا رّ اذإ أ
ا .إ د ،ةا ه و ا ا ا ز از . ا حا ت ءاإ
ا ا ز عو تا ارد .
ةا وأ ضا وأ ضا إ آ ا ا ز وأ ت يأ لاا م يد . إ فاا م يد
ةا وأ ضا وأ ضا.
4.2 .او ءاراسأا
1( يا ءا ا ا ا ز ا تا د إ راCompact Airتاا ه ءار ا تاءاا ف . و
آ صا ا تا د Honeywell com.honeywellsafety.www.2(سأا او ءار اًه ، ا يا او تا ه عا . 3(سأا او ءارا: a(ا م إ ،جا او أر سأا او كّ. b( زا PA111ا أ ، ،آ د ا ءا سأا ء ا ا كّ ، . د ا ءا أ
ا PRIMAIR PLUSءا ا د .سأا أ ا ف دو و. c(أا او آ جا آ أو س. d( زاا ق PA111و PA121ر وأ اا ا وأ ا ا . ِ ، ا آ اذإ)2 ( ا زا
ا ا ا ا ةدا او.
ةدا تا PRIMAIR PLUS Honeywellا وأ زا ا .،آ ،ا ا او ض
سأا أ ق ق ،ا تارPRIMAIR 100 . ا ض إ ا ا او ءارا م يد . زاا ز ماا Compact Air 200 إو ؛ا فإ ءأ آوا دا و ا آأ ز آا
ءا ا دا.
ة ء ا آ أ .
5 .و سأا او
5.1 .سأا او
1(ا بر ا سأا دا ا ةرادإ ل سأا او . 2(ا قو سأا ء د ا ا ا ل سأا ء از ،سأا او . 3(أا او را ا بأ تو ةرادإو ا ا ا ل ا بأ سأا او از س.
5.2 .سأا او سأا ء
1( ا ا)2 ( اPA111و PA121سأا ا ءا ا . 2(ا جا ا ءا ا.
ا ء ا ءأ ا داا و ا تازا ءار ،ماا ءأ ت ءا ض اًسأ.
5.3 .سأا او
1( او ا ،ل ل ما سأا او EPI U-S 19aإ وأ ش و . سأا او ا. 2(و ش سأا او /ءاا آا وأ. 3(او اسأا . ا إ را"4.1 .ا." 4( سأر ء ، و سأا او . ا إ را"8.1 .را " زا ء ا را فPRIMAIR . را
ا إ"3.2 .سأا او سأا ء آ "ا فا ءا ءار ا ت.
أا ء جا م ا ةد ازإ إ ذ يد ،ا س . ِ ، صا ءاا إ ، ،ا لد و
ءاأ يأ از د ءاا ءاا ا ، يا ءا ا ا ا ز سأا اوا . يد
تا إ ًأ يد و ، ا إ ا ا دو ءأ ا وأ سأا او. سأا او ءأ ت ماا .ا ا ا ةدا فإ إ ا تا ماا يد . ،ا رد ةرا ترد سأا او اذإ0 تا ، رد .
5.4 .سأا لاا
1( سأا .از ، سأا ا. 2( ش ماا دا يأ از ووا ل. 3( ا ا ا ةا سأا PA104 او .

AR-4
6 .ا
ت يأ اً ،و ا ا ةأ .ا سأر او PRIMAIR PLUS Honeywell وأ ا قوا
ىا ا ا ز ت و وأ ة يأ) اCompact Air.( 1( ازإ وأ ،ماا و ا ب ً سأا او ك . 2(ا ز ت تا اً ا . ٍ ،سأا ء ىأ ة شا عا ءا ماا أ
سأا او ،ذ ،ىا ا ا ز ت ث . 3(آ وأ وأ ةد ءاأ يأ دو إ أ ا ا ز و وأ اا صا ، . ز
ةد وأ ءاأ.
سأا او ،ا ذ ،ا ءا ةاز دا يأ لدإ . ضا ّ و ،اا ا ءاأ ث إ ذ يد
ةا وأ ضا وأ ة . ةاز ةرا ر سأا ء ) 60 رد (ا ءأ دا وأ وأ . إ ةاا ةراا رد يد
ةا وأ ضا وأ ا ما ض ّ و ،تا .
7 . زا ا ا تاPRIMAIR
او سأر اوو ا و ا او ء ا ا ي.
PA111EU ا ةرPRIMAIR PLUSاز ا ءا ت ةاو ةو لا و دو ء ةا PA121EU ا ةرPRIMAIR PLUSاز ا ءا ت ةاو ةو لا و دو ل ء ةا
8 .تاو را
8.1 .را
PA112 ا ةرPRIMAIR PLUS زا ء ةدوا PA111EU PA122 ا ةرPRIMAIR PLUS زا ء ل ء ةدوا PA121EU PA103ةآ ت ،ا سأا او PA104سأا PA105 زا از ا ءا تPA111EU
8.2 .تا
او ا EPI U-S 19a
9 .ا ما
ة ارتا
ا ءا ر :yyyy=ما/mm=ا
ا فو ةرا رد ق
ا فو ىا ا

AR-5
10 .ا م
ا ت صا ا م ا تا ح : عا /ءاا ء : ر ا .؛ا ءا اد را ا :؛ ا ا ا ت إ راما :؛را تاذ ا ارراو ا ةو :ا ة ا ءا ار. 11 .ااو ا تا
89/686/EECا ا ةأ وروا ا EN12941ء وأ ةذ ةدواو ا ا ةأ.
ةد و جا ا11BINSPEC, 56 Leslie Hough Way, Salford
Greater Manchester, M6 6AJ, United Kingdom
ز ةدا تا:CE 0194
EC اا ةا تEC ع تارا ءا تُأ ا تا ةا CE. دا ءإ إ ءاا اه عا م يد CE.
12 . ت
آ Honeywell Respiratory Safety Productsا ه ا راا وا ، ، م ر وأ وأ ما وأ
و ماا ، وأ إ ، او ،ا /و ا ض ي ا ماا ذ ، ما وأ/ وأ
د ةدراا تا ةا م وأ لا مو آ ما / هؤاإ وأ ا ا ا حإ ت وأ. تا ا تاو را طو . آ Honeywell Respiratory Safety Products و
رإ ود ا اه ةدراا تاا .
وروا ا 89/686/EEC ا او ا ا ةأ لوا ز أ ،ا ا ةأ يا ،CE
ااو . دا ءإ ا ا را ماا إCEا قا آو يا دا وأ ما ،
ا ءا ذ إ ،وروا دا ءا اا ا تا ه را اا م
اا را تا و ماا . ا آا إ ،ا دا مرأ ل ا را فا
و" داCE"ماا م دو إ ،.
13 .ا
آ مHoneywell Respiratory Safety Products ،ا م اذإ ،اا وأ ا اه ح وأ داا وأ دو ً12 اً
ما ًو يدا ما ض ا أ ،ءاا ر . أ اذإ وأ ،ازإ وأ عا وأ ا ا اذإ ا
او.
تا ا اه ةرآا:
Honeywell Respiratory Safety Products، وا ا اا ا ا ة ا آا هو ISO 9001.ZI PARIS NORD II – B.P. 5028833 ,rue des Vanesses95958 ROISSY CDG CedexFRANCE
اه ةرآا تا ا: NORTH Safety Products900 Douglas Pike SmithfieldRhode IslandUSA

CZ-1
CZ
1. ÚVOD
Řada Honeywell PRIMAIR PLUS zahrnuje sestavu náhlavní soupravy s látkovou pokrývkou hlavy navrženou pro použití s mobilním
respirátorem se vzduchovým filtrem (PAPR) firmy Honeywell, řady Compact Air. Tyto respirátory se ideálněhodí pro aplikace, kde
nejsou praktické respirátory se vzduchovým filtrem nebo je vyžadovaný vyšší ochranný faktor kapuce, ale atmosféra není
bezprostředněživotu a zdraví nebezpečná. Kapuce řady Honeywell PRIMAIR PLUS se používají ve spojení s kompaktní sestavou
baterie dmychadla a čističem částic, benzínovými a kombinovanými čističi.
Tato „Uživatelská provozní příručka a příručka pro údržbu“ je pouze doplňkovou příručkou. Musíte se také podívat do
Návodůpro obsluhu poskytnutých s dalšími součástkami kompletního respirátoru na všechny další pokyny, výstrahy
a upozornění a na příslušná osvědčení.
Řada PRIMAIR PLUS zahrnuje:
PA111 EU Sestavu PRIMAIR PLUS s kapucí s náprsenkou nastavitelné délky a jedno balení slupovacích krycích čoček
PA121 EU Sestavu PRIMAIR PLUS s kapucí s náprsenkou nastavitelné délky a jedno balení slupovacích krycích čoček
Navíc ke kuklám řady PRIMAIR 100 k vytvoření kompletního respirátoru schváleného podle EN 12941 musí být použity následující
kombinace:
Kombinační matice řady PRIMAIR PLUS je měnitelná na základěfiltrůa respirátoru se vzduchovým filtrem řady Compact Air (viz
přiložené Prohlášení o shodě)
1.1. DŮLEŽITÁ INFORMACE
Tento respirátor by měl být používaný a udržovaný pouze osobami, které si kompletněpřečetly a pochopily tyto pokyny, varování a
upozornění obsažené v tomto Návodu pro obsluhu a všech Uživatelských příručkách a Příručce (příručkách) pro údržbu, obsažených
v dalších součástkách používaných jako součást kompletního respirátoru.
1.1.1. TERMINOLOGIE
Varování, upozornění a poznámky použité v této příručce mají následující význam:
VAROVÁNÍ
Postupy a techniky, které, pokud nejsou pozornědodržovány, vystaví uživatele riziku vážného úrazu, nemoci
nebo smrti.
UPOZORNĚNÍ
Postupy a techniky, které, pokud nejsou pozornědodržovány, budou mít za následek poškození zařízení.
POZNÁMKA
Postupy a techniky, které jsou považovány za natolik důležité, aby byly zdůrazněné.
2. POPIS HLAVNÍCH SOUČÁSTEK RESPIRÁTORU
Schválený respirátor se sestává z následujících součástek, které musí být od jediného výrobce. Systém pro přívod vzduchu může být
jen ze systému pro bezpečné dýchání firmy Honeywell. MOBILNÍ RESPIRÁTOR SE VZDUCHOVÝM FILTREM (u řady
Compact Air)
•Kapuce nebo volná spojovací lícnicová část
•Dýchací trubice
•Pásek
•Sestava ventilátoru a baterie
•Filtr, vložka nebo kombinace filtru a vložky
Osvědčení a všechny záruky společnosti Honeywell jsou neplatné, pokud jsou použity jiné součástky
a náhradní díly než od společnosti Honeywell. Použití součástky jiného výrobce může uživatele vystavit riziku
úrazu, nemoci nebo smrti.
2.1. VOLNÁ SPOJOVACÍ POKRÝVKA HLAVY
Pokrývky hlavy PRIMAIR PLUS od společnosti Honeywell zahrnují textilní pokrývku hlavy a náhlavní soupravu. Pokrývka hlavy může
být kapuce s těsněním kolem krku nebo kapuce s náprsenkou. Kapuce s těsněném kolem krku a náprsenkou jsou také k dispozici
s povrchovou úpravou pro ochranu před chemikáliemi a postříkáním. Náhlavní souprava má tři typy nastavení pro co největší pohodlí
a padnutí.
PA111EU a PA121EU jsou klasifikovány jako volné spojovací pokrývky hlavy s náprsenkami.
Kapuce s povrchovou úpravou jsou pouze k občasnému postříkání a nejsou zamýšleny jako součást
chemického obleku s utěsněnými švy. Nesprávné použití kapucí s povrchovou úpravou bude mít za následek
vážný úraz, nemoc nebo smrt.

CZ-2
2.2. SESTAVA COMPACT AIR A FILTR/VLOŽKA (POUZE PAPR)
2.2.1. Sestava Compact Air obsahuje ventilátor, který obsahuje sadu tří filtrů/vložek, baterii, rovnou dýchací trubici k připojení k
náhlavní soupravěPRIMAIR, látkovou pokrývku pro dýchací trubici, indikátor průtoku vzduchu a přepravní obal.
2.2.2. Filtry, vložky a kombinace filtru a vložek přicházejí jako sady tří součástek a zahrnují filtry částic, plynové filtry a kombinované
filtry.
3. POKYNY PŘED POUŽITÍM
Zkontrolujte vizuálněsestavu HONEYWELL PRIMAIR PLUS, abyste se ujistili, že jsou všechny součástky na místěa v dobrém
pracovním stavu. Součástky PRIMAIR se sestávají z náhlavní soupravy a volné spojovací pokrývky hlavy, PRIMAIR PLUS se
sestává z kapuce s náprsenkou nebo kapuce s těsněním kolem krku a jedné sady slupovacích čoček. Řada PRIMAIR PLUS je
odesílána z výrobního závodu s pokrývkou hlavy (volnou spojovací pokrývkou hlavy nebo kapucí) předmontovanou na náhlavní
soupravě.
Respirátor obsahuje sestavu ventilátoru/baterie a filtr a vložky (PAPR). Nepoužívejte respirátor, pokud nejsou
připojeny všechny požadované součástky. Podívejte se v pokynech pro uživatele pro Honeywell Compact Air
PAPR na seznam schválených součástek, nebo zkontrolujte s vaším vedoucím bezpečnosti práce nebo
průmyslovým hygienikem nebo se zákaznickým servisem společnosti Honeywell pro ochranné dýchací
prostředky.
3.1. NASTAVENÍ NÁHLAVNÍ SOUPRAVY
Budete potřebovat pokrývku hlavy, abyste provedli všechna tři nastavení uvedené níže. Podívejte se na oddíl „5.2. VYJMUTÍ
POKRÝVKY HLAVY Z NÁHLAVNÍ SOUPRAVY“.
Náhlavní souprava PRIMAIR má tři nastavení k co největšímu pohodlí a padnutí. Nastavte náhlavní soupravu na správnou velikost
podle následujících krokůuvedených níže. Nastavení A je základní nastavení a nemusí být znovu nastavované poté, co je dosaženo
pohodlného a bezpečného padnutí. Nastavení B stanovuje výšku náhlavní soupravy na vaší hlavěa může být nastaveno častěji,
pokud je to žádoucí. Nastavení C je západka, která nastavuje obvod náhlavní soupravy na vaší hlavěa bude nastavena pokaždé,
když dáte náhlavní soupravu PRIMAIR PLUS na sebe.
1) Nastavení A: Základní nastavení je přednastaveno na „prostřední“ velikost. Pro přenastavení na menší nebo větší velikost
zastrčte svůj prst pod horní boční pás umístěný poblíž zadní části náhlavní soupravy a odepněte ho ze žlutého pojistného
spínadla (Obr. 1). Zopakujte tento postup u spodního bočního pásu. Posuňte spodní pás tak, aby požadovaný otvor (malý,
střední nebo velký) byl zarovnaný se žlutým pojistným spínadlem a zabouchněte boční pás zpět do spínadla. Posuňte horní pás
tak, aby byl požadovaný otvor nad žlutým spínadlem a zabouchněte ho na místo (Obr. 2). Zajistěte, aby konce bočních pásů
byly pod připojením žlutého vzduchového potrubí.
2) Nastavení B: Pro nastavení výšky náhlavní soupravy na vaší hlavěstiskněte dvěpoutka na středním bočním pásu vaším
palcem a ukazováčkem, uvolněte blokovací mechanismus a táhněte za každou stranu středního pásu, abyste pás rozšířili.
Vložte náhlavní soupravu na vaši hlavu. Stiskněte opět střední poutka, abyste uvolnili blokovací mechanismus a táhněte za
každou stranu středního pásu, abyste pás zkrátili nebo prodloužili. Nastavujte, dokud není náhlavní souprava pohodlná a na
požadovanou výšku vaší hlavy (Obr. 3).
3) Nastavení C: Otočte západku po směru hodinových ručiček, abyste utáhli náhlavní soupravu tak, že máte příjemné a pohodlné
padnutí (Obr. 4). V této chvíli může být provedeno přenastavení středního bočního pásu (Nastavení B) a západky (Nastavení C)
může být pro co nejpohodlnější a bezpečné padnutí. Pokud nedokážete dosáhnout příjemného a pohodlného padnutí,
přenastavte zadní boční pásy na menší nebo větší velikost. Zopakujte kroky 2 a 3.
3.2. MONTÁŽ POKRÝVKY HLAVY NA NÁHLAVNÍ SOUPRAVĚ
1) Navlékněte pokrývku hlavy na náhlavní soupravu tak, aby dva otvory na pokrývce byly vyrovnané se západkou a hrdlem
potrubí.
2) Protáhněte žlutý konec hrdla potrubí horním otvorem na pokrývce hlavy a ujistěte se, že žlutý vodičzcela prošel tímto otvorem.
3) Protáhněte západku spodním otvorem tak, aby byla západka snadno dostupná a aby byl pružný pásek pod kolem západky
(Obr. 5).
4) Zaklapněte pokrývku hlavy do zasunovacích západek na náhlavní soupravě. PA111 a PA121 mají dvě(2) nástrčné západky.
U PRIMAIR PLUS zaklapněte nástrčné západky do zasunovacích západek, které jsou nejblíže k přední části náhlavní soupravy
(nejdále od nastavení západky na zadní straně).
5) Nasaďte spodní část čoček na pokrývku hlavy dolů, tak, aby bylo potrubí náhlavní soupravy zcela pod látkovou částí pokrývky
hlavy. Ujistěte se, že látka uvnitřPRIMAIR PLUS nebrání otevření potrubí (Obr. 6).
6) Před použitím respirátoru odstraňte ochranné plastové kryty (uvnitři venku) na čočkách pokrývky hlavy.
7) Délka náprsenky pokrývky hlavy PRIMAIR PLUS může být nastavena pomocí dvou sad západek uvnitřpřední části náprsenky.
Toto nastavení může být provedeno nyní nebo v jakémkoliv okamžiku při používání tohoto respirátoru. (Obr. 7).
4. PŘEDNASTAVOVACÍ POSTUPY
4.1. KONTROLA
Pokaždé, když si na sebe dáte respirátor, musíte zkontrolovat všechny součástky.
1) Ohledněpostupu kontroly všech těchto součástek se podívejte do Příručky pro uživatele PAPR řady Compact Air
2) Zkontrolujte kapuci a náhlavní soupravu, zda není opotřebená nebo poškozená.
a) Zkontrolujte kapuci, zda na ní nejsou trhliny nebo díry.
b) Zkontrolujte náhlavní soupravu, zda na ní nejsou nějaké praskliny nebo poškození.
c) Zkontrolujte spojovací díl na dýchací trubici.
d) Zkontrolujte jestli jsou západky na pokrývce hlavy připevněné k náhlavní soupravě.
e) Zajistěte, aby byla náhlavní souprava správněnastavena, aby seděla na vaši hlavu.

CZ-3
3) Pokud některé části chybí, jsou poškozené nebo opotřebované, vyměňte je nebo váš respirátor označte štítkem a vyřaďte ho
z provozu.
Pokud zpozorujete nějaké opotřebení nebo poškození, pokud je to možné, vyměňte poškozenou součástku.
Pokud nedokážete tuto poškozenou součástku vyměnit, nepoužívejte tento respirátor. Vyřaďte respirátor z
provozu, označte jednotku štítkem a vraťte ji k opravě. Opravy mohou být prováděné pouze někým, kdo je
obeznámený s Návodem pro obsluhu a typem respirátoru.
Opomenutí výměny poškozených součástek nebo celého respirátoru může mít za následek nemoc, úraz nebo
smrt. Opomenutí nápravy anomálii může mít za následek vážný úraz, nemoc nebo smrt.
4.2. OBLEČENÍ SESTAVY NÁHLAVNÍ SOUPRAVY
1) Ohledněpostupu oblékání těchto jednotek se podívejte do Návodu pro obsluhu PAPR řady Compact Air. Kopie Návodu pro
obsluhu je umístěna na webových stránkách společnosti Honeywell www.honeywellsafety.com.
2) Po dodržení těchto pokynůa pokud respirátor funguje správněsi můžete sestavu náhlavní soupravy obléct.
3) Oblečení náhlavní soupravy:
a) Navlečte si sestavu náhlavní soupravy na vaši hlavu, pokud je to nutné, uvolněte západku.
b) U PA111 stáhněte přední část pokrývky hlavy, aby pružná tkanina seděla pohodlněpod vaší bradou. Povšimněte
si, že pružná tkanina PRIMAIR PLUS je umístěna uvnitřkapuce. Konec potrubí by měl být umístěný v horní části
vašeho čela.
c) Utáhněte západku tak, aby náhlavní souprava pohodlněa bezpečněseděla.
d) Náprsenka PA111 a PA121 může být nošená pod nebo nad vaší košilí nebo kombinézou. Pokud je náprsenka
příliš dlouhá, připojte dvě(2) sady nasunovacích a zástrčných západek umístěných na vnitřní straněpřední
náprsenky.
Čočky u řady Honeywell PRIMAIR PLUS neposkytují ochranu očí nebo tváře. Ve spojení s pokrývkami hlavy
řady PRIMAIR 100 musí být také nošena základní ochrana očí, jako jsou bezpečnostní brýle. Opomenutí
nošení základní ochrany očí může mát za následek poškození očí pracovníka.
Nepoužívejte přístroj Compact Air 200 při vypnuté elektřině; může dojít k rychlému hromadění oxidu
uhličitého a spotřebování kyslíku v kapuci.
Filtry nesmí být namontovány přímo na kapuci.
5. STÁHNUTÍ A ČIŠTĚNÍ SESTAVY NÁHLAVNÍ SOUPRAVY
5.1. STÁHNUTÍ NÁHLAVNÍ SOUPRAVY
1) Uvolněte návladní soupravu otočením knoflíku za vaší hlavou ve směru proti pohybu hodinových ručiček.
2) Když se náhlavní souprava roztáhla, stáhněte sestavu náhradní soupravy stáhnutí pružné přední části pokrývky hlavy přes vaši
tvář.
3) Sundejte sestavu náhradní soupravy od dýchací trubice stlačením žlutého poutka dopředu a otáčením otočného spojovacího
dílu od sestavy náhlavní soupravy.
5.2. STÁHNUTÍ POKRÝVKY HLAVY Z NÁHLAVNÍ SOUPRAVY
1) Otevřete rozepnutím dvě(2) západky PA111 a PA121, které připojují hadici k náhlavní soupravě.
2) Natáhněte pokrývku zpět na potrubí, protažením západky ven otvorem.
Protože kapuce byla během používání vystavena nečistotám, doporučujeme, abyste měli při manipulací
s přikrývkou hlavy oblečené vhodné rukavice odolné vůči chemikáliím.
5.3. ČIŠTĚNÍ NÁHLAVNÍ SOUPRAVY
1) Náhlavní soupravu čistěte pomocí jemného čistícího roztoku, čistícího a dezinfekčního prostředku EPI U-S 19a a hadříku nebo
houby. Opláchněte náhlavní soupravu čistou vodou.
2) Osušte náhlavní soupravu čistým hadříkem a/nebo ji nechejte osušit na čistém místě.
3) Zkontrolujte náhlavní soupravu. Podívejte se na oddíl „4.1. KONTROLA”.
4) Poté, co je náhlavní souprava zcela suchá a byla zkontrolovaná, nasaďte novou pokrývku hlavy. Podívejte se na oddíl „8.1.
NÁHRADNÍ DÍLY” pro seznam náhradních kapucí PRIMAIR. Podívejte se na oddíl „3.2. MONTÁŽ POKRÝVKY HLAVY NA
NÁHLAVNÍ SOUPRAVĚ” pokud jde o pokyny k nasazení nové kapuce.
Nenamáčejte náhlavní soupravu do vody, mohlo by se odstranit mazivo v systému západky. Pokud by se
nedopatřením dostala voda do vzduchového potrubí, připojte náhlavní soupravu k vaší PAPR a několik minut
vhánějte vzduch vzduchovým potrubím,a byste odstranili jakékoliv stopy vody. Skladování nebo použití
náhlavní soupravy s vodou uvnitřmůže součástku poškodit a může mít také za následek růst plísní.
Nepoužívejte při čištění náhlavní soupravy tekutá rozpouštědla. Tekutá rozpouštědla mohou chemicky oslabit
plast.
Pokud bude sada náhlavní soupravy skladovaná při teplotách pod bodem mrazu, 0°C, musí být všechny
součástky před skladováním důkladněosušeny.
5.4. VÝMĚNA POTNÍHO PÁSU
1) Potní pás je udržovaný na místěpáskem. Jemněsloupněte potní pás a vyhoďte ho.
2) Použijte hadřík navlhčený v isopropylalkoholu a odstraňte veškeré zbytky lepidla.
3) Vystřeďte nový potní pás, č. výrobku PA 104 a zatlačte ho na místo.

CZ-4
6. SKLADOVÁNÍ
Veškeré respirátory jsou skladované v čistém, suchém prostředí mimo veškeré nečistoty. Můžete skladovat vaši náhlavní soupravu
řady Honeywell PRIMAIR PLUS v její originální krabici, nějaké přepravní bedněnebo v uzavřené nástěnné skříni s dalšími
součástkami respirátoru (řady Compact Air).
1) Náhlavní souprava může být ponechaná připevněná k dýchací trubici a soupravěpásůnebo může být pro skladování
odstraněna.
2) Součástky respirátoru skladujte v čistém prostředí mimo nečistoty. Pokud bude látková pokrývka vaší sestavy náhlavní
soupravy znovu použita, uložte ji tak, aby neznečistila další součástky respirátoru, včetněvnitřní části náhlavní soupravy.
3) Pokud některé části chybí, jsou poškozené nebo opotřebované, vyměňte je nebo váš respirátor označte štítkem k opravě.
NESKLADUJTE RESPIRÁTOR S POŠKOZENÝMI NEBO CHYBĚJÍCÍMI SOUČÁSTKAMI.
Nezasunujte žádný přebytečný materiál použité kauce, včetněnáprsenky, do sestavy náhlavní soupravy.
Znečistilo by to vnitřní dýchací oblast a může to mát za následek vážný úraz, nemoc nebo smrt.
Během skladování nevystavujte sestavu pokrývky hlavy nadměrnému teplu (nad 60 °C), vlhkosti nebo
znečišťujícím látkám. Nadměrné teplo může pokroutit součástky a tím vystavuje uživatele riziku úrazu,
nemoci nebo smrti.
7. HLAVNÍ SOUČÁSTI HADIC PRIMAIR
Kompletní sestava obsahuje jednu jednoúčelovou odnímatelnou přizpůsobivou kapuci a jednu nastavitelnou náhlavní soupravu.
PA111EU Sestavu PRIMAIR PLUS s kapucí s náprsenkou nastavitelné délky a jedno balení slupovacích krycích čoček
PA121EU Sestavu PRIMAIR PLUS s kapucí s náprsenkou nastavitelné délky a jedno balení slupovacích krycích čoček
8. NÁHRADNÍ DÍLY A PŘÍSLUŠENSTVÍ
8.1. NÁHRADNÍ DÍLY
PA112 PRIMAIR PLUS s kapucí s náprsenkou pro PA111EU
PA122 PRIMAIR PLUS s kapucí s náprsenkou opatřenou nátěrem pro PA121EU
PA103 Náhradní náhlavní souprava, hromadnězabalená
PA104 Potní pás
PA105 Slupovací krycí čočky pro PA111EU
8.2. PŘÍSLUŠENSTVÍ
EPI U-S 19a Čistící a dezinfekční prostředek
9. PIKTOGRAMY
Viz informační brožurka
Konec skladovací doby: yyyy = rok/ mm/měsíc
Teplotní rozsah pro skladovací podmínky
Maximální vlhkost pro skladovací podmínky

CZ-5
10. ROK VÝROBY
Informace ohledněroku výroby hlavních součástí výrobku mohou být umístěny následovně:
Vzduchová kapuce / maska: Stříbrná nálepka s datem výroby. Lze ji nalézt na vnitřní straněhlavové části;
Filtry: Viz oddělené pokyny k použití;
Sestava hadice: Viz bajonetové připojení;
Ventilátor a baterie: Viz zadní stranu jednotky ventilátoru.
11. ZÁKONNÉ POŽADAVKY A PŘEDPISY
89/686/EHS Evropské směrnice pro osobní ochranné prostředky
EN12941 Poháněné filtrační přístroje zahrnující helmu nebo hadici.
Kontrola výroby podle paragrafu 11B INSPEC, 56 Leslie Hough Way, Salford
Greater Manchester, M6 6AJ, SPOJENÉ KRÁLOVSTVÍ
Značky na systému: CE 0194
Normy EU se používají na celé zařízení vyhovující konfiguracím CE ověřeným úředněoznámenými orgány,
které typovou zkoušku CE prováděly.
Nesplnění tohoto postupu ruší platnost označení CE.
12. OBECNÉ
Společnost Honeywell Respiratory Safety Products nemůže ve všeobecnosti přijmout zodpovědnost za poškození vzniklé vlastníkovi,
uživateli a dalším osobám či třetím stranám používajícím ochranný produkt, které by byly způsobeny přímo či nepřímo nesprávným
použitím a/nebo údržbou ochranného produktu, včetněpoužívání produktu pro jakýkoli jiný účel, než pro který byl určen, a/nebo
z neuposlechnutí či nedodržování pokynůobsažených v této uživatelské příručce a/nebo ve spojení s opravami ochranného
produktu, které nebyly vykonány námi nebo naším jménem.
Naše obecné prodejní a dodací podmínky se vztahují na všechny transakce. Společnost Honeywell Respiratory Safety Products
neustále pracuje na vylepšení svých produktůa vyhrazuje si právo na změnu specifikací zmíněných v této příručce bez předchozího
upozornění.
Evropská směrnice „Osobní ochranné prostředky 89/686/EHS“ stanovuje, že prodávány a používány mohou
být pouze kontrolované ochranné přístroje s označením CE. Použití alternativních, neoriginálních náhradních
dílůčiní osvědčení CE neplatné a také veškerá práva související se zárukou, čímž uživatel a osoba původně
prodávající tyto náhradní díly budou potrestáni odpovědnými úřady členských zemí EHS a celý produkt
dodatečněvyloučen z použití a následněstažen z tržních transakcí. Originální náhradní díly lze rozpoznat
podle číselných kódů, doplněných výrobní značkou a označením „osvědčení CE“, případněs uvedenou roční
použitelností.
13. ZÁRUKA
Společnost Honeywell Respiratory Safety Products opraví, nebo, je-li třeba, vymění tento produkt zdarma, pokud se během 12
měsícůod data prodeje objeví poškození materiálu nebo výrobní vady, za předpokladu, že byl produkt používán běžným způsobem v
souladu s uživatelskou příručkou. Tato záruka pozbývá platnosti, pokud je typ nebo sériové číslo značky upraveno, odstraněno nebo
nečitelné.
Produkty uvedené v této příručce jsou produkty od společnosti:
Honeywell Respiratory Safety Products, ISO 9001, certifikovaný výrobce ochranných respiračních přístrojů.
ZI PARIS NORD II – B.P. 50288
33, rue des Vanesses
95958 ROISSY CDG Cedex
FRANCIE
Produkty uvedené v této příručce jsou produkty vyrobené v:
NORTH Safety Products
900 Douglas Pike Smithfield
Rhode Island
USA

DE-1
DE
1. EINLEITUNG
Die Honeywell PRIMAIR PLUS Serie besteht aus Kopfschutzsystemen mit textilen Abdeckungen, die für die Verwendung mit den
Honeywell Gebläseatemschutzgeräten (PAPR) der Compact Air-Serie bestimmt sind. Diese Atemschutzgeräte eignen sich für
Anwendungen, bei denen Atemschutzgeräte ohne Gebläse unpraktisch sind, oder ein höherer Schutzfaktor der Haube notwendig ist
und die Umgebungsatmosphäre noch keine Gefahr für Leben und Gesundheit darstellt. Die Hauben der Honeywell PRIMAIR PLUS-
Serie werden in Verbindung mit den Compact Air Gebläsebatteriesystemen und Partikel-, Gas- und Kombinationsfiltern verwendet.
Diese "Bedienungs- und Wartungsanleitung" ist lediglich ein ergänzendes Handbuch. Für Anweisungen, Sicherheits- und
Warnhinweise und die erforderlichen Genehmigungen beachten Sie auch die Betriebsanweisungen, die den anderen
Bestandteilen für ein vollständiges Atemschutzgerät beiliegen.
Die PRIMAIR PLUS-Serie besteht aus:
PA111 EU PRIMAIR PLUS-System mit Haube und Halskrause, längenverstellbar und einer Packung abziehbarer
Abschlussscheiben
PA121 EU PRIMAIR PLUS-System mit beschichteter Haube und Halskrause, längenverstellbar und einer Packung
abziehbarer Abschlussscheiben
Zusätzliche zu den Hauben der PRIMAIR 100-Serie sind folgende Kombinationen zu verwenden, um ein nach EN 12941
zugelassenes vollständiges Atemschutzgerät zu erhalten:
Die Kombinationsmatrix der PRIMAIR PLUS-Serie hängt von den Filtern und dem Gebläseatemschutzgerät der Compact Air-Serie
ab (siehe beigefügte Konformitätserklärung)
1.1. WICHTIGER HINWEIS
Dieses Atemschutzgerät darf
nur von Personen verwendet und gewartet werden, die die Bedienungsanweisungen und Sicherheits-
und Warnhinweise vollständig gelesen und verstanden haben, die in dieser Bedienungsanleitung sowie in allen Bedienungs- und
Wartungsanleitungen, die den anderen Bestandteilen der vollständigen Atemschutzeinheit beiliegen, aufgeführt sind.
1.1.1. BERIFFSKLÄRUNG
Warnungen, Sicherheitshinweise und Anmerkungen, die in dieser Anleitung verwendet werden, haben folgende Bedeutung:
WARNUNG
Verfahren und Techniken, deren ungenaue Befolgung bzw. Nichteinhaltung für den Benutzer eine Gefahr
darstellt und zu schweren Verletzungen, Erkrankungen oder zum Tod führen kann.
SICHERHEITSHINWEIS
Verfahren und Techniken, bei deren ungenauer Befolgung bzw. Nichteinhaltung die Ausrüstung
beschädigt wird.
HINWEIS
Verfahren und Techniken, die als wichtig genug erachtet werden, um hervorgehoben zu werden.
2. BESCHREIBUNG DER HAUPTBESTANDTEILE DES ATEMSCHUTZGERÄTS
Ein zugelassenes Atemschutzgerät besteht aus den folgenden Bestandteilen, die alle vom gleichen Hersteller stammen müssen. Das
Luftzufuhrsystem darf nur ein Produkt von Honeywell Respiratory Safety Products sein. GEBLÄSEATEMSCHUTZGERÄT
(Compact Air-Serie)
•Haube oder locker sitzender Atemanschluss
•Atemschlauch
•Gürtel
•Gebläse und Batteriesystem
•Filter, Kartuschen oder Filter-/Kartuschen-Kombination
Die Zulassung und alle Honeywell-Garantien für dieses Atemschutzgerät verlieren ihre Gültigkeit, wenn
Bestandteile oder Ersatzteile verwendet werden, die nicht von Honeywell stammen. Die Verwendung von
Bestandteilen von anderen Herstellern stellt für den Benutzer eine Gefahr dar und kann zu Verletzungen,
Erkrankungen und zum Tod führen
2.1. LOCKER SITZENDE KOPFBEDECKUNG
Honeywell PRIMAIR PLUS Kopfbedeckungen bestehen aus einer textilen Kopfbedeckung und einer Kopfhalterung. Die
Kopfbedeckung kann eine Haube mit Nackenschutz oder eine Haube mit einer Halskrause sein. Zum Schutz gegen
Chemikalienspritzer sind die Hauben mit Halsabdichtung und Halskrausen auch mit Beschichtungen erhältlich. Für einen
hervorragenden Tragekomfort und eine perfekte Passform verfügt die Kopfhalterung über drei verstellbare Regelungen.
Die Artikel PA111EU und PA121EU werden als locker sitzende Hauben mit Halskrausen eingestuft.
Beschichtete Hauben sind nur für sporadische Spritzer ausgelegt und nicht dafür bestimmt, eine Haube zu
ersetzen, die Teil eines Chemikalienschutzanzuges mit Schweißnähten ist. Der Fehlgebrauch von
beschichteten Hauben stellt eine Gefahr dar und kann zu schweren Verletzungen, Erkrankungen oder zum
Tod führen.

DE-2
2.2. COMPACT AIR SYSTEM UND FILTER/KARTUSCHE (NUR PAPR)
2.2.1. Das System der Compact Air-Serie besteht aus einem Gebläse mit einem Set aus drei Filtern, einer Batterie, einem geraden
Atemschlauch zum Anschluss an die PRIMAIR-Kopfhalterung, einer Textilabdeckung für den Atemschlauch, einer
Luftdurchsatzanzeige und einem Transportkoffer.
2.2.2. Filter und Filter-Kombinationen werden in 3er-Sets geliefert und beinhalten Partikelfilter, Gasfilter und Kombinationsfilter.
3. ANWEISUNGEN VOR DER VERWENDUNG
Das HONEYWELL PRIMAIR PLUS-System ist einer Sichtprüfung zu unterziehen, um sicherzustellen, dass alle Bestandteile
ordnungsgemäß montiert und betriebsbereit sind. Die PRIMAIR-Bestandteile beinhalten eine Kopfhalterung und einen locker
sitzenden Atemanschluss, die PRIMAIR PLUS-Einheit besteht aus einer Haube mit Halskrause oder einer Haube mit Halsabdichtung
und einem Set abziehbarer Abschlussscheiben. Bei der PRIMAIR PLUS-Serie wird die Kopfbedeckung (locker sitzender
Atemanschluss oder Haube) im Werk auf die Kopfhalterung vormontiert und so ausgeliefert.
Das Atemschutzgerät besteht aus einem Gebläse-/Batterie-System und Filtern (PAPR). Verwenden Sie dieses
Atemschutzgerät nicht, bevor nicht alle benötigten Bestandteile angeschlossen sind. Eine Liste mit
zugelassenen Bestandteilen finden Sie am Ende der Bedienungsanleitung des Honeywell Compact Air
Gebläseatemschutzgeräts oder informieren Sie sich dazu bei Ihrem Sicherheitsbeauftragten oder
Hygienetechniker oder beim Kundendienst von Honeywell Respiratory Safety Products.
3.1. EINSTELLEN DER KOPFHALTERUNG
Für alle drei unten stehenden Einstellungen müssen Sie die Kopfbedeckung entfernen. Siehe Abschnitt "5.2. ENTFERNEN DER
KOPFBEDECKUNG VON DER KOPFHALTERUNG".
Für einen hervorragenden Tragekomfort und eine perfekte Passform verfügt die PRIMAIR Kopfhalterung über drei Einstellungen.
Stellen Sie die Kopfhalterung auf die richtige Größe ein, indem Sie die folgenden Schritte ausführen. Einstellung A ist die
Grundeinstellung und muss nicht neu geregelt werden, sobald eine bequeme und sichere Passform eingestellt wurde. Einstellung B
regelt die Höhe der Kopfhalterung auf Ihrem Kopf und kann bei Bedarf häufiger verstellt werden. Einstellung C ist die Ratsche, mit
der Umfang der Kopfhalterung an Ihren Kopf angepasst wird und sie wird jedes Mal, wenn Sie die PRIMAIR PLUS Kopfhalterung
aufsetzen, neu eingestellt.
1) Einstellung A: Als Grundeinstellung ist die Größe "Medium" voreingestellt. Um die Halterung größer oder kleiner zu stellen,
fahren Sie mit Ihrem Finger unter den oberen Seitenbügel in Richtung Hinterseite der Kopfhalterung und klinken Sie ihn aus
dem gelben Sicherungsstift aus (Abbildung 1). Den Vorgang für den unteren Seitenbügel wiederholen. Verschieben Sie den
unteren Bügel so, dass die gewünschte Öffnung (Small, Medium, Large) über dem gelben Sicherungsstift liegt, und klinken Sie
den Bügel wieder in den Stift ein. Verschieben Sie den oberen Bügel so, dass die gewünschte Öffnung über dem gelben Stift
liegt und klinken Sie ihn wieder ein (Abbildung 2). Versichern Sie sich, dass sich die Enden der Seitenbügel unter der gelben
Luftkanalverbindung befinden.
2) Einstellung B: Zur Einstellung der Höhe der Kopfhalterung pressen Sie die zwei Streifen in der Mitte des Seitenbügels mit
Daumen und Zeigefinger zusammen, um den Verschlussmechanismus zu lösen, und ziehen Sie an beiden Seiten des
Mittelbügels, um den Bügel zu vergrößern. Setzen Sie die Kopfhalterung auf. Pressen Sie die mittleren Streifen erneut
zusammen, um den Verschlussmechanismen zu lösen und schieben oder ziehen Sie an beiden Seiten des Mittelstreifens, um
diesen zu verkürzen bzw. zu vergrößern. Stellen Sie die Kopfhalterung auf eine bequeme Passform sowie auf die gewünschte
Kopfhöhe ein (Abbildung 3).
3) Einstellung C: Für eine angenehme und bequeme Passform drehen Sie die Ratsche im Uhrzeigersinn, um die Kopfhalterung
enger zustellen (Abbildung 4). Damit die Kopfhalterung so bequem und sicher wie möglich auf Ihrem Kopf sitzt, können der
mittlere Seitenbügel (Einstellung B) und die Ratsche (Einstellung C) neu eingestellt werden. Wenn es Ihnen nicht gelingt, eine
angenehme und bequeme Passform einzustellen, regeln Sie die hinteren Seitenbügel auf eine kleinere oder größere Größe.
Wiederholen Sie Schritt 2 und 3.
3.2. ANBRINGEN DER KOPFBEDECKUNG AUF DER KOPFHALTERUNG
1) Ziehen Sie die Kopfbedeckung über die Kopfhalterung, so dass die zwei Öffnungen der Kopfbedeckung über der Ratsche und
der Schlauchöffnung liegen.
2) Stecken Sie das gelbe Ende der Schlauchöffnung durch die obere Öffnung der Kopfbedeckung, wobei der gelbe Anschluss
vollständig durch die Öffnung geschoben werden muss.
3) Stecken Sie die Ratsche durch die untere Öffnung, sodass die Ratsche leicht zu erreichen ist und sich das Gummiband unter
dem Ratschenrad befindet (Abbildung 5).
4) Drücken Sie die Kopfbedeckung in die Druckknopf-Stecker der Kopfhalterung. Die PA111 und PA121-Einheiten verfügen über
zwei (2) Druckknopf-Buchsen. Bei der PRIMAIR PLUS-Haube drücken Sie die Druckknopf-Buchsen in die Stecker, die sich am
nächsten an der Vorderseite der Kopfhalterung befinden (am weitesten von der Ratscheneinstellung an der Hinterseite
entfernt).
5) Ziehen Sie das Unterteil der Scheiben an der Kopfbedeckung herunter, sodass der Schlauch der Kopfhalterung vollkommen
vom Stoffbereich der Kopfbedeckung abgedeckt wird. Stellen Sie sicher, dass der Stoff auf der Innenseite der PRIMAIR PLUS-
Haube die Schlauchöffnung nicht blockiert (Abbildung 6).
6) Entfernen Sie die Kunststoffschutzabdeckungen (innen und außen) an den Scheiben der Kopfbedeckung, bevor Sie das
Atemschutzgerät verwenden.
7) Die Länge der Halskrause der PRIMAIR PLUS Kopfbedeckung kann mit den beiden Druckknöpfen an der vorderen Innenseite
der Halskrause eingestellt werden. Die Länge kann sofort oder jederzeit bei der Benutzung des Atemschutzgeräts angepasst
werden (Abbildung 7).
4. MASSNAHMEN VOR DEM EINSATZ
4.1. KONTROLLE
Jedes Mal, wenn Sie das Atemschutzgerät aufsetzen, müssen Sie alle Bestandteile kontrollieren.

DE-3
1) Die Prüfverfahren für diese Bestandteile sind in der Bedienungsanleitung der Compact Air-Gebläseatemschutzgeräte
beschrieben
2) Prüfen Sie die Haube und die Kopfhalterung auf Abnutzungen und Schäden.
a) Prüfen Sie die Haube auf Schlitze und Löcher.
b) Prüfen Sie die Kopfhalterung auf Risse oder andere Schäden.
c) Prüfen Sie den Anschluss des Atemschlauchs.
d) Prüfen Sie, ob die Druckknöpfe der Kopfbedeckung mit der Kopfhalterung verbunden sind.
e) Stellen Sie sicher, dass die Kopfhalterung korrekt an Ihren Kopf angepasst ist.
3) Ersetzen sie fehlende, beschädigte oder verschlissene Teile oder kennzeichnen Sie das Atemschutzgerät und nehmen Sie es
außer Betrieb.
Wenn Sie Abnutzungen oder Schäden bemerken, ersetzen Sie wenn möglich das beschädigte Teil. Wenn Sie
das beschädigte Teil nicht ersetzen können, verwenden Sie das Atemschutzgerät nicht. Nehmen Sie das
Atemschutzgerät außer Betrieb, kennzeichnen Sie die Einheit und lassen Sie es reparieren. Reparaturen sind
nur durch eine Person durchzuführen, die mit der Bedienungsanleitung der Einheit und der Art des
Atemschutzgeräts vertraut ist.
Das Nichtaustauschen von beschädigten Teile bzw. eines gesamten Atemschutzgeräts kann zu
Erkrankungen, Verletzungen und zum Tod führen. Falls Störungen nicht behoben werden, kann dies zu
schweren Verletzungen, Erkrankungen und zum Tod führen.
4.2. AUFSETZEN DES KOPFSCHUTZSYSTEMS
1) Die Verfahren zum Aufsetzen dieser Einheiten sind in der Bedienungsanleitung des Compact Air-Gebläseatemschutzgeräts
einzusehen. Eine Kopie der Bedienungsanleitung ist auf der Internetseite von Honeywell zu finden: www.honeywellsafety.com.
2) Nachdem Sie diese Anweisungen befolgt haben und wenn das Atemschutzgerät ordnungsgemäß funktioniert, können Sie das
Kopfschutzsystem aufsetzen.
3) Aufsetzen des Kopfschutzsystems:
a) Schieben Sie das Kopfschutzsystem über Ihren Kopf und stellen Sie bei Bedarf die Ratsche weiter.
b) Bei der PA111-Einheit ziehen Sie die Vorderseite der Kopfbedeckung herunter, sodass das Gummiband bequem
unter Ihrem Kinn liegt. Beachten Sie, dass sich das Gummiband der PRIMAIR PLUS-Einheit in der Haube
befindet. Das Schlauchende sollte oben auf Ihrer Stirn positioniert sein.
c) Stellen Sie die Ratsche enger, sodass die Kopfhalterung bequem und sicher anliegt.
d) Die Halskrause von PA111 und PA121 können unter oder über ihrem Hemd oder ihrem Overall getragen werden.
Ist die Halskrause zu lang, schließen Sie die beiden (2) Druckknöpfe an der vorderen Innenseite der Halskrause.
Die Scheiben der Honeywell PRIMAIR PLUS-Serie-bieten keinen ausreichenden Schutz für Augen oder
Gesicht. Zusätzlich zu den Kopfbedeckungen der PRIMAIR 100-Serie ist ein grundlegender Augenschutz wie
beispielsweise eine Sicherheitsbrille zu tragen. Falls kein grundlegender Augenschutz getragen wird, kann
dies beim Arbeiter zu Augenverletzungen führen.
Verwenden Sie das Compact Air 200-Gerät nicht bei ausgeschalteter Power-Taste, da sich in der Haube
schnell Kohlendioxid anreichert und der Sauerstoff zur Neige geht.
Filter dürfen nicht direkt an die Haube angeschlossen werden.
5. ABNEHMEN UND REINIGEN DES KOPFSCHUTZSYSTEMS
5.1. ABNEHMEN DER KOPFHALTERUNG
1) Lockern Sie die Kopfhalterung, indem Sie die Ratsche an der Hinterseite Ihres Kopfes entgegen dem Uhrzeigersinn drehen.
2) Nachdem Sie die Kopfhalterung gelockert haben, nehmen Sie die Kopfbedeckung ab, indem Sie die dehnbare Vorderseite der
Kopfbedeckung nach oben über Ihr Gesicht ziehen.
3) Entfernen Sie das Kopfschutzsystem vom Atemschlauch, indem Sie den gelben Streifen nach unten drücken und die
Schwenkanschlüsse des Atemschlauchs aus dem Kopfschutzsystem drehen.
5.2. ENTFERNEN DER KOPFBEDECKUNG VON DER KOPFHALTERUNG
1) Öffnen Sie die beiden (2) Druckknöpfe der PA111- und PA121-Einheit, mit denen die Haube mit der Kopfhalterung verbunden
ist.
2) Ziehen Sie die Kopfbedeckung über den Schlauch, wobei die Ratsche durch die Öffnung herauszuführen ist.
Da die Haube bei ihrer Benutzung Schadstoffen ausgesetzt war, wird empfohlen, bei der Handhabung der
Kopfbedeckung geeignete Chemikalienschutzhandschuhe zu tragen.
5.3. REINIGEN DER KOPFHALTERUNG
1) Die Kopfhalterung ist mit einer milden Reinigungslösung, EPI U-S 19a Reinigungs- und Desinfektionsmittel und einem Tuch
oder Schwamm zu reinigen. Spülen Sie die Kopfhalterung mit klarem Wasser ab.
2) Trocknen Sie die Kopfhalterung mit einem sauberen Tuch ab oder lassen Sie sie an einem sauberen Ort an der Luft trocknen.
3) Kontrolle der Kopfhalterung. Siehe Abschnitt "4.1. KONTROLLE".
4) Wenn die Kopfhalterung vollständig trocken ist und kontrolliert wurde, bringen Sie eine neue Kopfbedeckung an. Siehe
Abschnitt "8.1. ERSATZTEILE" für eine Liste mit PRIMAIR-Ersatzhauben. Siehe Abschnitt "3.2. ANBRINGEN DER
KOPFBEDECKUNG AUF DER KOPFHALTERUNG" für Anweisungen, wie die neue Haube anzubringen ist.
This manual suits for next models
2
Table of contents
Languages:
Other Honeywell Ventilation Hood manuals

Honeywell
Honeywell D896 Operation manual

Honeywell
Honeywell Perfect Window HR150 200 Operation manual

Honeywell
Honeywell ER150B2006 User manual

Honeywell
Honeywell TrueFRESH User manual

Honeywell
Honeywell PERFECT WINDOW ER200 User manual

Honeywell
Honeywell NFPA 1971 Owner's manual

Honeywell
Honeywell TrueFRESH ERV User manual

Honeywell
Honeywell ER90 User manual