Ikon IK40 User manual

Power Pack User Guide
18 Charlies Way, Frankton, Hamilton, New Zealand, 3204
www.ikoncommercial.co.nz
Published May 2015
IK40, IK41, IK77, IK78, IK79

DESCRIPTION OF PRODUCT
1) Cooker hood sheet body
2) Cooker lighting
3) Edge Suction Steel
4) Control panel
Sizing of Cooker Hood
Picture 1
Figure 1

WARNINGS AND SAFETY PRECAUTIONS
* This product has been designed for
domestic use.
*Usage voltage of your product is 220-240
Volt~50 Hz.
* Power cord of your product is fitted with
a grounded plug. This cord must definitely
be connected to a grounded socket.
* The whole electrical wiring must be
installed by a qualified electrician.
* Installation by unauthorized persons
could lead to poor operation performance,
damage to the product, and accidents.
* The power supply cable must not be
stuck in any place or exposed to crushing
during the installation process. The mains
cord must not pass close to cookers;
otherwise, it could melt and cause a fire.
* Do not plug in the appliance before the
installation.
* Make sure that the installation place
allows the user to easily unplug the power
cable in case of any danger.
* Do not touch your product's lamps when
they work for a long time. Since they
would be hot, they could burn your hand.
* The kitchen cooker hoods intended for
household use have been produced ??for
normal cooking practices. When used for
other purposes, a failure risk arises, and
the appliance becomes out of warranty
coverage.
* Comply with the rules and instructions
regarding discharge of outgoing air,
stipulated by the relevant authorities (This
warning does not apply to uses without
flue).
* Flammable foods must not be cooked
under the appliance.
* Switch on the product after placing
saucepan, pan, etc. on the cooker.
Otherwise, high temperature may cause
deformation of some parts of your product.
* Turn off the cooker's burner before
taking the saucepan, pan, etc. off the
cooker.
* Do not leave hot oil on your cooker.
Pots that contain hot oil might lead to
inflammation.
* While cooking food such as fried
foods, etc. oil might catch fire; watch
out your curtains and covers.
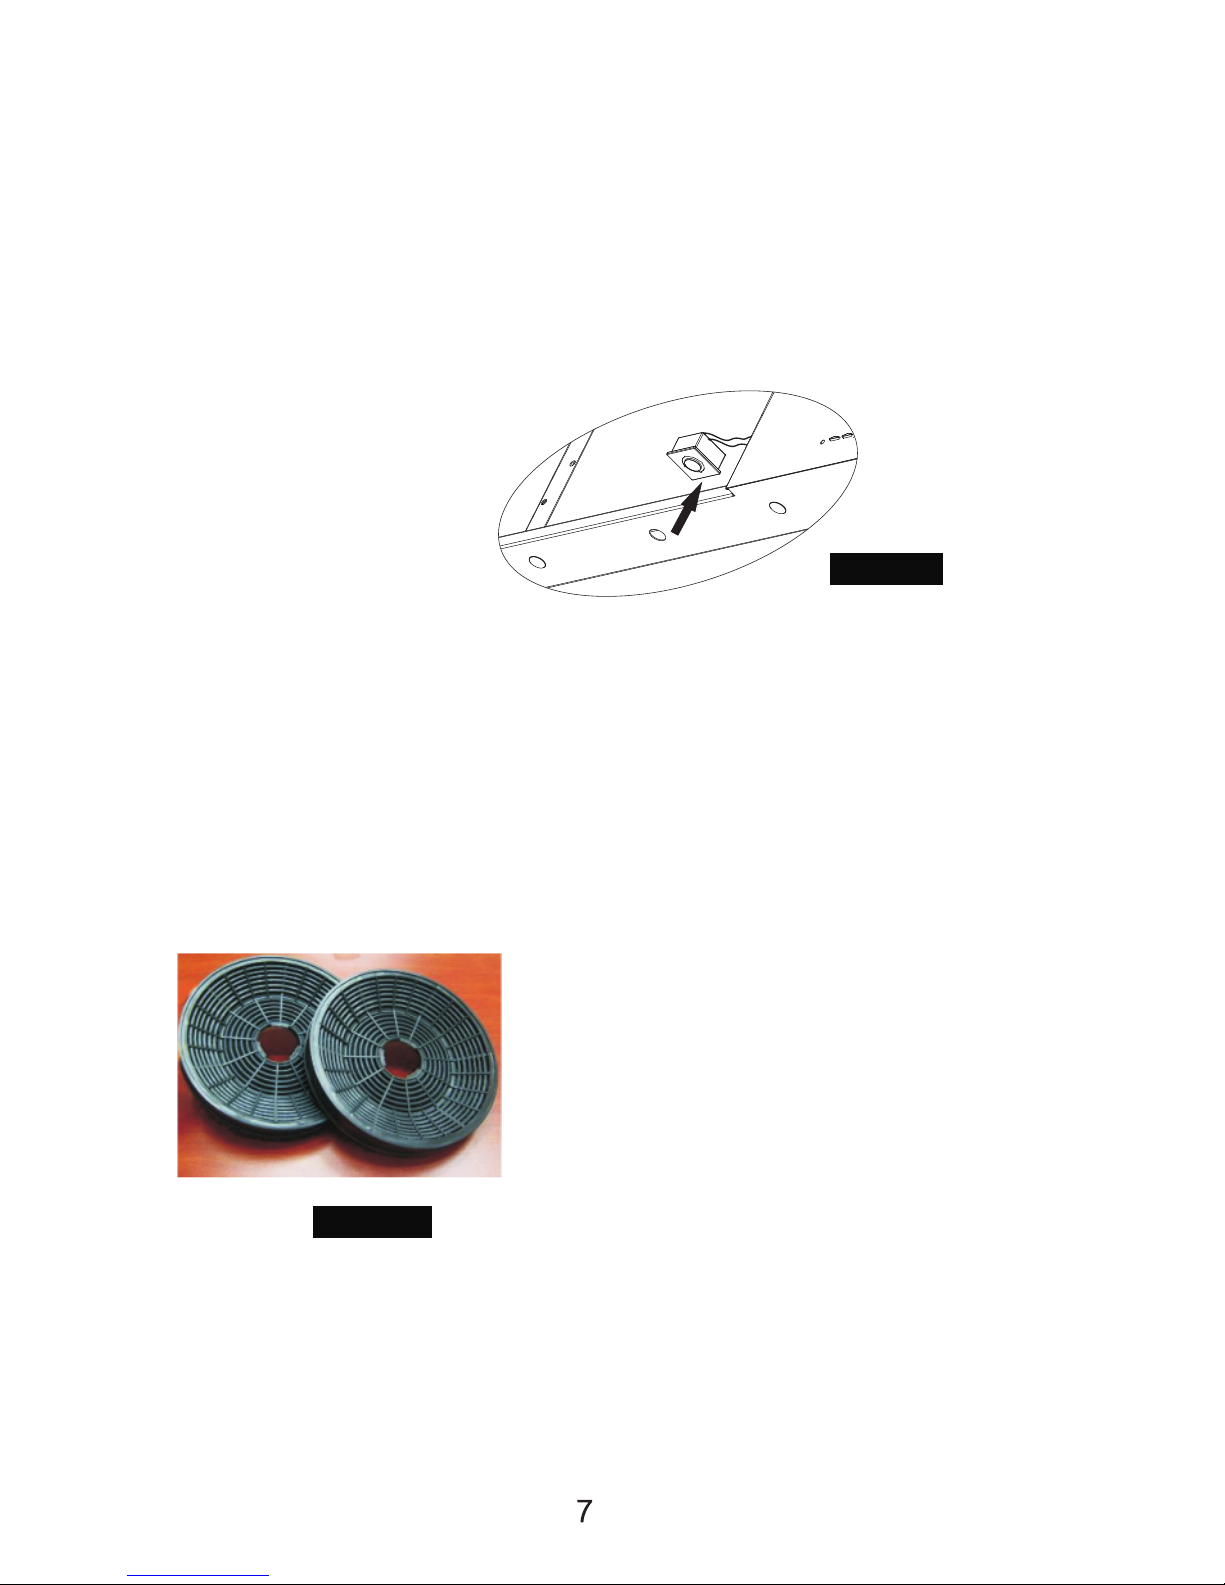
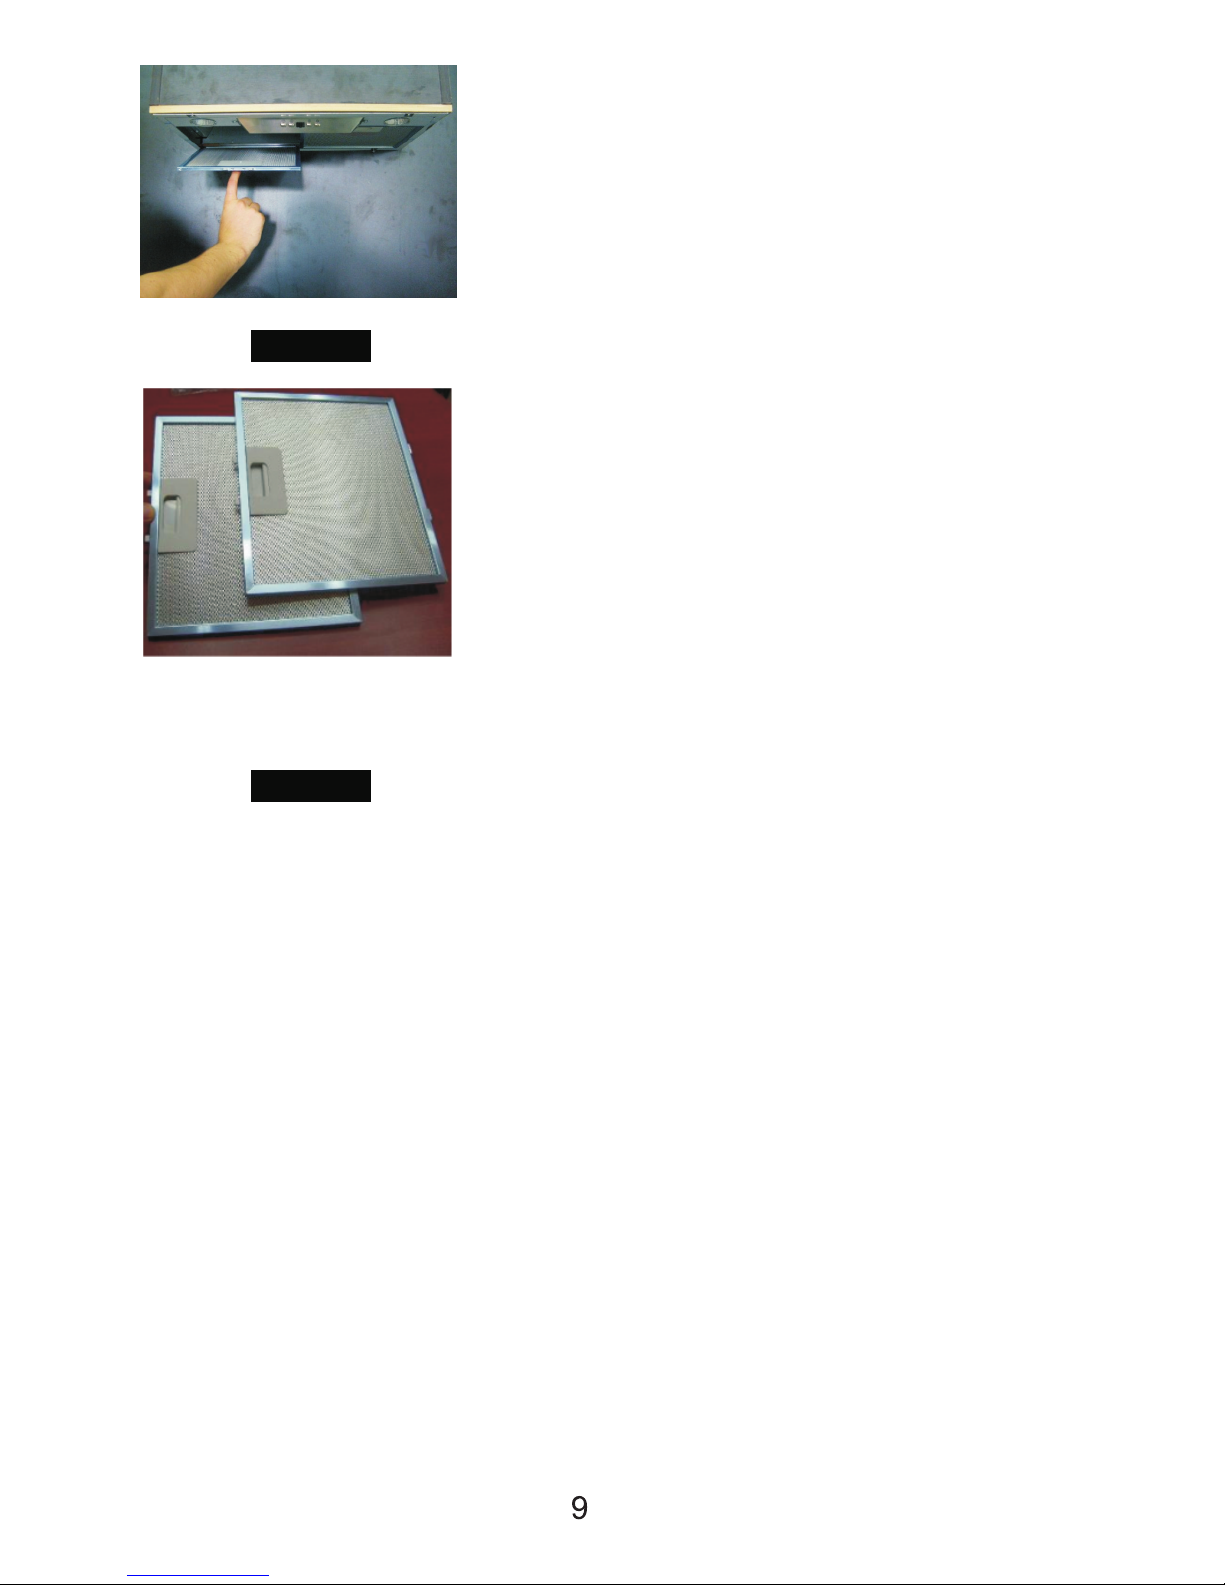
* Ensure timely replacement of the
filters. Filters not replaced in a timely
manner pose risk of fire due to
accumulated grease deposits on them.
* Do not use non-fire-resistant filtering
materials instead of the filter.
* Do not use your product without a
filter, and do not remove filter while your
product is in operation.
* In case of any deflagration, de-
energize the cooker hood and cooking
appliances. (De-energize the appliance
by unplugging it.)
*f your product's periodic cleaning is not
made in a timely manner, it could pose
risk of fire.
* De-energize the appliance before
maintenance processes. (De-energize
the appliance, by unplugging it. )
* When electric cooker hood and
devices fed with energies other than
electricity operate simultaneously, the
negative pressure in the room must not
exceed 4 Pa ( 4 X 10 bar ).
* Gas or fuel oil burning appliances,
such as room heaters, which share the
same environment with your product,
must be fully insulated from the exhaust
of this product or they must be
hermetical.
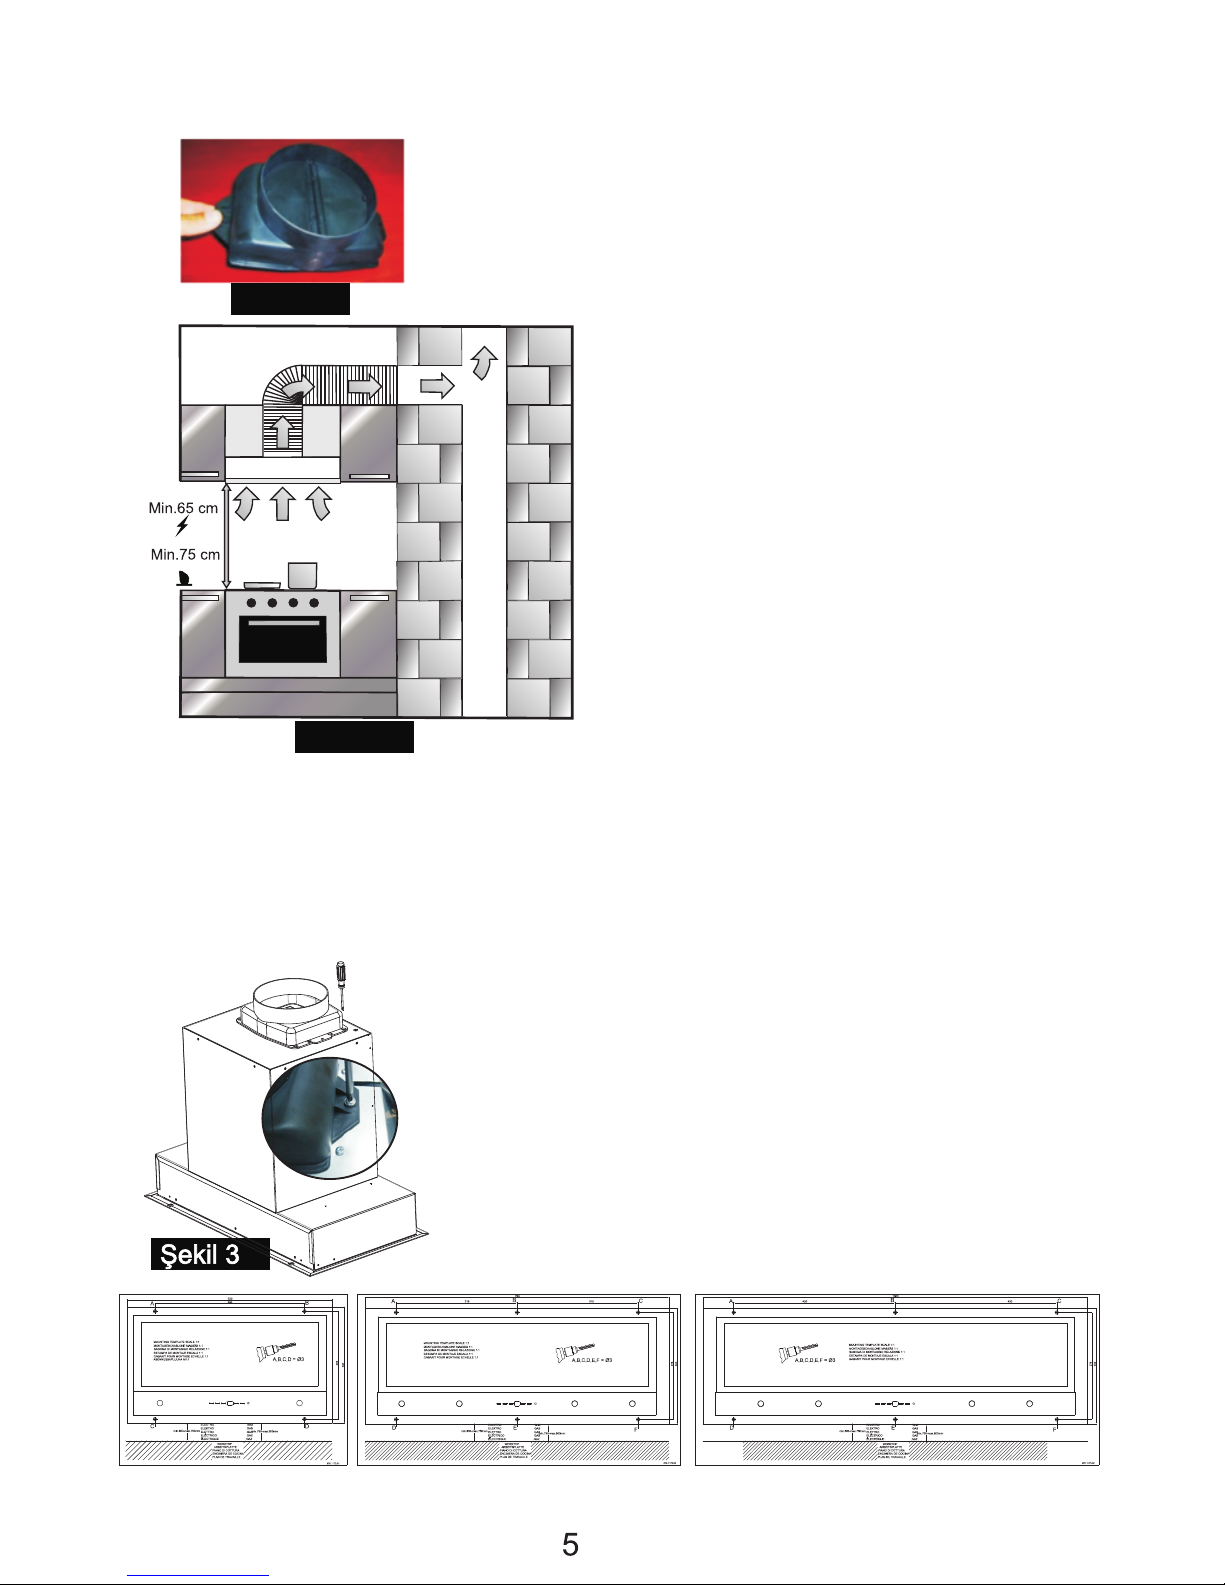
* When you make a flue connection for
your product, use pipes with a diameter
of 150mm or 120 mm. The length of the
pipe connection as well as the number
of elbows must be as minimum as
possible.
* Make sure your child does not play

* When cooking appliances are in
operation, their accessible parts could
be hot.
* This appliance is not intended to be
used by people with physical, sensory
and mental disabilities (including
children) or those who have not
adequate experience and knowledge
regarding its use, unless they are under
the supervision of a person responsible
for the safety of the appliance.
Warnings Regarding Shipment and Transportation
*All materials used in the package of your product are appropriate for recycling.
*Follow the signs stated on the package during shipment.
*Grab the knobles at the sides of your package to handle the product.
If you need shipment;
*Keep the original package.
*Carry by using the original package; follow the handling signs on the package.
If the original package is missing;
*Do not place any weight on the cooker hood.
*Protect the external surface against impacts.
*Carry the product by packaging in a manner to prevent damage.
with the product. Do not allow little
children to use your product.
For your safety, use ”MAX 6 A” fuse
in the cooker hood system.
-5
* Since the packing materials could be
dangerous, keep them away from
children.
* If the power supply cable is damaged,
it must be replaced by its manufacturer
or authorized technical service or any
other personnel qualified at the same
level, in order to avoid any dangerous
situation.
* In case of any deflagration, de-
energize the cooker hood and cooking
appliances, and cover the flame. Never
use water to extinguish the fire.

Standard Accessories
Plastic Flue
Plastic flue that is mounted to the air
vent of cooker hood. (Picture 2)
Position of Device:
After the installation of the cooker
hood, the minimum distance must be
65 cm between the product and any
electric cooker; and 75 cm between it
and any gas ranges or cookers
burning other fuels.
(Figure 2)
Installation and Unpacking of the Appliance
* Check to see if there is any deformation in your appliance.
* Transport damages must be immediately reported to the person responsible for the
shipment.
* The faults that may be seen must be reported to the seller.
*Do not allow children to play the with packaging materials !!!
Screwing the Plastic Flue
Before placing the cooker hood in the
cabinet, screw the plastic flue. (Figure 3)
1175 60 Installation Draft 1175 90 Installation Draft 1175 100 Installation Draft
Figure 2
Picture 2

Mounting of aluminium pipe
Mount one end of the aluminium pipe to the plastic flue you
have installed. Mount the other end to the kitchen flue; make
sure that both connections are tight enough to avoid removal
during operation of the cooker hood at the highest speed.
(Picture 3)
Mount the circuit box of product inside the cabinet (Figure 4).
Installation in the Cabinet
Place the cooker hood inside the cabinet. (Figure 5)
Fix the product by aligning the holes drilled according to
the mounting draft and holes on the product panel. (Figure
5)
Since twists and bends in the aluminium pipe will lead to reduction in the air suction
power, avoid using twists and bends as much as possible.(Picture 4)
Correct Incorrect
Picture 3
Figure 4
Figure 5
Picture 5

Replacing the Lamps
Disconnect the electrical supply of the cooker hood.
1W LED LAMP
* Remove the tampered glass.
* Disconnect the electrical connection of LED lamp.
* Push on the lamp with your hand, to remove it.
* Separate the self adhesive tape around the lamps and the body plate from each
other.
* Before placing the new LED lamp, remove the protective folio from the frame, and
then stick it on its place on the body of the product. Figure 6
Functions of Device
Cooker hood is used in kitchens with or without flue.
In case of use with flue;
In flue-connected use, cooker hood must be connected to a flue that will discharge the air.
Prefer the shortest way for the pipe system that leads to flue, in order to get the maximum
efficiency from your cooker hood. Your product leaves the factory in a form appropriate for
use with flue.
Warning!!!
Output of the cooker hood must not be connected to air ducts where other smokes
exist.
Active Carbon Filter
In environments without flue, active carbon filter must
be used for filtering the air and resending it in.
Activated carbon filters must be obtained from the
authorized technical service or your dealer.
(Picture 5)
Output of the cooker hood must not be connected
to air ducts where other smokes exist.
Figure 6
Picture 6

Use of Carbon Filters
The product you are using has a carbon filter use feature.Use of carbon filters is as
specified below.De-energize your appliance before replacing the carbon filter.
Since carbon filters are used in kitchens without flue outlet, they must be replaced with
new ones every 3-5 months, depending on their use.Carbon filters must never be
washed.grease filters must be installed in the product, regardless of whether or not
carbon filters are used. Do not use your product without grease filter.
Replacement of Carbon Filters
2 carbon filters must be used in the product.To mount the carbon filter, align and turn
clockwise the channels on the motor cap and channels on the carbon filter.Turn anti-
clockwise to remove it (Figure 7).
TECHNICAL SPECIFICATIONS
Supply voltage
Insulation class of the motor
Insulation class
To Use the Cooker Hood Efficiently:
*Use pipes with a diameter of 150/120mm and as few bends as possible while making the
flue connection of your cooker hood.
*Pay attention to the cleaning periods of metal filters and replacement times of carbon
filters.
*Use the product at medium level when high suction power is not needed.
*In order to allow for ventilation properly, windows that open outwards in the kitchen must
be kept closed.
Figure 7
Table 1

Maintenance
* The cooker hood must be unplugged or the switch must
be turned off before maintenance and cleaning
processes.
*Aluminium cassette filter captures the dust and oil in the
air.
* Metal filter must be washed in hot soaped water or in
the dishwasher, if possible, once a month.(60 C)
* Remove the aluminium cassette filter by pressing the
spring catches on the edge. Do not mount in place
before drying (Picture 6-7).
* External surfaces of the cooker hood must be wiped
with a cloth damped with soaped water or alcohol. *
Attention must be paid to avoid contact of electronic
parts with water or similar materials.
* For Inox products, using commercially available inox
cleaner and maintenance products will extend the life of
your product.
Warning: Aluminium filters can be washed in
dishwashers. Colour of aluminium filters might change
after a few washes. This is normal and filters do not need
to be replaced.
Washable Aluminium
cassette filter
Efficient Ventilation
In order to allow for ventilation properly, windows that open outwards in the kitchen must be
kept closed. In order to create air flow, operate the cooker hood and cooker spontaneously.
Suction power will be affected in a positive way. After completion of cooking, leave the
device in an operative mood for a while to let it suck the remaining odour and vapour.
IMPORTANT NOTE
You must be careful when using the appliance spontaneously with other appliances (e.g.
gas, diesel fuels, coal, wood, etc. burning heaters, shower heaters), which use the same
air in the same environment. Attention must be paid when using them spontaneously. It is
because the cooker hood could adversely affect the combustion, by discharging the
ambient air.
This warning does not apply to uses without flue.
Picture 6
Picture 7

Operation
This manual applies to several appliance variants. Some specifications described
here may not apply to your appliance.
Note: Turn on the hood when you start cooking and turn it off only after a few
minutes later than you have finished cooking. The vapor inside the kitchen is
removed most effectively in this way.
Turning on the fan: Variant 1
Press the On/Off button.
Increase the fan level with button or reduce the fan level with button.
Illumination
You may turn on or off the illumination irrespective of the fan.
Timer: When you press this button for more than 2 seconds, a timer function of
15 minutes shall be activated, display shall signal when the timing function has
started and motor shall stop automatically after 15 minutes.

CONVERTION OF PRODUCT TO EXTERNAL MOTOR
Disconnect the power of product, and remove the connection cables shown in the above picture.
Loosen and remove the screws at A, B, C, D points
at the front panel of product.
External Motor
Conversion Kit
Screw the steel part with circular
air discharge found in the
accessories to the air vent of
motor cabinet and mount the flue
adapter.
Screw the steel part with rectangular outlet found in
the accessories to the upper part of front panel and
mount the rectangular steel adapter.
Connect the flue adapter to air vent
and flexible pipe.
11

Before Contacting Authorized Dealer
Ensure that the appliance is plugged in the outlet and that the fuses are OK.
If the Lighting Does Not Operate:
Ensure that the appliance is plugged in the outlet and that the fuses are OK. Check the
bulbs. Always unplug the appliance during this check. Tighten if the bulbs are loosened;
you may replace them if they do not turn on although you have tightened them.
Possible Faults and Things To Do Before Contacting the Service:
A) If the appliance does not operate anyway:
- Check the fuse that the appliance is connected and main fuse of your home.- Check
whether the hood is plugged and whether the plug is fully seated on the outlet.
B) If the performance of the appliance is not enough or operates loudly:
- Is the outlet diameter of the flue adequate? (min. 120 mm).
-Are metal filters clean? Check it.
- Ensure that the carbon filters are not older than 6 months if you are using the hood
flueless.
- Make sure that your kitchen is adequately ventilated to ensure the air flow.
Contact authorized service if the performance of your appliance does not still satisfy you.
12
Other manuals for IK40
1
This manual suits for next models
4
Table of contents
Other Ikon Ventilation Hood manuals
Popular Ventilation Hood manuals by other brands

Premium
Premium PCH6004H Use & care manual

Dacor
Dacor Discovery PHW Series installation instructions

Logik
Logik L60CHDB12 Instruction & installation manual

Elba
Elba PLANET Series Installation guide and operation manual

Cooke & Lewis
Cooke & Lewis CLVHW60a manual

Miele
Miele DA 2808 Operating and installation instructions

THERMEx
THERMEx INTEGRO Mounting instruction

Progress
Progress PDV6060B user manual

KitchenAid
KitchenAid KIRD801V Dimension Guide

Gaggenau
Gaggenau AH 590-120 Original Operating and Assembly Instructions

Electrolux
Electrolux LFL219X user manual

Jenn-Air
Jenn-Air LI3UNC/W10274316C Installation Instructions and Use & Care Guide