Honic HN-4KZ User manual

HN-4KZ
Quick Start Guide
Ultra HD 4K 8MP Outdoor POE IP Camera
3.6-11mm Optical Zoom Lens

Welcome
Thank you for purchasing our Honic POE Bullet Cameras!
This user manual is designed to be a reference tool for the installation and operation of
your camera.
Here you can find information about the camera’s features and functions, as well as
information to aid in troubleshooting.
Many of the setup and installation sections below have corresponding videos on YouTube
To access the setup videos, please go to YouTube and search “Honic Technology”.
To contact Honic support, please do one of the following:
•Tech support: support@honictech.com
•Service support: service@honictech.com
•WhatsApp: +86 18028341866
Contents
NO.
Item
Quantity
1
Bullet IP Camera
1
2
Quick Start Guide
1
3
Screws Pack
1
4
Drill Template
1
5
Waterproof Components for RJ45
1
Quick Reference
HTTP Port: 80
RTSP Port: 554
Main Stream: rtsp://ip address:port/0
Sub Stream: rtsp://ip address:port/1
Tri Stream: rtsp://ip address:port/2
If username and password needed, please add user and password:
rtsp://username:password@ipaddress:rtsp port/0 (or 1,2)
HTTPS Port: 443
ONVIF Port: 8999
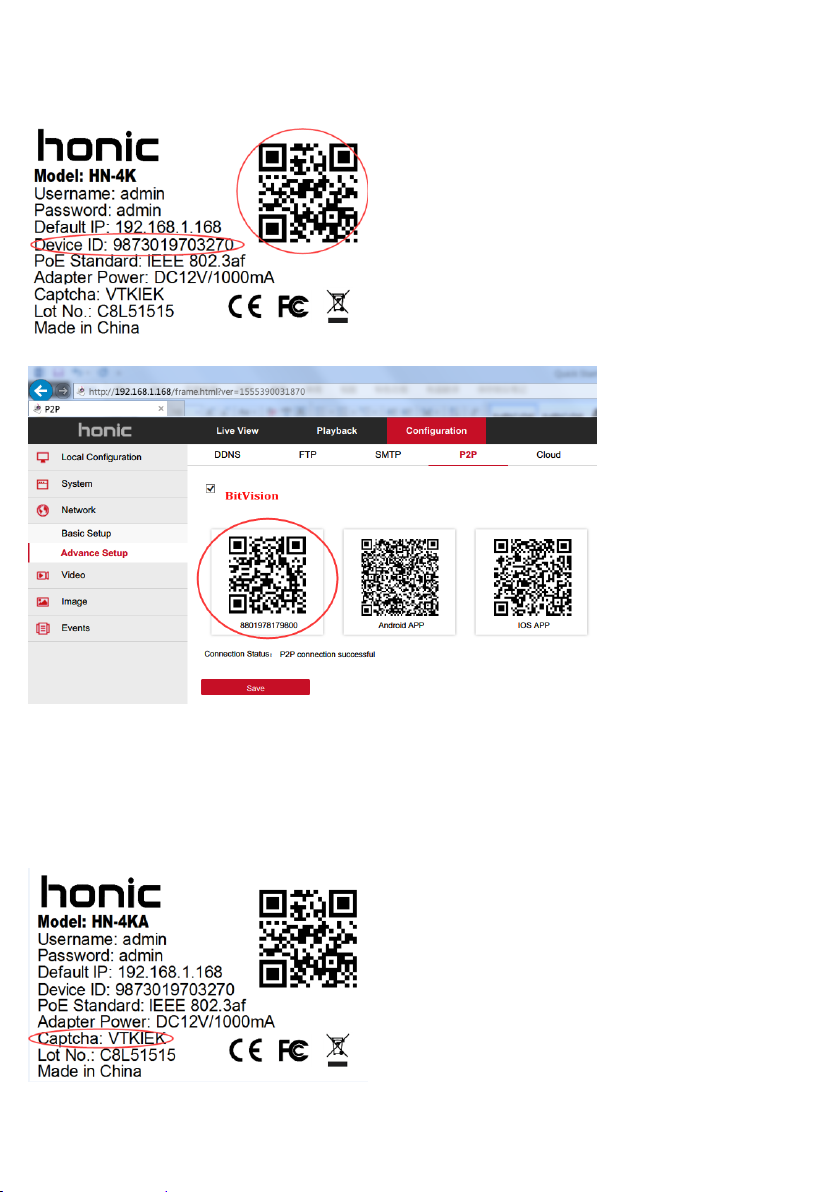
APP (Bitvision) Port: 6000
JEPG Address: http://ipaddress:http port/snap.jpg
rtsp://ipaddress:rtsp port/snap.jpg
FFMPEG Address:

rtsp://username:password@ipaddress:rtsp port/0 (or 1,2)
Default Passwords: Username: admin Password: admin
Device ID: Please check the label on the camera (package)
Or (Configuration-Network-Advanced Setup-p2p)
DHCP Enabled in default,: To disable DHCP, please check “Quick Configuration Tool”
chapter bellow.
PoE Standards: IEEE 802.3af
Captcha: Please check the label on the camera (package), you need it when you add
device to mobile app.
Software Supported: Blue Iris, iSpy, Synology, Zoneminder etc. NAS supported
NVR Supported: Onvif NVRs

VMS Compatible List: Original VMS Lite (Windows, Mac), Milestone、Exacq、Avigilon、
MARCH、Axxon、Nuuo
Browser Supported: IE 8-11 (Windows), Safari (Mac)
Google Chrome (lower than Ver44), Firefox (lower than Ver53)
Higher version of Chrome and Firefox no longer support NPAPI.
Dimensions and Appearance (mm)
No.
Description
1
Audio In (RCA)
Active pickup needed
2
DC 12V Power
DC 12V 2A or 3A
3
Network (PoE)
IEEE 802.3af
4
BNC Connector
960H analog signal for tester
5
Audio Out (RCA)
Active speaker
6
Alarm I/O
3-20V alarm in; Max 36V alarm out
It is recommended to connect the camera to the PoE Router or an external PoE switch.
If using a DC power adapter with the camera, a REGULATED power supply is REQUIRED.

Insert MicroSD Card & Recording Setting
This camera has microSD card slot to record video data if with microSD card inserted.
When inserting / replacing the SD card, make sure that power is off and that recording
has been deactivated (Deactivated in default) in the browser (Configuration > System >
SD Card > Rec Setup > Deselect Enable Record.
Insert the MicroSD card
Insert the microSD card and gently press it until you hear click sound. Make sure that the
SD card is fully inserted.
Class10 or higher MicroSD card required
Reboot the camera each time you format MicroSD card.
MicroSD card is NOT included; Support max 128GB.
Make sure that power is off when inserting MicroSD card.
Activate SD card recording

Enable Recording: Select to enable SD card recording and deselect to disable it.
Record Mode: This dropdown box allows the user to select “Overwrite” or “Does
not cover”.
StreamType: This dropdown box allows the user to select “Main Stream”, “Sub-
Stream” or “Tri Stream”.
Week: This dropdown box allows the user to select Monday to Sunday or Every day.
All Day: Select all day, then it will record 24h a day.
Schedule: Choose needed hours to record.
To Install the Camera
General Guidelines
Try to place the camera in a position that a potential security threat will find it
difficult to avoid detection. A strategy which is often effective is to monitor
entrances and exits - after all, a security threat has to get in somewhere.
The internal components of the camera can be damaged by prolonged exposure to
direct sunlight. Don’t let direct sunlight into the lens!
The camera gets great images when it’s in the shade, looking at subjects that are
well lit. Don’t place the camera in bright light and have it facing shade or darkness.
Bright light sources to the sides of, or behind the subject will interfere with your
images.
The camera’s night vision will give well-exposed images if the area is dark. However,

if there’s a bright point source in the camera’s view (a streetlight, car headlights or
similar) then it might not engage night vision mode.
The camera’s casing is resistant to water, different weather conditions and
tampering. It would take an overwhelming event of this kind to damage the housing
of the camera (severe weather such as hurricanes or someone intentionally
damaging the lens would be enough). However, the cable and connector are
vulnerable and require protection.
Installation Diagram
Ensure the camera is working correctly prior to permanent installation by temporarily
connecting the camera(s) and cable(s) to the NVR or computer.
Installation Diagram
If you install the camera outside of your home, we highly recommend using waterproof
tape to wrap all the trail cables connection areas. Use as much as is necessary for the layer
of tape to protect the connections. This will help prevent water or moisture from leaking
into the cables which can cause the cable connections to degrade over time or stop
working.

Connecting the Camera
1. Connect the Ethernet cable to the camera.
A 12V DC power adapter (NOT included) is only required if connecting the camera’s
Ethernet cable to a router or switch that does not support PoE.
2. Connect the end of the Ethernet cable to the NVR’s PoE ports. The camera may take up
to 1 minute to power up after being connected to the NVR.
OR
Connect the end of the Ethernet cable to a PoE router or switch on your network. See your
NVR instruction manual for details on connecting the camera to your NVR.
Support Onvif NVRs, Onvif port in default: 8999
Set Diagram

Cable Extension Options
Extend the Ethernet cable run for your camera up to 300ft. See table below. It is
recommended to use UL CMR approved cables.
Cable Type
Max Cable Run Distance
Max # of Extensions
Cat5e or higher Ethernet cable
300ft / 92m
3
You can use a RJ45 Coupler (not included) or switch (not included) to connect male ends
of Ethernet cable together.
Quick Configuration Tool
Install IP Search Tool
Windows: Download Search Tool from www.herospeed.net--Tools--Search Tool
(Windows) and install it.
Mac: Download Search Tool from www.herospeed.net--Tools--Search Tool (Mac).
Start IP Search Tool
1. Refresh
2. Change “All” to “IPC”
3. Select the IPC

4. Change parameters and Disable DHCP (optional)
5. Input password (Both are admin in default)
6. Modify
For the best security, Honic recommends you use a static IP setting and standard port
forwarding.
Assign an IP address to the IP Camera by using the first 3 sets of numbers of your default
gateway.
For example, my default gateway is 192.168.0.1
Need change IP camera address to 192.168.0.xxx
For detailed user manual of Search Tool, please download it from www.herospeed.net--
Manual--Search Tool User Manual for Win & Mac.
For additional assistance, please contact us:
support@honitech.com
WhatsApp: +86 18028341866

Access the Camera by Browser
Windows: IE 8-11
Mac: Safari
1. Start your browser, input the IP address of your camera (IP address showed in Search
Tool) in the address bar and then press Enter to start the login page.
2. Install “ActiveX control”
An ActiveX control is necessary in your computer for the first time when install IP
camera, Click the “DOWNLOAD” to install ActiveX control as show below.
3. Complete the installation, restart the web browser, input IP camera address, and input
the username and password and then login. (default username: admin, password:
admin)
Strongly suggest you to modify the user name and password to improve security level.

4. If there is problem to install Active X plugin in IE browser, Please check the following:
IE browser—Tool—Internet Option—Security—Customized Level—ActiveX controls
and plug-ins, Enable all the options bellow—OK
For additional assistance, please contact us:
support@honitech.com or WhatsApp: +86 18028341866

Mobile Connection
1. Install Android/iOS App
a. Search “Bitvision” in App store or Google Play.
b. Or scan the following QR code to download.
Android App iOS App
2. Add Device
a. Start Bitvision app (For security purpose, please register an account if you are a
new user). Input mailbox, password, confirm password, sending verification code,
Go to email box to get captcha (Double check your spam folder).
b. Log in the account.

c. Click on the top left, choose “Device” to go to Device interface.
d. Click and then “Add device” at the bottom on Device interface.
e. Select “SN Add”

f. Scan the QR code printed on the device sticker and posted on the web (Browser—
Configuration—Network—Advanced Setup—P2P). You could also input serial
number (Device ID) manually, Device ID was printed on the camera sticker.
g. Input the device name, username, password, captcha (Captcha number was
printed on the device sticker) and select group, then submit.
h. Go back to Real time interface.
i. Click “+” and choose the device, Click “Done” at the top right.

j. Default definition is “Fluent”, you could choose BD or HD. BD is recommended.
3. Playback
a. Click Playback in default interface.
b. Click “+” and choose the device, Click “Done” at the top right.

c. Click calendar icon at the top right, choose date, click “ok”, then go back to
Playback, drag the timeline to check the playback video. Click “Open audio” at the
bottom if all audio settings enabled and pickup device connected.
4. Camera Configuration in Bitvision
a. Go to “Device Manage”, find the camera.

b. Click the camera (iOS); Click the three dots at the end of the camera (Android).
c. Set up parameters.

Motion detection: Enable or disable motion detection, for detailed motion detection
settings, please go to browser.
Coding format: Main stream; Sub stream, Tri steam.
Coding type: H.265; H.264; MJPEG.
H.265+: H.265+ must be enabled for cloud recording. If your NVR support H.265+,
please enable it too.
Resolution: For main stream resolution setting, 4k (3840*2160), 6mp, 5mp, 4mp, 3mp,
2mp, 1mp available.
Frame rate: Change the frames per seconds.
Storage setting: Micro SD card setting.
Available/Total: Storage capacity available and totally in SD card.
Format: Format SD card.
Service privileges: For cloud service settings.
Playback setting-Video type: This dropdown box allows the user to select “ordinary
video” or “alarm video”. Ordinary video means all videos recorded; Alarm video
means video recorded when motion detection occurred. (Please note: Video
resolution recorded in SD card when motion detection occurs is Sub stream (720*480),
not 4k 3840*2160 resolution, we recommend you record both ordinary video and
motion detection alarm video.)
Alarm Push: To get motion alerts, “alarm push” must be enabled.
Reset: Reset the camera.
Reboot: Reboot the camera.
5. Enable Cloud
Go to Device Manage, go to camera configuration interface.

Enable H265+ in Coding parameters.
Go to Service privileges in Could service, then enable cloud service (H.264+ or H.265+
could also be enabled in Web settings, Browser—Configuration—Video)
Table of contents
Other Honic Security Camera manuals