Honsel VVG BZ3 Series User manual

Honsel
VVG
Bedienungsanleitung
BZ3-Serie
Instruction manual
Notice d´instruction
Guia de instrucciones
Istruzioni per I´uso
Gebruiksaanwijzing
Bruksanvisning
Bruksanvisning
Betjeningsvejledning
Käyttöohje
Instrukcja obslugi
Kullanim El Ktabi
GB
F
E
I
NL
S
N
DK
SF
PL
TR
MADE IN
GERMANY

Thank you
Vielen Dank
Thank you
Vielen Dank
Vielen Dank
Vielen Dank für den Kauf dieses hochwertigen BZ-Werkzeuges zur
Verarbeitung von Blindniete aus den Häusern der HONSEL-Gruppe.
Thank you
Jahrzehntelange Erfahrung in der Konstruktion und Produktion von
Niet-Technologie sowie die permanente Weiterentwicklung machen
dieses Werkzeug zu einem zuverlässigen, robusten Hilfsmittel für
jeden Anwendungsfall.
Damit Sie lange und gewinnbringend mit dem Gerät arbeiten können, bitten wir Sie
(auch wenn Sie schon viel Erfahrungen auf diesem Sektor haben) sich unbedingt die
Zeit zu nehmen, diese Anleitung vor der ersten Inbetriebnahme genau zu lesen!
Sie vermeiden so unnötige Fehler bei der Bedienung und erhalten wertvolle Hinweise
zur richtigen und notwendigen Pflege.
i
Thank you for buying this first-class BZ-tool for blind rivets,
produced by the companies of the HONSEL-Group.
HONSEL designs and produces rivet-technology for decades.
The experience and the permanent and continuous
development turns the tool into your rugged and reliable
device for every application.
Therewith you can use the tool profitably for a long time,
we like to ask you to read this instruction manual accurately
before using it the first time - also if you are familiar in
handling this type of machines. This will avoid unnecessary
mistakes and provide valuable details for the correct care
of the tool.
2Honsel
VVG

Notice d´instruction
Guia de instrucciones
Istruzioni per I´uso
Gebruiksaanwijzing
Bruksanvisning
F
E
I
NL
S
Das Werkzeug
Allgemeine Hinweise
Vorbereitungen
Sicherheitshinweise
Verarbeitung
Wartung und Pflege
Kurzübersichten
Teileliste + Geräte-
zeichnung BZ103A
Bruksanvisning
Betjeningsvejledning
Käyttöohje
Instrukcja obslugi
Kullanim El Ktabi
N
DK
SF
PL
TR
Honsel
VVG
Inhalt
Content
24+25
26
27
28+29
30
31
4
5
6-8
9-12
13+14
15-19
20+21
22+23
Teileliste+ Geräte-
zeichnung BZ123A
Konformitätserkläruing
Geräuschinformation
Produktinformationen
Niet-Technik
Online-Hilfen
Adressen
The tool
General information
Preparations
Safety instructions
Processing action
Maintenance and care
Overview
Spare parts and
drawing BZ103A
24+25
26
27
28+29
30
31
4
5
6-8
9-12
13+14
15-19
20+21
22+23
Spare parts and
drawing BZ123A
Declaration of conformity
Noise information
Product information
rivet-technology
Online facilities
Contact adresses
Bedienungsanleitung
Instruction manual
D
GB
3

Das Werkzeug
The Tool
1 2
Honsel
VVG
345
6 7 8 9
SERIEN-NUMMER
SERIAL NUMBER
0125 8934 67
DETAILS AUF DEN SEITEN 20 + 21
DETAILS ON PAGES 20 + 21
MUNDSTÜCKE
NOSEPIECES
X
L
W
H
G
V
UNTERER DRUCKLUFTANSCHLUSS
LOWER COMPRESSED AIR CONNECTION
JUSTIERUNG DER INTERVALLABSAUGUNG
ADJUSTMENT OF CLEARANCE EXHAUSTION
AKTIVIERUNG / DEAKTIVIERUNG
DER INTERVALLABSAUGUNG
ACTIVATION / DEACTIVATION
OF CLEARANCE EXHAUSTION
4

!
GB
D- Lagern Sie das Werkzeug möglichst generell in der Originalverpackung.
- In jedem Fall sollte die Lagerung staubfrei und trocken erfolgen.
- Nach längerer Lagerung sollte möglichst das Hydrauliköl gewechselt werden (siehe S.16)
- Um alle notwendigen Wartungs- und Einstellarbeiten vornehmen zu können, benötigen
Sie folgende Werkzeuge:
- Das Setzgerät darf nur für das Verarbeiten von Blindniete der folgenden Größen
verwendet werden:
- Maulschlüssel SW 11 / 14 / 15 / 22 (BZ 103 A)
- Maulschlüssel SW 13 / 17 / 24 (BZ 123 A)
- BZ 103 A : Blindniete 2,4 - 5,0 mm alle Materialien
- BZ 123 A : Blindniete 4,0 - 8,0 mm Aluminium + Stahl
4,0 - 6,4 mm Edelstahl + Kupfer
- Transportieren Sie das Werkzeug möglichst generell in der
Originalverpackung - so ist es optimal geschützt!
- Das Werkzeug nicht werfen oder fallen lassen!
Diese Angaben finden Sie zur Kontrolle ggf. auch auf dem Zylinderaufkleber auf dem Gerät.
- Jeder Anwender muss im Umgang mit dem Werkzeug geschult sein
Allgemeine Hinweise
General Information
- Store the tool in original packaging generally
- Store the tool dust-free and dry in any case .
- After a longer period of non-use we advise to change the hydraulic oil (page 17)
- You need the following tools for all necessary care or setting actions:
- Only use this tool for handling blind rivets of the following size:
- open-end jaw wrench size 11 / 14 / 15 / 22 (BZ 103 A)
- open-end jaw wrench size 13 / 17 / 24 (BZ 123 A)
- BZ 103 A : Blind rivets 2,4 - 5,0 mm all materials
- BZ 123 A : Blind rivets 4,0 - 8,0 mm aluminium + steel
4,0 - 6,4 mm stainless steel + copper
- Use the original packaging for transportation in general to
guarantee ideal shelter!
- Never throw or drop the tool!
You can control these datas on the tool sticker too.
- Every operator must be advised in the use of this tool.
Honsel
VVG
5

5
F
E
I
NL
S
N
DK
SF
PL
TR
GB
DVor der Benutzung überprüfen
Verifier avant utilisation
Antes de la utilizacion compruebe
Verificare prima dell’uso
Controleren voor het gebruik
Kontrollera före användadet
Kontroller før bruk
Kontroller følgende før brug
Tarkista ennen käyttöä
Przed uzyciem sprawdz
Kullanmadan önce kontrol edin
Check before use
ÖLSTAND
NIVEAU HUILE
NIVEL DE ACEITE
LIVELLO OLIO
OLIEPEIL
OLJENIVÅ
OLJENIVÅ
OLIESTAND
ÖLJYN MÄÄRÄ
POZIOM OLEJU
YAG SEVIYESI
OIL LEVER
BETRIEBSDRUCK
PRESSION D’UTILISATION
PRESSION DE UTILIZACION
PRESSIONE DI UTILIZZO
LUCHTDRUK
ARBETSTRYCK
ARBEIDSTRYKK
ARBEJDSTRYK
KÄYTTÖPAINE
CISNIENIE SPREZONEGO
POWIETRZA
CALISMA BASINCI
OPERATING PRESSURE
ZUSTAND DER SPANNBACKEN
CONDITION OF THE JAWS
ETAT DES MORS
ESTADO DE LAS MORZADAS
STATO DELLE PINZE
STAAT VAN DE
TREKKLAUWTJES
SPÄNBACKARNAS KONDITION
RENE BAKKER
SPÆNDBAKKERNES TILSTAND
VETOLEUKOJEN ASENTO
STAN SZCZEK
CENELERIN DURUMU
F
E
I
NL
S
N
DK
SF
PL
TR
GB
D
F
E
I
NL
S
N
DK
SF
PL
TR
GB
D
F
E
I
NL
S
N
DK
SF
PL
TR
GB
D
!Vorbereitungen
Honsel
VVG
6

!!
Preparations
F
E
I
NL
S
N
DK
GB
DTROCKENE LUFT
AIR SEC
AIRE SECO
ARIA SECCA
DROGE LUCHT
TORR LUFT
TORR LUFT
TOR LUFT
KUIVAA ILMAA
SUCHE SPREZIONE
POWIETRZE
KURU HAVA
DRY AIR ÖL
HUILE
ACIETE
OLIO
OLIE
OLJA
OLJE
OLIE
ÖLJYÄ
OLEJ
YAG
OIL WASSER
EAU
ACQUA
AQUA
WATER
VANN
VANN
VAND
VESI
WODA
SU
WATER
i
SF
PL
TR
Honsel
VVG
WEITERES DRUCKLUFTZUBEHÖR AUF ANFRAGE ÜBER DEN FACHHANDEL VERFÜGBAR
ADDITIONAL ACCESSORIES FOR COMPRESSED AIR HANDLING AVAILABLE ON REQUEST
FROM YOUR LOCAL DEALER.
GB
D
7

!Vorbereitungen
D- Führen Sie vor jeder Inbetriebnahme eine optische Kontrolle durch. Achten Sie hierbei
zum Beispiel auf Risse oder austretendes Öl.
- Der Stiftauffangbehälter oder die entsprechende Abdeckkappe muß montiert sein!
- Achten Sie darauf, dass das passende Mundstück zur Verarbeitung des jeweiligen Blindnietes
die vordere Hülse eingeschraubt ist. Die Wechselmundstücke befinden sich im Boden des
Setzwerkzeuges - die entsprechende Größenangabe ist auf den Sechskant des Mund-
stückes geprägt. Der Federdruck der Spannbacken kann durch Einschrauben mit Hilfe der
Maulschlüssel von Hand überwunden werden. Wenden Sie keine Gewalt an, verkanten Sie
das Mundstück nicht!
- Es ist eine sichere/feste Verbindung zum Druckluftnetz (5-7 bar) herzustellen. Der kunden-
seitige Druckluftschlauch ist über eine geeignete Kupplung mit dem Ventil des Setzgerätes
(1/8”) zu verbinden. Hierzu gibt es zwei Anschlussmöglichkeiten.
- Verwenden Sie ausschließlich nicht geölte, trockene und saubere Luft. Feuchtigkeit und
Verunreinigungen führen zu nicht reparablen Schäden! Wir empfehlen unbedingt eine
Wartungseinheit direkt vor das Gerät zu schalten.
GB
Preparations
- Check the outer appearance of the tool before every beginning of operation. Take a closer
look for example on cracks or leaks from oil.
- The mandrell container or the equal cover cap has to be installed always!
- Consider that the correct nose piece according to the size of the blind rivet is installed into the
front sleeve. You can find the additional nose pieces under the bottom of the tool.
The size is stamped into the hexagon of each nose piece.
One can get over the spring pressure while installation of the nose piece by using the fitting
jaw wrench. Do not try to use violence! Do not twist the nose piece!
- Connect the tool to your compressed air system in a safe and steady way (5-7 bar).
Always use suitable hose coupling to connect your system to the valve of the tool (1/8”).
You can install the tube in two different ways.
- Only use non-oiled, dry and clean air! Wetness and pollution leads to non-repairable damages!
We suggest to use a air maintenance unit straight in front of the tool.
Honsel
VVG
8

– N’UTILISER QUE DES PIECES D’ORIGINES
– NE PAS EFFECTUER DE REPARATIONS VOUS MÊME
– EN CAS D’ANOMALIE, VEUILLEZ CONTACTER
VOTRE DISTRIBUTEUR
– NE PAS UTILISER UNE PRESSION SUPERIEURE A 7 BAR
– NE DIRIGEZ JAMAIS CET OUTIL VERS UNE PERSONNE
– PORTEZ DES LUNETTES DE PROTECTION LORS
DE L’UTILISATION
– PORTEZ UN CASQUE D’ISOLATION PHONIQUE
PENDANT L’UTILISATION
– UTILICE UNICAMENTE PIEZAS DE ORIGEN
– NO EFECTUE REPARACIONES USTED MISMO
– EN CASO DE ANOMALIA, PONGASE EN CONTACTO
CON SU DISTRIBUDO
– NO USE UNA PRESION DE UTILIZACION SUPERIOR
A 7 BARES
– NO DIRIJA NUNCA ESTA HERRAMIENTA HACIA UNA
PERSONA
– LLEVE GAFAS DE PROTECCION DURANTE LA UTILIZACION
– LLEVE UN CASCO DE AISLAMIENTO FONICO DURANTE
LA UTILIZACION
– UTILIZZARE UNICAMENTE RICAMBII ORIGINALI
– NON EFFETTUARE RIPARAZIONI. LA MANUTENZIONE DEVE
ESSERE EFFETTUATA DA PERSONALE QUALIFICATO.
– IN CASO DI ANOMALIA CONSULTARE IL VOSTRO
DISTRIBUTORE
– NON USARE MAI UNA PRESSIONE D’UTILIZZO
SUPERIORE A 7 BAR
– NON PUNTARE MAI LO UTENSILE CONTRO UNA PERSONA
– METTERE OCCHIALI DI PROTEZIONE DURANTE L’UTILIZZO
– ALLEEN ORGINELE ONDERDELEN GEBRUIKEN
– ZELF GEEN REPARATIES UITVOEREN
– BIJ STORINGEN CONTACT OPNEMEN MET UW LEVERANCIER
– GEEN DRUK HOGER DAN 7 BAR GEBRUIKEN
– DIT GEREEDSCHAP NOOIT OP IEMAND RICHTEN
– TIJDEN GEBRUIK GEHOOR- EN GEZICHTSBESCHER
MING DRAGEN
– ANVÄND ENDAST ORGINALDELAR
– REPARERA EJ SJÄLV
– VID EV. DRIFTSTÖRNINGAR KONTAKTA DIN LEVERANTÖR
– ANVÄND EJ HÖGRE TRYCK ÄN 7 BAR
– RIKTA ALDRIG VERKTYGET MOTANDRA PERSONER
– ANVÄND SKYDDSGLASÖGON
– ANVÄND HÖRSELSKYDD
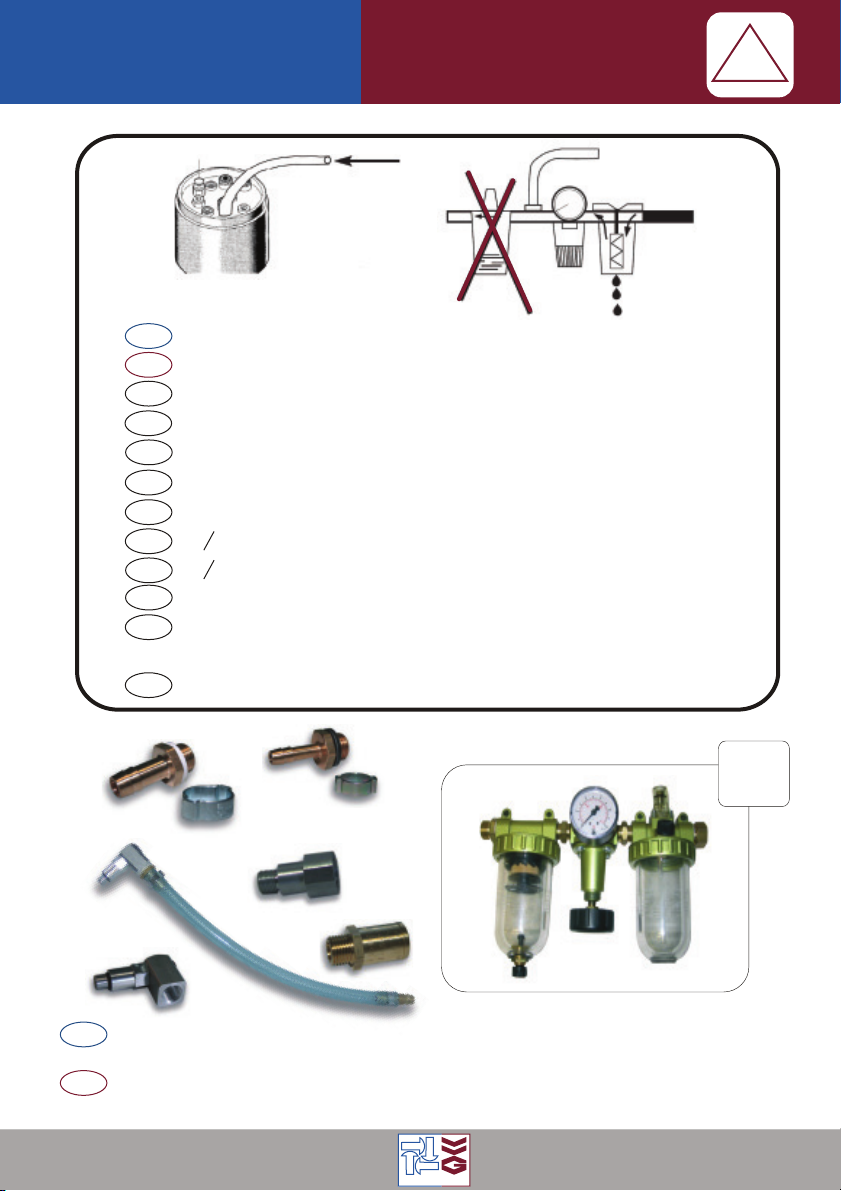
– KONTROLLER TRYKKLUFTSLANGEN OG KOPLINGEN
FØR BRUK
– ARBEIDSTRYKKET MÅ IKKE OVERSTIGE 7 BAR
– KOBLE FRA TRYKKLUFTSLANGEN FØR DU UTFØRER
NOE ARBEIDE PÅ SELVE VERKTØYET
– VED PROBLEMER, KONTAKT SELGER
– SIKT ALDRI MED VERKTØYET PÅ ANDRE MENNESKER
– BRUK VERNEBRILLER OG VED BEHOV HØRSELVERN
– BRUK VERKTØYET KUN FOR DET RIKTIGE FORMÅLET
– ANVEND KUN ORIGINALDELE
– REPARER ALDRIG SELV VÆRKTØJET
– KONTAKT DERES LEVERANDØR VED VÆRKTØJS-
PROBLEMER
– VÆRKTØJET MÅ IKKE BRUGES VED MERE END
7 BAR TRYK
– PEG ALDRIG VÆRKTØJET MOD EN ANDEN PERSON
– BÆR ALTID BESKYTTELSBRILLER UNDER ARBEJDET
– BÆR ALTID HØREVÆRN UNDER ARBEJDET
– KÄYTA VAIN ALKUPERÄISIÄ VARAOSIA
– ÄLÄ TEE ITSE KORJAUSTÖITÄ
– OTA ONGELMATAPAUKSISSA YHTEYTTÄ LAITTEEN
MYYNEESEEN LIIKKEESEEN
– ÄLÄ KÄYTÄ YLI 7 BARIN PAINETTA
– LAITTEELLA EI SAA OSOITTA MUITA IHMISIÄ KOHTI
– KÄYTÄ SUOJALASEJA JA MAHDOLLISESTI MYÖS
KUULOSUOJAIMIA
- STOSOWAC WYLACZNIE ORIGINALNE CZESCI ZAMIENNE
- NEI PODEJMOVAC SAMODZIELNYCH REPARATUR
- W PRZYPADKU USTEREK SKONTAKTOWAC SIE Z
PUNKTEM SPRZEDAZY
- NIE STOSOWAC SPREZONEGO POWIETRZ POWYZEJ 7 BAR
- NIGDY NIE KIEROWAC NARZEDZIA W STRONE OSOB
- PODCZAS PRACY NOSIC OKULARY OCHRONNE
STOSOWAC SRODKI OCHRONY SLUCHU
– SADECE ORJI·NAL PARÇA KULLANIN
– KENDI·NI·Z TAMI·RAT YAPMAYIN
– SORUN HALI·NDE BÖLGE BAYI·NI·ZLE TEMAS KURUN
– 7 BARDAN YÜKSEK BASINÇTA ÇALIS¸TIRMAYINIZ
– BU ALETI· BAS¸KA BI·R S¸AHSA DOG RU TUTMAYINIZ
– BU ALETI· KULLANIRKEN EMNI·YET GÖZLÜG Ü TAKINIZ
– BU MAKI·NEYI· KULLANIRKENKULAK
F
E
I
NL
S
N
DK
SF
PL
TR
!
!
Safety Instructions
Sicherheitshinweise
Honsel
VVG
9

57
- Das Werkzeug darf nur für die bestimmungsmäßige Verwendung und für die auf der
Seite 5 und auf dem Zylinderaufkleber angegebene Blindniettypen und Größen eingesetzt
werden.
- Verwenden Sie nur Originalteile.
- Nehmen Sie keine baulichen Veränderungen an den Werkzeugen vor.
- Nehmen Sie keine Reparaturen selbst vor. Diese dürfen nur von qualifiziertem Personal
durchgeführt werden.
- Bei Störungen nehmen Sie Kontakt zu Ihrem Händler auf.
- Der Betriebsdruck sollte abhängig von der zu verarbeitenden Blindnietabmessung zwischen
5 und 7 bar liegen.
- Prüfen Sie die Druckluftanschlüsse regelmäßig auf festen Sitz und sorgen Sie dafür, dass
die Druckluftleitungen ohne Stolpergefahr verlegt sind.
- Betreiben Sie das Setzgerät nie in explosionsgefährdeten Räumen.
- Benutzen Sie das Werkzeug nie ohne Stiftauffangbehälter oder die alternative Abdeckkappe.
Beim Arbeiten ohne Auffangbehälter muß die Absaugung abgestellt und der Reststift
manuell nach vorne aus dem Gerät gekippt werden.
D
!
!
safety instructions
!Sicherheitshinweise
Honsel
VVG
10

GB
!
!
Safety Instructions
D
GB
F
E
I
NL
S
N
DK
SF
PL
TR
- You may use the tool only for the primal application and the blind rivet types and sizes
mentionend on page 5 and the tool itself.
- Only use original spare parts.
- Do not take hand in any construtional changes.
- Do not take hand in any repair of the tool. Repairs should be done by qualified persons only.
- Contact your local dealer in case of failure.
- Do not exceed the operating pressure of 7 bar.
- Check regularily if the compressed air connections are tight and take care that there is
no risk of stumbling by bad installed tubes.
- Never use the tool in explosive rooms or surroundings!
- Never use the tool without mandrel container or cover cap!.
If you use the tool without mandrel container the exhaustion has to be deactivated.
The mandrel must be tipped manually forward out of the tool.
CHUTE DU CLOU APRÈS RIVETAGE
CAIDA DEL CLAVO DESPUÉS DEL
REMANCHADO
CADUTA DEL CHIODO DOPO LA
RIVETTATURA
NA HET KLINKEN MOET DE RESTSTIFT
ERUIT VALLEN
SPLINTEN FALLER UT EFTER NITING
STIFTEN FALLER UT ETTER NAGLING
STIFTEN FALDER UD EFTER NITING
NIITTAUKSEN JÄLKEEN KARA PUTOAA
TRZPIEN WYPADA PO ZAKON CZENIU
NITOWANIA
PERCINLEMEDEN SONRA CIVININ
ASAGI DÜSMESI
NACH DEM NIETEN HERUNTER-
FALLENDER STIFT
PIN DROPS OUT AFTER RIVETING
Honsel
VVG
11

i
4
Nachdem alle auf den vorhergehenden Seiten beschriebenen Vorbereitungen am Gerät
und der Druckluftanlage getroffen und die Sicherheitshinweise berücksicht wurden, kann
mit der Verarbeitung begonnen werden.
Stellen Sie zunächst sicher, dass Sie den korrekten Niet für Ihre Anwendung ausgewählt
haben, dieser den zugelassenen Parametern des Werkzeuges (siehe Seite 5) entspricht
und dass das passende Mundstück (Kennzeichnung auf dem Sechskant) montiert ist.
D
GB When you prepared the tool and the compressed air system as described on the previous
pages and considered every safety instruction, you can start the handling.
Make sure at first, that you choose the correct rivet for you application, which fits to the
parameter (page 5)of the tool and that the correct nose piece is installed.
A = B + C
min
A
B
C
min
i
D
GB
Honsel
VVG
Einstecken des Nietdornes
in das Setzgerät.
Niet in die Bohrung einführen.
Beim Auslösen des Gerätes
wird der Nietdorn von den
Spannbacken gegriffen und
gezogen.
Der Nietdornkopf formt dabei
das Schaftende der Hülse um.
Nietdorn reißt an der Sollbruch-
stelle ab. Der abgerissene Dorn
wird entfernt - ein Restnietdorn
kann je nach Niet-Typ in der Hülse
verbleiben.
Insertation of the mandrel. The mandrel is pulled back
by the clamping jaws.
The head of the mandrel forms
the end of the shaft.
The mandrel tears at the pre-
determined breaking point and
will be removed.
Some types of rivets lkeeps a rest
of the mandrel in the connection .
Verarbeitung
Processing Action
12

!
safety instructions
- Das Werkzeug niemals auf Personen richten.
- Das Setzwerkzeug darf nicht als Schlagwerkzeug genutzt werden.
- Tragen Sie bei der Benutzung eine Schutzbrille und Gehörschutz.
- Never point the tool to a person
- Never use the tool for hammering
- Always wear savety glasses and ear protection while using the tool
Sicherheitshinweise
Safety Instructions
!
GB
D
!
Honsel
VVG
13

5
All
7
Processing Action
- Prüfen Sie immer, dass das Bohrloch exakt den Vorgaben entspricht und weder zu groß,
noch zu klein gebohrt ist, damit ein optimales Ergebnis gewährleistet ist.
- Prüfen Sie ebenfalls, dass der ausgewählte Niet den benötigten Klemmbereich nicht
über- oder unterschreitet, damit ein optimales Ergebnis gewährleistet ist.
- Die Blindniete muß unbedingt immer im rechten Winkel zum Bauteil gesetzt werden
- Der Setzkopf des Blindnietes muß fest an das Werkstück angedrückt werden.
- Die Bauteile müssen fest und ohne Zwischenraum aufeinander liegen.
Honsel
VVG
Einstellung der Absaugung
5 sec
D
GB Adjustment of the exhaustion
5 sec
All Bitte unbedingt beachten !
D
GB Please consider!
- Check that the drill hole corresponds exactly to the specifications. It must not be to big or to
small to guarantee a perfect result.
- Check that the clamping range of the chosen rivet is not exceeded or undercutted as well.
- The blind rivet has to be handled in a right angle to the component always.
- The head of the rivet must be pressed to the work piece strongly.
- The components must lie on each other tight and without any space between.
Verarbeitung
14

4
Wartung und Pflege
Honsel
VVG
Maintenance and Care
All Die Geräte der Honsel/VVG-BZ-Serie sind für den Dauereinsatz in der industriellen
Serienfertigung konzipiert und haben sich als robustes, zuverlässiges Werkzeug
tausendfach bewährt.
Sie können die Lebensdauer erheblich verlängern, indem Sie regelmäßige Pflege-
maßnahmen vornehmen.
Vor dem Gebrauch sollten Sichtprüfungen am Gerätegehäuse (Risse/Ölaustritt), den
Mundstücken und Spannbacken(Beschreibung Wechsel S.18) auf Verschleiß
vorgenommen werden.
Nach dem Einsatz sollte das Nietwerkzeug gründlich gereinigt und dann sicher und
trocken in der Originalverpackung gelagert werden.
Beachten Sie, dass ein regelmäßiger Ölwechsel durchgeführt werden muß!
D
GB
Die BZ 103A / BZ 123 A sind mit einem Siebfilter ausgerüstet. Dieser filtert einen Großteil
des möglichen vorhandenen Schmutzes aus der Druckluftleitung.
Der Siebfilter kann mit einem Innensechskantschlüssel entfernt und gereinigt werden.
Achtung - der Siebfilter entbindet nicht vom Einsatz eines Filterdruckminderers (Seite 17)!
All D
GB
The tools of HONSEL/VVG BZ series are designed for continuous operation in serial
productions. They prooved their value as robust and dependable utility thousandfold.
You can prolong the life expectancy by continuous tending strategies.
Please make a visual inspection of the housing (cracks/ oil leakage),the nose pieces
and the clamping jaws (page 18) before using the tool, to avoid any abrasion.
The tool must be cleaned after using and should be stored in the original package.
Please note that the oil has to be changed regularly!
The BZ 103A / BZ 123 A are prepared with a gauze filter which culls the majotity of dirt out
of the compressed air line.
This filter can be removed with an allen wrench to be cleaned.
Attention - this filter does not replace the use of a pressure reducer (page17)!
15

i
4,5E / 50°C
(MOBIL DTE 24,
SHELL TALLUS 17)
57
Honsel
VVG
Wartung und Pflege
Ölwechsel
(1) Der Hydraulikkolben der BZXX2/3-Serien wird durch Druckluft in der vorderen Grund-
stellung gehalten. Daher müssen diese Geräte beim Ölwechsel an der Druckluft ange-
schlossen bleiben.
Es ist unter allen Umständen zu vermeiden, dass der Auslöser bei den im Folgenden
beschriebenen Tätigkeiten betätigt wird! Gefahr von herausspritzendem Hydrauliköl!
Unbedingt Schutzbrille tragen!
(3) Entfernen Sie die Ölnachfüllschraube mit einem Schlitzschraubendreher.
(4) Halten Sie das Setzgerät über ein geeignetes Ölauffangbehältnis und betätigen Sie den
Auslöser. VORSICHT! Das Öl spritzt in einem kompletten Stahl aus dem Gerät !!!
(5) Ziehen Sie Hydrauliköl mit der Spritze auf. Schrauben Sie den Messingadapter in die
Position der entfernten Schlitzschraube handfest ein. Stecken Sie die gefüllte Spritze fest
in den Messingadapter.
Drücken Sie mäßig Hydrauliköl aus der Spritze in das Setzgerät. Warten Sie einige Minuten
und wiederholen sie den Vorgang. Steigen keine Luftblasen mehr in der Spritze auf (Spritze
mehrmals leicht hochziehen und eindrücken), können Spritze und Messingadapter wieder
entfernt werden.
(6) Schrauben sie die Schlitzschraube wieder ein und beachten Sie, dass dabei der zuge-
hörende O-Ring vorhanden und unbeschädigt ist und messen Sie den Setzhub (Bild 1)
wie folgt:
Entfernen Sie die vordere Hülse mit einem geeigneten Maulschlüssel und messen Sie das
Maß zwischen Vorderkante Spannhülse und Hydraulikgehäuse. Betätigen Sie den Auslöser
(Achtung! Bewegung des Kolbens!) und halten Sie diesen gedrückt. Messen Sie erneut das
genannte Maß. Die Differenz “s” beider Messungen ergibt den Setzhub des Gerätes.
Ist dieser kleiner als in der Tabelle auf Seite 21 angegeben, muss Hydrauliköl nachgefüllt
werden.
ACHTUNG! Ölverlust bzw. Eine Reduzierung des Setzhubes kann ein Anzeichen für eine
Undichtigkeit im Hydrauliksystem sein. Senden Sie das Gerät ggf. zur Wartung ein.
All D
123
!
!
16
!
! !

57
Honsel
VVG
Maintenance and Care
456
Im Lieferumfang enthalten:
- Flasche Hydrauliköl
- Einwegspritze
- Messingadapter
All
D
GB Included in delivery:
- bottle with hydraulic oil
- syringe
- brass adapter
GB Change of oil
(1) The hydraulic piston of the BZXX2/3 series stays in the front basic position by
compressed air. Therefore the tools must be connected to the compressed air system
while changing the oil..
Never push the trigger during the following steps of changing the oil.
Danger of spouting oil! Wear safety glasses!
(3) Remove the cheese head bolt with the o-ring on top of the tool with a screwdriver.
(4) Turn the tool upside down so that the used oil leaks into an adequate bin.
(5) Drew up the new oil to the syringe. Screw the adapter made of brass in the position
of the removed screw. Plug the filled syringe into ths adapter and press the oil into the tool.
Repeat the operation after a few minutes.
If no air blowings ascent while pulling and pushing the syringe a little bit, the syringe and the
adapter can be removed.
(6) Reinstall the screw with the o-ring. Make sure that tis o-ring is undamaged.
Detect the stroke as follows (picture 1):
Remove the front sleeve with a jaw wrench, measure the dimension between leading edge of
the clamping sleeve and the hydraulic housing.
Push (Attention - the piston moves!) the trigger and keep it pushed in this position.
Measure the described dimension again.
The difference “s” is the current stroke of the tool. If this stroke is smaller than specified in the
table on page 21, more hydraulic oil must be added.
ATTENTION! The loss of oil respectively
the decrease of the stroke can be a sign
of leakage in the hydraulic system.
Send the tool for check and repair in any
case.
!
17

4Honsel
VVG
Spannbackenwechsel
Entfernen Sie die vordere Hülse mit dem angegebenen Maulschlüssel. Schrauben Sie die
Spannhülse vom Zwischenstück ab.
Die Spannbacken sind nun zugänglich und können herausgeschüttet und gereinigt/ausge-
tauscht werden. Die Zähne der Spannbacken sollten frei von Beschädigungen oder
Abnutzungen sein, nur so kann ein optimales Ergebnis beim Nieten erzielt werden. Bitte
beachten sie, dass die Spannbacken NUR AUF DER RÜCKSEITE gefettet werden dürfen!
Die Montage erfolgt in umgekehrter Reihenfolge. Die Spannbacken gleichmäßig in die
Spannhülse gleiten lassen, Spannhülse mit Spannbacken wieder auf die Kolbenverlängerung
schrauben. Die Spannbacken müssen durch Fingerdruck leicht beweglich sein!
Spannhülse festziehen und vordere Hülse aufschrauben.
All D
1234
BZ 103 A
BZ 123 A
SW 22
SW 24 SW 15+14
SW 17+17 SW 11
SW 13 SW 15
SW 17
Z
Z
13
42
71 mm
78 mm
18
Wartung und Pflege

Honsel
VVG
D
GB
F
E
I
NL
S
N
DK
SF
PL
TR
EXTÉRIEUR GRAS
LA PARTE DELANTERA GRASA
USARE GRASSO PER LA PARTE ESTERNA
BUITENZIJDE VET
UTSIDAN FETT
FETT UTVENDIG
FEDT UDVENDIGT
ULKOPUOLELLE RASVAA
SMAR NA STRONIE ZEWNETRZNEJ
DIS KISMINA YAG
AUßENSEITE FETT
OUTSIDE GREASE
GB Change of clamping jaws
Remove the front sleeve with the correct jaw wrench. Unscrew the clamping sleeve from
the piston extension.
The clamping jaws are now approachable and can dumped out for cleaning / replacing.
The teeth of the clamping jaws must be free from damage or abrasion to guarantee an
ideal performance.
Please note, the clamping jaws may only be lubricated ON THE BACKSIDE!
The assembly occurs in the inverted order. Slide the clamping jaws smoothly into the clamping
sleeve. The clamping sleeve with the jaws will be srewed to the piston extention. Make sure,
that the clamping jaws are flexibel by finger pressure. At last fix the clamping sleeve and screw
the front sleeve to the tool.
19
Maintenance and Care

Honsel
VVG
1 2 3 45
6 7 8 9
kg
Übersicht
5 sec
G
90 mm
2,4 - 5,0 mm
3,8 mm
1/4”
4,5 E / 50 C
< 75 dB(A)
(68,32 dB(A))
< 2,5 m/s²
(0,62 m/s²)
110 mm
4,0 - 6,4 mm
4,6 mm
1/4”
4,5 E / 50 C
< 75 dB(A)
(69,31 dB(A))
< 2,5 m/s²
(1,1 m/s²)
BZ 103A BZ 123A
D min - D max
d max
20
(- 8,0 mm: Aluminium und Stahl Niete; aluminium and steel rivets)
This manual suits for next models
2
Table of contents
Other Honsel Power Tools manuals
Popular Power Tools manuals by other brands

BEA
BEA 900 DCC Spare parts list/service instructions

Cedar
Cedar DI Series Operation manual

HP
HP 209A Operating and service manual

Metabo HPT
Metabo HPT CV 18DBL Safety instructions and instruction manual

Parkside
Parkside PGKGA 40-Li B2 Translation of the original instructions

Laguna Tools
Laguna Tools DAKE 33-493 instruction manual

Wolverine
Wolverine SP5930 instruction manual

Parkside
Parkside PKGA 40-Li A1 Translation of the original instructions

Greenlee
Greenlee GATOR EK1230L Operation manual

MLCS
MLCS Rocky 30 9056 instruction manual

Parkside
Parkside PSG 50 B2 Operation manual

Adkins
Adkins Alpha Calender Roll-Master 1.2 Operator's handbook