hopf 6875 Parts list manual

Technical Description
GPS Satellite Controlled Clock
6875
Version 04.00 16.07.2008

COMPANY INFO
Page 2 GPS Satellite Controlled Clock 6875 - Ver. 04.00
hopf Elektronik GmbH
Nottebohmstr. 41 58511 Lüdenscheid
Postfach 1847 58468 Lüdenscheid
Tel.: ++49 (0)2351 / 9386-86
Fax: ++49 (0)2351 / 9386-93
Internet: http://www.hopf.com
Safety information
The safety regulations and technical data are important for the smooth running of the devices and
the protection of people and equipment. Strict compliance with these regulations is required. In case
of non-compliance with these regulations the guarantee and warranty claims for the device expire.
There is no liability for possible consequential damages.
Safety of the Devices
The production of this device follows the latest technological standards and safety regulations.
The device must not be assembled by anyone but trained personnel. Please make sure that all the
connected cables are laid and fixed properly. The device is to be run with the supply voltage stated
on the identification plate only.
Only trained personnel or specialists may operate the device.
Repair on opened devices must not be carried out by anyone but specially trained staff or by the
hopf Elektronik GmbH company.
If the maintenance work requires the opening of a device or if a fuse needs changing the device
must be separated from all voltage supplies.
If there are reasons to believe that the operational safety can no longer be guaranteed the device
must be taken out of service and labelled accordingly. The safety may be impaired when the device
does not operate properly or if it is obviously damaged.

TABLE OF CONTENTS
CONTENTS Page
GPS Satellite Controlled Clock 6875 - Ver. 04.00 Page 3
1 General information 5
2 Quick installation 6
3 Hardware 7
3.1 Front panel components 7
3.2 Installation 8
3.2.1 Power supply 8
3.2.2 Connecting the antenna 8
3.2.3 Installation of the configuration software 8
3.3 Technical Data 9
4 Software 11
4.1 System requirements 11
4.2 Installation of the remote software 12
4.2.1 Uninstalling the remote software 12
4.2.2 Start programme 12
4.2.3 Trouble shooting 13
4.3 Functions of the configuration software 14
4.3.1 General 14
4.3.2 Selecting the serial interface 14
4.3.3 Changing the language 14
4.3.4 Information 15
4.3.5 Extras 15
4.3.6 Date & Time 17
4.3.7 Time Zone 18
4.3.8 Changeover time/changeover point 19
4.3.9 Position 20
4.3.10 Satellites 21
4.3.11 System Byte 22
4.3.12 Serial Parameters 24
4.3.13 Mode bytes 25
4.3.14 Optical coupler 27
4.3.15 Outputs 29
4.3.16 DCF77 Simulation 30
4.3.17 IRIG-B / IRIG Time Code 31
4.3.17.1 IRIG Time Code Structure and Timing-Diagram 32
4.3.17.2 Format categories IRIG-Bxxx according to IRIG Standard 200-04 33
4.3.17.3 IRIG IEEE 1344-1995 33
4.3.17.4 AFNOR NFS 87-500 33
4.3.18 Version / Reset 34
5 Data strings 35
5.1 General information on the serial data output of the 6875 board 35
5.2 Set-up of the standard (hopf6021) string 35
5.2.1 Status and day of the week nibble 36
5.2.2 Configuration for NTP (Network Time Protocol) 36
5.3 Data string: Standard (hopf6021) with year 2000 37
5.3.1 Status and day of the week nibble 38
5.4 Data string SINEC H1 39
5.4.1 Status in data string SINEC H1 40

TABLE OF CONTENTS - CONTINUED
CONTENTS Page
Page 4 GPS Satellite Controlled Clock 6875 - Ver. 04.00
5.5 Data string T-String 41
5.6 Data string Master/Slave 42
5.6.1 Status in Data String Master/Slave 43
5.6.2 Setting 43
5.7 GPS2000 Data String 44
5.7.1 Time Accuracy in the GPS2000Data String 44
5.7.2 Configuration for GPS2000 Data String 45
5.8 Data String SAT 1703 Time String 46
5.8.1 Specified Settings 46
5.8.2 Data String Structure 46
5.8.3 Data String Example 47
5.9 SINEC H1 Extended 48
5.9.1 Data String Structure 48
5.9.2 Status 49
5.9.3 Example of a Transmitted Data String 49
6 Examples of connections 50
6.1 Assignment of the screw clips 50
6.1.1 Examples of connections for OC1-3 50
7 Dimensions of Snap-in Module Housing 52
8 Glossary und Abbreviations 52

GENERAL INFORMATION
GPS Satellite Controlled Clock 6875 - Ver. 04.00 Page 5
1General information
The 6875 radio-controlled clock is a universal GPS reception module with a highly accurate time
reference developed for controlling industrial processes. The 6875 snap-in module for 35mm
(DIN) track mounting is fitted with three PhotoMOS signal relays, an analogue and digital TTL
output and up to four independent serial interfaces.
The PhotoMOS signal relay outputs can be used, for example, for the SPS or measuring proc-
ess control. Following output modes are available:
• DCF77 pulse
• System status (radio-controlled or quartz)
• Status of the power supply on/off
• Cyclical pulses
• Non-cyclical pulses (1 pulse per day at a defined time, 1 pulse per year at a defined
time and on a defined date)
The analogue output can be used to synchronize DCF77 or IRIG-B systems.
The serial interfaces COM0...COM3 are used for the output of different pulses and data strings.
Each interface can be configured with hopf remote software.
The 6875 snap-in module has further features:
• Potential-free antenna circuit
• All outputs potential-free
• All settings can be parametered via the COM0 serial interface
• COM1 interface can be switched from RS232 to RS422 via configuration software
• switchable analogue output IRIG-B / DCF77
The following versions of the system are available (indicated on the identification label):
• FG6875G00 (GPS 6875 snap-in module basic version) with
• 3 PhotoMOS pulse outputs
• serial interface COM0: RS232
• serial interface COM1: RS232/RS422
• simulation output for DCF77 antenna simulation or IRIG-B 12x (x=0..3)
• programming cable, remote software and technical documentation included
• FG6875G01 (6875 snap-in module) with
• GPS 6875 snap-in module basic version FG6875G00
• Serial interface COM2: optical output
• FG6875G02 (6875 snap-in module) with
• GPS 6875 snap-in module basic version FG6875G00
• Serial interface COM2: optical output
• Serial interface COM3: optical output
• FG6875G03 (6875 snap-in module) with
• GPS 6875 snap-in module basic version 6875
• Serial interface COM2: optical output
• Serial interface COM2: optical input
The configuration software on the CD supplied is available for the most common MS Windows,
Linux and Sun Solaris operating systems (for more details see 4.1).

QUICK INSTALLATION
Page 6 GPS Satellite Controlled Clock 6875 - Ver. 04.00
2Quick installation
Synchronization is accelerated by initialising the GPS 6875 satellite clock when first putting into
operation. It is not absolutely necessary to enter set-up values. However, without initialisation it
may be several hours before the first signals are received.
For quick installation it is necessary to set the following set-up values in the GPS 6875 satellite
controlled clock:
• Earth the device
• Connect the antenna
• Create communication between the PC and the remote-controlled clock
• Connect the power supply
• Install and start the remote software
• Set the current local time
• Ser the local time difference to UTC (local time - UTC)
• Set changeover dates
• Set the position data of the location; if this is not known then set an approximate value
or set everything to zero
• Activate the reset of the clock after the next minute change
• Wait approx. 10 minutes to 4 hours before synchronizing the radio-controlled clock
The individual menu items of the programme are explained on the following pages.

HARDWARE
GPS Satellite Controlled Clock 6875 - Ver. 04.00 Page 7
3Hardware
3.1 Front panel components
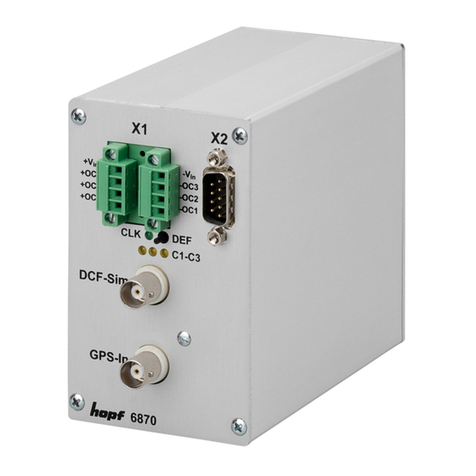
Connector X1 2 x 4 pole plug-in connectors (female) with codeable profile and threaded
flange (corresponding connector (male) is included)
+Vin Connection for positive potential of the power supply
–Vin Connection for negative potential of the power supply
+OC3, +OC2, +OC1 PhotoMOS signal relay connection for positive voltage potential (Drain)
−OC3, −OC2, −OC1 PhotoMOS signal relay connection for negative voltage potential (Source)
Connector X2 9 pole SUB-D connector
Pin No.: Function
1, 5 GND
4 Digital output, TTL
COM0 RS232
2 Receiving line (RxD0)
3 Transmission line
(TxD0)
COM1 RS232 RS422
6 Transmission line
TxD1 +TxD11
7 Transmission line
-TxD12
8 Receiving line
RxD1 -RxD12
9 Receiving line +RxD11
1high active
2low active

HARDWARE
Page 8 GPS Satellite Controlled Clock 6875 - Ver. 04.00
LED / Key Function
CLK green, indicates the synchronization status of the clock
C1-C3 yellow, indicates the switch status of the corresponding PhotoMOS signal
relay
DEF key (DEF)ault key for restoring the standard configuration
BNC connec-
tors
IRIG-B /
DCF77-Out
analogue output for the output of the modulated IRIG-B or DCF77 signal
(BNC female connector)
GPS-In input for GPS antenna (BNC connector)
Option optical interfaces COM2, COM3 (ST connection: bayonet)
FL 1 optical transmitter for serial interface COM2
FL 2 optical transmitter COM3 / optical receiver for serial interface COM2
3.2 Installation
3.2.1 Power supply
The power supply is connected via the 2 x 4-pole connectors, as supplied, with threaded flange,
connections +Vin und -Vin on the connecting unit X1. The system is provided with a voltage of
18...72 VDC..
The internal voltage supply of the 6875 snap-in module is potential-free. It must be earthed on
the rear side of the housing via the screw as labelled, in order to compensate the potential dif-
ference between the ground potential of the housing and the earth.
Please Note: ALTHOUGH THERE IS INTERNAL PROTECTION AGAINST WRONG POLING, ATTENTION
MUST BE PAID TO THE CORRECT VOTLAGE AND POLARITY WHEN CONNECTING THE
POWER. ONLY QUALIFIED STAFF SHOULD FIRST PUT THE EQUIPMENT INTO OPERA-
TION.
3.2.2 Connecting the antenna
The antenna is connected via the hopf antenna cable to the GPS-In BNC connector (more in-
formation in the GPS appendix).
3.2.3 Installation of the configuration software
see 4.2.

HARDWARE
GPS Satellite Controlled Clock 6875 - Ver. 04.00 Page 9
3.3 Technical Data
General
Snap-in module dimensions of
housing
width: 65 mm, height: 105 mm, depth: 130 mm
max. outer dimensions width: 65 mm, height: 105 mm, depth: 155 mm
Power supply min. 18 to max. 72 VDC
Output isolation 500V DC
typical / max. performance 3,5 VA / 4 VA
Temperature range 0...+ 50 °C with improved free wheeling characteristics
0...+ 70 °C with restricted free wheeling characteristics
MTBF > 295.000 hrs.
Accuracy (GPS Model)
PPS pulse (internal) ± 300 nsec
VCO control (internal time
base)
± 0,1 ppm, after approx. ½ hr. continuous GPS recep-
tion
Free wheeling characteristics ± 0,05 ppm, after VCO control at a constant tempera-
ture +10...+50 °C
PPS drift depending on
changes in power supply in free
wheeling status
± 0,0002 ppm/V
PPS drift depending on
changes in temperature in free
wheeling status
± 0,16 ppm/°C, at constant Uin=24V and temperature
radient of approx. 1,5°C/min
Accuracy (quartz model)
Free wheeling characteristics ± 0,5 ppm, after factory setting of VCO control at a con-
stant temperature of +20°C
Drift max. ±4 ppm/Year
Backup Clock
Accuracy ± 25 ppm from +10°C to +50°C
Backup (maintenance free) min. 3 / typ. 10 / max. 15 days
Optical coupler
max. performance, capacity in
Ohms
60V DC / 200 mA
Switch on/off delay 130 / 70 µsec. at 10 mA switch mode power supply
Output isolation 500V DC
DCF77 pulse output at COM1,COM2 (FL1),
COM3 (FL2), TTL (X2)
accuracy same as internal PPS pulse
signal level depending on output interface
DCF77 simulation output output at BNC (IRIG-B / DCF77-Out)
accuracy same as internal PPS pulse
carrier signal frequency 77.5 kHz ± 25 ppm
signal level 3...5 mVpp at 50 Ohm

HARDWARE
Page 10 GPS Satellite Controlled Clock 6875 - Ver. 04.00
Info: The IRIG-B Output is done by the IRIG Standard 200-04!
IRIG Time Code (digital) output at COM1,COM2 (FL1),
COM3 (FL2), TTL (X2)
accuracy same as internal PPS pulse
signal level depending on output interface
IRIG Time Code Format IRIG-B - B002 / B003 / B006 / B007,
IEEE1344, AFNOR NFS 87-500
IRIG Time Code (analogue) output at BNC (IRIG-B / DCF77-Out)
accuracy same as internal PPS pulse
carrier signal jitter (1kHz) ± 2 µsec
signal level ca. 2 Vpp (± 10%) at 50 Ohm
ca. 2 Vpp (± 10%) at 600 Ohm
modulation ratio 3 : 1
IRIG Time Code Format IRIG-B – B122 / B123 / B126 / B127,
IEEE1344, AFNOR NFS 87-500
Interfaces: COM0, COM1 asynchronous, without handshake
Baud rate 300 - 19.200 Baud
Stop bit 1 / 2 bit
Word length 7 / 8 bit
Parity no, even or odd
Line length The line lengths depend on the type of line and the
setting of the Baud rate.
Option: optical interface, λ= 820 nm
Interfaces: COM2, COM3 asynchronous, without handshake, optical
Baud rate 300 - 19.200 Baud
Stop bit 1 / 2 bit
Word length 7 / 8 bit
Parity no, even or odd
Optical transmitter:
COM2 (FL 1), COM3 (FL 2)
Optical receiver:
COM2 (FL 1)
Connection: ST series (bayonet)
Wave length λ= 820 nm
Cable types supported (multi-
mode)
50/125 µm, 62.5/125 µm, 100/140 µm or
200 µm HCS ® fibre
GPS receiver 8 canal, C/A Code, code plus carrier tracking
Log-in sensitivity -134 dBm
Log-out sensitivity -143 dBm
Frequency range L1 = 1575,42 MHz
Recording time
Warm start < 1 min. (backup max. 3 days)
Cold start 30 min. - 4 hrs.
(1st installation without definition of position)
Accuracy ± 300 nsec
Temperature range 0...+ 60 °C
Additional components: see GPS accessories
Please Note: SUBJECT TO ERRORS AND TECHNICAL MODIFICATIONS

SOFTWARE
GPS Satellite Controlled Clock 6875 - Ver. 04.00 Page 11
4Software
4.1 System requirements
The hopf 6875 configuration software is for configuration of a hopf 6875 radio-controlled clock
via a serial interface. The serial interface cable included is connected between the computer (at
the free serial interface) and the radio-controlled clock (COM0).
Depending on the platform the following system requirements are necessary for the remote soft-
ware and/or the installation programme:
Windows
• Windows 95, 98, ME, NT, 2000, XP
• min. 32 MB RAM (128 MB recommended)
• min. 40 MB free hard disk memory
• screen resolution min. 640x480 (1024x768 recommended)
Linux
• RedHat 7.1, SuSE 7.2 or Debian 2.2R3
• glibc 2.x
• libstdc++-libc6.1-1.so.2
• X-Windows
• min. 32 MB RAM (128 MB recommended)
• min. 110 MB free hard disk memory
• screen resolution min. 640x480 (1024x768 recommended)
Solaris SPARC
• Solaris 8
• X-Windows
• min. 32 MB RAM (128 MB recommended)
• min. 75 MB free hard disk memory
• screen resolution min. 640x480 (1024x768 recommended)
Solaris x86
• Solaris (x86) 8
• X-Windows
• min. 32 MB RAM (128 MB recommended)
• min. 75 MB free hard disk memory
• screen resolution min. 640x480 (1024x768 recommended)
Please Note: FOR PROBLEM-FREE EXECUTION THE INSTALLER AND/OR THE CONFIGURATION
SOFTWARE REQUIRE ADMINISTRATOR OR ROOT RIGHTS FOR THE CORRE-
SPONDING INTERFACE DEVICE.

SOFTWARE
Page 12 GPS Satellite Controlled Clock 6875 - Ver. 04.00
4.2 Installation of the remote software
To install the remote software the installation programme/script must be started. This requires a
graphic user interface:
Windows
6875_v01_03_Win32_install.exe
Linux
6875_v01_03_Linux_install.bin
Solaris SPARC
6875_v01_03_Solaris_SPARC_install.bin
Solaris x86
6875_v01_03_Solaris_x86_install.bin
Follow the instructions in the installation programme to complete the installation.
4.2.1 Uninstalling the remote software
Windows
The application can be uninstalled via system control:
• Start menu ÖSet-up ÖSystem control ÖSelect software
• Select remote software and click add/remove ÖUninstall-programme starts
• Follow the instructions in the uninstall-programme
Unix Platforms
The application can be removed via the uninstall-programme supplied (Uninstall6875) which is
found in the corresponding subdirectory UninstallerData
(e.g. /opt/Hopf/6875/UninstallerData/Uninstall6875).
4.2.2 Start programme
Windows
After installation has been completed in the chosen directory (e.g. C:\rogramme\Hopf\6875) the
configuration software can be started by selecting the appropriate link (e.g. Start ÖProgramme
ÖHopf ÖHopf 6875).
Unix Platforms
After completing installation into the chosen directory (e.g. /opt/Hopf/6875) the configuration
software can be started via Startscript (Hopf6875) which can be found in the bin-directory (e.g.
/opt/Hopf/6875/bin/Hopf6875).
Please Note: SINCE THE VALUES SHOWN ARE CONSTANTLY UPDATED, DELAYED REACTION
TIMES IN THE INPUT FIELDS WITH MOUSE OR KEYBOARD ENTRIES ARE POSSIBLE
WITH LESS POWERFUL SYSTEMS.

SOFTWARE
GPS Satellite Controlled Clock 6875 - Ver. 04.00 Page 13
4.2.3 Trouble shooting
• If there is an initialisation error when the configuration software is started then the serial
interface is either incorrectly configured or is being used by another programme.
• If a communication error arises during the execution of the configuration software, then
the radio- controlled clock is incorrectly connected or another instrument is connected to
the interface selected.
• If another programme is using the same serial interface as the configuration software
(e.g. an NTP service), then this must be ended to ensure that the configuration software
functions correctly.
• If the monitor resolution is low or some fonts are missing there may be slight distortion
in the script of the configuration software. This does not however affect the functions.
• If during installation a JAVA VM version is selected which is already installed, then care
must be taken that the minimum version is Java2 1.3. Usually we advise using or install-
ing JAVA-Runtime as supplied.
• Information about possible errors specific to operating systems can be found in the cor-
responding readme-file as supplied.
If there are any questions or installation problems please contact the support team at Ruprecht
Updated versions can be found on the website of Ruprecht & Partner OEG: http://www.rdcs.at/

SOFTWARE
Page 14 GPS Satellite Controlled Clock 6875 - Ver. 04.00
4.3 Functions of the configuration software
4.3.1 General
The hopf 6875 configuration software is for convenient configuration of a hopf radio-controlled
clock 6875 via an RS232 interface. All the parameters of the radio-controlled clock can be dis-
played or set via a graphic user interface. These are divided into categories (e.g. time zone,
changeover time, serial parameters, etc.). Each of these categories is illustrated on a tab in the
upper section of the window.
A click of the mouse activates a tab – the window with the corresponding details is switched up.
This is divided into two areas: the current values and the values to be set. When a tab is se-
lected, the current values of the radio-controlled clock are requested and displayed. In this case
the values to be set correspond to the current values and can be changed by clicking the corre-
sponding arrow fields or by manual input.
Activating the button "SEND" transmits the values to be set to the radio-controlled clock. If an
error occurs a message is emitted, otherwise the current values are updated.
The software can be ended by activating the button "END".
4.3.2 Selecting the serial interface
The serial interface to which the radio-controlled clock is connected can only be selected when
the programme is started.
Depending on the PC or operating system it may take some time to set up the selection window.
After selecting the appropriate interface the hopf 6875 configuration software will try to connect
to the radio-controlled clock. If no connection can be made a corresponding message will ap-
pear. In this case please check that the cable is correct and/or that the cable is connected to the
correct interfaces.
A new attempt to make a connection on the same interface can be made by selecting any other
tab. If this is to be tried on another interface then the programme must be ended and re-started.
4.3.3 Changing the language
The language used in the software can be changed during operation by selecting the desired
language in the selection menu on the left hand side of the window. This takes effect immedi-
ately after closing the selection window (perhaps with a slight delay, depending on the type of
PC).

SOFTWARE
GPS Satellite Controlled Clock 6875 - Ver. 04.00 Page 15
4.3.4 Information
In this section information about the software or contacts can be found in the info dialogue
which is activated by clicking on the info button (on the right next to the button “help”).
4.3.5 Extras
This section makes it possible to save a complete configuration of a radio-controlled clock in a
configuration file (text file) or to load down from a configuration file and transmit to the radio-
controlled clock.

SOFTWARE
Page 16 GPS Satellite Controlled Clock 6875 - Ver. 04.00
SAVE (IN A FILE)
Selecting the button "SAVE" opens a dialogue which enables selection of a target directory or
indication of a file name. After the target directory or a file name has been defined the current
configuration of the radio-controlled clock can be saved by selecting the button “SAVE“. As soon
as “SAVE” has finished, a confirmation dialogue appears which reports either success or error.
LAODING (FROM A FILE)
If a configuration is to be loaded which is already available or has already been saved then the
button “LOAD” should be clicked. A dialogue appears in which the file to be loaded is selected.
After selecting the file and confirming this with the button “OPEN” the following dialogue ap-
pears:
[LOAD DIALOGUE]
This dialogue shows in a well-structured form all the configuration data in the file which has
been loaded. The left column contains the definition of the value, the middle column the actual
value and the right column the status. If the status is “OK” (green), then this value is available –
if not, then the status of this value is “ERROR” (red). If at least one value has the status “ER-
ROR”, the configuration cannot be transmitted to the radio-controlled clock. Otherwise the con-
figuration shown can be transmitted to the radio-controlled clock by activating the button
“SEND”. This procedure can take some time and is confirmed after completion with a success
or error message. The dialogue can be ended by selecting the button “CLOSE”:
The button "HELP" is for activating online help – this contains all the information contained in
this document and additional general information about GPS.

SOFTWARE
GPS Satellite Controlled Clock 6875 - Ver. 04.00 Page 17
4.3.6 Date & Time
This section makes it possible to display and/or change values relating to date and time.
The following values are displayed or can be configured:
Day of the week, date, time:
Setting the day of the week, the date and the time is only necessary when commissioning the
radio-controlled clock. In this case the configuration software checks the plausibility of the time
and date values entered. Before transmission of the time to the radio-controlled clock the cor-
rect day of the week for the date entered is checked – if the day of the week entered differs from
that which is calculated then a corresponding message will appear.
Time difference:
Shows the actual time difference between local time and UTC in hours and minutes.
In this section the value is for information purposes only and can only be changed in the section
“Time Zone“ (4.3.7).
Status Timeout:
Shows the time delay in minutes until the resetting of the radio-controlled bit in the time status.
This value can be between 2 and 255 minutes.

SOFTWARE
Page 18 GPS Satellite Controlled Clock 6875 - Ver. 04.00
Status:
Is made up of: synchronization status (e.g. quartz mode, radio-controlled mode, etc.) and actual
time status (e.g. daylight saving, standard time, announcement of changeover etc.). It is for in-
formation purposes only and cannot be changed.
Synchronization status of the radio-controlled clock:
• invalid time of day
• quartz mode
• radio-controlled mode (without quartz frequency control)
• radio-controlled mode (with high accuracy / with quartz frequency control)
Time status for local time of day:
• standard time
• daylight saving time
• announcement of changeover
• announcement of leap second
4.3.7 Time Zone
In this section the time zone for the location of the radio-controlled clock can be displayed and
adjusted. Setting the time difference is only necessary when commissioning.
The time difference (country- or location- specific time offset to UTC, difference between local
time and UTC) is made up of the following information:
Hour, minute and the information as to whether the location is west or east of the 0 meridian
(Greenwich).
The configuration software checks the plausibility of the values entered.
Example: West (-) 08:00 USA and Canada (Pacific Time)
East (+) 01:00 Germany

SOFTWARE
GPS Satellite Controlled Clock 6875 - Ver. 04.00 Page 19
4.3.8 Changeover time/changeover point
In this section the daylight saving/standard and standard/daylight saving changeover times can
be displayed and changed.
In order to set the changeover times the changeover function must first be activated. If no
changeover is required this must be deactivated Ötime of day (local time) then runs in stan-
dard time status.
To set the changeover times the following information is required:
• first, second, third, fourth or last day of the week in the month
• day of the week
• month
• time in hours and minutes

SOFTWARE
Page 20 GPS Satellite Controlled Clock 6875 - Ver. 04.00
4.3.9 Position
This section enables the display and setting of the geographical position of the radio-controlled
clock.
Setting the approximate location position (if known) shortens the time required for first initialisa-
tion of the GPS receiver in the radio-controlled clock.
The entries of latitude and longitude are in degrees, minutes, 1/100 und 1/10000 minutes and
the following additional information concerning the geographical location:
Entry for latitude:
North = northern hemisphere
South = southern hemisphere Example: North 51°12,3651
Entry for longitude:
East = east of Greenwich meridian
West = west of Greenwich meridian Example: East 007°37,8426
For accelerated synchronization the GPS radio-controlled clock requires only the entry of the
approximate location. For the exact position shown in the above example the following entry
would suffice:
North 50°00,0000
East 007°00,0000
Table of contents
Other hopf Clock manuals